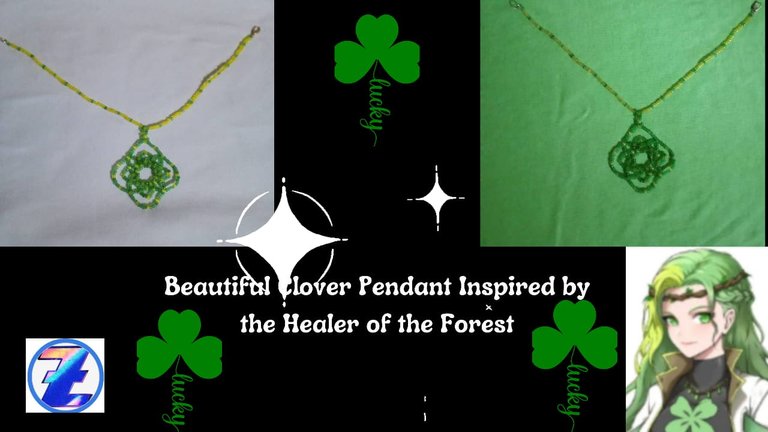
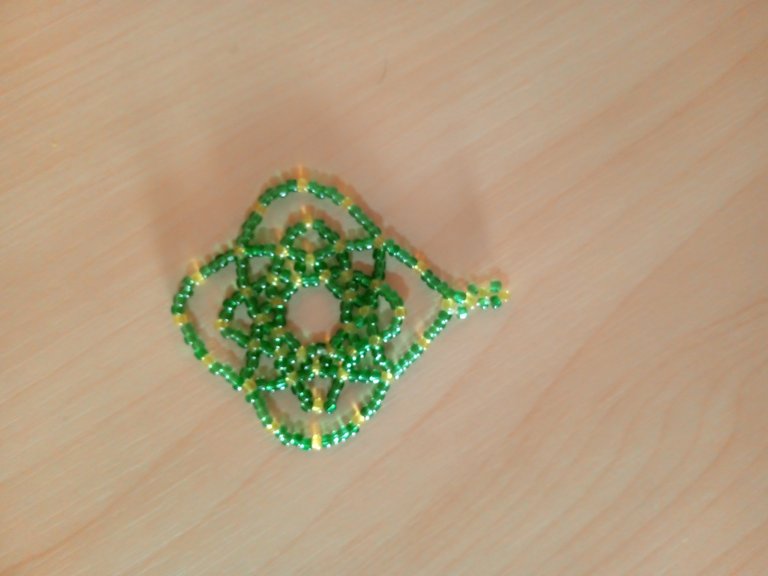
Esp-Ing: Beautiful Clover Pendant Inspired by the Healer of the Forest/ Holozing fanart
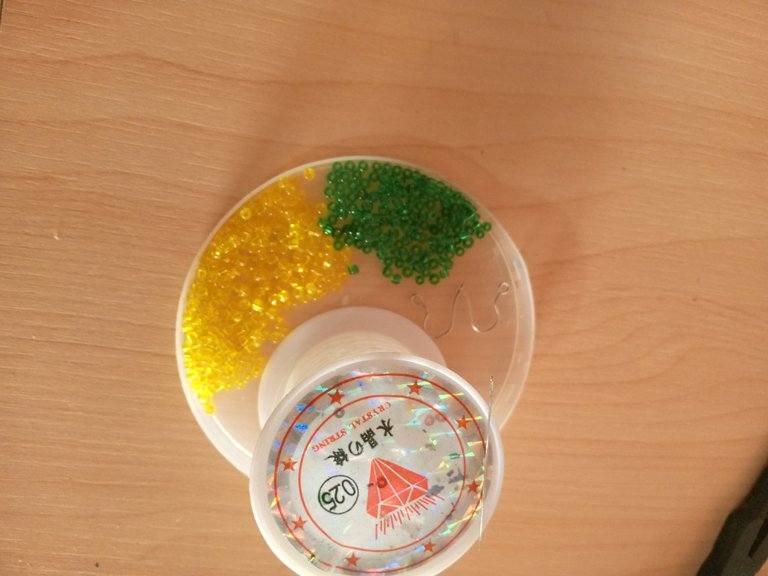
Next I will be presenting the materials used to make this elegant and simple necklace with clover charm.
MATERIALS
- Yellow beads
- Green beads
- Nylon fishing nylon #0.25
- Needle #12
- Scissors
- Hoop
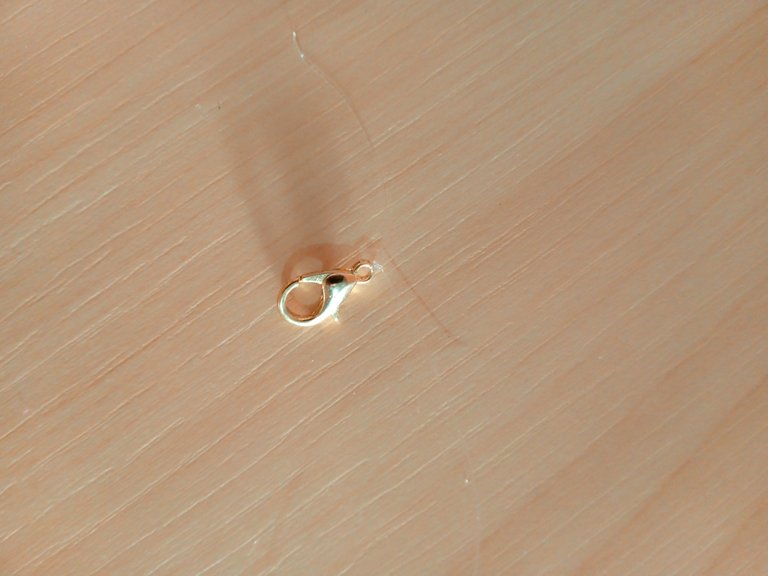
- Safety latch or locking ring

Step by Step Used
Step 1
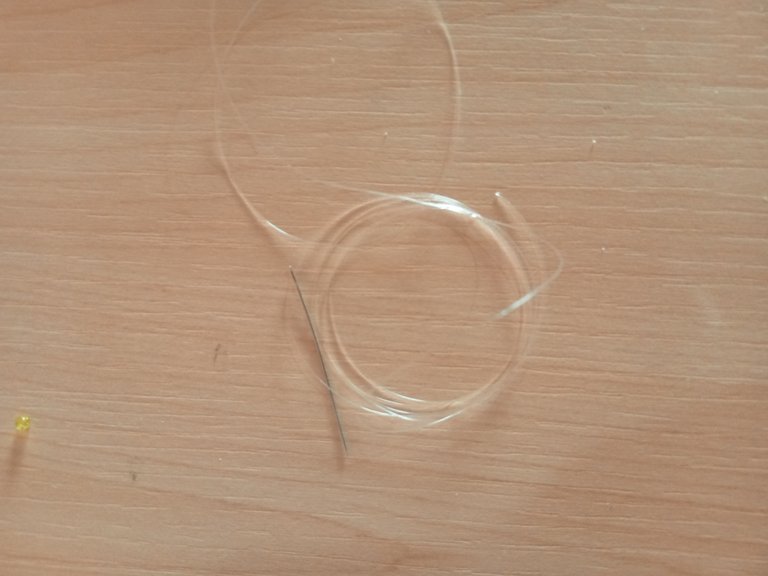
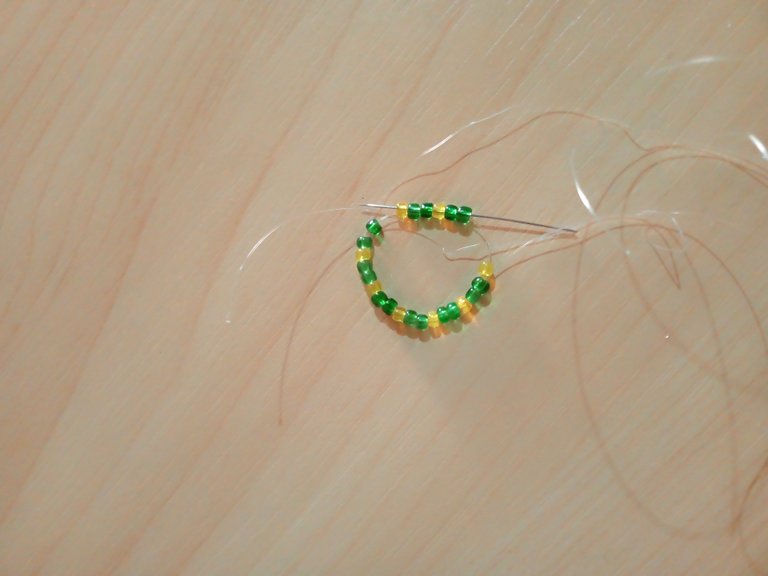
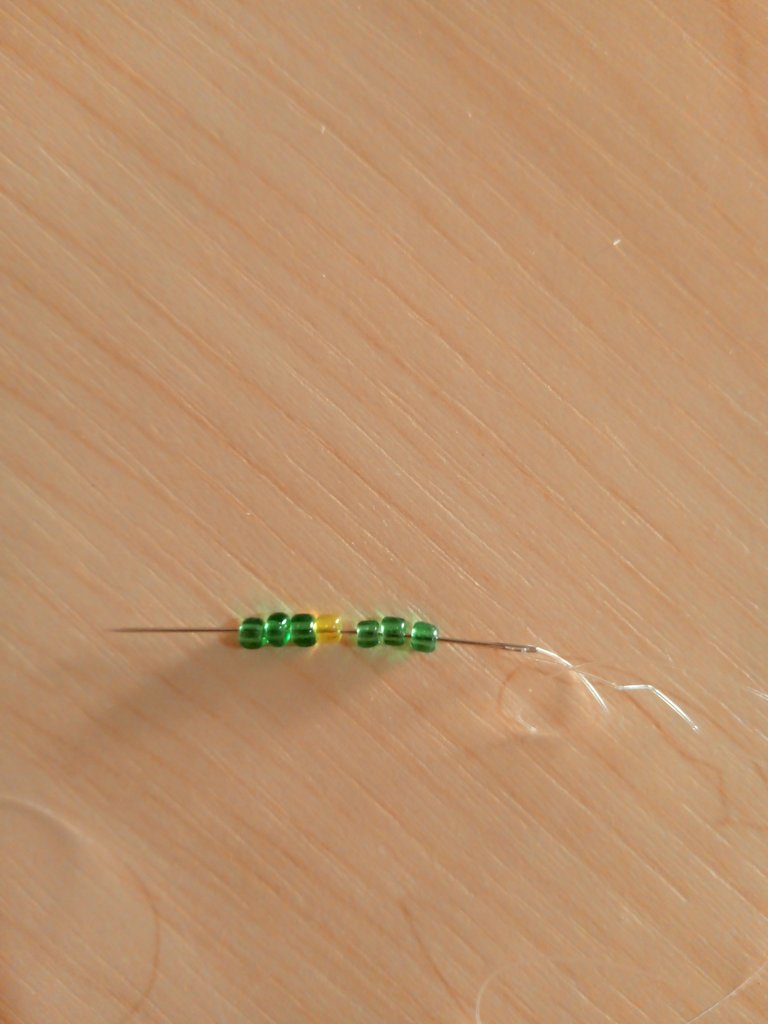
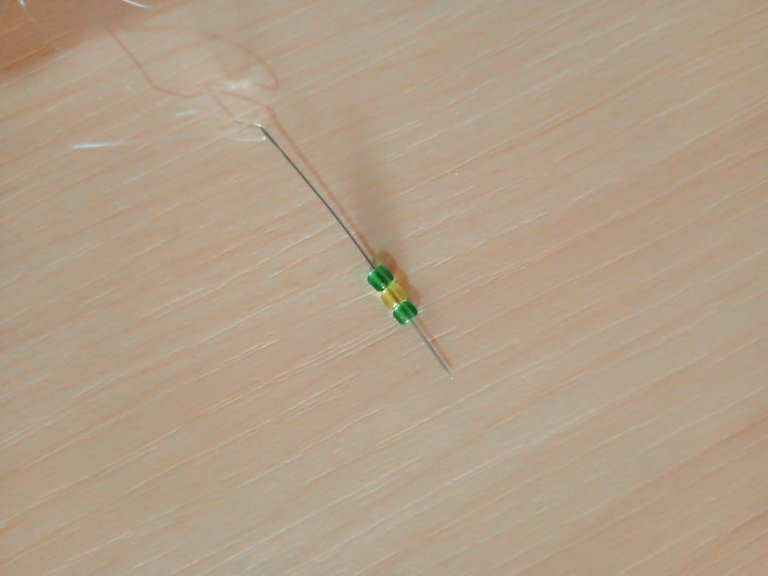
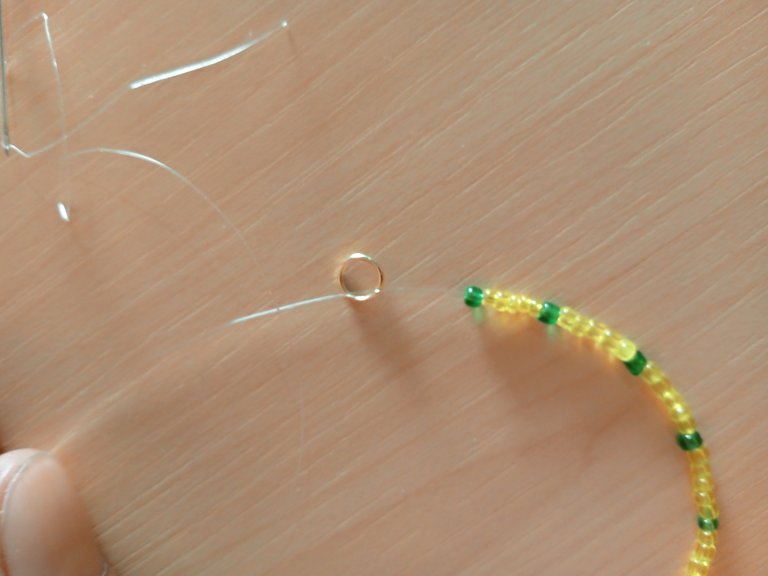
As always we start our first step, the first thing we will do is to thread our needle with approximately 60 cm of nylon.
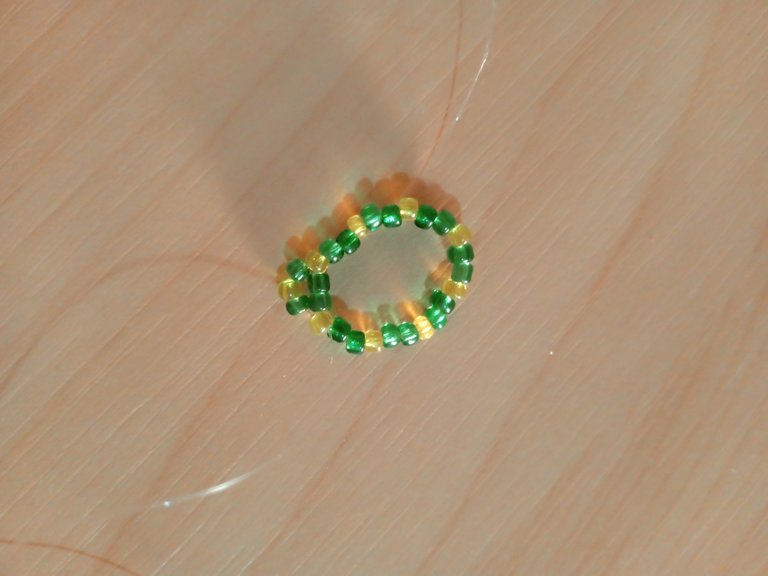
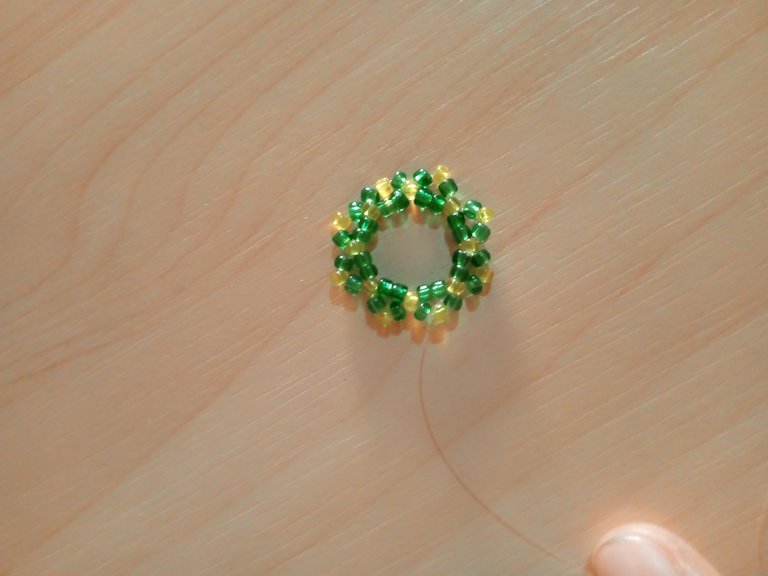
Then we will take 24 beads between green and yellow, we will start with a green one, then a yellow one, then two green ones and a yellow one, we will follow the same sequence until we reach the 24 beads, taking into account to finish with a green one.
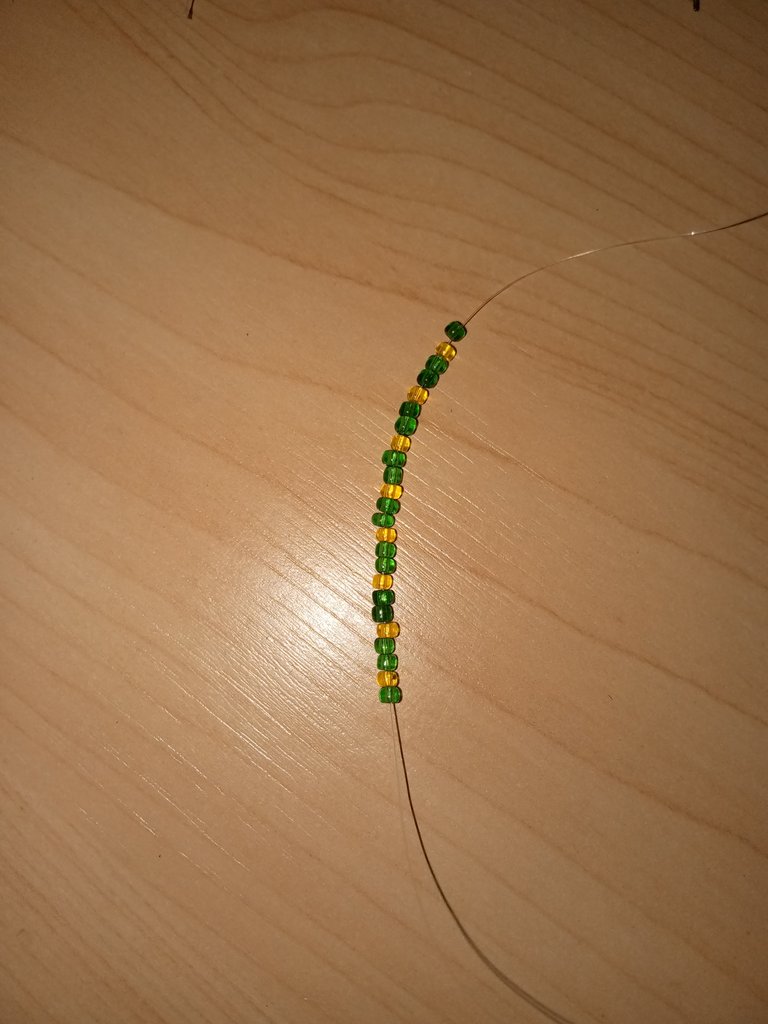
We are going to introduce our needle through all the beads and then pull it, then we will make several simple knots, and we will have a beautiful circle.

Step 2
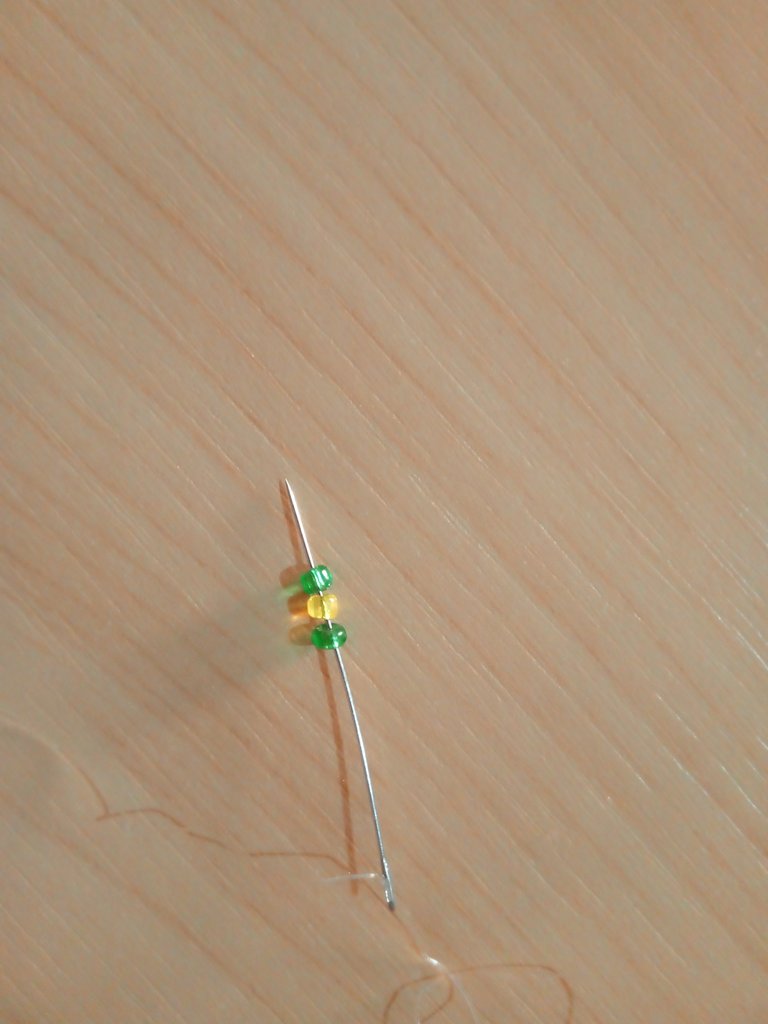
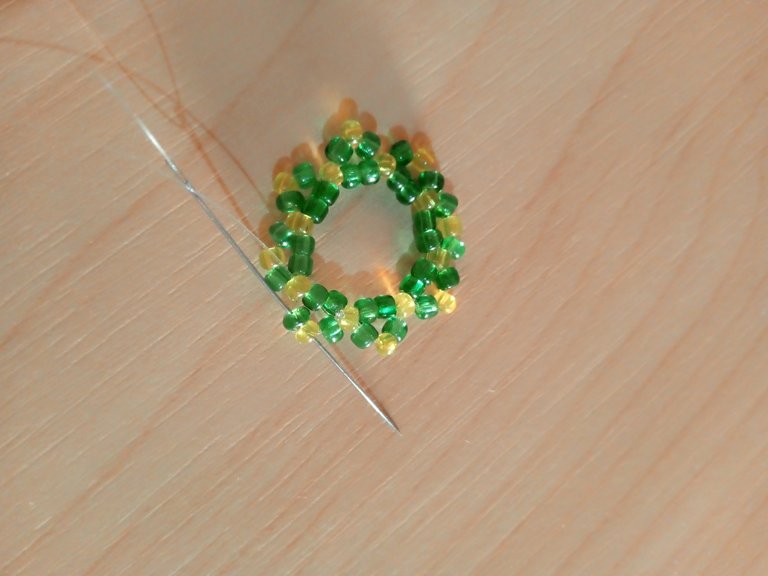
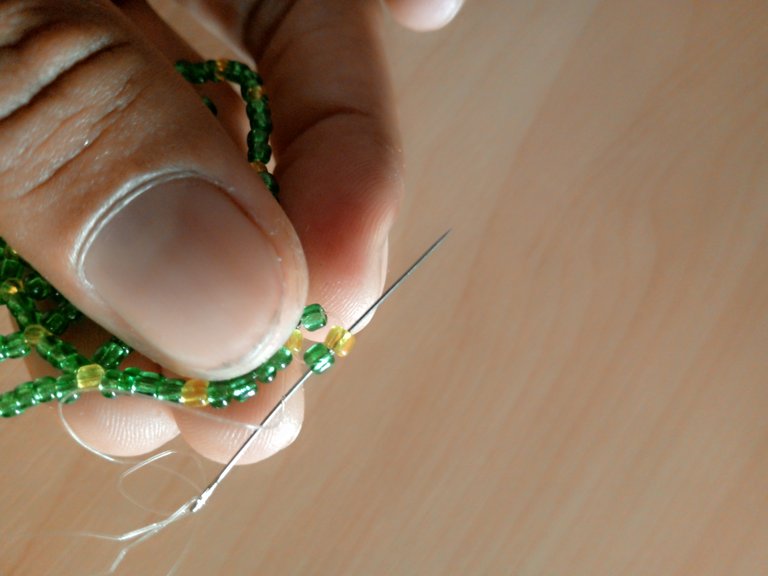
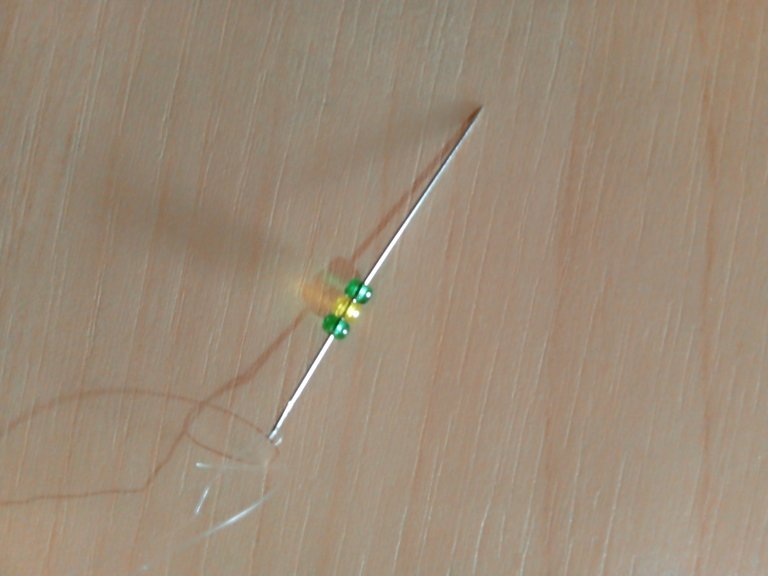
For this step we're going to position our needle on the yellow bead, then we're going to insert a green bead, a yellow bead, and a green bead.
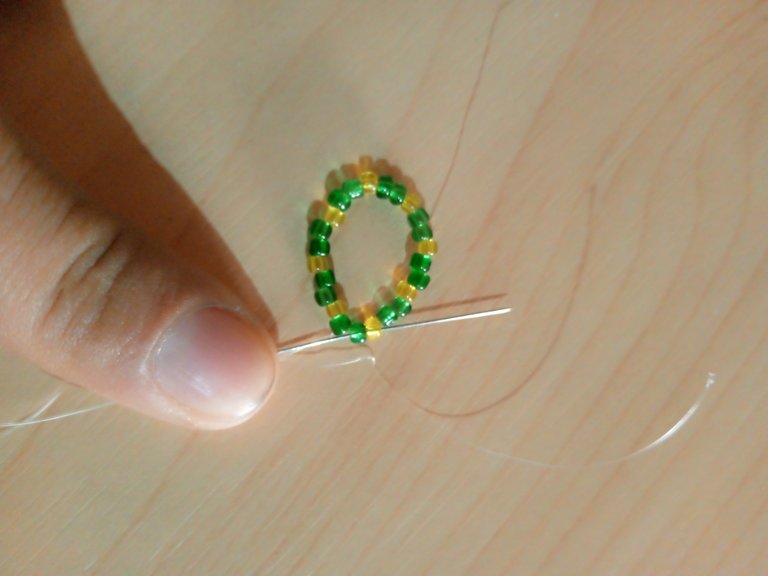
We are going to pass over the two green beads and introduce our needle through the yellow bead, then we will pull the nylon and we would have this result.
Again we will take a green bead, a yellow one and then another green one, we will skip two green beads and introduce them in the yellow one.
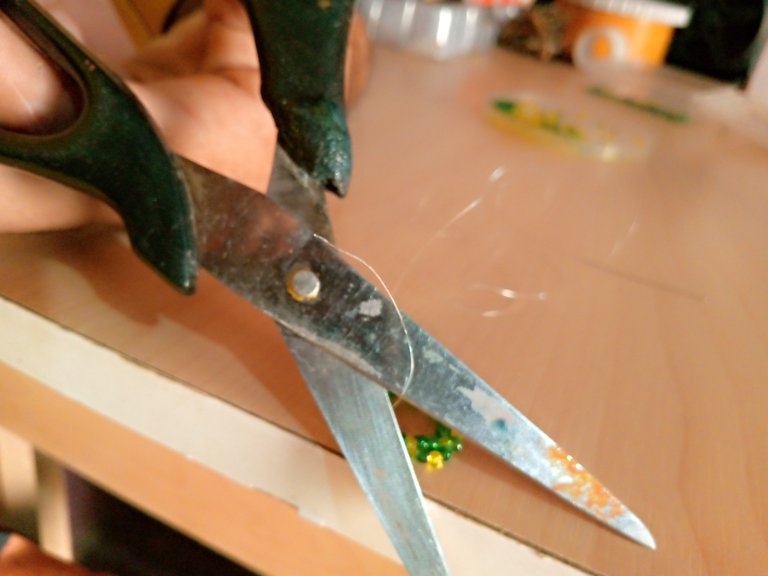
We will repeat the same procedure until we have surrounded the circle, then with the help of the scissors we will cut the excess of the nylon.
Step 3
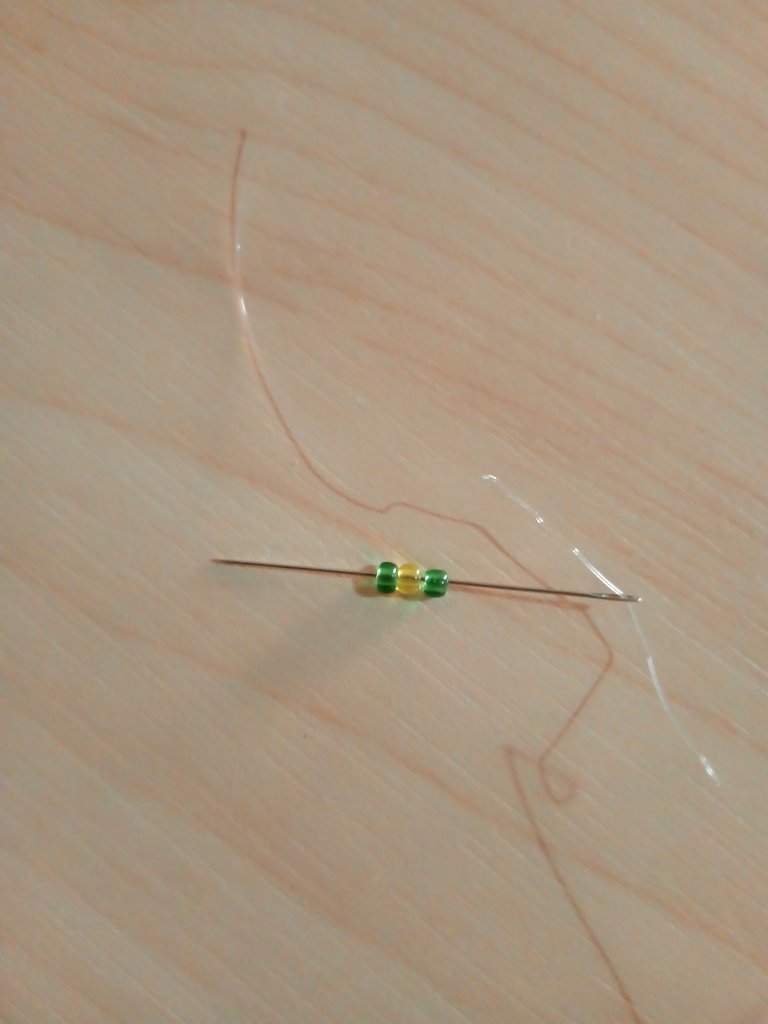
We are going to position the needle on the following yellow mustard.
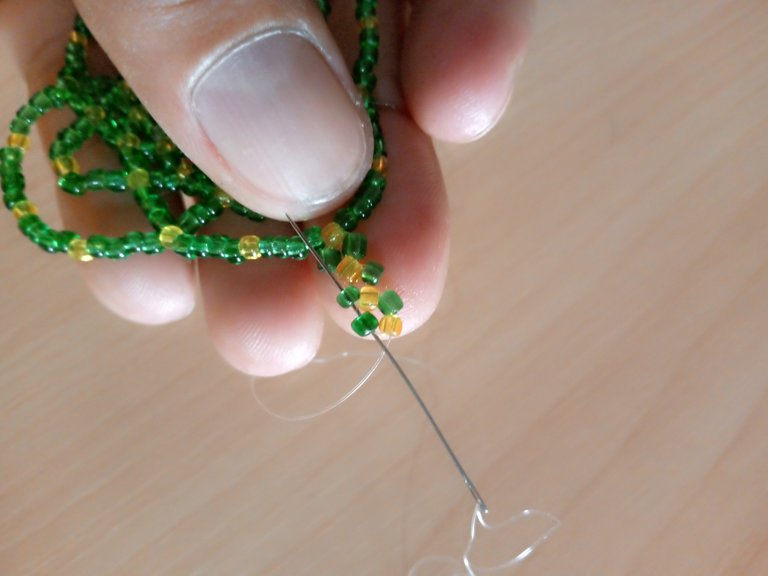
Now we will take two green beads, one yellow bead and again two green beads.

We are going to skip green beads and introduce our needle with nylon through the yellow beads and pull the nylon.
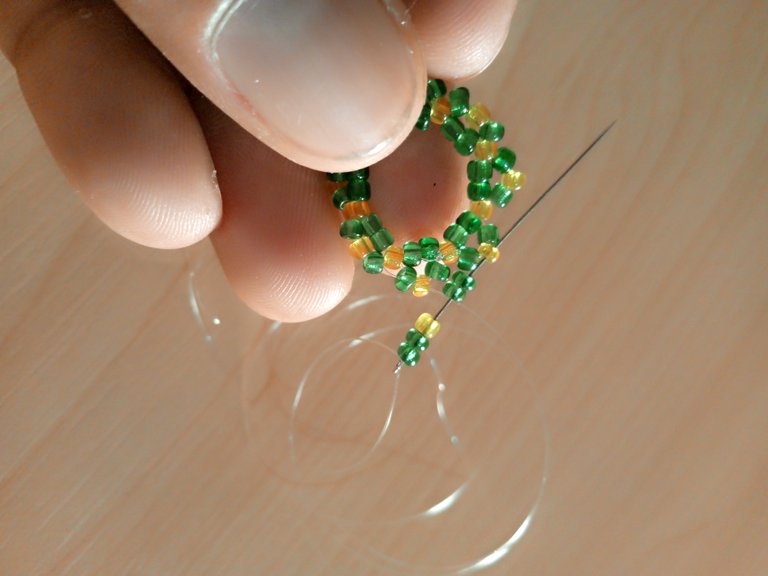
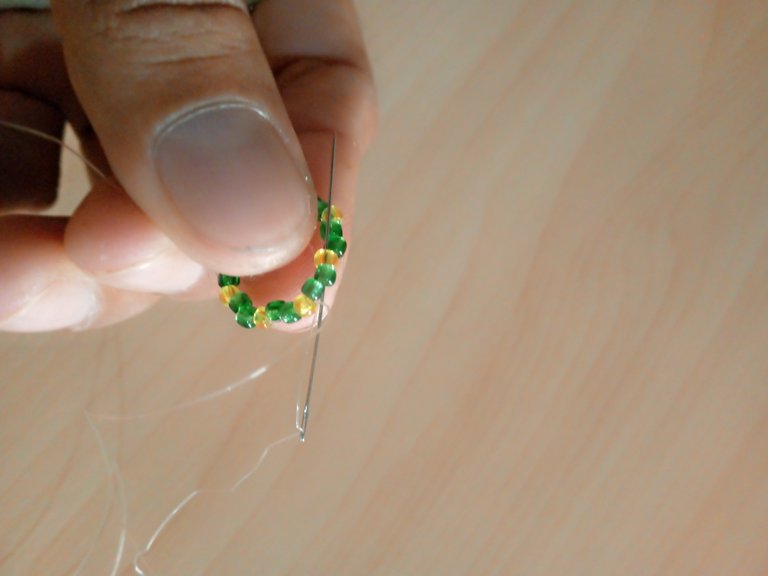
Again we are going to take two green beads, one yellow bead and two green beads, we will skip two green beads and introduce them in the next yellow bead and pull the nylon.
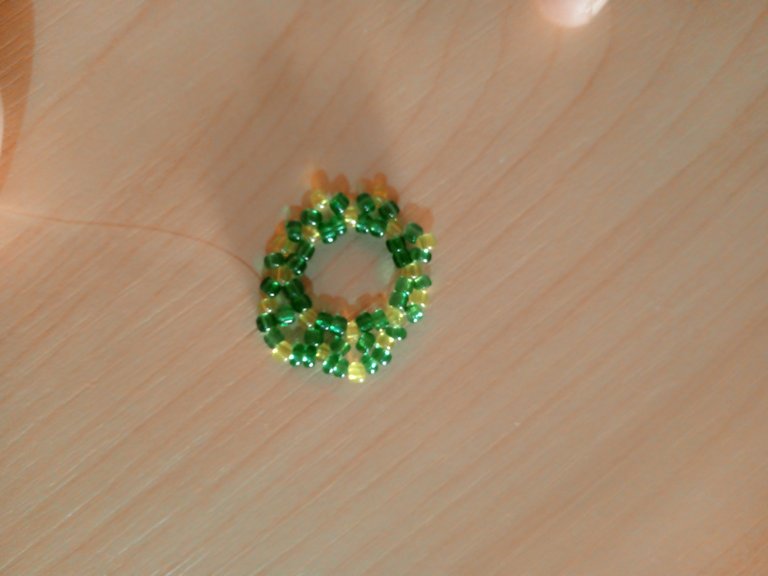
We are going to repeat this same process until we have the whole circle surrounded by the five beads.

Step 4
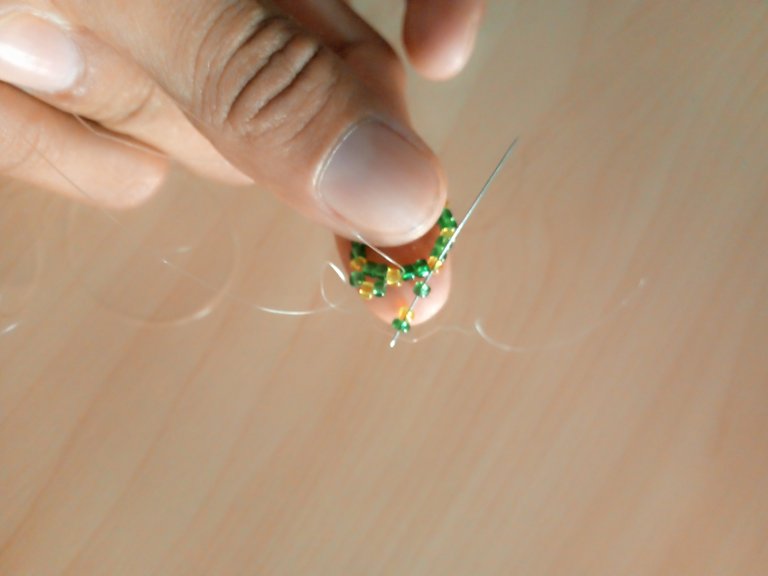
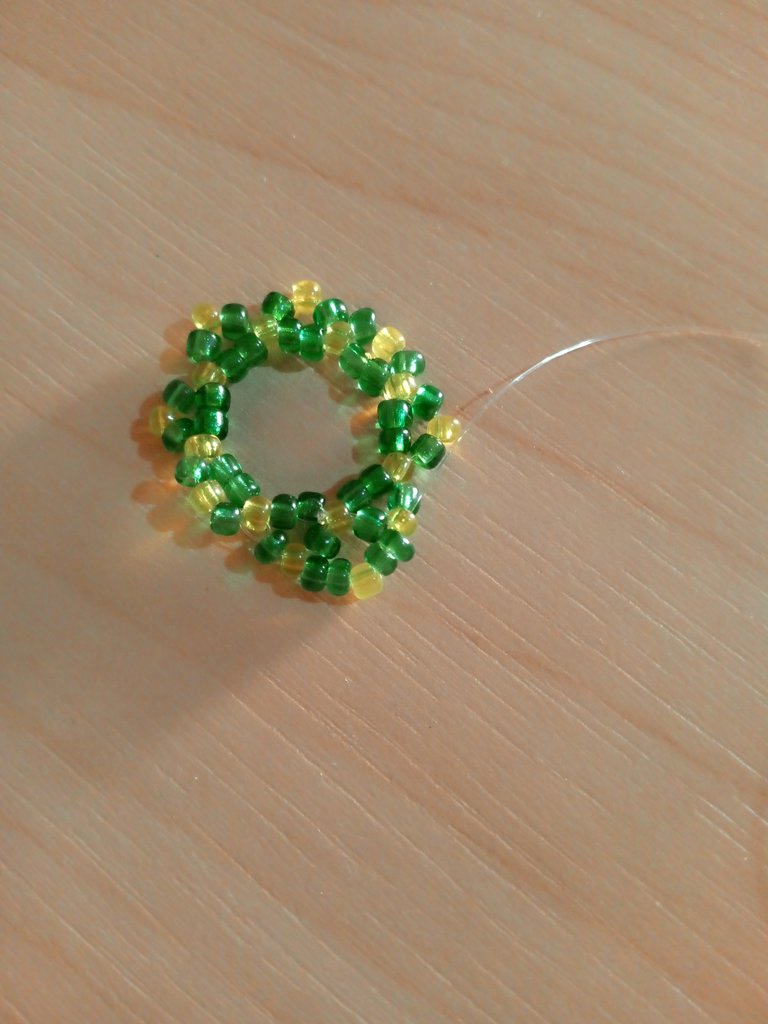
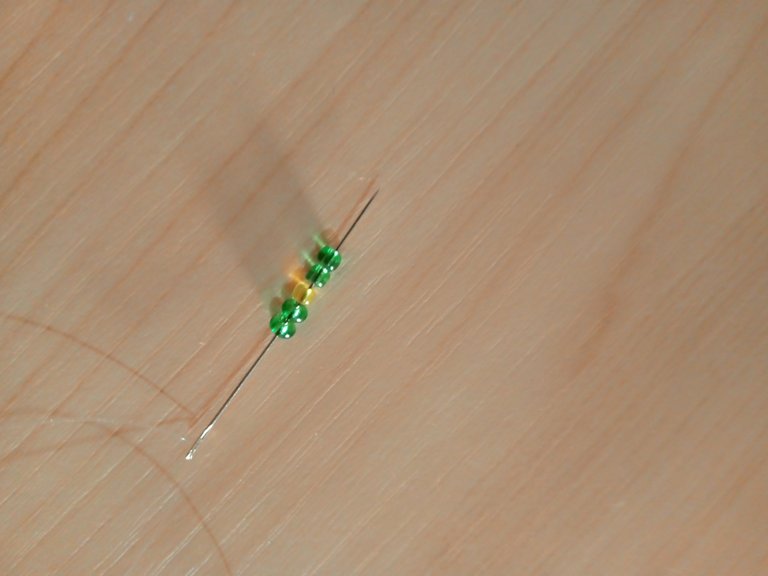
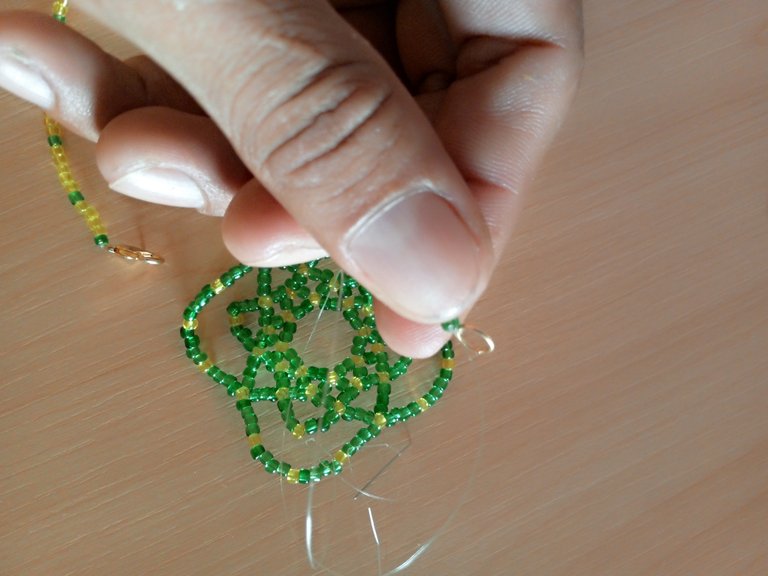
After positioning our needle with nylon, we will take three green beads, one yellow bead and again three green beads.

Same as the previous steps we are going to jump to the green beads and introduce our needle with the nylon through the next yellow bead, we will pull our nylon and we will have this result.

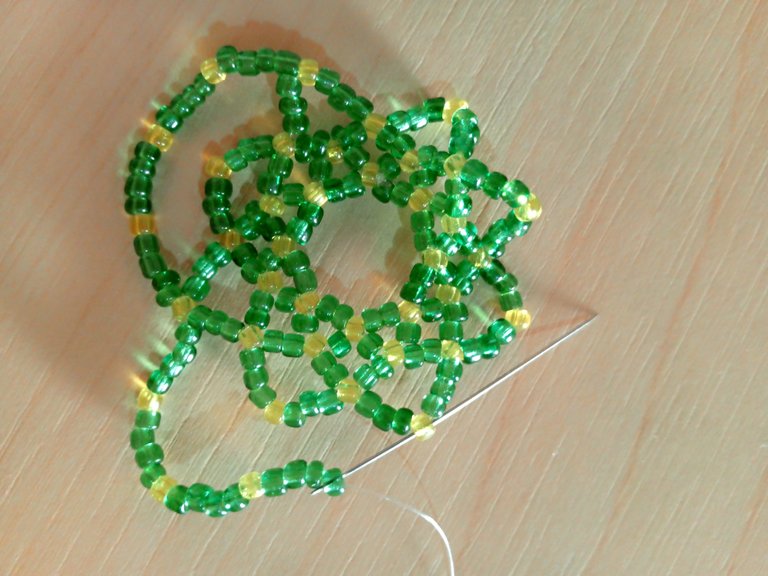
Again we are going to take three green beads, one yellow bead and three green beads, in the same way we are going to skip the green beads and introduce them in the yellow one, we pull the nylon and continue introducing the same beads until we surround our beautiful pendant.


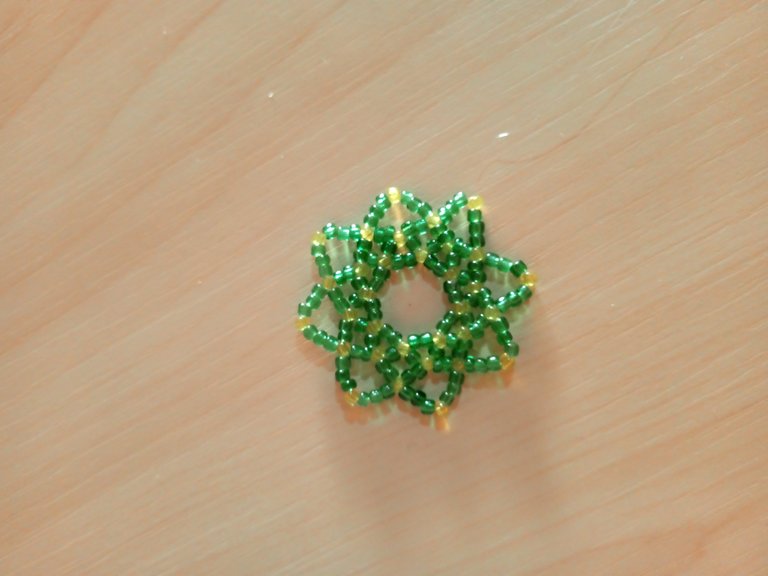
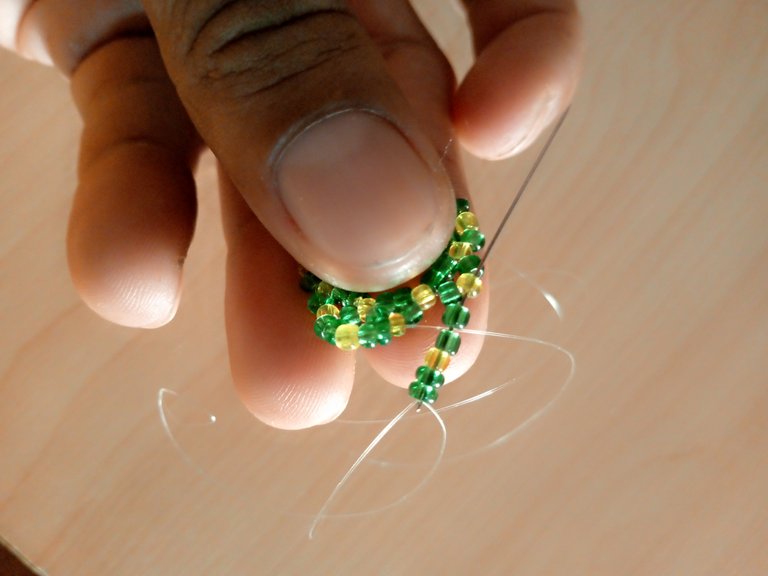
Step 5
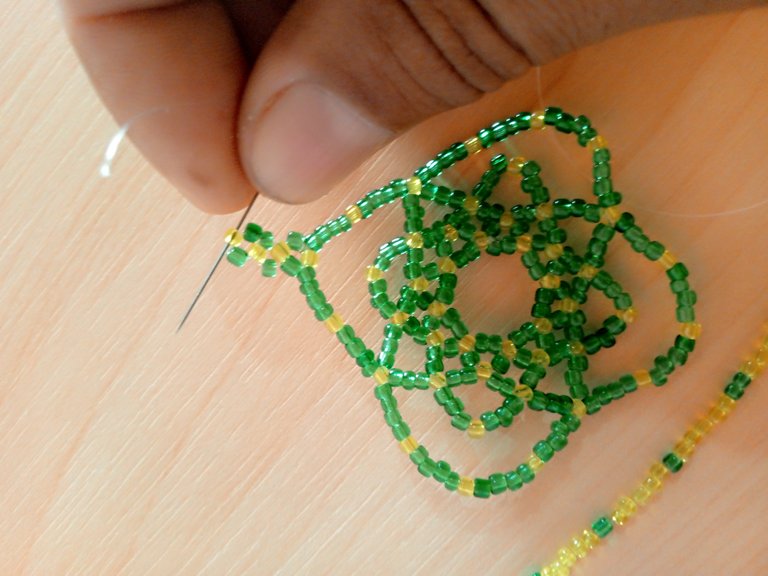
After positioning our needle on the yellow bead in the center, we will take 19 beads, first we place four green beads, then one yellow bead, then one yellow bead, again four green beads, followed by one yellow bead, again four green beads, repeat with one yellow bead and finally four green beads.

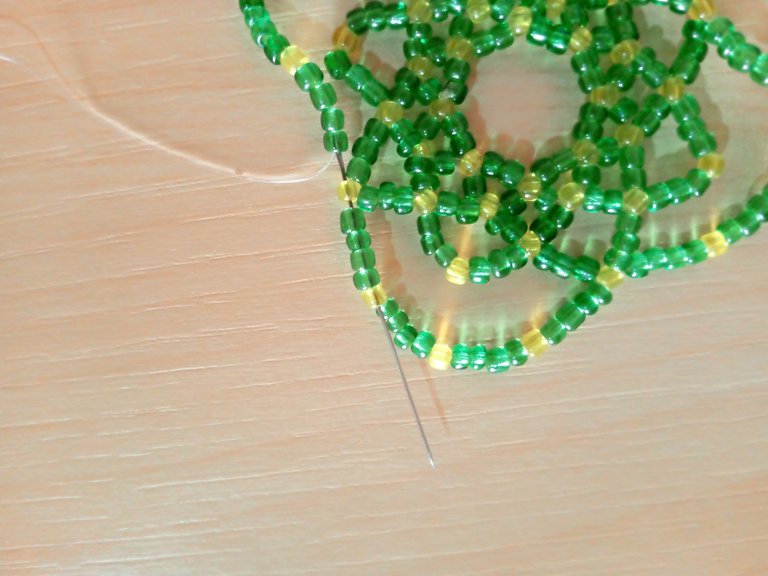
We are going to introduce our needle in the second yellow bead, that is to say we will skip a petal and introduce it in the next one.
Again we are going to take the 19 beads in the same order already mentioned, in the same way we will skip a petal having as a guide a yellow bead, then we introduce our needle with nylon in the next yellow bead or in the next petal.
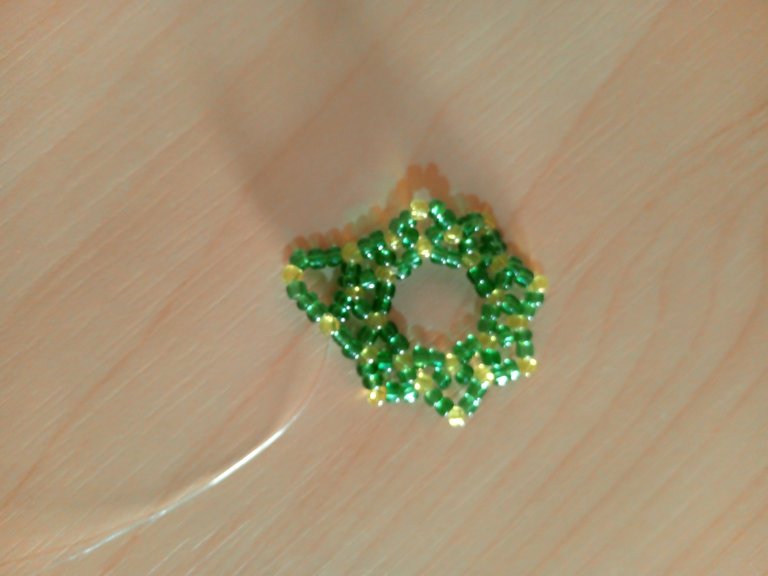
We will continue repeating the same procedure until we have assembled our beautiful Clover charm.
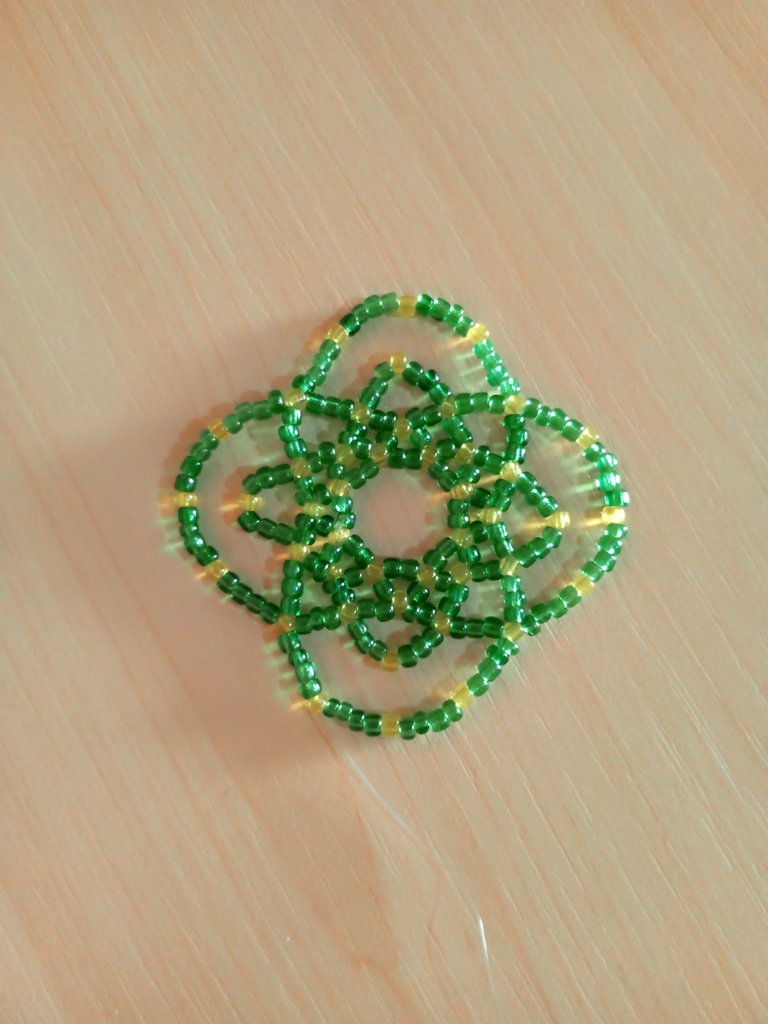
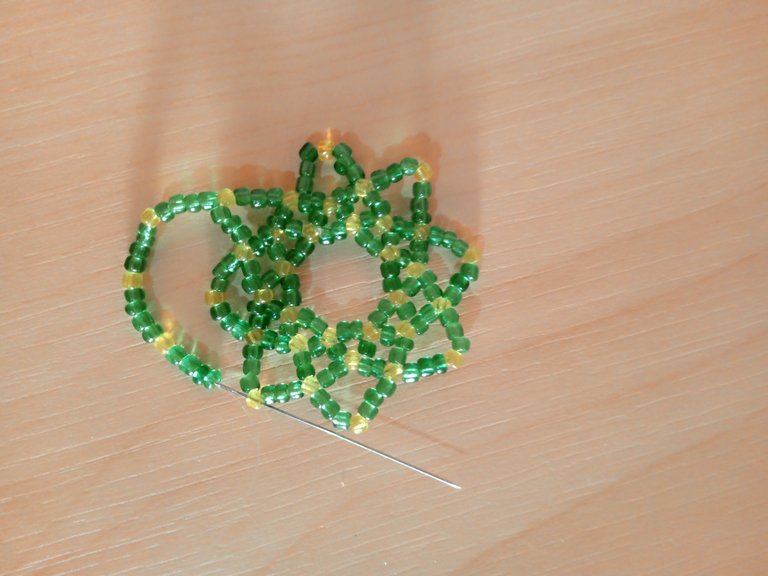
Step 6
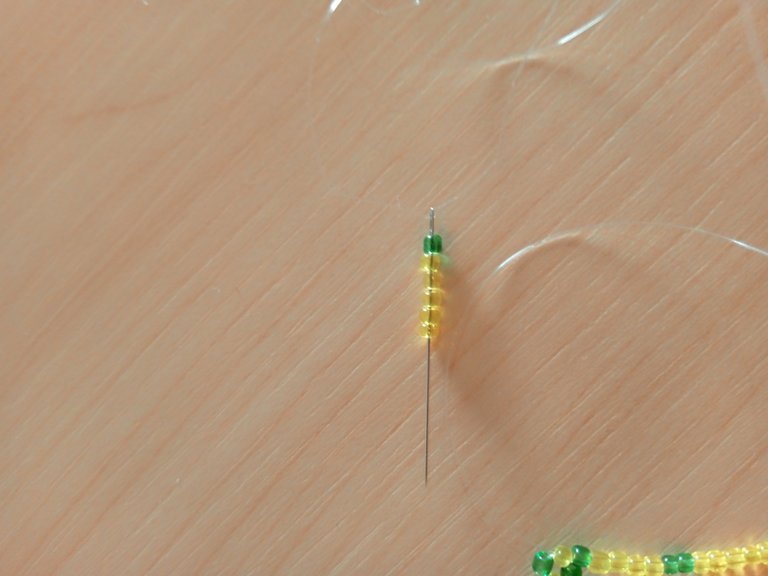
In the same way we are going to position our needle on the yellow bead that is still our guide, we will pass through the green beads until we reach it.
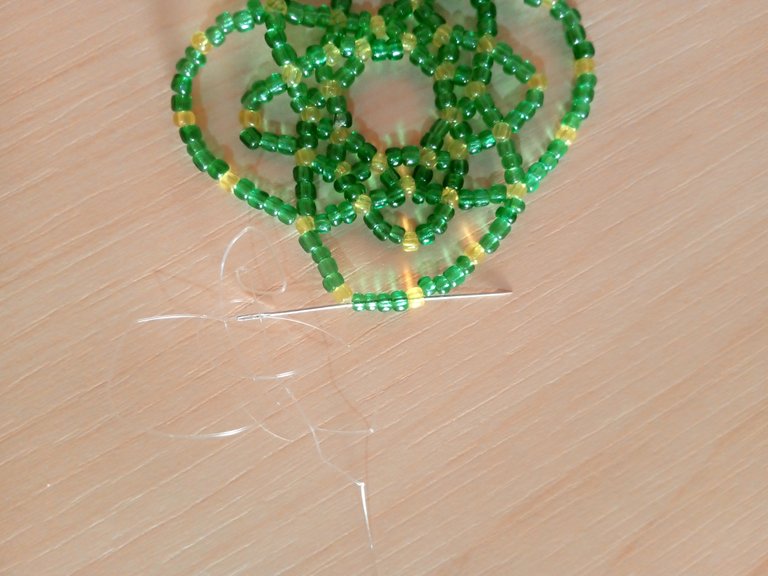
Then we will take a green bead, another yellow bead and again a green bead.
We are going to introduce our needle through the center of the yellow bead on the opposite side of the others.


Then we introduce the needle through the two beads, one green and one yellow until we get to the top
Taking again a green bead, a yellow one and a green one, we will make the same procedure of the previous one, we introduce the needle through the side of the yellow bead to pull the nylon.

In this way it would be ready the grip of our elegant clover pendant, with the rest of our nylon we will reinforce our pendant returning us for each one of the beads, this way we will have ready our beautiful clover.
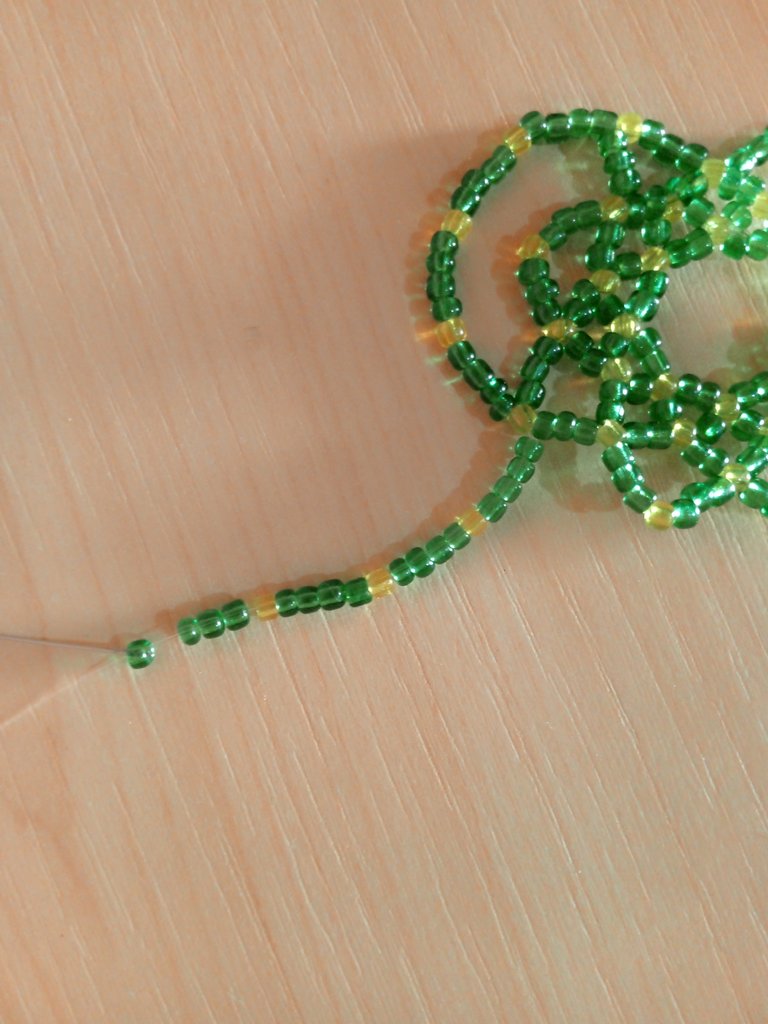
Step 7
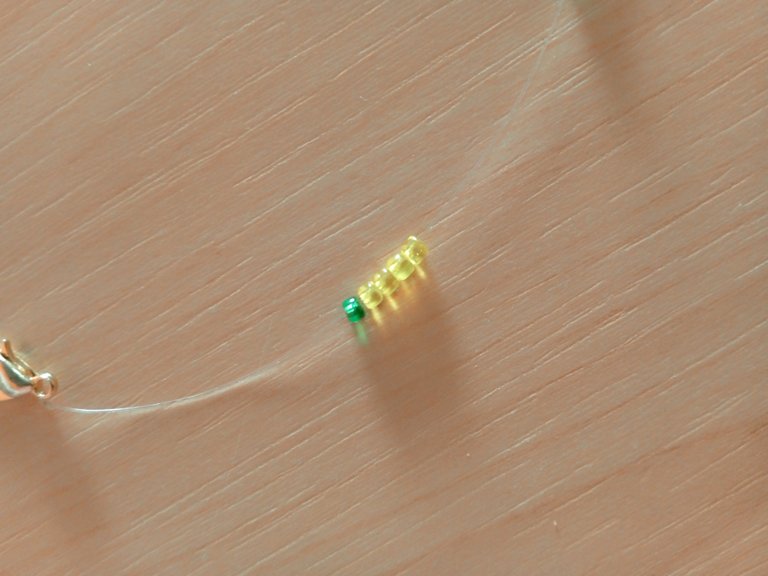
Now we would have to make the simple but elegant necklace to place our beautiful pendant, we will take approximately 30 cm of nylon and a trancadero, we will make several simple knots to ensure that it does not come loose.
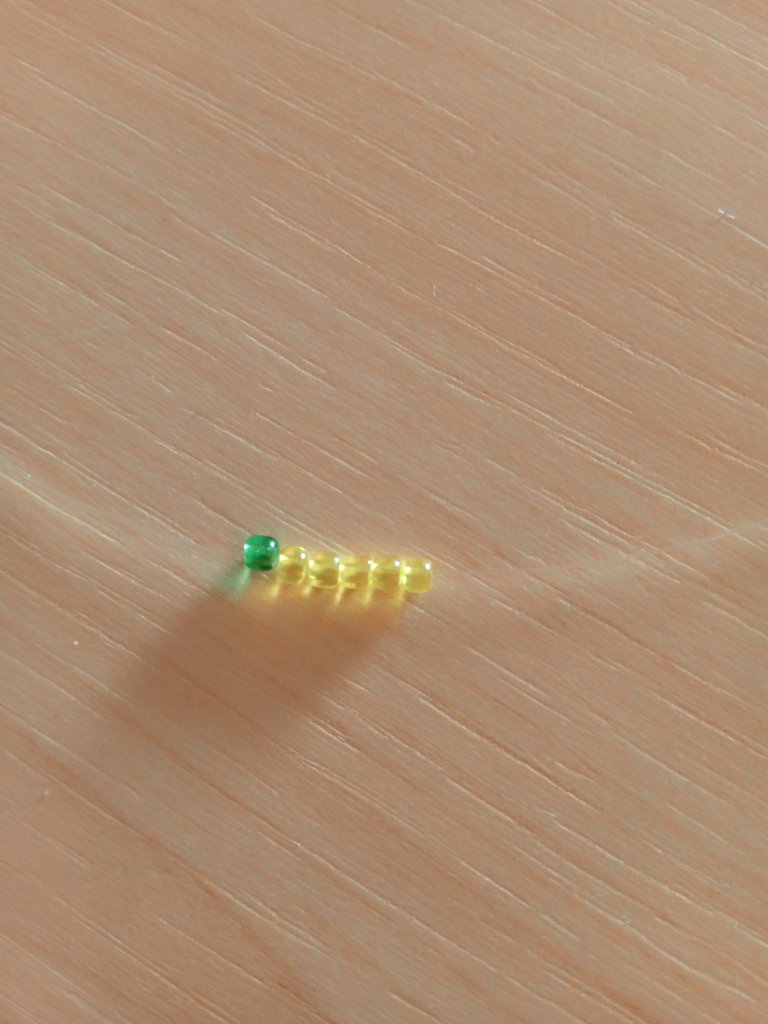
We are going to take five yellow beads and one green bead and we are going to bring them to the end of the pendant.
We will take one green bead and five yellow beads, in the same way we will bring to the end of our nylon.
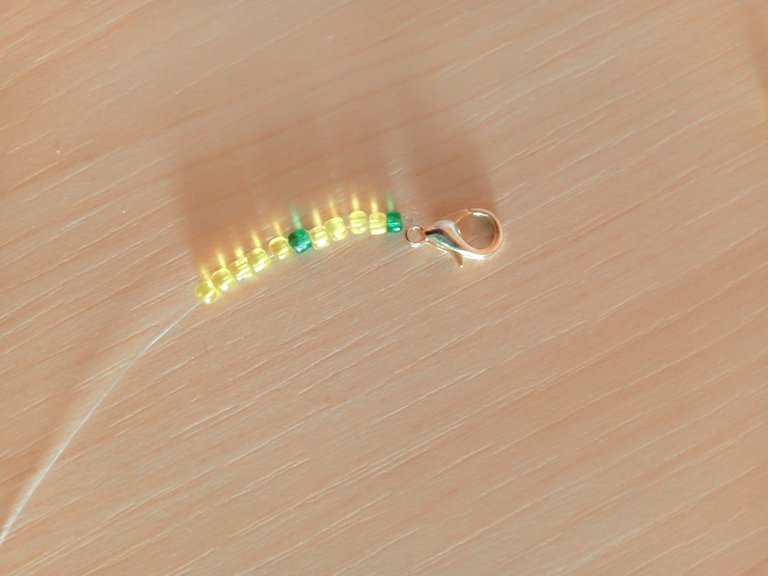
In the same way we are going to introduce a green bead and five yellow beads, we are going to make a calculation until we reach the middle of our necklace and we place a green bead at the end.
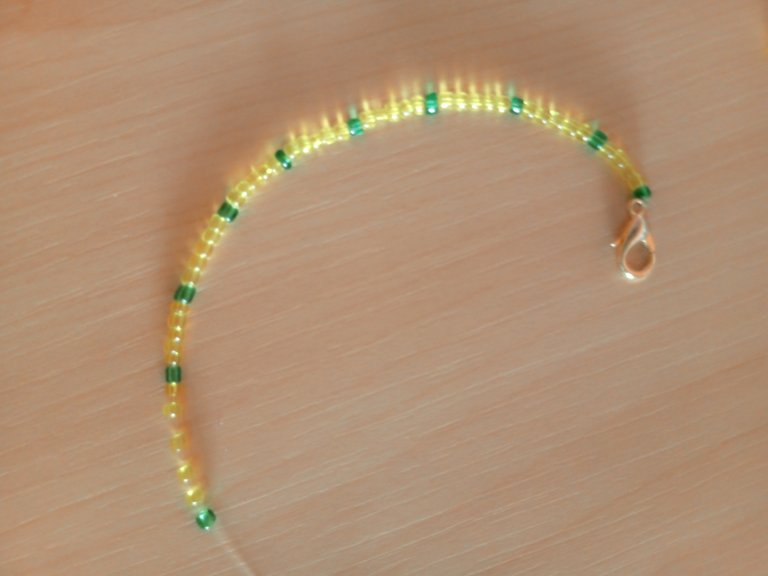
We are going to take our pendant and pass our needle through the center of the bead.
Then we will continue with the same procedure by inserting a green bead and five yellow beads.
Finally we will take the ring and we will make several simple knots to secure it, then we will reinforce by inserting our needle through each bead and then cut.
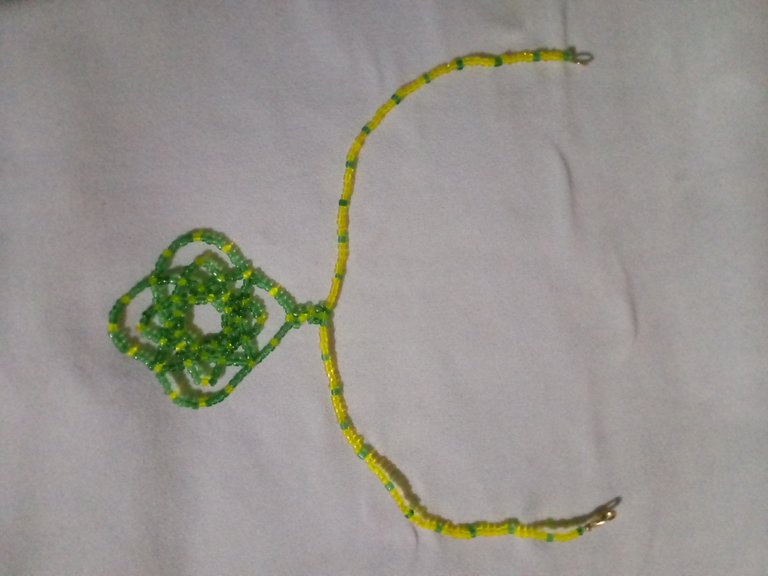
In this way we would have ready our beautiful clover charm inspired by the Healer of the Forest, I accompanied it with a simple but nice necklace to show off our beautiful charm. I hope you liked this tutorial that I have made with much love for all of you. Success and Blessings
Final Result
The photos were taken from my phone tecno spark Go 2023.
Translator Used: Deepl
Images are edited from canva application.
A continuación les estaré presentando los materiales utilizados para la elaboración de este elegante y sencillo collar con dije de trebol.
MATERIALES
- Mostacillas Amarillas
- Mostacillas Verdes
- Nylon de pescar #0.25
- Aguja #12
- Tijeras
- Argolla
- Seguro o trancadero
Paso a Paso Utilizado
Paso 1
Como siempre iniciamos nuestro primer paso, lo primero que haremos será enhebrar nuestra aguja con un aproximado de 60 cm de nylon
Luego vamos a tomar 24 mostacillas entre verde y amarillo, comenzaremos con una verde luego una amarilla, seguidamente con dos verdes y una amarilla, seguiremos la misma secuencia hasta llegar a las 24 mostacillas, tomando en cuenta terminar en una verde.
Vamos a introducir nuestra aguja por todas las mostacillas y luego tiramos de ella, luego haremos varios nudos simples, y nos quedaría un hermoso círculo.
Paso 2
Para este paso vamos a posicionar nuestra aguja en la mostacilla amarilla, luego vamos a introducir una mostacilla verde, una amarilla y otra verde.
Vamos a pasar por encima de las dos mostacillas verdes e introducimos nuestra aguja por la mostacilla amarilla, luego tiraremos del nylon y nos quedaría este resultado.
Nuevamente tomaremos una mostacilla verde, una amarilla y luego otra verde, saltaremos dos mostacillas verdes introducimos en la amarilla
Repetiremos el mismo procedimiento hasta haber rodeado el círculo, luego con la ayuda de la tijera cortaremos el excedente del nylon.
Paso 3
Vamos a posicionar la aguja en la siguiente mostacilla amarilla
Ahora tomaremos dos mostacillas de color verde, una de color amarillo y nuevamente dos mostacillas verdes
Vamos a saltar silla verdes e introducimos nuestra aguja con nylon por la mostacilla amarilla tiramos del nylon.
Nuevamente vamos a tomar dos mostacillas verdes, una mostacilla amarilla y dos mostacillas verdes, saltaremos dos de color verde introducimos en la siguiente mostacilla amarilla y tiramos del nylon.
Vamos a repetir este mismo proceso hasta tener todo el círculo rodeado de las cinco mostacillas.
Paso 4
Luego de posicionar nuestra aguja con nylon, vamos a tomar tres mostacillas de color verde, una de color amarillo y nuevamente tres mostacillas de color verde
Igual que los pasos anteriores vamos a saltar a mostacilla de color verde e introducimos nuestra aguja con el nylon por la siguiente mostacilla de color amarillo, tiraremos de nuestro nylon y tendremos este resultado.
Nuevamente vamos a tomar tres mostacillas verdes, una amarilla y tres mostacillas de color verde, de la misma manera vamos a saltar las mostacillas verdes e introducimos en la amarilla, tiramos del nylon y seguimos introduciendo las mismas mostacillas hasta rodear nuestro hermoso dije.
Paso 5
Luego de posicionar nuestra aguja en la mostacilla amarilla que está en el centro, vamos a tomar 19 mostacillas, primero colocamos cuatro mostacillas verdes, después una amarilla, nuevamente cuatro mostacillas verde, seguido de una amarilla, nuevamente cuatro mostacillas verdes, repetimos con una amarilla y por último cuatro mostacillas verdes.
Vamos a introducir nuestra aguja en la segunda mostacilla amarilla, es decir saltaremos un pétalo e introducimos en el siguiente.
Nuevamente vamos a tomar las 19 mostacillas en el mismo orden ya mencionado, de igual manera saltaremos un pétalo teniendo como guía una mostacilla amarilla, luego introducimos nuestra aguja con nylon en la siguiente mostacilla amarilla o en el siguiente pétalo.
Seguiremos repitiendo el mismo procedimiento hasta tener armado nuestro hermoso dije de Trébol.
Paso 6
Igualmente vamos a posicionar nuestra aguja en la mostacilla amarilla que sigue siendo nuestra guía, pasaremos por las mostacillas verde hasta llegar a ella.
Luego tomaremos una mostacilla de color verde, otra de color amarillo y nuevamente una mostacilla de color verde
Vamos a introducir nuestra aguja por el centro de la mostacilla amarilla del lado contrario de las demas.
Después introducimos la aguja por las dos mostacillas, una verde y una amarilla hasta llegar a la parte de arriba
Tomando nuevamente una mostacilla verde una amarilla y otra verde, haremos el mismo procedimiento del anterior, introducimos la aguja por el lado puesto de la mostacilla amarilla para tirar del nylon.
De esta manera quedaría listo el agarre de nuestro elegante dije de trébol, con los restantes de nuestro nylon reforzaremos nuestro dije devolviéndonos por cada una de las mostacillas, así tendremos listo nuestro hermoso Trébol.
Paso 7
Ahora nos quedaría realizar el sencillo pero elegante collar para colocarle nuestro hermoso dije, tomaremos un aproximado de 30 cm de nylon y un trancadero, haremos varios nudos simples hasta asegurar que no se suelte.
Vamos a tomar cinco mostacillas de color amarillo y una mostacilla de color verde y llevaremos al final junto a nuestro trancadero.
Tomaremos una mostacilla de color verde y cinco mostacillas amarillas, de la misma manera llevaremos al final de nuestro nylon.
De la misma manera vamos a ir introduciendo una mostacilla verde y cinco mostacillas amarillas, vamos a hacer un cálculo hasta llegar a la mitad de nuestro collar y colocamos una mostacilla verde al final
Vamos a tomar nuestro dije y pasaremos nuestra aguja por el centro de la mostacilla.
Luego seguiremos con el mismo procedimiento introduciendo una mostacilla de color verde y cinco mostacillas de color amarillo
por último tomaremos la argolla y haremos varios nudos simples para asegurarla, después reforzamos introduciendo nuestra aguja por cada mostacilla para luego cortar.
De esta manera tendríamos listo nuestro hermoso dije de trebol inspirado en la Sanadora Del Bosque, lo acompañe con un sencillo pero bonito collar para lucir nuestro hermoso dije. Espero les haya gustado este tutorial que he realizado con mucho cariño para todos ustedes. Éxitos y Bendiciones
Resultado Final
Las fotos las tome de mi teléfono tecno spark Go 2023.
Traductor Utilizado: Deepl
Las imágenes son editadas desde aplicación canva.
Simplemente hermoso amigo .. 🤗❤️❤️❤️😎
Está muy bonito 😊 que lindo y delicado dijen ñ.