❤️Hermoso brazalete de Corazones al Estilo Miyuki❤️Beautiful Miyuki Style Hearts Bracelet❤️

Feliz y Bendecido dia para todos mis compañeros de Hive y compañeros de esta bonita comunidad de jewelry, reciban un cordial saludo y un fraternal abrazo, espero este dia haya sido de bendiciones para todos
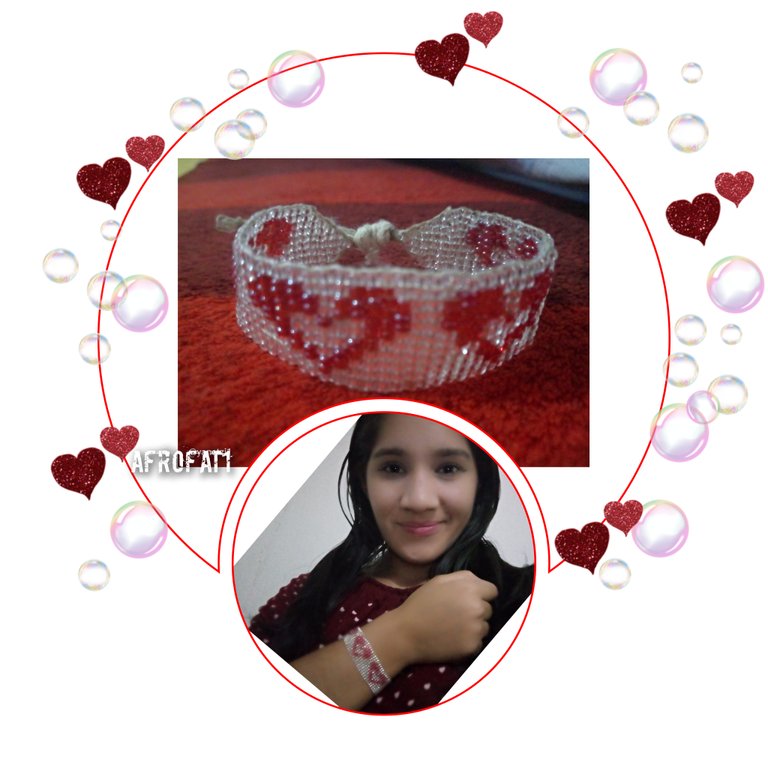
Hoy quiero hablarles sobre un bonito brazalete al estilo miyuki con un diseño de corazones, ideal para este 14 de febrero que ya esta cerca, también para obsequiarlo a sus familiares y amigos cualquier dia del año. En mi caso lo hice pensando en una persona muy especial para mi, la compañera de vida y la madre de mi hermosa hija, mi esposa @yanetzi1, esa compañera que ha estado conmigo en las buenas y malas, a pesar de los obstaculos que pone la vida siempre ha estado a mi lado, aqui un pequeño gesto de agradecimiento.❤️
Quiero mostrarles el paso a paso utilizado para la realización de este hermoso brazalete, a pesar de los inconvenientes que se me prentaron pude culminar este hermoso brazalete.
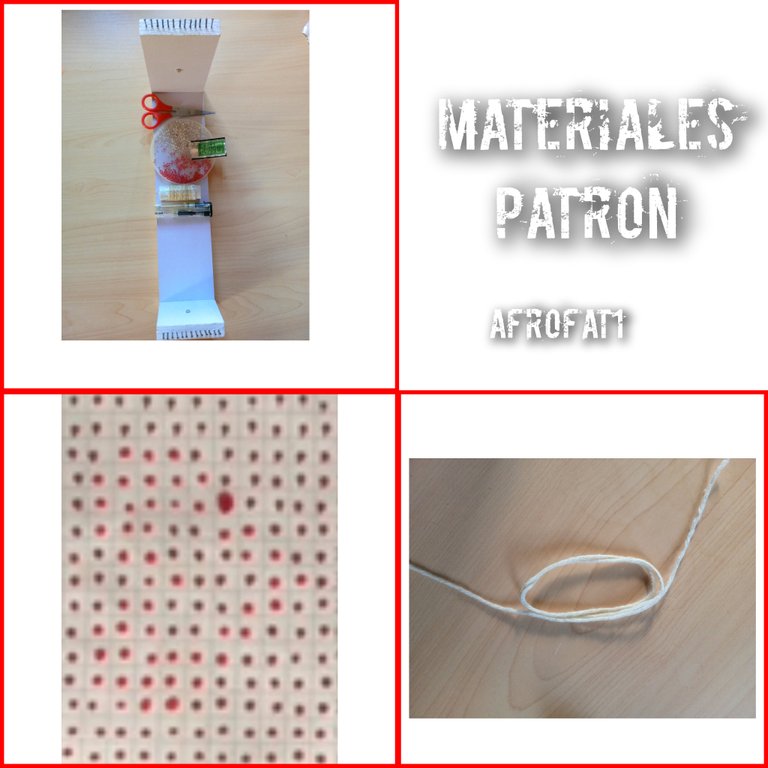
Materiales utilizados
- Mostacillas Rojas
- Mostacillas Transparentes
- Hilo Poliéster Color Beige
- Telar de Madera
- 15 cm de Hilo macrame
- Aguja para Mostacillas #12
- Encendedor o Yesquero
- Tijeras
- Tabla con gancho
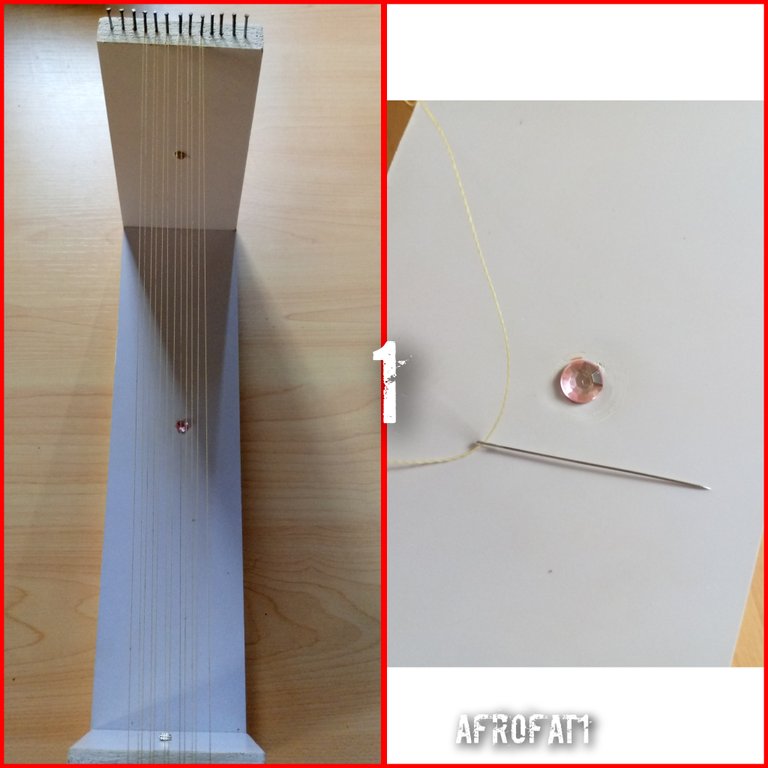
Paso 1Para comenzar lo primero que haremos sera tomar el hilo de poliester y colocarlo en el telar, vamos a usar 6 clavitos, es decir 3cm en el telar, y nos quedarian 12 hilos en total,
Seguidamente vamos a colocar hilo poliéster en nuestra aguja para mostacillas.
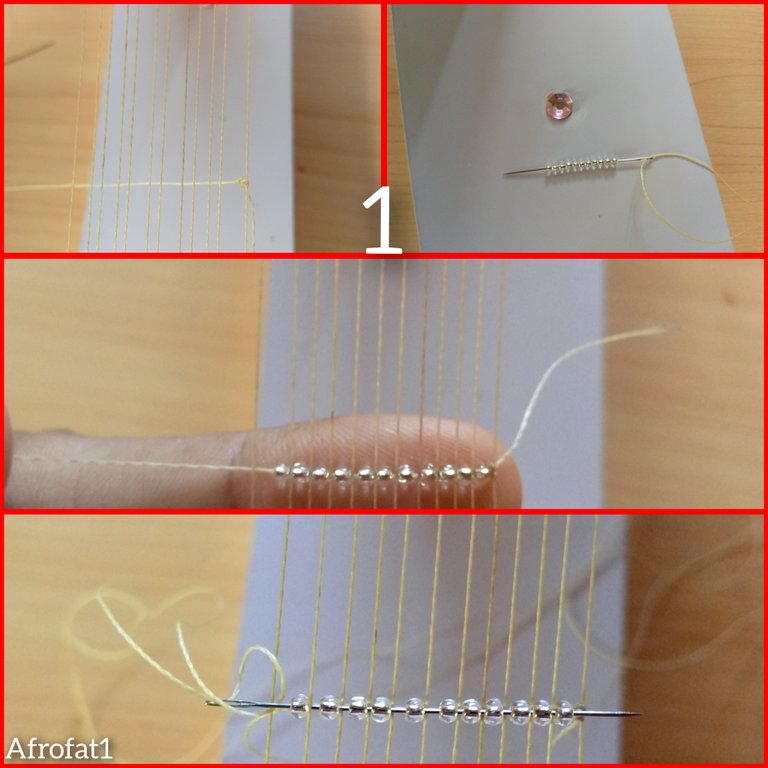
Vamos a ensartar la aguja con el hilo, luego haremos un pequeño nudo en unos de los hilos del telar y dejaremos unos 20cm sobrantes, tomaremos 11 mostacillas transparentes y por la parte de abajo vamos a posicionar cada una en los hilos del telar, teniendo en cuenta que tienen que quedar dentro, despues vamos a devolvernos con la aguja y por la parte de arriba la introducimos por cada mostacillas.
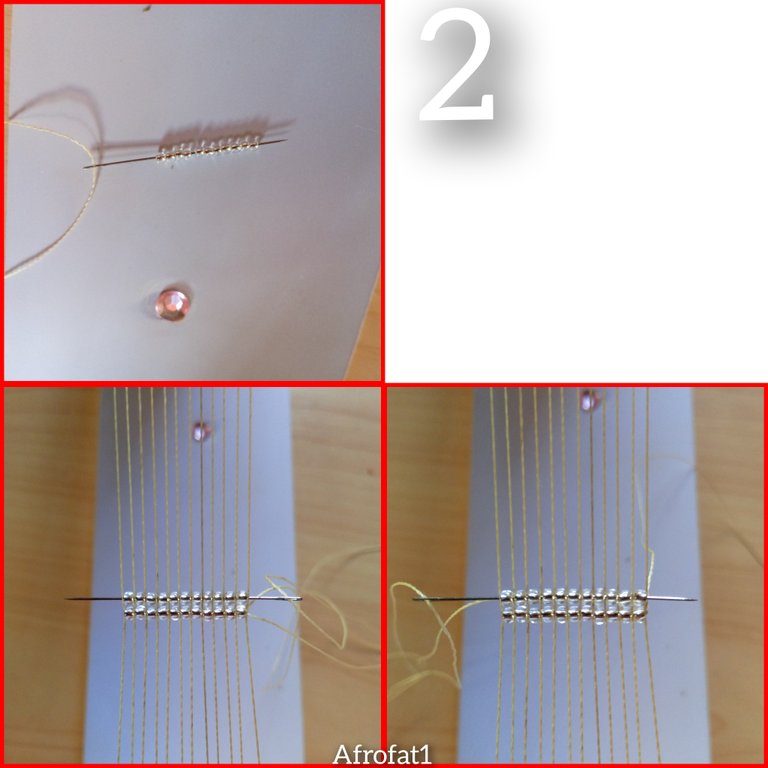
Paso 2Nuevamente colocamos 11 mostacillas transparentes, vamos a posicionarlas por debajo de los hilos, para asi devolvernos con la aguja por la parte de arriba e introducir por cada mostacillas.
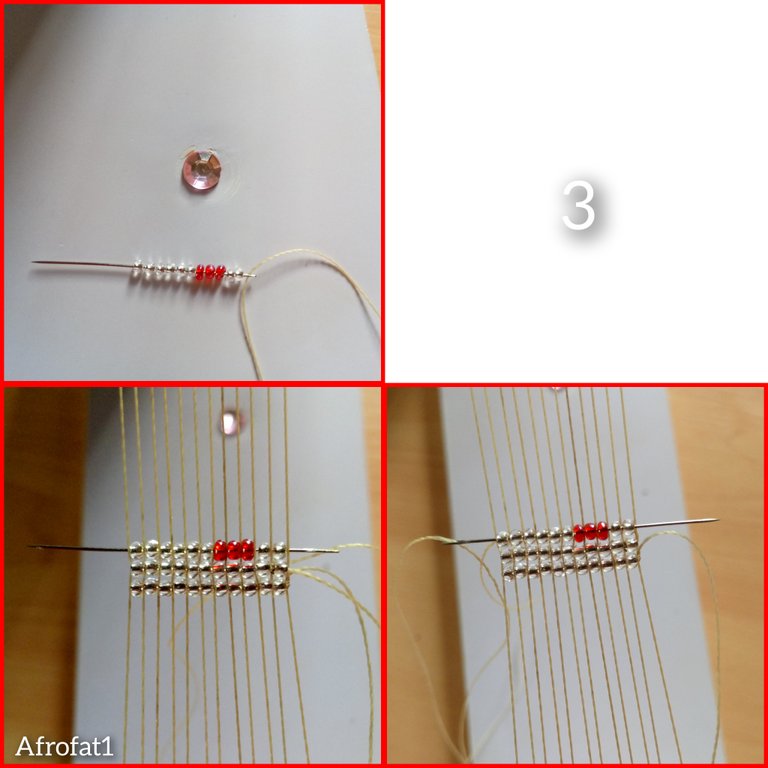
Paso 3Para este paso colocaremos seis mostacillas transparentes tres rojas y dos transparentes, para así posicionar la mostacillas por la parte de abajo y luego nos devolvemos por la parte superior y por cada una de las mostacillas introducimos el aguja con el hilo.
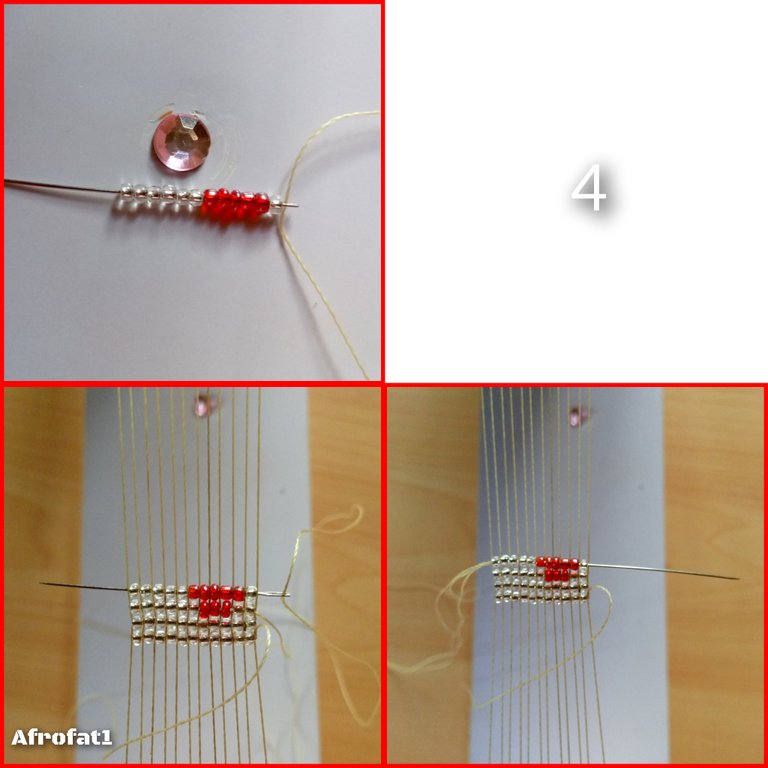
Paso 4Seguidamente vamos a tomar una mostacilla transparente cinco, mostacillas rojas y otras cinco mostacillas transparentes, posicionamos las mostacillas por la parte de abajo luego nos devolvemos y por la parte de arriba introducimos nuestra aguja.
Paso 5Para este paso tomaremos una mostacilla transparente, seis mostacillas rojas, cuatro transparentes, igualmente como los anteriores veces, posicionaremos las mostacillas y nos devolvemos por la parte de arriba e introducimos la aguja por cada una de las mostacillas, este mismo procedimiento lo vamos a repetir en cada paso, solo cambiaría el orden de las mostacillas.

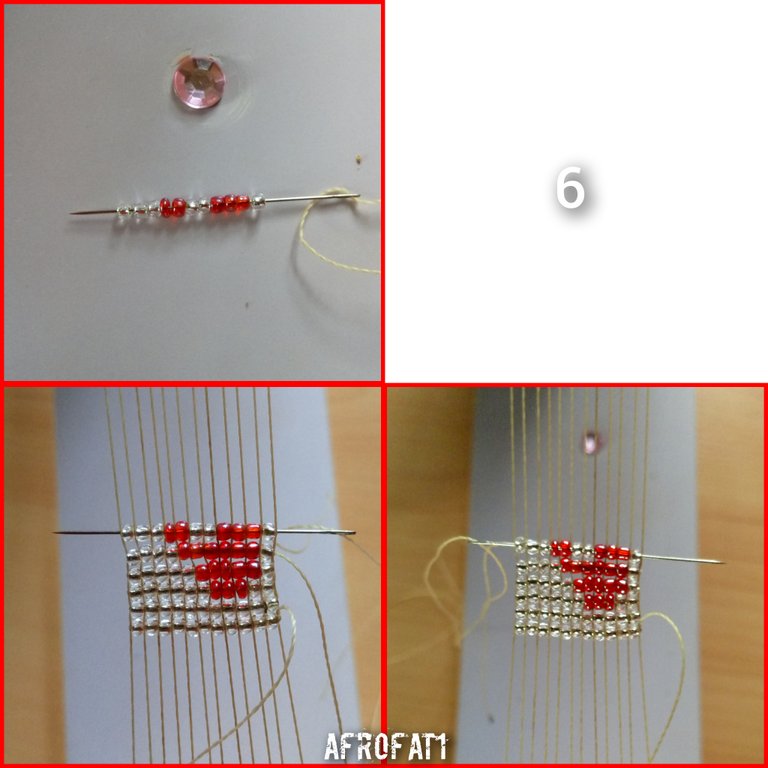
Paso 6Vamos a tomar una mostacilla transparente, tres mostacillas rojas, dos mostacillas transparentes dos rojas y tres transparentes, vamos a posicionar la mostacilla por cada hilo del telar y luego con la aguja nos devolvemos por cada una de las mostacillas que están en la parte de arriba.
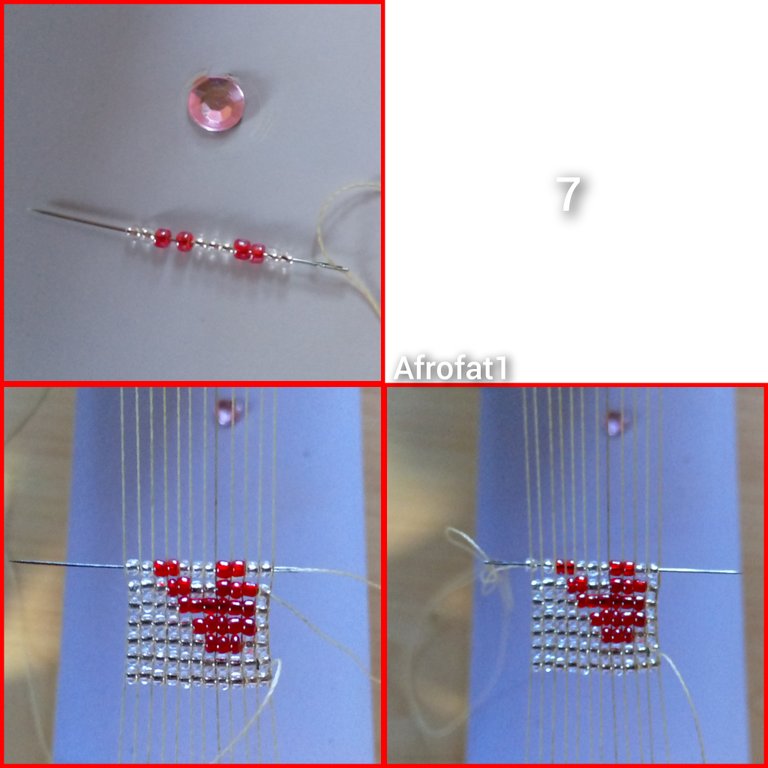
Paso 7Tomaremos dos mostacillas transparentes, dos mostacillas rojas, tres transparentes, dos rojas y dos transparentes, posicionamos la mostacilla en la parte de abajo y nos devolvemos con la aguja y pasaremos por cada una de la mostacilla y vamos tirando un poco del hilo, para que se vaya ajustando.
Paso 8Después vamos a tomar cuatro mostacillas transparentes, una mostacilla roja tres transparente, dos rojas y una transparente, de la misma forma que los anteriores pasos, vamos a posicionar las mostacillas para luego devolvernos por la parte de arriba de los hilos e introducir la aguja por cada una de la mostacillas.

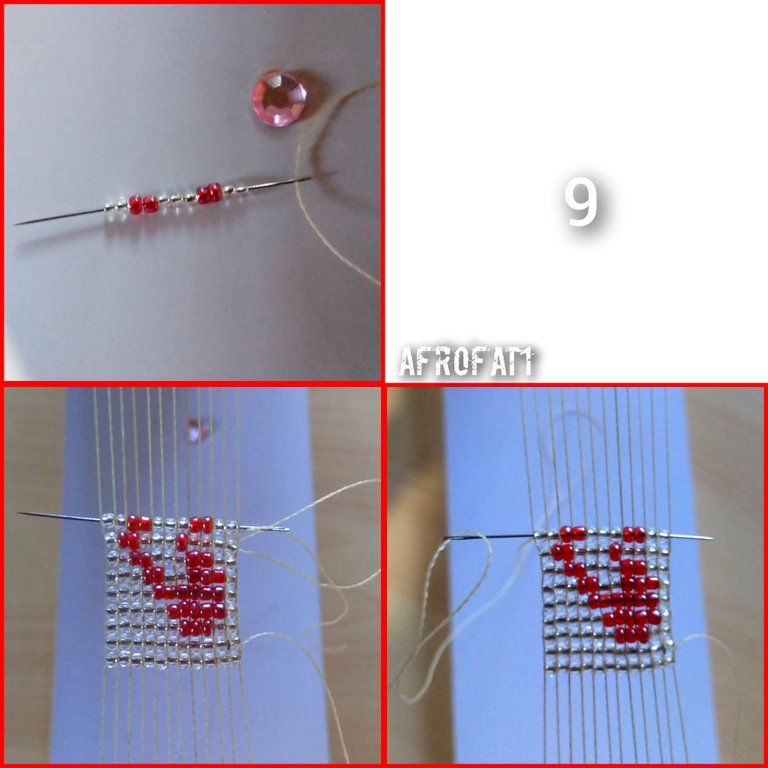
Paso 9Colocaremos dos mostacillas transparente, dos mostacillas rojas, tres transparente, dos rojas y dos transparentes, posicionamos la mostacilla por cada uno de los hilos y por la parte de arriba introducimos la aguja por cada una de las mostacillas.
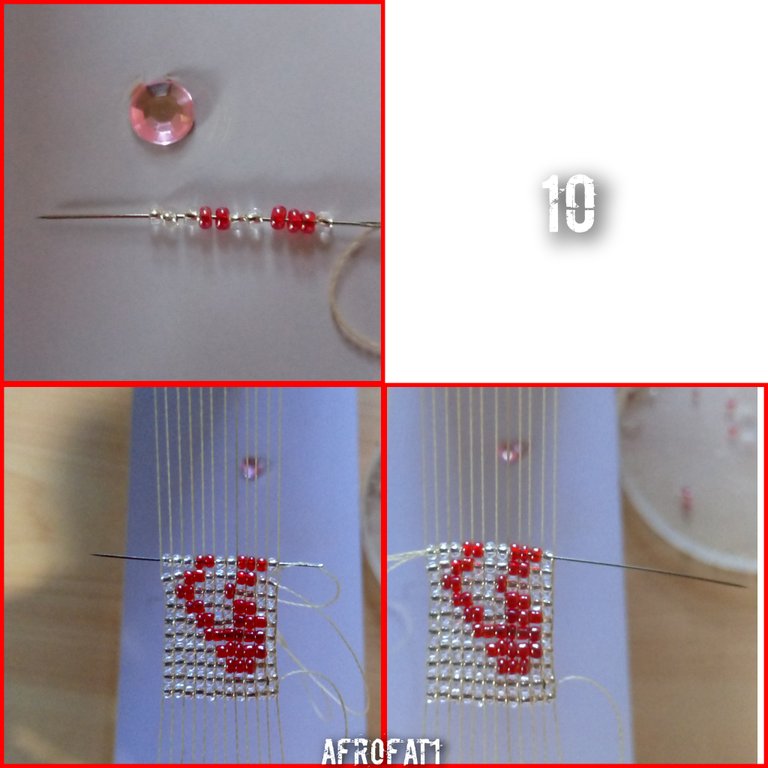
Paso 10Vamos a introducir una mostacilla transparente,tres rojas, dos transparentes, dos rojas y luego tres mostacillas transparentes, vamos a posicionar cada una de las mostacillas luego pasamos la aguja por encima de los hilos y por cada una de las mostacillas.
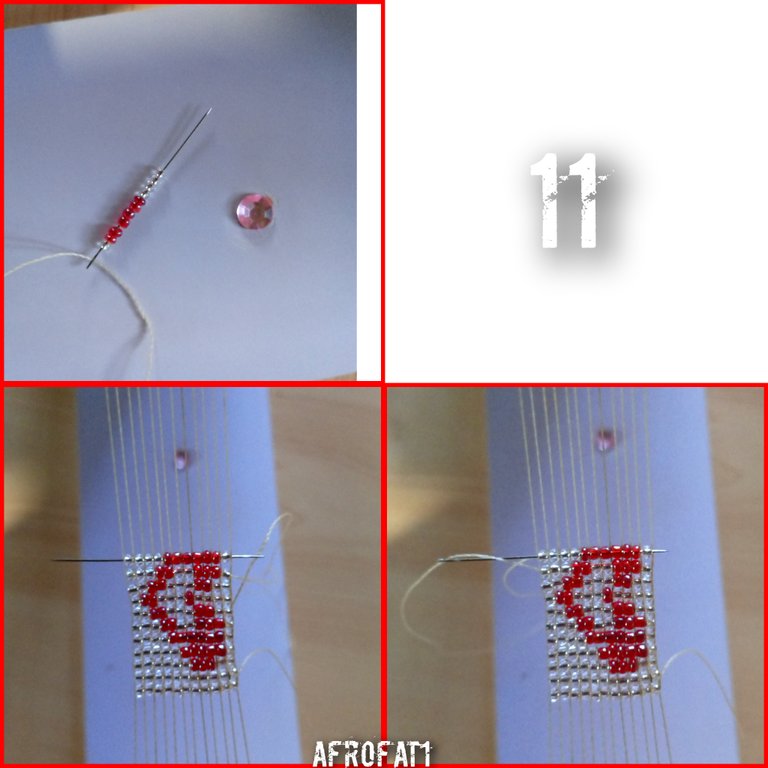
Paso 11Tomaremos una mostacilla transparente, seis mostacillas roja, luego cinco mostacilla transparentes, para luego posicionarlas en el telar para después pasar la aguja por encima de los hilos y devolver por cada mostacilla.
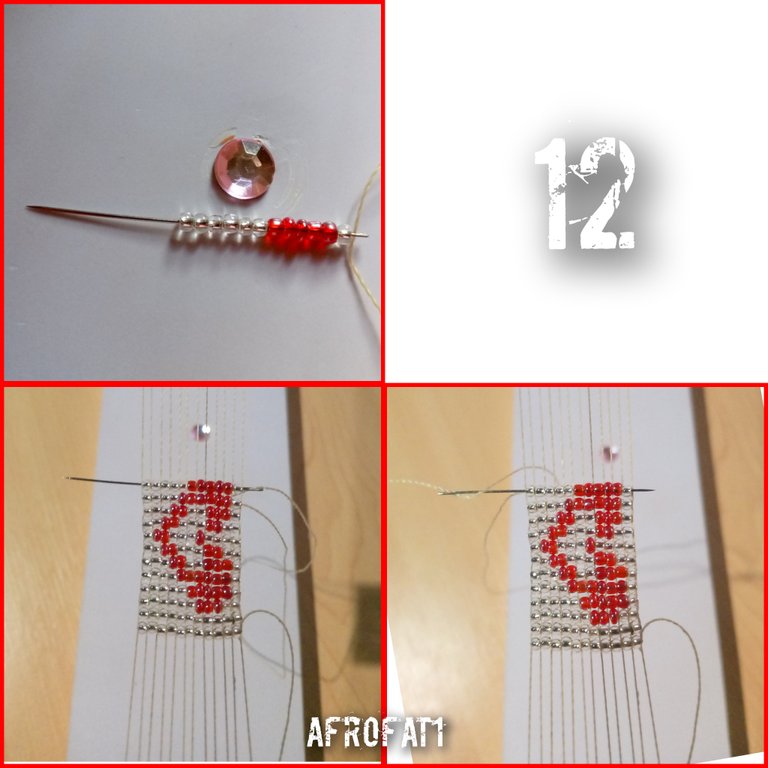
Paso 12Seguiremos con los pasos hasta ir al mando nuestro hermoso brazalete, introduciendo una mostacilla transparente, cinco mostacillas rojas y cinco transparente, posicionamos la mostacilla por cada hilo del telar y nos devolvemos pero por encima del hilo y por cada mostacilla.
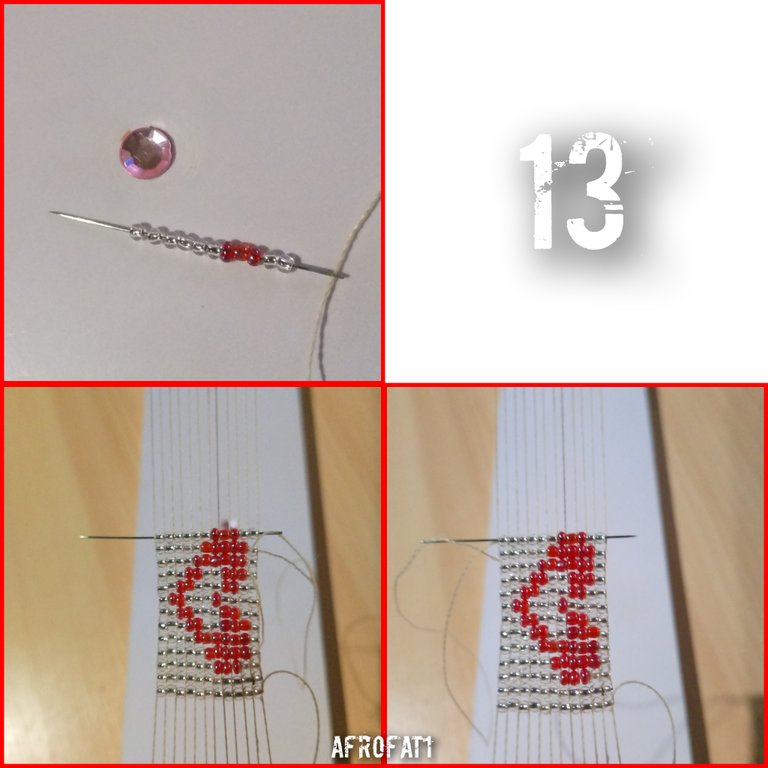
Paso 13Colocaremos dos mostacillas transparentes, tres rojas y seis mostacillas transparentes, hacemos el mismo procedimiento de los pasos anteriores, posicionamos la mostacilla nuevamente y devolvemos la aguja por encima de los hilos y por dentro de cada mostacilla.
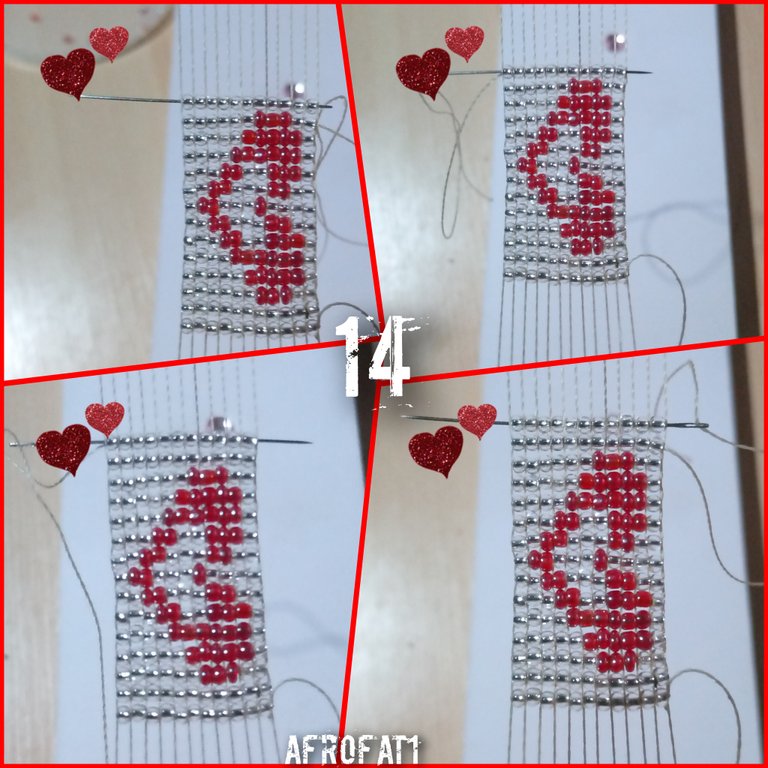
Paso 14De esta manera quedó listo nuestro primer corazón, para hcer la separaciones vamos a colocar 11 mostacillas transparentes, hacemos el mismo procedimiento de los pasos anteriores, luego introducimos 11 mostacillas y de igual manera posicionamos la mostacilla en cada hilo del telar y luego devolvemos por la parte de arriba, y de la siguiente manera irá quedando nuestro hermoso brazalete.
Paso 15Vamos a ir repitiendo cada paso hasta lograr obtener el largo o los centímetros que deseamos.

Paso 16Después de haber obtenido el largo deseado, vamos a ir haciéndole los terminales a nuestro hermoso brazalete, esto lo haremos disminuyendo la cantidad de mostacillas, primero vamos a introducir nueve mostacillas transparentes, igual manera vamos a posicionar las mostacillas, Pero esta vez vamos a centrarla dejamos un espacio en la mostacilla anterior de cada extremo, luego vamos a introducir siete mostacillas, después cinco, posteriormente tres y por último una mostacilla transparente.
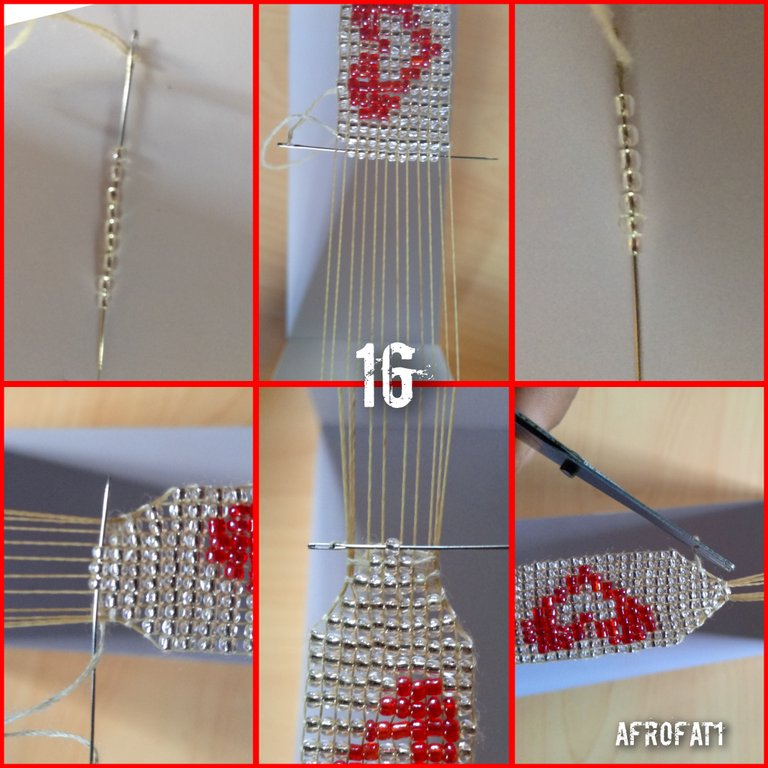
Cada vez que vayamos reduciendo la cantidad de mostacilla vamos a hacer el mismo proceso de los pasos anteriores y ir centrando las mostacillas, este mismo paso hacemos del otro lado del brazalete con el, hilo que habíamos dejado anteriormente, lo vamos a utilizar para hacer el terminal del otro lado y vamos a repetir el mismo paso que la anterior, por último cortaremos los hilos excedentes y sellaremos con nuestro encendedor.
Paso 17Después vamos a retirar los hilos del telar y los cortaremos parejos, luego con la ayuda de una tabla con pinza vamos a colocar un extremo para hacer una trenza con los hilos, haremos un nudo para asegurarlos, vamos a dividir en tres partes para que sean Iguales y comenzamos a realizar nuestra trenza de hilos, al tener la trenza lista haremos un nudo y cortaremos los hilos hasta tener los extremos iguales, vamos repetir el proceso en la otra parte den brazalete hasta yener las partes iguales.

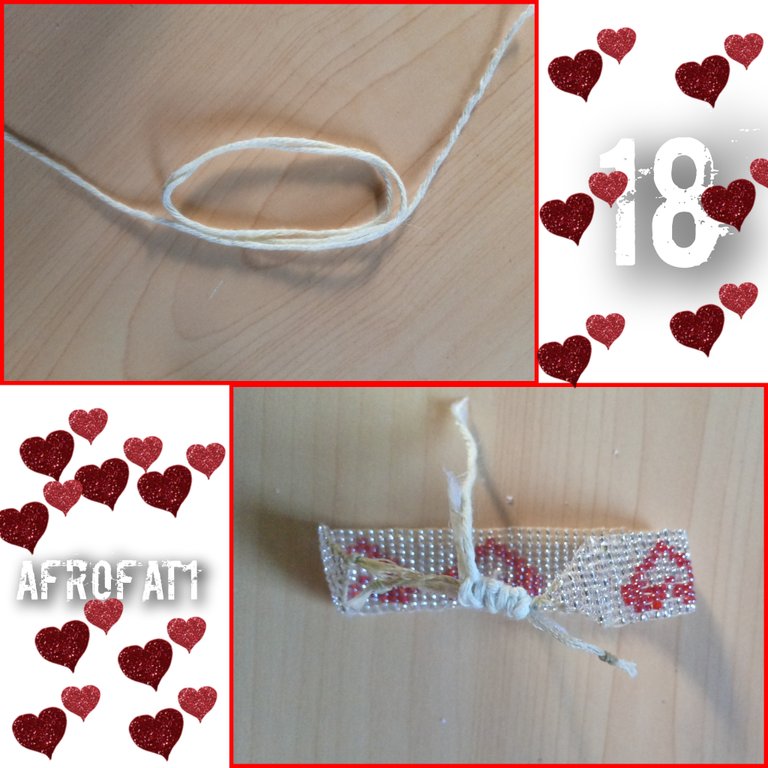
Paso 18Para este ultimo paso vamos a tomar los 15 centimetros de hilo macrame, vamos a hacer varios nudos planos, esto para que el brazalete quede corredizo y se haga fácil a la hora de ponerselo en la muñeca.
RESULTADO FINALDe esta manera quedaría listo nuestro Hermoso Brazalete de Corazónes, ideal para obsequiarlo en cualquier ocasión, ya sea aniversario de bodas, noviazgo o sencillamente por un gesto de cariño.
Espero haya sido de su agrado este bonito tutorial que he realizado con mucho cariño para todos ustedes, gracias por la atención prestada y por leer este post, espero les sirva de ayuda, Bendiciones
Las imágenes son de mi propiedad y fueron tomadas por mi teléfono tecno spark Go 2023.
Traductor Utilizado:Deepl traductor
Las imágenes son editadas mediante la aplicación editor de fotos canva
Happy and Blessed day to all my fellow Hive members and fellow members of this beautiful jewelry community, receive a warm greeting and a fraternal embrace, I hope this day has been of blessings for everyone.
Today I want to talk about a nice miyuki style bracelet with a hearts design, ideal for this February 14 that is near, also to give it to your family and friends any day of the year. In my case I made it thinking of a very special person for me, my life partner and the mother of my beautiful daughter, my wife @yanetzi1, that partner who has been with me through thick and thin, despite the obstacles that life puts has always been by my side, here a small gesture of thanks. ❤️
I want to show you the step by step used for the realization of this beautiful bracelet, despite the inconveniences that I was able to complete this beautiful bracelet.
Materials used
- Red beads
- Transparent beads
- Beige Polyester Thread
- Wooden loom
- 15 cm of macrame thread
- Needle for beads #12
- Lighter or tinder
- Scissors
- Board with hook
Step 1To begin the first thing we will do is to take the polyester thread and place it on the loom, we will use 6 pins, that is 3cm on the loom, and we will have 12 threads in total,
Next we are going to place polyester thread on our beading needle.
We are going to thread the needle with the thread, then we will make a small knot in one of the threads of the loom and we will leave about 20cm left over, we will take 11 transparent beads and from the bottom we are going to position each one in the threads of the loom, taking into account that they have to be inside, then we are going to return with the needle and from the top we will introduce it through each bead.
Step 2Again we place 11 transparent beads, we are going to position them underneath the threads, so that we return with the needle through the top and introduce it through each bead.
Step 3For this step we will place six transparent beads, three red and two transparent, to position the beads at the bottom and then we return to the top and through each of the beads we introduce the needle with the thread.
Step 4Next we are going to take a transparent beads five, red beads and another five transparent beads, we position the beads at the bottom then we return and at the top we introduce our needle.
Step 5For this step we will take a transparent beads, six red beads, four transparent beads, likewise as the previous times, we will position the beads and we return to the top and introduce the needle through each of the beads, this same procedure we will repeat in each step, just change the order of the beads.
Step 6We are going to take one transparent bead, three red beads, two transparent beads, two red beads and three transparent beads, we are going to position the bead on each thread of the loom and then with the needle we go back through each of the beads that are on the top.
Step 7We will take two transparent beads, two red beads, three transparent beads, two red and two transparent beads, we position the bead at the bottom and we go back with the needle and we will go through each of the bead and we will pull a little bit of the thread, so that it will be tightened.
Step 8Then we are going to take four transparent beads, one red bead, three transparent beads, two red beads and one transparent bead, in the same way as the previous steps, we are going to position the beads and then return to the top of the threads and introduce the needle through each of the beads.
Step 9We will place two transparent beads, two red beads, three transparent beads, two red beads and two transparent beads, we position the bead through each of the threads and from the top we introduce the needle through each of the beads.
Step 10We are going to insert one transparent bead, three red beads, two transparent beads, two red beads and then three transparent beads, we are going to position each of the beads then we pass the needle over the threads and through each of the beads.
Step 11We will take one clear bead, six red beads, then five clear beads, then position them on the loom and then pass the needle over the threads and back through each bead.
Step 12We will continue with the steps until we go to the command our beautiful bracelet, introducing a transparent bead, five red beads and five transparent beads, we position the bead for each thread of the loom and we return but over the thread and for each bead.
Step 13We will place two clear beads, three red beads and six clear beads, we do the same procedure as the previous steps, position the bead again and return the needle over the threads and inside each bead.
Step 14In this way our first heart was ready, to make the separations we will place 11 transparent beads, we do the same procedure of the previous steps, then we introduce 11 beads and in the same way we position the bead on each thread of the loom and then we return by the top, and in the following way will be our beautiful bracelet.
Step 15We will repeat each step until we get the length or centimeters we want.
Step 16After obtaining the desired length, we will go making the terminals to our beautiful bracelet, we will do this by decreasing the amount of beads, first we will introduce nine transparent beads, the same way we will position the beads, but this time we will center it leaving a space in the previous bead at each end, then we will introduce seven beads, then five, then three and finally a transparent bead.
Each time we go reducing the amount of beads we will do the same process of the previous steps and go centering the beads, this same step we do on the other side of the bracelet with the, thread that we had left previously, we will use it to make the terminal of the other side and we will repeat the same step as the previous one, finally we will cut the excess threads and seal with our lighter.
Step 17Then we will remove the threads from the loom and cut them even, then with the help of a board with clamp we will place one end to make a braid with the threads, we will make a knot to secure them, we will divide into three parts so that they are equal and begin to make our braid of threads, when we have the braid ready we will make a knot and cut the threads until we have equal ends, we will repeat the process in the other part of the bracelet until we have equal parts.
Step 18For this last step we are going to take the 15 centimeters of macrame thread, we are going to make several flat knots, this so that the bracelet is sliding and it is easy to put it on the wrist.
FINAL RESULTThis way our Beautiful Bracelet of Hearts would be ready, ideal for any occasion, whether wedding anniversary, engagement or simply for a gesture of affection.
I hope you liked this beautiful tutorial that I have made with love for all of you, thank you for your attention and for reading this post, I hope it helps you, Blessings.
The images are my property and were taken by my phone tecno spark Go 2023.
Translator Used:Deepl translator
Images are edited using canva photo editor application.
Gracias mi amor por tan bonito regalo este brazalete me encantó demasiado por la elegancia y las mostacillas que son brillantes felidades para ti. Eres un maestro en las bisuterías gracias por tan bonito detalle mi amor💝💪✨🎁@afrofat1
Siempre a la orden para ti mi amor, bendiciones 💖
Yay! 🤗
Your content has been boosted with Ecency Points, by @yanetzi1.
Use Ecency daily to boost your growth on platform!
!DIY
!discovery 27
This post was shared and voted inside the discord by the curators team of discovery-it
Join our Community and follow our Curation Trail
Discovery-it is also a Witness, vote for us here
Delegate to us for passive income. Check our 80% fee-back Program
The heart shaped design on the bracelet is a fine touch.
Thank you very much, blessings
You can query your personal balance by
!DIYSTATSHermoso brazalete de corazones.. quedo hermoso..
Muchas gracias amiga, bendiciones
Congratulations @afrofat1! You have completed the following achievement on the Hive blockchain And have been rewarded with New badge(s)
Your next target is to reach 5000 upvotes.
You can view your badges on your board and compare yourself to others in the Ranking
If you no longer want to receive notifications, reply to this comment with the word
STOPUn Hermoso detalle para tu esposa, quedo genial esta pulsera en miyuki y un gran paso a paso donde se recrea muy bien la técnica, es bueno poder apreciar todos los detalles.
Agradecido por apreciar mi trabajo, bendiciones
https://reddit.com/r/blogs/comments/19a6lnf/hermoso_brazalete_de_corazones_al_estilo/
The rewards earned on this comment will go directly to the people( @yolimarag ) sharing the post on Reddit as long as they are registered with @poshtoken. Sign up at https://hiveposh.com.
Definitivamente.. has mejorado mucho tu técnica y me encanta .. saludos amigos 🤗🎉🎉
Muchas gracias, de los errores se aprende, bendiciones
Te quedó preciosa me encanta!!
Muchas gracias, bendiciones
Es maravilloso que puedas trabajar con tanta precisión está técnica. Por supuesto que has tenido gran motivación y fue agradar a tu bella esposa, siempre que tenemos motivación, todo nos queda espléndido.
Saludos a ambos.
Muchas gracias amiga, cuando se tiene la motivación, se puede trabajar con mucha facilidad, bendiciones
¡Enhorabuena!
✅ Has hecho un buen trabajo, por lo cual tu publicación ha sido valorada y ha recibido el apoyo de parte de CHESS BROTHERS ♔ 💪
♟ Te invitamos a usar nuestra etiqueta #chessbrothers y a que aprendas más sobre nosotros.
♟♟ También puedes contactarnos en nuestro servidor de Discord y promocionar allí tus publicaciones.
♟♟♟ Considera unirte a nuestro trail de curación para que trabajemos en equipo y recibas recompensas automáticamente.
♞♟ Echa un vistazo a nuestra cuenta @chessbrotherspro para que te informes sobre el proceso de curación llevado a diario por nuestro equipo.
🏅 Si quieres obtener ganancias con tu delegacion de HP y apoyar a nuestro proyecto, te invitamos a unirte al plan Master Investor. Aquí puedes aprender cómo hacerlo.
Cordialmente
El equipo de CHESS BROTHERS