[ENG- ESP] Elegant hanging tendrils in Alambrismo / Elegantes zarcillos colgantes en Alambrismo /@alexanderflx
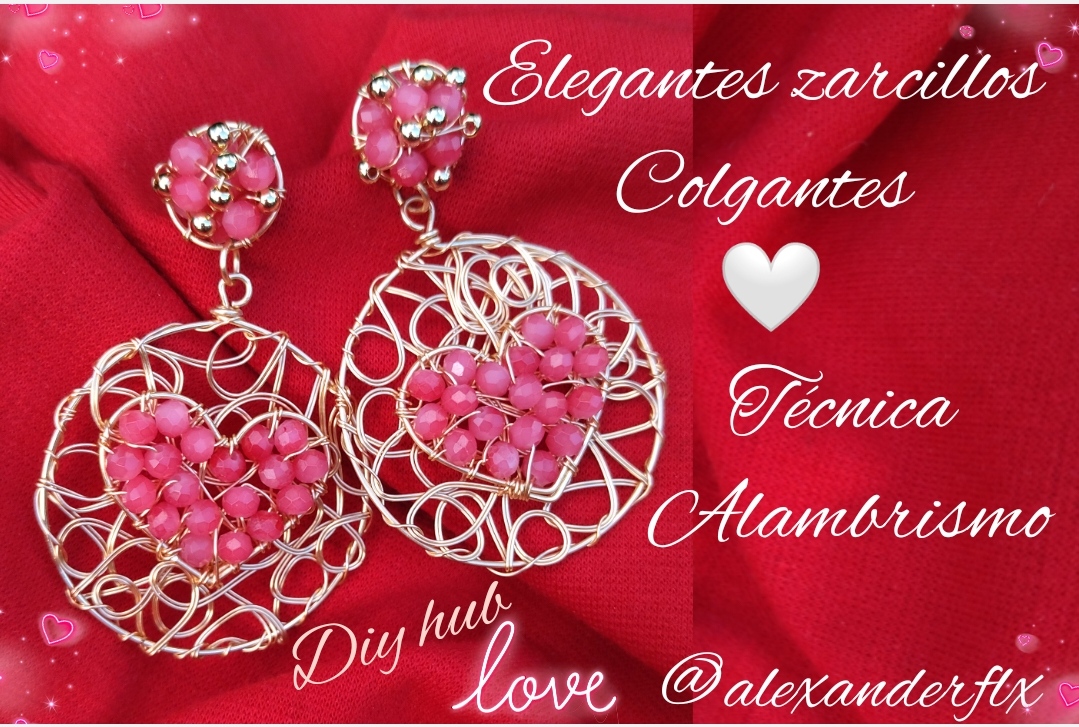
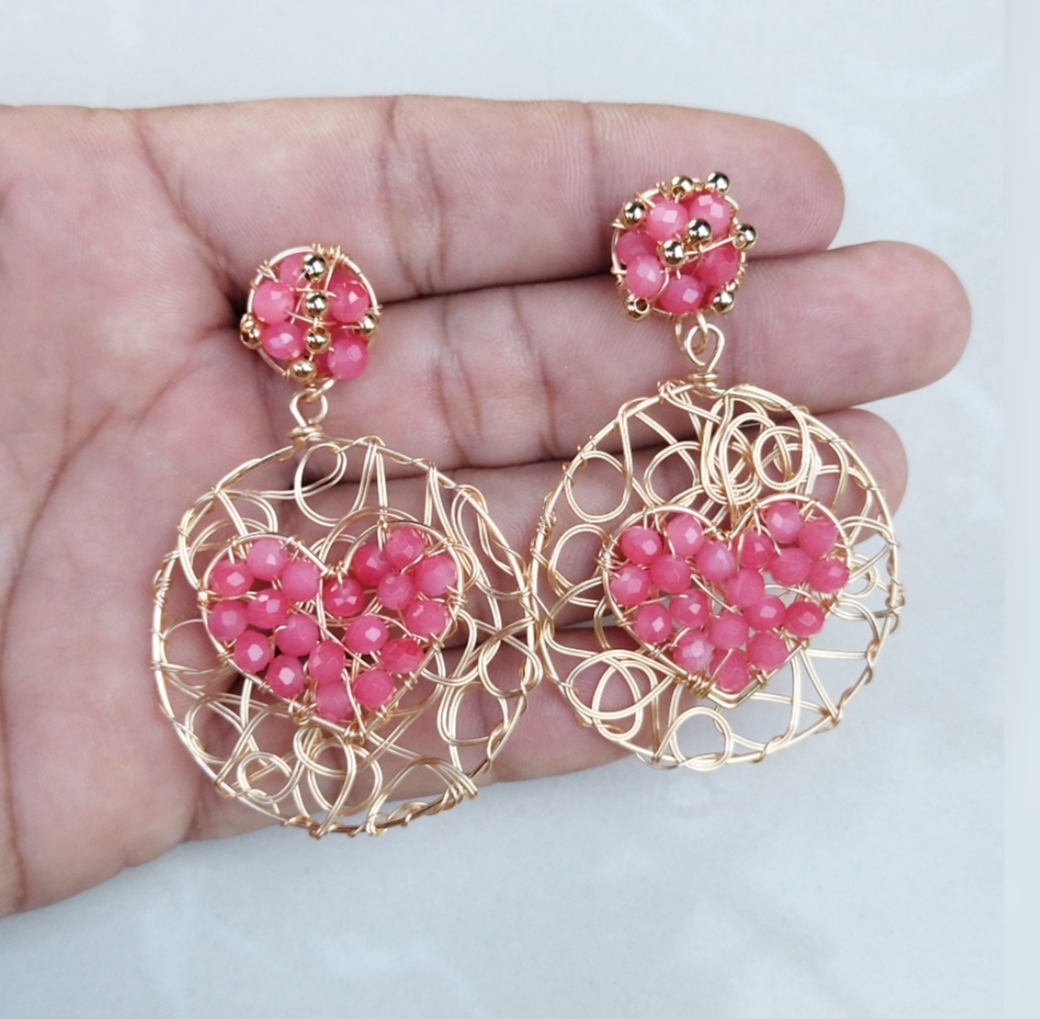
Hello, happy night everyone, I hope you are well, on this beautiful night I want to share with you the preparation of some beautiful dangling earrings, as I told you, my passion is the technique of wire rope and these earrings have this technique very well represented, as you can see they are a a little big but surely many girls like large earrings, braided wire and it has a beautiful pink color, very beautiful, I hope the girls like it, they are made with love, if anyone is interested, I have a business and it would be an honor for me that a girl from this beautiful platform wears earrings made by me.🌹 😊🤗😁🍓😉♥️❤️
Hola feliz noche para todas espero se encuentren bien, en esta hermosa noche quiero compartir con usted la elaboración de unos hermosos pendientes colgantes como les dije mi pasión es la técnica de alambrismo y estos pendientes lleva esta técnica muy bien representada como pueden ver son un poquito grandes pero de seguro muchas chicas le gustan los pendientes grandes el trenzado en alambré y tiene un hermoso color rosa muy hermoso espero a las chicas les guste están echo con mucho cariño, si alguien está interesad@ tengo un emprendimiento y sería un honor para mí que una chica de esta hermosa plataforma luzca unos pendientes echos por mi.🌹🤍😊🤗😁🍓😉♥️❤️
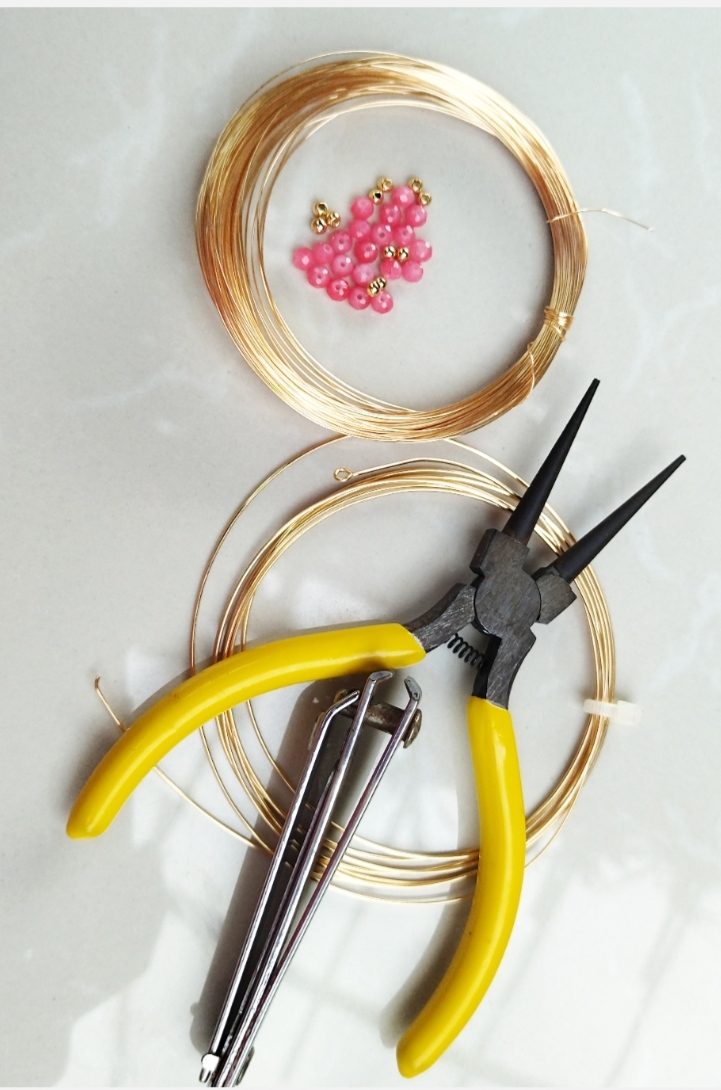
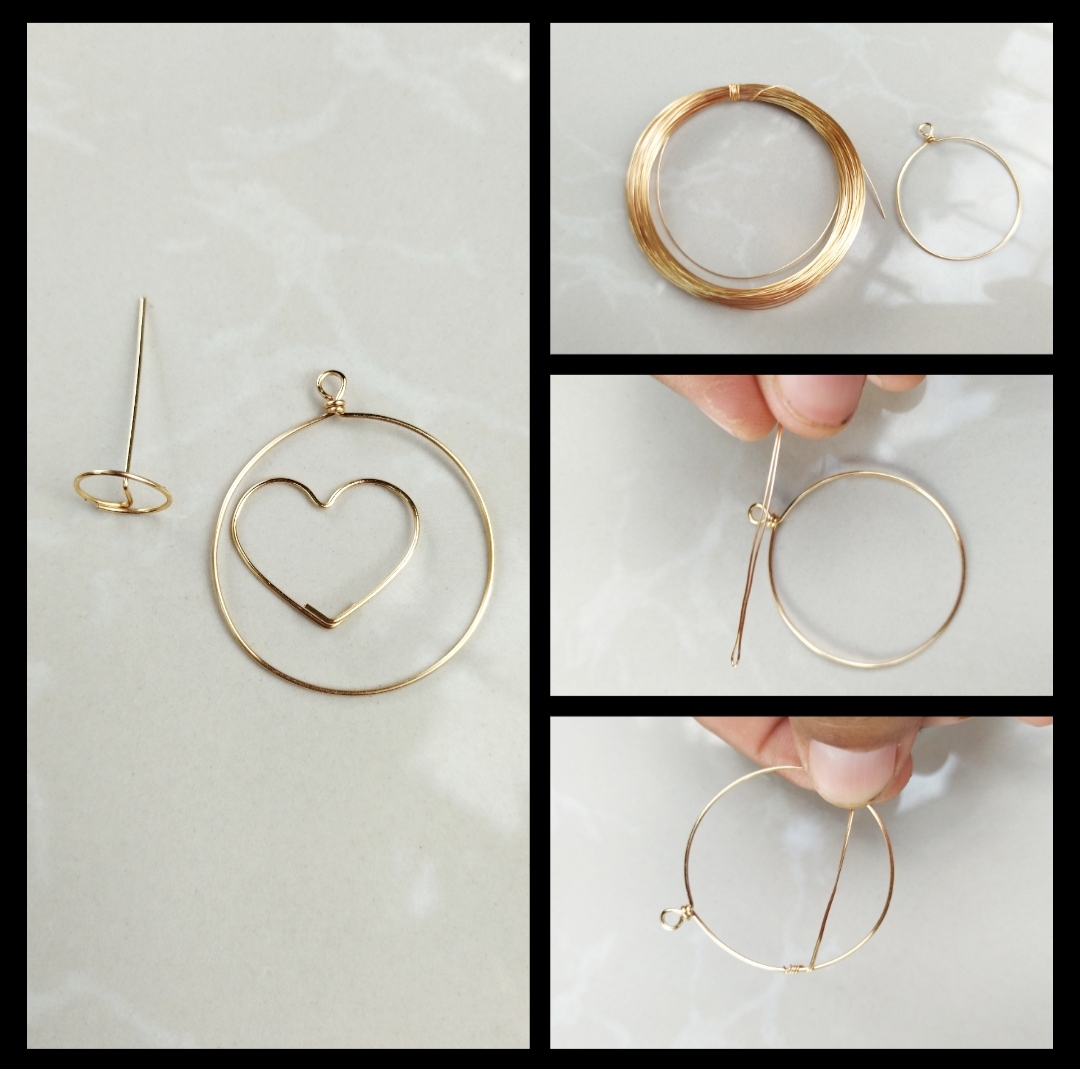
- 20 gauge jewelry wire.
- 26 gauge jewelry wire.
- jewelry tweezers.
- Jewelery stones
Que necesitamos .
Alambre de bisuteria calibre 20
Alambre de bisuteria calibre 26.
pinzas de bisutería.
Piedras de bisutería
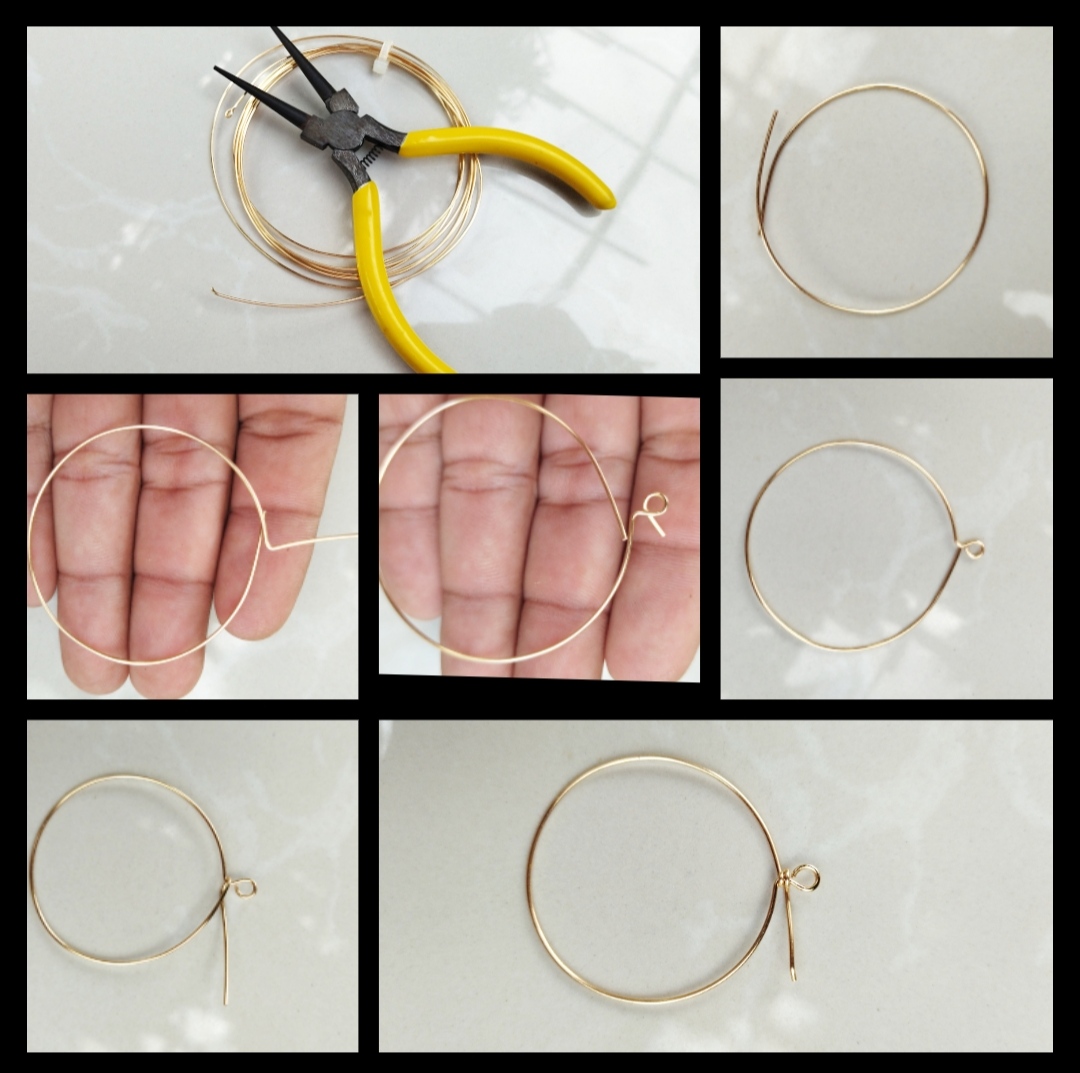
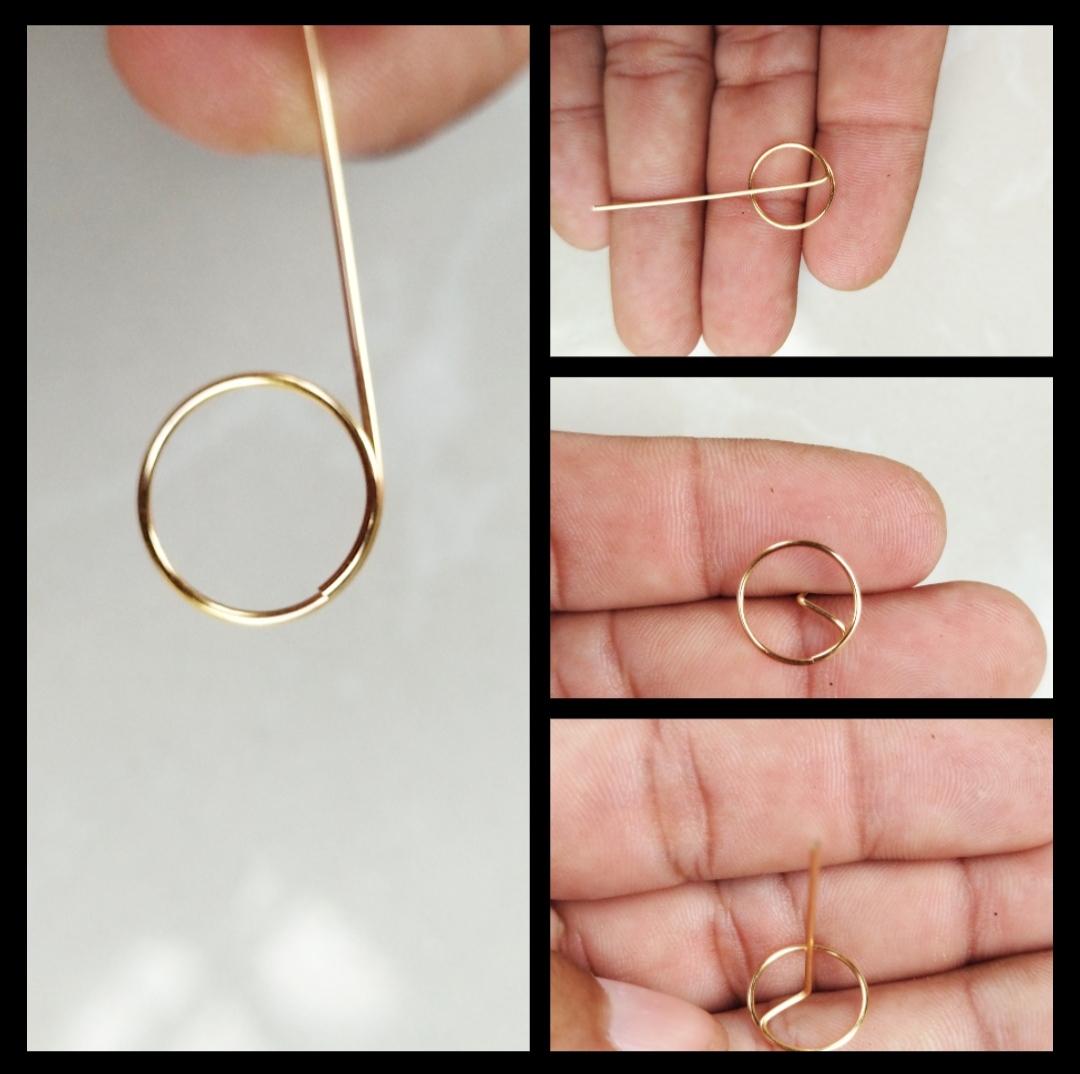
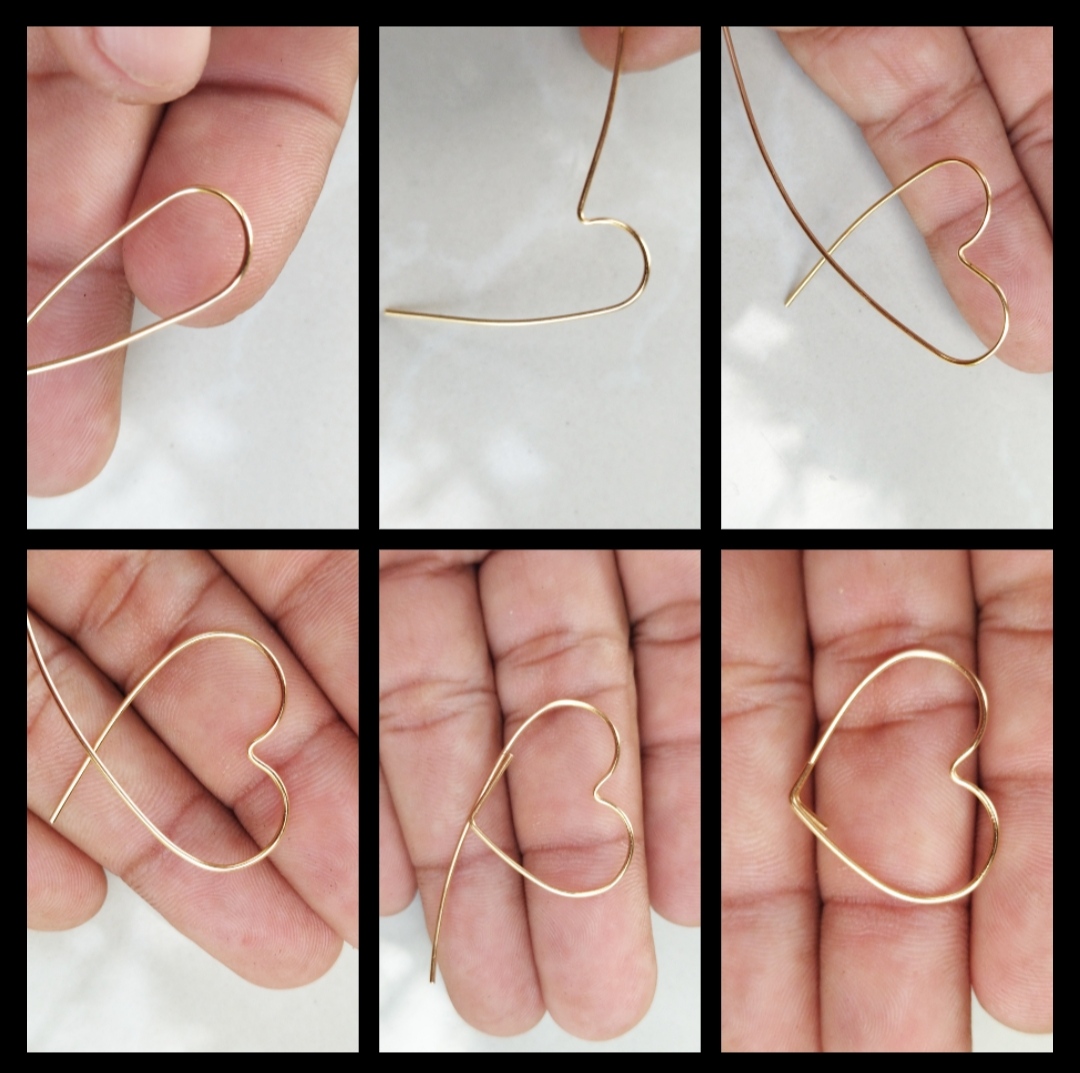
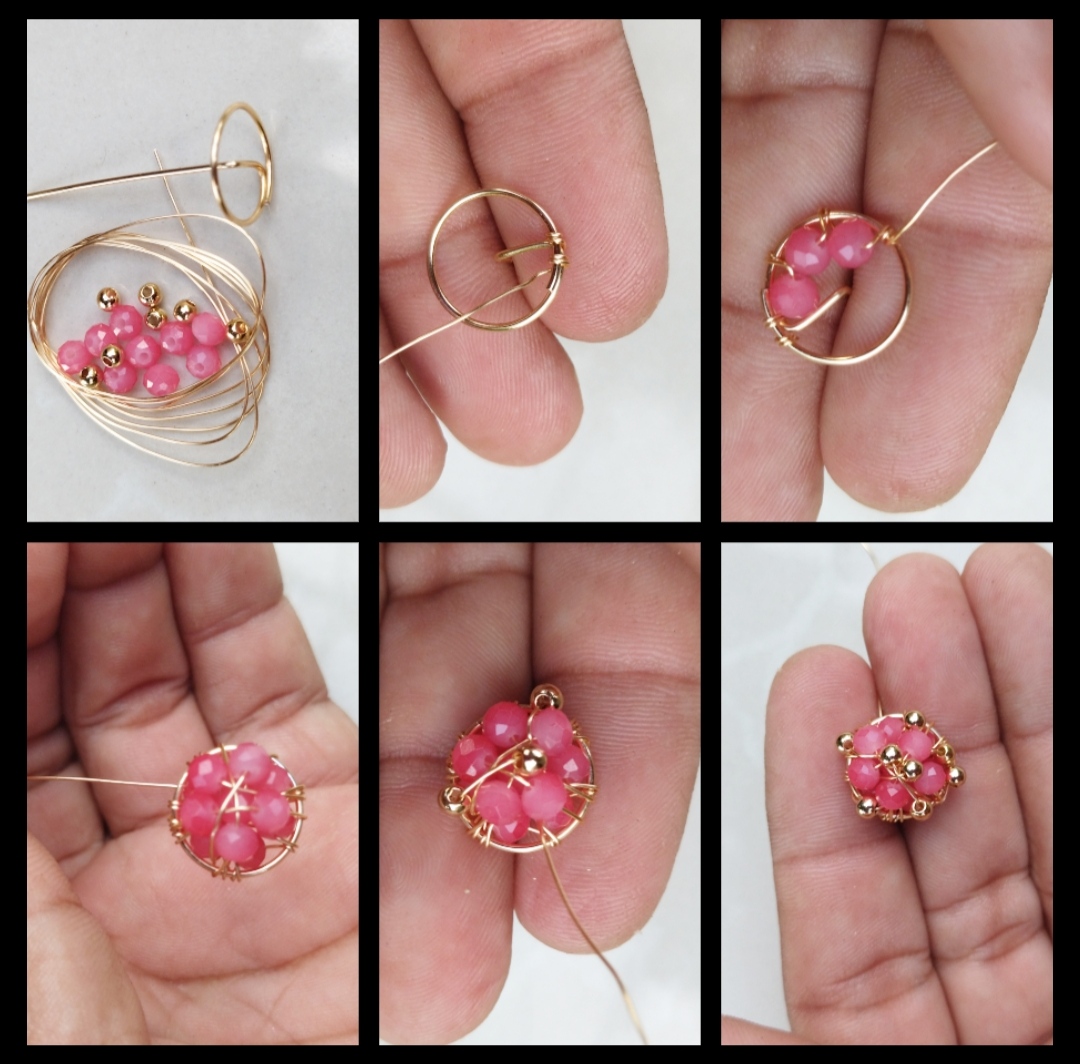
Step 1: For our first step we will use 20 gauge wire and we will make three main pieces to begin with, we will make a large round piece, you can help by using a round object after having the round wire we will take one of the two ends and we will bend it upwards and we will make a very small round then we will secure it with the other end giving it a few turns around the small round we cut the excess and ready now we will make another piece with the same wire 20 we will make a small round and we will leave a long piece of wire which we will bend downwards later we will fold backwards trying that the double is in the middle of the round, now we will make a heart for this we will make it half a circle then we fold up and we will make another half r where as you can see in the photo the wires cross right at the intersection We will make a double at each end of the wire, cut off the excess and that's it, we already have our three main pieces. .
Paso 1: Para nuestro primer paso utilizaremos alambre calibre 20 y aremos tres piezas principales para empezar aremos un redondo grande se pueden ayudar utilizando algún objeto redondo luego de tener el alambre redondo tomaremos una de las dos puntas y la doblaremos hacia arriba y aremos un redondo muy pequeño luego lo aseguraremos con la otra punta dándole unas vueltas al rededor del redondo pequeño cortamos el exceso y listo ahora aremos otra pieza con el mismo alambre 20 aremos un redondo pequeño y dejaremos un trozo de alambre largo el cual doblaremos hacia abajo después doblamos hacia atrás tratando que el dobles quede en medio del redondo, ahora aremos un corazón para este lo aremos haciendo la mitad de un círculo luego doblamos hacia arriba y aremos otro medio r dondo como pueden ver en la foto los alambre se cruzan justo en el cruce aremos un dobles a cada punta de alambre cortamos el exceso y listo ya tenemos nuestras tres piezas principales.
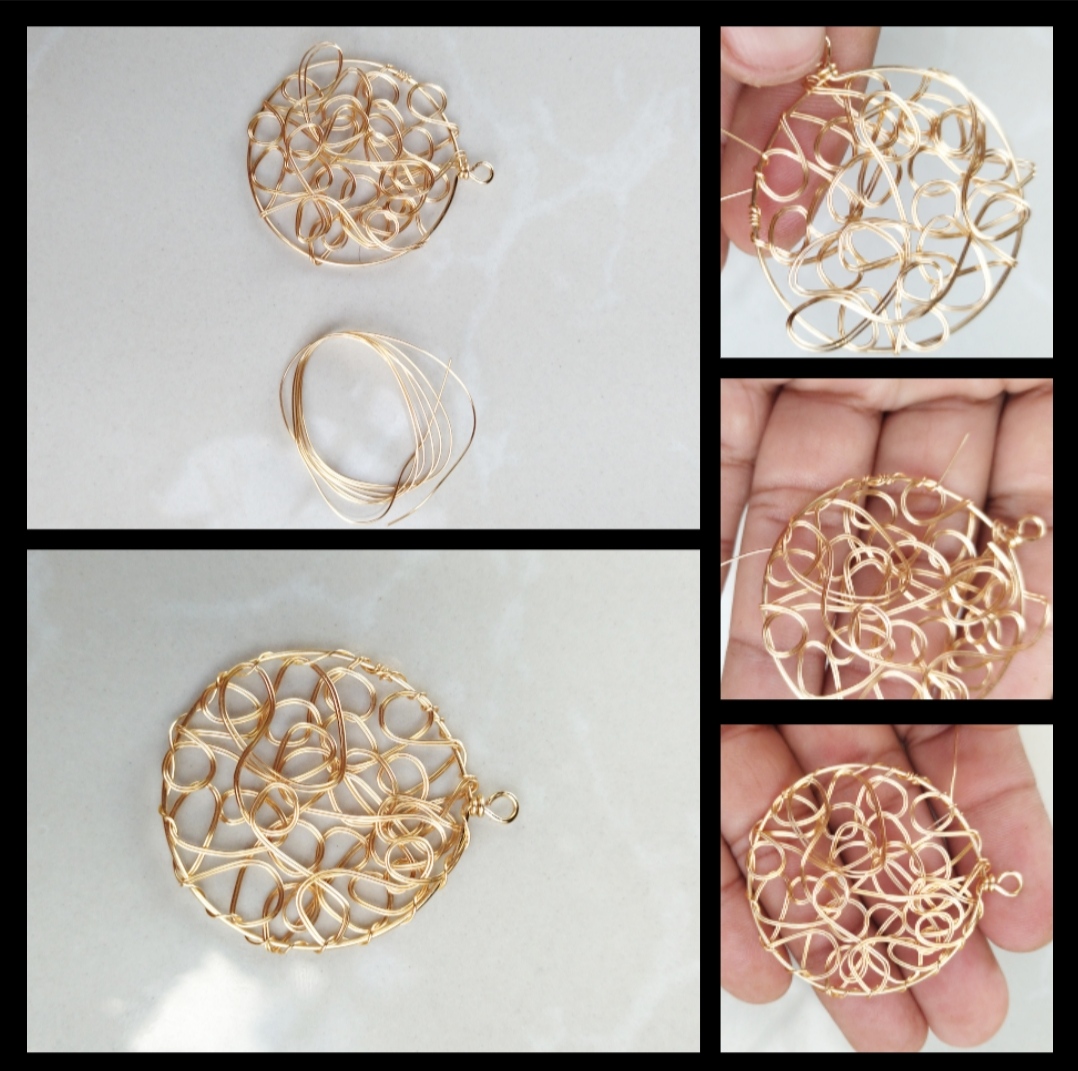
Step 2: Now we will work first on our first piece, which was the large round to begin with, we will cut a somewhat long piece of 26 gauge wire and we will double it, taking our round and we twist the end of the wire into the round and with our hands we will make a round to our liking, how to do it, they must flatten the wire and make the round at the same time so that it looks like this after filling the round we will take a piece of wire 26 we will secure by weaving the edge of the round so we will secure the whole piece let's do it very carefully so as not to damage the piece then we cut off the excess and that's it. .
Paso 2:Ahora trabajaremos primero en nuestra primera pieza que fue el redondo grande para empezar cortaremos un trozo de alambre calibre 26 un poco largo y lo pondremos doble tomando nuestro redondo y entorchamos la punta del alambre en el redondo y con nuestras manos aremos redondo a nuestros gusto como hacerlo deben aplastar el alambre y hacer el redondo a la misma vez para que les quede así luego de rellenar el redondo tomaremos un trozo de alambre 26 aseguraremos tejiendo el borde del redondo así aseguraremos toda la pieza hagámoslo con mucho cuidado para no dañar la pieza luego cortamos el exceso y listo

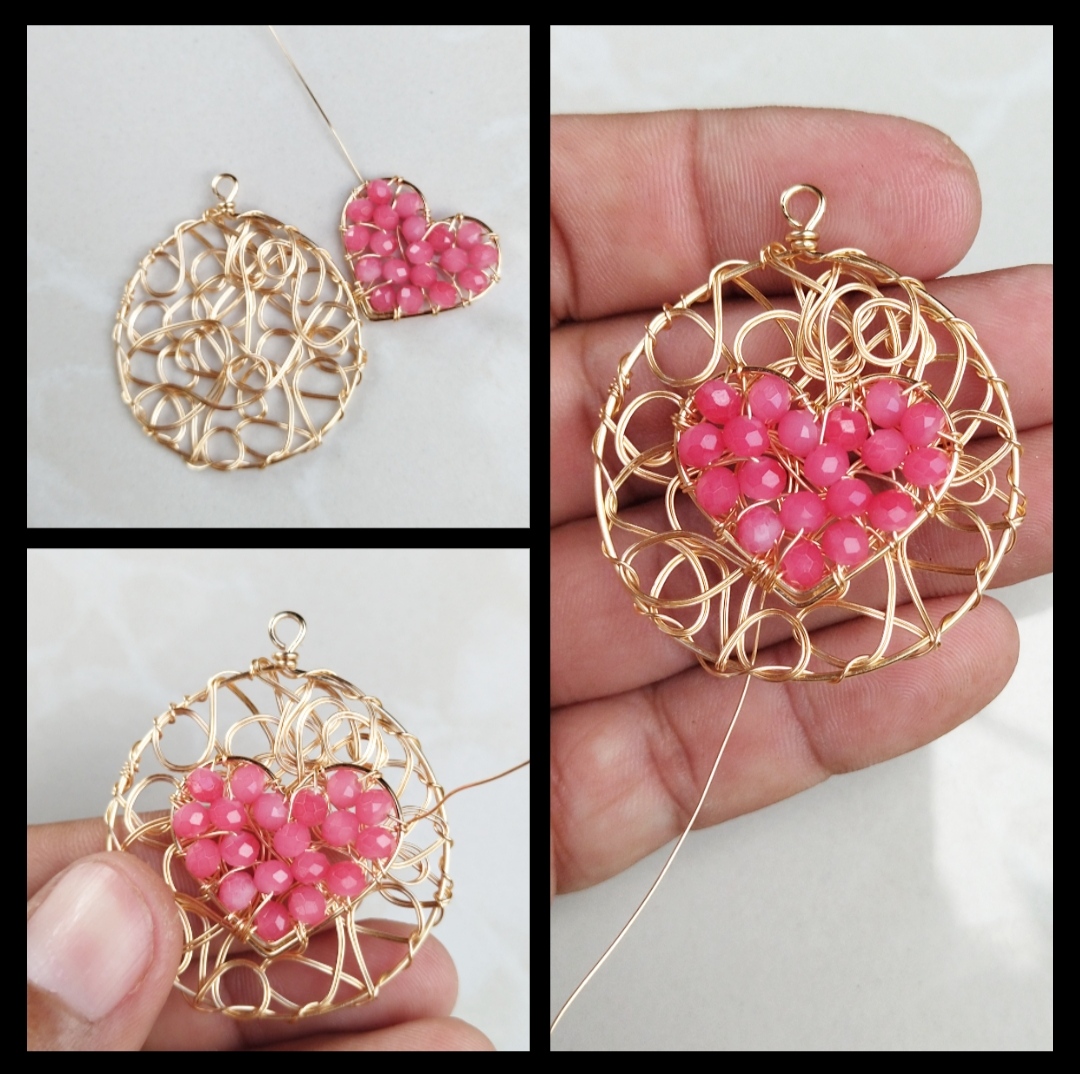
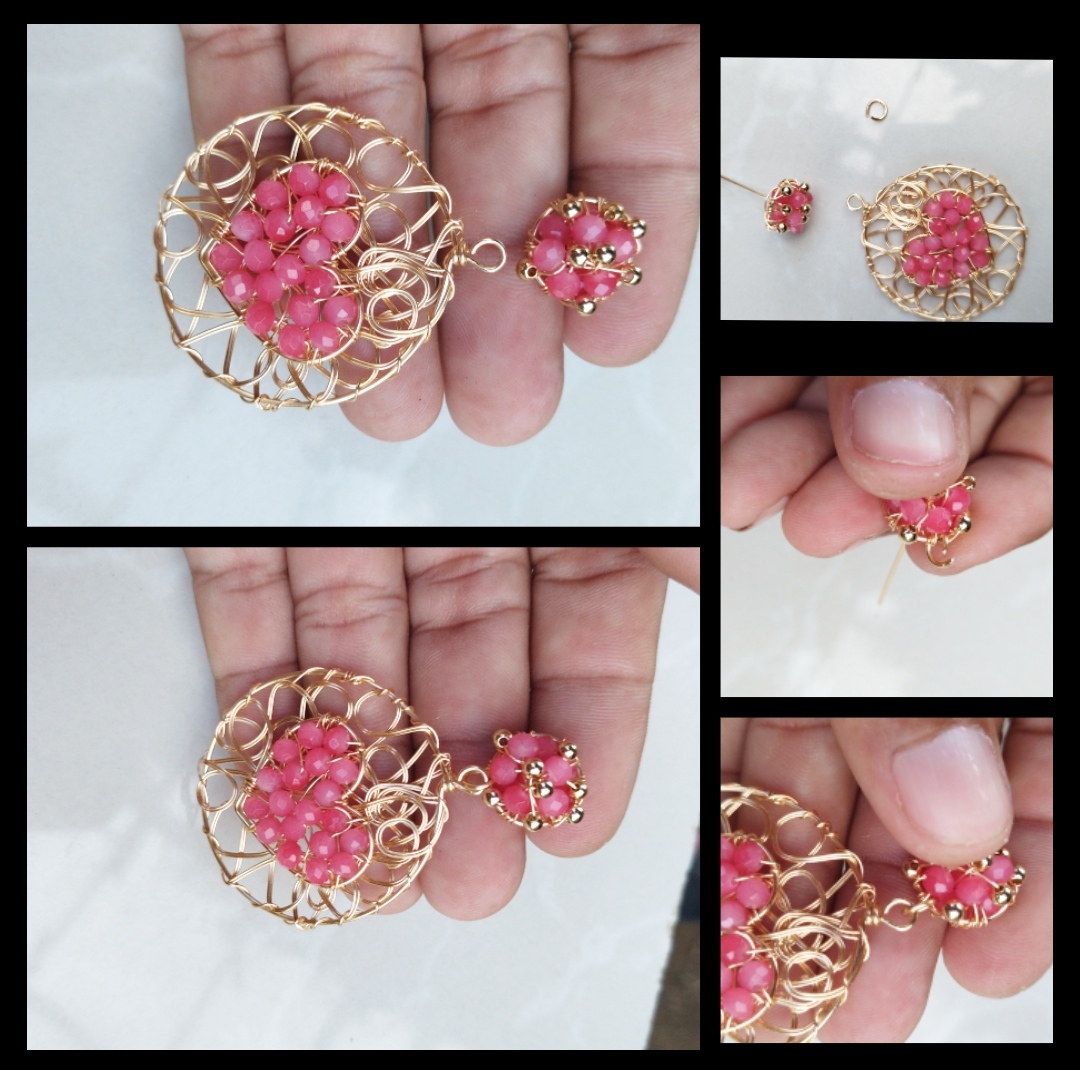
Step 3: Now we will work on our heart to begin with, we will cut a piece of wire 26 and we will take some pink crystals, we will twist the tip of the wire to the heart, we will secure it very well, then we will insert a stone and turn it twice to secure that stone, insert another stone and plow the same to ensure and so until we have the heart full of crystals, we will not cut the excess wire because now we will join the heart with the large round. careful.
Paso 3: Ahora trabajaremos en nuestro corazón para empezar cortaremos un trozo de alambre 26 y tomaremos unos cristales rosa entorchamos la punta del alambre al corazón aseguramos muy bien luego metemos una piedra y le damos dos vueltas para asegurar esa piedra metemos otra piedra y aremos lo mismo para asegurar y así asta tener el corazón lleno de cristales, no cortaremos el exceso de alambre porque ahora uniremos el corazón con el redondo grande este corazon lo pondremos en medio del redondo y con el alambre que tenemos del corazón lo fijaremos tegiendolo con mucho cuidado.

Step 4: Well, we are already in the last step, in this step we will work on our last piece, which is the small round, we will use wire 26 and pink stones and golden pellets to begin with, we will secure the tip of the wire, insert a pink stone and secure as we did with the heart and so we continue making until the round is filled, we will put other extra stones to make it look a little chubby and finally the pellets we cut the excess wire and ready now we must join the two pieces to join it we must make a very small round we put the smaller piece and then the larger one we close and ready we already have a beautiful tendril I hope you like it.😁 😊 .
Paso 4: Bueno ya estamos en el último paso en este paso trabajaremos en nuestra última pieza que es el redondo pequeño utilizaremos alambre 26 y piedras rosas y balines dorados para empezar aseguraremos la punta del alambre metemos una piedra rosa y aseguramos como lo hicimos con el corazón y así seguimos haciendo asta llenar el redondo le pondremos otras piedras extras para que se vea un poco gordito y por último los balines cortamos el exceso de alambre y listo ahora debemos unir las dos piezas para unirla debemos hacer un redondo muy pequeño metemos la pieza más pequeña y luego la más grande cerramos y listo ya tenemos un hermoso zarcillo espero les guste.😁🥰😊🤍.
<Beautiful Wire Rope Tendrils
<Hermosos zarcillos en Alambrismo
Todas las Fotos son de mi autoría y fueron tomadas con mi Celular Redmi 9T
Thank you for sharing this post in the DIYHUB Community!
Your content got selected by our fellow curator desro & you just received a little thank you upvote from us for your great work! Your post will be featured in one of our recurring compilations which are aiming to offer you a stage to widen your audience within the DIY scene of Hive. Stay creative & HIVE ON!
Please vote for our hive witness <3
https://twitter.com/491703210/status/1611333954539491330
The rewards earned on this comment will go directly to the people( @cetb2008 ) sharing the post on Twitter as long as they are registered with @poshtoken. Sign up at https://hiveposh.com.
This is really amazing and Beautiful ❤️ you did quite very well Thumps up 👍
Están bellisimos 😍 los amé, esta diseño me encantó, desde el color hasta la forma, un resultado hermoso
Hola, gracias es un placer recibirlos tu comentario, de seguro te quedarían hermosos, aunque no te hacen falta😊😊😊♥️❤️👍🤗😉
Gracias por el halago, eres muy amable 😉
Congratulations @alexanderflx! You have completed the following achievement on the Hive blockchain And have been rewarded with New badge(s)
Your next target is to reach 600 replies.
You can view your badges on your board and compare yourself to others in the Ranking
If you no longer want to receive notifications, reply to this comment with the word
STOPCheck out our last posts:
Support the HiveBuzz project. Vote for our proposal!