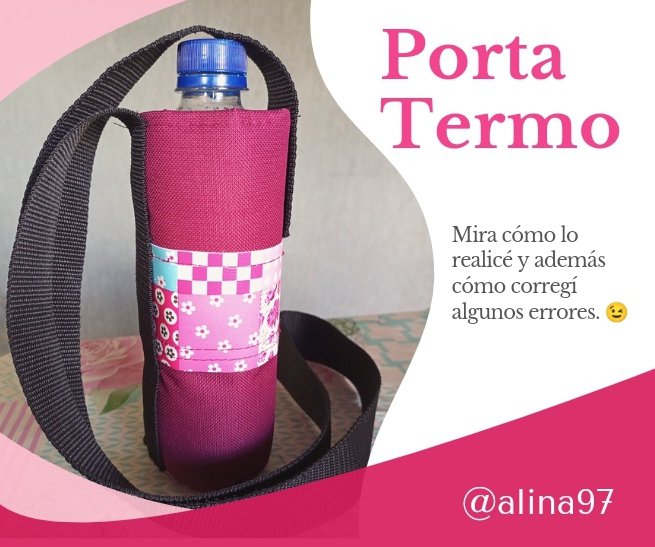
Porta termo, mira cómo lo realicé paso a paso ( Esp / Eng)
Hola queridos hivers 😊
Que gusto es saludarles una vez más, y ver sus geniales trabajos, pero está vez quiero ser yo quien les muestre mi trabajo. Yo siempre que salgo a la calle sueño llevar un termo de agua pues hace mucho calor y no me gusta pasar sed, pero se me estaba haciendo un poco engorroso llevarlo en mi bolso con una bolsita porque a veces se me derramaba el agua, mojando algunos papeles importantes es por eso que ví muy necesario hacer este porta termo, a medida que lo fui haciendo se me presentaron algunas dificultades en cuanto a costura, sin embargo pude resolver, les muestro cómo a continuación. 😊
Hello dear hivers 😊
What a pleasure it is to greet you once again, and see your great work, but this time I want to be the one to show you my work. Whenever I go out I dream of carrying a thermos of water because it is very hot and I don't like to be thirsty, but it was becoming a bit cumbersome to carry it in my bag with a bag because sometimes the water would spill, wetting some important papers that is why I saw it very necessary to make this thermos holder, as I was doing it I had some difficulties in terms of sewing, however I was able to solve it, I show you how below. 😊
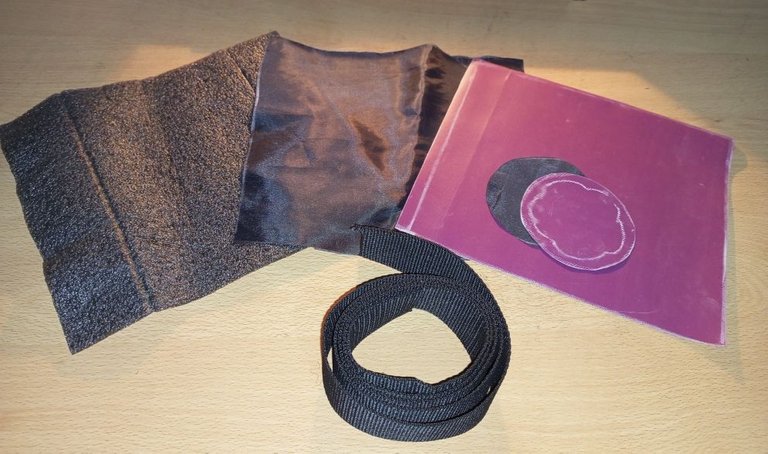
Materiales
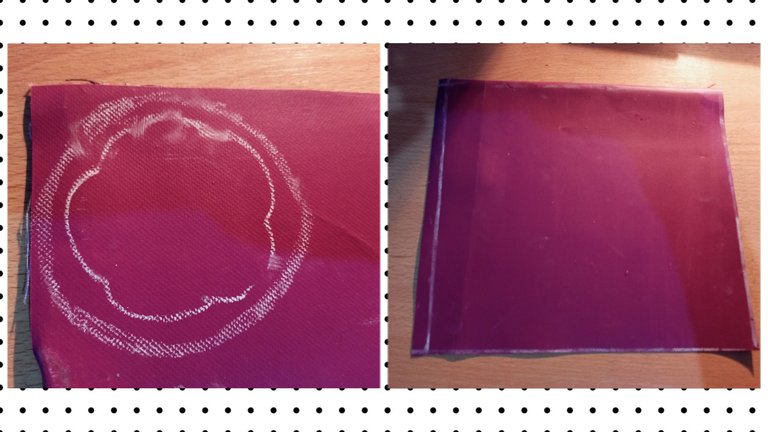
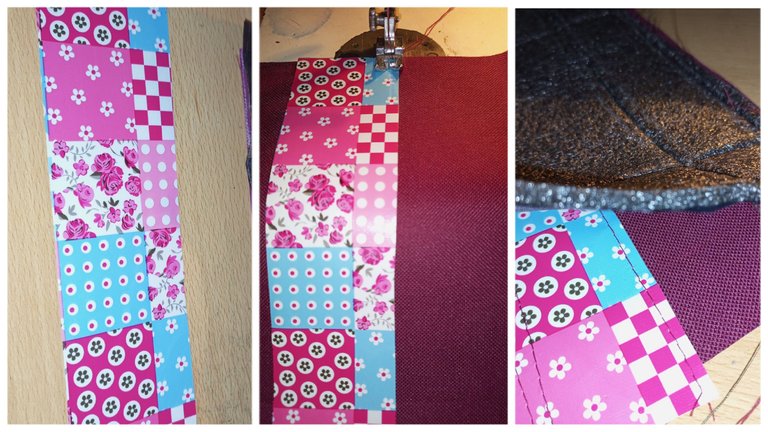
Para este proyecto utilice loneta, tela tafetán, y un aislante que recicle de un bolso viejo, realmente no sé el nombre pero le da grosor a la tela y proteje más de que se pase la humedad del termo hacia afuera. Estos retazos los corte del mismo tamaño, aunque el último luego tuve que cortar el excedente a medida que lo ví necesario. Medi el largo del envase por el contorno, 19cm. de alto por 23cm. de contorno, además de el espacio para la costura.
También corte el círculo de la base, en loneta y tafetán.
También utilicé una tira larga para colgar.
Materials
For this project I used canvas, taffeta fabric, and an insulator that I recycled from an old bag, I don't really know the name but it gives thickness to the fabric and protects more from the moisture from passing out of the thermos. I cut these pieces of the same size, although the last one I then had to cut the excess as I saw it necessary. I measured the length of the container around the contour, 19cm. high by 23cm. of contour, in addition to the space for the seam.
Also cut the base circle, in canvas and taffeta.
I also used a long strip for hanging.
Proceso
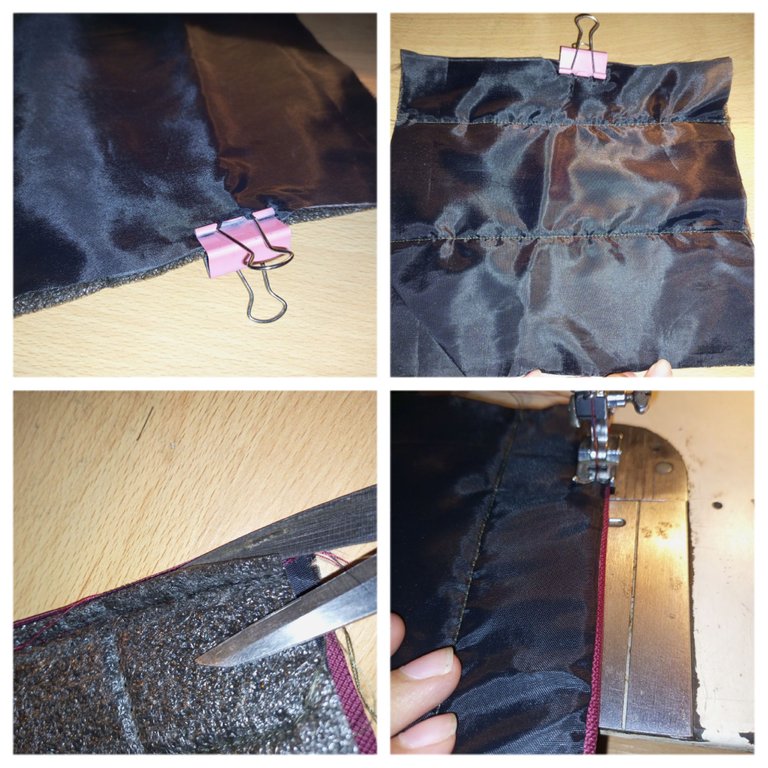
Cosí el aislante con el tafetán, luego coloqué el lado de la tafeta frente al lado derecho de la loneta y lo cosi en la parte superior. Después voltee y retire el excedente de aislante, voltee de nuevo para repisar.
Process
I sewed the insulation with the taffeta, then placed the taffeta side facing the right side of the canvas and sewed it on top. Then flip and remove excess insulation, flip again to stack.
Quise darle un toque más divertido y bonito y corte una tira de loneta estampada y la cosi del lado exterior de la loneta morada.
I wanted to give it a more fun and beautiful touch and cut a strip of printed canvas and the seam on the outer side of the magenta canvas.
El paso siguiente fue coser el círculo de pase por la parte de abajo, lo cosi les lado derecho. Cosi con la máquina lo que pude, luego se me hizo difícil y terminé cosiendo a mano lo que faltaba. En este punto me di cuenta de un error. No le di suficiente espacio para la costura, además no podía hacerle una costura escondida, porque una vez cosido no podría voltear, pues quedaría muy angosto.
The next step was to sew the pass circle at the bottom, I sewed it on the right side. I sewed what I could with the machine, then it became difficult for me and I ended up sewing by hand what was missing. At this point I noticed an error. I did not give it enough space for the seam, also I could not make a hidden seam, because once it was sewn it would not be able to turn, because it would be very narrow.
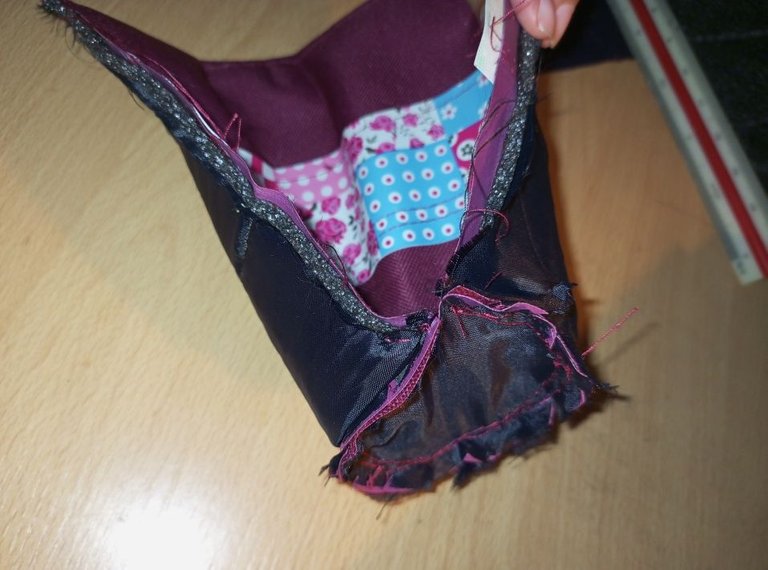
Acá puede ver mejor lo que les estoy explicando. Y lo que hice, decidí coserlo al ras a mano. Esto no me preocupa pues se me ocurrió colocar encima de esta costura la tira que sirve de asa. 😃
Here you can see better what I am explaining to you. And what I did, I decided to sew it flush by hand. I'm not worried about this because it occurred to me to place the strip that serves as a handle on top of this seam. 😃
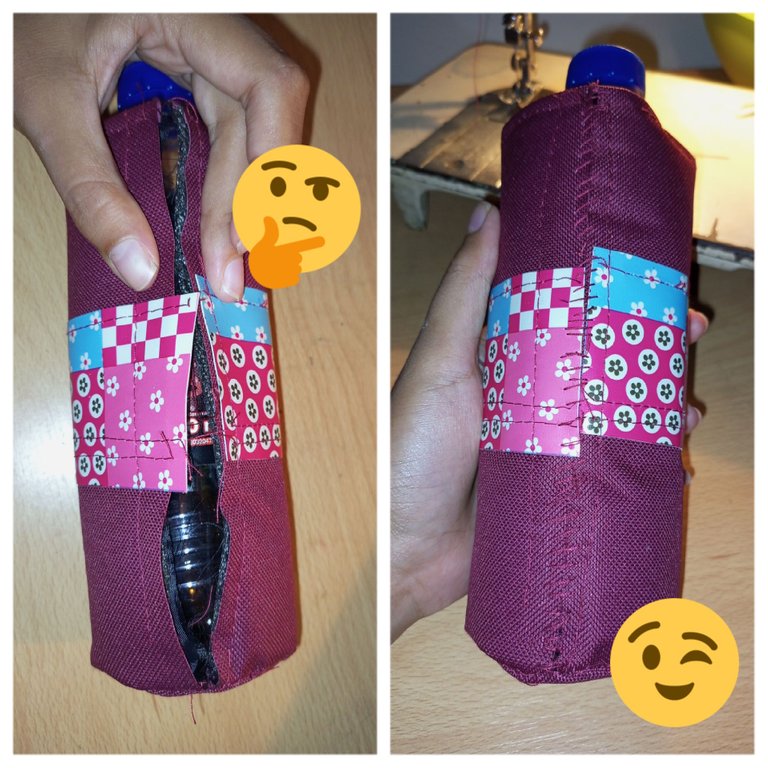
De los bordes lo cosi con máquina, y en la parte superior coloque unas puntadas a mano. Esto lo puedo hacer pues el envase no agarra mucho peso, solo unos 400ml. Así que no hay problema 😊
From the edges I sewed it with a machine, and on the upper part I placed some stitches by hand. I can do this because the container does not hold much weight, only about 400ml. So no problem 😊

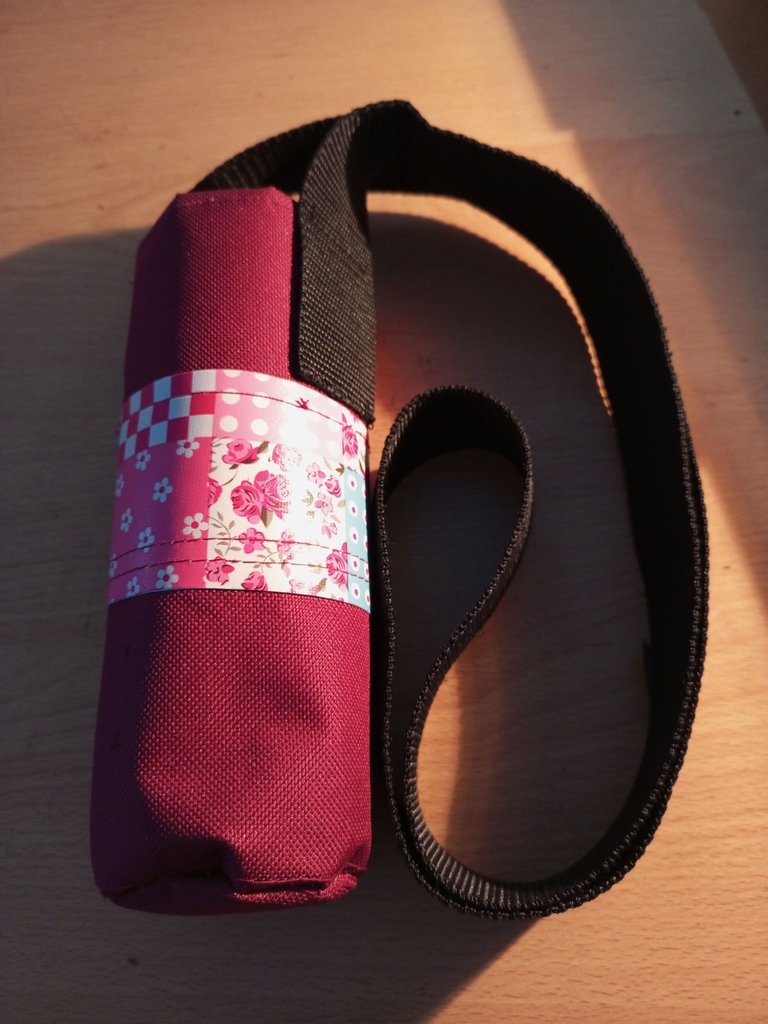
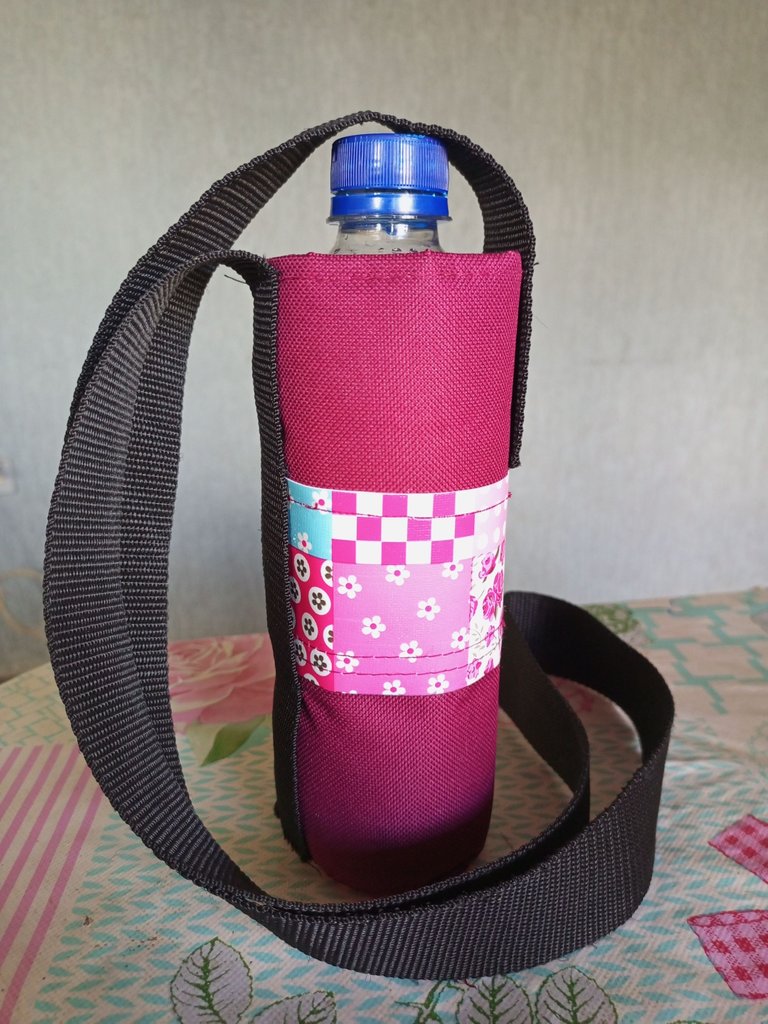
Finalmente así quedó mi porta termos amigos. A mí encanto el resultado,😍 espero que les haya servido este tutorial para realizar su propio porta termo, puede que quede mucho mejor que el mío 😉 si tienen alguna sugerencia me la pueden dejar en los comentarios. 😊😊
¡Gracias por su atención! 😊
Finally, this is how my friends thermos holder was left. I loved the result,😍 I hope this tutorial has helped you to make your own thermos holder, it may be much better than mine 😉 if you have any suggestions, you can leave them in the comments. 😊😊
Thanks for your attention! 😊
¡Hasta la próxima! Gracias por visitar mi blog. Todas las imágenes son de mi propiedad. | Until next time! Thank you for visiting my blog. All images are my property.

@tipu curate
Upvoted 👌 (Mana: 3/43) Liquid rewards.
Oye que lindo y práctico yo hace días estoy por hacer uno , pero estaba pensando en como hacerlo
Muy práctico para no salir sin el agua de la casa. Gracias por compartir. Quedó precioso.
🎆🎇🎉🎊🌧️💐✨🌾🌱🌹🌙🌿🍃🥀⚡🌺☘️🍀🌈🌷⭐🪴🌵🌸🌟💮🌴🌳💫☀️💮☔🌲🌳🌍🌌🌠☄️🏵️🐝🌻🌼🍄🐞🦋💙☕💜🍍🎆🎇🎉🎊🎆🎇🎉🎊🌧️💐✨🌾🌱🌹🌙🌿🍃🥀⚡🌺☘️🍀🌈🌷⭐🪴🌵🌸🌟💮🌴🌳💫☀️💮☔🌲🌳🌍🌌🌠☄️🏵️🐝🌻🌼🍄🐞🦋💙☕💜🍍🎆🎇🎉🎊
Oye que hermoso porta termo realizaste, se ve que es muy resistente, a veces es mejor realizar las cosas un mismo, el amor y la técnica lo hace todo posible, me encanta. Que bueno como resolviste la falta de espacio. Muchas gracias por tu post.
¡Vaya! Te quedó genial. Super práctico para una caminata. Saludos.
Me encanta! Se ve muy lindo y práctico!
Que buen trabajo , amiga quedo super bonito. Saludos 🤗
¡Que bonito te quedó! @alina97 😻
A veces uno está haciendo un trabajo y tiene que ir solventando a medida que cose 🤗 Es parte de la costura. Me gustó la tela y como resolviste el inconveniente.
Es muy raro que yo salga sin agua 😅 la sed me agobia, así que tengo que tener agua a mano. ¡Ya me puedo hacer uno gracias a ti! 💟
Ohh que linda, gracias 😊 me alegra mucho que te haya servido
Saludos @alina97, el porta termos quedó muy hermoso, las telas me encantan combinan a la perfección.
Bendiciones!
Hola Alina. Dicen que de los errores se aprenden así que seguro habrás aprendido algo esta vez jaja. Es muy compun olvidar los márgenes de costura, pero que bueno que lo pudiste resolver y terminar tu proyecto a tiempo.
Espero que ahora disfrutes de tu porta botella :) ¡Saludos!
Wow!! quedó muy bonito!! además esos materiales que usaste parecen ser muy buenos para mantenerlo fresco también ✨ te felicito!!
Thank you for sharing this post on HIVE!
Your content got selected by our fellow curator hafizullah & you received a little thank you upvote from our non-profit curation initiative. Your post will be featured in one of our recurring curation compilations which is aiming to offer you a stage to widen your audience within the DIY scene of Hive.
Next time make sure to post / cross-post your creation within the DIYHub community on HIVE and you will receive a higher upvote!
Stay creative & hive on!