DIY •Piñata de Súper Mario🍄💚 [ESP-ENG]
Ahora bien, la semana pasada compartí con ustedes la elaboración de una decoración sencilla de las plantas carnívoras de Súper Mario, eso debido a que mi pequeño ahijado se encontraba de cumpleaños y esta sería la temática de su fiesta, pero NO todo terminó allí.
También fui la encargada de realizarle su piñata, y esta vez con el personaje principal ¡Si, Mario! Y como no podía dejar pasar este oportunidad, aquí les muestro como realice esta piñata 🍄💚
Greetings creative friends! I hope you are feeling great and that your day has been the best, we are doing quite well around here.
Now, last week I shared with you the elaboration of a simple decoration of the carnivorous plants of Super Mario, that because my little godson had a birthday and this would be the theme of his party, but it did NOT end there.
I was also in charge of making his piñata, and this time with the main character Yes, Mario! And as I could not let this opportunity pass, here I show you how I made this piñata 🍄💚


Materiales✨:
- Cartón grueso (extraído de una caja de TV)
- Cartón en kilo
- Papel crepe rojo y azul
- Foami de color (piel, rojo, marrón, blanco, negro)
- Silicón
- Corta Exacto
- Regla y Tijeras
Materials✨:
- Thick cardboard (taken from a TV box).
- Cardboard in kilo
- Red and blue crepe paper
- Colored Foami (skin, red, brown, brown, white, black)
- Silicone
- Exact cutter
- Ruler and scissors
Paso a Paso | Step by Step ✨
🍄 The first thing I did was to draw Super Mario (just as my friend wanted it) this I did more as a practice, then I drew him again on half of a bond paper, which I cut out and used as a pattern; to cut 2 pieces of the silhouette on the thick cardboard.

🍄 En el cartón en kilo (por fortuna lo venden cerca de mi casa), medí una tira a lo largo de la lámina del carton por 19cm de ancho, (haciendo divisiones a los 3cm, 16cm, y 19cm) esto con la finalidad de que me quedarán pestañas de 3cm y un ancho de 13cm; hecho esto comencé a pegar con Silicón las siluetas de Mario.
📌 For the assembly of the piñata I had used the same cardboard but due to its thickness it did not work for me, since it broke very easily when bending the tabs, so I had to look for another alternative (cardboard in kilo).
🍄 In the kilo cardboard (fortunately they sell it near my house), I measured a strip along the length of the cardboard sheet by 19cm wide, (making divisions at 3cm, 16cm, and 19cm) this in order to have 3cm tabs and a width of 13cm; done this I started to glue with Silicone the silhouettes of Mario.

🍄 Una vez que tenía la piñata armada (entamborada) decidí reforzarla por sus orillas con papel de reciclaje y engrudo artesanal. Una vez que esto estaba completamente seco, con papel crepe cubrí todos los laterales en forma de pliegos.
Engrudo: 1cda colmada de harina de trigo diluida en ½ taza de agua, llevamos al fuego revolvemos constantemente y una vez que espese, retiramos dejamos enfriar y esta listo pata usar como pega con ayuda de un pincel
🍄 Once I had the piñata assembled I decided to reinforce the edges with recycling paper and craft glue. Once this was completely dry, with crepe paper I covered all the sides in the form of folds.
Paste: 1tablespoon of wheat flour diluted in ½ cup of water, take to the fire stir constantly and once it thickens, remove, let it cool and it is ready to use as glue with the help of a brush

🍄 Ya cubierto todos los laterales, corte trozos de papel crepe de 6cm de ancho aproximadamente, hice varios cortes verticales (para lograr el efecto) y comencé a pegar capa a capa. Hice igual que sus laterales mitad de cada color, por ambos lados.
🍄 Adicional, en la parte trasera con ayuda d corta exacto realice un pequeño corte cuadrado (por allí se insertará los dulces)
🍄 Once all the sides were covered, I cut pieces of crepe paper about 6cm wide, made several vertical cuts (to achieve the effect) and started gluing layer by layer. I did the same as your sides half of each color, on both sides.
🍄 Additional, on the back side, with the help of an exacto cutter, I made a small square cut (where the candy will be inserted).

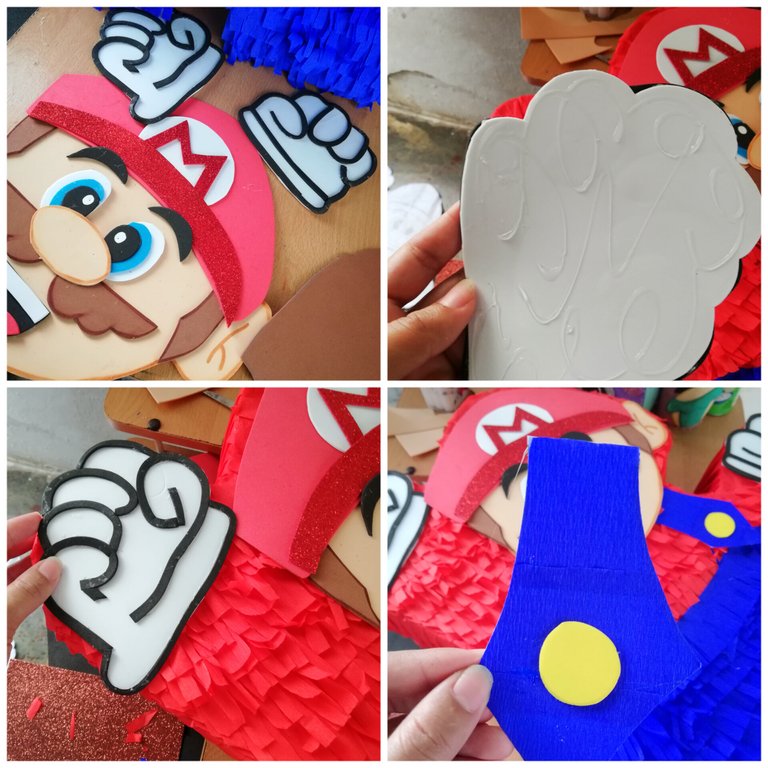
🍄 En este punto ya estaba tomado forma la piñata, comencé a realizar el rostro, para ello marque cada pieza del mismo en el Foami correspondiente a cada color, recorté y algunas piezas (como el rostro, nariz y bigote) los difumine con marcadores marrón.
🍄 Los ojos los realice con diferentes círculos y pegué uno sobre otro y con pintura blanca le di luz. Seguidamente comencé a darle forma al rostro, siempre guiándome de mi patrón principal (el dibujo que hice al principio)
🍄 At this point the piñata had already taken shape, I began to make the face, for this I marked each piece of it in the Foami corresponding to each color, I cut out and some pieces (such as the face, nose and mustache) I blurred them with brown markers.
🍄 The eyes were made with different circles and I glued them one on top of the other and with white paint I gave them light. Then I started to shape the face, always following my main pattern (the drawing I did at the beginning).

🍄 Culmine de ultimar detalles al rostro y por supuesto no podía faltar la inicial que lleva en su gorra. También realicé las manos o en este caso los puños, y con tiras de Foami negro de 0,5cm de ancho delinee.
🍄 I finished the final details to the face and of course I couldn't miss the initial that he wears on his cap. I also made the hands or in this case the cuffs, and with black Foami strips of 0.5cm wide outline.

🍄 Teniendo listo todas las piezas comencé a pegar cada uno en su lugar, y las tiras de la braga las improvise con un poco de papel crepe y hoja de papel, recorté y pegue sin obviar el botón amarillo (hecho con un círculo de Foami).
🍄 Para dar un mejor acabado a la piñata, dispuse de tiras de Foami de 0,50cm de ancho y delinee toda la piñata, logrando así definir a la perfección cada parte y cada detalle de Súper Mario.
🍄 Having all the pieces ready I started to glue each one in its place, and the strips of the panty I improvised them with some crepe paper and paper sheet, I cut and glued without obviating the yellow button (made with a circle of Foami).
🍄 To give a better finish to the piñata, I used 0.50 cm wide Foami strips and outlined the entire piñata, thus perfectly defining each part and each detail of Super Mario.

Resultado | Result
Espero que esta creación haya sido de su agrado, por aquí quedamos más que satisfechos ¡Ameeee😍😍! Y a ti, que te pareció? Te leo en los comentarios✨🍄
I hope this creation has been to your liking, we are more than satisfied with it! And you, what did you think? I read you in the comments✨🍄


📷Ediciones | Editing in Canva and Picstar
✨Traducciones | Translations in Deepl
@alizmarpaola
https://inleo.io/threads/view/hive-130560/re-leothreads-b17nmh9q
Thanks for the support
Amiga, felicitaciones la piñata te quedó MUY hermosa! Imagino la felicidad de tu sobrinito cuando la vio, me alegra que hayas sido la creadora de ésta belleza, tienes mucha creatividad!
Un abrazote!
No quería que más nadie la tocará solo el JAJAJAJA
Gracias amiga, valoro mucho tus palabras!
Me encanta Mario y esa piñata quedó más que preciosa amiga! Gracias por compartir! 😍
Ususu, gracias amiga que bella 💗💗
Nunca había visto la elaboración de una piñata y mucho menos que alguien compartiera este tipo de trabajos en Hive. Lo que más me impresiona es que no es cualquier ejemplar, de verdad es un trabajo hecho con amor porque esa es la cara de Mario, nada que ver con un dibujo que a penas se asemeje y eso lo valoro mucho de ti. Imagino la emoción de los niños al ver esta divertida decoración. Todo está bien explicado aquí, no hay manera de que no salgamos haciendo una buena piñata después de visitarte jeje... ¡Felicitaciones y feliz miércoles! Un gusto conocerte a través de tus talentos ✌️
Wow, que comentario tan alentador, te agradezco mucho!
Fue satisfactorio pata mi ver el resultado a medida que trazaba, marcaba y cogía forma esta piñata, me alegro mucho que te haya gustado! ✨✨
Post manually reviewed. 😊
Thanks you✨
Yay! 🤗
Your content has been boosted with Ecency Points, by @alizmarpaola.
Use Ecency daily to boost your growth on platform!
Support Ecency
Vote for new Proposal
Delegate HP and earn more
Gracias por el apoyo!
Que belleza de manualidad amiga, queso increíble esta piñata, cada detalle de Mario es increíble, tienes un gran talento 👐😉
Gracias amiga, me alegra mucho que te haya gustado! 🤗🤗
No es por nada pero te quedó demasiado demasiado hermoso amiga, me gusto muchísimo el resultado ya que se parece tal cual a Mario. Excelente trabajo ❤️✨
Awww, pero que preciosa tú ¡Gracias mi Vanelinda! 💗💗
Oye pues no te quedó nada mal 😁. Gracias por compartir
Gracias a ti por pasarte y comentar 🤗✨
!discovery 50
This post was shared and voted inside the discord by the curators team of discovery-it
Join our Community and follow our Curation Trail
Discovery-it is also a Witness, vote for us here
Delegate to us for passive income. Check our 80% fee-back Program
Thanks for the support 🤗
Hola gracias por compartir. Mi hijo cumple años en un mes creo que trataré de hacerle la piñata siguiendo su tutorial. A usted le quedó bellísima.
Hola preciosa, espero te sirva mi tutorial y que además te quede mega hermosa!
Ami que preciosa te quedó esa piñata 😍 Los detalles son perfectos, deberías tener tu propio negocio para fiestas, todo te queda increíble 🤗
Lo he pensado, pero no sé JAJAJA
Gracias por apreciar y por tus palabras mi Mary Lindas💗💗
Mi reina, esa piñata quedo bellísima, me encanto. Yo pienso que deberías dedicarte seriamente a este emprendimiento! Tienes talento! 😍
Wow, debería intentarlo🤗🤭
Gracias por tu lindo comentario amiga!
Felicidades @alizmarpaola, quedo muy bonita la piñata.
Gracias amigo, y gracias por pasarte 💗💗
Amiga, te quedó espectacular 😍😍😍
Deberías vender piñatas jaja. Tienes mucho talento.
Jajaja tendría que intentarlo, gracias amiga bella💗😍😍
Me encantó Aliz, te quedó demasiado hermosa
Gracias princesa, me alegra que te guste!
Hola Paola. Hermosísima te quedó esta piñata, un nivel de detalles increíble y que paciencia para pegar todos esos flecos. Seguro a tu ahijado le encantó, a mí también. Te felicito ❤️.
Hola Laura, me hace feliz el hecho que agrade mi trabajo.. Mi ahijado apesar de su cortita edad amo con locura su piñata y por mi parte, feliz de haberla creado!
Agradezco tu apoyo😍💗
Te quedó muy bonita esa piñata te felicito
Gracias amiga ✨