•DIY: Tarjeta Obsequio ¡Un ramo de Margaritas! | Gift Card A Bouquet of Daisies!🌼✨
Este próximo domingo es día de las madres, y que mejor que expresar nuestro amor a través de algún obsequio hecho por nosotros mismos? La verdad, esto me trae muy bonitos recuerdos de mi época escolar, donde cada año, poníamos todo nuestro empeño y dejábamos salir a flote la creatividad y la imaginación para hacer alguna manualidad para ese amor bonito al que llamamos mamá.
Siempre crecí con esto, y aunque le compre algún detalle, siempre lo complemento con algo realizado por mi🌸
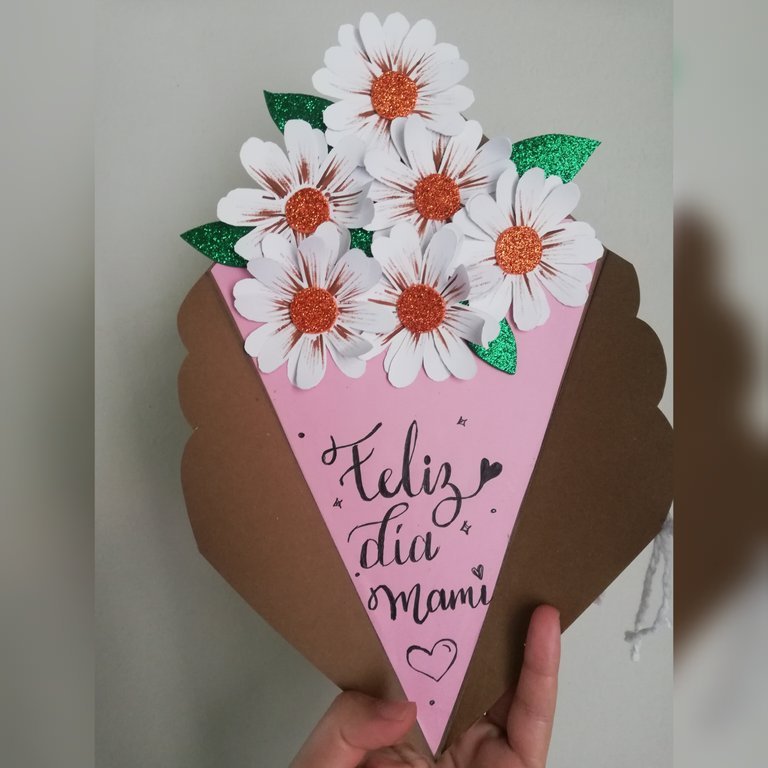
Hoy te traigo una bonita idea de una tarjeta, en forma de ramo de flores o margaritas, ideal para regalarle junto con algún chocolate y además podemos dejar plasmado allí un mensaje!💗
Lo siento, me emocioné ¡Sin más, aquí te dejo el paso a paso
I hope you are well, what a pleasure to be back in this creative community, I hope your day has passed in the best way.
This coming Sunday is Mother's Day, and what better than to express our love through a gift made by ourselves? To tell the truth, this brings back beautiful memories of my school days, where every year, we put all our efforts and let our creativity and imagination come to the surface to make a craft for that beautiful love we call mom.
I always grew up with this, and even if I buy her some detail, I always complement it with something made by me.
Today I bring you a nice idea of a card, in the form of a bouquet of flowers or daisies, ideal to give her along with some chocolate and we can also leave a message there!💗.
I'm sorry, I got excited! Without further ado, here's the step by step

Materiales | Materials🌸
Hoja de cartulina Marrón
Cartulina blanca
Hoja de color rosada
Foami naranja escarchado
Foami verde escarchado
Pintura al frío blanca y marrón
Silicón liquido
Puntero
Pincel delineador
Tijera, lápiz y regla
Brown cardboard sheet
White cardboard
Pink sheet
Frosted orange foami
Frosted green foami
White and brown cold paint
Liquid silicone
Pointer
Liner brush
Scissors, pencil and ruler
Paso a Paso | Step by Step🌸
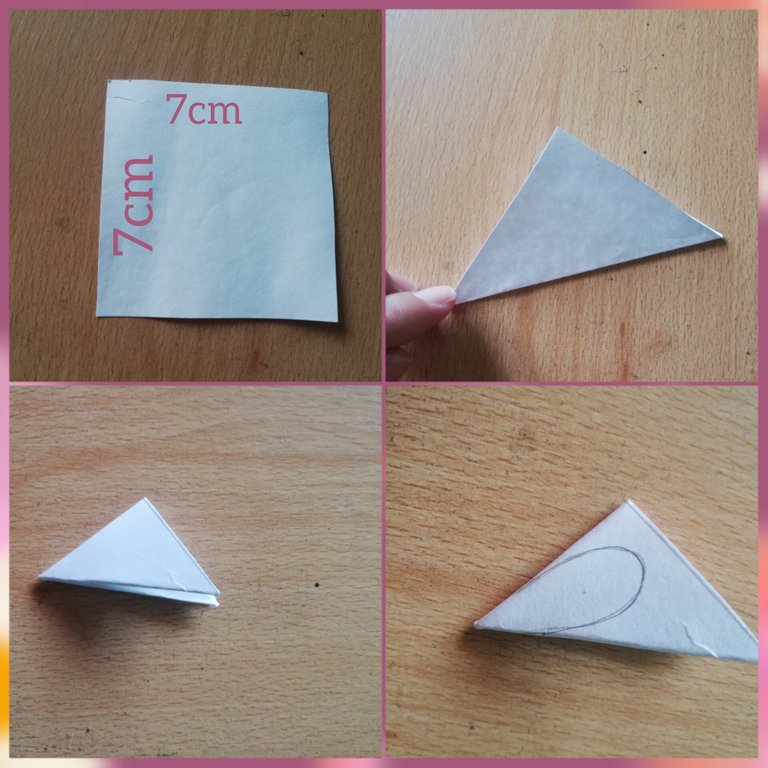
🌸 Lo primero fue medir en la cartulina blanca, 12 cuadrados de 7cm × 7cm, recorté para luego doblar de forma diagonal es decir, unir las esquinas, repetí este dobles dos veces más, luego dibujé una especie de pétalo. (repetí este proceso con los 12 cuadrados)
🌸 The first thing to do was to measure 12 squares of 7cm × 7cm on the white cardboard, cut them out and then fold them diagonally, that is to say, join the corners, I repeated this double twice more, then I drew a kind of petal (I repeated this process with the 12 squares).
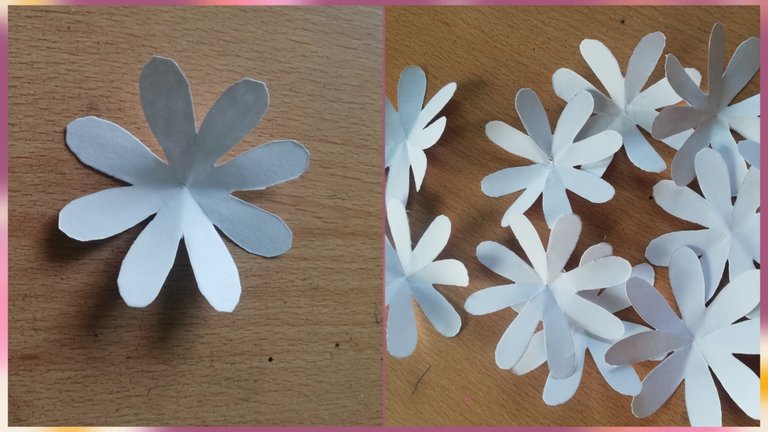
🌸 Recorte justo por el pétalo dibujado, y al abrir obtuve la siguiente flor, una vez más repetí el proceso de corte con todos para obtener 12 flores.
🌸 I cut right through the drawn petal, and when I opened I got the next flower, once again I repeated the cutting process with all to get 12 flowers.
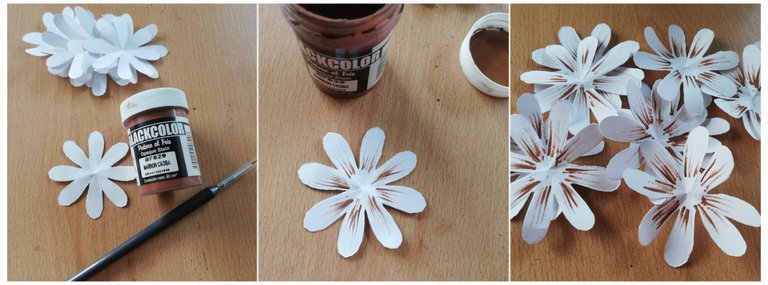
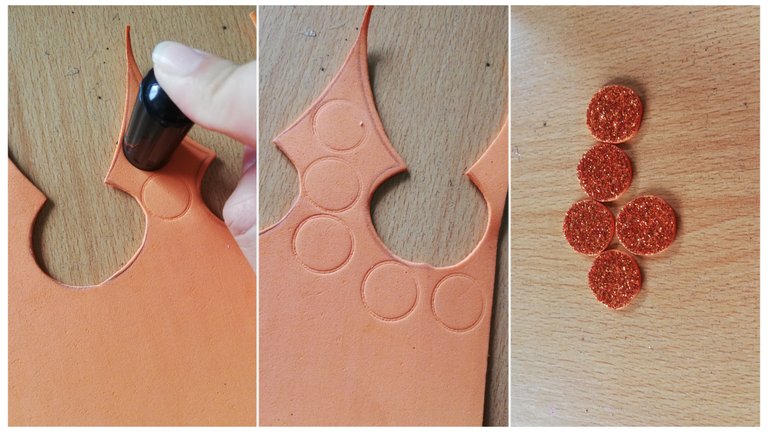
🌸 Con pintura marrón, y el pincel delineador, hice algunos detalles a cada una de las flores.
🌸 With brown paint, and the eyeliner brush, I made some details to each of the flowers.
🌸 Utilicé la tapa de un marcador, la presione sobre el Foami naranja, a fin de obtener un círculo pequeño y perfecto, realice 6 de estos y los recorté.
🌸 I used the cap of a marker, pressed it on the orange Foami, in order to get a small and perfect circle, made 6 of these and cut them out.
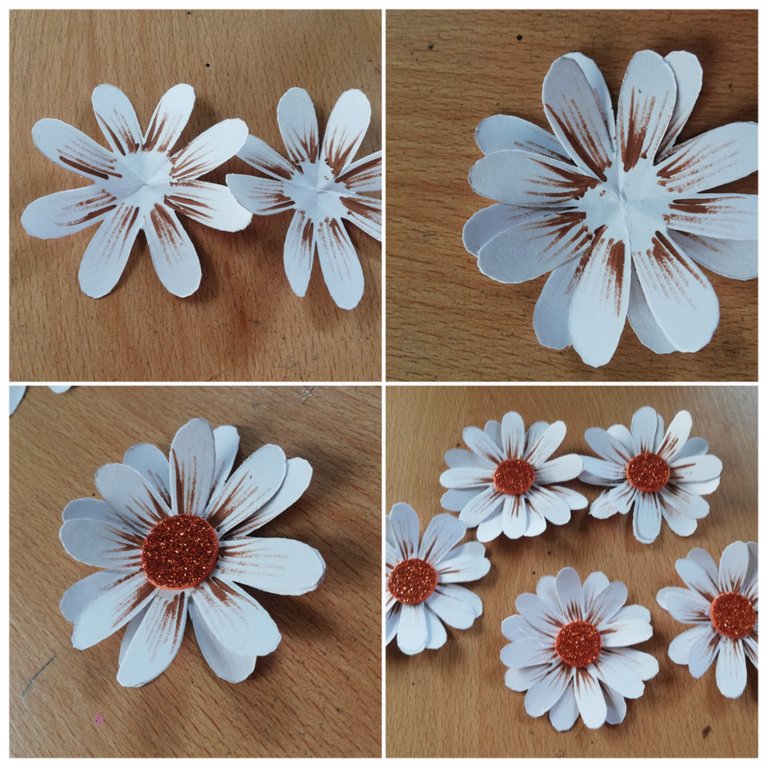
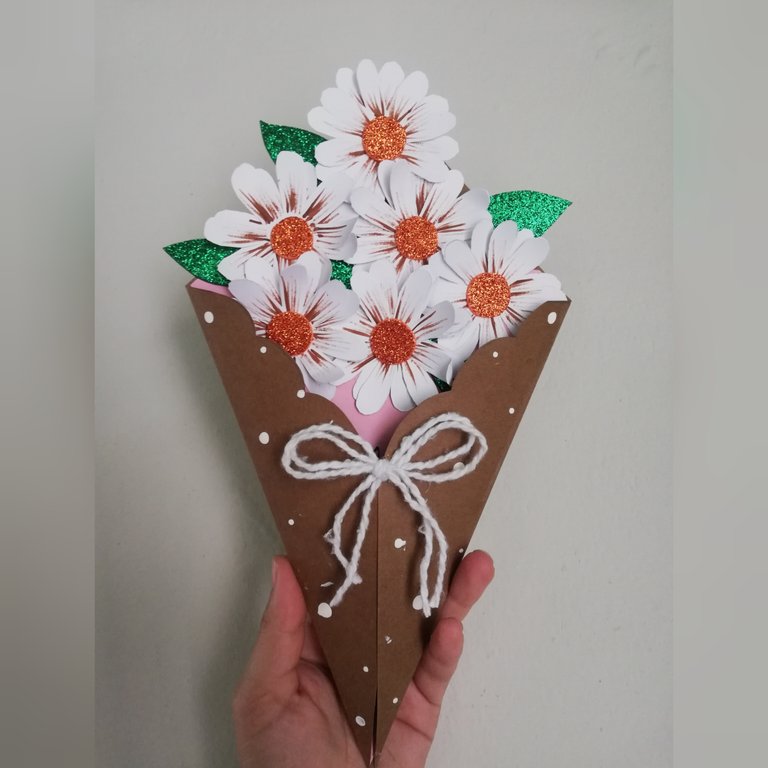
🌸 Para armar las margaritas, tome dos de las flores y pegue una sobre otra, para en el centro pegar uno de los círculos hechos anteriormente.. Repetí el proceso a fin de obtener 6 flores o margaritas.
🌸To assemble the daisies, take two of the flowers and glue one on top of the other, and in the center glue one of the previously made circles. I repeated the process in order to obtain 6 flowers or daisies.
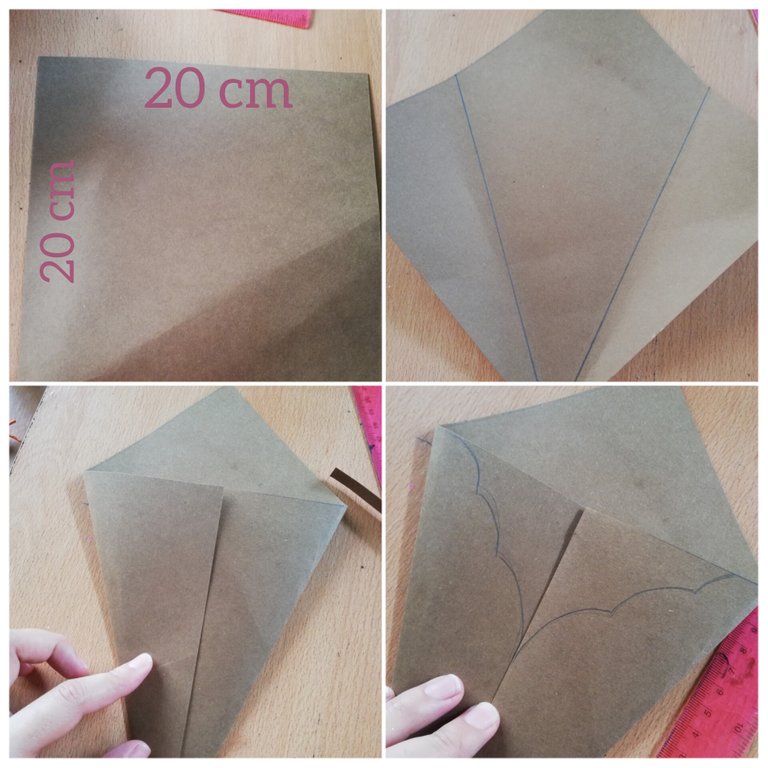
🌸 Para lo que sería la base de la tarjeta, medí un cuadrado de 20cm × 20cm, el cual doble a los 9cm de lado y lado en forma diagonal, a fin de obtener una tarjeta en forma de V.
En lo que sería las tapas, dibujé una forma ovalada y recorte para una vista más bonita.
🌸 For what would be the base of the card, I measured a 20cm × 20cm square, which I folded to the 9cm side and side diagonally, in order to get a V-shaped card.
On what would be the covers, I drew an oval shape and cut out for a nicer look.
🌸 En la hoja de color rosado, corte justo la medida de la V y pegue para ser el fondo y sobre este ir pegando las flores. Adicional recorte en Foami verde, unas hojitas, con la finalidad de ir cubriendo los espacios que fuesen quedando.
🌸 On the pink sheet, cut just the size of the V and glue it to be the background and on it, glue the flowers. Additional cut in green Foami, some leaves, in order to cover the spaces that would be left.
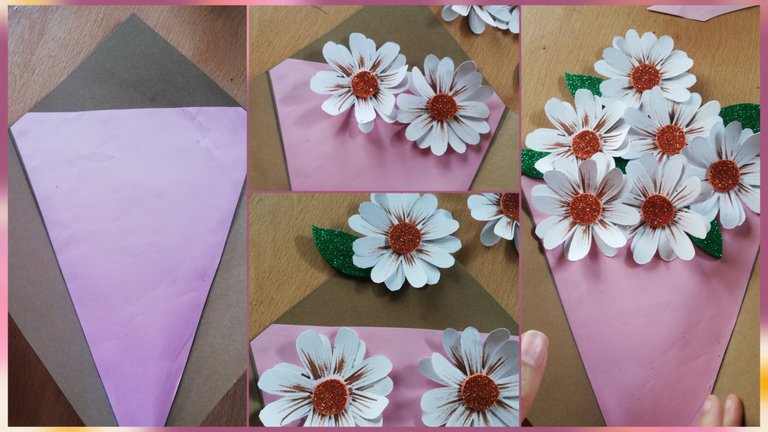
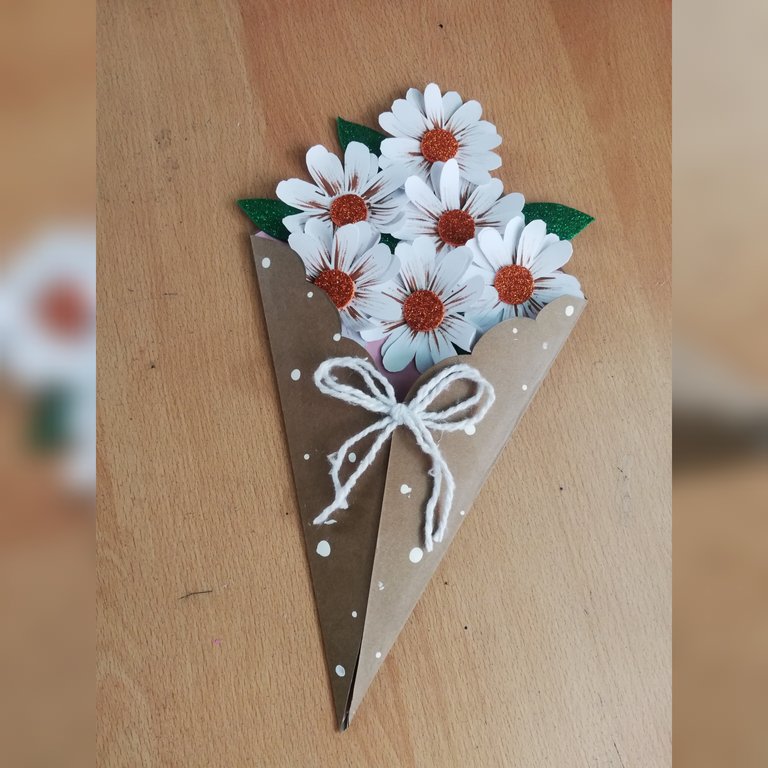
🌸 Por último y para finalizar, con el puntero y pintura al frío color blanca, realice algunos puntos en las tapas de la tarjeta y a uno de sus lados, pegue un lazo hecho en hilo pabilo (simulando el moño que ata el ramo de flores)
🌸Finally and to finish, with the pointer and white cold paint, make some dots on the card covers and on one of its sides, glue a bow made of wicker thread (simulating the ribbon that ties the bouquet of flowers).

Parece bastante complejo, pero la verdad que es una forma muy fácil de realizar una tarjeta obsequio. Ya lo último que puedes hacer, es como en mi caso que agregué un mensaje.. También puedes poner dentro algún chocolate o detalle pequeño!
Sin más, me despido esperando que esté post sea de su agrado amigos ¡Hasta una próxima oportunidad! 🌸
It seems quite complex, but the truth is that it is a very easy way to make a gift card. The last thing you can do, as in my case, is to add a message.... You can also put inside some chocolate or small detail!
Without further ado, I say goodbye hoping this post is to your liking friends See you next time! 🌸
Ediciones en Canva y Picstar | Editing in Canva and Picstar
Traducciones en Deepl | Translations in Deepl
Ayyyyyy pero que cosa mas linda amiga 😍😍😍 me encantó ami, no me sabía esa forma de hacer las flores ni tampoco como darle la forma al ramo, así que este post me lo guardo para hacer mis intentos, que bonito trabajo ♥️
Jaja me encanta que lo tomes para alguna futura creación amiga, pues siento que es la forma más fácil de crear florecitas ami, resulta muy útil este tip✨
Me alegra que te haya gustado ami bella, un abrazo!
😍 Que belleza. Ese ramillete de flores te quedo hermoso.
Gracias por compartir con nosotros tu grandioso proceso creativo u paso a paso impecable mi bella @alizmarpaola...
Éxitos 💗
Que lindo verte por aquí mi querida Darcy💗
Me alegra que te haya gustado esta linda forma de obsequiar a nuestras mamis.. Un abrazo!
Te quedo hermoso me encanto mi corazón. Lindo día 💕
Que belleza mi Aliz! Que talentosa eres amiga. Sin duda es un excelente detalle para el día de las madres.
Cómo sabes me encantan las margaritas y ese toque que le diste con marrón hizo una gran diferencia.
Un abrazo amiga bella!!! 💗💗
Feliz de que te haya gustado ami bella💗✨
Gracias por tus halagos!
Lo sé, también me gustan muchooote y bueno es un tip como para resaltar aún más, espero te sirva en alguna creación futura amiga de mi corazón!
Gracias a ti por pasarte💗💗🌸
https://leofinance.io/threads/view/dayadam/re-leothreads-2yrwty2at
The rewards earned on this comment will go directly to the people ( dayadam ) sharing the post on LeoThreads,LikeTu,dBuzz.
#hive #posh
https://twitter.com/Darcy1387/status/1656083905827536897
https://twitter.com/valenpba/status/1656087284544860160
Amiga sin duda alguna, este es un hermoso regalo para sorprender a mamá. Me gusta mucho, las florecitas se ven espectaculares!
Gracia por la idea! 🤗
Gracias amiga, siii, ademas de que podemos escribirle algún mensaje, fácil podemos incluir dentro del ramo algún chocolate o algún detalle pequeño! ✨💗
Sería un lindo detalle, te quedó muy bonito Aliz me encantó la delicadez que se ve, por cierto ame mucho las florecitas🥰
Aaaaims que bella 💗
No podía dejar pasar en alto este día y hacer un detalle.. Feliz que te hay gustado mi Yage!
Amiga, amé éste ramillete de flores, luce muy hermoso y delicado, mi madre estaría feliz con éste adorno en la sala... Mil gracias por compartir, un abrazo!
Pero tu siempre tan bella💗✨
Gracias amiga, esta fácil, anímate y crearle uno🙈🌼
Ay, amigaaa. Te quedó bellisimo 🥹😍😍
Me encantó. Es un hermoso detalle 😍
Gracias Albi hermosa, que bueno que 5e haya gustado😍😍😍😍💗
Pero qué belleza amiga! Estoy segura que a tu mamá le va a encantar!
Espero que si amiga bella, pero pata que le guste aún más debo incluir algún chocolatico jaja🙈😍
Me gustó la idea de las flores, es un bonito detalle para regalar a las mamitas en su día
Claro que si mi Marluy, y lo mejor que es bastante fácil de hacer y queda muy bonito💗
Yay! 🤗
Your content has been boosted with Ecency Points, by @alizmarpaola.
Use Ecency daily to boost your growth on platform!
Support Ecency
Vote for new Proposal
Delegate HP and earn more
Que linda te quedo, super original! 😍
Muchísimas gracias por tu comentario, me alegra mucho que te gusto.. Saludos✨✨
Hola Alizmar :) Hermosa te quedó esta tarjeta, muy delicada y un gran regalo para el día de las madres. Me gustó el detalle de que el ramo se pueda abrir, quizás para agregar alguna dedicatoria. Todo se ve muy prolijo y lindo, se nota que está hecho con amor.
Gracias por compartir tu trabajo, te mando un saludo ❤️-
Hola Laura🌸
Que placer verte por aquí, y encantada que mi tarjeta sea de tu agrado. Si justo por eso quería que el ramo abriera, así además de dar un lindo detalle podemos plasmar una linda dedicatoria💗
Un abrazo! Gracias por tu apoyo..
Wow..This is really nice and creative. I am sure if you start making more of this to sell out, you would have people that would be interested.
Thank you very much for your nice comment and for your support. In addition to thank you for the idea and for appreciating my creation! Greetings ✨💗
Aliz esto esta bellisisisisimoooo!!!! 😍😍😍😍😍😍
¡QUE HERMOSURAA! 😍😍😍 ME ENCANTAAAA, te quedo demasiado cuchiii amiga🥰🥰 siento que me quiero arriesgar para completar el regalo de este domingo jejeje es que se ven bellisimas esas margaritas 😍😍
Arriesgate amiga bella, es muy fácil y cualquier duda sabes donde acudir!
Me alegra en sobremanera que te hayan gustado mi Mili Josefina🌸✨
Esas bellas margaritas se ven lindas dentro de la tarjeta, me encanto gracias por compartir excelente creatividad, saludos.
This is great. You can make someone happy with such work.
No había visto esta belleza!!!!
Amiga prepárate porque arranca un concurso en hive arte de Manualidades por el día de las madres. Ve pensándolo!
Te quedó hermoso amiga
Demasiado demasiado lindas 😍 me gustó mucho, muy original y súper lindo aliz 💐 me encantan estas cosas espero tener tiempo en algún momento de dejar volcar mi creatividad y ser tan artista como ustedes 🤭🧡