Tutorial paso a paso/Diadema colorida para niña💖 hecha de tela//Step-by-step tutorial/Colorful headband for girls made of fabric.
HELLO FRIENDS OF HIVE DIY!🙋
¡Feliz y bendecida noche, que la paz de Dios rebose en sus corazones! En esta noche estoy muy feliz de volver a estar compartiendo con esta hermosa comunidad creativa de hive diy.
Pido disculpas por no estar frecuentemente con ustedes, he estado muy ocupada en este último tiempo; pero cada vez que puedo compartir con ustedes a través de ésta plataforma,me siento muy contenta.
Esta vez quiero compartir un hermoso proyecto, se trata de una linda y colorida diadema para niñas, hecha de tela. En casa se que ustedes también tienen muchos retazos de tela de diferentes colores, esto es perfecto ya que podemos hacer diademas de diferentes colores, por eso la llame diadema colorida.
Cuando trabajamos con muchos colores debemos saber combinarlos para que haya armonía. Les cuento que me llevo un poco de tiempo elaborarla ya que no tenía un patrón e idea exacta para seguir, sino que me deje llevar por mi imaginación y creatividad combinando colores para ver cuales se veian bien; aunque con un poco de estrés😥 por la cantidad de veces que hice flores, ¡jejeje!😂 ¡por fin pude lograrlo y obtener un satisfactorio resultado que la primera fascinada fue mi hija!.
Amigos les invito a leer cada paso para que te animes y puedas hacer uno para tus pequeñas.
¡Happy and blessed night, may the peace of God overflow in your hearts! Tonight I am very happy to be sharing again with this beautiful creative community of hive diy. I apologize for not being with you frequently, I have been very busy lately; but every time I can share with you through this platform, I feel very happy.
This time I want to share a beautiful project, it is a cute and colorful headband for girls, made of fabric. At home I know that you also have many pieces of fabric of different colors, this is perfect since we can make headbands of different colors, that's why I call it a colorful headband.
When we work with many colors we must know how to combine them so that there is harmony. I tell you that it took me a little time to make it since I did not have an exact pattern or idea to follow, but rather let myself be carried away by my imagination and creativity combining colors to see which ones looked good; although with a little stress😥 because of the number of times I made flowers, hehehe! Friends, I invite you to read each step so that you are encouraged and can make one for your little ones.
Materiales:
- Retazos de tela.
- Hilo y aguja.
- Algunas cintas gross.
- Botones.
- Colita de ratón.
- Algunas perlas.
- Tijera.
Materials:
- Pieces of cloth.
- Thread and needle.
- Some gross tapes.
- Buttons.
- Mouse tail.
- Some pearls.
- Scissors.

Procedure.
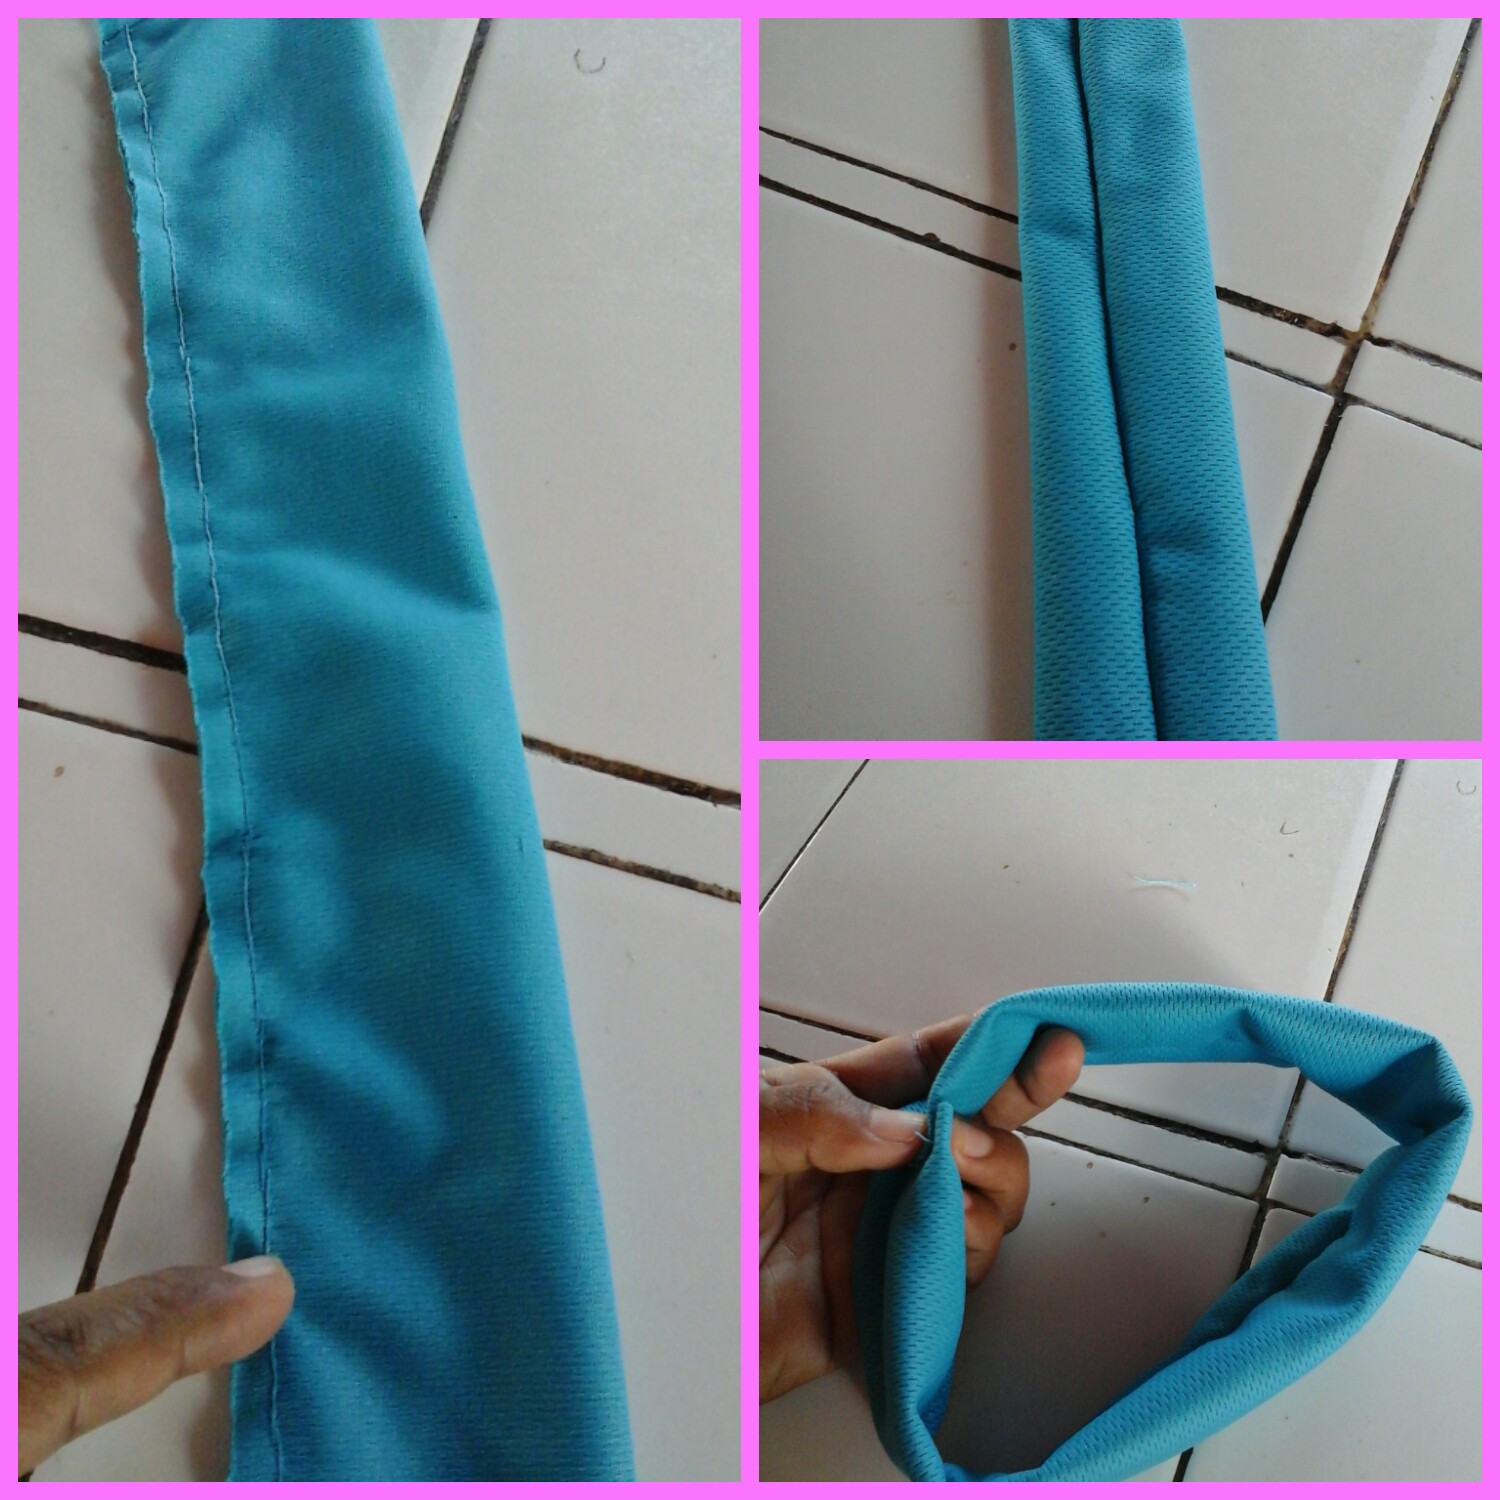
Paso 1.
Amigos para comenzar la elaboracion de esta linda y colorida diadema, lo primero será recortar una tira de aproximadamente 6cm de largo al doblez de la tela, medidos el diámetro de la cabeza de la niña y así obtendremos las medidas exactas para nuestra diadema.
Cosemos por el revés de la tela y volteamos por el lado derecho de la misma, para que la costura quede por dentro. Unimos los extremos y cosemos, no importa si la costura se ve fea por que recordemos que los detalles decorativos cubrirá dicha costura.
Step 1.
Friends, to begin the elaboration of this beautiful and colorful headband, the first thing will be to cut a strip of approximately 6cm long at the fold of the fabric, measuring the diameter of the girl's head and thus we will obtain the exact measurements for our headband. We sew on the wrong side of the fabric and turn on the right side of it, so that the seam is inside. We join the ends and sew, it does not matter if the seam looks ugly because we remember that the decorative details will cover said seam.
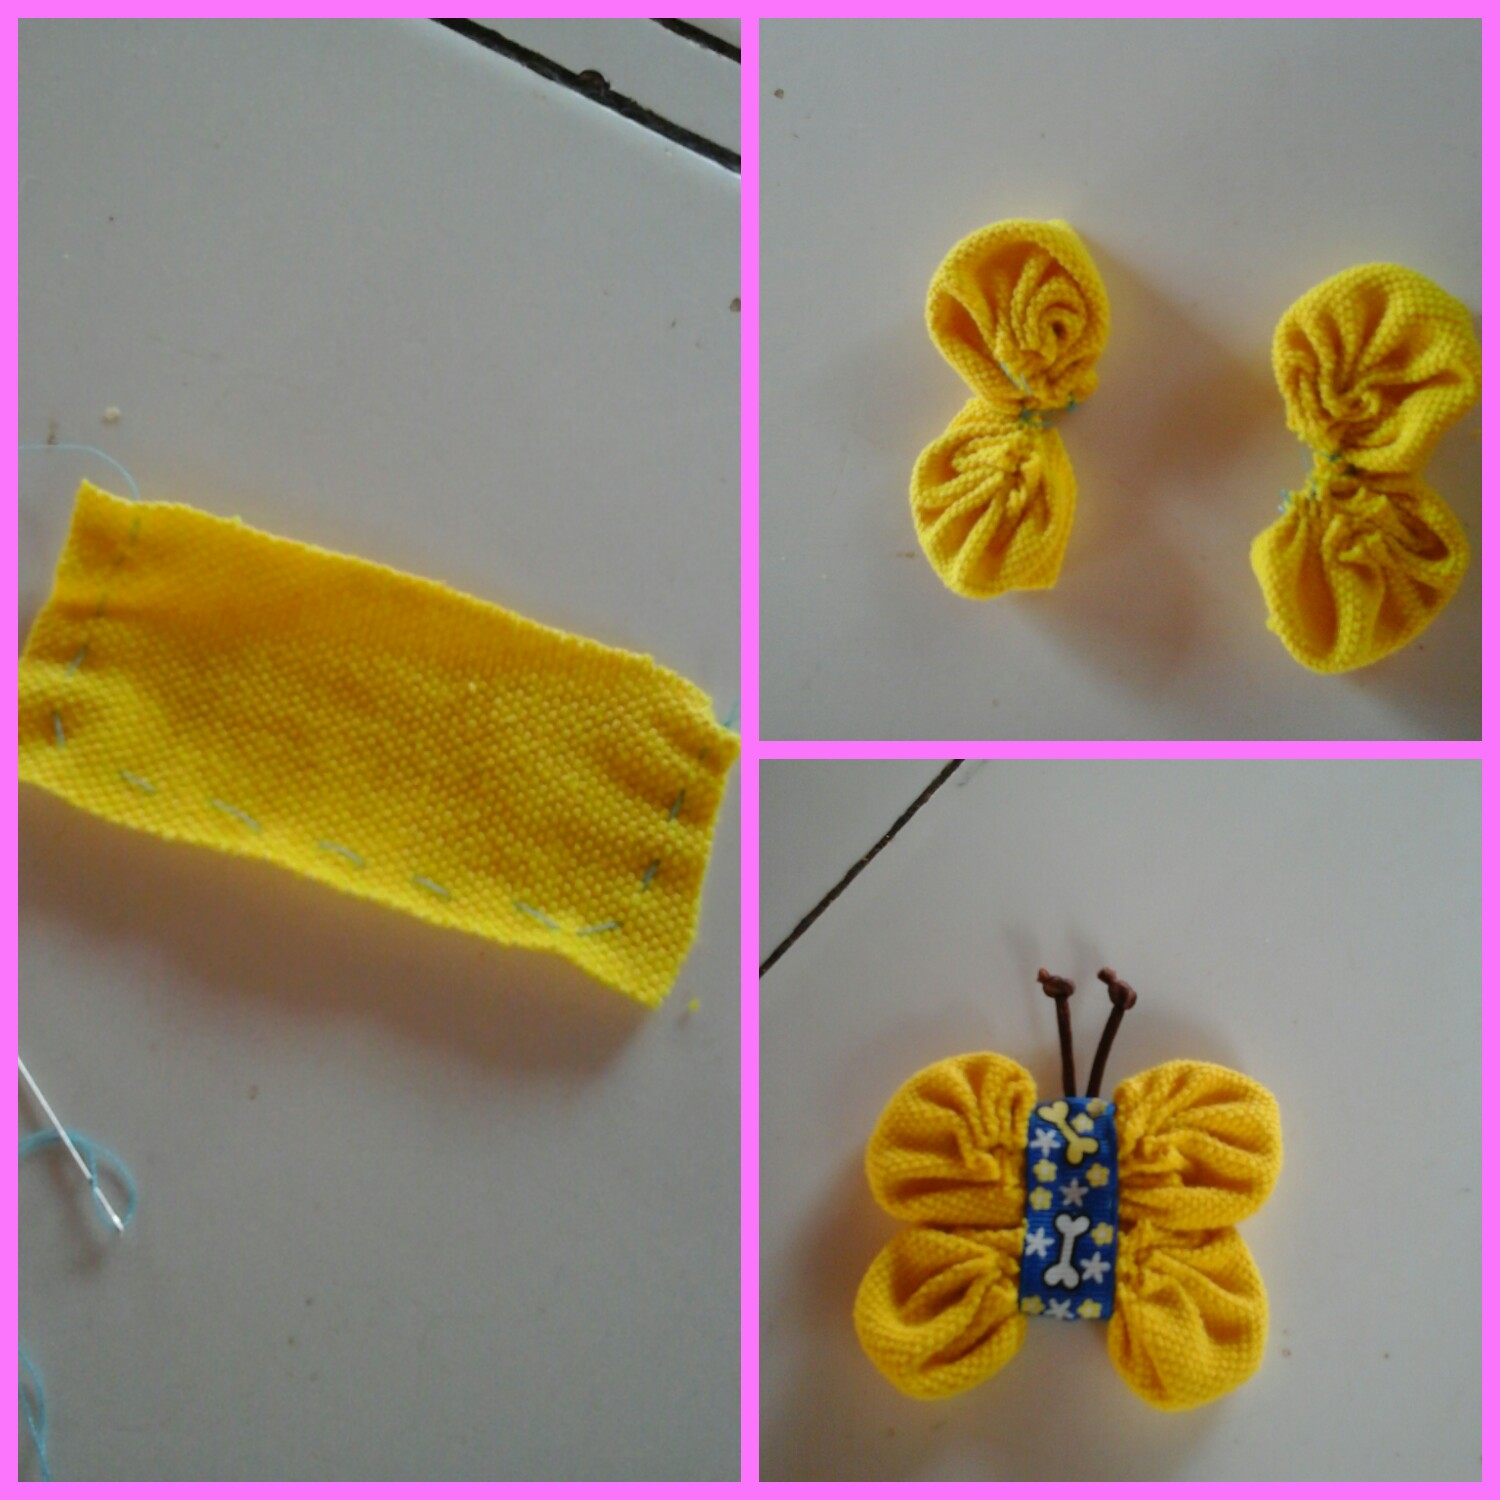
Paso 2.
En este paso procedemos a elaborar la mariposa. Tomamos retazos color amarillo como en este caso, pero puedes utilizar el color naranja o el que más te guste.
Recortamos 2 pares en forma de pequeños rectángulos y pasamos la aguja con un poco de hilo por el borde, halamos para fruncir, repetimos el procedimiento para crear 4 pétalos.
Unimos los pétalos y creamos una mariposa, colocamos una cinta en el centro y finalmente hacemos las antenas con la cola de ratón color marrón.
Step 2.
In this step we proceed to make the butterfly. We take yellow pieces as in this case, but you can use orange or the color you like the most. We cut 2 pairs in the shape of small rectangles and pass the needle with a little thread around the edge, pull to gather, repeat the procedure to create 4 petals. We join the petals and create a butterfly, we place a ribbon in the center and finally we make the antennae with the brown mouse tail.
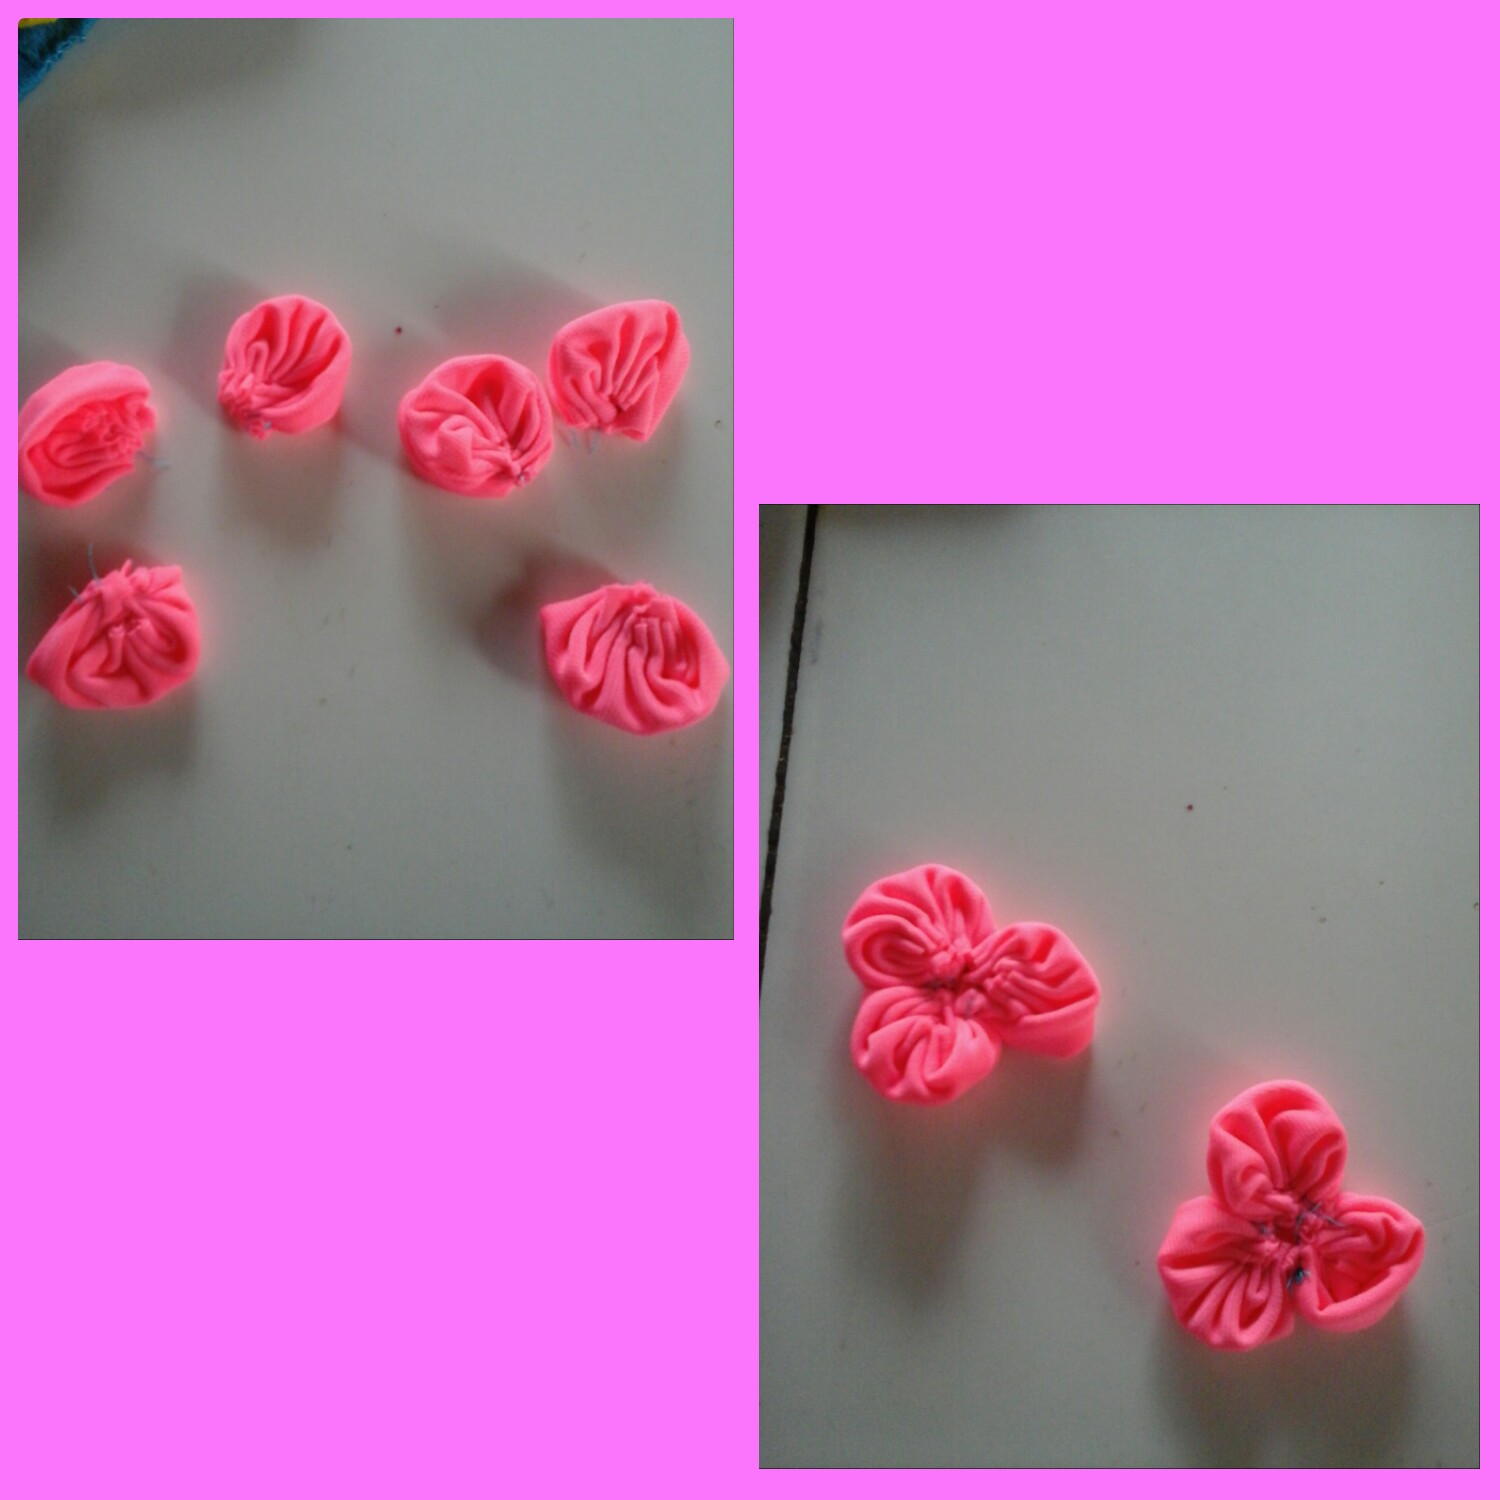
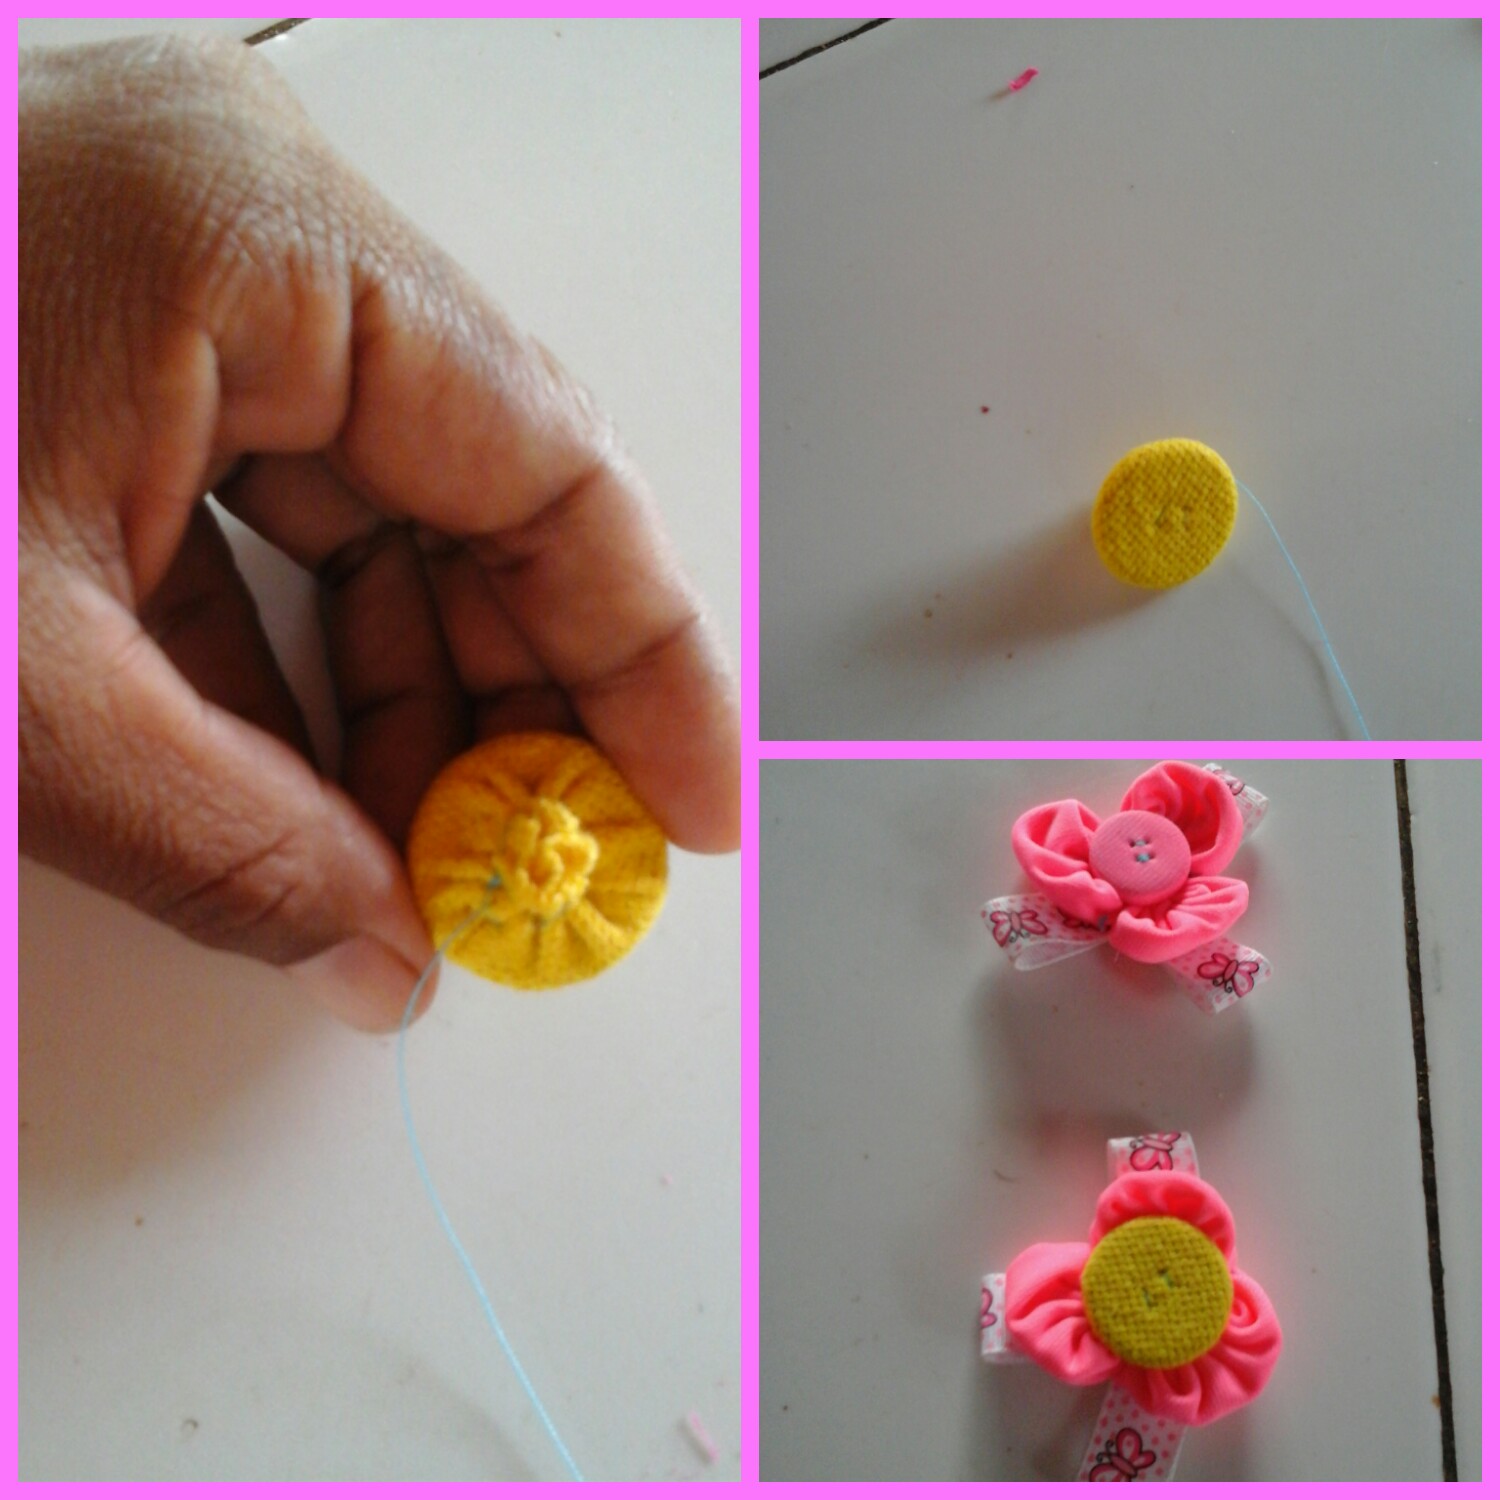
Paso 3.
Para hacer las flores que también aportan un toque decorativo a nuestra diadema, debemos repetir el procedimiento anterior, recortamos la tela en forma de pequeños cuadrados, doblamos y pasamos la aguja con un poco de hilo por el borde de cada uno, halamos para fruncir, cosemos y creamos unos pétalos.
Para hacer estas flores utilicé tela lycra color rosa fluorescente, puedes usar cualquier tipo de tela y color. Yo he elaborado 6 pétalos para crear 2 flores de 3 pétalos.
Step 3.
To make the flowers that also add a decorative touch to our headband, we must repeat the previous procedure, cut the fabric in the form of small squares, fold and pass the needle with a little thread around the edge of each one, pull to gather, we sew and create some petals. To make these flowers I used fluorescent pink lycra fabric, you can use any type of fabric and color. I have made 6 petals to create 2 flowers of 3 petals.
Paso 4.
Tomamos unos botones y los cubrimos con cualquier tipo de tela y con el color que prefieras, esto en caso de no tener botones de tela.
Puedes colocar cualquier adorno de pedrería, en mi caso quise colocarle botones para que las flores se vean hechas en casa y con el tema costura.
Colocamos cada botón sobre las flores y cinta gross para hacerlas más coquetas.
Step 4.
We take some buttons and cover them with any type of fabric and with the color you prefer, this in case you don't have fabric buttons. You can place any rhinestone decoration, in my case I wanted to place buttons so that the flowers look homemade and with a sewing theme. We place each button on the flowers and gross tape to make them more flirty.
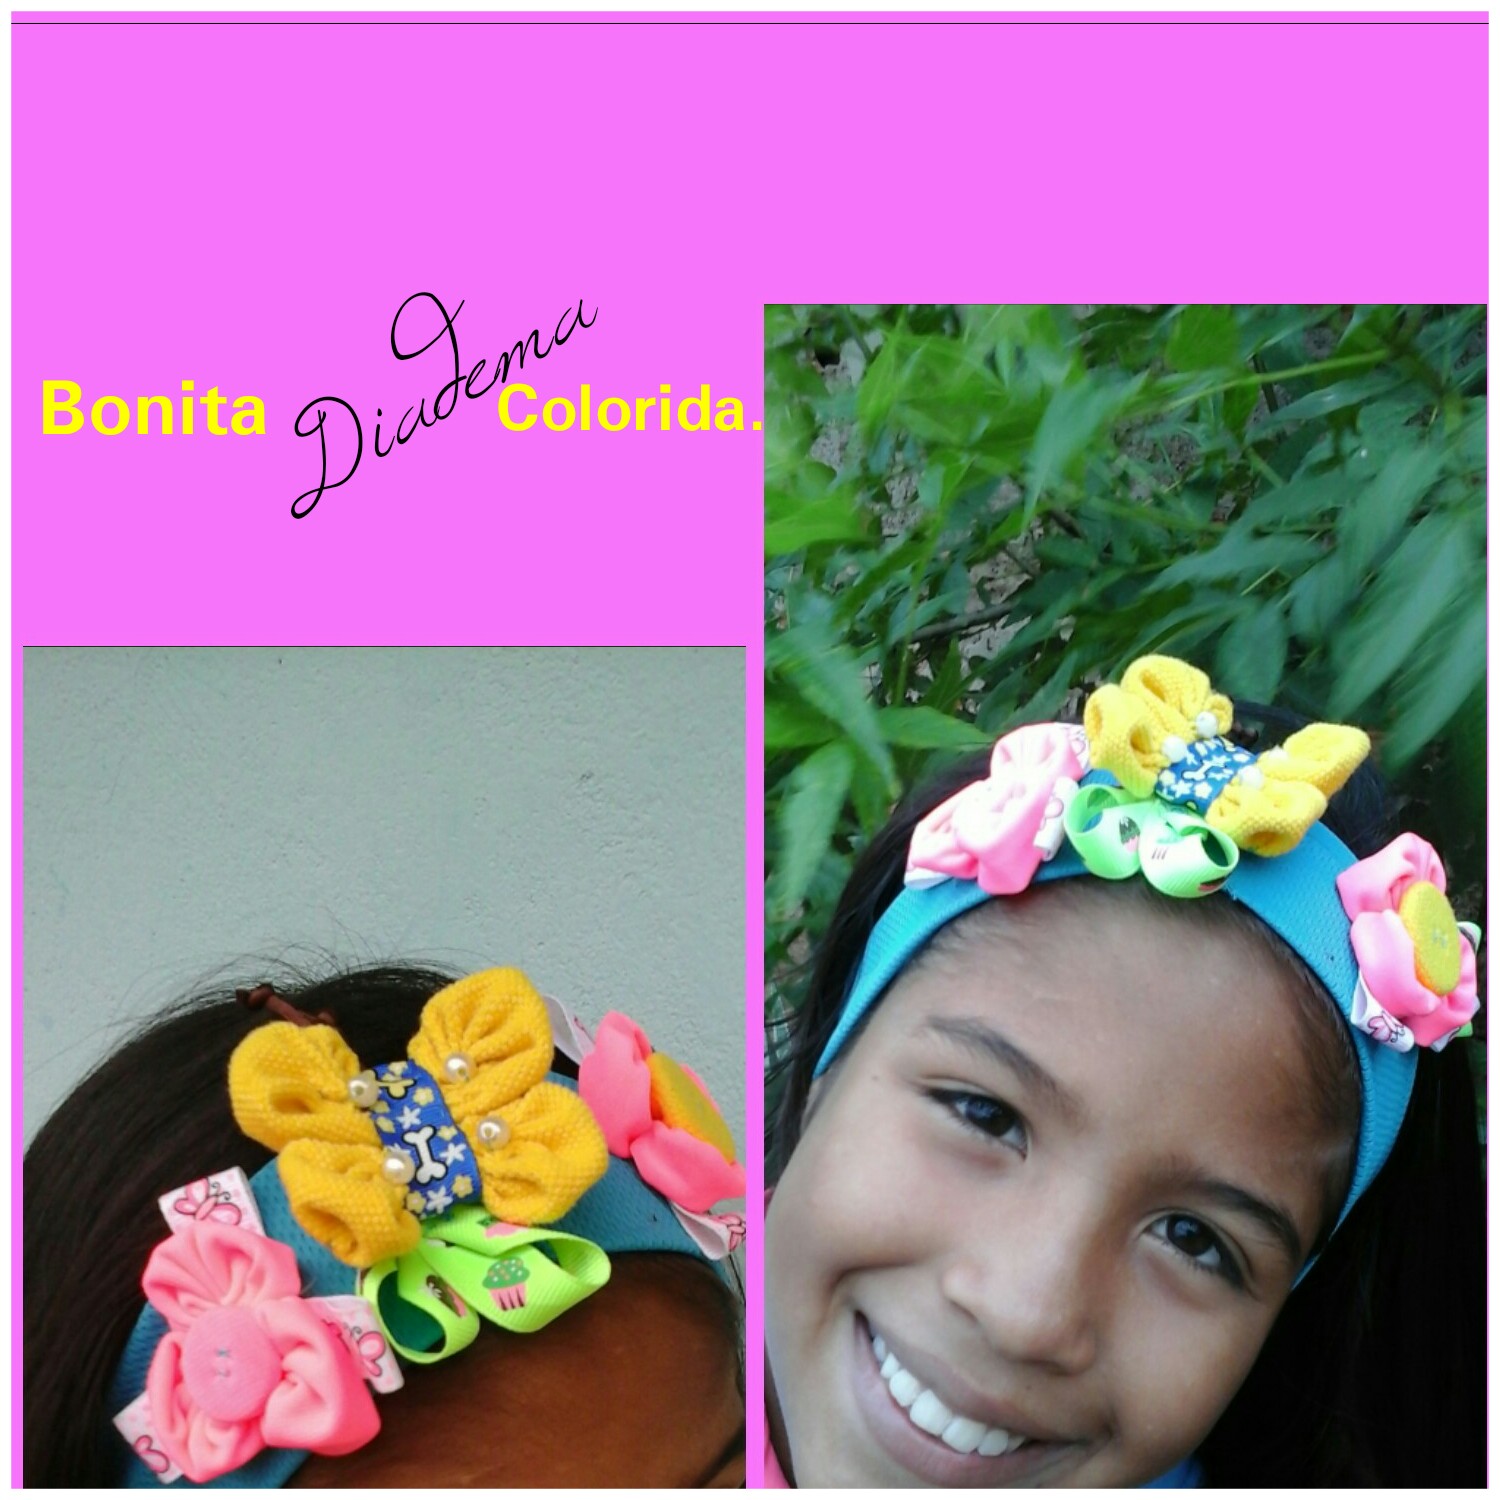
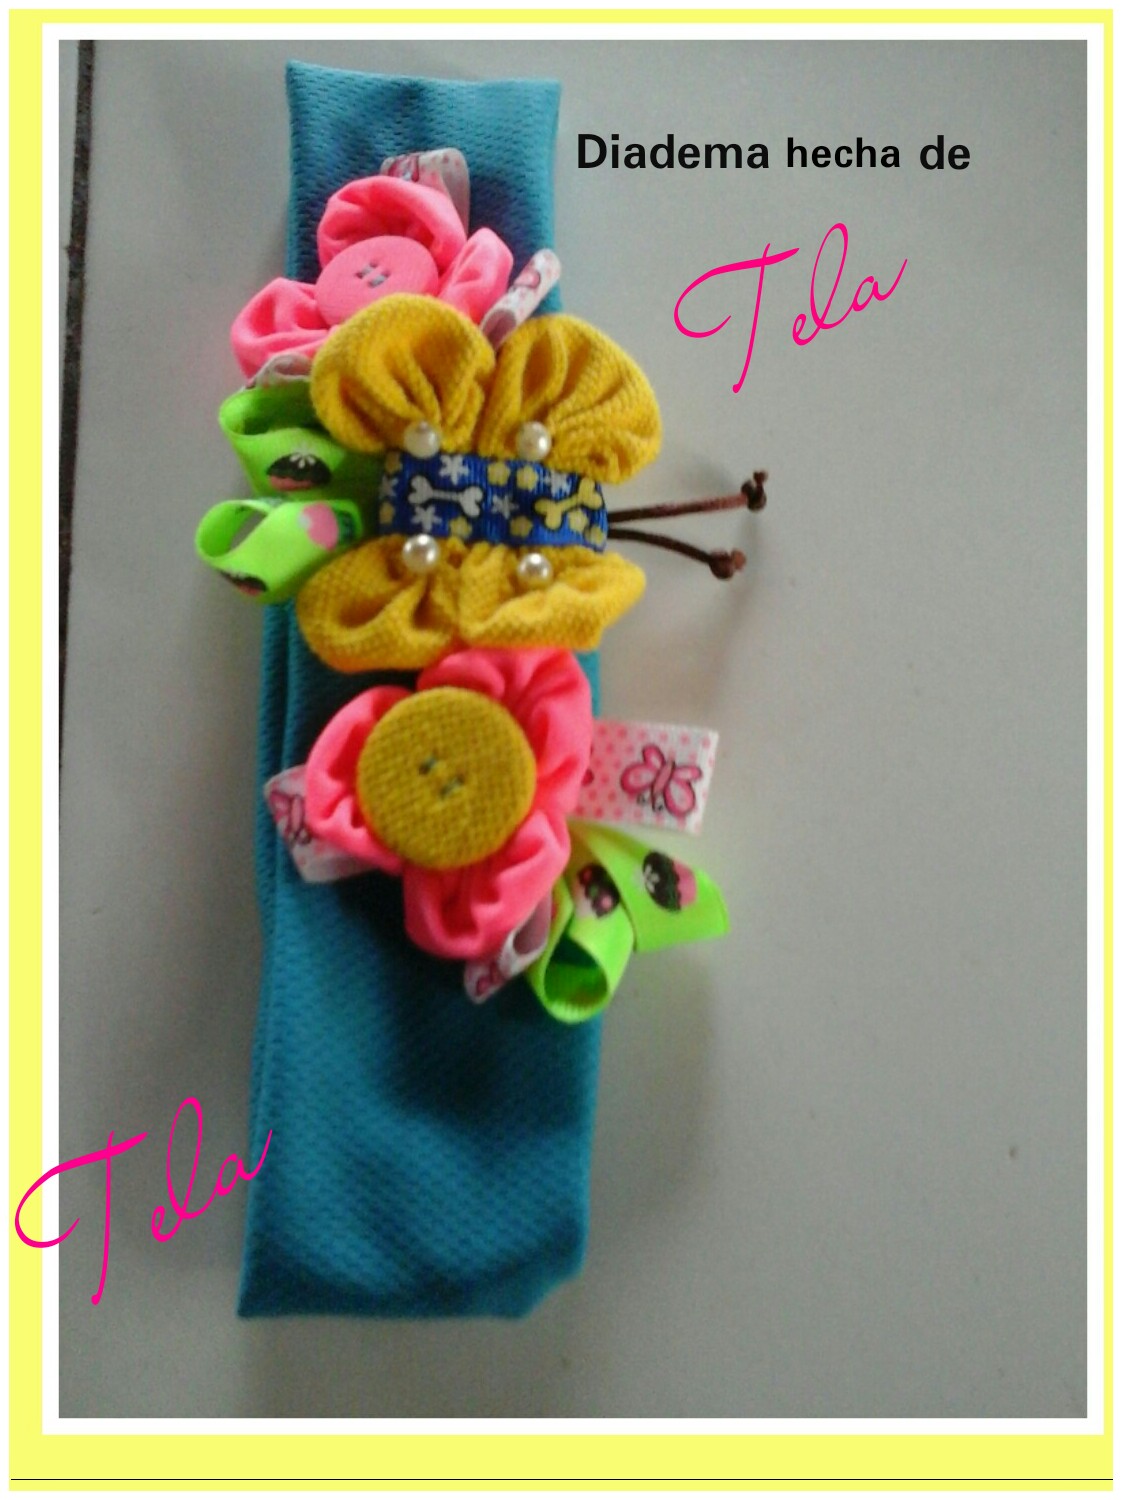
PROJECT FINISHED.
Finalmente cosemos la mariposa y demás decoraciones a la diadema, coloqué algunos otros elementos como perlas y algunas hojas de cinta gross estampada.
De esta manera nos ha quedado éste linda y colorida diadema para niñas, hecha de tela, perfecta para que ellas luzcan hermosas a la hora de salir a pasear, o simplemente estar en casa.
Finally we sew the butterfly and other decorations to the headband, I placed some other elements such as pearls and some leaves of printed gross ribbon. In this way we have this beautiful and colorful headband for girls, made of fabric, perfect for them to look beautiful when going for a walk, or simply being at home.
Amigos hemos terminado con este hermoso y fácil proyecto, el cual podemos hacer en casa. Quiero agradecerles a todos los lectores que han tomado un poco de su valioso tiempo para leer mi post hasta el final.
No me quiero despedir sin antes ¡desearles que tengan una excelente noche y que la paz de Dios llene sus vidas!.
Espero nos podamos ver pronto a través de ésta hermosa comunidad creativa.
¡Abrazos y bendiciones!.😙
Friends we have finished with this beautiful and easy project, which we can do at home. I want to thank all the readers who have taken some of their valuable time to read my post to the end. I don't want to say goodbye without first wishing you a great night and may the peace of God fill your lives! I hope we can see each other soon through this beautiful creative community.
¡Hugs and blessings!.😙
Todas las fotos son de mi autoria capturadas por mi tablet Samsung galaxy.
Editadas por Collage_maker.
Traductor utilizado en cada párrafo español/inglés (google.com)
All photos are my own, captured by my Samsung galaxy tablet.
Edited by Collage_maker.
Translator used in each paragraph Spanish/English (google.com)
Muy hermosa diadema 😍 llena de detalles y colores alegres. Te felicito❤
Muchas gracias querida!😊😊
Que hermosa diadema amiga, los pasos están bien explicados, a mi bebé le quedaria muy linda también 😍✨
Si, a una bebé le quedará estupendo! gracias por comentar.
Thank you for sharing this amazing post on HIVE!
Your content got selected by our fellow curator @rezoanulvibes & you just received a little thank you via an upvote from our non-profit curation initiative!
You will be featured in one of our recurring curation compilations and on our pinterest boards! Both are aiming to offer you a stage to widen your audience within and outside of the DIY scene of hive.
Join the official DIYHub community on HIVE and show us more of your amazing work and feel free to connect with us and other DIYers via our discord server: https://discord.gg/mY5uCfQ !
If you want to support our goal to motivate other DIY/art/music/homesteading/... creators just delegate to us and earn 100% of your curation rewards!
Stay creative & hive on!