Tejido de mostacilla sin telar [Eng-Esp]
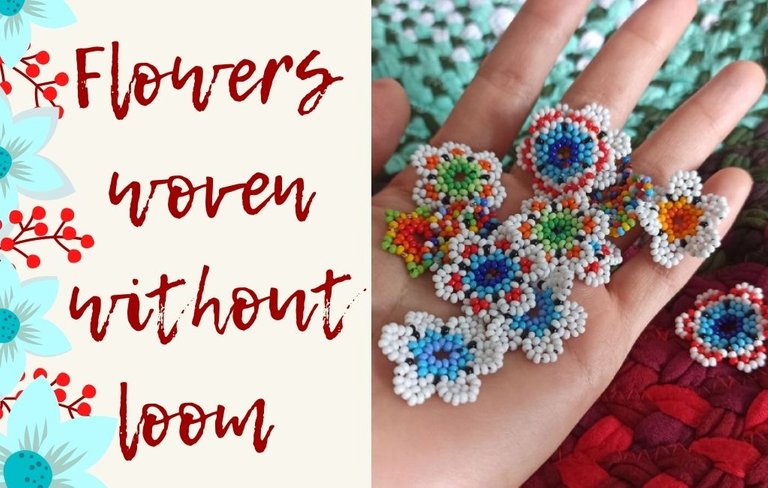

Varias veces me ha tocado salir de casa a hacer diligencias en lugares donde pasare un buen tiempo o a reuniones en casas de algunos amigos y para aprovechar la oportunidad me gusta tejer pero llevar el telar se me hace muy incomodo, por esta razón un día sin más después de haber visto unos diseños de flores hechos a mano alzada, decidí aprender como se hacían las pulseras de este tipo, para así poder tejer cuando quisiera solo llevando un kit pequeño de mostacilla, hilo y aguja.
Several times I have had to leave home to run errands in places where I will spend a good time or to meetings at some friends' houses and to take advantage of the opportunity I like to weave but carrying the loom is very uncomfortable, for this reason one day after seeing some designs of flowers made freehand, I decided to learn how to make bracelets of this type, so I could weave whenever I wanted just carrying a small kit of beads, thread and needle.
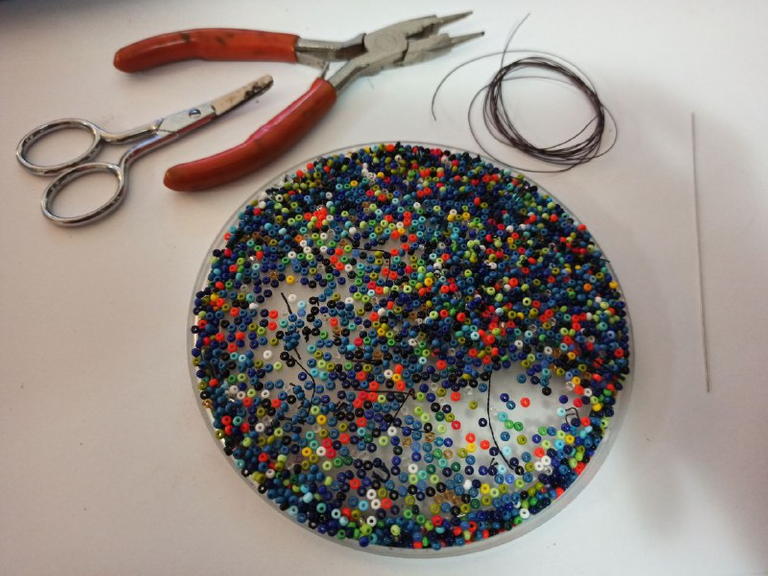
Para estas florecitas solo se necesitan:
- 1 metro de nylon lubricado numero 30;
- 2 gramos de mostacilla checa (calibrada);
- 1 aguja para mostacilla;
- 1 tijera;
- 1 pinza.
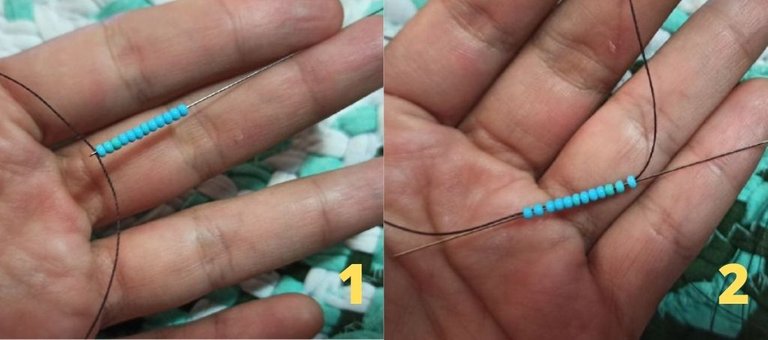
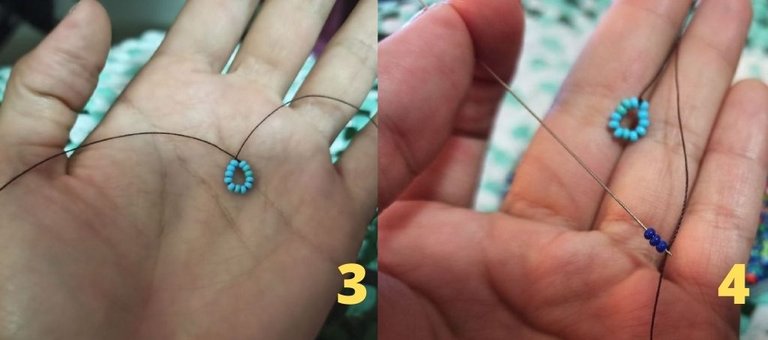
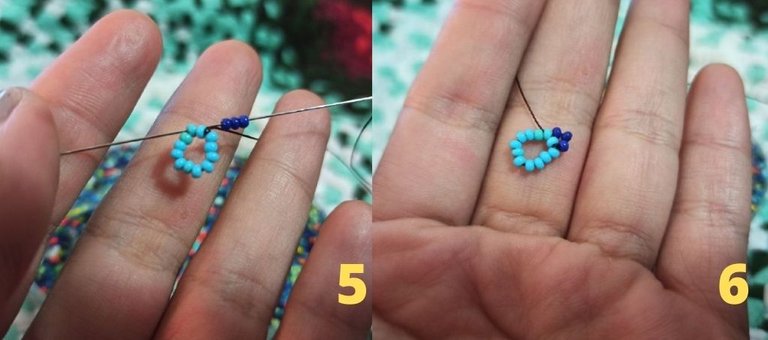
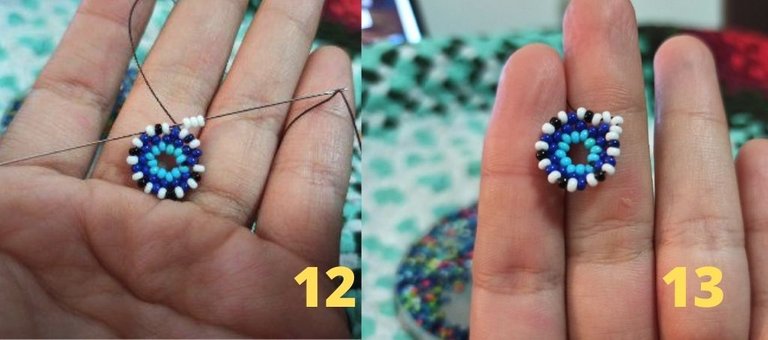
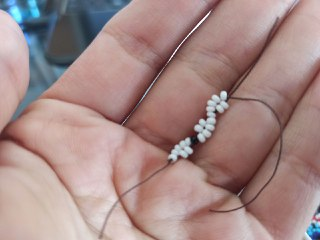
Lo primero después de armar la aguja y el hilo, metemos 12 mostacillas y la pasamos completas por el hilo dos veces para hacer una circunferencia. Anudamos bien para que no se salga, cortamos el excedente, quemamos la puntita para sellar y masajeamos para que todo quede en su forma.
For these little flowers you only need:
- 1 meter of lubricated nylon number 30;
- 2 grams of Czech beads (calibrated);
- 1 needle for mustard;
- 1 scissors;
- 1 pliers.
First of all, after assembling the needle and thread, we put 12 beads and pass them through the thread twice to make a circumference. We knot well so that it does not come out, cut the excess, burn the tip to seal and massage so that everything stays in its shape.
Una vez que tenemos el circulito, comenzamos a pasar 3 mostacillas de un color mas oscuro, saltando una mostacilla, esto nos dejaría una flor principal de donde partirán los pétalos.
Once we have the circle, we begin to pass 3 beads of a darker color, skipping a bead, this would leave us a main flower from where the petals will start.
Para que queden en forma puntiaguda, (que es la forma correcta), debemos darle masajes con los dedos mientras vamos ajustando el hilo al mismo tiempo.
To make them pointy (which is the correct shape), we must massage them with our fingers while adjusting the thread at the same time.
Una de las cosas que hay que tener en cuenta es que los hilos siempre deben ir por dentro de las mostacillas, por lo que ciertamente en ocasiones deberemos pasar el hilo varias veces por la misma cuenta, es por esto a la vez que es tan importante usar una aguja especial con cabezal delgado.
One of the things to keep in mind is that the threads must always go inside the beads, so certainly sometimes we will have to pass the thread several times through the same bead, which is why it is so important to use a special needle with a thin head.
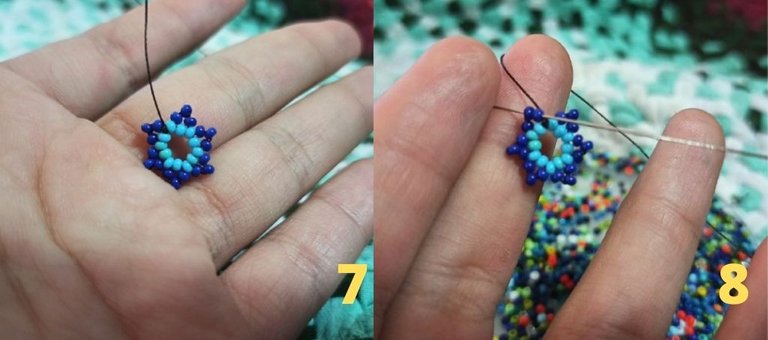
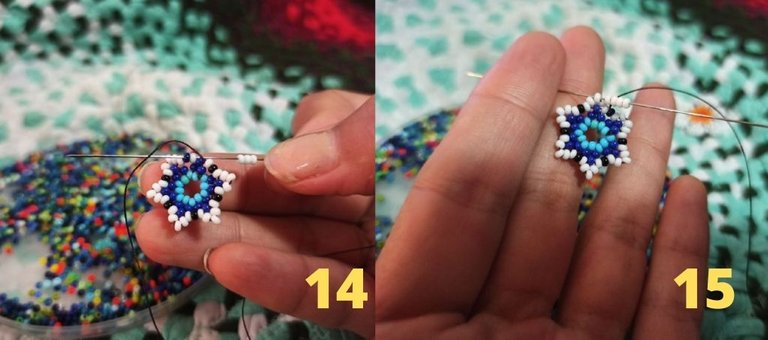
Al finalizar con la primera flor de 6 puntas debemos colocarnos con la aguja después de el siguiente pico que nos quede, para así poder crear una guía redonda entre cada pico.
At the end of the first 6-pointed flower, we must place the needle after the next remaining beak in order to create a round guide between each beak.
Para esta parte cambiamos el color, teniendo en cuenta que este cambio es para comenzar los pétalos por lo que la elección del color dependerá de eso justamente, de que color prefiramos los pétalos. Y en el centro un color negro que nos servirá para distinguir esa separación entre pétalos. Este será el punto pivote.
For this part we change the color, keeping in mind that this change is to start the petals so the choice of color will depend on just that, what color we prefer the petals. And in the center a black color that will serve to distinguish the separation between petals. This will be the pivot point.
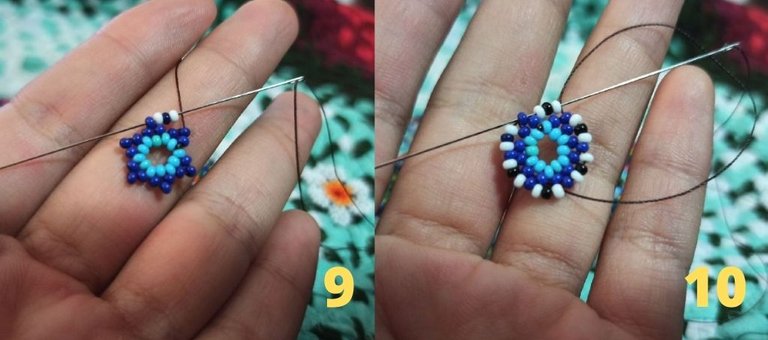
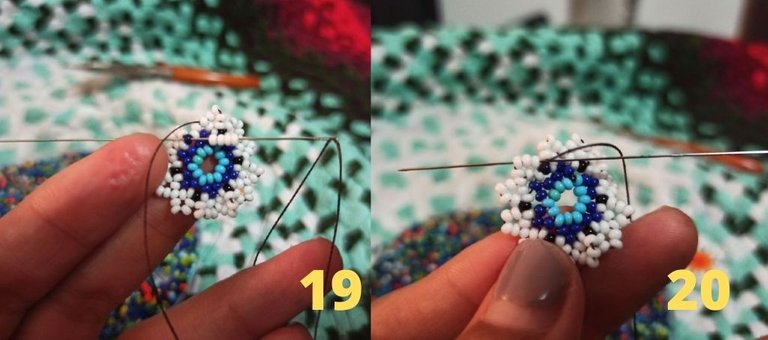
Cuando completamos el circulo hay que asegurar bien el hilo para que siga siendo uniforme, masajeamos, y pasamos la aguja por las siguientes 4 mostacillas, que en este caso eran, azul, blanco, negro y blanco.
When we complete the circle we must secure the thread well so that it remains uniform, massage, and pass the needle through the next 4 beads, which in this case were blue, white, black and white.
Estando aquí comenzamos a armar la segunda flor de 6 puntas que es el centro del pétalo. Aquí podemos cambiar por un color degradado si así gustan y también se vera hermoso.
Here we start to assemble the second 6-pointed flower which is the center of the petal. Here we can change to a gradient color if you like and it will also look beautiful.
Cuando tengamos la flor hecha volvemos a pasar el hilo a través de la mostacilla negra que sigue para de allí comenzar a meter 4 del mismo color del pétalo.
El procedimiento es, salimos de la negra, insertamos 4 mostacillas blancas y las metemos en la numero 3, que seria la punta, el pico de ese pétalo.
When we have the flower made, we pass the thread through the black bead that follows to start inserting 4 beads of the same color of the petal.
The procedure is, we leave the black one, we insert 4 white beads and we put them in the next number 3, which would be the tip, the peak of that petal.

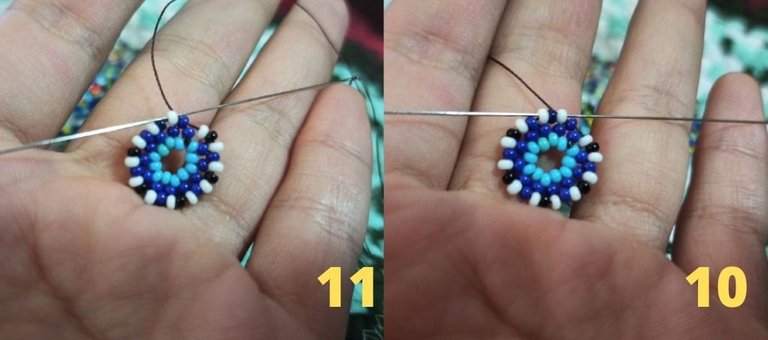
Aquí debemos repetir el patron de amasado y tensado jajaja, ir poco a poco dándole la forma al pétalo, hay que practicar un poco la percepción creativa de la figura que se esta creando, para no perderse del todo, al principio puede verse como desordenado, allí entra nuestro trabajo de acomodar las cuentas de tal forma que podamos llevar un orden.
Here we must repeat the pattern of kneading and tightening hahaha, gradually giving the shape to the petal, you have to practice a little creative perception of the figure that is being created, to not get lost at all, at first it may look messy, there comes our work to accommodate the beads so that we can bring an order.
Este puede ser el paso mas confuso y de alguna forma es en el que mas cuidado debemos tener. porque hay que pasar atreves de todas las mostacillas por tercera vez y el hilo y la aguja se complican un poco por el espacio, en esta parte del trabajo es que utilizo la pinza, normalmente con los dedos se hace mas difícil jalar.
This can be the most confusing step and in some ways is the one we must be most careful with, because we have to pass through all the beads for the third time and the thread and needle are a little complicated by the space between they, in this part of the work is that I use the pliers, normally with the fingers it is more difficult to pull.
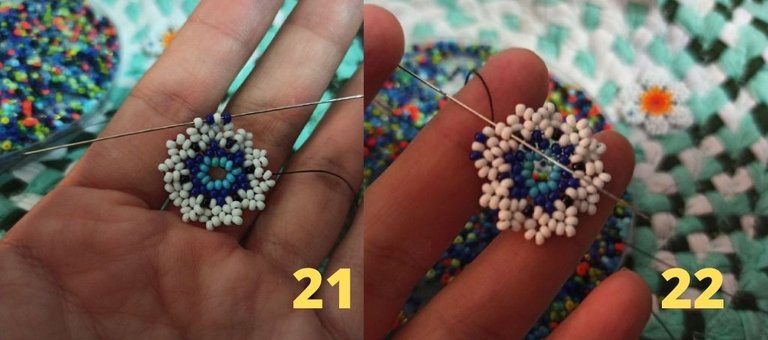
Y hablando de eso al final de este ejemplo justo me paso que jale bruscamente la aguja con la pinza y partí las mostacillas casi terminando el patron jajajaja, entonces... importante lo que les decía en el paso anterior y en el paso 6 y 7. La aguja delgada es esencial y mientras mas fuerte y delgado sea el nylon, mucho mejor.
And speaking of that at the end of this example I just happened to pull the needle abruptly with the pliers and I split the beads almost finishing the pattern hahaha, so... important what I was telling you in the previous step and in step 6 and 7. The thin needle is essential and the stronger and thinner the nylon, the better.
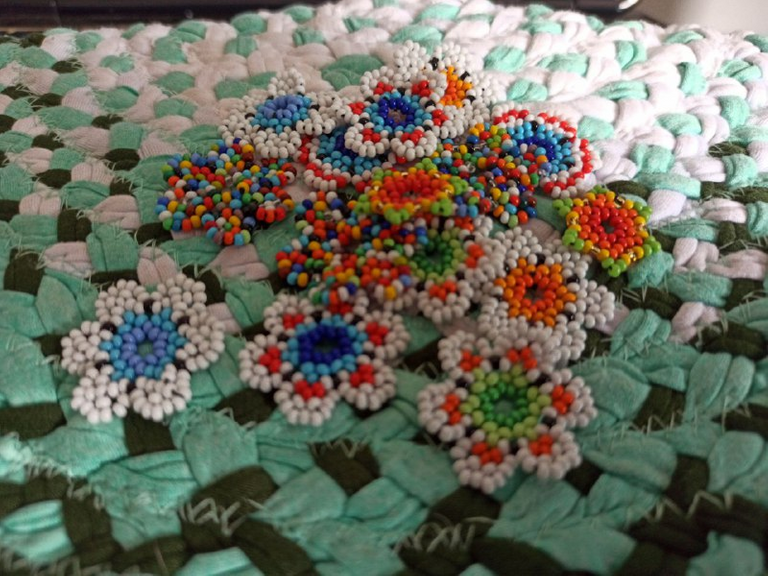
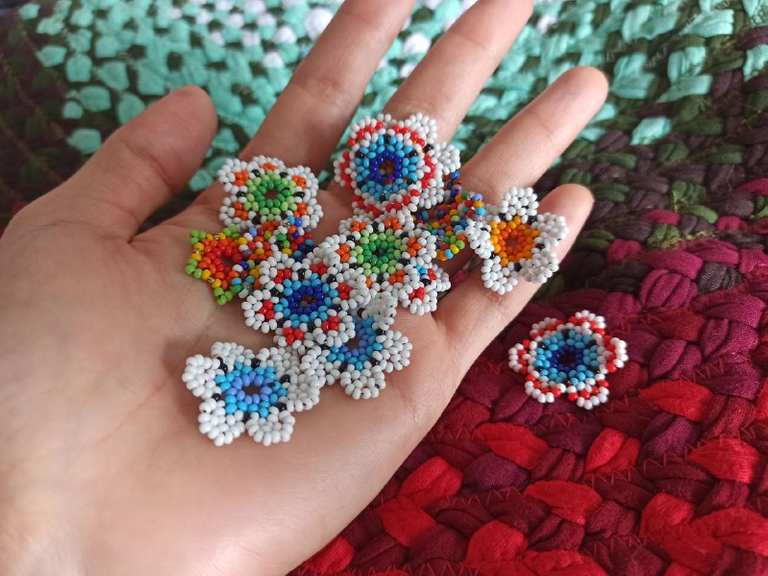
Una vez que terminas una pues solo queda inventar mil combinaciones más, los patrones también han ido fluyendo para crear otro tipo de flores, pero sin dudas son bastante entretenidas de hacer, y bueno son una belleza.😅
Once you finish one, you just have to invent a thousand more combinations, the patterns have also been flowing to create other types of flowers, but without a doubt they are quite fun to make, and well, they are a beauty.😅

Esto es todo por el día de hoy, espero les haya gustado y motivado a crear con amor. Un abrazo y los mejores deseos desde el fondo de mi corazón. Adiwa!
This is all for today, I hope you liked it and motivated you to create with love. A hug and best wishes from the bottom of my heart. Adiwa!
Me encantó! Hay que tener mucha paciencia para hacerlo pero queda súper lindo! Saludos.
Muuuuuucha paciencia, lo reconozco, pero eso es justo lo que me hace practicar esto como un arte, creo que suelo ser en exceso impaciente y avanzar paso a paso a esa virtud me ha costado mucho, ME SIGUE COSTANDO jeje, mas ahora solo lo disfruto cualquier cosa que me ayude a respirar calmada y conscientemente.
Muchas gracias por pasar🤗. Adiwa!
Hola @auelitairene, son unas lindas flores las que haces, se ve que es un trabajo muy delicado que amerita de mucha paciencia.
Las utilizas como apliques para otras labores?
Me sentí muy identificada contigo con eso de llevar tu labor a todas partes, suelo hacer eso, cuando voy de visita a casa de un familiar.
Hola hola muchas gracias, tejer en casa ajena cuando no hay nada que hacer le da sentido a todo el rato jajaja.
Y si, las hago algunas para hacer el cuello de una camisa y las otras para unos sarcillos en base de cobre. Espero pronto poder mostrarles ese trabajo.
Gracias por responder a mi pregunta.
Saludos!
Hola Irene, me gustó mucho tu trabajo. A veces por querer terminar rápido cometemos algunos errores, esto me pasa bastante seguido ajajaja. Hay que fomentar la paciencia, y se ve que para hacer estos diseños con pequeñas mostacillas tenes que tener mucha 😅❤️. ¿Cuál es el destino final de estas flores?
Me gustó leerte, tu post bien armado y lindas fotos. Te felicito 😃.
Hola Laura muchísimas gracias. Siiii A veces el trabajo radica en la paciencia, y como dije antes, este en particular necesita extras de calma de vez en cuando. Estas florecitas se convertirán en el cuello de una camisa y en unos hermosos sarcillos con base de cobre❤️
Muchas gracias por pasarte y dejar por aquí un poquito de amor. Saludos, Adiwa!
These are very pretty beaded flowers. I think it’s a great idea you have to carry a small bead kit around and do these as you you wish. Thanks for sharing with us today ~
Yeeeee :D Thanks you so much.
You’re welcome ;)
Oh you are so good at these. I tried a simpler bead flower before and mine were so messy!
Oh, eres tan bueno en esto. ¡Probé una flor de cuentas más simple antes y las mías estaban tan desordenadas!
hahaha yes, patience is often the key, it doesn't always come out right the first time, the beauty is seen after you have done the third time. Never stop trying, if you really like it.
Thank you very much for stopping by, greetings!
Hola @auelitairene,
Esto es simplemente hermoso, me ha encantado, creo que las haré, tengo bastante mostacilla, hasta ahora he entendido el paso a paso. Una pregunta ¿qué significa mostacilla calibrada?
Gracias por compartir tan hermoso resultado, he quedado fascinada
Saludos
Siiii te va a encantar!
La mostacilla calibrada es la mostacilla que es toda del mismo tamaño, también se conoce como chaquira o mostacilla checa. por eso es que se ven exactas, voy a publicar pronto la diferencia.
Gracias por tu respuesta. Seguimos en contacto. Me encantaron esas flores
Hola @auelitairene ,
Acá practicando, creo hice mal la tercera vuelta ¿cierto?🙃
No tengo el hilo ni la aguja, pero quiero ir practicando mientras tengo todos los materiales
Gracias adelantadas por tu respuesta
Holaaaa que lindo ver qué te animaste 👀❤️🥰 ajaaaammm ponle cuidado a la segunda vuelta... Primero metemos 12, luego de 3 en 3 saltando una mostacillas, luego cuando termines esa vuelta metes la aguja por las que siguen hasta llegar al pico del pétalo y así seguir con 3 de pico a pico
Haces bellezas! Además de tener unos ojos excelentes para ver bien por dónde pasar el nylon. Me encanta tu arte eres muy creativa!