DIY: Beautiful lighter holder hen (ENG - ESP)
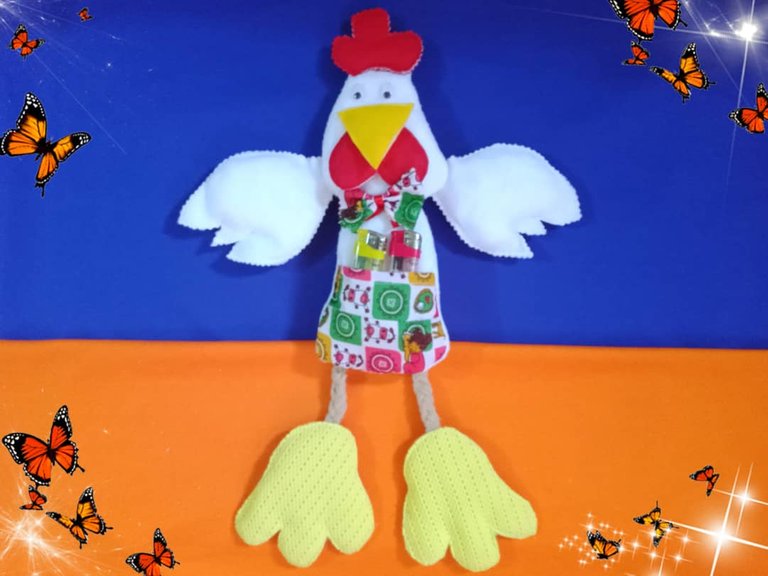

Hello friends lovers of threads and needles, God bless you and have a happy Friday, these weeks I have been a little busy finishing the pending projects, my idea was to finish them in January, although I managed to advance a lot I missed the small details such as elastic and stickers that I have not yet bought because of the time factor due to my son's school activities and my almost exclusive dedication to sewing hahaha, I am happy to share with you a project to decorate the kitchen and at the same time keep the lighters, it is made with scraps of fabric that are left over from different jobs, it is simple to make and in a few steps.

Hola amigos amantes de los hilos y las agujas que Dios les bendiga y tengan un feliz viernes, estas semanas he estado un poco ocupada terminando los proyectos pendientes, mi idea era terminarlos en el mes de enero, aunque logré avanzar mucho faltaron los pequeños detalles como elástico y stickers que aún no he comprado por el factor tiempo debido a las actividades escolares de mi hijo y mi dedicación casi exclusiva a la costura jajaja, me siento feliz de compartir con ustedes un proyecto para adornar la cocina y a la vez guardar los encendedores, está elaborada con retazos de tela que van quedando de diferentes trabajos, es sencilla de hacer y en pocos pasos.


For this project I used scraps of POP fleece blanket fabric and wadding.
Scissors
Chalk
Thread
Silicone stick
Needle

Para este proyecto utilicé retazos de tela manta polar POP y guata.
Tijera
Tiza
Hilo
Silicón en barra
Aguja


The first step is to see the amount of fabric available and draw the patterns according to the fabric, then I marked the pieces in the corresponding fabrics (wings, body and head in white polar blanket), beak, crest and legs in POP, I faced right to right and sewed the body, the head leaving an opening, I added a piece of fabric to make the lighter bag, cut the excess fabric and flipped.

El primer paso es ver la cantidad de tela disponible y sacar los patrones de acuerdo a la tela, luego marqué la piezas en las telas correspondientes (alas, cuerpo y cabeza en manta polar blanca), pico, cresta y patas en POP, enfrenté derecho con derecho y cosí el cuerpo, la cabeza dejando una abertura, agregué un retazo de tela para hacer el saco porta encendedores, corté el exceso de tela y volteé.


When sewing the body and head pieces, I wanted to give a different look to the hen, to the remaining marked pieces I put scraps of wadding and sewed on the outside facing back to back, then very careful not to cut the seam I removed the excess fabric, in the crest I used zig zag scissors for a better finish.
Al coser las piezas del cuerpo y la cabeza, quise darle un aspecto diferente a la gallina, a las piezas restantes marcadas les puse retazos de guata y cosí por fuera enfrentando revés con revés, luego con mucho cuidado de no cortar la costura retiré el sobrante de tela, en la cresta utilicé tijera de zig zag para un mejor acabado.


I filled the white pieces with wadding and closed the openings with hand stitching, I also made a bow to match the "sack" of the hen, with the finished pieces I only need to assemble the hen.
Rellené las piezas de color blanco con guata y cerré las aberturas con costura a mano, también hice un lazo a juego con el "saco" de la gallina, con las piezas terminadas solo falta armar la gallina.


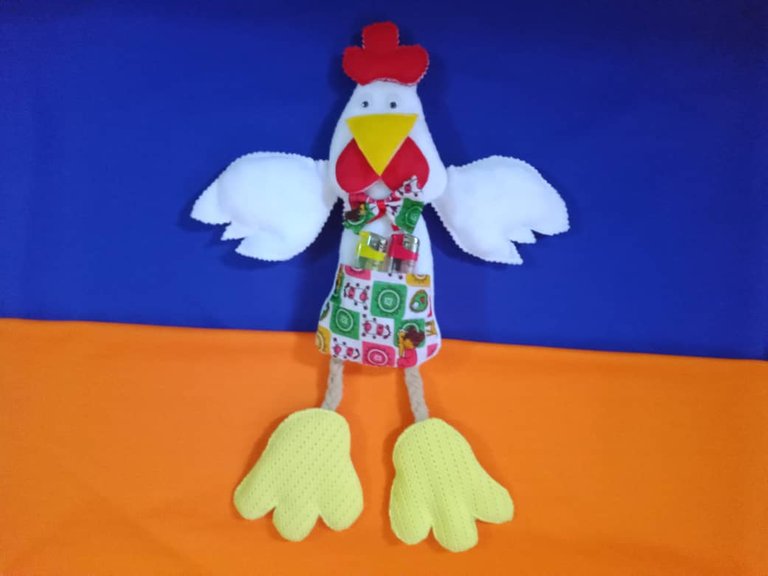
To assemble the hen, I glued the crest with hand stitching, then the beak and with a silicone stitch the eyes, then I attached the head to the body, and glued the wings.
Para armar la gallina, pegué la cresta con puntada a mano, seguidamente el pico y con un punto de silicón los ojos, luego uní la cabeza al cuerpo, y pegué las alas.


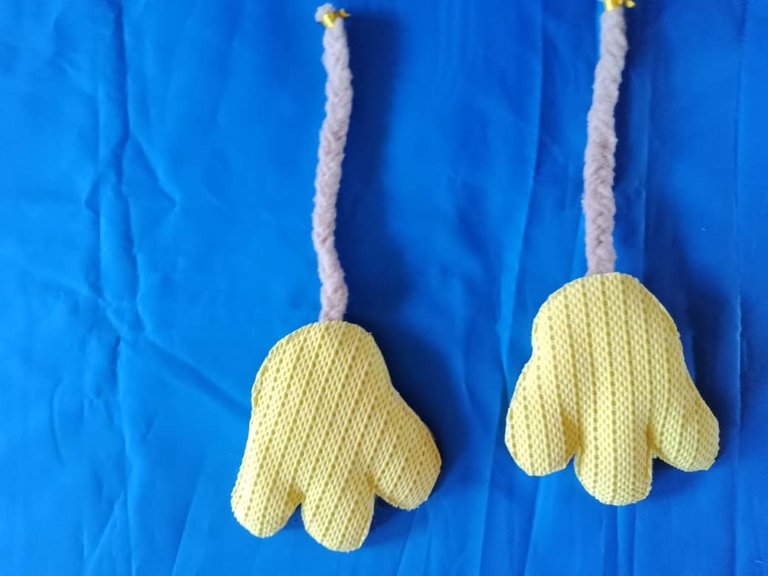
I made the legs of the hen by weaving two braids with strips of light brown polar blanket, then I glued them to the legs of the hen and these in turn to the body from the back, there I also put a ribbon for the hanger, this way our lighter holder hen is finished.
Las piernas de la gallina las hice tejiendo dos trenzas con tiras de manta polar marrón claro, luego las pegué a las pata de la gallina y estas a su vez al cuerpo por la parte de atrás, allí también puse una cinta para el colgadero, de esta forma está terminada nuestra gallina porta encendedores.


Coser estos proyectos es una opción para aprovechar los retazos de tela que tenemos en casa, se pueden hacer muchas figuras; frutas, animales, flores jarrones entre otros, para decorar la cocina y darle uso a los restos de tela, también con la técnica de Patchwork se puede sacar el máximo provecho a los retazos creando hermosos adornos para embellecer la casa, este proyecto es lo más parecido a una muñeca que he hecho y me gustó el resultado, el proceso fue bastante sencillo y sin dificultades, lo más importante es tener las piezas listas al momento de armar para evitar contratiempos; ya encontré donde usar los retazos de tela que tengo en casa, debo ahora pensar cuales figuras voy a hacer y las bolsas de retazo me dejarán mucho espacio libre.


Blessings!
Bendiciones!
Hasta luego!
Translated with https://www.deepl.com/translator
              All images are my own, captured by a Síragon LC-3000 camera. Dividers courtesy of @kattycrochet.


   Todas las imágenes son de mi autoría, capturadas por una cámara Síragon LC-3000. Divisores cortesía de @kattycrochet.
Me encantó tu gallinita para colocar los yesqueros, oye es un problema que permanezcan en un solo lugar ja ja, es excelente para que en la casa recuerden donde van, gracias por compartirnos tu trabajo, feliz viernes 🤗
Saludos @marlynmont, jajaja es cierto al parecer los yesqueros y la cajas de fósforo tienen "patitas" no permanecen en un solo lugar, gracias por pasar y tu hermoso comentario , creo que con la" gallinita" estarán en solo lugar en un solo lugar, aunque no se sabe, pueden cargar también con ella.
Que tengas una bendecida noche!
https://twitter.com/1567306537697251328/status/1621640250517856257
The rewards earned on this comment will go directly to the people( @evelin71 ) sharing the post on Twitter as long as they are registered with @poshtoken. Sign up at https://hiveposh.com.
Thank you for sharing this post on HIVE!
Your content got selected by our fellow curator priyanarc & you just received a little thank you upvote from us for your great work! Your post will be featured in one of our recurring compilations which are aiming to offer you a stage to widen your audience within the DIY scene of Hive. Stay creative & HIVE ON!
Please vote for our hive witness <3
Greetings @diyhub and @priyanarc, grateful for the support.
Happy night!