A Big DIY Project. Entry #1. My First Venezuelan Cuatro: Embla.
Hello, dear readers
I wanna share with you one of the most satisfying projects I have embarked on. This is something I had the chance to do last year. Since it is close to its anniversary, I wanted to show it to you too:
Buen día, estimados lectores.
Quiero compartir con ustedes uno de los proyectos más gratificantes en los que he participado. Es algo que tuve la oportunidad de hacer el año pasado. Como ya se acerca su aniversario, quería mostrárselos
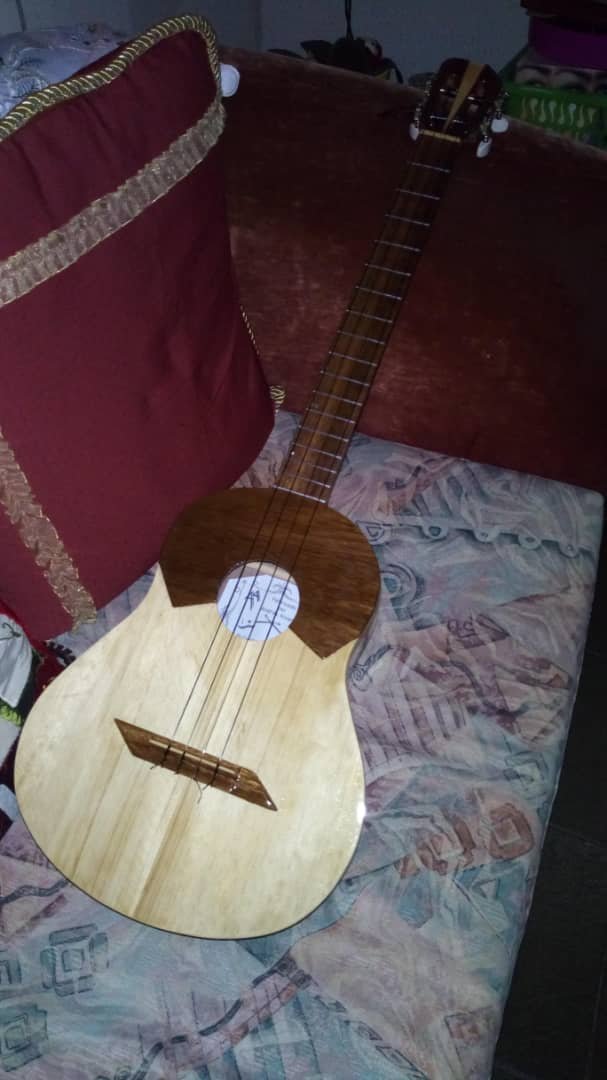
Meet Embla, my first Venezuelan Cuatro:
Conozcan a Embla, mi primer cuatro venezolano:
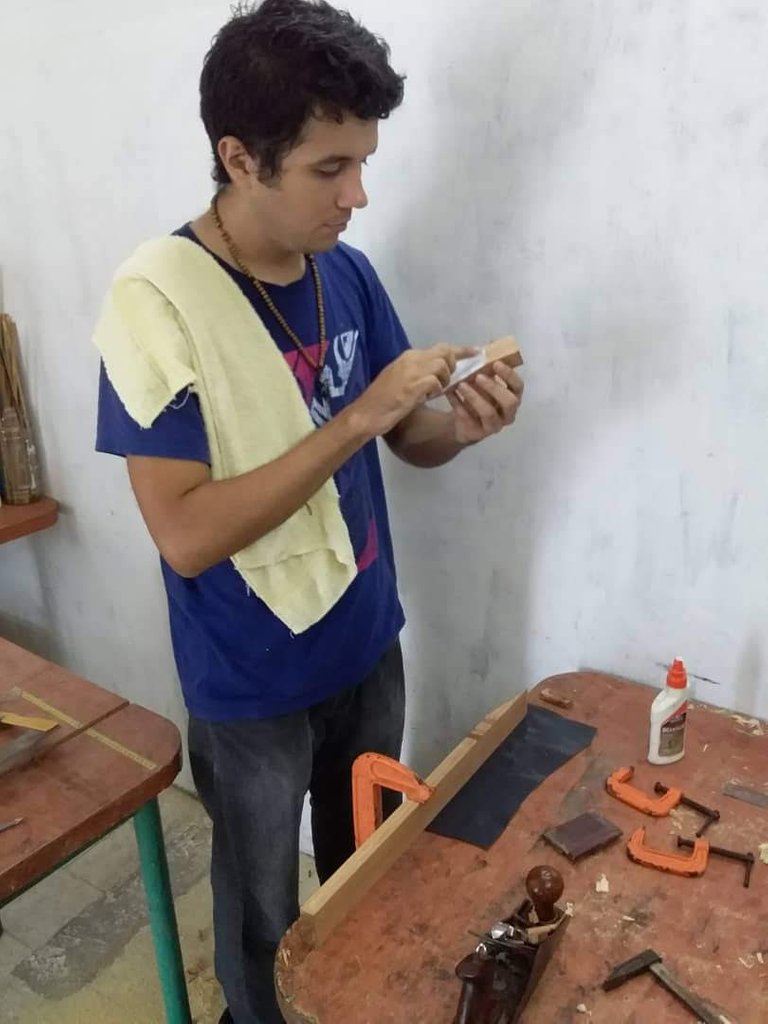
Yes, the first Cuatro I made with my hands. Today, I’ll start a series of posts about the process of making Embla. But worry not, this is not going to be a tutorial on how to make a Cuatro from scratch. I don’t think I’m ready for showing something like that, but hopefully the time will come when I’m making these on order.
I didn’t do it alone. I had some help of a friend and Venezuelan luthier Andrés Rodríguez, who received me with open arms in his workshop and showed me some basics about the process of making a string instrument.
En efecto, el primer cuatro hecho con mis manos. Hoy, comenzaré una serie de publicaciones sobre el proceso de fabricación de Embla. No se preocupen, no es un tutorial sobre cómo hacer un cuatro. No estoy listo para hacer algo así. Quizá en algún momento esté en capacidad de hacer esto.
No estuve solo durante este proyecto. Tuve la ayuda del luthier venezolano Andrés Rodríguez, quien me recibió con los brazos abiertos en su taller y me enseñó los puntos básicos del proceso de construcción de un instrumento de cuerdas.
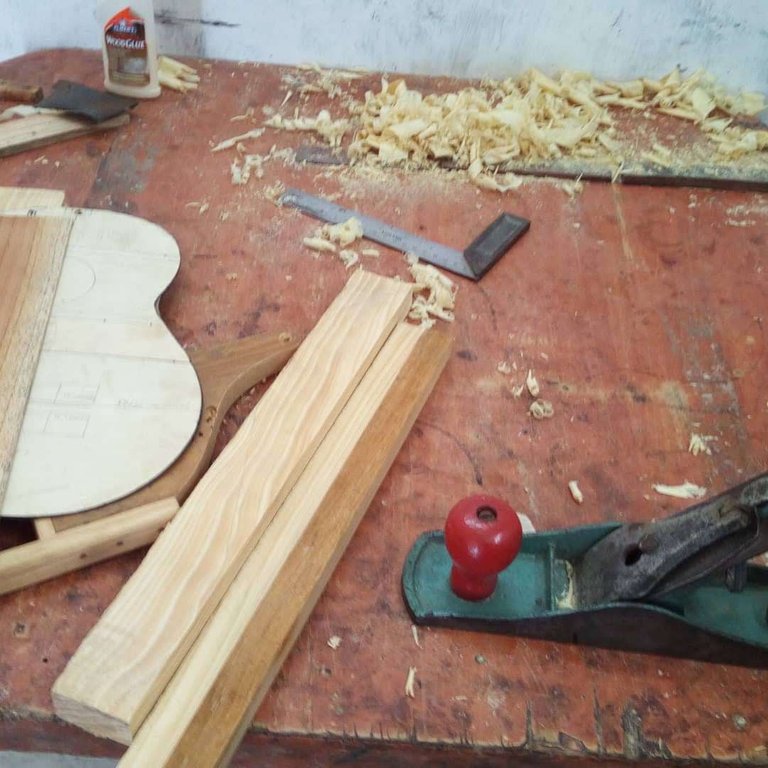
It started with the selection of materials.
These are Embla’s features:
Sound board: Pine
Neck and head stock: Cedar
Body, fretboard and bridge: Saman
Tunning pegs: Mechanic
Aesthetic details: saman and pine
Nut and Bridge Saddle: Manzanero
Frets and fretmarkers: Aluminum
Todo comenzó con la selección de los materiales.
Estas son las características de Embla:
Tapa armónica. Pino
Mástil y clavijero: Cedro
Fondo y Aros (cuerpo), diapasón y puente: Samán
Clavijas: Mecanizadas
Detalles estéticos: Samán y Pino
Cejilla y Cejuela: Manzanero
Trastes y Puntos Armónicos: Aluminio
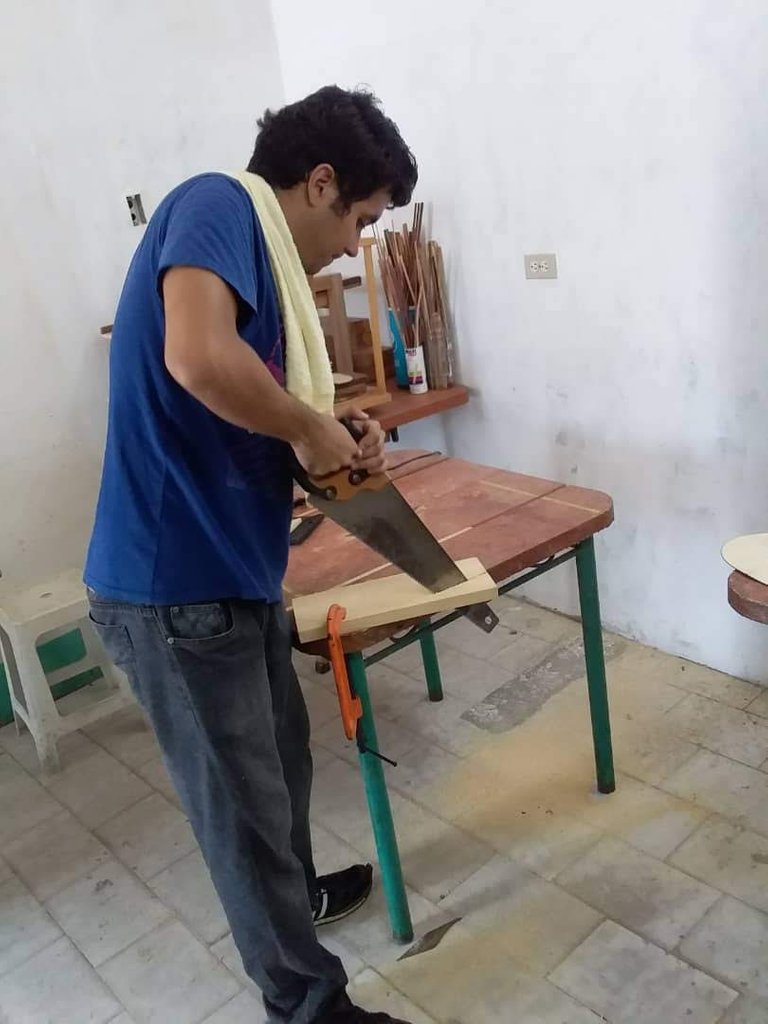
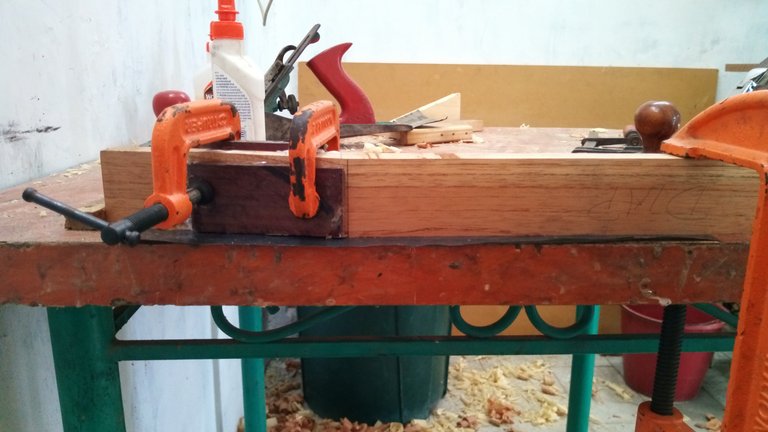
During the first days in the workshop, it was all about of getting to know the tools and their functions. For this project, the starting point of instrument was the neck (some people start by building the body of the instrument, but this is just preference and, in some cases, some crafting styles or schools).
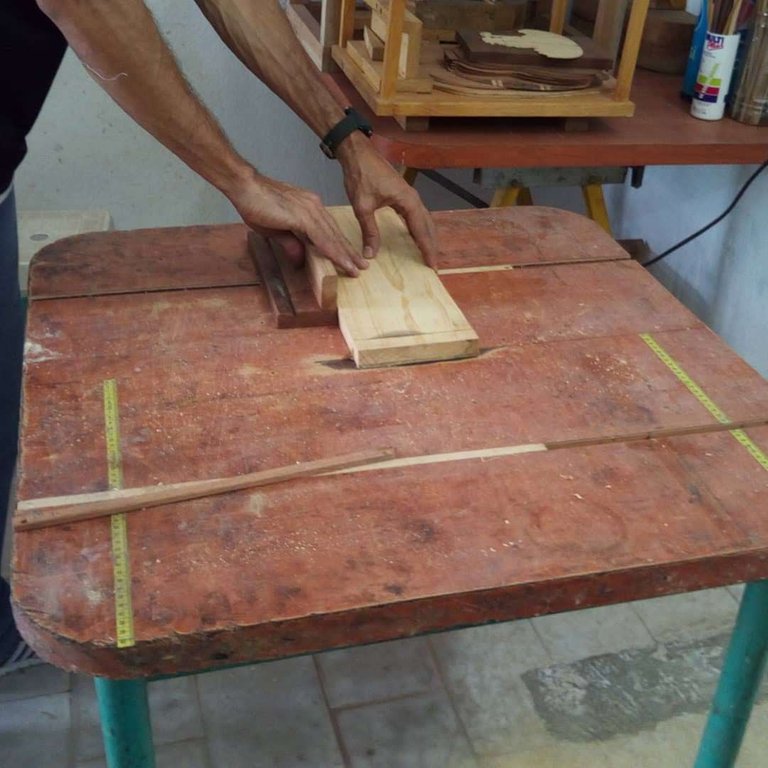
From a 55cm cedar piece, a portion of at least 12 cm is cut at an angle of 13°. This piece is then reattached at the longer one. The reason of this is to make up the division between neck and head stock. One important detail about this process and carpentry in general is that, in order to glue two pieces of wood together, you need to make their surfaces even. Otherwise, this union will be weak. And in the case of an instrument, the tension of the strings would break it. So, after cutting, I used a plane and sandpaper to even out the surfaces and applied wood glue. Then, placed clamps over the union to make it strong and keep it in place. And with this the first step towards building a cuatro was completed.
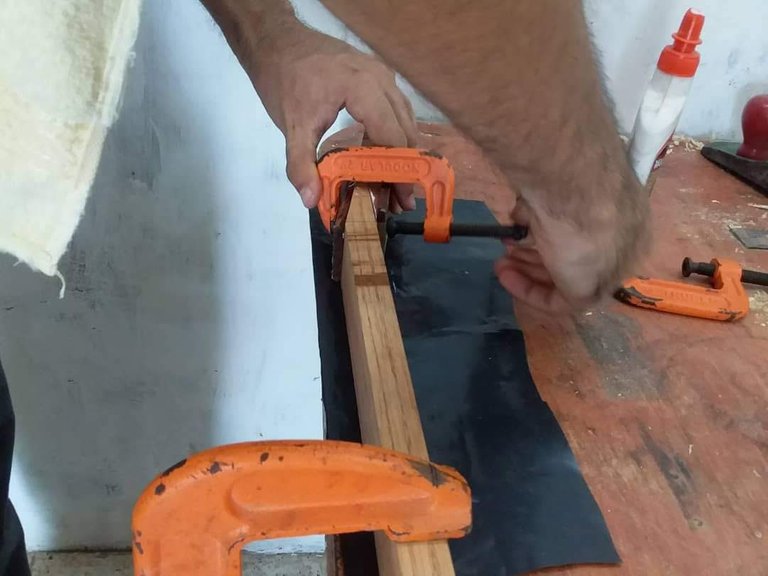
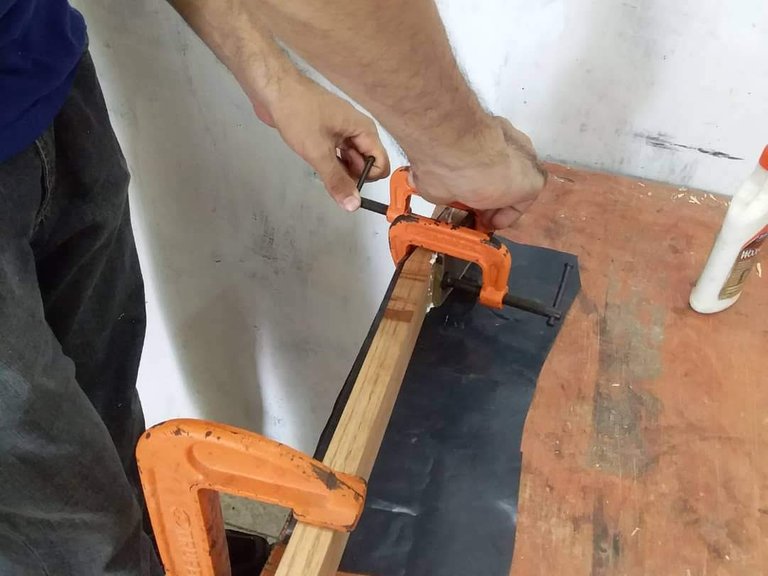

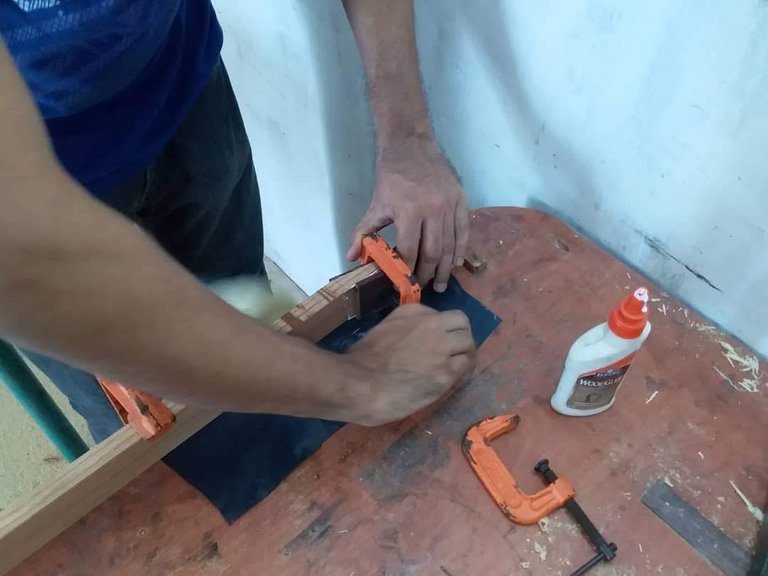
Los primeros días en el taller fueron familiarizarme con las herramientas y sus funciones. Este proyecto empezó por el mástil (algunas personas comienzan por el cuerpo del instrumento, pero esto se debe a preferencias o, en algunos casos, estilos o escuelas de fabricación).
De una pieza de cedro de 55cm, se corta una más pequeña, de unos 12 cm aproximadamente a un ángulo de 13°. Después, esta nueva pieza se ensambla con la más grande. Esto sea hace para crear la división entre mástil y clavijero. Un detalle importante de este proceso y de la carpintería en general es que, para poder pegar dos piezas de madera, se necesitan superficies rectas. Aquí en Venezuela, a esto se le conoce coloquialmente como “dejar a escuadra”. Básicamente, no dejar ningún tipo de relieve o depresión en la madera. De lo contrario, las uniones serían muy débiles y, en el caso de los instrumentos, la tensión de las cuerdas acabaría por romper esto. Así que, después de cortar, utilicé un cepillo y papel de lija para emparejar las superficies y poder pegarlas. Luego, se reforzó la unión con prensas para mantener las piezas en su lugar. Con esto el primer paso para completar este proyecto estuvo listo.
This was all for the first entry in this series of posts. There’s no need to say how exciting it was to start this work. From this moment, I was already dreaming about playing this instrument for the first time.
Esto fue todo para esta primera entrega. No es necesario mencionar lo emociónate que fue ver cómo esto tomaba forma. Desde el primer día, ya fantaseaba con poder tocar este instrumento.
All the pictures used in this post are either mine or were taking by my teacher Andrés Rodríguez. He doesn’t mind me using the pictures.
Besides, you should go ahead and check out his Instagram page and see his amazing work. Maybe you’ll want to by a cuatro or ukulele from him. Who knows? Just check it out: https://www.instagram.com/luthier_andresrodriguez/?hl=es-la
Todas las fotos utilizadas en este post son de mi autoría o de mi profesor, Andrés Rodríguez. A él no le molesta que utilice algunas de estas fotos.
Además, deberían ir a ver su perfil de Instagram. El trabajo del tocayo es genial. Quizá hasta terminen adquiriendo uno de sus instrumentos. ¿Quién sabe? Solo vayan a ver.
This is great craftsmanship and it's great to see the transfer of skills from your teacher to yourself, it perpetuates the craft, ensures it survives rather than ending up in some robot-filled factory. Nice work and thanks for sharing. @bashadow and @bigtom13, take a look.
Thanks also to little songbird @manujune for reblogging into my feed.
Yes, it is an awesome experience to see how applying that knowledge you can transform raw material into something with purpose.
You're welcome, @galenkp. @bertrayo is a good friend of mine and my father's😁🤗
That's a good enough endorsement. For me. He seems to do good posts and engages...That's all it takes to build relationships. 🙂
You'll have to do a song with it, let us know how it sounds. The finished project looks great.
I was supposed to upload a video for the introduction of this post, but the internet connection hasn't been helpful since yesterday. But don't worry, a sample was already made for that purpose.
Cool, I'll take a listen when it is up.
The connection let me do it, finally! There you go: https://peakd.com/hive-141487/@bertrayo/elbaukfp
That looks great. Nice work!
Thanks a lot!
I was looking forward to this post, @bertrayo.
I followed closely the process that led to your cuatro (now I know it has a name, weird as it ws expected). I remember asking you week after week whether it was ready. I could not believe it would take so long (Of course, I had no idea). I recently had the pleasure of meeting Andrés Rodriguez and I could not believe my eyes. He is very young and the quality of the instruments he makes is just beyond amazing.
I am very happy you got to tell us the story of your cuatro. It looks great.
I see you gathered here a great gang, This is the kind of company you'll enjoy on #Hive. I know they will enjoy your work, especially when you get to show you your musical talent, and I know you'll enjoy theirs.
Great job.
!ENGAGE 25
ENGAGEtokens.Well, it is a process. Besides, @hlezama, I don't live near the workshop. It seems I have gotten myself a nice audience. Good thing there's still more to go about post and meeting new people on #Hive. Thanks for all the help so far.
https://twitter.com/yagguaraparo/status/1326696790230523905
Congratulations @bertrayo! You have completed the following achievement on the Hive blockchain and have been rewarded with new badge(s) :
You can view your badges on your board and compare yourself to others in the Ranking
If you no longer want to receive notifications, reply to this comment with the word
STOPWell. I can tell that I'm going to love this series!
I'm impressed that you are using all hand tools, I love that that skill passes on and on. Good for you.
I'm also impressed with your work benches. Simple, and humble but so effective.
Do you know that the plane chips that I see around the waste basket are the best possible medium for varnish removal when refinishing furniture? Put what ever removal chemical on the surface and grab a handful of plane chips to scrub it off. It's like magic!
You've got a great supporting cast here in the comments. I look forward to more and more of this project!
Thanks for your words, @bigtom13.
Well, you have to use the tools you have at hand.
The pictures you see here were taken at my teacher's workshop. And well, each one keep his/her space as neat as one wants.
Thanks for the advice about refinishing furniture. I will keep it in mind when I get my own working space.
That's a good looking instrument that you've built! I like the way you're showing pictures of the process of building it.
Thanks. There are more to come to show more and more details about its construction.
¡Que orgullo hacer con tus manos un instrumento tan bello!
Te felicito @bertrayo
Gracias, @mllg. El orgullo es hacerlo sonar y que guste. Ahí es donde está el gusto.
♥♥♥