Battle Mages Secrets: A Cool Equal Opportunity Battle to Watch
Equal Opportunity is a fun and action packed ruleset, and some cool battles may emerge from this kind of Rulesets and keep reminding us that Splinterlands isn't only about Profits and $$ gains but also Fun and Interesting!
Equal Opportunity

- All units gain the opportunity ability which allows them to attack the unit with the lowest health on the enemy team.
Last time we spoke about the Martyr Sandwich, and this time we shed some light some of the insane Bloodlust Monsters that can scale to infinity given the right conditions!
Moreover, it's crucial to give an even more importance to a specific key element notably Speed: Abilities like Slow & Swiftness can make or break a battle!
Without further ado, let's get rolling:


- Mid High Mana Cap 33 Mana
- Life, Death, Dragons Elements available
Equal OpportunityRuleset
So I have decided to go as follow:
Summoner
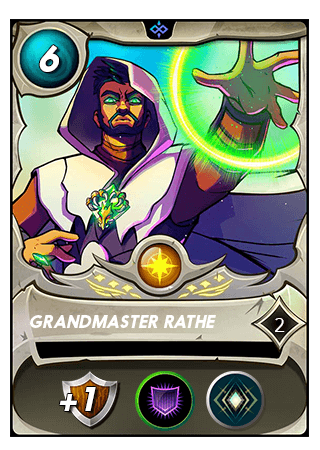
Abilities: Void Armor + +1 Armor + Amplify
This summoner does provide a much needed protection against the opportunity play: Void Armor! That protects my units against all damage types especially Magic, without forgetting about the additional Armor provided to every unit of the team!
Amplify could be useful on a certain monster that would be described below.
1st Position
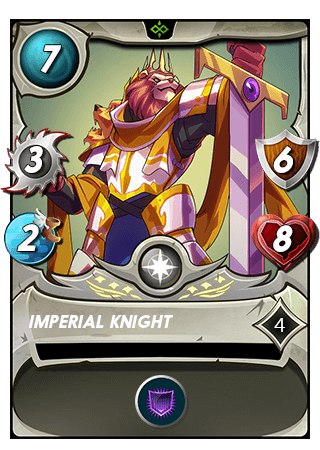
Ability: Void Armor
This monster is a beefy Tank with Up to 15 (14 Base + 1 Armor) Hit points allowing to sustain as long as possible against the enemy tank especially if some support is provided!
3 Melee Damage doesn't sound too bad too!
2nd Position
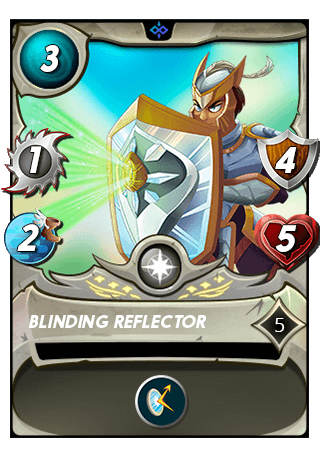
Ability: Magic Reflect
A 3 Mana Tank that is used as an Opportunity attractor as it provided 9 hit points. Morever, in case it got hit by Magic Damage, the Magic Reflect + Amplify will return as much damage to the Magic attacker, Talk about Defense and Offense at the same time!
The Carry

Ability: Bloodlust + True Strike
Talk about a perfect Monster for the opportunity ruleset (still lacks Piercing at level 3), this monster, with a massive starting 5 Melee Damage, will hit any given target no matter what if the Armor doesn't go its way and pretty much garantee a Bloodlust Stack! Its lack of Speed doesn't matter as its compensated with True Strike!
The Martyr

Why don't we give our carry a little more Power to make it even more deadly. Martyr is the way!
The Support
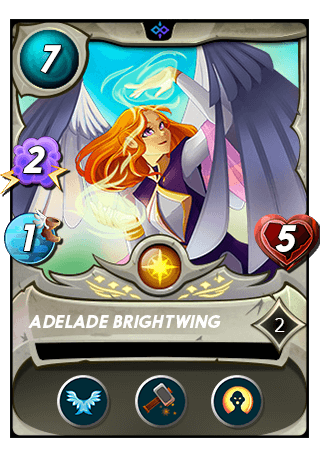
Ability: Flying + Repair + Ressurect
The awesome support Card that provides everything we need for defense! It things goes well, I would like the Ressurect to be ablied on the Venari Marksrat to benefit TWICE from the Martyr ability. Buffing both Jared Scar & Adelaide Brightwing!
Repair is key to help with Imperial Knight Sustain in Armor!
Here's the Link to The Battle
Pre Round 1
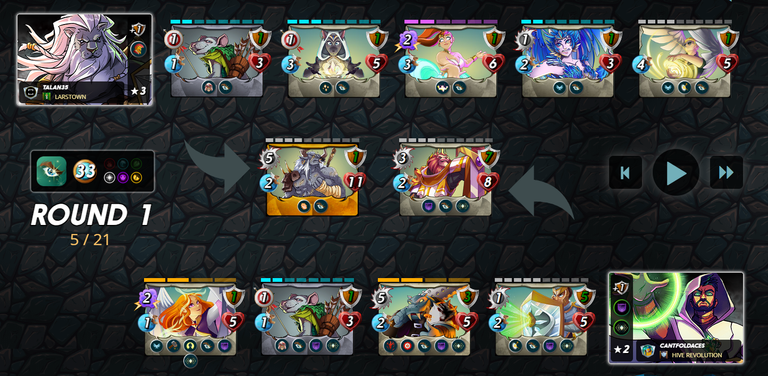
Enemy Team did apply for the Life Team as well but with the Soulbound Summoner, Putting its main carry on the 1st Position! Gladly we bought a sturdy Tank up front!
Round 1
- Nothing Interesting happened except exchanging blows here and out.
- Enemy Venari was the one to take down my Martyr Monster, leading to the Martyr Buff to the adjacent monsters and got revived by Adelaide Ressurect!
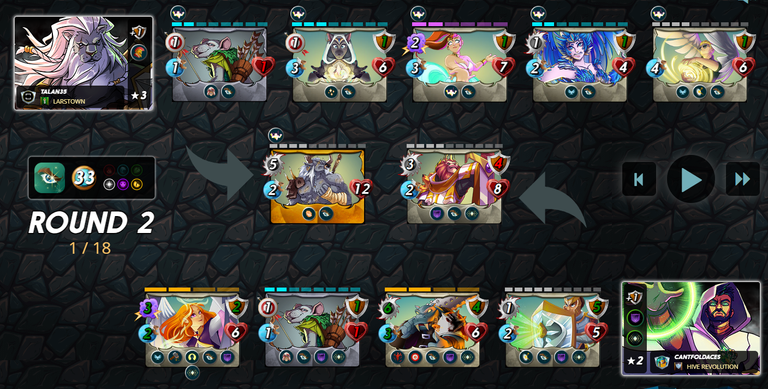
Round 2
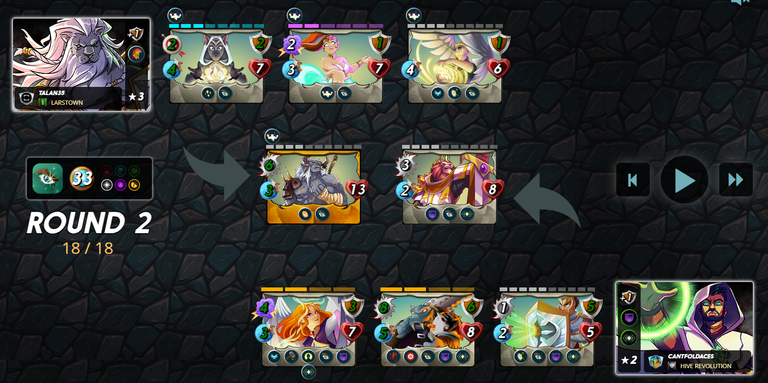
- Enemy Venari Crystalsmith slained my Martyr monster for the second time and here comes another Martyr Buff to both Jared Scar (7 Melee + 4 Speed) & Adelaide (4 Magic + 3 Speed)
- Jared Scar fires a deadly attack on enemy Venari! 1st Bloodlust stack! while the enemy benefited from the Martyr buff! Let's get Rolling!
- Adelaide Brightwing fires its magic bolt and One-shot the Celestial Harpy!
Round 3
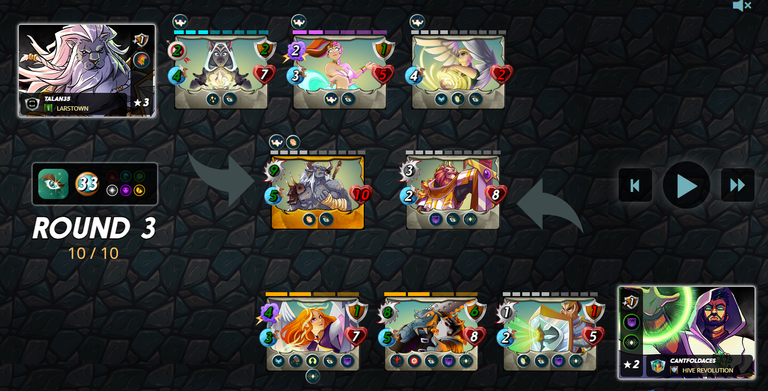
Nothing much happened during this round:
- Jared Scar attack was wasted on the Pelacor's Armor, following by Adelaide attack that left it with only 2 Health
- The Magic Reflect on Blinding Reflector works wonderfully as it returned the damage dealt by Djinn Renova
Round 4
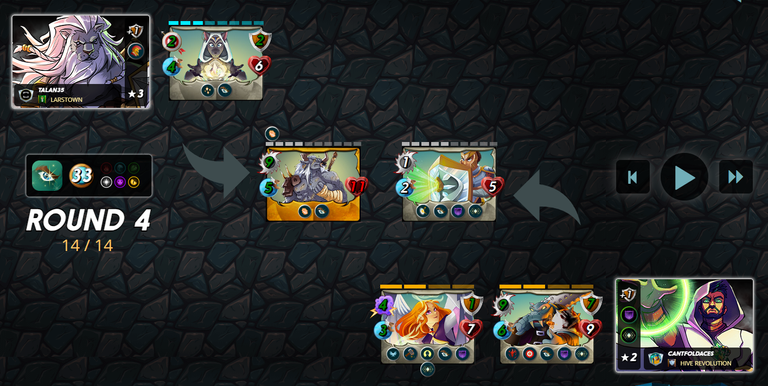
- Drybone Takes down the Imperial Knight after getting Enraged
- Jared Scar gets another Bloodlust powerup after taking down the Pelacor Conjurer
- The Amplified Magic Reflect took down Djinn Renova after taking a massive Magic Bolt from Adelaide!
- Now we're 3 Vs 2
Round 5 + 6
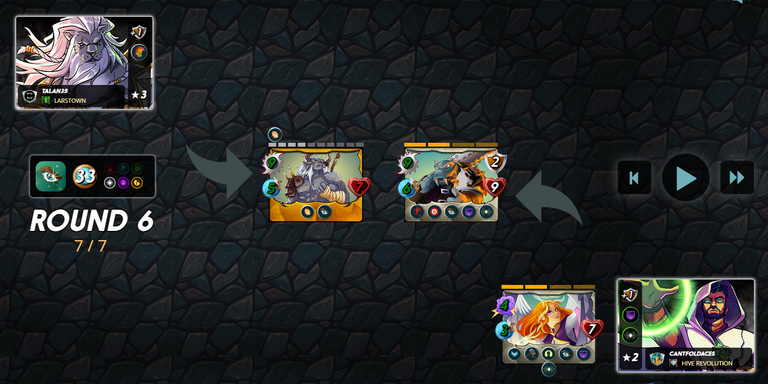
- Drybone Raider took down the Blinder Reflector
- Now a Face Off between Jared Scar & Drybone! Jared Scar took more than half Drybones Health, while the latter got it's attack wasted on Jared's Armor
- In the Meantime, Adelaide did 2 Shot the Enemy Venari CrystalSmith and we're left with a 2 V 1 Battle!
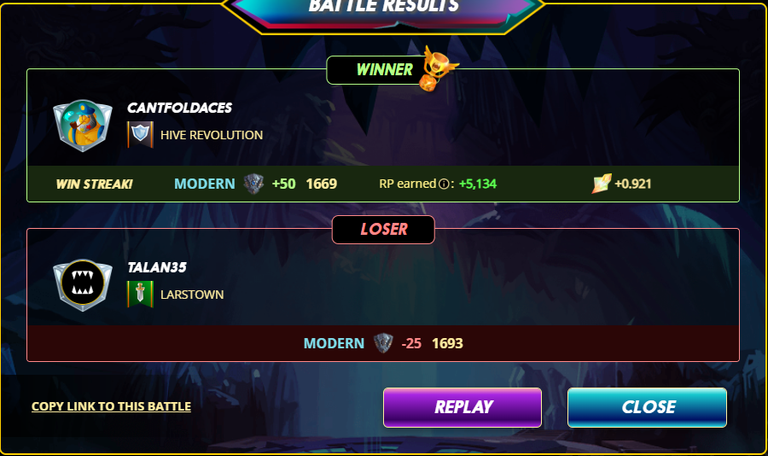
Round 7 : End Of Battle
Now that Jared has the Speed Advanatge over Drybone, it was the first to act and Took down the last standing monster to score a superb WIN and get rewarded with +50 Trophies & 0.92 SPS
Here's the Link to The Battle
After Battle Commentary
- A really satisfactory battle to be fair and no changes are needed to make on my team, Maybe if I had more mana, some modifications could've been made.
- As for my opponent, it didn't feel like his team was focused on the ruleset, despite that fact, the battle was still close!
Thank you for reading till now and Good luck Have Fun on your Splinterlands Battles!
Make sure to take part in the Weekly battle Mage Secret here
Wanna take part in these exciting Splinterlands battles: Join me here
!hiqvote
!DHEDGE
@cantfoldaces, the HiQ Smart Bot has recognized your request (1/1) and will start the voting trail.
In addition, @cantfoldaces gets !PIZZA from @hiq.redaktion.
For further questions, check out https://hiq-hive.com or join our Discord. And don't forget to vote HiQs fucking Witness! 😻
Congratulations @cantfoldaces! You have completed the following achievement on the Hive blockchain And have been rewarded with New badge(s)
Your next payout target is 4000 HP.
The unit is Hive Power equivalent because post and comment rewards can be split into HP and HBD
You can view your badges on your board and compare yourself to others in the Ranking
If you no longer want to receive notifications, reply to this comment with the word
STOPTo support your work, I also upvoted your post!
Check out our last posts:
Checkout our BDVoter Daily Hive Showcase & Participate into our Daily giveaway to win various prize.
Thanks for sharing! - @alokkumar121
