Sueños de una costurera. "Que todo quede bien ❣️ " Dreams of a seamstress. "Let all things be well."


Hola mis queridos amigos de Hive; ya pasó una semana desde que les comenté de mi proyecto y de todos los pro y contras que tuve pasar para poder iniciar este trabajo. Hoy puedo decir que valió la pena mantener la calma, así que tengo que dar gracias a la señora paciencia por haber sobresalido en todo momento, eso y más hicieron posible que hoy les presente uno de los trabajos más bonitos que haya hecho en este estilo.
Las telas hicieron juego perfecto, su combinación, la calidad, su suavidad, los bordados y por supuesto mis manos quienes hicieron que la magia se hiciera realidad.
Como no agradecerle a DIOS quien me dio el entendimiento para asimilar cada detalle y ejecutarlo lo mejor posible.
A mi esposo que me tuvo paciencia y me llevo tres veces a Caracas para buscar en todos lados hasta obtener lo que deseaba. Te amo "AMOR"
Y sin lugar a dudas tengo que agradecer a mi clienta, Lucia creyó en mí y me dijo "Tu puedes hacerlo" eso me llenó de coraje, de ganas y me animo muchísimo, aun cuando creía que no iba a poder.
En cada momento siempre pensé en mi comunidad, así que ustedes también formaron parte en esta idea, siempre me imaginaba en el día que pudiera publicar. Y mi mayor anhelo es que les guste, tanto como a mí.


En mi taller de costura es donde se amplían las ideas, donde se corta y se cose con puntadas de AMOR. Las costureras o manualistas nunca nos detenemos a pensar, siempre estamos buscando que es mejor, que nos falta; nunca no somos perfectas, también cometemos errores, pero lo bueno es darnos cuenta a tiempo, reconocerlos y corregirlos.
El tiempo me ha dado experiencia, ¡si vieran mis trabajos anteriores! ¡No tienen idea de cuánto he avanzado! dicen que es malo comparar, pero yo no lo hago por mal, por el contrario, lo hago para animarme a continuar. Hoy que veo realizado este trabajo y comparo me siento orgullosa de haber dejado la flojera a un lado y haber aprendido todo lo que pude.
Nosotras las manualistas nunca dejamos de aprender ni siquiera cuando estamos dormidas, nos acostamos remendando ideas y nos paramos rápido para poner orden y continuar cociendo. Tal vez algún haga un post contándoles más de todas esas cosas que nos pasan a las costureras. Así que sin más las invito a recorrer un poco de cómo se ejecutó todo este proyecto.

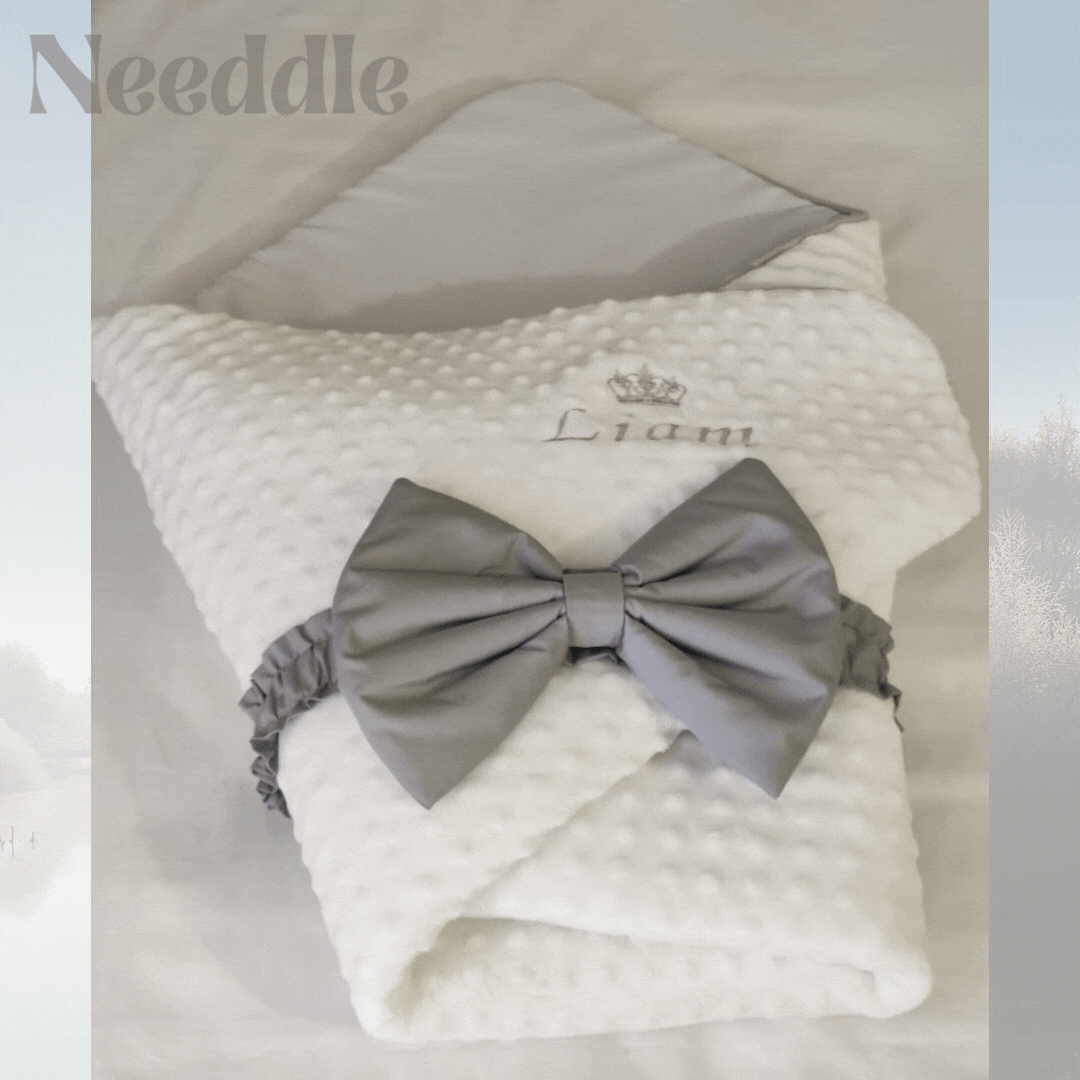
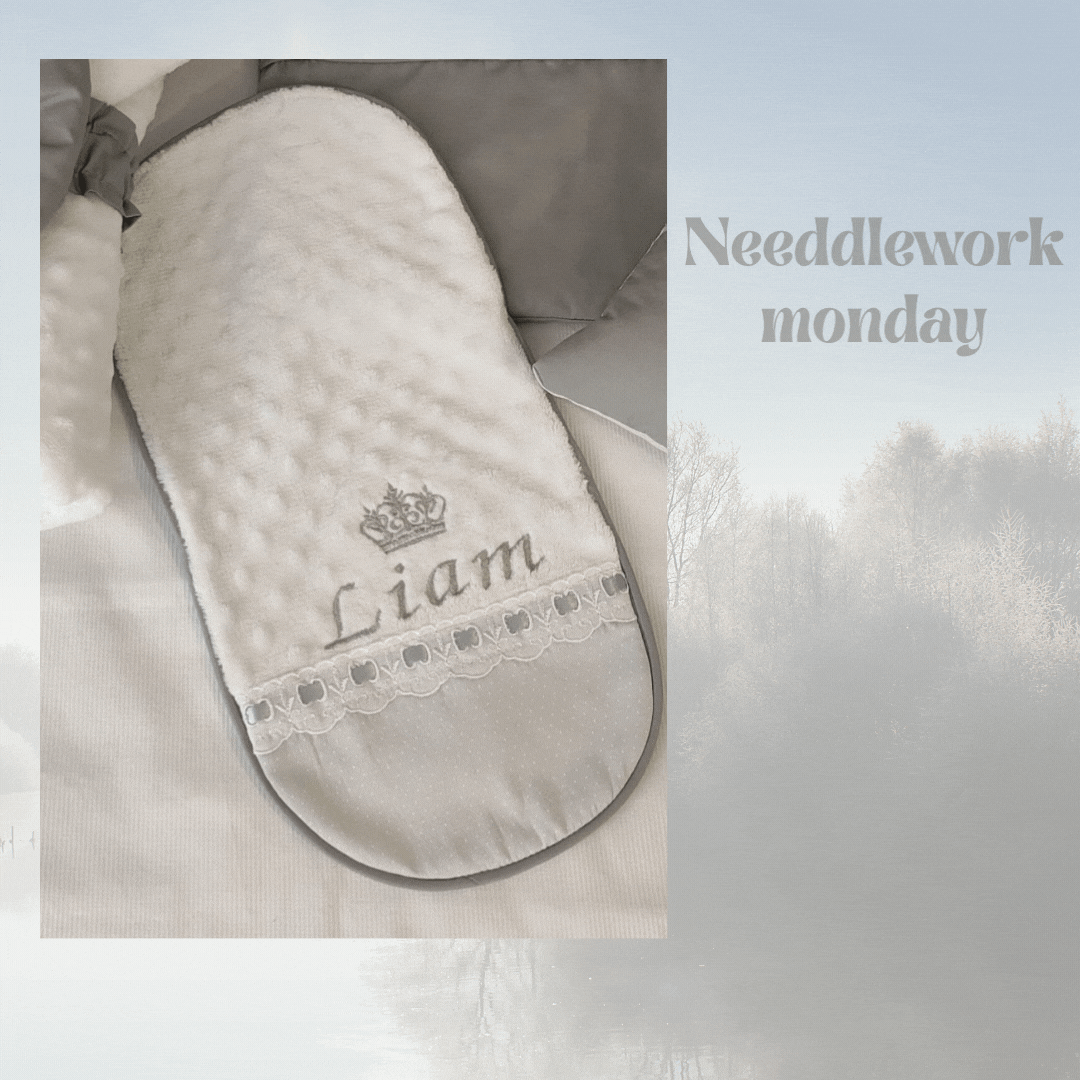
Hoy les voy a contar sobre la nana, este es un modelo nuevo que se impuso en el mercado hace poco tiempo y ahora todas las mamás lo quieren para sus bebés.
Como era la primera vez que alguien me la encomendaba me puse en la tarea de buscar tutoriales, busqué información en mercado libre, me metí en los blogs e instagram de las manualistas que hacen excelentes trabajos y así fui tomando nota de una y otra parte hasta formar mi propia idea. Siempre he tenido la idea de que en las revistas sale todo muy bonito pero en la realidad es otra cosa.
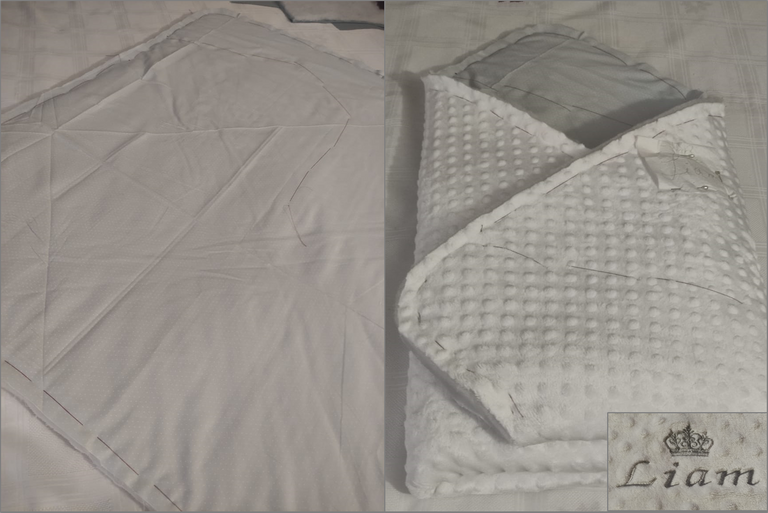
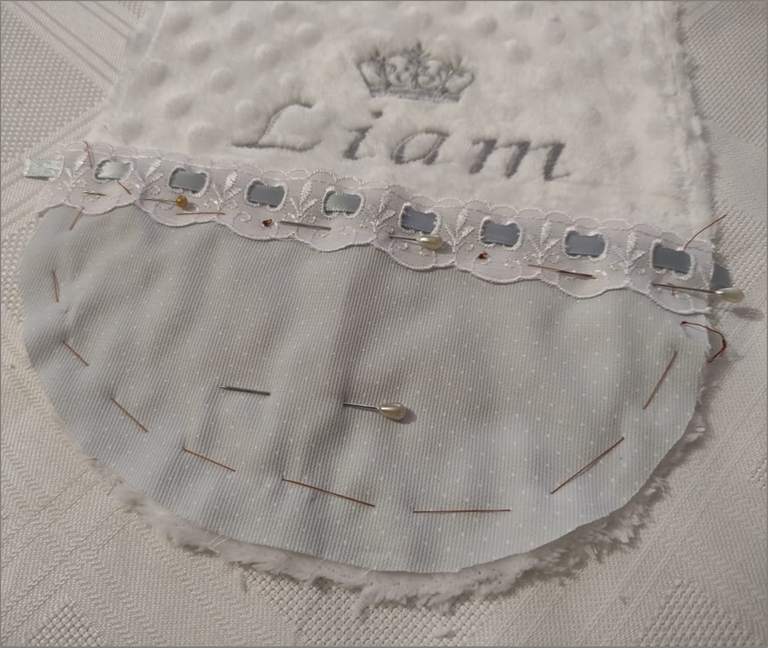
Es por eso que antes de coser quise armar la nana con las tres piezas ya cortadas de un metro de ancho en cada lado, es decir corte la tela blanca volver burbuja, la guata y la tela principito. Luego hice una costura con puntadas largas o bastear; cuando ya tenía esto listo doble varias veces para un lado y para otro para ver cómo se veía.

Este proceso me daba la oportunidad de ubicar en un buen lugar el nombre del bebé, ya que como recordaran, esta vez lo mande hacer en un lugar donde hacen bordados a máquina. Ustedes dirán que estoy loca, pero así mismo me la llevé al centro comercial donde hacen este trabajo y entre la señora y yo le dimos la mejor ubicación.
En mi país hay un dicho que dice: "una cosa es la que piensa el burro y otra el que arriba lo arrea" así que yo siempre voy a buscar el consejo de los expertos y en este caso la experta en este bordado era la señora Lauren.

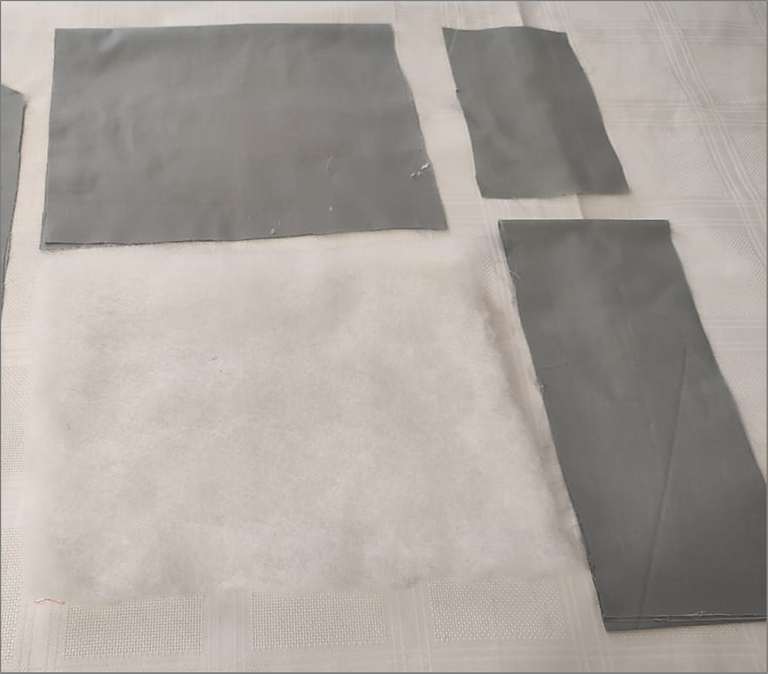
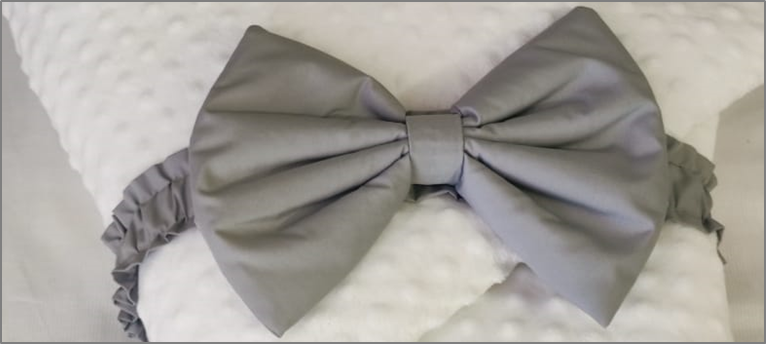
Para el lazo quise cortar un cuadrado de una medida de 25x30 centímetros, 2 en tela principal y una en guata. También cortamos una tira larga de 12 centímetros por el doble de lo que mide la nana, en mi caso corte una tira de 140 centímetros para que quede bien arruchada. Yo le hice como un túnel en medio de la tira para pasar por allí una liga de 2 centímetros. Por ultimo corte un cuadro más pequeño de 10x 12 para hacer el centro.

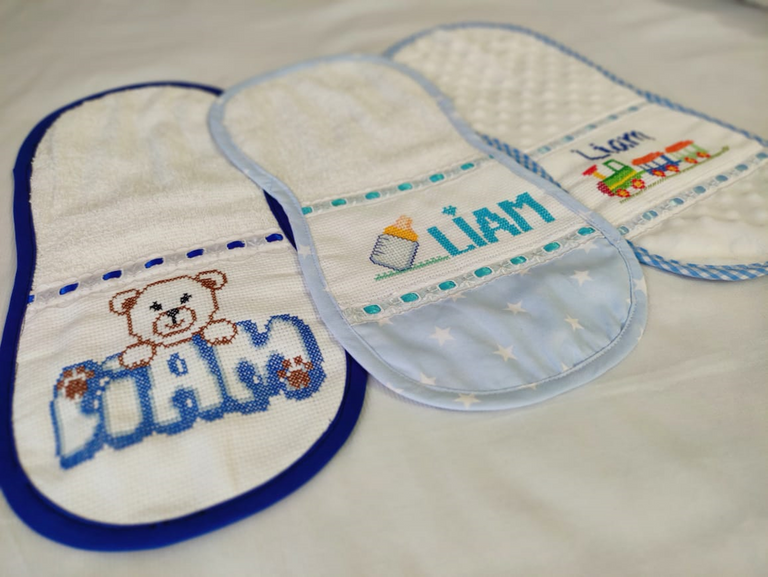
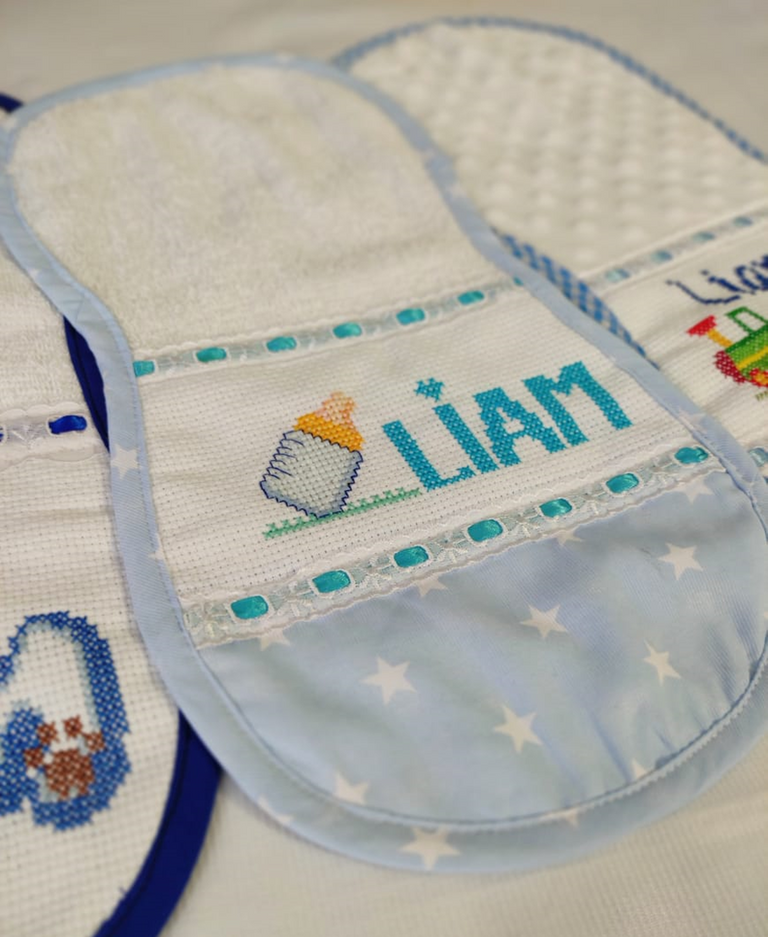
En otras oportunidades les he elaborado estos bucheros, los puedes ver en uno de mis más recientes post Un bordado de cariño para Sebastián.💙, aquí lo que quiero resaltar es el sesgo relleno que coloque en casi todas mis piezas de este proyecto.
El sesgo relleno se elabora cortando las tiras de tela al bies, en una medida de 3 centímetros y se introduce un cordón de algodón o rabo de ratón grueso, se pasa costura con el pie de la máquina de hacer cierres, esto ayuda a que quede perfecto, también puedes usar este pie para pasar la costura cuando estés armando toda la pieza.
Pero si no te quieres enredar mucho la vida puedes elaborarlo con sesgo normal.
Los bordados en punto de cruz hacen que la pieza resalte muchísimo, así que no tenga miedo y aprende a bordar que es muy fácil.
Bien amigos, esta es la primera parte de este lindo sueño, para la próxima semana les contaré de como hice el set para la cuna de la clínica.


Hello my dear friends of Hive; it's been a week since I told you about my project and all the pros and cons I had to go through to be able to start this work. Today I can say that it was worth it to keep calm, so I have to thank Mrs. patience for having excelled at all times, that and more made it possible that today I present you one of the most beautiful works I have done in this style.
The fabrics matched perfectly, their combination, the quality, the softness, the embroidery and of course my hands who made the magic come true.
How can I not thank GOD who gave me the understanding to assimilate every detail and execute it as best as possible.
To my husband who was patient and took me three times to Caracas to look everywhere until I got what I wanted. I love you "AMOR".
And without a doubt I have to thank my client, Lucia believed in me and told me "You can do it" that filled me with courage, desire and encouraged me a lot, even when I thought I could not.
At every moment I always thought about my community, so you were also part of this idea, I always imagined the day I could publish. And my greatest wish is that you like it as much as I do.

In my sewing workshop is where ideas are expanded, where you cut and sew with LOVE stitches. As seamstresses or crafters we never stop to think, we are always looking for what is better, what is missing; we are never perfect, we also make mistakes, but the good thing is to realize it in time, recognize them and correct them.
Time has given me experience, if you could see my previous works! You have no idea how much I have advanced! They say it is bad to compare, but I do not do it for bad, on the contrary, I do it to encourage me to continue. Today that I see this work done and I compare, I feel proud to have left the laziness aside and to have learned everything I could.
We manualists never stop learning even when we are asleep, we go to bed knitting ideas and we stand up embroidering. Maybe someday I will do a post telling you more about all those things that happen to us sewists. So without further ado, I invite you to take a look at how this whole project was executed.

oday I'm going to tell you about the nana, this is a new model that was imposed on the market recently and now all moms want it for their babies.
As it was the first time that someone entrusted it to me I started looking for tutorials, I searched for information in the free market, I got into the blogs and instagram of the craftswomen who do excellent work and so I was taking note of one and another part until I formed my own idea. I have always had the idea that in magazines everything looks very nice but in reality it is something else.
That's why before sewing I wanted to assemble the lullaby with the three pieces already cut one meter wide on each side, that is to say, I cut the white fabric back bubble, the wadding and the little prince fabric. Then I sewed a seam with long stitches or baste; when I had this ready I folded several times to one side and to the other to see how it looked.

This process gave me the opportunity to place the baby's name in a good place, since as you may remember, this time I had it done at a place where they do machine embroidery. You will say that I am crazy, but I took it to the mall where they do this work and between me and the lady we gave it the best location.
In my country there is a saying that goes: "one thing is what the donkey thinks and another one is what the person on top is doing" so I always seek the advice of the experts and in this case the expert in this embroidery was Mrs. Lauren.

For the bow I wanted to cut a square measuring 25x30 centimeters, 2 in main fabric and one in wadding. We also cut a long strip of 12 centimeters for twice the size of the nana, in my case I cut a strip of 140 centimeters so that it is well crumpled. I made a tunnel in the middle of the strip to pass a 2 centimeter garter through it. Finally I cut a smaller 10x 12 square to make the center.

In other opportunities I have elaborated them these bucheros, you can see them in one of my most recent post An embroidery of affection for Sebastian.💙, here what I want to highlight is the stuffed bias that I put in almost all my pieces of this project.
The stuffed bias is made by cutting the strips of fabric on the bias, in a measure of 3 centimeters and introduce a cotton cord or thick mouse tail, it passes seam with the foot of the machine to make closures, this helps to make it perfect, you can also use this foot to pass the seam when you're putting together the whole piece.
But if you don't want to mess up your life too much you can make it with normal bias stitch.
Cross stitch embroidery makes the piece stand out a lot, so don't be afraid and learn how to embroider, it's very easy.
Well friends, this is the first part of this nice dream, next week I will tell you how I made the set for the clinic's crib.
𝕋𝕠𝕕𝕠 𝕧𝕒𝕝𝕖 𝕝𝕒 𝕡𝕖𝕟𝕒 𝕤𝕚 𝕝𝕝𝕖𝕧𝕒, 𝕙𝕚𝕝𝕠𝕤, 𝕥𝕖𝕝𝕒𝕤 𝕪 𝕞𝕦𝕔𝕙𝕒𝕤 𝕡𝕦𝕟𝕥𝕒𝕕𝕒𝕤 𝕕𝕖 𝔸𝕄𝕆ℝ.
Video básico de la nana en youtube.
@tipu curate 6
Upvoted 👌 (Mana: 0/55) Liquid rewards.
gracias
Amiga!!! Te felicito. Tu proyecto quedó precioso. Claro que tu cliente sabe de lo que eres capaz de hacer.
El lazo me.encanta, me enamora, me atrae. Estoy segura que te seguirán llegando solicitudes para realizar más como estos. Bello y muy delicado. Además está impregnado de mucho amor y dedicación. ¡Excelente para arropar a un bebé!
Gracias por dejarnos los detalles del proceso. Es importante para mí. Saludos.
Estas en lo cierto lelys, hoy me acaba de llegar un nuevo trabajo gracias a estas imágenes que monté en mi estado de Whatsapp, pero esta vez es para una niña, estoy contenta. Mientras que se estabiliza el mercado tenemos que buscar otros ingresos.
Es correcto. Seguir haciendo lo que nos gusta mientras tanto. Me alegro mucho por ti. Esa niña se verá hermosa.
Muchos saludos 🤗
I absolutely understand what you mean by „you have learned a lot“ because the projects are fabulous, the are so neat and perfect. The colors are soft and harmonious and the bias tape and the embroidery adds interest and something special. One can see how much work and thinking went into this.
And I love the proverb wit the donkey, I guess I will translate and make it popular here 😀
Hehehehehehehe, you made me laugh with the donkey thing.
This project was a complete learning experience, now I can work calmly and faster because I already understand a lot of things.
I'm sure the next one will be better
Congratulations, your post has been upvoted by @dsc-r2cornell, which is the curating account for @R2cornell's Discord Community.
Enhorabuena, su "post" ha sido "up-voted" por @dsc-r2cornell, que es la "cuenta curating" de la Comunidad de la Discordia de @R2cornell.
Muchisimas gracias señor cornell, usted me tiene enamorada. 😍
Estaba ansiosa por ver este resultado, ha quedado todo precioso 💖
Amiga Dios te ha Bendecido con tan hermosos dones creativos👏🤩. Excelente trabajo con mucha paciencia❤