[ESP/ENG]DELICIOSO BRAZO GITANO🍒//DELICIOUS GITANO ARM🍒😋
 Foto editada en Inshot
Hola y feliz bendecido día para todos mis amigos de hive y comunidades, reciban de mi parte un caluroso abrazo virtual ! 🤗
Hoy vengo con mucho deseos de compartir con ustedes un rico y esponjoso bizcocho llamado aquí en mi país, Venezuela, Brazo Gitano, cabe destacar que es muy práctico y fácil de realizar. Estoy muy feliz en realizarlo ya que no tenía un instrumento en dónde hornearlo, y qué les parece !, que hace unos días atrás, un primo de mi esposo al enterarse que estoy realizando distintas recetas tuvo la maravillosa idea de obsequiarme uno que tenía en su casa sin uso, cosa que le estoy muy agradecida.
También, les comento que al momento de realizar este brazo gitano, me llevó a recordar, que hace muchos años atrás realicé muchos de ellos, para la comercialización y así poder cancelar mi paquete de grado de mi carrera universitaria, contando con la ayuda de mi esposo y mis hijos, en dicha labor; ya que fuimos un equipo en ese entonces en todo momento, y hoy me siento muy dichosa y feliz de volverlo a realizar.
Este brazo gitano, tendrá su relleno con un dulce de leche condensada, ah pero este relleno tiene su particularidad, que dicha leche condensada la cocinaremos aún en su envase (lata), muchos dirán , ¿cómo así ?; Pues, déjenme decirle, que la cocinaremos, para obtener un delicioso arequipe.
Ingredientes, para el bizcocho
250 gramos de harina de trigo
250 de azúcar
5 Huevos
1 Cucharada de esencia de vainilla
1 Lata de leche condensada
100 gramos de cerezas en almíbar, para la decoración.
Azúcar pulverizada, al gusto.
 Foto editada en Inshot
A continuación le estaré presentando los pasos a pasos a seguir, para la elaboración de este rico y esponjoso brazo gitano.
1 Paso
Debemos colocar en una olla con agua la lata de leche condensada que la cubra por completo, y colocarla a una temperatura moderada durante una hora aproximada.
También debemos tener el horno previamente encendido para así al momento de hornear esté caliente a una temperatura de 180°grados.
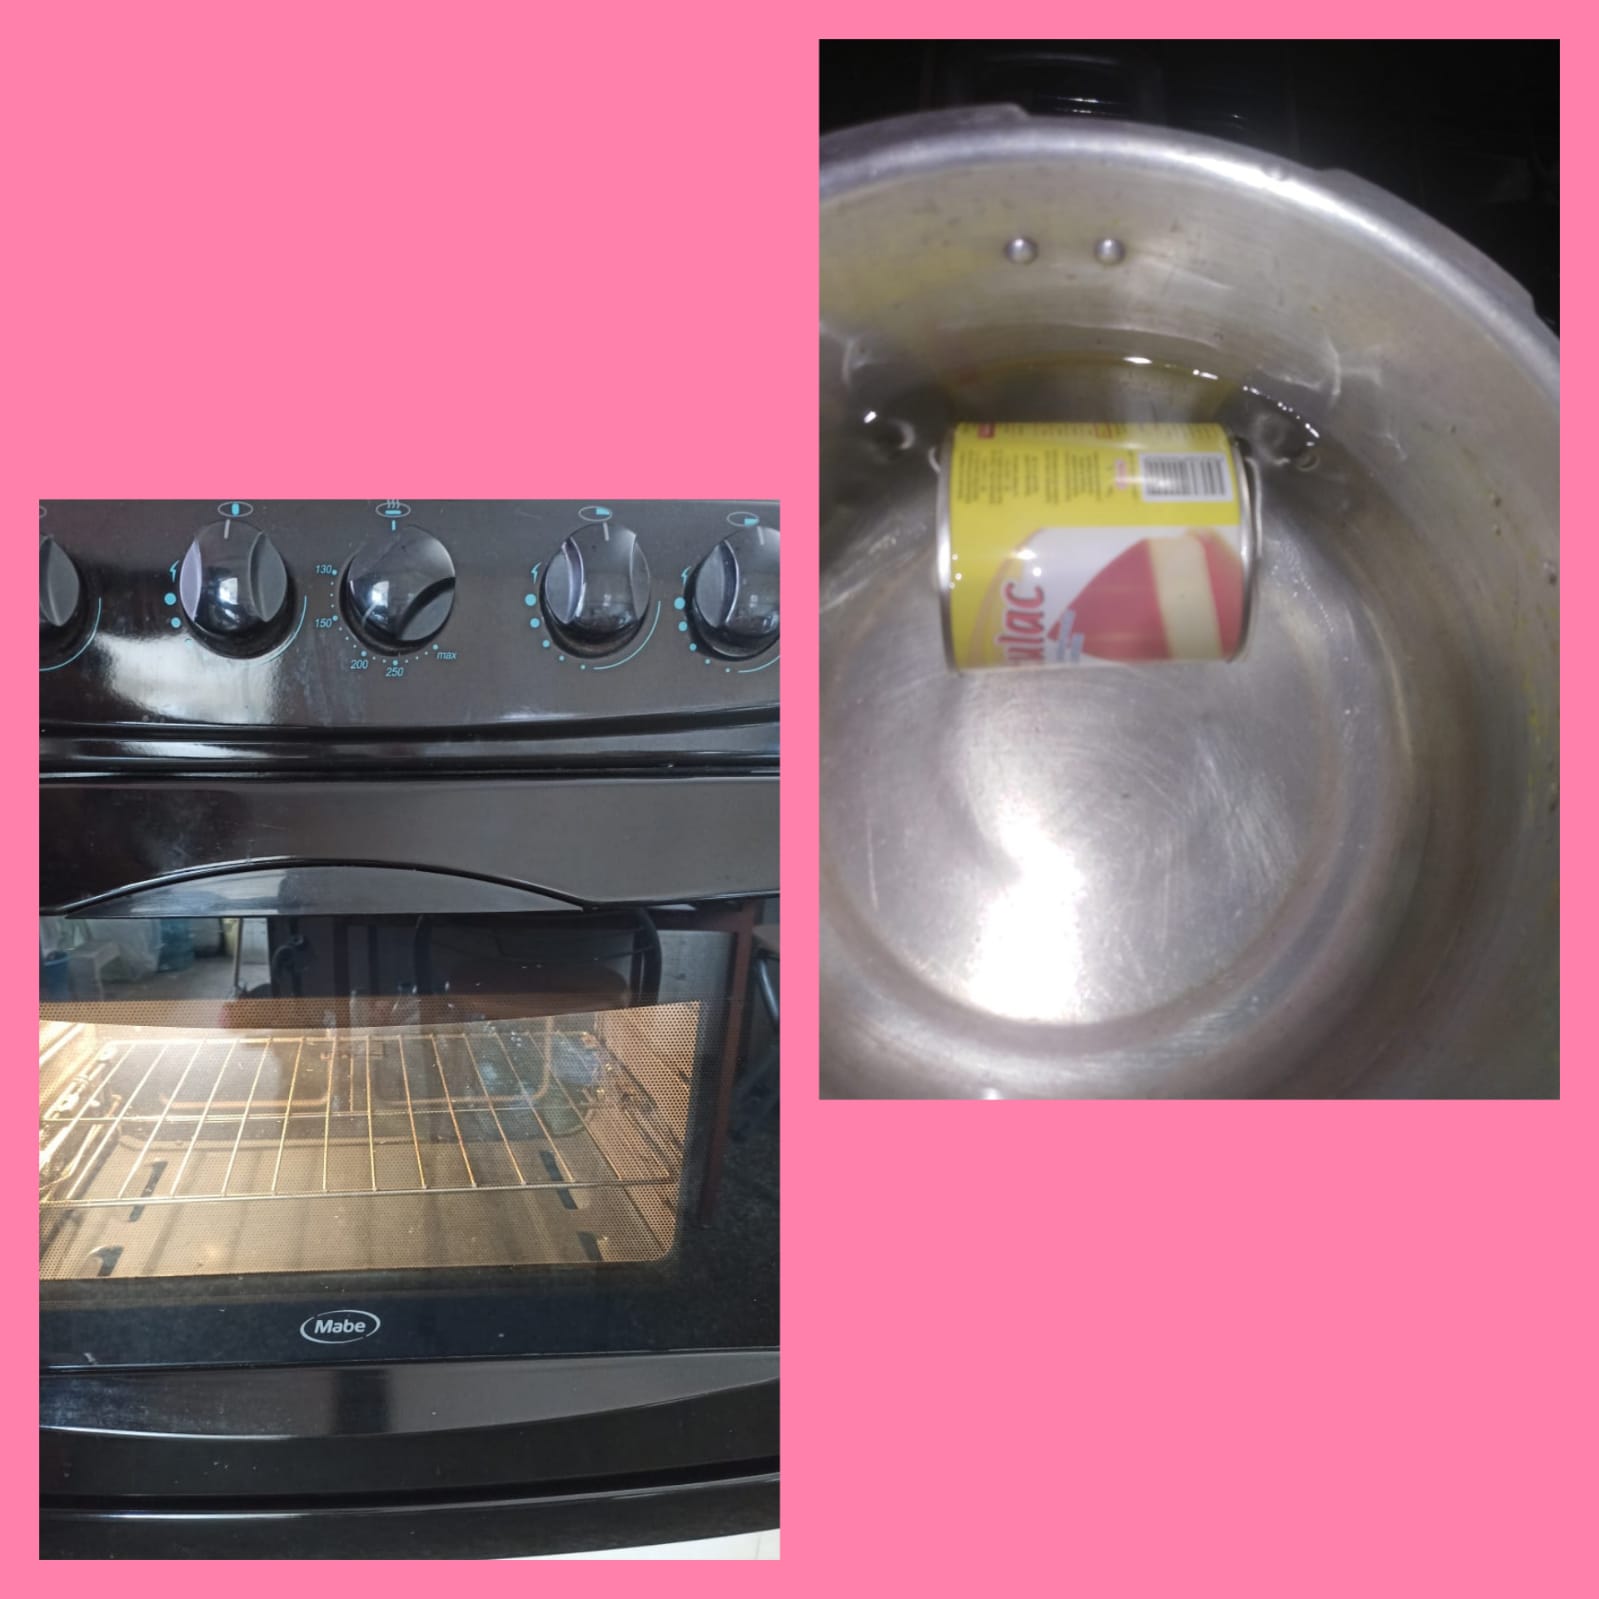 Foto editada en Inshot
2 Paso
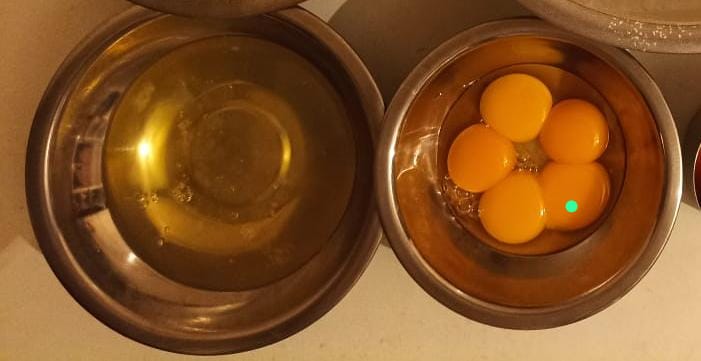
Comenzamos a separar las yemas y la colocamos en un bol, de igual manera proseguimos con la clara de huevos colocándola en otro bol más grande.
3 Paso
Luego comienza a batir la claras de huevos durante unos minutos, y le vamos agregando la azúcar lentamente hasta que logre quedar a punto de nieve.
Seguidamente proseguimos por separado las yemas en la batidora y agregando de igual manera los otros 125gr de azúcar, para integrarlas y obtener una mezcla homogénea.
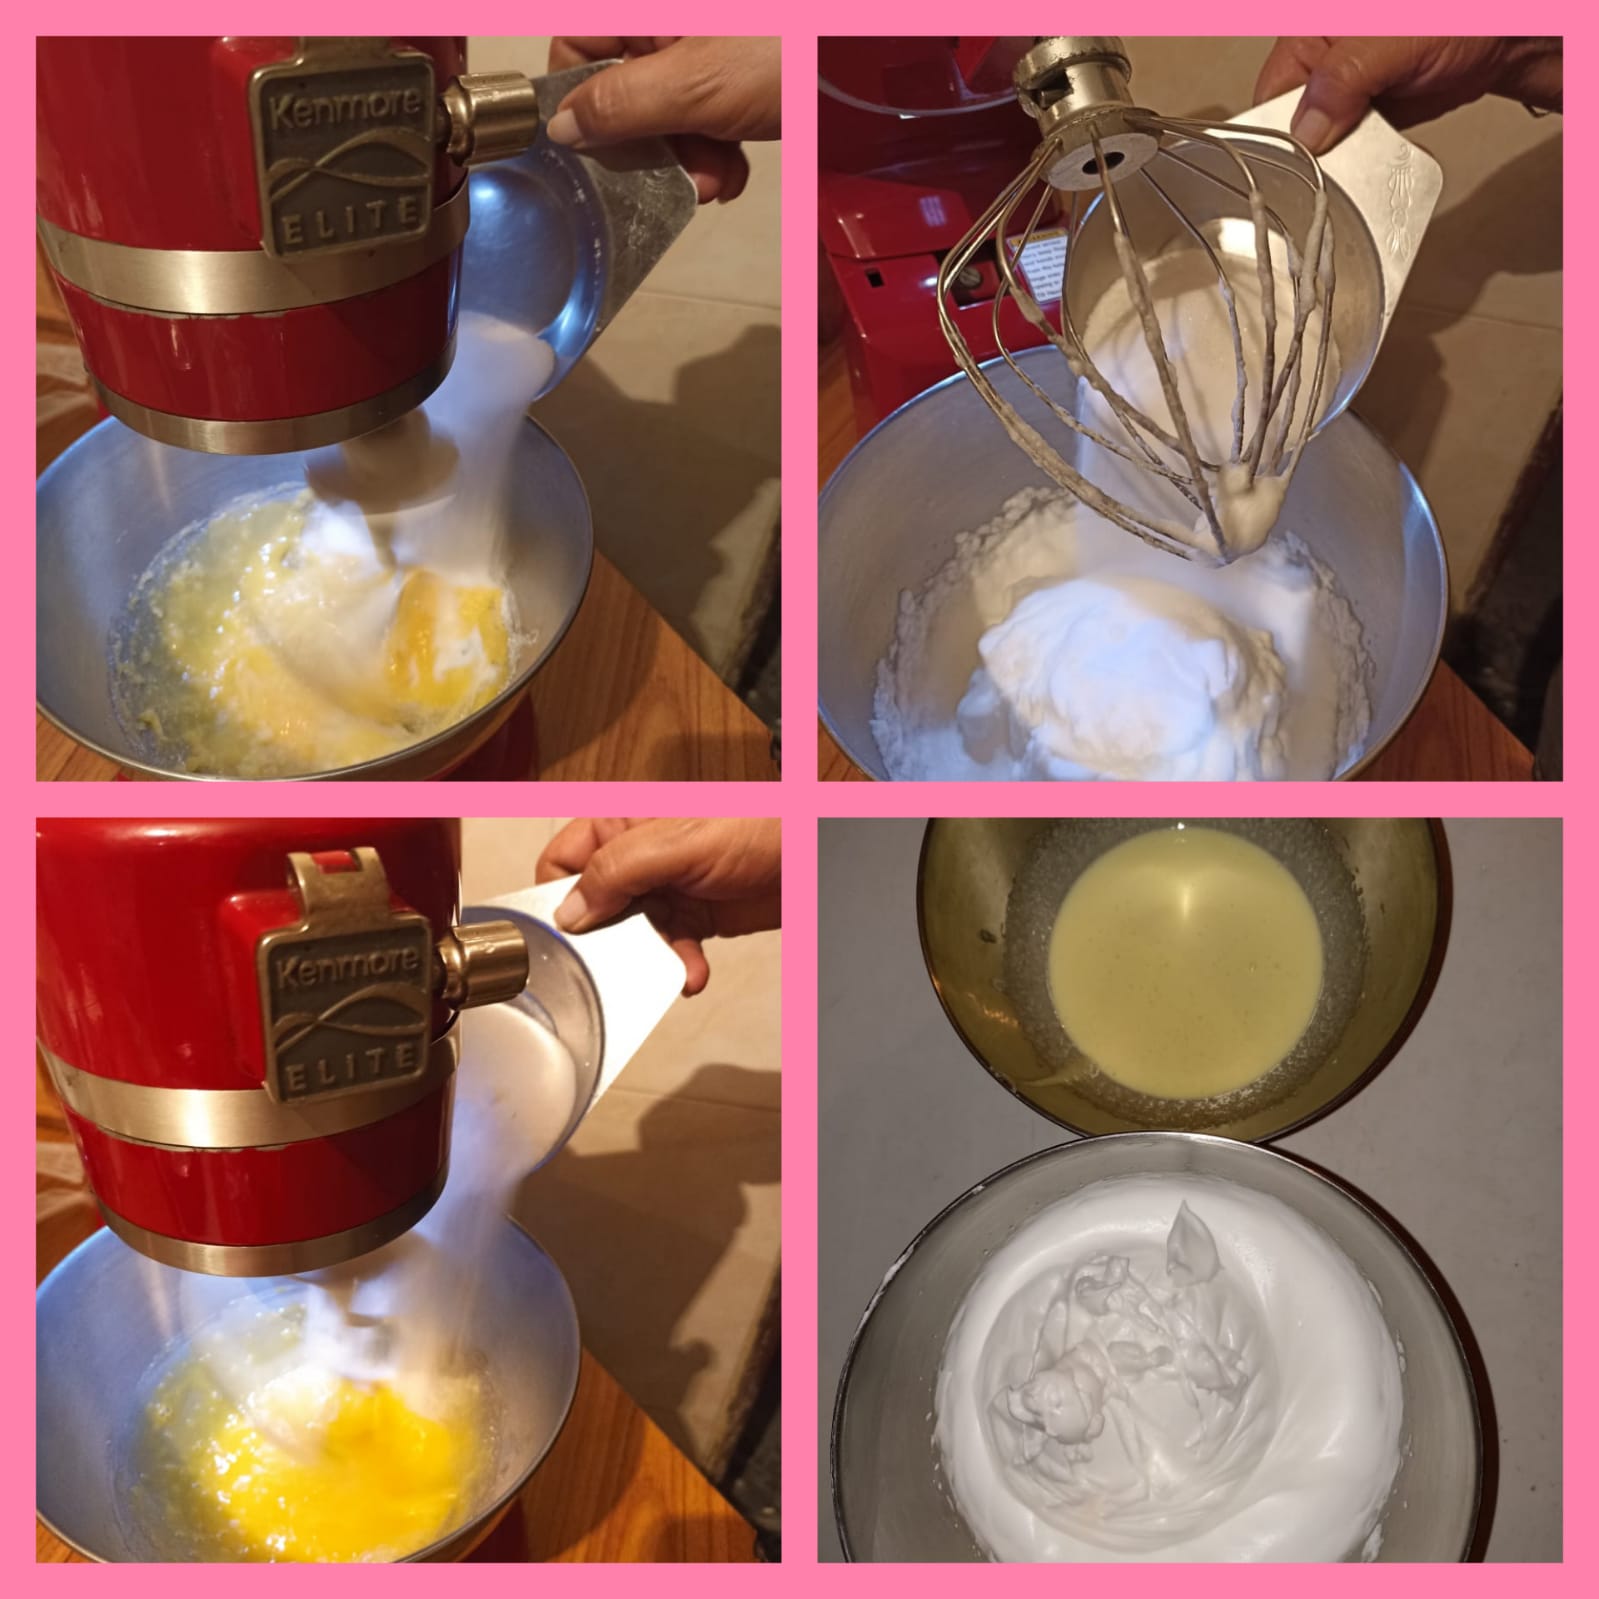 Foto editada en Inshot
4 Paso
Ya estando listas las dos mezclas comenzaremos a unirlas lentamente, en esta oportunidad se comienza con las mezcla de las yemas uniendola con la mezcla de claras de huevos, les damos unos movimientos circular con una paleta, hasta que las dos se integren. Luego usamos un colador para ir agregando la harina de trigo en pequeñas cantidades, para así no dejar que se le hagan pequeños grumos, y por último colocamos la cucharadita de vainilla.
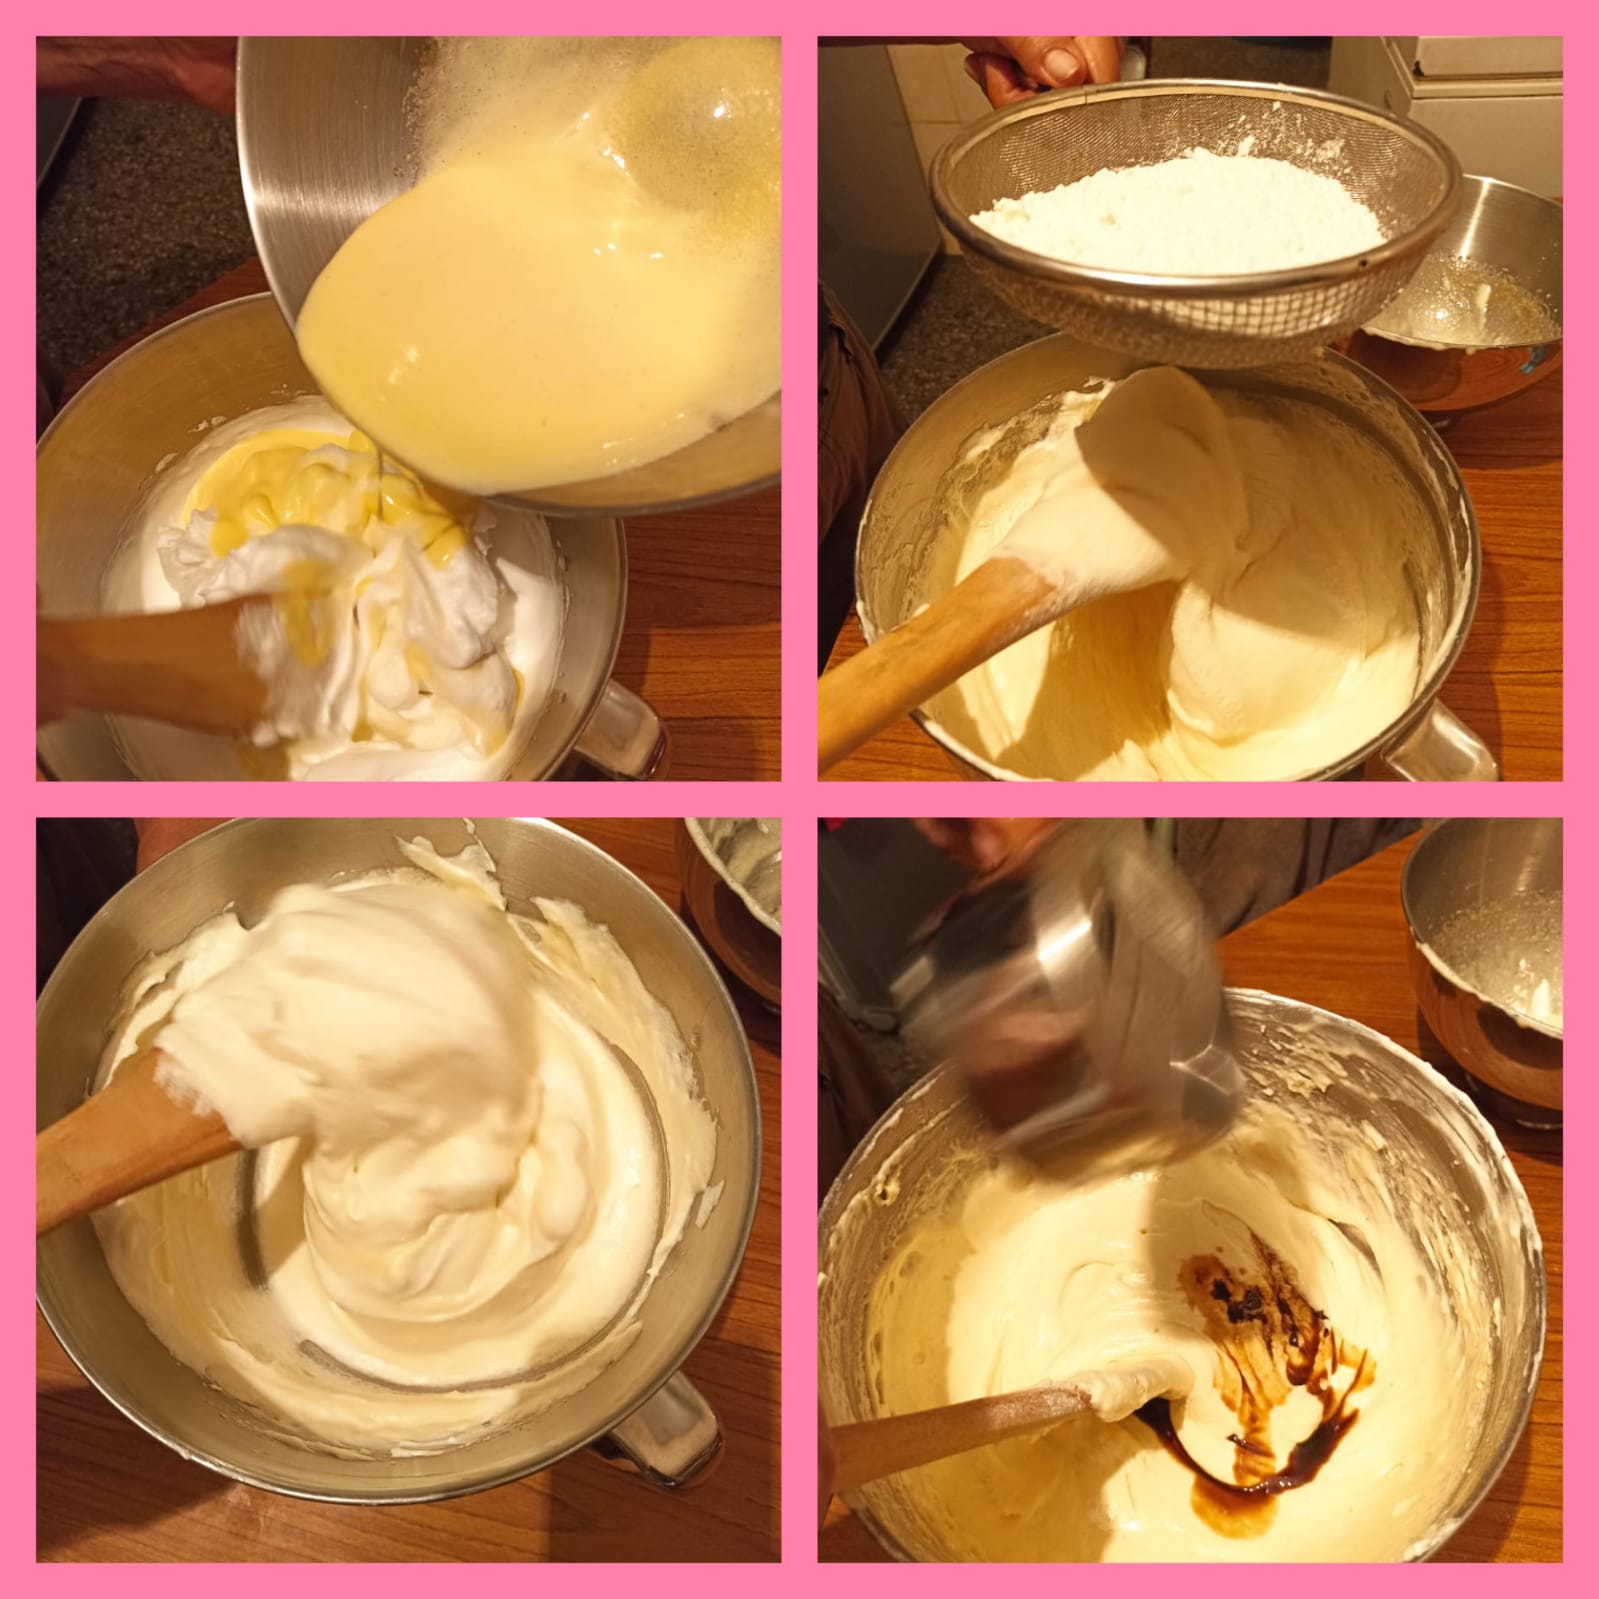 Foto editada en Inshot
5 Paso
Habiendo culminado con la mezcla del bizcocho, comenzamos a vaciar con lentitud en la bandeja ya previamente lista con su papel vegetal o parafinado, para así lograr que se haya horneado sin pegarse al molde. dejándolo aproximadamente unos treinta minutos.
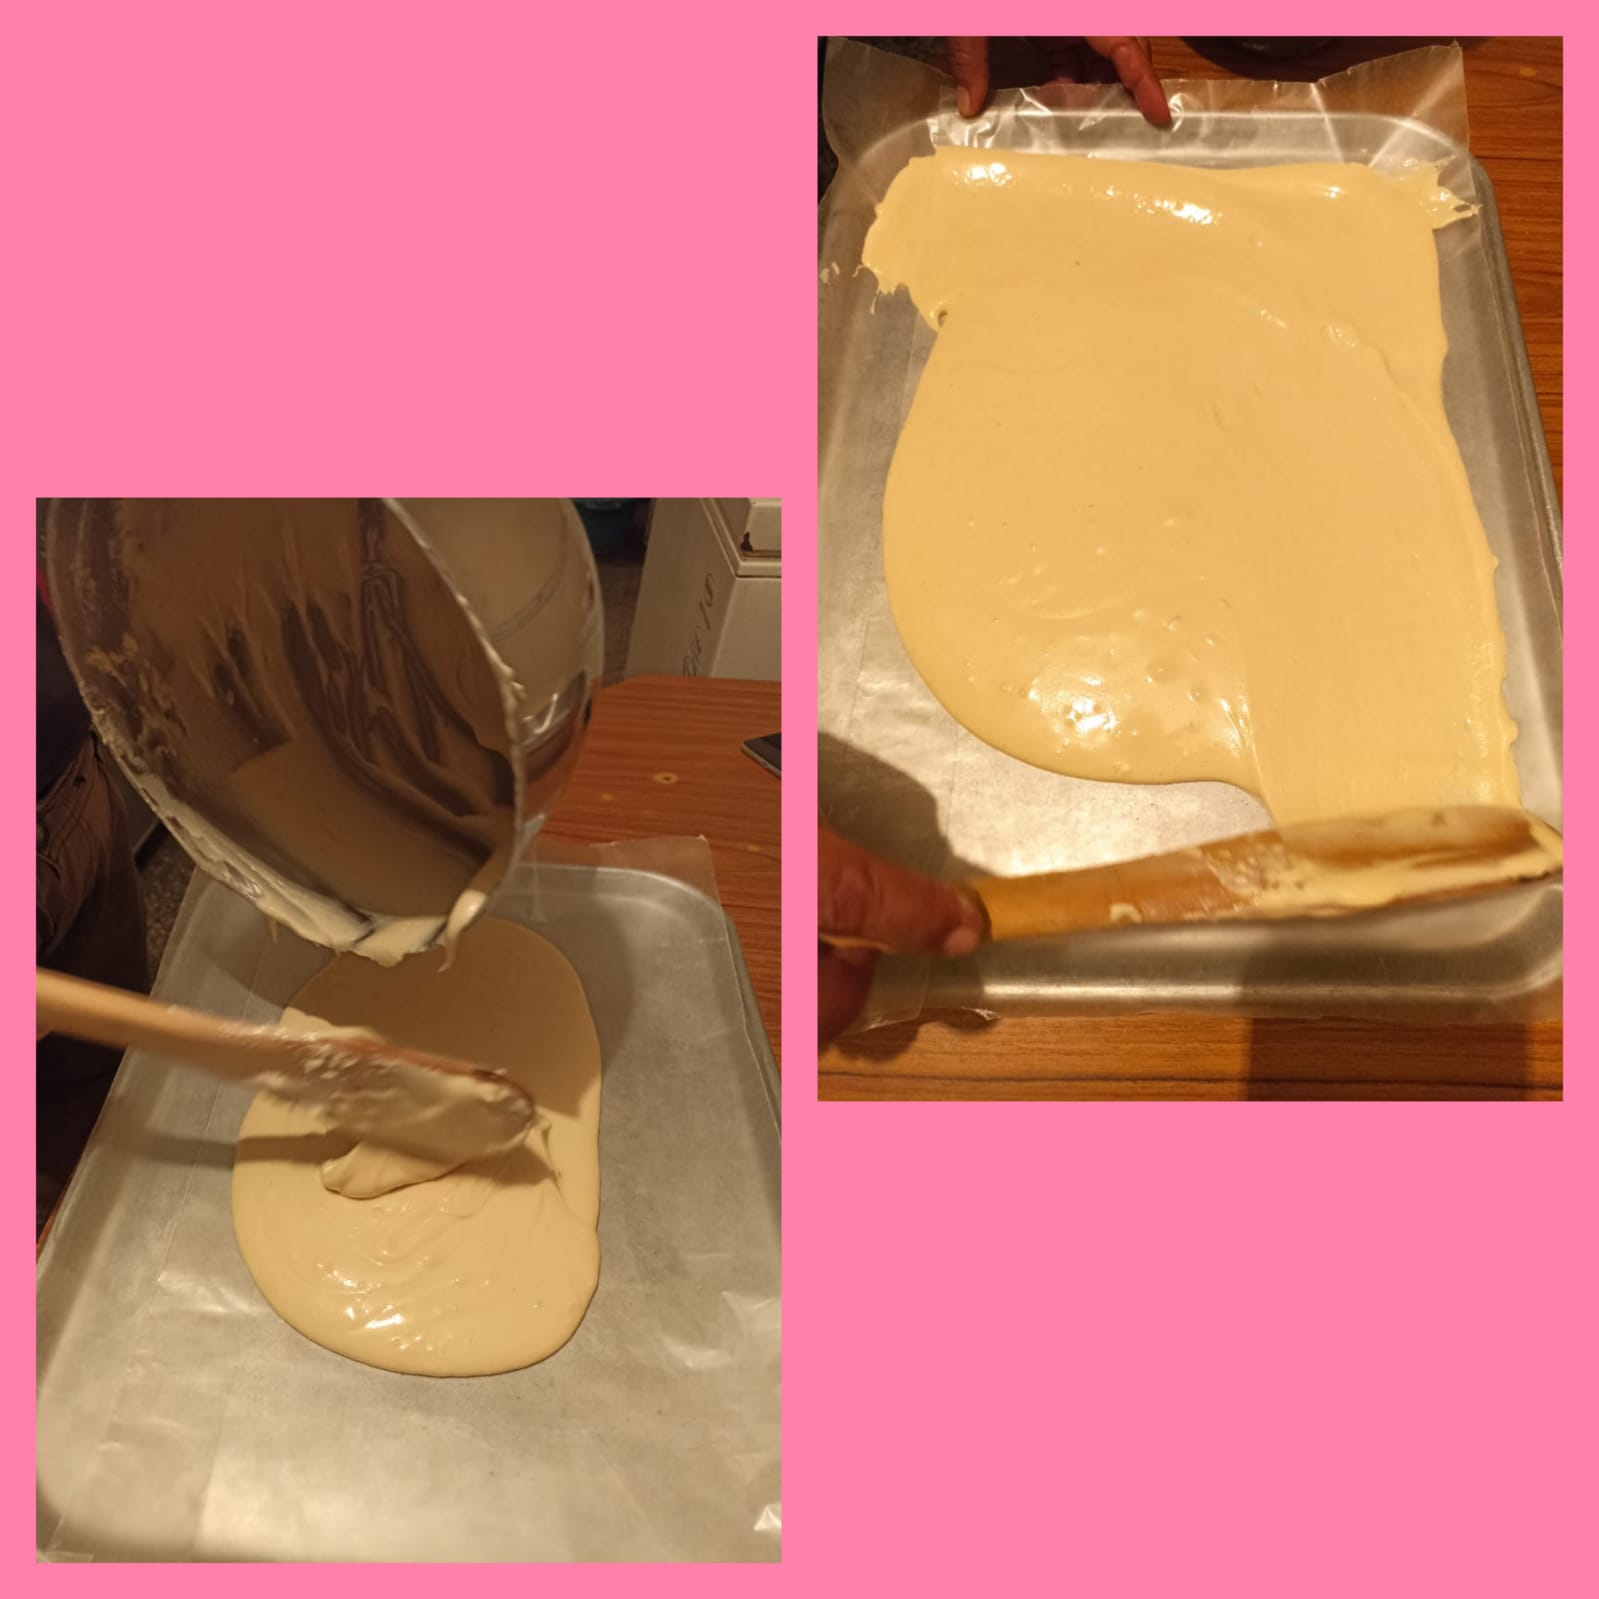 Foto editada en Inshot
.jpg) Foto editada en Inshot
Foto editada en Inshot6 Paso
Luego de estar ya horneado y fresco el bizcocho, comenzamos a rociar con una brocha pastelera el almíbar de las cerezas para humedecerlo y así poderle untar el dulce de leche condensada o arequipe, obtenido después de su cocción. Seguidamente ya estando completamente distribuido el relleno en el bizcocho comenzamos a separarlo del papel vegetal y a enrollarlo. Y ya para terminar le rociamos la azúcar pulverizada de arriba hacia abajo, y para finalizar le colocamos esas ricas y hermosas cerezas.
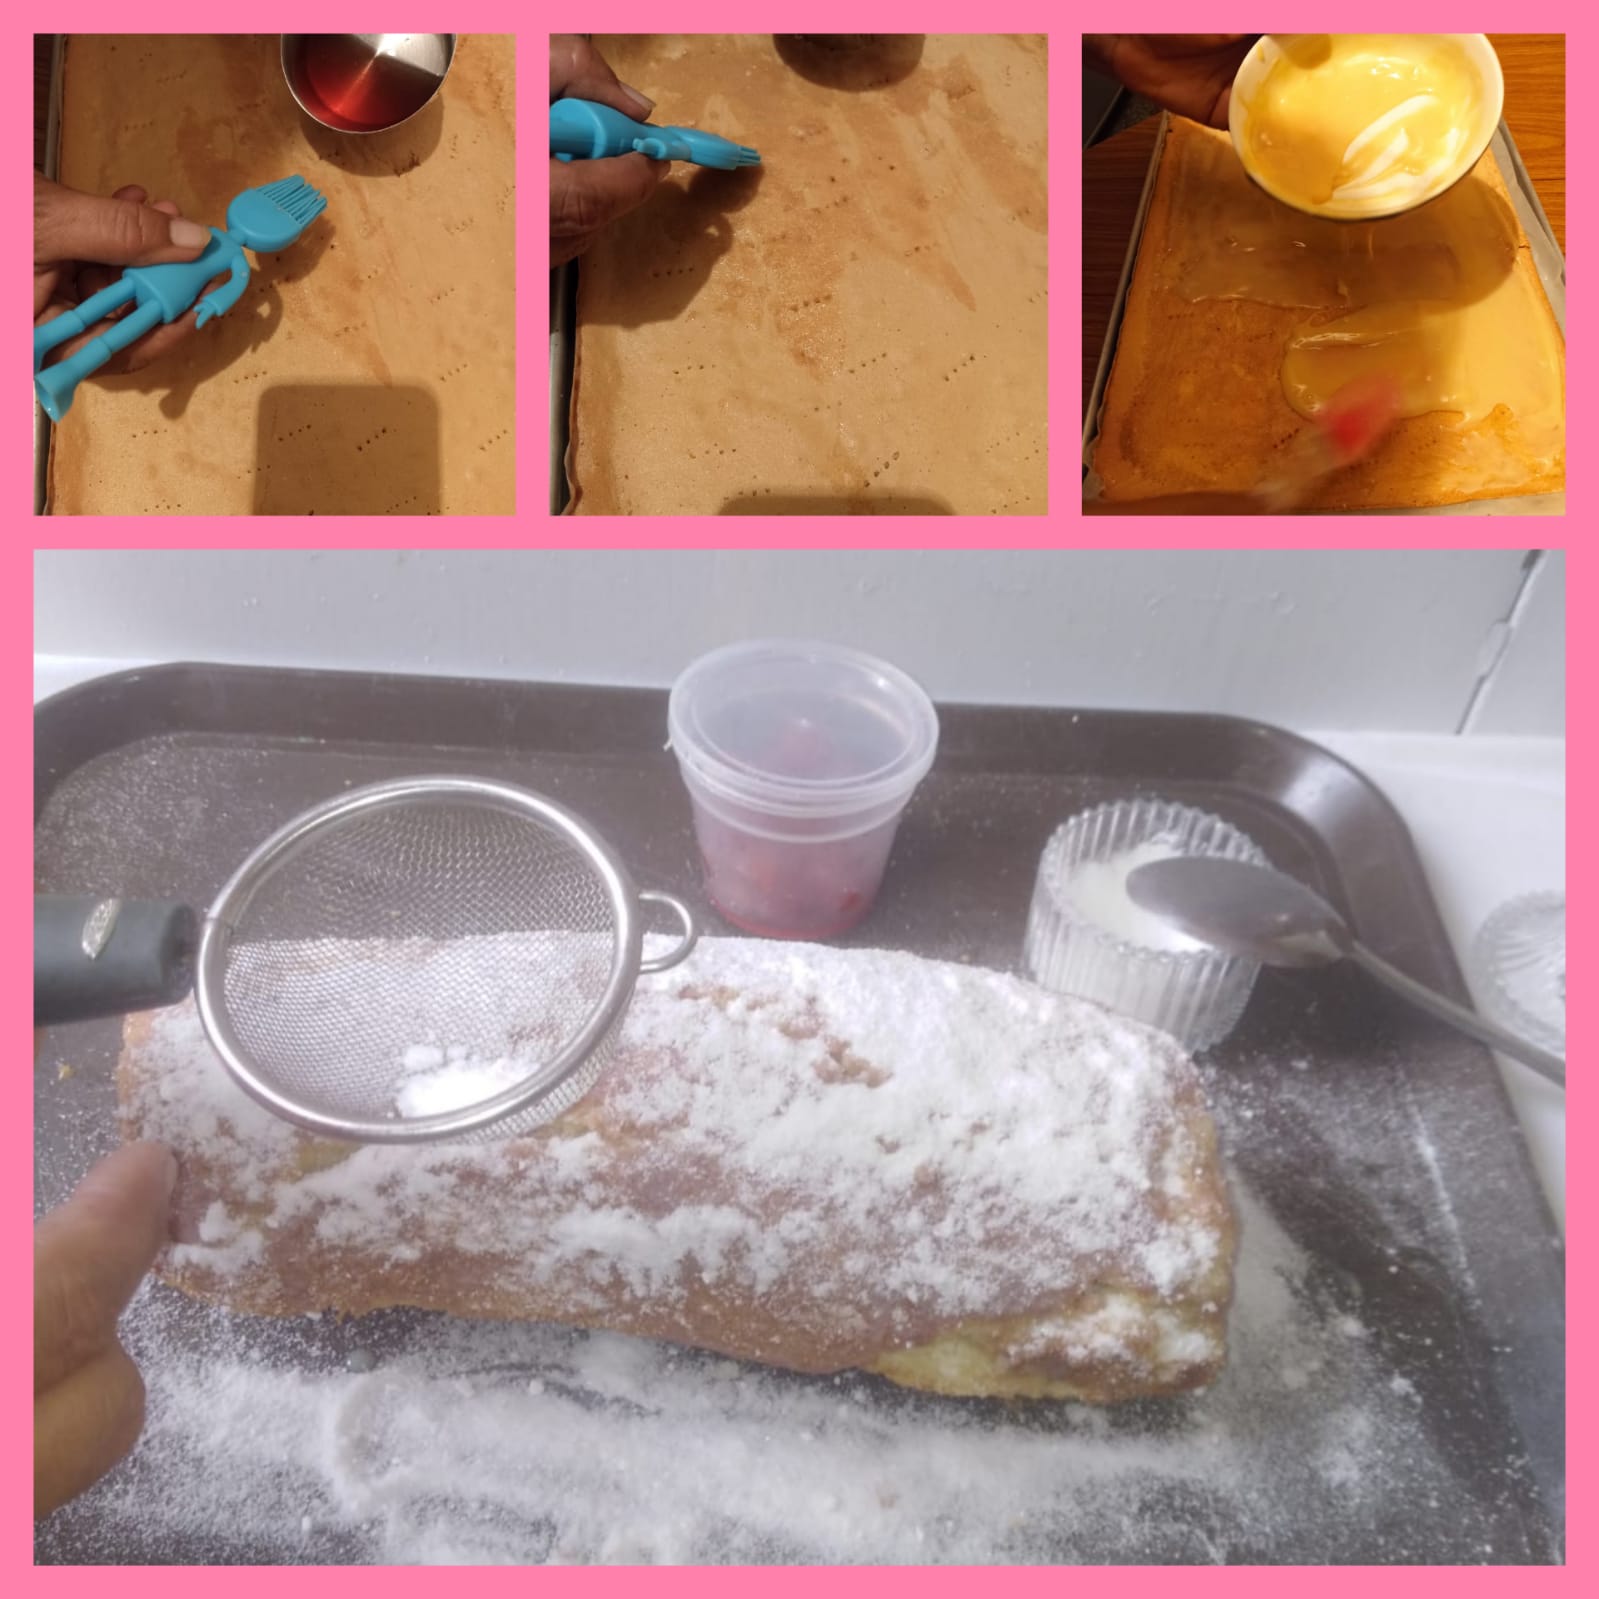 Foto editada en Inshot
.jpg) Foto editada en Inshot
Foto editada en InshotRecomendaciones
✓Es importante tener siempre presente el horno previamente caliente, para que al momento de hornear el bizcocho no se pasme también revisarlo con un palito de altura en varias oportunidades a medida que se va cocinando, ya que dicho bizcocho es muy delgado.
✓La leche condensada debemos cocinarla en ese tiempo dicho, ya que mientras más se cocine su textura líquida pasa hacer espesa y por entre se logra obtener un arequipe, es muy importante dejarla reposar al momento de vaciar la lata por lo caliente que suele quedar al bajarla de la estufa.
✓Por último y lo más importante, es tener en cuenta, cuidar de las mezclas, el que no pierdan sus consistencias, ya que al perderlo no se podrá lograr un bizcocho esponjoso y suave.
English
Photo edited in InshotHello and happy blessed day to all my friends of hive and communities, receive from me a warm virtual hug 🤗.
Today I come with much desire to share with you a rich and fluffy cake called here in my country, Venezuela, Brazo Gitano, it should be noted that it is very practical and easy to make. I am very happy to make it since I didn't have an instrument to bake it in, and what do you know, a few days ago, a cousin of my husband's found out that I am making different recipes and had the wonderful idea of giving me one that he had in his house without use, which I am very grateful for.
Also, I tell you that at the time of making this gypsy arm, it took me to remember that many years ago I made many of them, for marketing and thus be able to pay my degree package of my college career, with the help of my husband and my children, in this work, as we were a team at that time at all times, and today I feel very happy and happy to do it again.
This gypsy arm, will have its filling with a sweet condensed milk, ah but this filling has its particularity, that this condensed milk will be cooked even in its container (can), many will say, how so; Well, let me tell you, that we will cook it, to obtain a delicious arequipe.
Ingredients, for the sponge cake
250 grams of wheat flour
250 grams of sugar
5 eggs
1 tablespoon vanilla essence
1 can of condensed milk
100 grams of cherries in syrup, for decoration.
Powdered sugar, to taste.
Photo edited in InshotHere are the steps to follow for the preparation of this rich and fluffy gypsy arm.
Step 1
We must place in a pot with water the can of condensed milk that covers it completely, and place it at a moderate temperature for about an hour.
We must also have the oven previously turned on so that at the moment of baking it is hot at a temperature of 180° degrees.
Photo edited in Inshot2 Step
We begin to separate the yolks and place it in a bowl, in the same way we continue with the egg whites placing it in another larger bowl.
3 Step
Then start beating the egg whites for a few minutes, and slowly add the sugar until it reaches stiff peaks.
Then we continue separately the yolks in the mixer and adding in the same way the other 125gr of sugar, to integrate them and obtain a homogeneous mixture.
Photo edited in Inshot4 Step
Once the two mixtures are ready we will begin to join them slowly, in this opportunity we start with the yolks mixture joining it with the egg whites mixture, we give them circular movements with a paddle, until the two are integrated. Then we use a sieve to add the wheat flour in small quantities, so as not to leave small lumps, and finally we put the teaspoon of vanilla.
Photo edited in Inshot5 Step
Having culminated with the cake mixture, we begin to pour slowly in the tray previously prepared with parchment paper or waxed, so that it has baked without sticking to the mold. leaving it about thirty minutes.
Photo edited in InshotPhoto edited in Inshot6 Step
After the sponge cake is baked and cool, we begin to sprinkle with a pastry brush the syrup from the cherries to moisten it and thus be able to spread the sweet condensed milk or arequipe, obtained after cooking. Next, once the filling is completely distributed on the sponge cake, we begin to separate it from the parchment paper and roll it up. Finally, sprinkle the powdered sugar from top to bottom, and finally place those rich and beautiful cherries.
Photo edited in InshotPhoto edited in InshotRecommendations
✓It is important to always have the oven previously hot, so that at the moment of baking the sponge cake does not overcook, also check it with a height stick several times as it is cooking, since the sponge cake is very thin.
✓The condensed milk must be cooked in that time, since the more it is cooked the more its liquid texture becomes thicker and in between it is possible to obtain an arequipe, it is very important to let it rest at the moment of emptying the can because of how hot it usually is when it is taken down from the stove.
✓Finally, and most importantly, it is important to take care of the mixtures so that they do not lose their consistency, because if they do, it will not be possible to obtain a fluffy and soft cake.
Amigos me despido y espero haya sido de su agrado mi post, nos vemos en una próxima oportunidad.
Friends I say goodbye and I hope you liked my post, see you next time.
I need to save this recipe as I love it. Now you made me hungry :)
Hi, hahaha 😊 glad you liked my recipe and incidentally it made you hungry. Blessings 🙏
Perfectly done
Hello, thank you very much 😊
Delicioso. Gracias por compartir. Saludos.