Using a Needle-Lace Technique to Repair an Old Garment
Hey guys! I've been gone for a while because I have been really busy recently, and I finally found the time and motivation to write for you guys. Today I have a short post, I just want to show you a needle-lace technique that I learned a while ago. I used this technique to patch some holes in a lace garment I have, and it makes me wonder about making entire piece of needle lace, but I am not sure what I should make.
So this technique is from making needle-lace, or Brussels lace as it is sometimes known. Soon, hopefully, I will take time to learn more about the historical context that Brussels lace originated in.
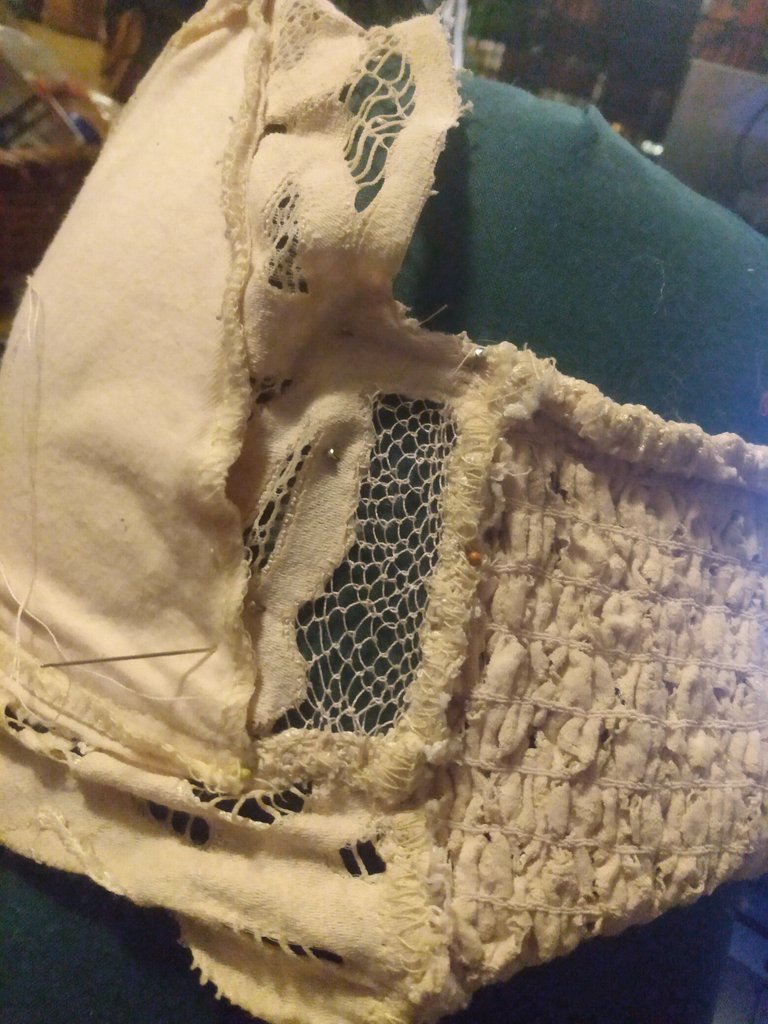
The first thing I did is cut away the loose threads that were in the way. This left an empty space that is surrounded by fabric on all sides. Next I found a color matching thread, and attached it to one of the bottom corners of the empty space. Then I used pins to secure the fabric to a foam piece I have, to keep it the same shape while I fill in the empty space.
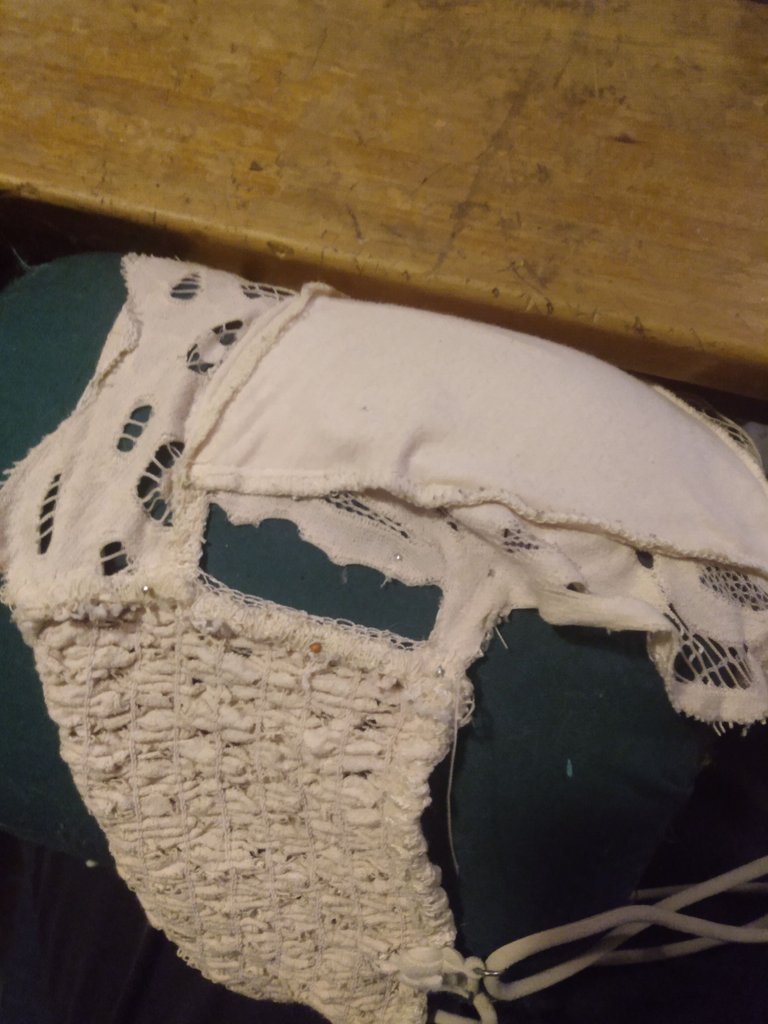
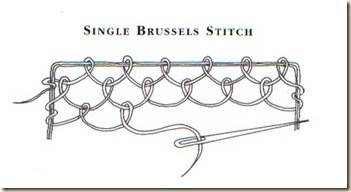
Next, I start making rows of stitches. Catch a bit of fabric with the needle, and make sort of a loop with the thread before you tighten it. I tried to make the spacing between the stitches small and consistent, but I still did a pretty messy job. After the first row, I did another in the opposite direction, this time only catching the tops of the stitches from the last row, but doing the same stitch. Here is a diagram I found that should explain it better than me. (this is the source for the disagram https://elmsleyrose.blogspot.com/2009/02/detached-buttonhole-stitch-vs-brussels.html)
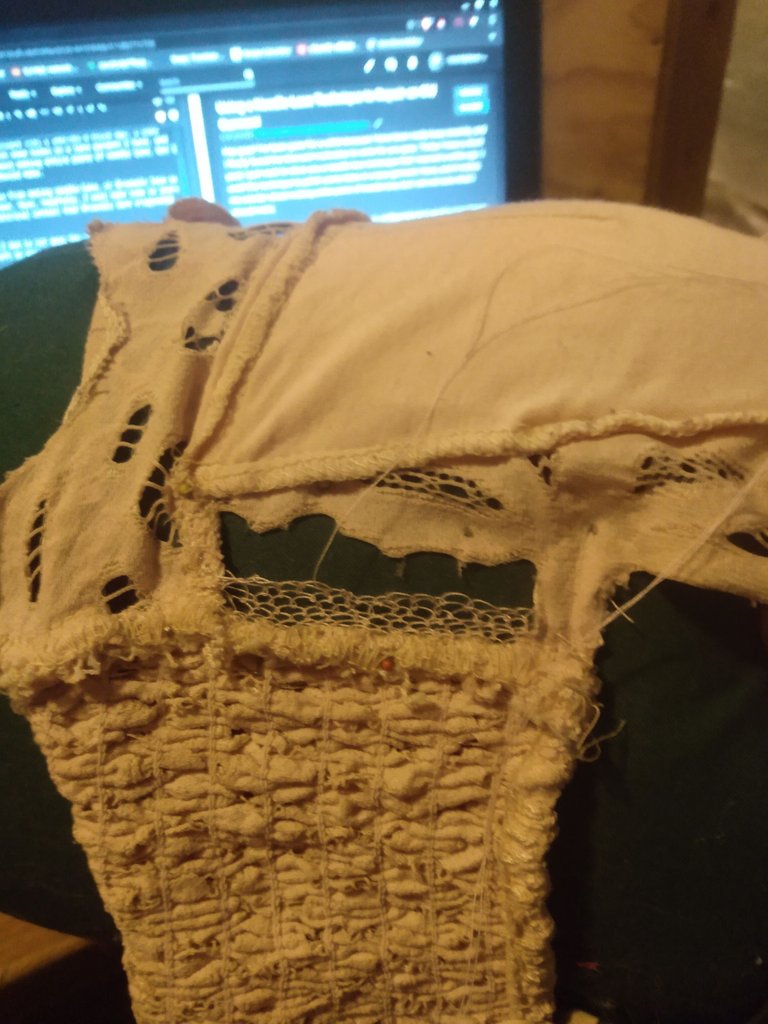
After I did enough rows that I reached the other end of the empty space, I whip-stitched the last opening closed, attaching the top of every stitch to the fabric with stitches that try to be invisible. The result looks like a netting I think, and I really like it.
If you are interested in seeing more of my work, I post pictures of them semi-regularly on my Instagram, which is @sid_the_raccoon. All of the photos I use (unless otherwise specified) belong to me. Also, please leave a comment, I really appreciate them. I wish peace, love, and world domination to all of you, and I hope you have a great next 24 hours.
Hallo Leute! Ich war eine Weile weg, weil ich in letzter Zeit sehr beschäftigt war, und ich habe endlich die Zeit und Motivation gefunden, für euch zu schreiben. Heute habe ich einen kurzen Beitrag, ich möchte euch nur eine Nadelspitzentechnik zeigen, die ich vor einer Weile gelernt habe. Ich habe diese Technik benutzt, um ein paar Löcher in einem Kleidungsstück aus Spitze zu flicken, das ich besitze, und das hat mich auf die Idee gebracht, ein ganzes Stück Nadelspitze zu machen, aber ich bin mir nicht sicher, was ich machen soll.
Diese Technik stammt also von der Herstellung von Nadelspitze, oder Brüsseler Spitze, wie sie manchmal genannt wird. Hoffentlich werde ich mir bald die Zeit nehmen, mehr über den historischen Kontext zu erfahren, in dem die Brüsseler Spitze entstanden ist.
Als erstes habe ich die losen Fäden, die im Weg waren, abgeschnitten. So blieb eine leere Stelle übrig, die auf allen Seiten von Stoff umgeben ist. Als Nächstes habe ich einen farblich passenden Faden gefunden und ihn an einer der unteren Ecken des leeren Raums befestigt. Dann habe ich den Stoff mit Stecknadeln an einem Schaumstoffstück befestigt, damit er seine Form beibehält, während ich den leeren Raum ausfülle.
Als Nächstes fange ich an, Stichreihen zu machen. Fange ein Stück Stoff mit der Nadel ein und mache eine Art Schlaufe mit dem Faden, bevor du ihn festziehst. Ich habe versucht, die Abstände zwischen den Stichen klein und gleichmäßig zu halten, aber ich habe trotzdem eine ziemlich unordentliche Arbeit gemacht. Nach der ersten Reihe habe ich eine weitere in umgekehrter Richtung gestrickt, diesmal nur die oberen Maschen der letzten Reihe, aber mit demselben Stich. Hier ist ein Diagramm, das ich gefunden habe und das es besser erklären sollte als ich (dies ist die Quelle für das Disagramm https://elmsleyrose.blogspot.com/2009/02/detached-buttonhole-stitch-vs-brussels.html)
Nachdem ich so viele Reihen genäht hatte, dass ich das andere Ende des leeren Raums erreicht hatte, habe ich die letzte Öffnung mit einem Peitschenstich geschlossen, wobei ich die Oberseite jeder Masche mit Stichen auf dem Stoff befestigt habe, die versuchen, unsichtbar zu sein. Das Ergebnis sieht aus wie ein Netz, und es gefällt mir sehr gut.
Wenn Sie mehr von meiner Arbeit sehen möchten, poste ich halb regelmäßig Bilder davon auf meinem Instagram-Account @sid_the_raccoon. Alle von mir verwendeten Fotos (sofern nicht anders angegeben) gehören mir. Bitte hinterlasst auch einen Kommentar, ich freue mich sehr darüber. Ich wünsche euch allen Frieden, Liebe und die Weltherrschaft, und ich hoffe, dass ihr die nächsten 24 Stunden genießen könnt.
Übersetzt mit www.DeepL.com/Translator (kostenlose Version)
@cassidydawn, @pixresteemer(4/10) sent you LUV. | tools | discord | community | HiveWiki | NFT | <>< daily
Congratulations @cassidydawn! You have completed the following achievement on the Hive blockchain And have been rewarded with New badge(s)
Your next target is to reach 5000 upvotes.
You can view your badges on your board and compare yourself to others in the Ranking
If you no longer want to receive notifications, reply to this comment with the word
STOPTo support your work, I also upvoted your post!
Check out our last posts:
Support the HiveBuzz project. Vote for our proposal!