INTERPLANETARIA👽💙 Interplanetary
Hola amigos de Hive!! 🙌💕Bienvenidos a todos a un nuevo post que les traigo! Como siempre deseando que se encuentren excelentes! 👋❤️😄🌷
Hello friends of Hive!! 🙌💕Welcome everyone to a new post that I bring you! As always wishing you are excellent! 👋❤️😄🌷
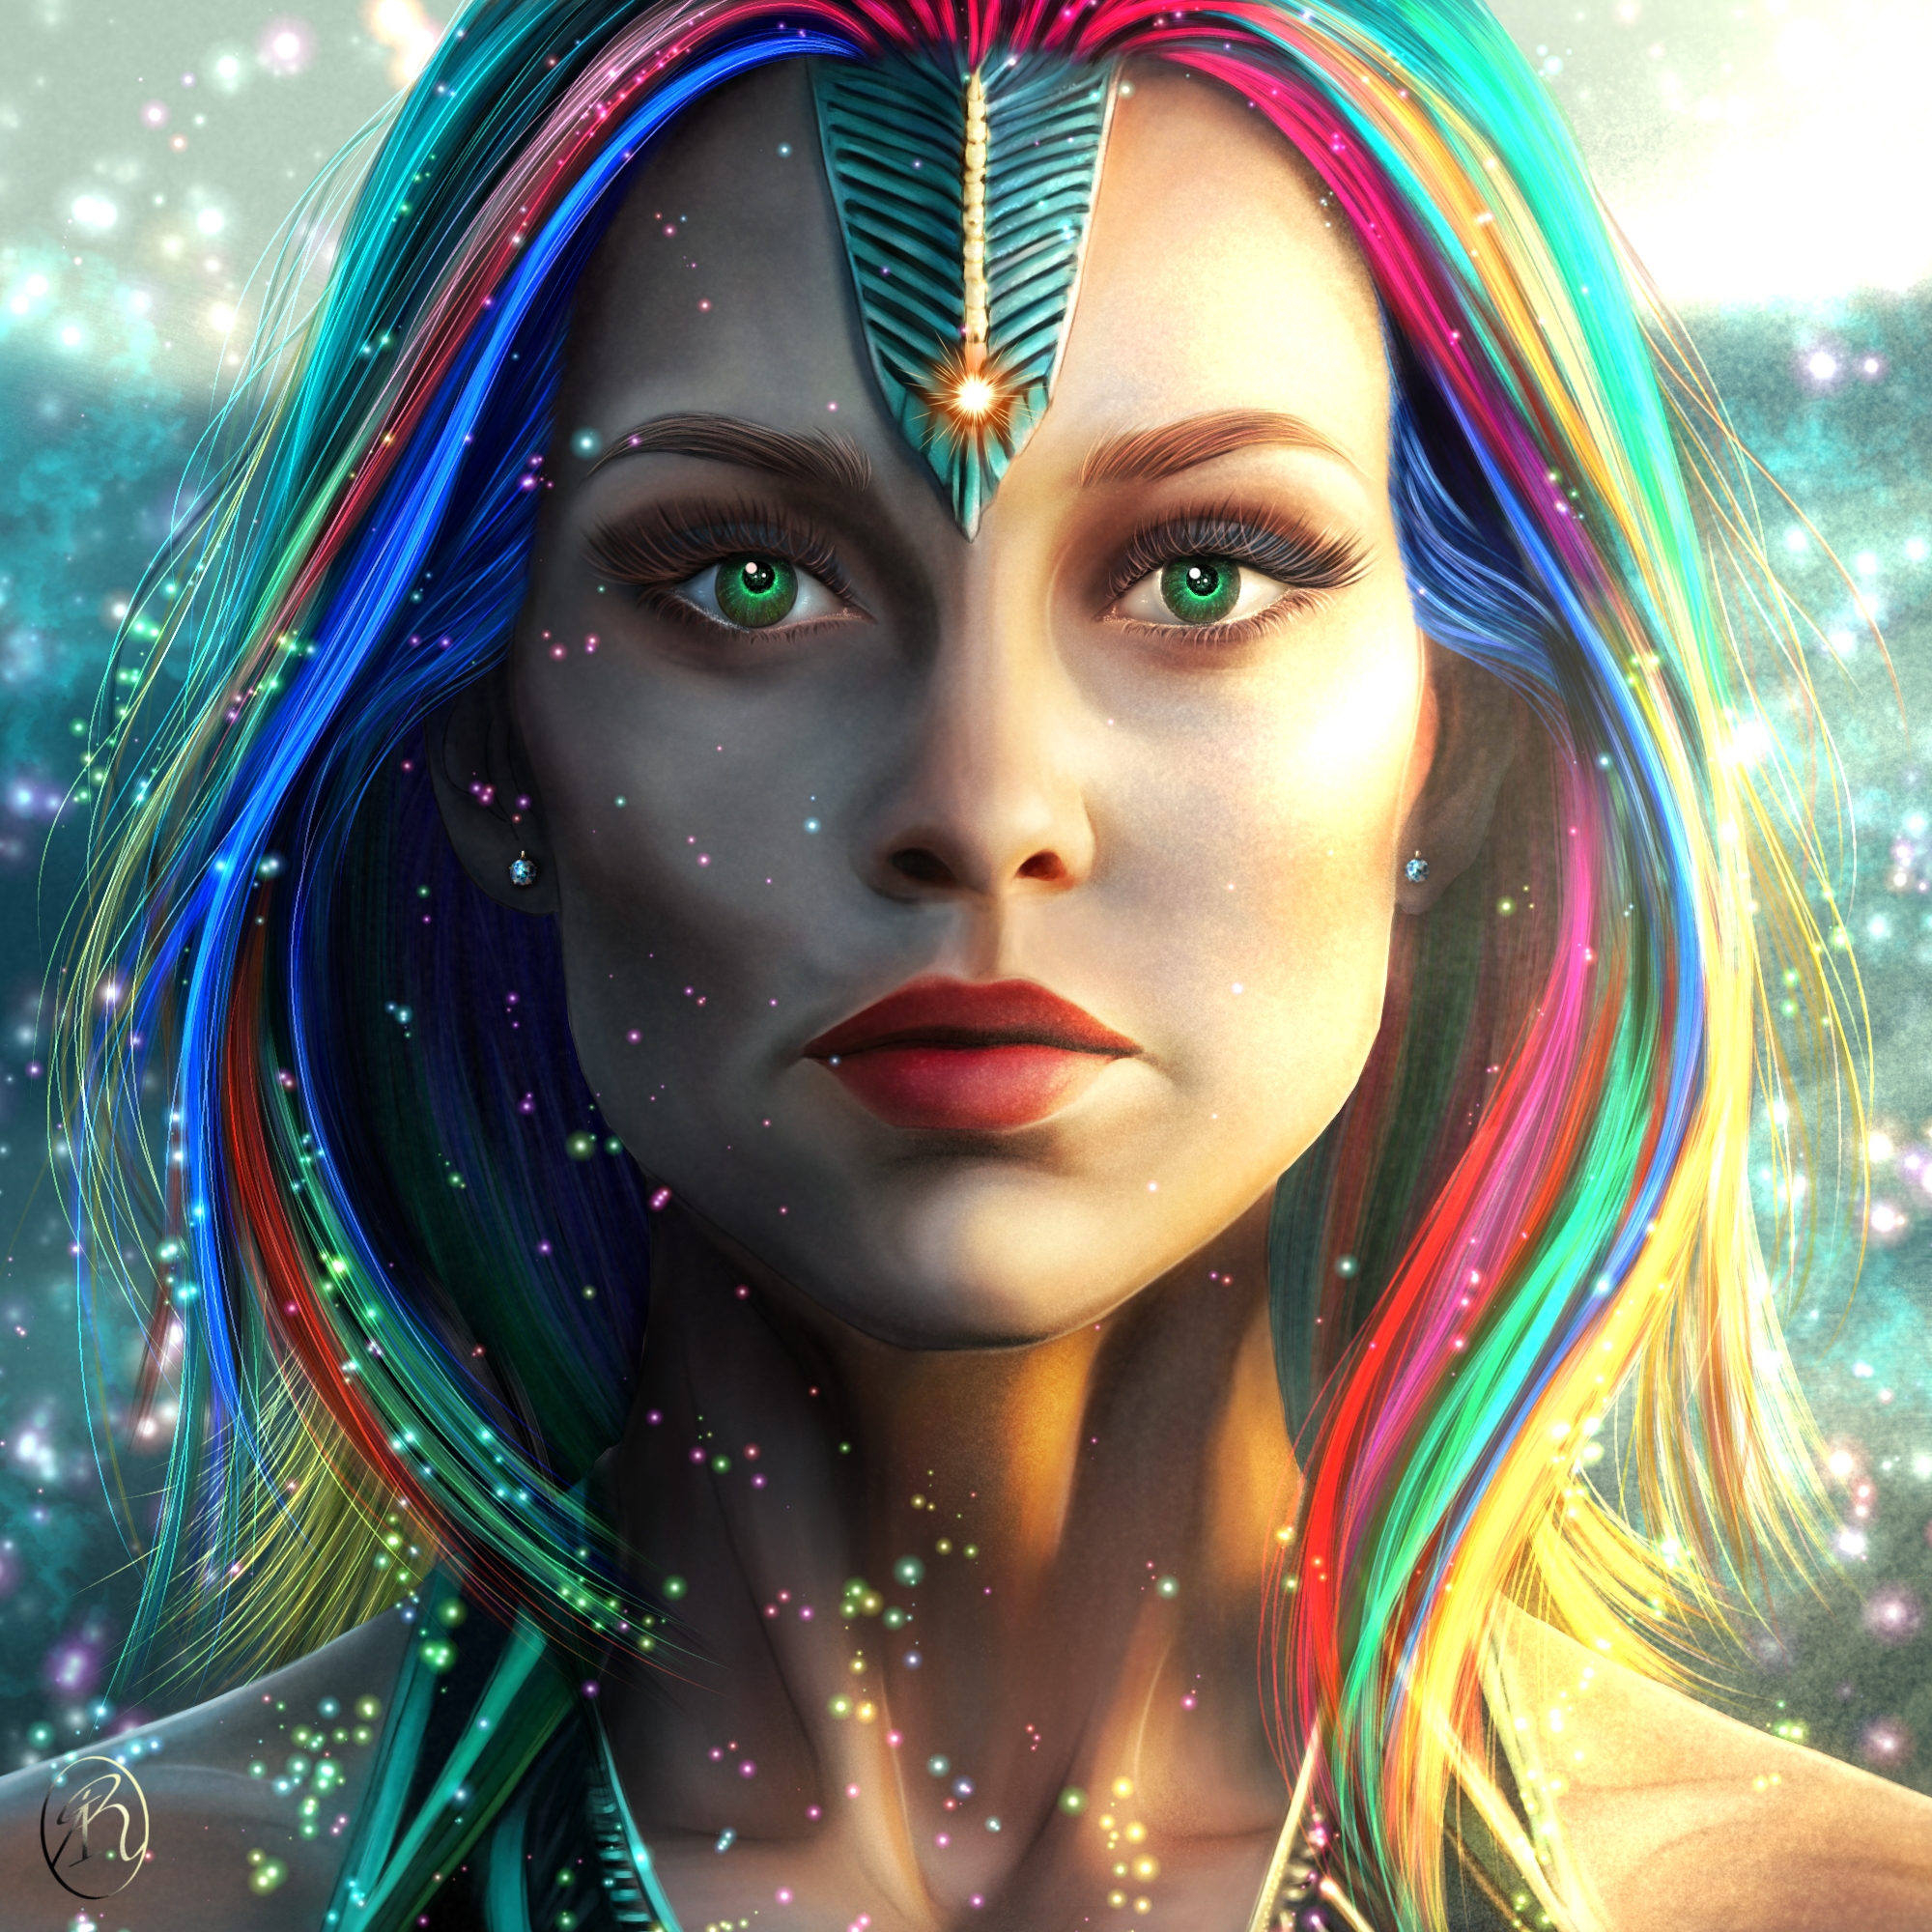
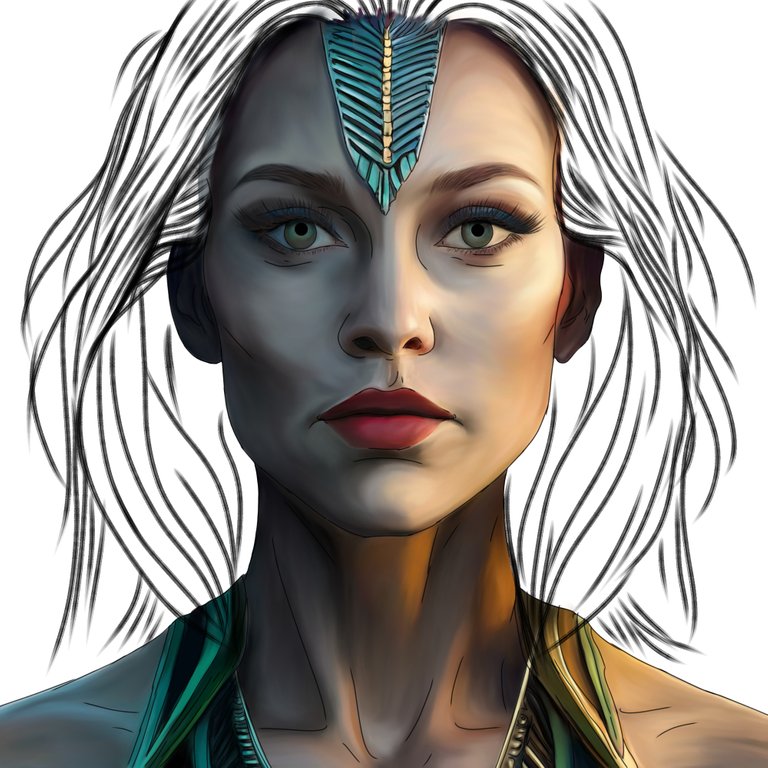
En esta ocasión, quiero compartirles esta pieza que desde hace unos días tenía muchas ganas de realizar, siendo está una alusión a una hermosa mujer interplanetaria con características bastantes coloridas, enfocándome en un cabello con varios matices de colores, y con unos ojos verdes esmeralda hipnotizantes. Realmente me gustó este resultado y me sentí bastante cómoda con esta pieza, ya que he sentido ese mayor dominio en las herramientas del programa, siguiendo una secuencia en cada etapa, la cual he ido canalizando para este estilo. De manera que espero les guste y me compartan aquí que les ha parecido esta ilustración. Disfrútenlo!! 🌷😊👍
On this occasion, I want to share this piece that I really wanted to do for a few days, being an allusion to a beautiful interplanetary woman with quite colorful features, focusing on hair with various shades of colors, and mesmerizing emerald green eyes. . I really liked this result and I felt quite comfortable with this piece, since I have felt that greater mastery in the program's tools, following a sequence in each stage, which I have been channeling for this style. So I hope you like it and share with me here what you think of this illustration. Enjoy it!! 🌷😊👍

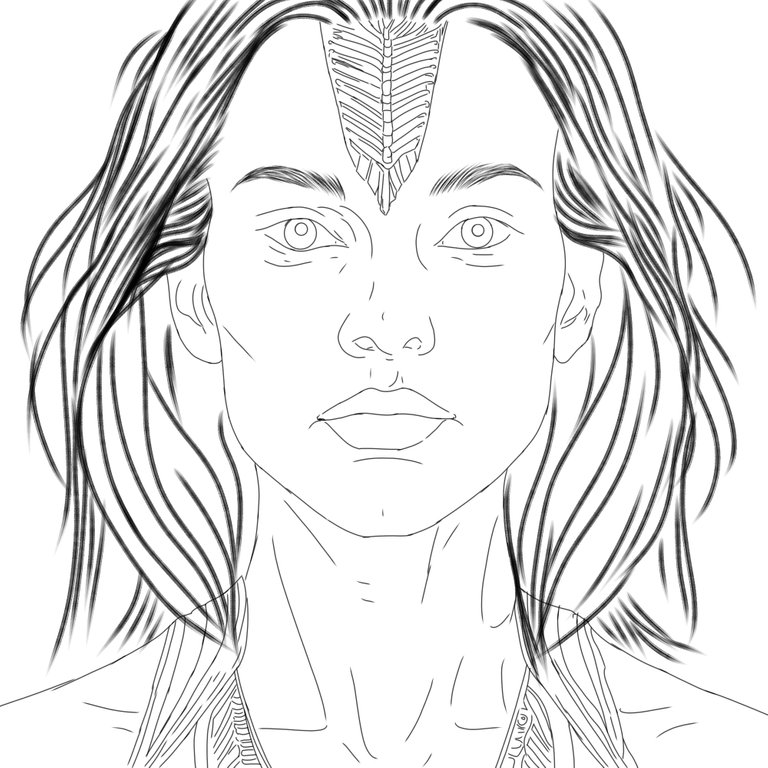
Etapas del Dibujo/Drawing Stages
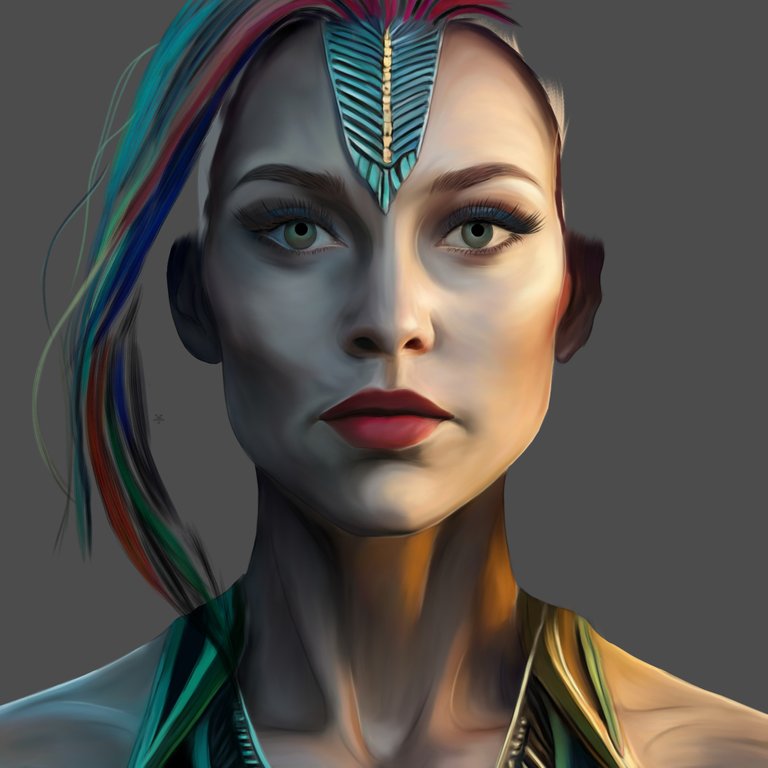
Inicie con un boceto de delineado donde use una brocha tipo pluma suave, luego en una nueva capa fui agregando colores base en cada sección usando una brocha tipo acuarela plana, donde luego pase a realizar en otra capa el coloreado de la vestimemta y accesorio con colores base. De seguido, empece la etapa de matizado con una brocha tipo acuarela plana, luego pase a la fase de suavizar los trazos con la herramienta difumino opacidad baja. Usando en esta primera fase un método de mezcla normal.
I started with an eyeliner sketch where I used a soft pen brush, then in a new layer I added base colors in each section using a flat watercolor brush, where I then proceeded to color the clothing and accessories with colors on another layer. base. Next, I started the shading stage with a flat watercolor brush, then moved on to the smoothing stage with the low opacity smudge tool. Using in this first phase a normal mixing method.
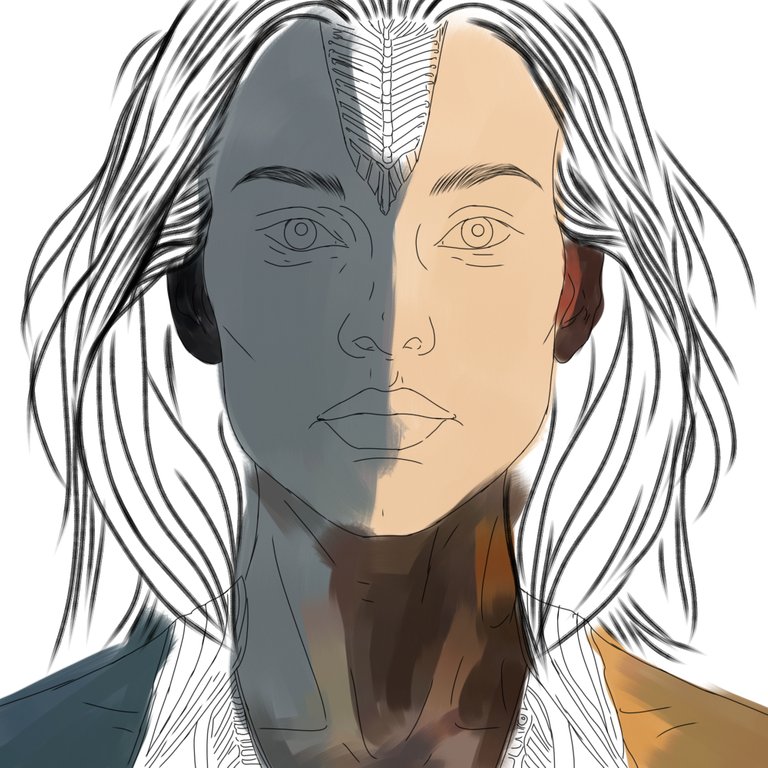


Matice los ojos y la boca en otra capa encima de la capa de color de la piel, usando el mismo método de mezcla normal, luego suavice para hacer transición de colores. En otra capa empecé la elaboración de las cejas y pestañas usando la brocha tipo Pelo como siempre usando un grosor bajo. Luego, seleccione la capa de delineado y con la herramienta bloqueo alfa cambie a un amarillo brillante algunas secciones del delineado donde hay mayor iluminación. Las cuales, pase a difuminar, bajando antes la opacidad del delineado para no ensuciar mucho los colores con el delineado negro. Después, en otra capa seguí la elaboración del cabello empezando con los mechones delanteros usando la brocha tipo Pelo y con método de mezcla normal, escogiendo mis queridos una variedad de colores llamativos.
Tint the eyes and mouth on another layer on top of the skin color layer, using the same normal blending method, then smooth to transition colors. In another layer I started the elaboration of the eyebrows and eyelashes using the Hair type brush as always using a low thickness. Then select the liner layer and with the alpha lock tool change some sections of the liner where there is more lighting to a bright yellow. Which, go on to blur, lowering the opacity of the eyeliner first so as not to dirty the colors too much with the black eyeliner. Then, in another layer I continued the elaboration of the hair starting with the front strands using the Hair brush and with the normal blending method, choosing my darlings a variety of striking colors.

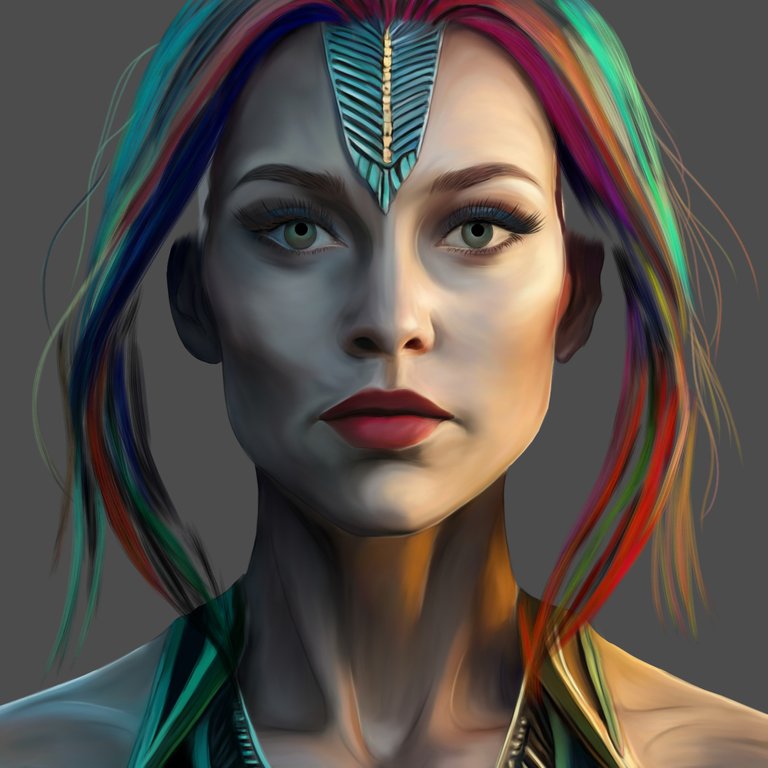
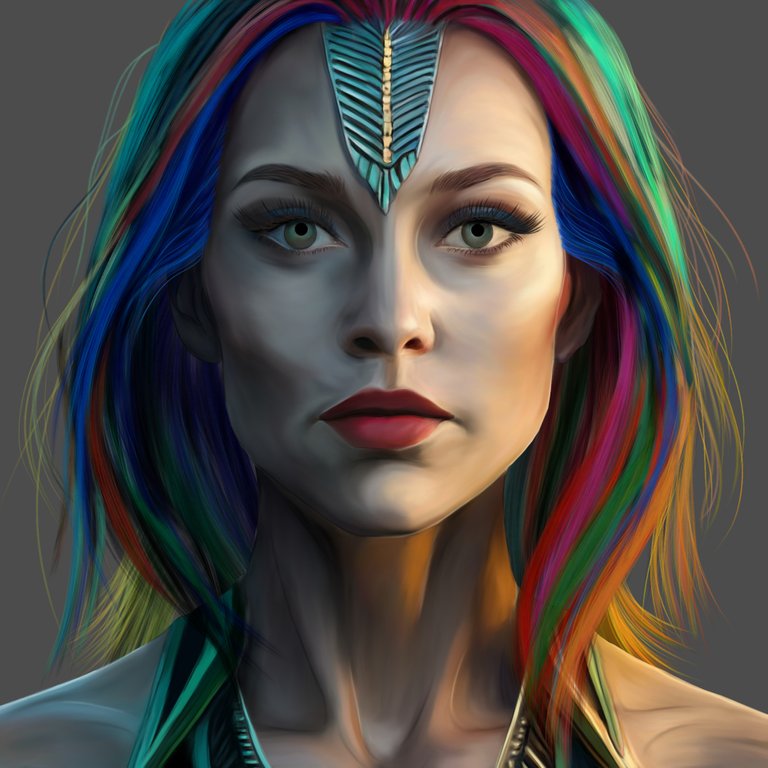
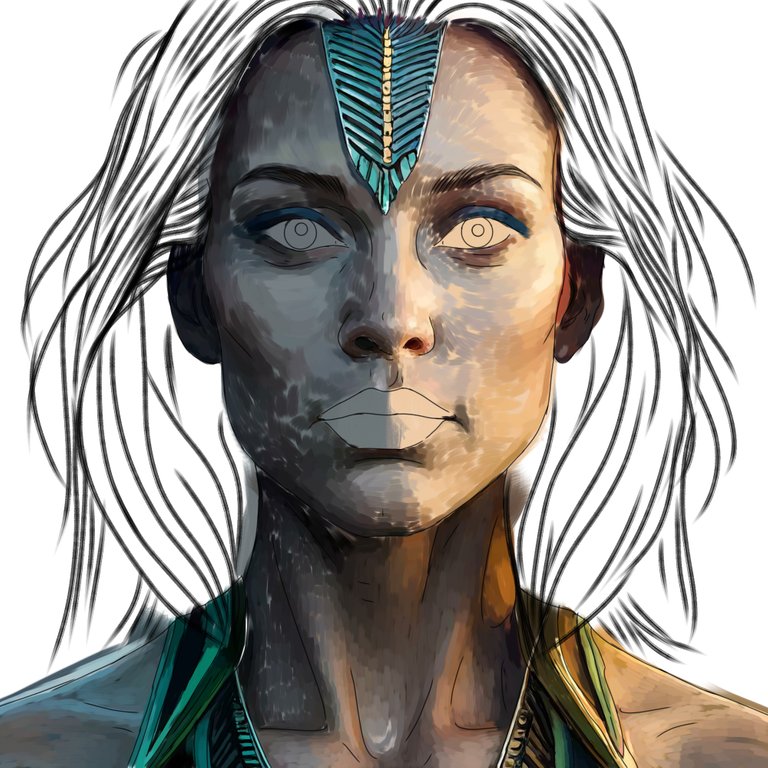
En esta etapa final, empecé a trabajar un fondo con una capa en método de mezcla normal usando el pincel tipo Aerógrafo de partículas, y luego difumine un poco con difuminado gauseano. Ya terminado la elaboración de todos los componentes, empecé con la etapa de iluminación y contraste. Abrí una capa de superposición de color para resaltar las partes iluminadas de la piel y otras secciones usando el aerógrafo de partículas con opacidad baja. Abrí una capa con método de mezcla añadir y agregué mechones iluminados en el cabello y ilumine también un poco las pestañas y cejas, luego abrí otra capa con ese mismo método y agregué algunos brillos en los ojos con brocha rotulador y con una brocha tipo punto de brillo. Y finalmente abrí otra capa, con método de mezcla añadir fui agregando brillos de fondo y delanteros con la brocha tipo punto de brillo, bajando y subiendo su opacidad. Luego con la brocha tipo Aerógrafo de partículas con opacidad muy baja fui texturizando, agregando un poco más de iluminación del lado derecho donde procede la luz solar, colocando en su accesorio en la frente un detalle de luz. Y así culmine esta tiesa que espero les haya gustado! Un saludo y hasta la próxima comunidad!! 👋😘❤️
In this final stage, I started working a background with one layer in normal blending method using the Particle Airbrush brush, and then blended a bit with Gaussian smudge. Once the elaboration of all the components was finished, I started with the stage of lighting and contrast. I opened a Color Overlay layer to highlight the highlighted parts of the skin and other sections using the Particle Airbrush with low opacity. I opened a layer with blending method add and added highlighted strands in the hair and also highlighted the lashes and eyebrows a little bit, then I opened another layer with that same method and added some glitters in the eyes with a marker brush and with a point type brush glow. And finally I opened another layer, with the blend method add I was adding background and front glitters with the glitter point brush, lowering and raising its opacity. Then with the particle Airbrush type brush with very low opacity I textured, adding a little more lighting on the right side where the sunlight comes from, placing a light detail on its accessory on the forehead. And so this stiff end that I hope you liked! Greetings and until the next community! 👋😘❤️

ILUSTRACIÓN FINAL/End Illustration
Redes Sociales/ Social Networks
Sigueme en/ Follow me in:
👉Instagram: @catrynart
👉 Twitter: @catrynart
Herramientas Usadas/Used Tools
- Tablet Android/ Android Tablet
- Programa Ibis Paint X/ Ibis Paint X Program
- Traductor Deepl/ Deelp Translator
- Servidor de Imagenes Imgbb/ Imgbb Image Server
- Dactilopintura Digital/ Digital Fingerprint Painting
🌺¡HASTA EL PRÓXIMO POST!🌺
Detenerse es Retroceder
To Stop is to go Backwards
https://twitter.com/1629316644987174912/status/1650267563538931714
The rewards earned on this comment will go directly to the people sharing the post on Twitter as long as they are registered with @poshtoken. Sign up at https://hiveposh.com.
Gracias @mayvileros 🥰🤗
OMG impresionante, demasiado bello me encanto! que dedicada, se ve muy realista 😍
Gracias @josmariyuyi 😊🌷
¡Felicidades! Esta publicación obtuvo upvote y fue compartido por @la-colmena, un proyecto de Curación Manual para la comunidad hispana de Hive que cuenta con el respaldo de @curie.
Si te gusta el trabajo que hacemos, te invitamos a darle tu voto a este comentario y a votar como testigo por La Colmena.
Si quieres saber más sobre nuestro proyecto, te invitamos a acompañarnos en nuestro servidor de Discord.
Gracias @colmena y @curie🤗🥰
¡Quedó hermoso!
Gracias @ocatia 🥰
So beautiful ❤️😍
Thank you @surrealworld 😊🌷
This turned out really pretty!
Thank You so @castleberry ♥️😊
Your content has been voted as a part of Encouragement program. Keep up the good work!
Use Ecency daily to boost your growth on platform!
Support Ecency
Vote for new Proposal
Delegate HP and earn more
Thank You @ecensy 🤗💗
Incredible!
!PGM
!PIZZA
BUY AND STAKE THE PGM TO SEND A LOT OF TOKENS!
The tokens that the command sends are: 0.1 PGM-0.1 LVL-0.1 THGAMING-0.05 DEC-15 SBT-1 STARBITS-[0.00000001 BTC (SWAP.BTC) only if you have 2500 PGM in stake or more ]
5000 PGM IN STAKE = 2x rewards!
Discord
Support the curation account @ pgm-curator with a delegation 10 HP - 50 HP - 100 HP - 500 HP - 1000 HP
Get potential votes from @ pgm-curator by paying in PGM, here is a guide
I'm a bot, if you want a hand ask @ zottone444
Thank You @torran🌷🤗💗
$PIZZA slices delivered:
@torran(1/10) tipped @catrynart