RIVER NIMPH🌊 Splinterlands Art Contest SPT W-270
Hola amigos! nuevamente les doy la bienvenida a una nueva presentación de la semana!😊👋❤️💕
Hello friends! Once again I welcome you to a new presentation of the week!😊👋❤️💕
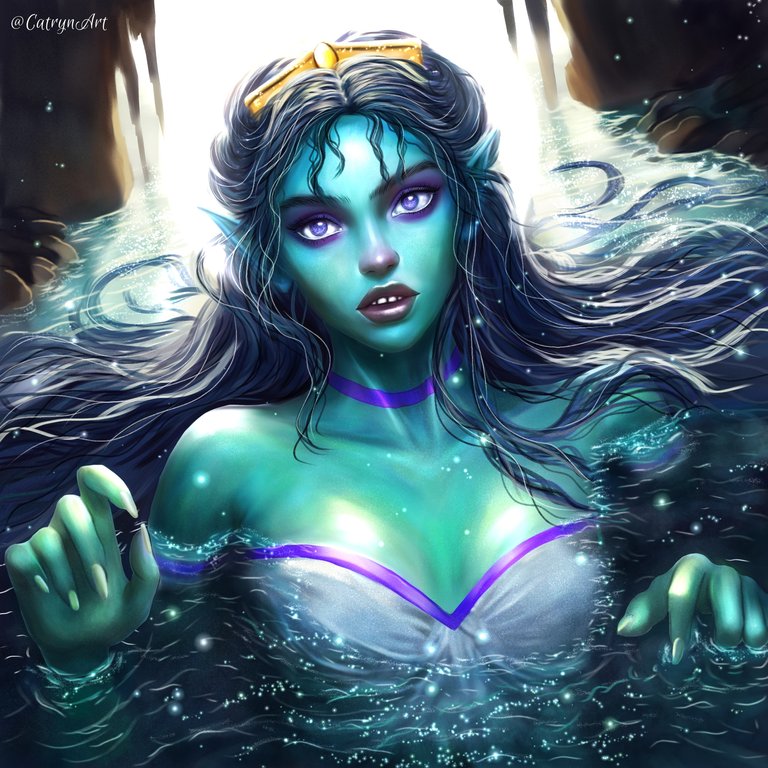

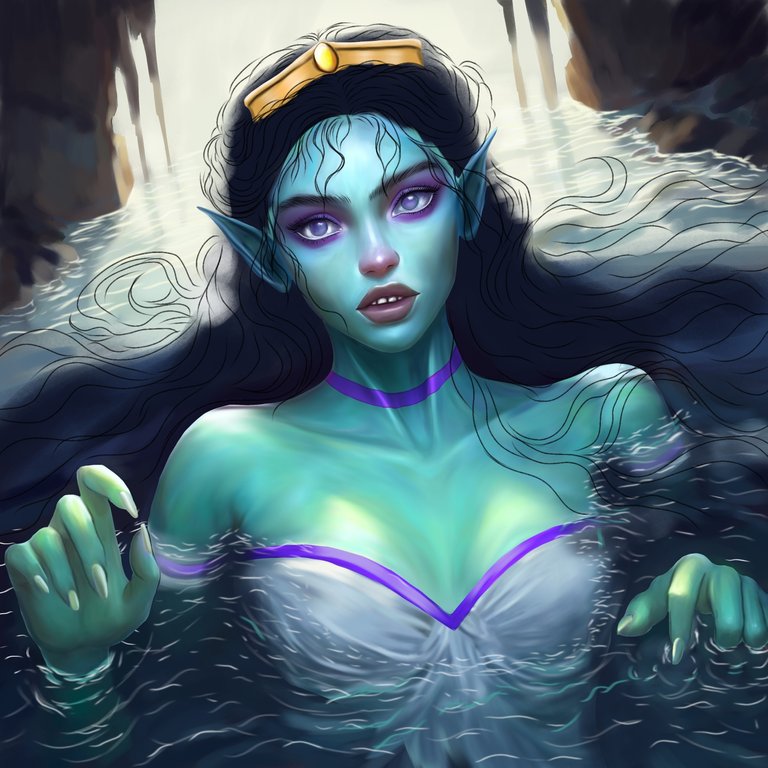
Hoy quiero compartir con ustedes un dibujo que realicé para el concurso de arte de esta semana, representando una carta del juego de @Splinterlands llamada RIVER NIMPH . Esta carta es una hermosa ninfa de río que tiene el poder de controlar el agua y sanar a sus aliados. Me inspiré para realizar este dibujo en la belleza y el misterio que rodean a esta criatura mágica, y también en el desafío de recrear el efecto del agua y la humedad en la piel. Pueden ver el resultado final del dibujo, donde se aprecia a la River Nimph dentro de una caverna, sobresaliendo a medio cuerpo del agua y mirando al espectador con una expresión enigmática. Me gustó mucho la posición que le di, porque creo que transmite su elegancia y su conexión con el elemento acuático.
Esta carta la había realizado en mis comienzos y aprendizaje en el arte digital, y con el tiempo, a medida que aprendía a manejar el programa digital, esperaba volver a rehacer esta carta con una nueva representación, más detallada y realista. Así que me sentí muy entusiasmada cuando me propuse hacer otra representación de esta carta, y más aún cuando vi que empezaba a tomar forma a medida que avanzaba. Uno de los aspectos que más me costó y que más me hizo pensar fue cómo hacer el agua y hacer una piel algo húmeda, que reflejara la luz y las sombras. Para lograrlo, tuve que retomar algunos pinceles que al principio usaba, pero que dejé por un tiempo, y experimentar con diferentes capas y modos de mezcla. Creo que el resultado fue bastante satisfactorio, y me gustaría compartir con ustedes el proceso y el paso a paso de esta elaboración. Disfrútenlo! 😊👋💕🌹
Today I want to share with you a drawing I made for this week's art contest, representing a card from the @Splinterlands game called RIVER NIMPH. This card is a beautiful river nymph that has the power to control water and heal its allies. I was inspired to make this drawing by the beauty and mystery that surrounds this magical creature, and also by the challenge of recreating the effect of water and humidity on the skin. You can see the final result of the drawing, where the River Nimph can be seen inside a cavern, sticking out half a body of water and looking at the viewer with an enigmatic expression. I really liked the position I gave her, because I think it conveys her elegance and her connection to the aquatic element.
I had made this card in my beginnings and learning in digital art, and over time, as I learned to use the digital program, I hoped to remake this card with a new, more detailed and realistic representation. So I was very excited when I set out to do another performance of this card, and even more so when I saw it starting to take shape as I went along. One of the aspects that was most difficult for me and that made me think the most was how to make the water and make the skin somewhat moist, reflecting light and shadows. To achieve this, I had to go back to some brushes that I initially used, but left for a while, and experiment with different layers and blending modes. I think the result was quite satisfactory, and I would like to share with you the process and step by step of this preparation. Enjoy it! 😊👋💕🌹
Link de la Imagen de Referencia/Reference Image Link

Etapas del Dibujo/Drawing Stages
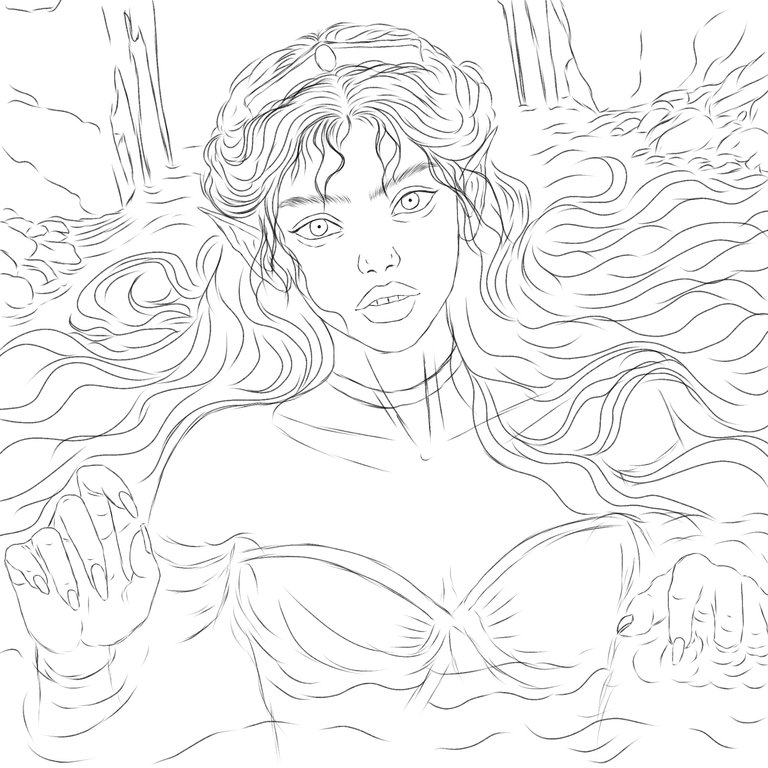
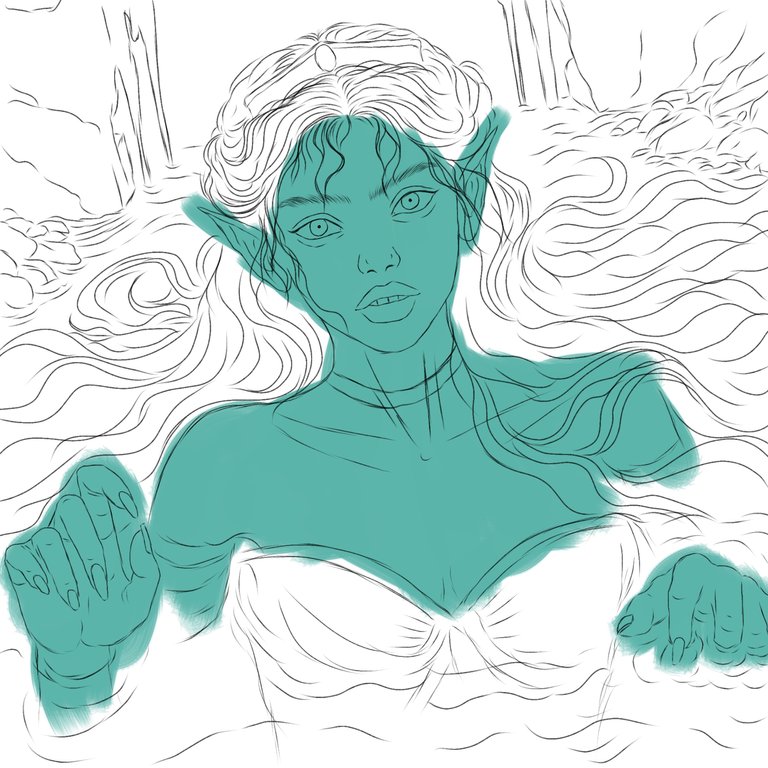
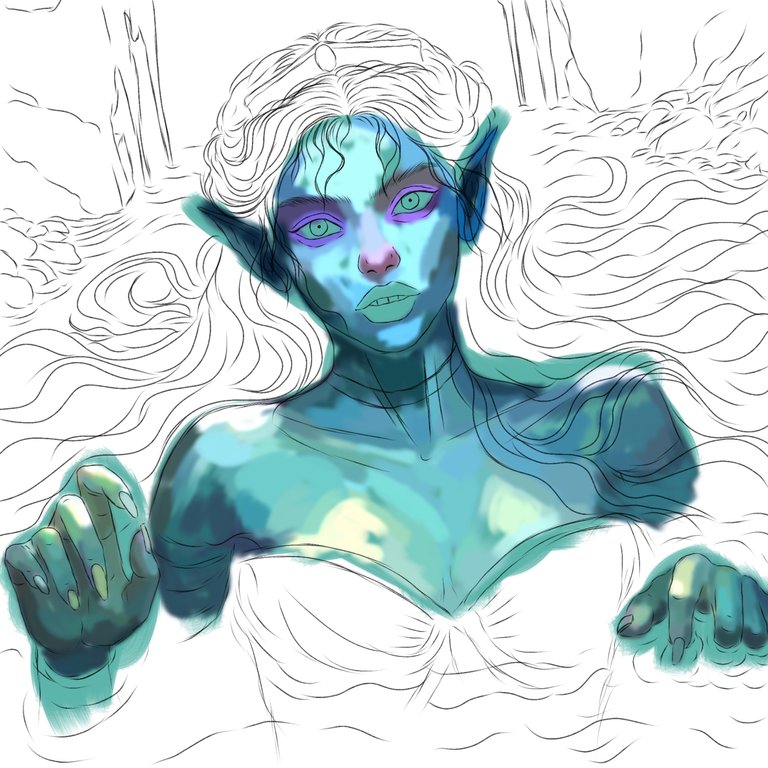
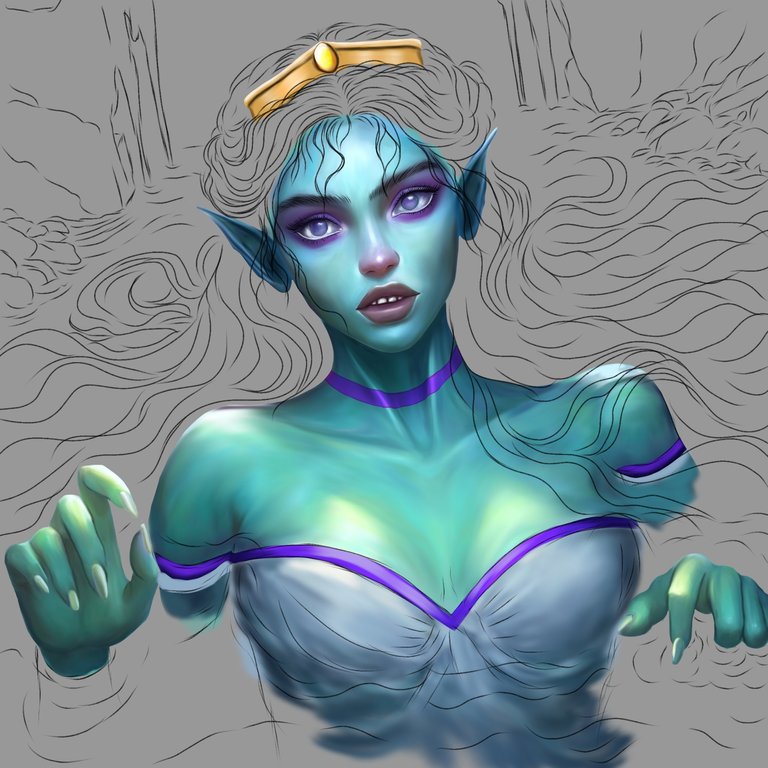
Para el boceto inicial, usé el pincel tipo pelo, que es el que últimamente he estado usando, con un grosor mínimo. Quería agregar en el boceto los detalles y trabajar de una vez en un fondo, para saber con más certeza qué iba a hacer. Así que dibujé la silueta de la River Nimph, el contorno de la caverna y algunas líneas para indicar el movimiento del agua. Luego, en otra capa, pasé a aplicar el color base, con un verde agua para su piel. Usé el pincel tipo plano real, que tiene una forma rectangular y permite cubrir grandes áreas con facilidad. Después, seguí pincelando con la brocha tipo plano real, para agregar sombras e iluminación a la piel de la River Nimph. Usé un verde más oscuro para las zonas de sombra y un verde más claro para las zonas de luz. También comencé con el difuminado, para integrar y uniformar los colores. Para ello, usé el pincel tipo pastel suave difuminado, que tiene una forma redonda y suave con una textura que me gusta mucho, y que permite mezclar los colores sin perder la intensidad. Para reforzar las sombras e iluminación, usé varias capas que luego pasé a unir. En una capa, usé el mismo pincel tipo plano real, pero con un verde más oscuro y más saturado, para crear contrastes más fuertes. En otra capa, usé el mismo pincel, pero con un verde más claro y más brillante, para crear iluminaciones más puntuales.
Luego, usé el pincel tipo difuminado para suavizar los bordes y crear un efecto de transición. Después, uní las capas y usé el pincel tipo borrador, que tiene una forma redonda y dura, para borrar lo restante y limpiar y definir la forma de la River Nimph. Seguí en otra capa haciendo los ojos, con el mismo método de mezcla que comencé, normal. Usé el pincel tipo pelo, con un grosor mínimo, para dibujar el contorno de los ojos, con un color azul y morados claros. Luego, usé el pincel tipo plano real, con un color blanco, para crear el brillo de los ojos. Después, usé el pincel tipo difuminado, para darle un toque de suavidad y realismo a los ojos. Finalmente, usé el pincel tipo borrador, para limpiar lo sobrante y definir la forma de los ojos.
For the initial sketch, I used the hair type brush, which is the one I have been using lately, with a minimum thickness. I wanted to add the details to the sketch and work on a background at once, to know with more certainty what I was going to do. So I drew the silhouette of the River Nimph, the outline of the cavern and some lines to indicate the movement of the water. Then, in another layer, I went on to apply the base color, with an aqua green for her skin. I used the real flat style brush, which has a rectangular shape and allows you to cover large areas with ease. Afterwards, I continued brushing with the real flat brush, to add shadows and highlighting to the River Nimph's skin. I used a darker green for the shadow areas and a lighter green for the light areas. I also started with blurring, to integrate and uniform the colors. To do this, I used the smudged soft pastel brush, which has a soft round shape with a texture that I really like, and that allows the colors to be mixed without losing intensity. To reinforce the shadows and lighting, I used several layers that I then joined together. On one layer, I used the same real flat brush, but with a darker, more saturated green, to create stronger contrasts. On another layer, I used the same brush, but with a lighter, brighter green, to create more specific highlights.
Then, I used the smudge brush to soften the edges and create a transition effect. I then merged the layers together and used the eraser brush, which has a hard round shape, to erase the rest to clean up and define the shape of the River Nimph. I continued on another layer making the eyes, with the same blending method I started, normal. I used the hair type brush, with a minimum thickness, to draw the contour of the eyes, with a blue and light purple color. Next, I used the actual flat style brush, with a white color, to create the glow in the eyes. Then, I used the smudge brush to give a touch of softness and realism to the eyes. Finally, I used the eraser brush to clean up the excess and define the shape of the eyes.
 |  |
 |  |
 |  |
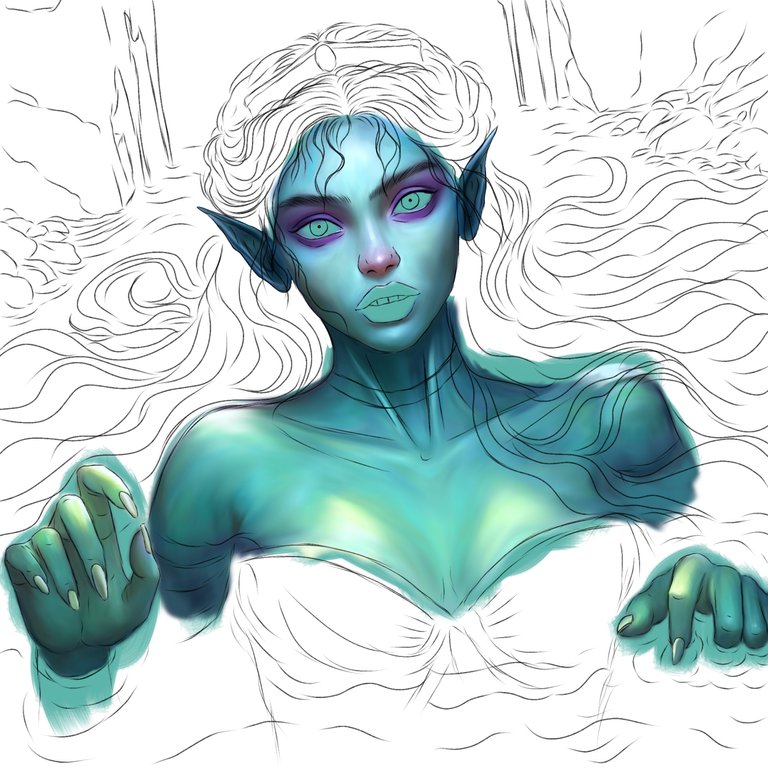
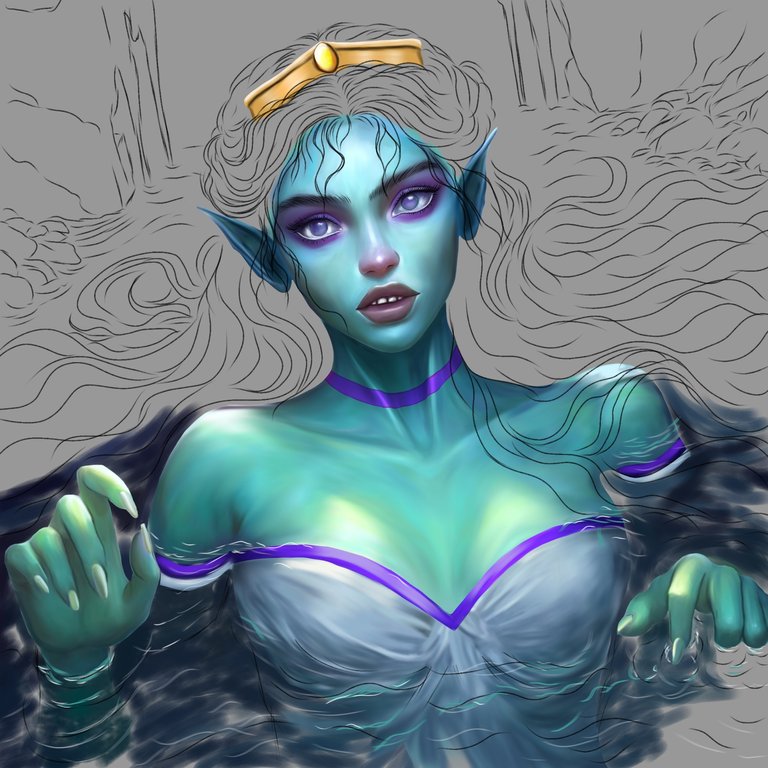
En otra capa, hice los accesorios que lleva la River Nimph. Usé el pincel tipo plano real, con un color blanco, para crear el brillo y el reflejo de la tiara en su cabeza. Después, usé el pincel tipo difuminado, para darle un toque de suavidad y realismo. Finalmente, usé el pincel tipo borrador, para limpiar lo sobrante y definir la forma de los accesorios. A medida que iba definiendo y difuminando los elementos, iba borrando para definir lo sobresaliente. También fui de a poco bajando el tono del fondo, para trabajar mejor sin tanta iluminación de fondo. Así, logré crear un efecto de contraste y profundidad entre la River Nimph y el fondo. Después, en otra capa, hice la vestimenta que lleva, usé el pincel tipo plano real, con un color blanco, para crear el color base y el brillo de la tela. Luego, usé el mismo pincel, con un color azul claro y grises, para crear las sombras y los pliegues de la tela. Después, usé el pincel tipo difuminado, para suavizar los bordes y crear un efecto de transición. Finalmente, usé el pincel tipo borrador, para limpiar lo sobrante y definir la forma de la tela.
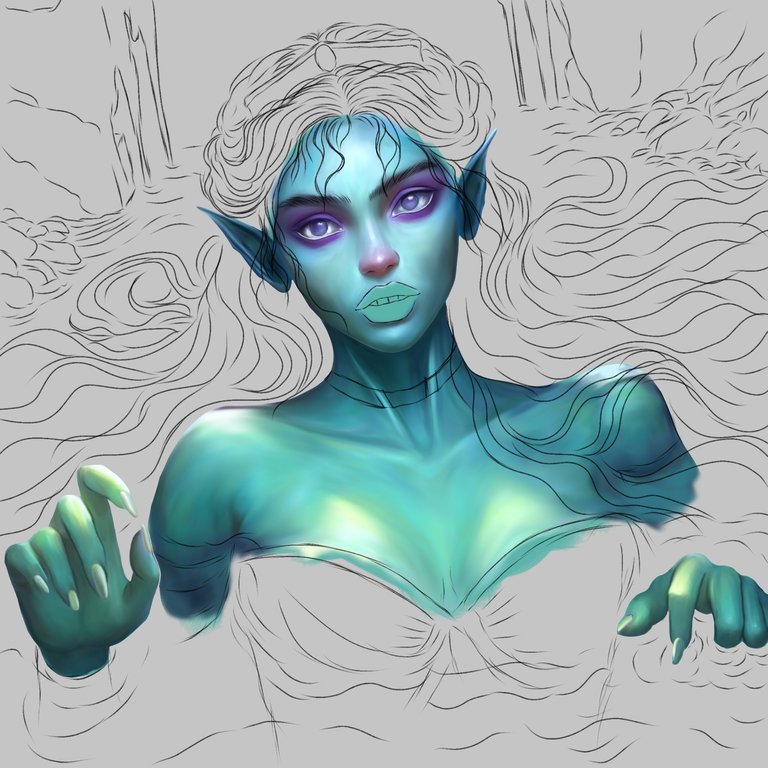
Luego, en otra capa, comencé con el entorno de agua, que rodea a la ninfa y que se ve en el fondo de la caverna. No sabía qué pincel usar, así que comencé con el pincel tipo plano abanico, que tiene una forma de abanico y que permite crear trazos irregulares y dinámicos. Usé este pincel, con un color blanco y un amarillo opaco muy claro claro y un grosor medio bajo, para crear el movimiento y la textura del agua. Luego, en otra capa, fui pincelando con la brocha tipo pastel suave, que tiene una forma redonda y una textura de difuminado, que me gustó cómo le daba ese aspecto de profundidad al agua. Usé esta brocha, con un color azul más oscuro y un grosor medio alto, para crear el fondo del agua y las sombras. Usé varias capas para esto, agregando un fondo más oscuro y luego uniéndolas. Después, usé el pincel tipo plano real, con un color blanco y un grosor mínimo, para crear el efecto de brillo y reflejo del agua en la superficie y en el cuerpo de ella difuminando un poco. Finalmente, usé el pincel tipo borrador, para limpiar lo sobrante y definir.
On another layer, I made the accessories that the River Nimph wears. I used the royal flat style brush, with a white color, to create the shine and reflection of the tiara on her head. Then, I used the smudge brush to give it a touch of softness and realism. Finally, I used the eraser brush to clean up the excess and define the shape of the accessories. As I defined and blurred the elements, I erased them to define what stood out. I also gradually lowered the tone of the background, to work better without so much background lighting. Thus, I managed to create an effect of contrast and depth between the River Nimph and the background. Then, on another layer, I made the outfit she is wearing, I used the real flat type brush, with a white color, to create the base color and the shine of the fabric. Then, I used the same brush, with a light blue and grays, to create the shadows and folds of the fabric. Next, I used the smudge brush to soften the edges and create a transition effect. Finally, I used the eraser brush to clean up the excess and define the shape of the fabric.
Then, on another layer, I started with the water environment, which surrounds the nymph and is seen at the bottom of the cave. I didn't know which brush to use, so I started with the flat fan brush, which has a fan shape and allows you to create irregular and dynamic strokes. I used this brush, with a white color and a very light opaque yellow color and a medium-low thickness, to create the movement and texture of the water. Then, on another layer, I brushed with the soft pastel brush, which has a round shape and a blending texture, which I liked how it gave that look of depth to the water. I used this brush, with a darker blue color and a medium-high thickness, to create the water background and shadows. I used several layers for this, adding a darker background and then stitching them together. Then, I used the real flat brush, with a white color and a minimum thickness, to create the effect of shine and reflection of the water on the surface and on her body, blurring it a little. Finally, I used the eraser brush to clean up the excess and define.
 |  |
 |  |
 |  |
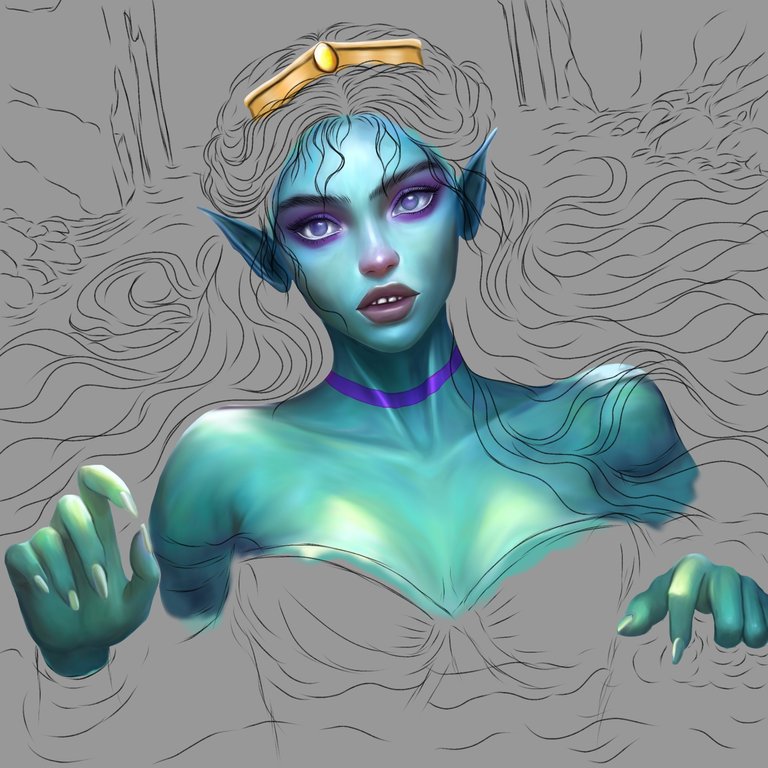
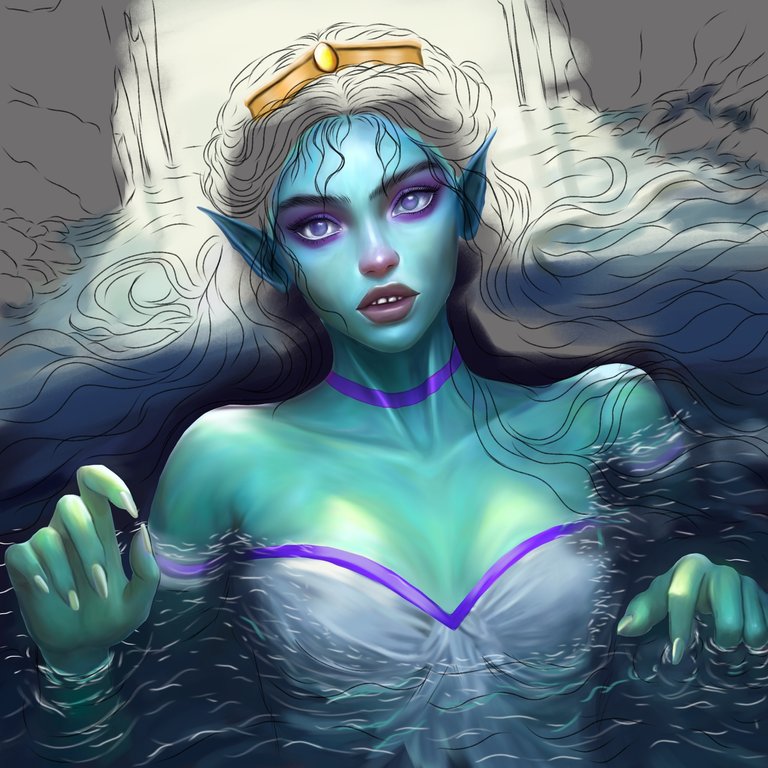
Después, en otra capa, hice el fondo de la caverna, que se ve detrás de ella. Usé la brocha tipo pastel suave, con un color marrón oscuro y un grosor medio alto, para crear el color base y la forma de la caverna. Luego, usé la misma brocha, con un color marrón más claro y un grosor medio bajo, para crear las luces y los detalles de la roca, agregándole una iluminación amarilla palida. Después, usé la brocha tipo plano abanico, con un color blanco y un grosor mínimo, para crear el efecto de brillo y reflejo del agua en la roca. Finalmente, usé el pincel tipo borrador, para limpiar lo sobrante y definir la forma de la caverna. Luego, en otra capa, hice el cabello, que es largo y de color azul. Usé el pincel tipo plano abanico, con un color azul oscuro y un grosor medio alto, para crear el color base y el cuerpo del cabello. Luego, usé el mismo pincel, con varios tonos de azul más claros y un grosor medio bajo, para crear las luces y los mechones del cabello.
Después, usé el mismo pincel, con un color blanco y un grosor mínimo, para crear el brillo y el reflejo del cabello. Luego, hice algunos mechones en una capa aparte, y agregué en otra capa de fondo un tono más oscuro, para darle profundidad y volumen al cabello. Después, usé la brocha tipo pelo, con tonos azules oscuros y blanco, y un grosor mínimo, para definir más el cabello y crear más mechones de iluminación.
Cuando logré terminar todos los elementos del dibujo, comencé con los ajustes finales, usando otras capas y diferentes modos de mezcla. Empecé con una capa de superposición, y con la brocha tipo pastel suave, que tiene una forma redonda y una textura de difuminado, resaltando así los tonos de los colores y reforzando las sombras. Luego, con una capa de añadir, culminé los detalles de iluminación, con la misma brocha y agregando destellos y brillos con la brocha tipo purpurina y la brocha tipo punto de brillo, que son unas de mis favoritas. También usé el pincel tipo borrador, para borrar lo que no me gustaba o lo que estaba de más.
Then, on another layer, I made the background of the cave, which can be seen behind it. I used the soft pastel brush, with a dark brown color and a medium-high thickness, to create the base color and the shape of the cave. Next, I used the same brush, with a lighter brown color and a medium-low thickness, to create the highlights and details of the rock, adding a pale yellow highlight. Then, I used the flat fan brush, with a white color and a minimum thickness, to create the effect of shine and reflection of the water on the rock. Finally, I used the eraser brush to clean up the excess and define the shape of the cave. Then, on another layer, I made the hair, which is long and blue. I used the flat fan brush, with a dark blue color and a medium-high thickness, to create the base color and the body of the hair. Next, I used the same brush, with several lighter shades of blue and a medium-low thickness, to create the highlights and hair strands.
Next, I used the same brush, with a white color and minimal thickness, to create the shine and reflection of the hair. Then, I made some strands on a separate layer, and added a darker tone to another background layer, to give depth and volume to the hair. Next, I used the hair brush, with dark blue and white tones, and a minimal thickness, to further define the hair and create more highlights.
When I managed to finish all the elements of the drawing, I started with the final adjustments, using other layers and different blending modes. I started with an overlay layer, and with the soft pastel brush, which has a round shape and a blending texture, thus highlighting the color tones and reinforcing the shadows. Then, with an add layer, I finished the lighting details, with the same brush and adding sparkles and shine with the glitter brush and the glitter point brush, which are some of my favorites. I also used the eraser brush to erase what I didn't like or what was extra.
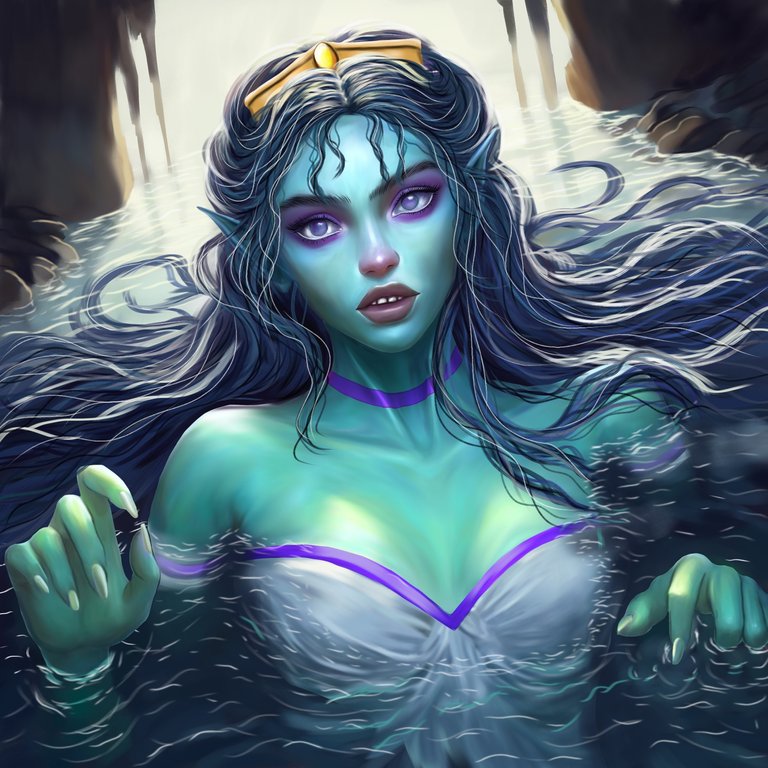 |  |
ILUSTRACIÓN FINAL/ End Illustration
Realmente, comparando con mis comienzos en el arte digital, quedé muy satisfecha con esta representación de la carta de RIVER NIMPH. Creo que logré captar su esencia y su belleza, y también mejorar mi técnica y mi estilo. Realmente espero que hayan disfrutado el proceso y el paso a paso de esta elaboración, y que les haya gustado mucho esta nueva presentación.
Quiero agradecerles por siempre acompañarme cada semana, y por apoyar mi trabajo y mi pasión. Me encanta compartir con ustedes mis dibujos y mis experiencias con mi aprendizaje en el arte digital, y también me encanta ver sus comentarios y sus sugerencias. Son una gran motivación para mí, y me ayudan a crecer y a mejorar. Les mando un fuerte abrazo, y nos vemos en el próximo post.!!!👋💕😘❤️😊
Les agradezco el tiempo de detenerse a ver este post y si quieres ver más de mis obras, puedes seguirme en mi perfil de Hive.blog, donde comparto mis creaciones y mis experiencias como artista digital. También puedes participar en el concurso de arte de la semana, organizado por @Splinterlands, donde puedes mostrar tu talento y compartir junto a muchos artistas más.
Actually, compared to my beginnings in digital art, I was very satisfied with this representation of the card from RIVER NIMPH. I think I managed to capture its essence and beauty, and also improve my technique and my style. I really hope you enjoyed the process and the step by step of this preparation, and that you really liked this new presentation.
I want to thank you for always joining me every week, and for supporting my work and my passion. I love sharing with you my drawings and my experiences with my learning in digital art, and I also love seeing your comments and suggestions. They are a great motivation for me, and they help me grow and improve. I send you a big hug, and see you in the next post.!!!👋💕😘❤️😊
I thank you for taking the time to look at this post and if you want to see more of my works, you can follow me on my Hive.blog profile, where I share my creations and my experiences as a digital artist. You can also participate in the art of the week contest, organized by @Splinterlands, where you can show your talent and share with many other artists.
🌟🚀 #Splinterlands 🚀🌟
Redes Sociales/ Social Networks
Sigueme en/ Follow me in:
👉 Instagram: @catrynart
👉 Twitter: @catrynart
Herramientas Usadas/Used Tools
- Tablet Android/ Android Tablet
- Programa Ibis Paint X/ Ibis Paint X Program
- Traductor Deepl/ Deelp Translator
- Servidor de Imagenes Imgbb/ Imgbb Image Server
- Dactilopintura Digital/ Digital Fingerprint Painting
🌺¡HASTA UN PRÓXIMO POST!/ UNTIL A NEXT POST!🌺
Detenerse es Retroceder
To Stop is to go Backwards
Congratulations @catrynart! You have completed the following achievement on the Hive blockchain And have been rewarded with New badge(s)
Your next target is to reach 32000 upvotes.
You can view your badges on your board and compare yourself to others in the Ranking
If you no longer want to receive notifications, reply to this comment with the word
STOPTo support your work, I also upvoted your post!
Check out our last posts:
https://twitter.com/cbit_roxana_mdh/status/1731816748213567602?t=ekA8nAEtsk24bWZqE03RlA&s=19
Es increíble, el color me gusto mucho y la composición en sí. Mucha suerte!
Gracias @mario02 😊🥰👋🏼
¡Felicidades! Esta publicación obtuvo upvote y fue compartido por @la-colmena, un proyecto de Curación Manual para la comunidad hispana de Hive que cuenta con el respaldo de @curie.
Si te gusta el trabajo que hacemos, te invitamos a darle tu voto a este comentario y a votar como testigo por La Colmena.
Si quieres saber más sobre nuestro proyecto, te invitamos a acompañarnos en nuestro servidor de Discord.
Gracias querida comunidad 😃🥰🤗
Que precioso y profesional trabajo en digital. Te quedo espectacular. Mi admiración y respetos para ti. La mejor de las suertes en el concurso bella @catrynart ✨
!DIY
Gracias @dayadam 🥰🤗 un saludo para ti
You can query your personal balance by
!DIYSTATSThank You 🥰
👍 ❤️ Upvoted ❤️ 👍
Thanks 🌷
@catrynart,
You are most welcome.
I just love how your nymph turned out it looks so beautiful hair ,the facial features and environment all are pleasing to eyes❤️
Thank you very much for appreciating every detail🤗🥰🌷
This post has been manually curated by @bhattg from Indiaunited community. Join us on our Discord Server.
Do you know that you can earn a passive income by delegating to @indiaunited. We share more than 100 % of the curation rewards with the delegators in the form of IUC tokens. HP delegators and IUC token holders also get upto 20% additional vote weight.
Here are some handy links for delegations: 100HP, 250HP, 500HP, 1000HP.
100% of the rewards from this comment goes to the curator for their manual curation efforts. Please encourage the curator @bhattg by upvoting this comment and support the community by voting the posts made by @indiaunited.
Thanks so 🥰
Wonderful digital drawing, you have great art in your hands. Success
Thanks so 🥰
Beautiful skin rendering. I love it
Thanks so dear ☺️🥰
Excelente trabajo, Rina. ¿Aceptas encargos? Por favor, ponte en contacto con nosotros a través de nuestro Discord: https://discord.gg/3dkrender
Muchas gracias 😊 me alegra que te guste mi trabajo, claro por supuesto.
Perfecto. Te he enviado una solicitud de amistad para que podamos hablar.