How to create an Animated Game Infographic Design with GIF
Welcome to this post where i'll be walking you through the process of designing this animated game poster:

This design is part of a 10-slide interactive animation game features poster(served on the web) which is to share general info about the game, called Alpacas Dash and their upcoming alpha release.
So Basically, this helps to share more information about the various features of "Alpacas Dash"(as users engage with it), but note that it can be created to be used for different purposes-
For Instance:
- Products Info
- Portfolios
- How-to Tutorials
- DIY Guides
Let's get started
NB: If you make a mistake at any point, simply press CTRL + z (for Windows) OR CMD + z (on Mac) to go back one Step.
STEP 1; Start in Figma App
▶ Download Figma Officially here
Create a New Design File and Change the name Untitled to whatever you want
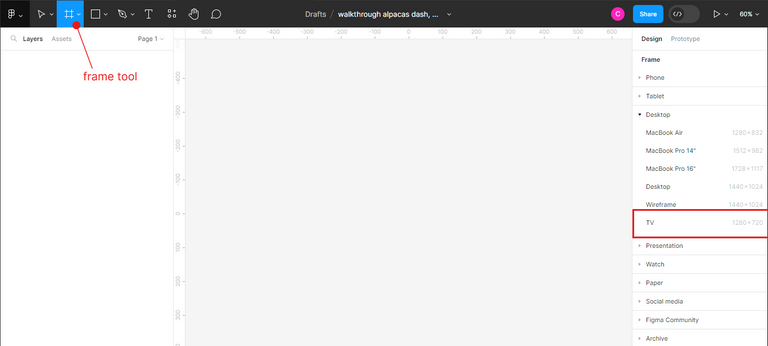
Use the frame tool and Select the
Desktop>TV>1280 X720Option. This is referred to as theResolution. It's how your infographic would appear on a PC / Mobile device.
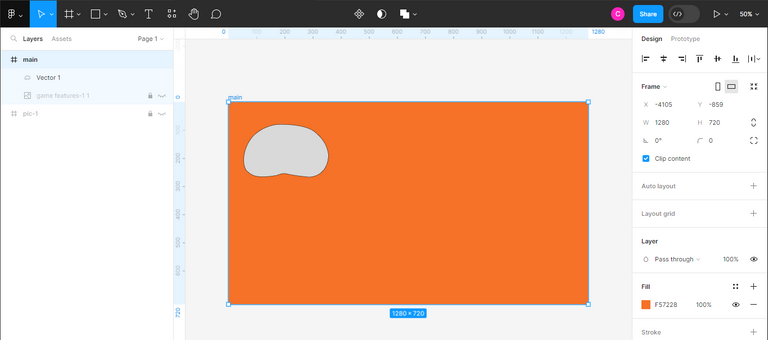
Next, change the fill color on your new frame (after renaming it) to
F57228. This is a deep orange color.Now, we want to start tracing out the individual feature partways(they actually look like
blobs, so let's call it that)The blobs can be drawn with minimal effort using the
Pen toolin Figma. if you haven't done this before, using the tool for the first time will feel strange bcos of the orientation.The fastest way to learn how the pen tool works is by copying and re-tracing with reference images. Feel free to use the Completed Image linked with the post below.
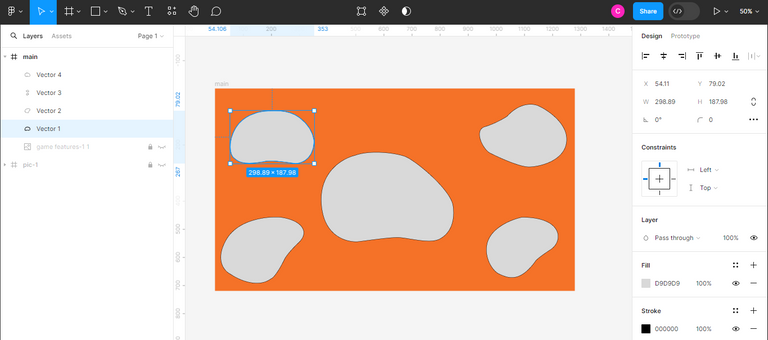
After tracing out one blob, you're gonna end up with something similar like in the image below (feel free to adjust your blob by
double-clickingit,clicking on a pointandswitching to move tool)
If by chance, your blob doesn't look like the one below( it's probably missing it's fill color), simply click on the
plusicon besideFILLLet's move on, by drawing the remaining
FOURblobs using the Pen tool. This is how mine looks like after doing so!.
STEP 2: Adding Color and Special Strokes
Okay, so now that we're done with the base shapes, let's make them look attractive.
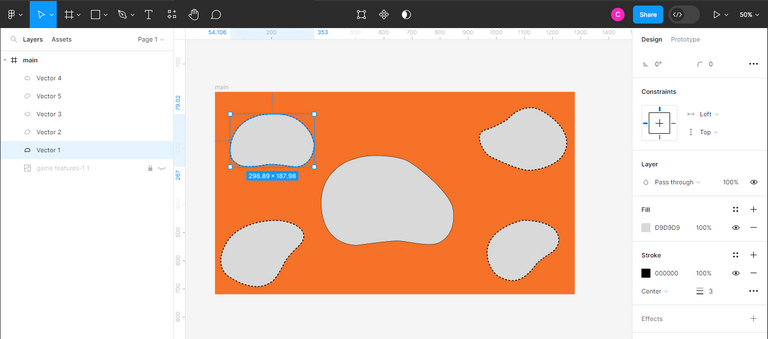
Click on the first top-left blob and edit the
default strokeby clicking thethree-dotted-linebeside stroke, then changing; --stroke-styletoDashAND --Dashto6. Then, change the stroke weight to3. Do this for all blobs (except the center blob).
Time to add Colors: Change the
top-left blobto00A8E3,bottom-left blobtoFAE73A. Alternate this for the remaining two blobs. Another way to add colors is toclick on an item, select Key I(to activate the color picker), and choose any colors you want.Time to add Effects: In the effects panel, add
Inner Shadowand in theEffect Settings, changeBlurto 40 ANDColor to Black@ 30% Opacity. Repeat for all blobs except the center one.
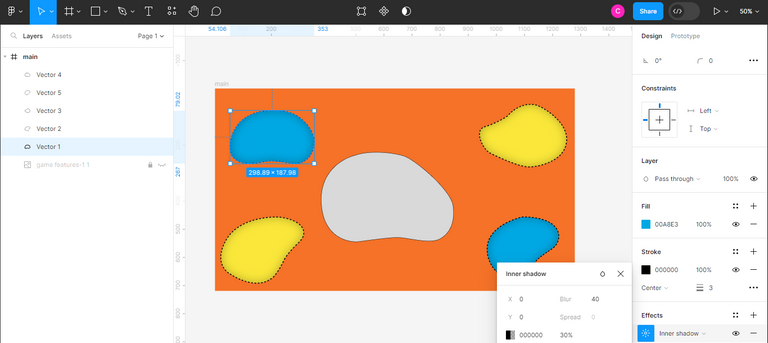
- Let's Face the Center Blob: The Center Blob is relatively similar to the rest but with just
ONESlight Difference. FirstRemove the Strokeleaving only aFill Color, Then Add Color ofFAE73A, Then add Inner Shadow withSimilar Settingsas above, Finally -- add another Effect (Drop Shadow) and change it's settings to50 Blur,Black Color @ 15%. Make sure your blob is centered (by pressing Alt + H).
NB: If you don't understand any settings as I mention them, mess with the icons you see under each Panel,
until you find the correct one. Remember to Undo mistakes with CTRL/CMD + Z
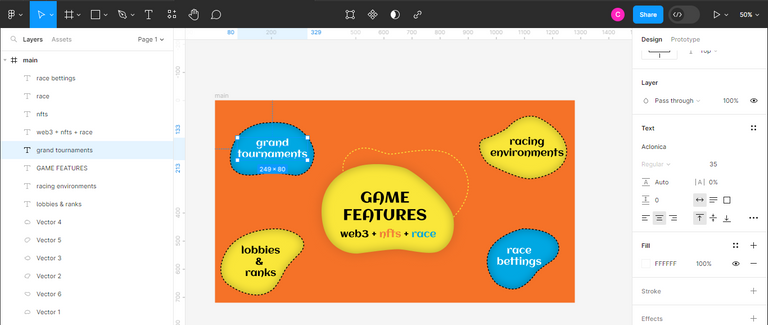
Time to add Texts: Now, we are gonna add simple texts to specify what each blob contains. Use the
Text Toolto create a new font and set the size to 40under Text Panel. Change the font toAclonica(a default google font). You can also align the text to the center as in my case. Hence,fill upyour blobs withPathways Text.Add
white texts in the blue blobsANDblack texts in the yellow blobs.For the center blobs, make your text size about 60, with the under ones about 40. change the colors accordingly here.
STEP 3: Add Icons and Re-Use Figma's Free Stickers
Welcome to the Step that Makes Figma Community so reliable and Invaluable, re-using templates, documents and graphics created by other users. If I had to create the Icons and Stickers used in the Design by myself, it would take me about three days to complete what took just 1 day.
So Again, Let's Keep Creating;
To Show you fully all the steps it took to put this Design together, I'm gonna share links to the community files used in creating this.
First,
Icons were required for each blob pathway, to provide a visual description AND I kept somecute arrow stickersto illustrate that; the following 4 blobs are the features of this game.both resource can be found in the figma community for free at this links:
3d ICONS - Go Here
Arrow Stickers - Go Here
After opening each Figma Community Files, you can find all stickers and Icons used in my Game Infographic Design. All you need to do to Achieve a Similar result is
reducing the width and height of the asset. Toimport assetsfrom another Figma document, you can simplyCopy[ctrl/cmd + c] and Paste[ctrl/cmd + v]in your main Docs.This is the
Before & Afterof importing the 3d Icons into my Design file ⬇
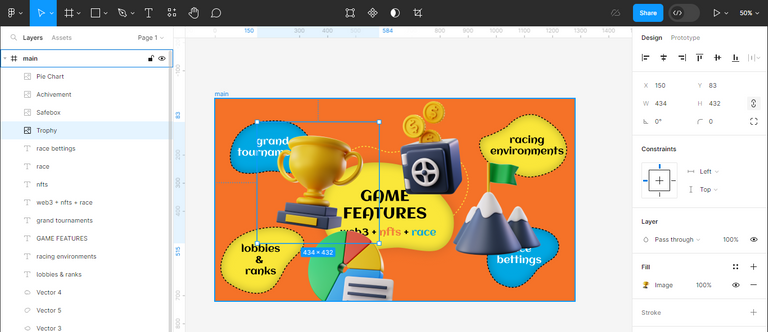
- Aside scaling the Icons Width & Height to 60 px, I also created a circle with uniform size of 70 px, for the icons to be place above on.
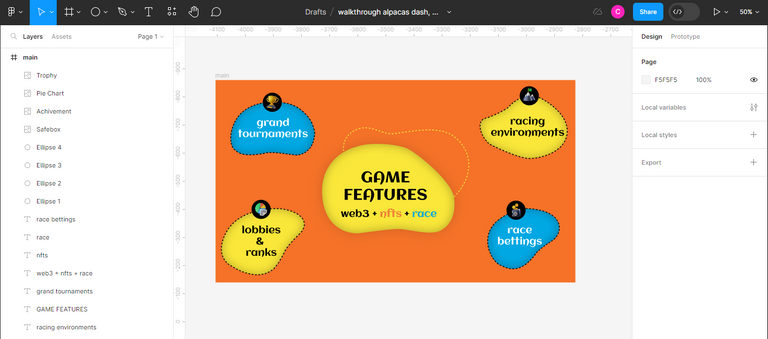
With addition of the Stickers as the Final Step, the Design is is almost complete.
And this is the final Infographic Design Re-produced:

What Comes Next: Animating The Design
In the next step, we will be animating this whole design with Path Rotation and Logo Pulse (Fade in & Out), to achieve this ⬇
We could even go on to adding Interactivity (which means - a user can interact with the elements), but that involves some extra techniques on how to serve html content on web browsers against simple GIF that can be played anywhere.
But that's gonna be it for now, and I've decided to split this tutorial into two-parts so it's easily digestible for you.
I hope you've enjoyed this and learned a lot from it. 👏
Catch you in my Next Post,
Your Gamer & Builder,
Chel_