´ESP-ENG: ¿Cómo hacer un laminado de cejas? Paso a Paso - How to make an eyebrow lamination? Step by Step

Desde que comencé a trabajar en el mundo de las cejas y las pestañas el laminado y el lifting era algo que me llamaba mucho la atención. Me gustaba las técnicas que utilizaban las chicas en Instagram, lo hacían ver tan fácil que dije ¿por qué no intentarlo?. Poco a poco fui investigando sobre los materiales y técnicas hasta que una amiga de la universidad me comentó sobre un curso personalizado que estaban dando cerca de mi universidad así que sin pensarlo me fui a inscribir y así comenzó toda esta experiencia.
Ya ha pasado un año y algunos meses de esto y gracias a Dios tuve la oportunidad de trabajarlo, vengo este día a compartirles un pedacito de un mundo que me hace muy feliz enseñandoles paso a paso como hacer un laminado de cejas.
Since I started working in the eyebrow and lash world laminating and lifting was something that really caught my attention. I liked the techniques that girls used on Instagram, they made it look so easy that I said why not give it a try. Little by little I was researching about the materials and techniques until a friend from college told me about a personalized course they were giving near my university so without thinking about it I went to sign up and that's how this whole experience started.
It's been a year and a few months and thank God I had the opportunity to work on it, I come this day to share with you a little piece of a world that makes me very happy teaching you step by step how to do an eyebrow lamination.
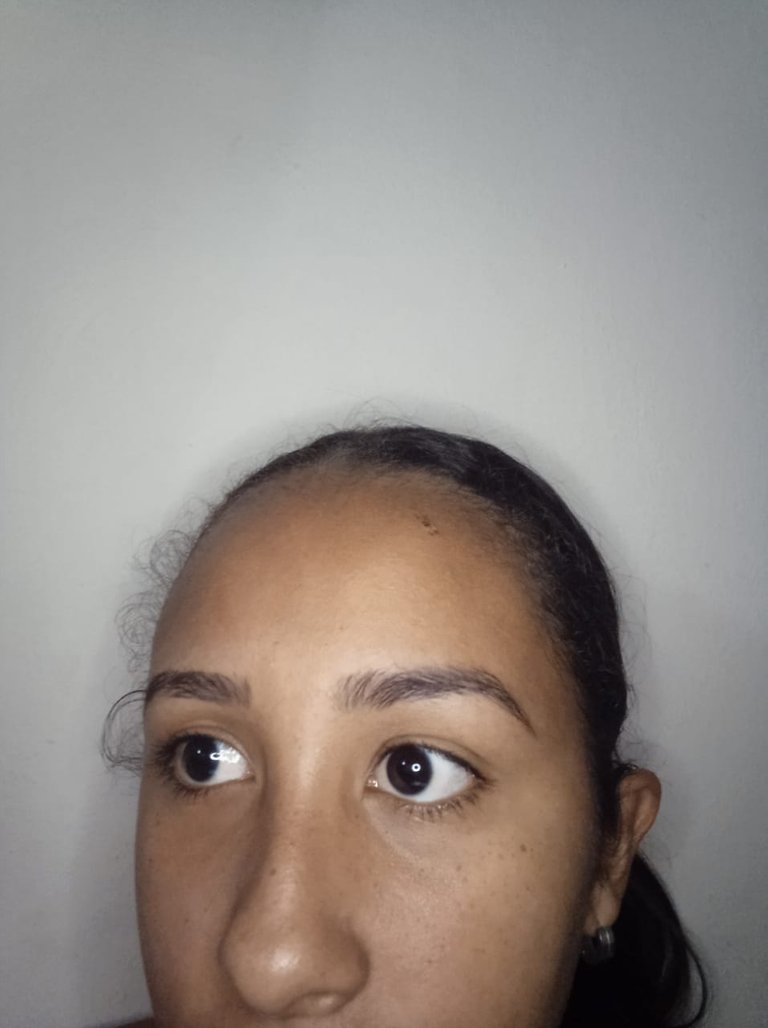
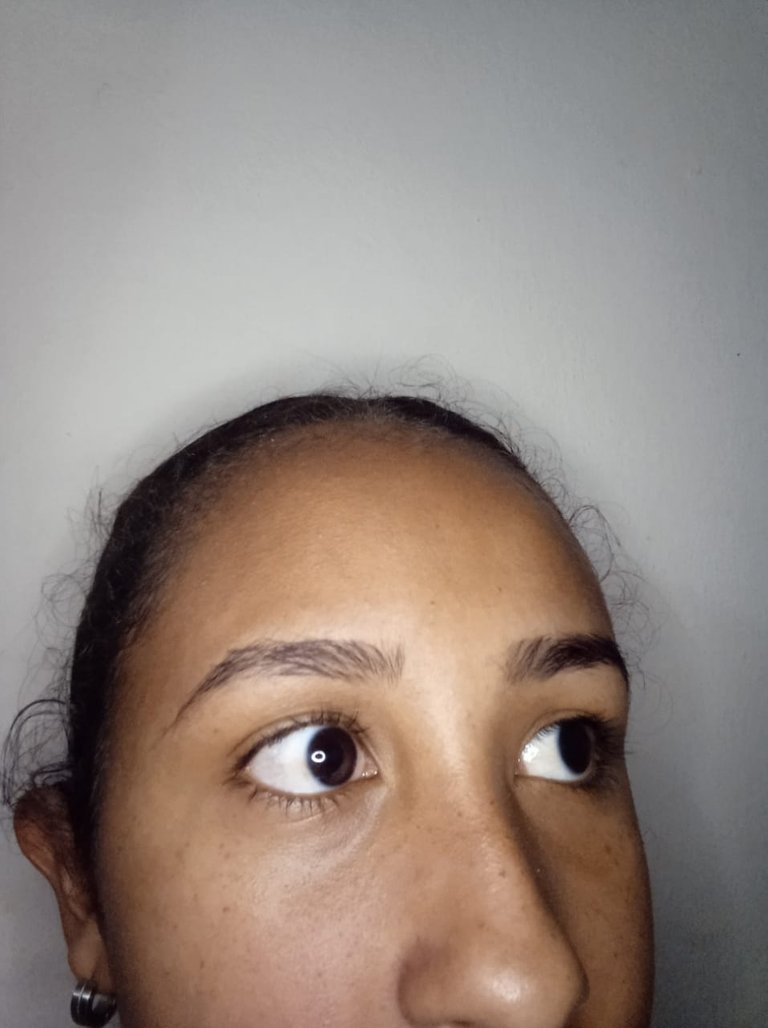
Okey, primeramente quiero mostrarles acá el antes de mis cejas, como pueden ver mis cejas son pobladas lo que facilita el realizar el laminado ya que se notara aun mas la diferencia cuando se peinen los pelitos de las cejas.
Quiero aclarar que aun no soy experta en la técnica, a pesar de que este producto tiene el paso por paso tiene su manera y su cuidado de maneras especificas dependiendo del producto que utilices. Aun estoy en proceso de aprender pero lo poco que domino es lo que puedo compartirles. Si desean realizarlo por su cuenta tengan cuidado y no se queden con la información que lean aquí, investiguen más y todo con precaución.
Ok, first of all I want to show you here the before of my eyebrows, as you can see my eyebrows are bushy which makes it easier to do the lamination because you will notice even more the difference when you comb the hairs of the eyebrows.
I want to clarify that I am not yet an expert in the technique, although this product has the step by step has its own way and its care in specific ways depending on the product you use. I am still in the process of learning but the little that I have mastered is what I can share with you. If you want to do it on your own be careful and do not stay with the information you read here, do more research and everything with caution.
Materiales y proceso / Materials and process
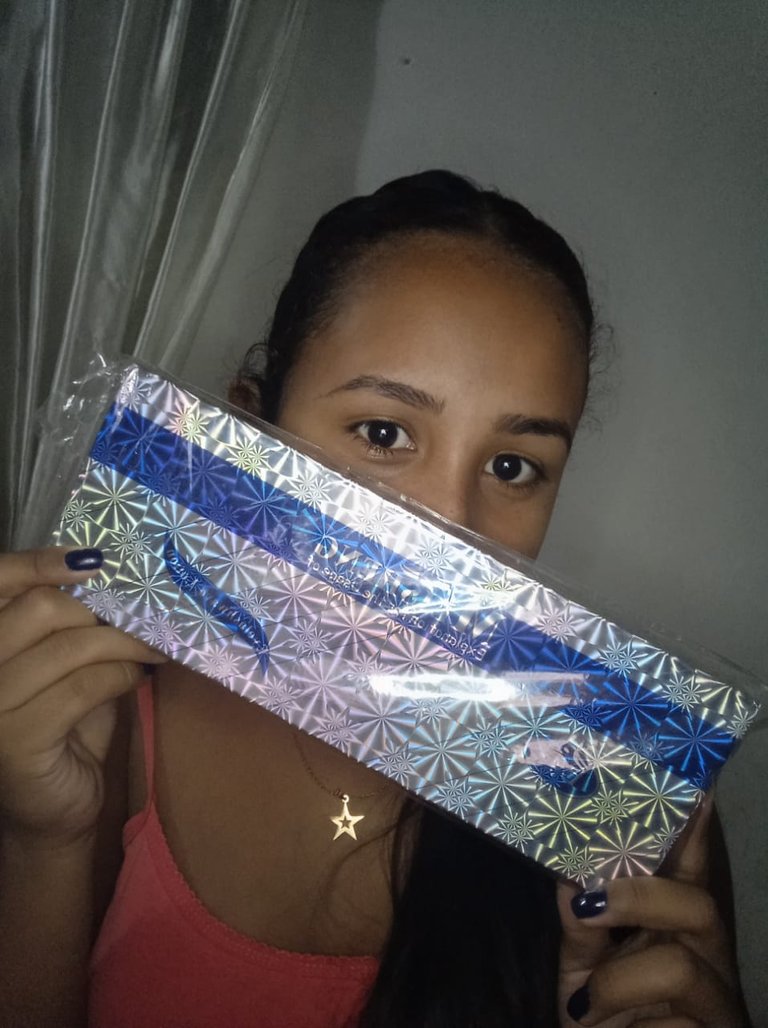
There are many brands on the market for lifting such as Nagaraku, Iconsing and others. In this case I will use the Meisheng brand which comes with three bottles of each product, three fixers, three sealers, two cleansers and an oil. Some of these boxes come with tubes that are used for curling the eyelashes.
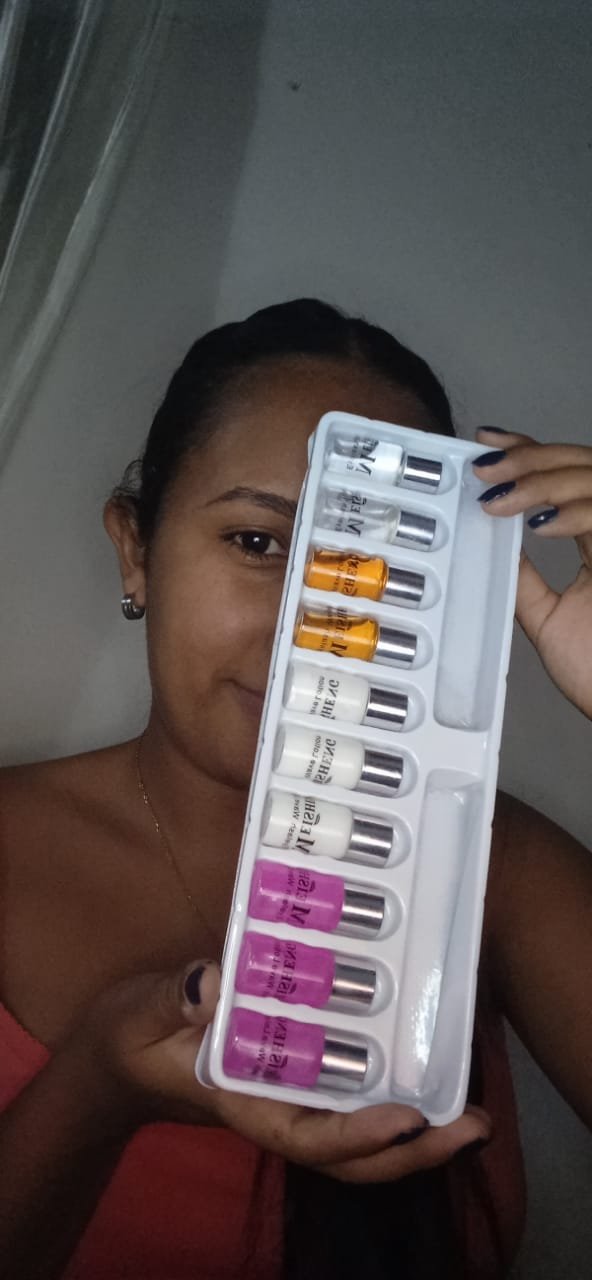
Acá les dejo una muestra de todos los frasquitos que trae la cajita de laminado de meisheng los tubitos que incluye para el rizado de pestañas se los mostrare a continuación con el resto de los materiales a utilizar, cabe destacar que no necesariamente debes tener los materiales exactos que voy a mostrar a continuación ya que varios de ellos pueden ser reemplazados como mejor te convenga pero si logras obtener los que mostraré seria excelente.
Here I leave a sample of all the little bottles that brings the box of meisheng laminate the tubes included for curling eyelashes I will show them below with the rest of the materials to use, note that you do not necessarily have to have the exact materials that I will show below as several of them can be replaced as best suits you but if you can get the ones I will show would be excellent.
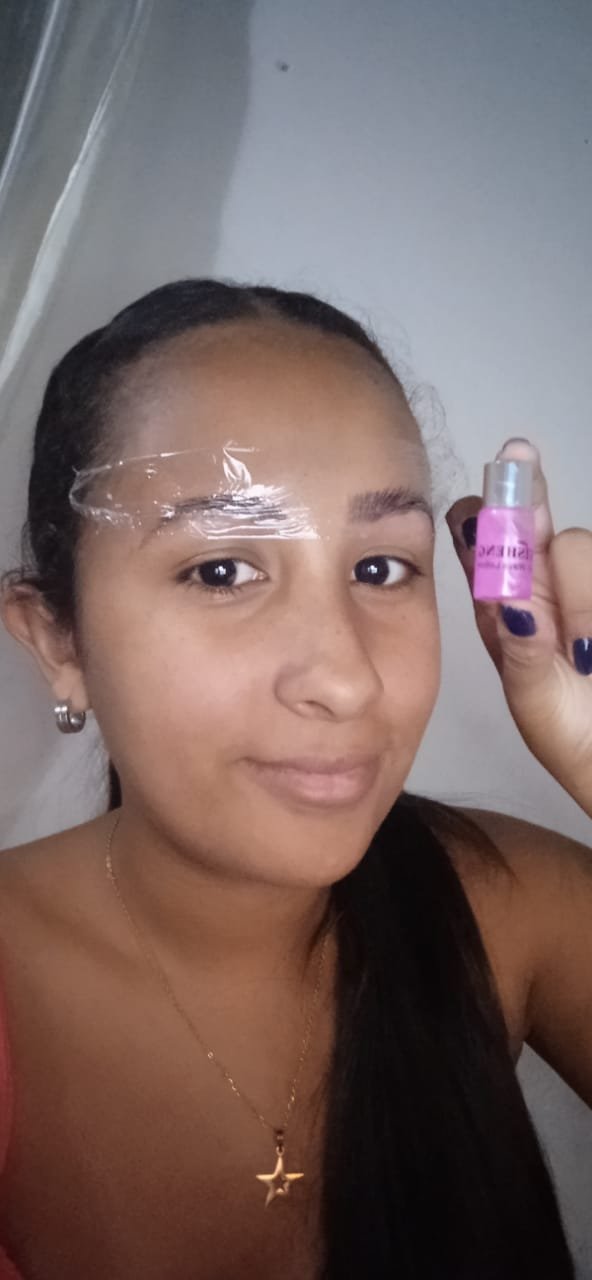
Antes de aplicar cualquier producto se debe higienizar muy bien el área de la ceja, ya después de esto con ayuda de un isopo o un microblush se aplica el primer frasquito que es el primer paso, luego de ser aplicado se utiliza un cepillo interdental para peinar la ceja hacia arriba con el fin de que todos los vellos absorban el producto. Una vez hecho esto, se toma un pedazo de papel film y se coloca sobre la ceja para que permanezca de la forma en que la peinaste.
Before applying any product, the eyebrow area must be well sanitized, and after that, with the help of an isopo or a microblush, apply the first vial, which is the first step. After it is applied, use an interdental brush to comb the eyebrow upwards so that all the hairs absorb the product. Once this is done, take a piece of cling film and place it over the eyebrow so that it stays the way you combed it.
El producto debe permanecer en la ceja aproximadamente de 8 a 12 minutos dependiendo de si los vellos de la ceja son delgaditos y en poca cantidad (8 minutos) y si es abundante y el vello es grueso (12 minutos). Luego de que los minutos hayan pasado, se retira el producto con un isopo limpio o una gasita limpia siempre de manera ascendente para luego repetir el mismo proceso que se hizo al inicio solo que con el paso numero que seria el siguiente frasco como lo muestro en la imagen, se tapa nuevamente la ceja con el papel film y se deja los mismos minutos dejados anteriormente.
OJO: en el caso de la marca meisheng los frascos vienen en orden en la cajita y no siempre vienen en el mismo color como los que muestro, siempre trae 3 del primer paso, 3 del segundo, 2 del limpiador y 2 de aceite y se aplican siempre en ese orden.
The product should remain on the eyebrow for approximately 8 to 12 minutes depending on whether the eyebrow hairs are thin and in small quantity (8 minutes) and if it is abundant and the hair is thick (12 minutes). After the minutes have passed, remove the product with a clean cotton swab or a clean gauze always in an ascending way and then repeat the same process that was done at the beginning but with the step number that would be the next bottle as I show in the image, cover the eyebrow again with the film paper and leave it for the same minutes as before.
NOTE: in the case of the brand meisheng the bottles come in order in the box and not always come in the same color as the ones I show, always brings 3 of the first step, 3 of the second, 2 of the cleanser and 2 of oil and are always applied in that order.
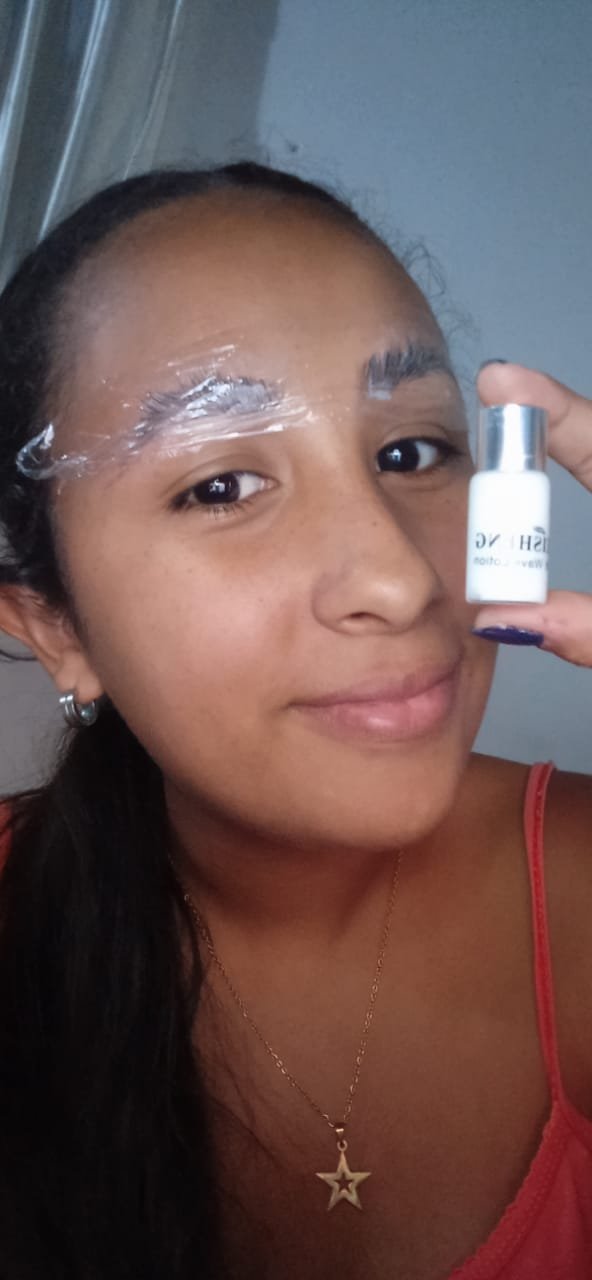
Después de que los minutos hayan transcurrido, se retira el paso 2 de igual forma con un isopo o gasita limpia con la diferencia que a la gasita o al isopo le aplicaremos un poco del limpiador (el frasco transparente) y se limpia con eso, luego, con un isopo se toma un poco del aceite y se aplica de a toquesitos. Para finalizar, con el cepillito intercostal se da la forma deseada en la ceja.
Resultado / Result:

¡y eso es todo mis amores! espero que este tutorial les haya parecido interesante y si desean intentarlo o si tienen alguna duda por favor dejarlo en comentarios
BESOOOOSSSS 😘
and that's all my loves! i hope you found this tutorial interesting and if you want to try it or if you have any questions please leave it in comments.
BESOOOOSSSS 😘
Texto traducido en: Deepl
portada y banner editados en Canva
las fotos fueron tomadas con un redmi 9c