Funny penguin made with tin can, light bulb and anime sheet. .. Divertido pinguino elaborado con lata, bombillo y làmina de anime..
Happy Saturday my beautiful loves of this community today I want to present a simple and creative work as always focused on working with recycled materials with the intention of giving another useful life to those objects that already had their time of utility for which they were created, this time I want to present the development of a fun and cheerful penguin so I hope you join me and do not miss any explanation of the steps.
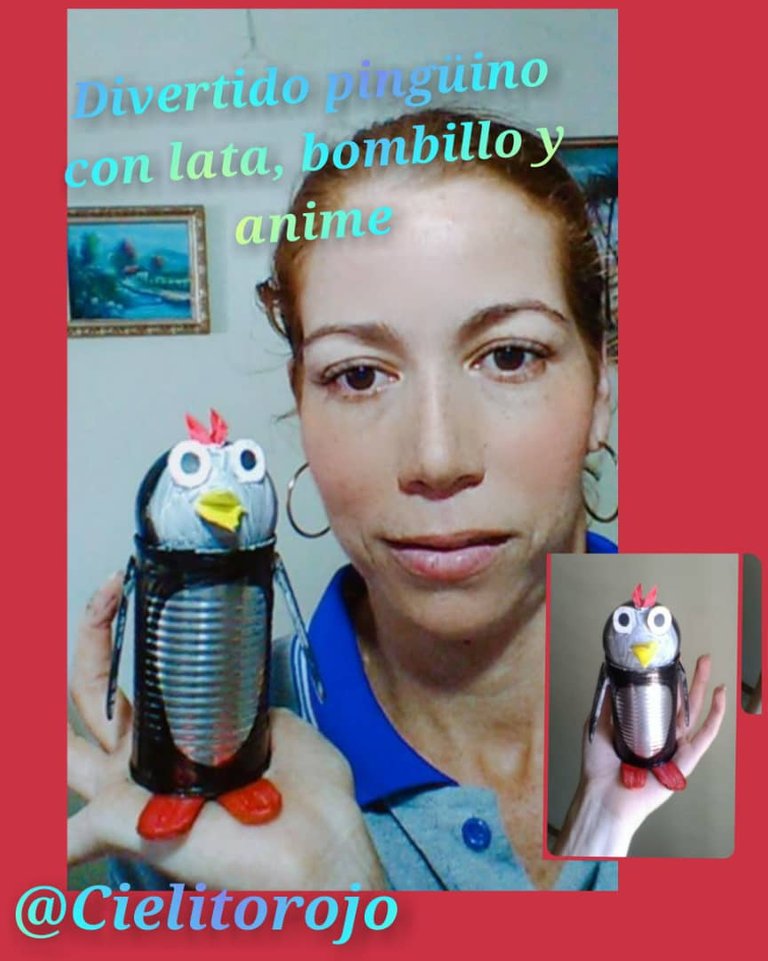
Feliz sábado mis amores bonitos de esta comunidad hoy quiero presentarles no trabajo sencillo y creativo como siempre enfocado en trabajar con materiales de reciclaje con la intencionalidad de darle otra vida útil a esos objetos que ya tuvieron su tiempo de utilidad por lo cual fueron creados, en esta ocasión quiero presentarles la elaboración de un divertido y alegre pingüino así que espero que me acompañe y no se pierdan nada explicación de los pasos.
Materials:
Metal can, light bulb, anime tray, pencil, scissors, brush, marker, toothpaste box, tempera and silicone.
Materiales:
Lata de metal, bombillo, bandeja de anime, lápiz, tijera, pincel, marcador, caja de crema dental, témpera y silicón.
Step by step:
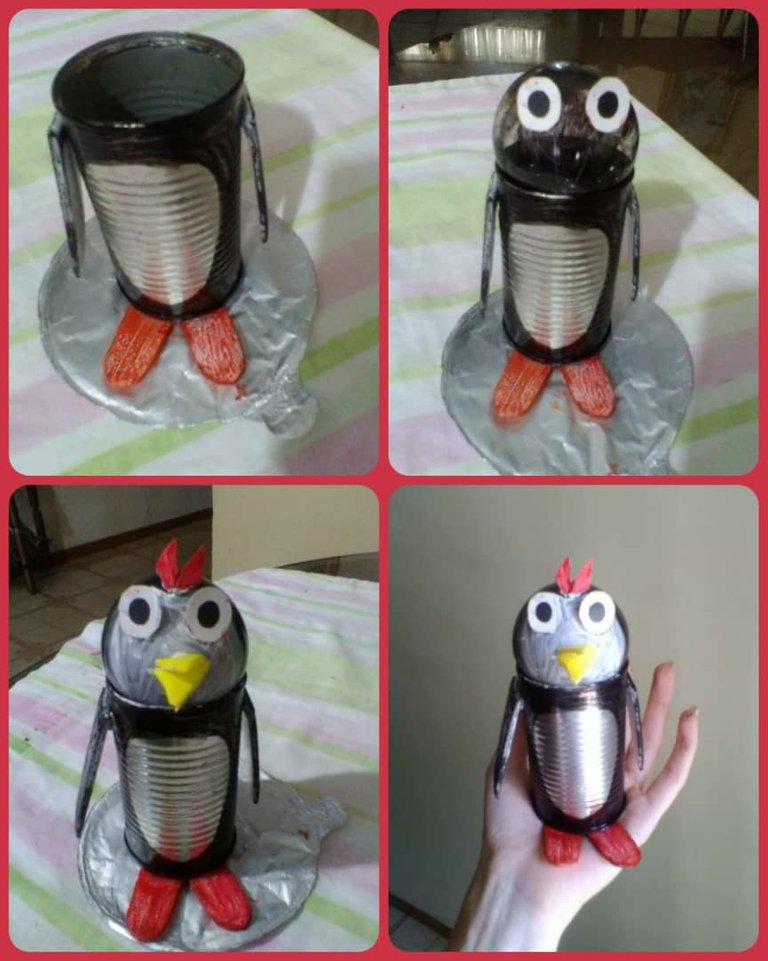
We start by marking and cutting out in the anime tray the pieces such as the little legs, wings and beak then we add color with the intention of giving a better appearance to the penguin then we proceed to paint the can in black color as well as a part of the bulb will also be painted a part of white color continuing cutting in the box of toothpaste. 2 mini circle with the marker we are going to dot of black and in turn of the cardboard we cut the bangs and it goes up of the head when having all and each one of the pieces we proceed to assemble the penguin with the purpose of that it wants us the most original possible that I walk as well as they show the images.
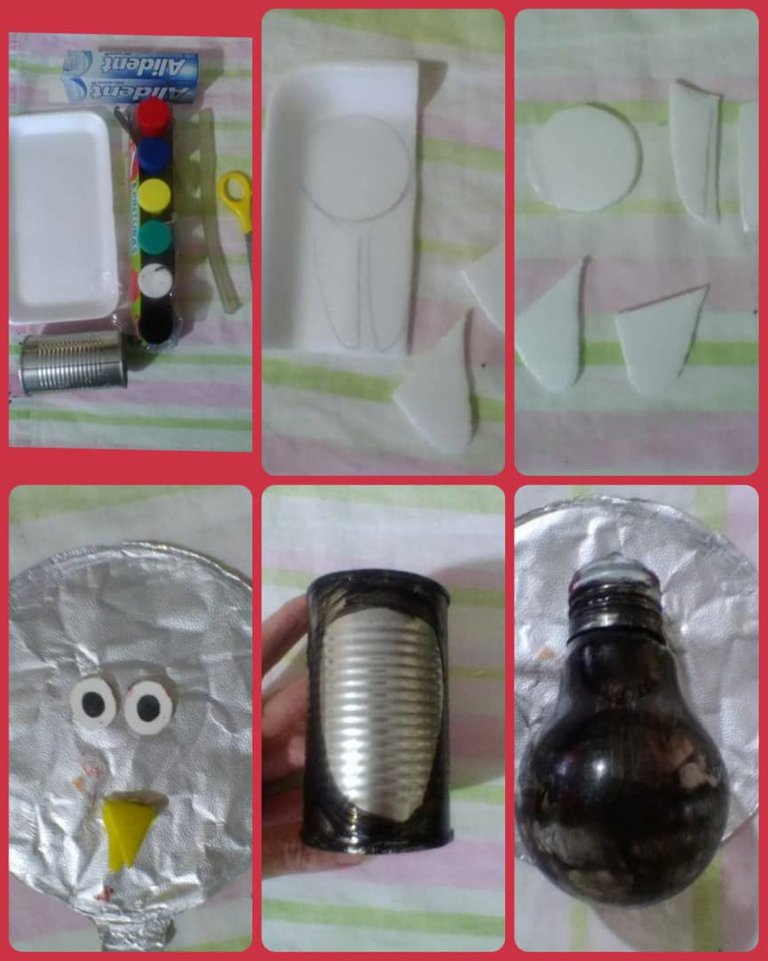
Paso a paso:
Iniciamos marcando y recortamos en la bandeja de anime las piezas como las patitas, alas y pico luego se le agrega color con la intencionalidad de darle una mejor apariencia vistosidad al pingüino después procedemos a pintarlo la lata de color negro igualmente que una parte del bombillo igualmente se va a pintar una parte de color blanco continuando recortando en la caja de crema dental 2 mini círculo con el marcador vamos a puntear de negro y a su vez del cartón recortamos los flequillos y va arriba de la cabeza al tener todas y cada una de las piezas procedemos armar el pingüino con la finalidad de que nos quiere lo más original posible, quedando así como muestran las imágenes.
Thank you for reading me and your valuable support.
The photos are from me @cielitorojo
Translated with Deepl translator.
Gracias por leerme y su valioso apoyo.
Las fotos son de mí @cielitorojo
Traducido con traductor de Deepl.
https://twitter.com/YolimarGuevar14/status/1451980717819314182
The rewards earned on this comment will go directly to the person sharing the post on Twitter as long as they are registered with @poshtoken. Sign up at https://hiveposh.com.
Excelente forma de reciclar latas, muy buena publicación.
Thank you for sharing this amazing post on HIVE!
Your content got selected by our fellow curator @rezoanulvibes & you just received a little thank you via an upvote from our non-profit curation initiative!
You will be featured in one of our recurring curation compilations and on our pinterest boards! Both are aiming to offer you a stage to widen your audience within and outside of the DIY scene of hive.
Join the official DIYHub community on HIVE and show us more of your amazing work and feel free to connect with us and other DIYers via our discord server: https://discord.gg/mY5uCfQ !
If you want to support our goal to motivate other DIY/art/music/homesteading/... creators just delegate to us and earn 100% of your curation rewards!
Stay creative & hive on!