Basket 🧺 made with cardboard and fabrics.
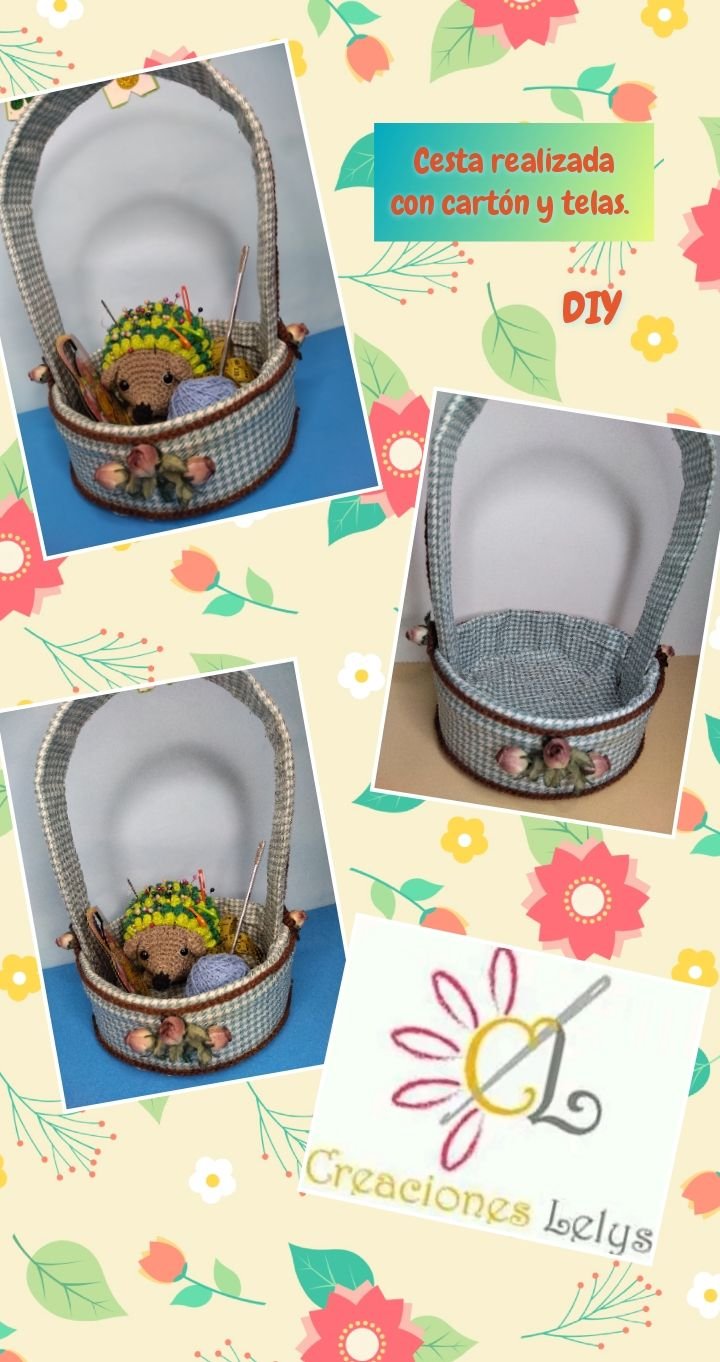
Cesta 🧺 elaborada con cartón y telas.
Hola amigos creativos, es un verdadero honor estar de nuevo con ustedes, me encanta leer sus publicaciones porque vienen cargadas de mucha energía positiva. Presentan proyectos que inspiran y nos invitan a crear siempre hermosos proyectos. Mi publicación de hoy es para presentarles el proceso y resultado final del trabajo que he estado haciendo en estos días, resulta que estoy preparando la participación para el concurso del mes de la comunidad amiga #diyhub por lo que decidí hacer esta linda cesta para complementar mi proyecto. Espero que esta idea les sea útil y la pongan en práctica.
Basket 🧺 made with cardboard and fabrics.
Hello creative friends, it's a real honor to be with you again, I love reading your posts because they come loaded with lots of positive energy. You present projects that inspire and invite us to always create beautiful projects. My today's post is to present you the process and final result of the work I have been doing these days, it turns out that I am preparing the participation for the contest of the month of the friendly community #diyhub so I decided to make this nice basket to complement my project. I hope you find this idea useful and put it into practice.
De antemano les digo que me encantó hacer esta 🧺 cesta, desde hace un tiempo tenía en mente hacerla, pero por diferentes motivos postergaba la labor, se llegó el momento y así fue que la hice.
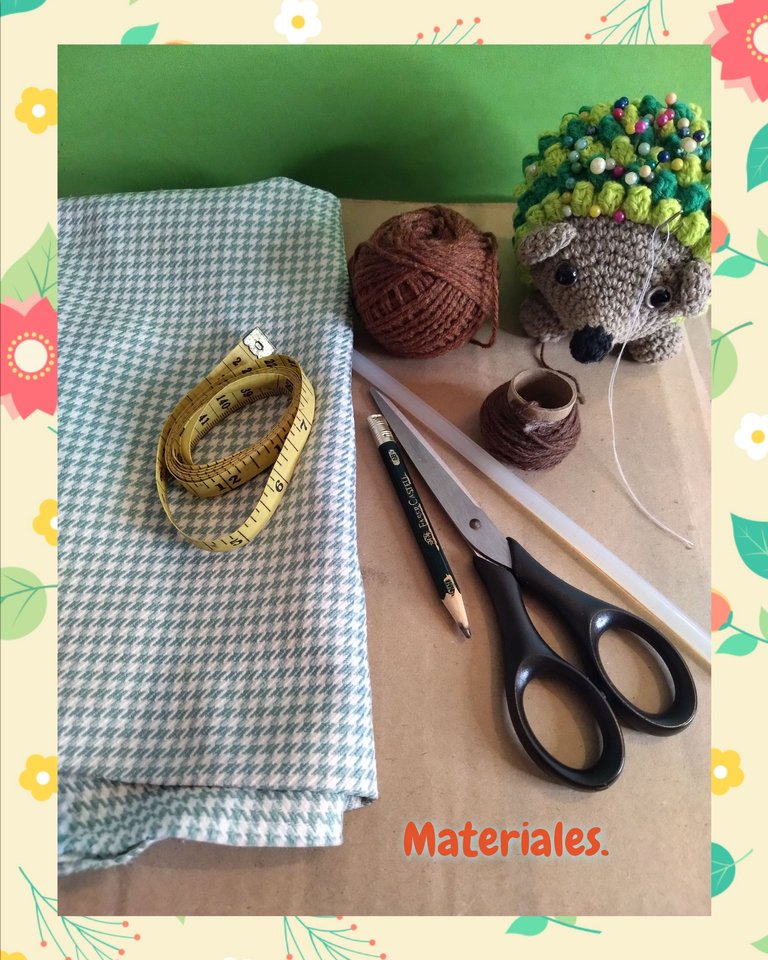
MATERIALES.
- Cartón reciclado.
- Telas estampadas.
- Pegamento.
- Hilos pabilos.
- Tijeras.
- Flores artificiales.
Beforehand I tell you that I loved making this 🧺 basket, for some time I had in mind to do it, but for different reasons I postponed the work, the time came and so I did it.
MATERIALS.
- Recycled cardboard.
- Printed fabrics.
- Glue.
- Wick yarn.
- Scissors.
- Artificial flowers.
PROCEDIMIENTO. PROCEDURE.
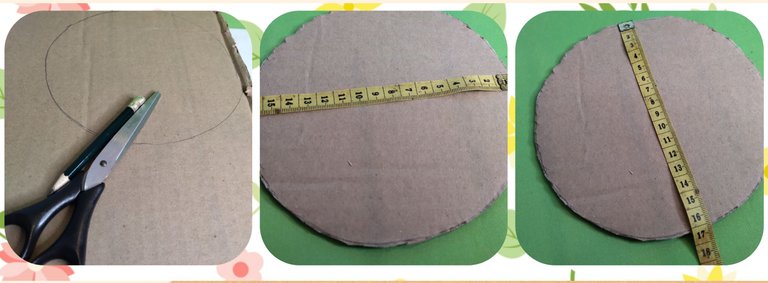
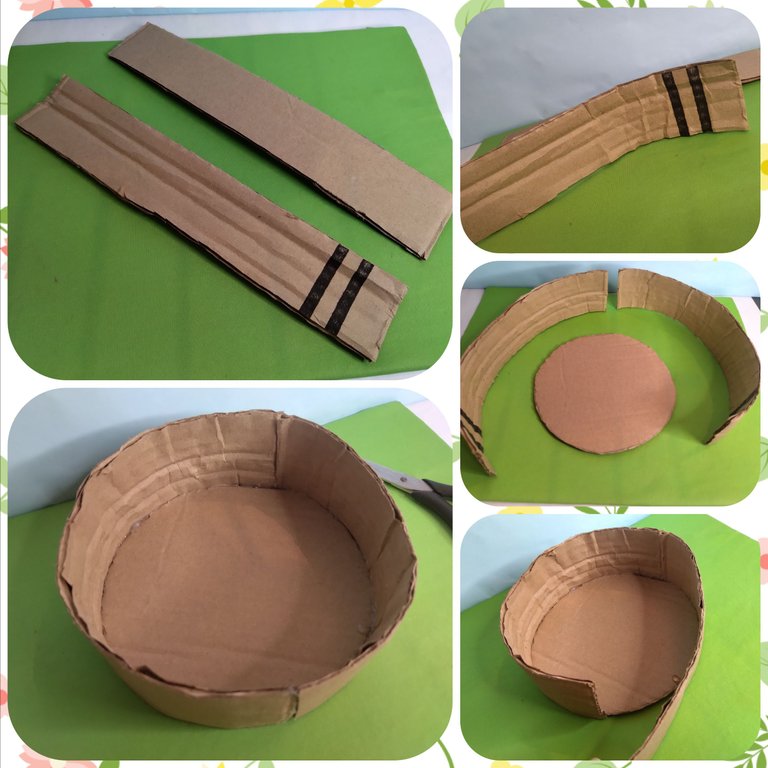
- Lo primero que hice fue definir el tamaño, usé un círculo redondo de anime para marcar con el lápiz sobre el cartón. Luego corté con la tijeras y reservé. Este círculo tienen un diámetro de 16cm.
- The first thing I did was to define the size, I used a round anime circle to mark with the pencil on the cardboard. Then I cut with the scissors and set aside. This circle has a diameter of 16cm.
- Lo siguiente fue elegir la medida para hacer el alto de la cesta. Tomé cartón, medí y corté el tamaño necesario para cubrir todo el círculo recortado poniéndolo por el borde externo. Una vez medido y cortado empecé a apretar el cartón para suavizarlo y darle la forma ondulada o de círculo. Después con silicón caliente fijé este listón a la base de la cesta.
- The next thing was to choose the size to make the height of the basket. I took cardboard, measured and cut the size needed to cover the entire cut out circle by putting it around the outside edge. Once measured and cut I began to squeeze the cardboard to smooth it and give it the wavy or circle shape. Then with hot silicone I attached this ribbon to the base of the basket.
- Corresponde ahora medir y cortar un listón para hacer el asa de la cesta. Ya es a gusto la altura que quieras darle. Yo uni con pegamento y tirro de papel dos listones de 30cm cada uno.
- It is now time to measure and cut a ribbon to make the handle of the basket. You can choose the height you want to give it. I joined with glue and paper strip two strips of 30cm each.
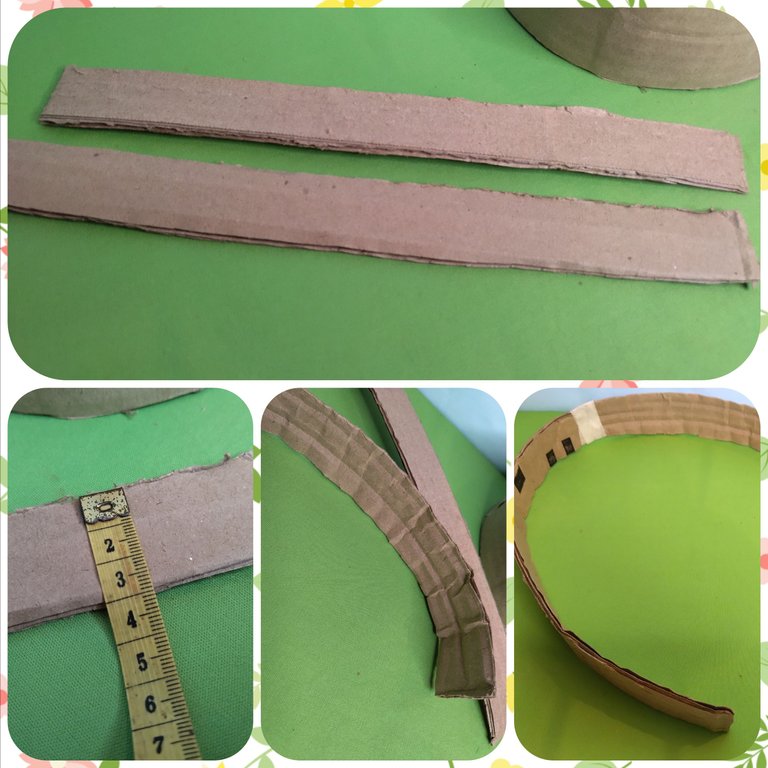
- Tomé la tela estampada para forrar la cesta, lo que hice fue medir montando la tela sobre la cesta, calculé a ojo el ancho necesario. Este recorte de tela debe cubrir parte de la orilla y todo el borde interno de la cesta. Asegurada las medidas corté el excedente y empecé a pegar la tela desde afuera de la cesta dejando un margen arriba de 2cm. Después de estar pegada la tela uno los dos extremos. A continuación pasé hacia adentro toda la tela y la fijé con silicón caliente en el borde y base de la cesta, por dentro.
- I took the printed fabric to line the basket, what I did was to measure by mounting the fabric on the basket, I calculated by eye the width needed. This fabric trimming should cover part of the border and all the inner edge of the basket. Once I was sure of the measurements I cut off the excess and began to glue the fabric from the outside of the basket leaving a margin of 2cm above. After the fabric was glued, I joined the two ends together. Then I put all the fabric inside and fixed it with hot silicone on the edge and base of the basket, on the inside.
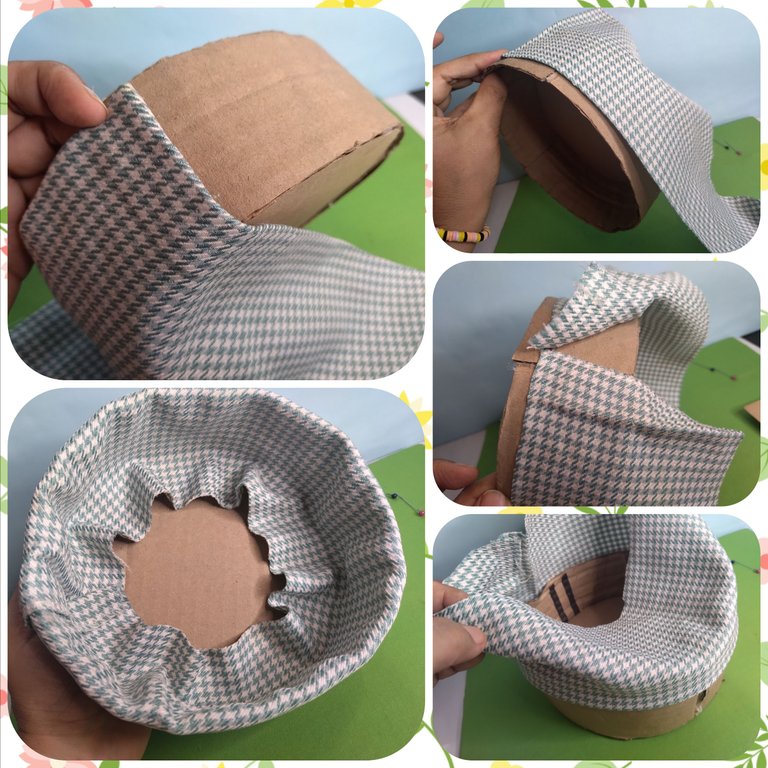
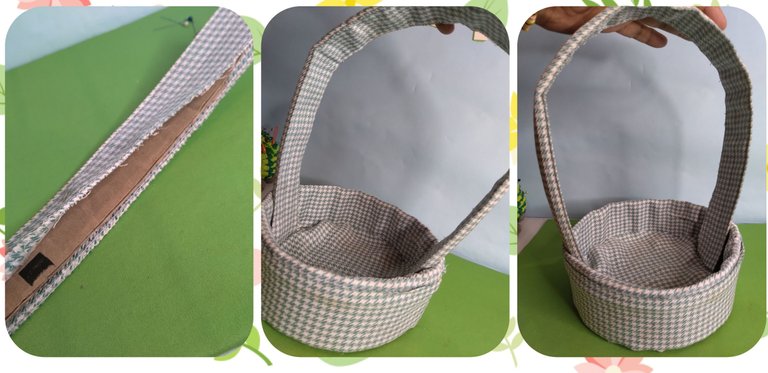
- Usando tela del mismo estampado dibujé un círculo del tamaño de la cesta, corté con las tijeras y lo fijé con silicón caliente en la parte interna de la cesta, tapando toda la tela visible del primer forro. Enseguida corté un listón largo de tela para cubrir toda la cesta por fuera. Pegué esta tela con silicón caliente y después pegué la cesta sobre la tela restante y corté todo el excedente alrededor. Así quedó forrada toda la cesta.
- Using fabric of the same pattern I drew a circle the size of the basket, cut with scissors and attached it with hot silicone to the inside of the basket, covering all the visible fabric of the first liner. I then cut a long strip of fabric to cover the entire basket on the outside. I hot glued this fabric with silicone and then glued the basket over the remaining fabric and cut off all the excess around it. This way the whole basket was covered.
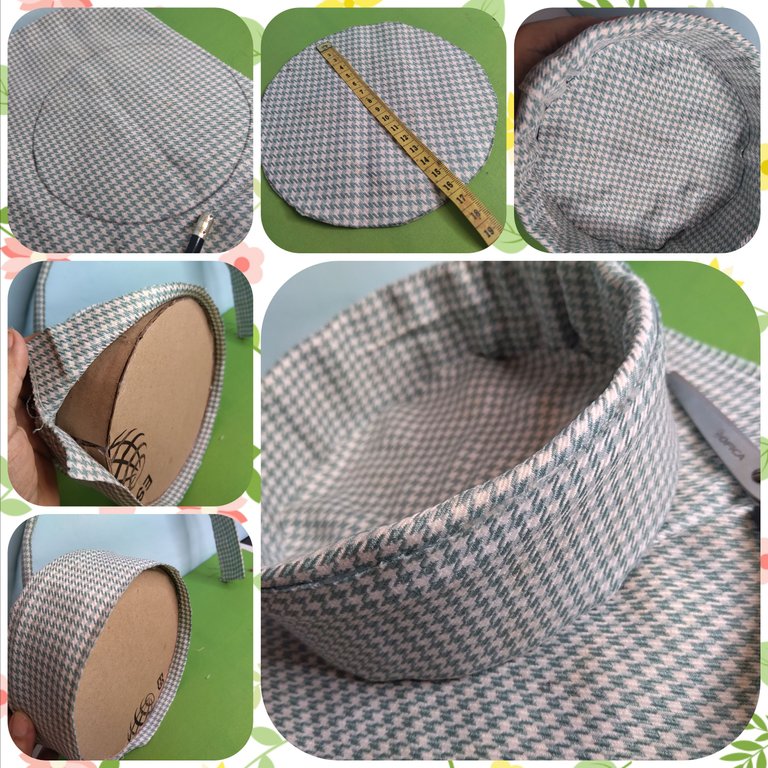
- También forré el asa de la cesta, doblé un listón largo de tela estampada, este listón mide el doble de ancho que el asa de cartón. Para forrarla solo monté el cartón sobre la tela y con silicón caliente fui pegando borde con borde de la tela.
- I also lined the handle of the basket, I folded a long strip of printed fabric, this strip is twice as wide as the cardboard handle. To line it, I just mounted the cardboard on the fabric and with hot silicone I glued edge to edge of the fabric.
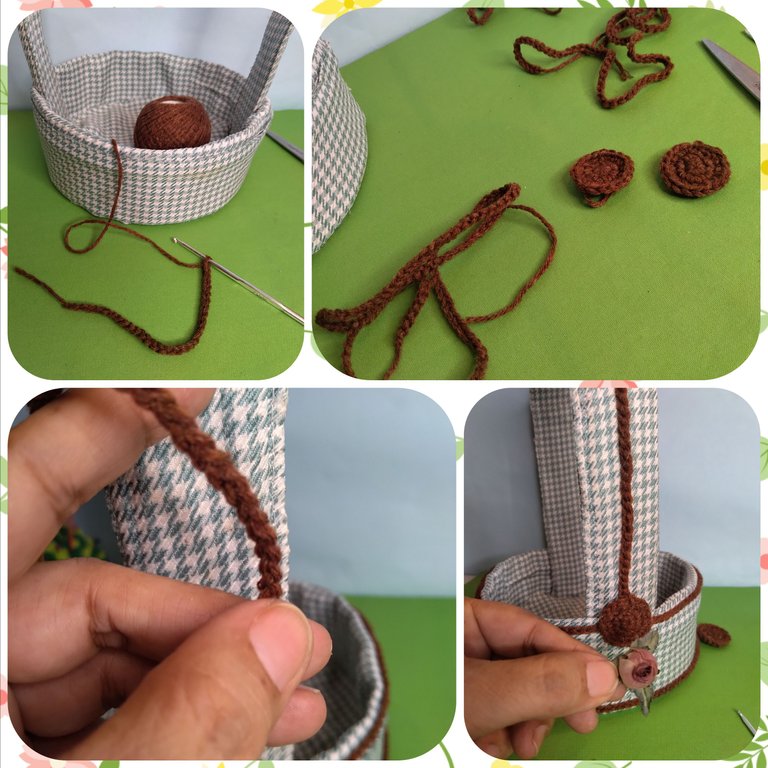
- Para la decoración tejí dos círculos básicos con hilo pabilo color marrón. Además tejí tres cadenetas largas para cubrir el cuerpo de la cesta y la parte superior del asa. Para obtener estas medidas fui tejiendo y midiendo. Una vez tejidas estas piezas las pegué con silicón donde corresponde cada una. Finalmente coloqué las florecitas artificiales a los lados y al frente de la cesta.
- For the decoration I wove two basic circles with brown wick yarn. I also wove three long chains to cover the body of the basket and the top of the handle. To obtain these measurements I weaved and measured. Once these pieces were woven, I glued them with silicone where each one corresponds. Finally, I placed the artificial flowers on the sides and front of the basket.
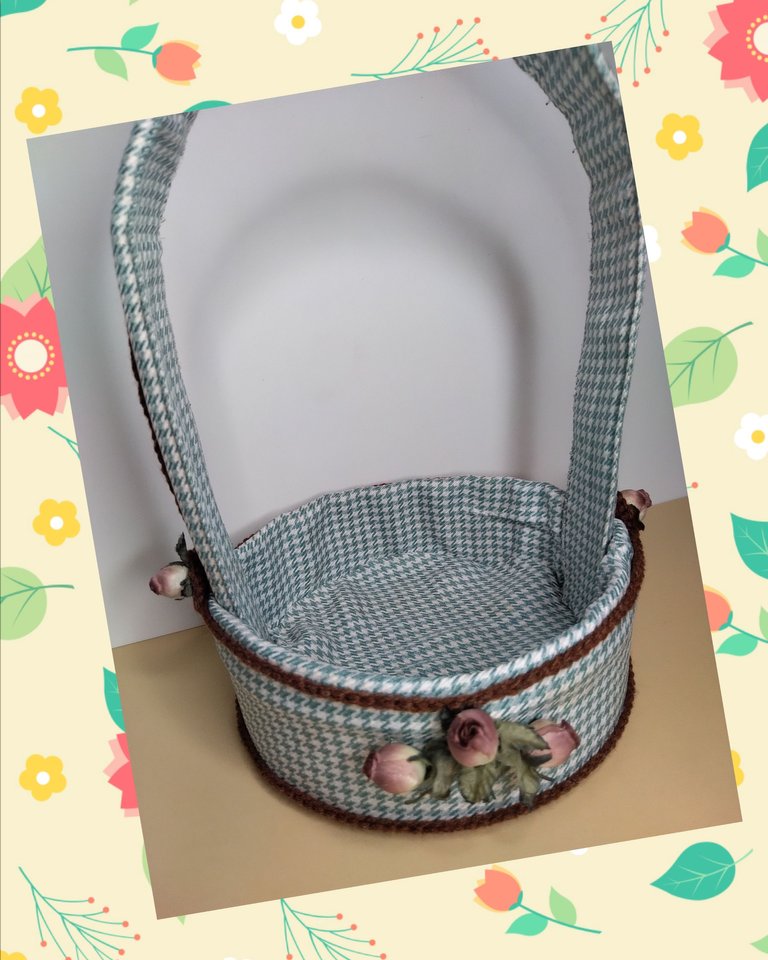
- Este es el resultado final. Espero que les guste y aprovechen los cartones que tengan disponibles para hacer cestas útiles y decorativas. Volverán a ver esta cesta en un próximo proyecto.
- This is the final result. I hope you like it and take advantage of the cardboard you have available to make useful and decorative baskets. You will see this basket again in a future project.


Muchísimas gracias por tu apoyo. Todas las fotos son de mi propiedad. Edité con FotoGrid. Usé el traductor de Deepl. No olvides seguirme en mis redes. Hasta pronto.
Thank you very much for your support. All photos are my property. I edited with FotoGrid. I used Deepl translator. Don't forget to follow me on my networks. See you soon.
Que hermoso te ha quedado @creacioneslelys, felicidades y mucha suerte .
Hola 🙋 muchas gracias. Que bueno que te gustó. 🫂
#hive #posh #diy #basket
https://twitter.com/obo2004/status/1690393915508092928?t=9wiUH_esISEY0F5K2EGUDw&s=19
Ay chamaaaaaaa, eso está bellísimo. Me encantó. No tengo palabras para decirte lo mucho que me gustó 🤭🤭
Hola 👋 que bueno que te gustó. Me alegra sentir tu emoción 💖 muchas gracias 🫂
¡Oh que hermosa cesta!
Me encanta la explicación fácil de seguir y los detalles que la hacen más linda.🌷🌷🌷🌷 Saludos.
¡Muchas gracias! Se hace bastante rápido y el proceso es sencillo. Me alegra saber que te gustó. 🫂
Muchas gracias por apoyar mi contenido ☺️
Congratulations @creacioneslelys! You have completed the following achievement on the Hive blockchain And have been rewarded with New badge(s)
Your next target is to reach 9250 replies.
You can view your badges on your board and compare yourself to others in the Ranking
If you no longer want to receive notifications, reply to this comment with the word
STOPCheck out our last posts:
Lelys te quedo preciosa la cesta, que belleza, un trabajo prolijo, delicado y super fino. Me encanta!!❤️
Gracias. Volverás a verla pronto. 🙋
Ayyy me muero, que belleza! Ya sabes lo que me gusta!😍
Ja ja ja. No lo sé 🙀
Amo a los gatos! No se nota? jajaja
Pues te invito a participar en el concurso ☺️ anímate. En la comunidad de diyhub.
Amiga, tienes unas manos Bendecida, me encanta tus trabajo, le quedo hermoso.
Hola. Muchas gracias por tus palabras. Me alegra saber que te gustó. Abrazos.
Te quedo muy linda amiga y la verdad es muy funcional este tipo de cestas en casa para guardar algunos objetos
Hola. Así es, este tipo de cesta es muy práctica, decora y es muy útil a la vez. Gracias por tu visita 😌
Esta genial amiga, muy decorativa.
Muchas gracias 🙂
#hive #posh #diy
https://m.facebook.com/story.php?story_fbid=pfbid02MzM8p2R5jWahPrKS2vQ31oVwFjW39fddh9aRhXXjrRdCmbmLMLT57MeyyJPzgdW8l&id=100064127911626&mibextid=9R9pXO