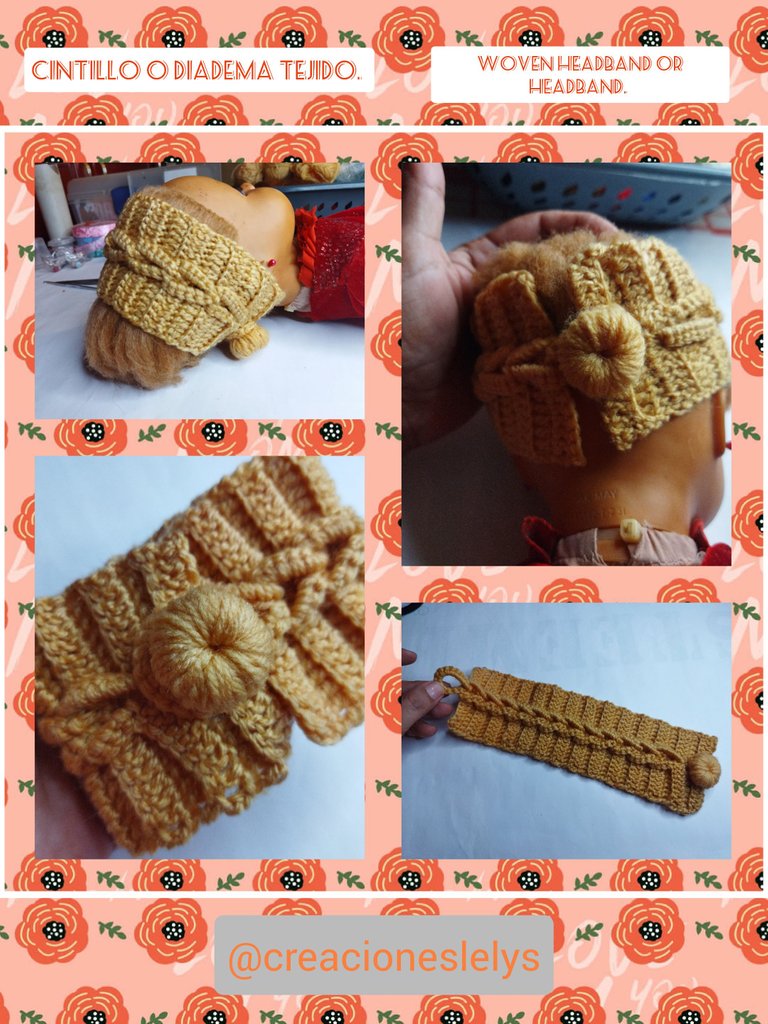
Cintillo o diadema tejida. Hermosísima. [ESP-ENG]
Hola amigos de esta prestigiosa comunidad. El día de hoy quiero presentarles un nuevo proyecto creativo. Esta vez la protagonista de mi inspiración ha sido la muñeca que me prestó una sobrina. Esta muñeca es muy linda, pero nunca queda firme ni parada ni sentada. Entonces la uso poco.
Estuve ordenando algunas cosas y ella se resbaló hasta caer en una de mis bolsas de reciclaje. Entonces me dediqué un poco a conversar con ella. Le encanta estar despeinada, su cabello es muy rebelde y corto. Así que acordamos que usaría un lindo cintillo que haría para ella.

Hace tiempo que no atiendo mis muñecas, ninguna de las que tengo son mías realmente ¿Será por eso? No creo. Lo que sí creo es que he sido descuidada, ellas son mis mejores modelos o mejor dicho las únicas. Así que, a esta princesa le llegó su momento para lucir algo nuevo. Acompáñame y te muestro lo que le hice.

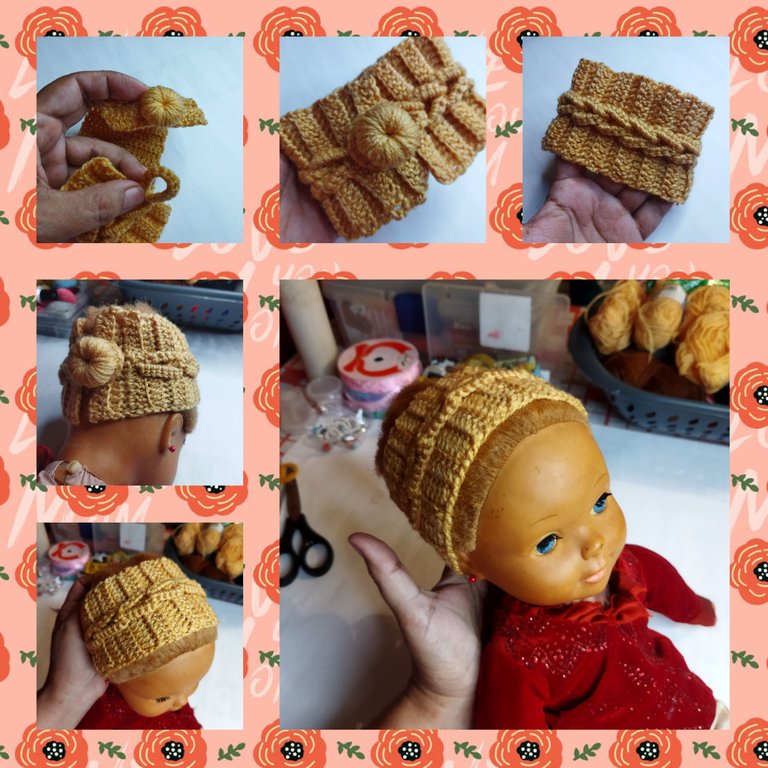
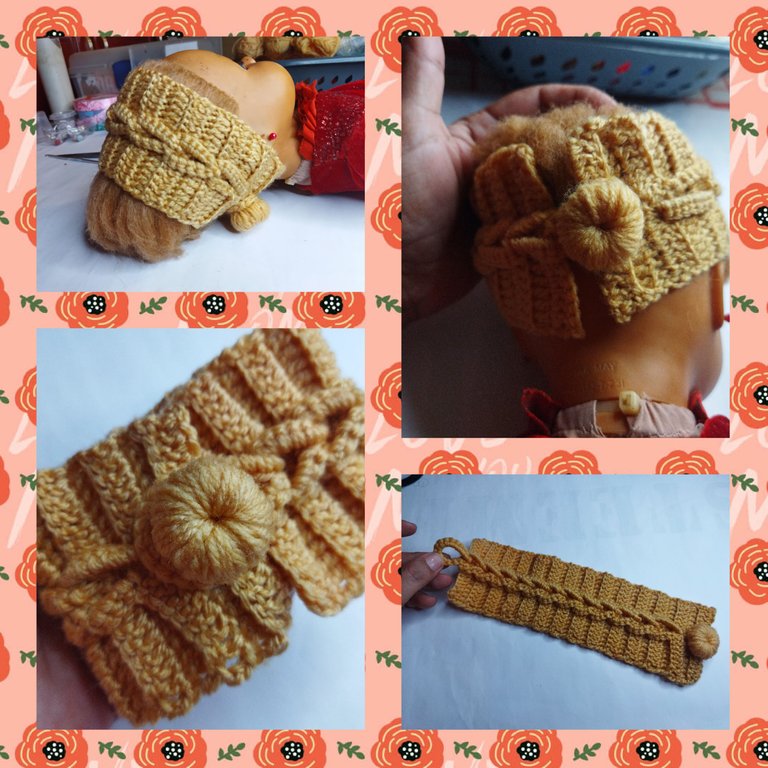
El cabello de la muñeca es muy rebelde y como está corto se hace difícil mantenerlo en una mejor posición. Además tenía una cola puesta desde hace mucho, entonces su melena le quedó levantada. Para que esto cambie le hice una diadema que le recogerá la mitad del cabello hacia atrás.
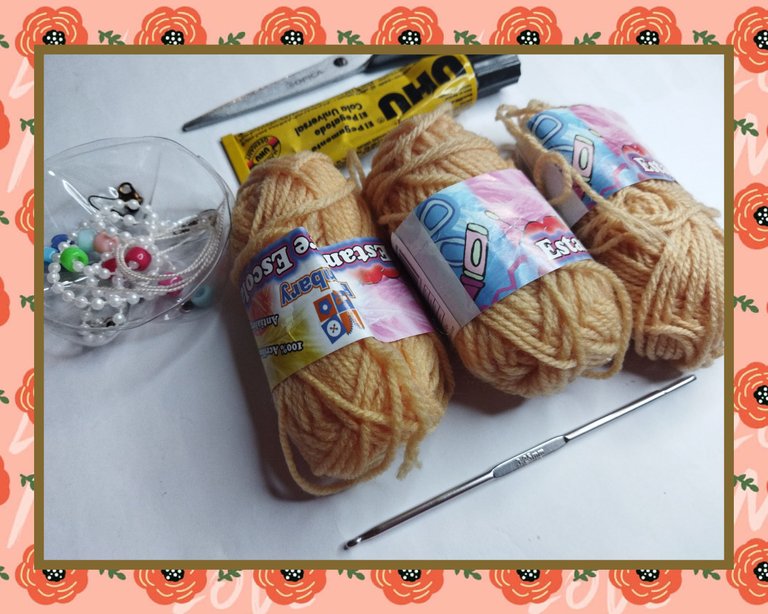
Para realizar este proyecto usé:
- Hilos estambres.
- Aguja de crochet de 3,5 mm.
- Tijeras.
- Aguja lanera.
- Pensé usar unas perlitas, pero se ven muy pequeñas. Puedes usar perlas más grandes.
El procedimiento para hacer la diadema es el siguiente:
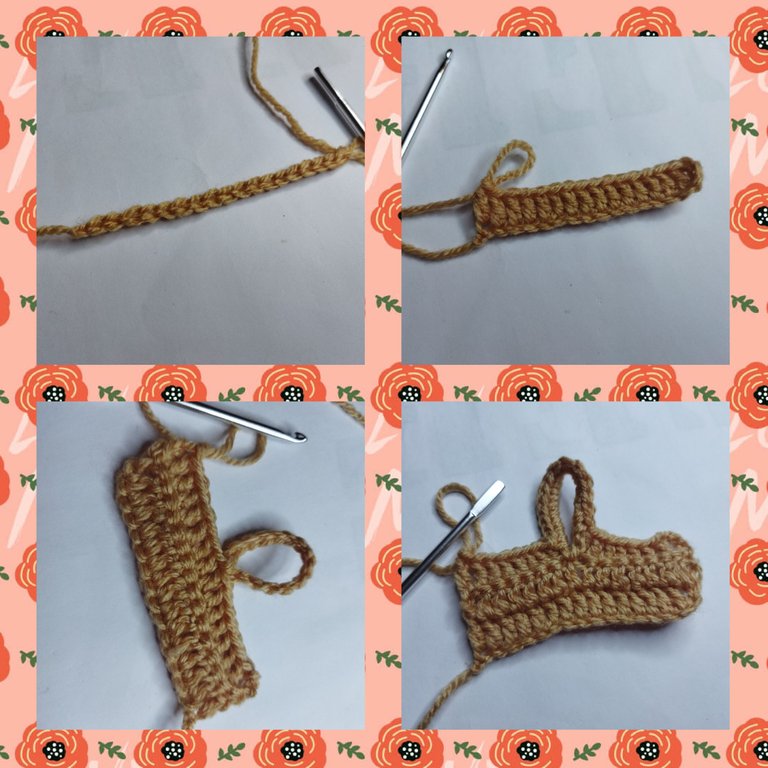
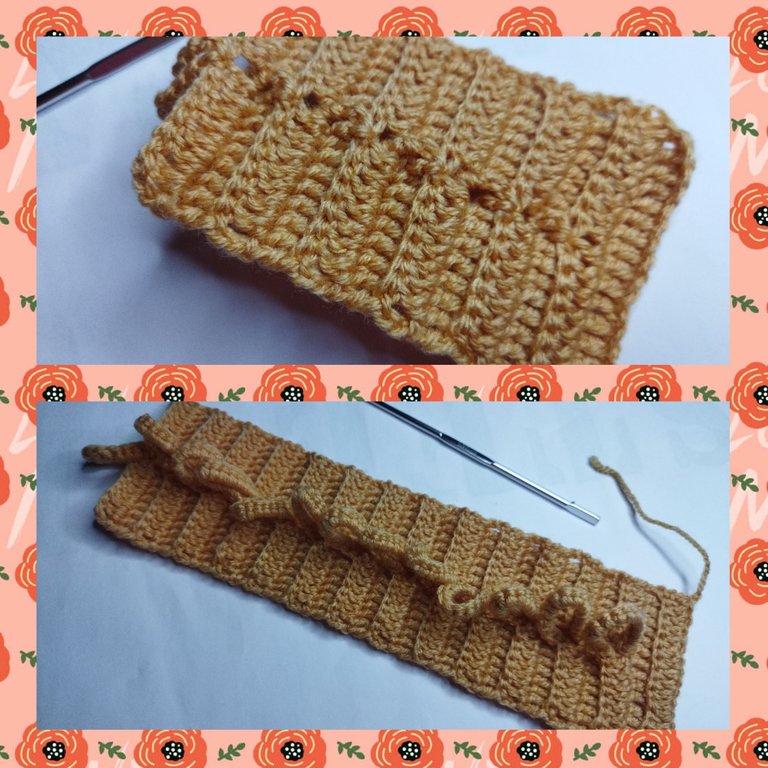
- Teje una cadena de 18 puntos.
- Levanta 16 puntos bajos en la siguiente vuelta.
- Luego sube tres cadenas y gira el tejido.
- Levanta para completar ocho puntos altos por la hebra de atrás. Esto lo harás siempre hasta terminar la diadema.
- Desde ese punto alto teje quince cadenas, engancha donde nacen esas cadenas con punto deslizado.
- Continua tejiendo ocho puntos altos.
- Ahora sube con tres cadenas, gira el tejido.
- Teje ocho puntos altos, rellena el arco con quince puntos bajos.
- Sigue tejiendo los ocho puntos altos restantes.
Todo el procedimiento anterior lo vas a repetir hasta obtener el largo de la diadema. La que hice para la muñeca tiene una medida de 28 cm. Si deseas hacer una para tí podría medir 50 cm más o menos.
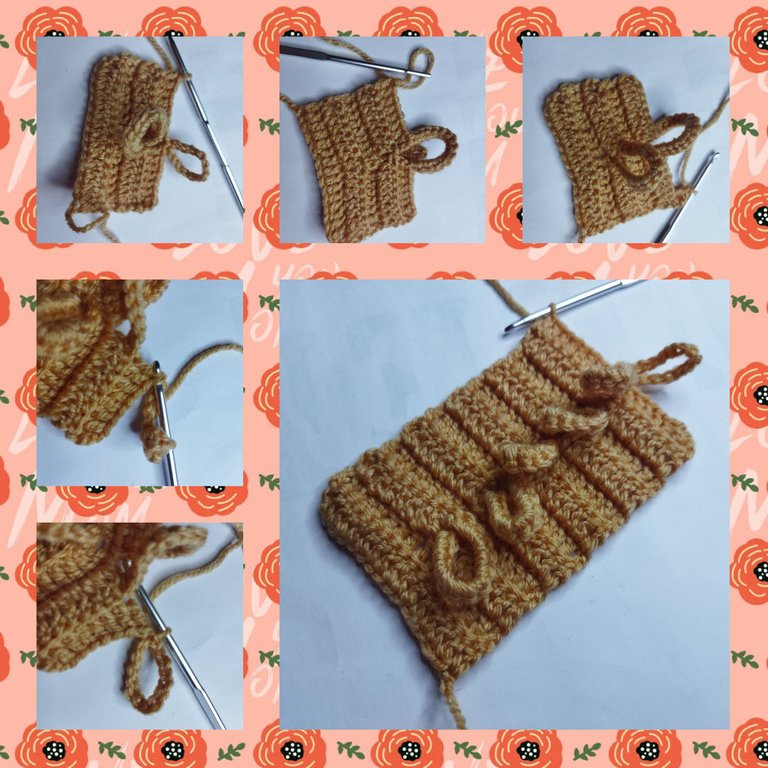
- La última vuelta debe coincidir con la que cubre el arco de la vuelta anterior. Cierra y remata.
- Esconde las dos hebras, de inicio y final del tejido.
- Haz un botón para cerrar la diadema.
- Teje un círculo de seis cadenas, teje muchos puntos bajos dentro del círculo hasta lograr que el orificio de en medio quede cerrado. Al finalizar deja la hebra larga para coser.
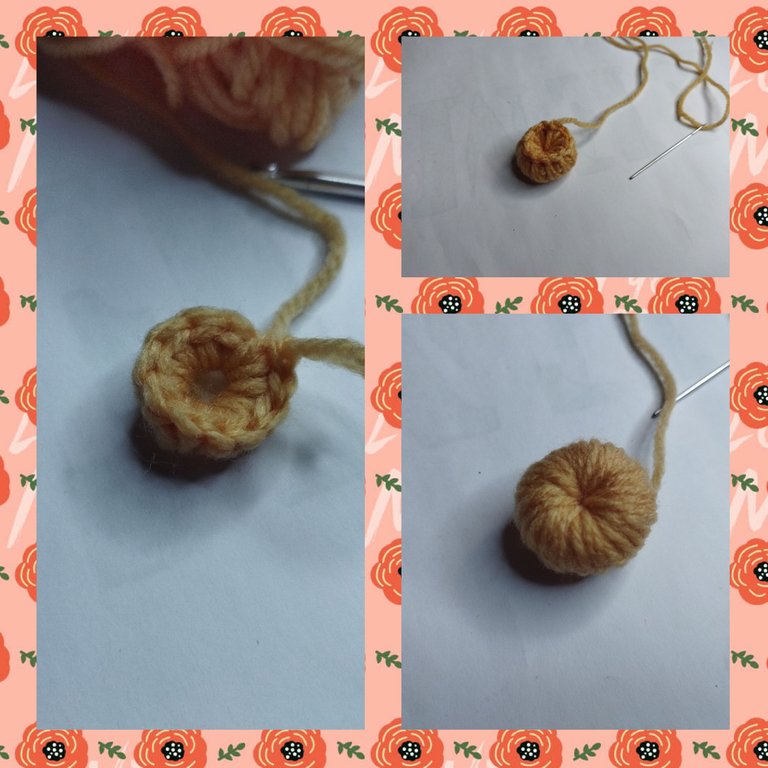
- Este botón debes coserlo entre las primeras vueltas que tejiste, centrado. Así debe verse tu diadema.

- Para finalizar vas a pasar un arco por dentro del otro. Iniciando con el arco desde atrás. Lograrás un efecto trenzado muy bonito. A medida que vas trenzado puedes ir acomodando para que luzca muy bien.
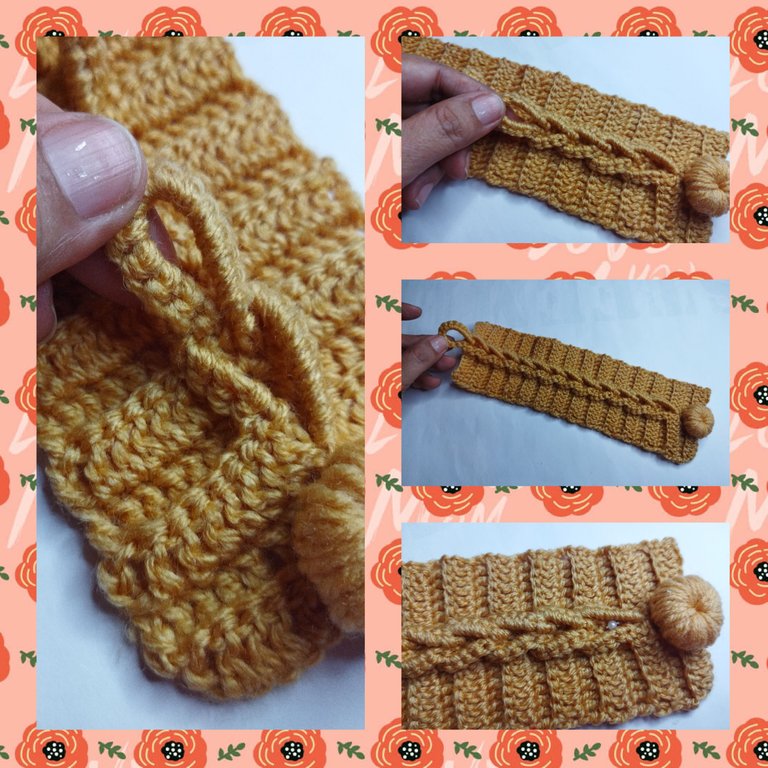
- Si tienes perlas medianas puedes decorarla, cosidas preferiblemente. Yo la dejé así porque no tengo perlas. ¡Me encanta como se le ve el cintillo a la muñeca!
- Trataré de atenderla mucho más seguido. Ella merece estar siempre linda. ¿No creen? Espero que les guste y hagan muchas como estas. Todas las fotos son de mi propiedad. Edité con Polish. Usé el traductor de DeepL. Muchas gracias por leer.

English.
Hello friends of this prestigious community. Today I want to present you a new creative project. This time the protagonist of my inspiration has been the doll that a niece lent me. This doll is very cute, but it never stays firm neither standing nor sitting. So I don't use it much.
I was sorting some things and she slipped and fell into one of my recycling bags. So I spent some time chatting with her. She loves to be disheveled, her hair is very unruly and short. So we agreed that I would wear a cute headband that I would make for her.
I haven't cared for my dolls in a while, none of the ones I have are really mine. Is that why? I don't think so. What I do think is that I have been neglectful, they are my best models or rather the only ones. So, it's time for this princess to wear something new. Join me and I'll show you what I did for her.
The doll's hair is very unruly and since it is short it becomes difficult to keep it in a better position. She also had a ponytail on for a long time, so her mane was left up. To change this I made a headband that will hold half of her hair back.
To make this project I used:
- Stretch yarn.
- Crochet needle of 3.5 mm.
- Scissors.
- Wool needle.
- I thought about using some beads, but they look too small. You can use bigger beads.
The procedure for making the headband is as follows:
- Knit a chain of 18 stitches.
- Pick up 16 single crochet stitches in the next row.
- Then pick up three chains and turn the knitting.
- Pick up to complete eight double crochet stitches through the back loop. You will do this every time until you finish the headband.
- From that high stitch knit fifteen chains, hook where those chains are born with slip stitch.
- Continue knitting eight high stitches.
- Now go up with three chains, turn the knitting.
- Knit eight high stitches, fill in the arch with fifteen low stitches.
- Continue knitting the remaining eight double crochet stitches.
All the above procedure you are going to repeat until you get the length of the headband. The one I made for the wrist is 28 cm long. If you want to make one for yourself it could measure 50 cm or so.
- The last loop should match the one that covers the bow of the previous loop. Close and finish off.
- Hide the two strands, beginning and end of the weave.
- Make a button to close the headband.
- Knit a circle of six chains, knit many single crochet stitches inside the circle until the hole in the middle is closed. At the end leave the long strand to sew.
- This button should be sewn in between the first few rows you knitted, centered. This is how your headband should look.
- To finish you are going to pass one bow inside the other. Starting with the bow from the back. You will get a very nice braided effect. As you braid the bow you can adjust it to make it look very nice.
- If you have medium pearls you can decorate it, preferably sewn. I left it like this because I don't have pearls, I love the way the headband looks on the doll!
- I will try to take care of her much more often. She deserves to be always pretty, don't you think? I hope you like it and make many like these. All photos are my property. I edited with Polish. I used DeepL translator. Thank you very much for reading.
https://twitter.com/obo2004/status/1543542661918982146
The rewards earned on this comment will go directly to the people sharing the post on Twitter as long as they are registered with @poshtoken. Sign up at https://hiveposh.com.
Mis respetos amiga, tienes una habilidad excepcional 💪🏼😁 he visto los trabajos que realizas y queda espectaculares, sobre todo los amigurumi son geniales 😋
Buenas vibras 🖖🏼
Hola!!! Qué tal? Me da mucho gusto tenerte de visita en mi blog.
Muchísimas gracias por tu apreciación. Tus palabras me llena de motivación. Saludos. 🤗
Esto quedó bellísimo. En colores variados tipo arcoiris debe quedar precioso.
Hola @linita, muchas gracias.
Se puede tejer perfectamente en diferentes colores, alternando el diseño cada dos vueltas.
Gracias por tu apoyo 🤗
Congratulations, your post has been upvoted by @dsc-r2cornell, which is the curating account for @R2cornell's Discord Community.
Thanks you 🤗
Croshe no se si se Escribe así la técnica muy lindas tus creaciones 🙌
Hola @yimark así es, la técnica del crochet. Se puede hacer millones de creaciones tejidas con un solo gancho.
Saludos. 🤗😁🥳
Que bien no sabia bien como se escribía que penita gracias 🙌🤟
Te a quedado muy lindo, felicidades.
Gracias amiga!
Thank you for sharing this amazing post on HIVE!
Your content got selected by our fellow curator @rezoanulvibes & you just received a little thank you via an upvote from our non-profit curation initiative!
You will be featured in one of our recurring curation compilations and on our pinterest boards! Both are aiming to offer you a stage to widen your audience within and outside of the DIY scene of hive.
Join the official DIYHub community on HIVE and show us more of your amazing work and feel free to connect with us and other DIYers via our discord server: https://discord.gg/mY5uCfQ !
If you want to support our goal to motivate other DIY/art/music/homesteading/... creators just delegate to us and earn 100% of your curation rewards!
Stay creative & hive on!
Thanks you 🤗
Woww amiga @creacioneslelys este cintillo te quedo realmente hermoso, Tu muñeca estará realmente agradecida ya que luce bellísima con el puesto. Pero debe lucir espectacular en una persona. Dios bendiga tus manos. Felicidades. 💖
Siiii. La muñeca se ve diferente. También quedan muy bonitas en la cabeza de las personas 🤗
Gracias por la visita.
Muy lindo el diseño que hiciste acá. Lo que tu usas para tejer yo lo uso para hacer mis figuras jeje. Las agujas de tejer son perfectas para lo que hago, de hecho las siento más cómodas para trabajar que las propias herramientas que venden para moldear...
En fin, este es un trabajo que requiere mucha paciencia y habilidad así que te felicito por hacerlo y compartirlo con nosotros.
Hola. Pude darme cuenta del uso que le das a las agujas leyendo tus publicaciones, me parece asombroso lo útiles que llegan a ser estos instrumentos.
Muchas gracias por apreciar mi labor @gaboamc2393
Saludos 🙋🥳🐝🤗
Realmente es hermosísimo... Es un trabajo precioso el que nos presentas. Gracias por compartir
🎆🎇🎉🎊🌧️💐✨🌾🌱🌹🌙🌿🍃🥀⚡🌺☘️🍀🌈🌷⭐🪴🌵🌸🌟💮🌴🌳💫☀️💮☔🌲🌳🌍🌌🌠☄️🏵️🐝🌻🌼🍄🐞🦋💙☕💜🍍🎆🎇🎉🎊
Gracias a ti por visitar mi blog. 🙋🐝👏👆🤗
Te ha quedado muy hermoso...
Muchas gracias 😉
¡Enhorabuena!
✅ Has hecho un trabajo de calidad, por lo cual tu publicación ha sido valorada y ha recibido el apoyo de parte de CHESS BROTHERS ♔ 💪
♟ Te invitamos a usar nuestra etiqueta #chessbrothers y a que aprendas más sobre nosotros.
♟♟ También puedes contactarnos en nuestro servidor de Discord y promocionar allí tus publicaciones.
♟♟♟ Considera unirte a nuestro trail de curación para que trabajemos en equipo y recibas recompensas automáticamente.
♞♟ Echa un vistazo a nuestra cuenta @chessbrotherspro para que te informes sobre el proceso de curación llevado a diario por nuestro equipo.
Cordialmente
El equipo de CHESS BROTHERS
Muchísimas gracias.
wao que interesante y como le presto a la muñeca, ahora se ve elegante
Este cintillo es uno de mis favoritos. Es demasiado bello y se teje súper rápido. A las muchachas les gusta mucho.
😉