CUSTOMIZE THE PLASTIC BAGS. [Esp-Eng]
Hola amigos, espero que estén bien. ¿Sorprendidos por la portada de mi publicación? ¡Lo sabía! Resulta que estaba editando las fotos de mi labor del día cuando de pronto la dapp no quería abrir sino hasta lo que pueden ver en la imagen, aproveché para hacer un capture por si se prolongaba y reportarlo. A los pocos minutos me dió aviso de una actualización y después abrió normalmente. Ya que tenía el capture en la galería se me ocurrió usarlo como plantilla para la edición de mis portadas ☺️ más adelante podrás ver la que tenía seleccionada 👇 antes de la actualización.
Hello friends, I hope you are well. Surprised by the cover of my publication? I knew it! It turns out that I was editing the photos of my work of the day when suddenly the dapp did not want to open until what you can see in the image, I took the opportunity to make a capture in case it was prolonged and report it. A few minutes later I was notified of an update and then it opened normally. Since I had the capture in the gallery I thought to use it as a template for editing my covers ☺️ below you can see the one I had selected 👇 before the update.
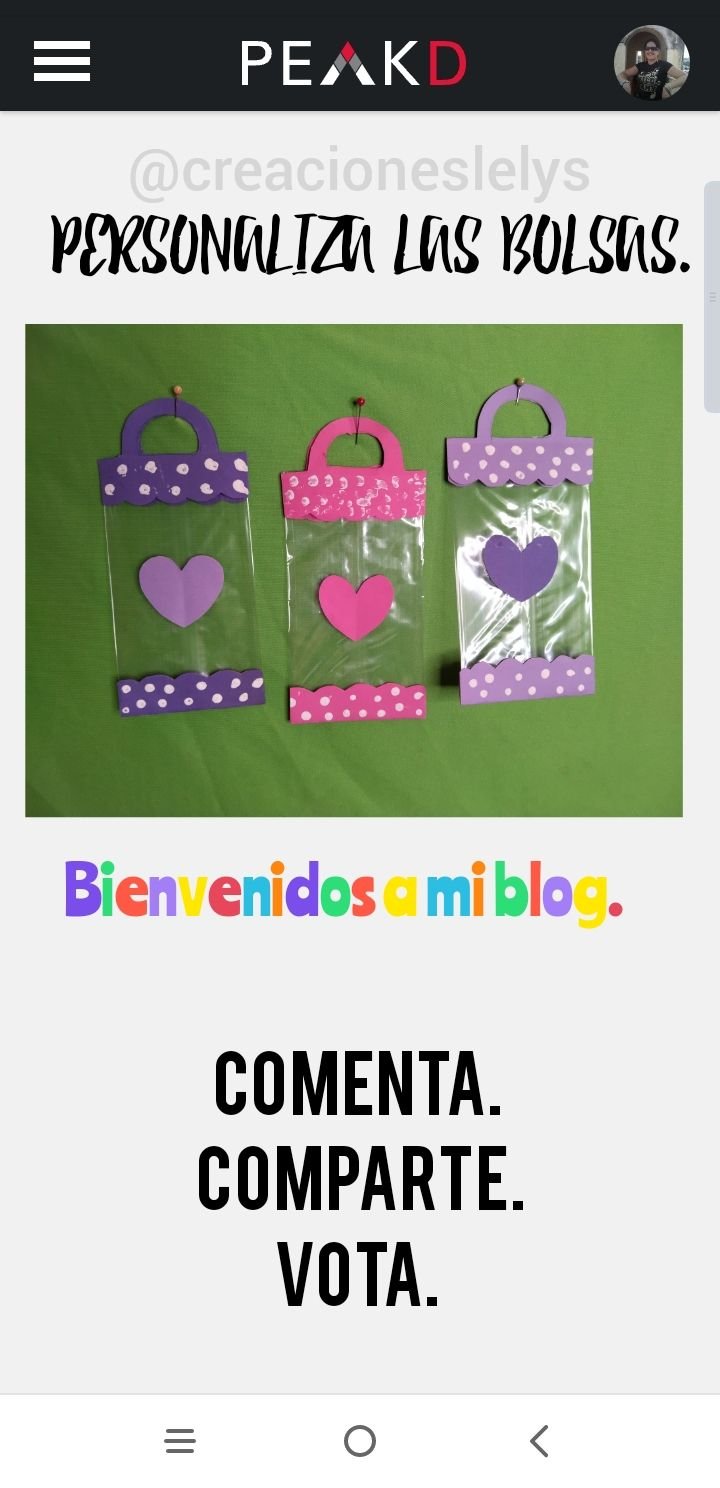
PERSONALIZA LAS BOLSAS PLÁSTICAS.
CUSTOMIZE THE PLASTIC BAGS.
Al momento de empaquetar algunos productos que elaboré recientemente recordé que había visto en unos chinos (comercio asiático) unas bolsitas decoradas que llamaron mi atención, tomé la idea para ponerla en práctica, hoy me dediqué a hacer las primeras.
When I was packing some products that I recently made, I remembered that I had seen in some Chinese (Asian trade) some decorated bags that caught my attention, I took the idea to put it into practice, today I dedicated myself to make the first ones.
Les mostraré cómo las realicé, pero ustedes van a perfeccionar el acabado, incluso pueden usar cartulina ya estampada y se ahorran el proceso de pintarlas. Lamentablemente por dónde vivo no hay un lugar donde vendan todos estos materiales así que para no esperar más yo improvisé y este es el resultado.
I will show you how I made them, but you can perfect the finish, you can even use cardboard already stamped and save the process of painting them. Unfortunately where I live there is no place where they sell all these materials so I improvised and this is the result.
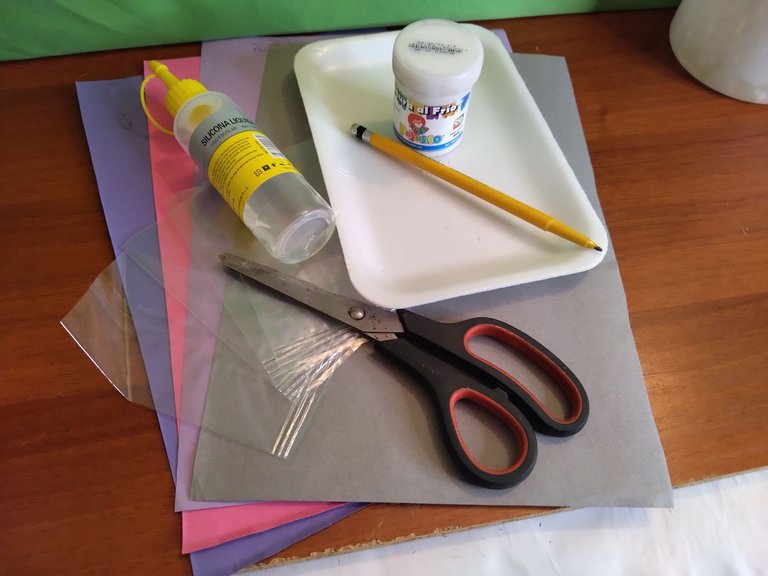
Materiales/Materials.
- Cartulina escolar de colores.
- Pintura al frío.
- Lapicero con borrador.
- Tijeras.
- Pegamento.
- Bolsas plásticas.
- Colored school cardboard.
- Cold paint.
- Pencil with eraser.
- Scissors.
- Glue.
- Plastic bags.
Procedimiento/Procede.
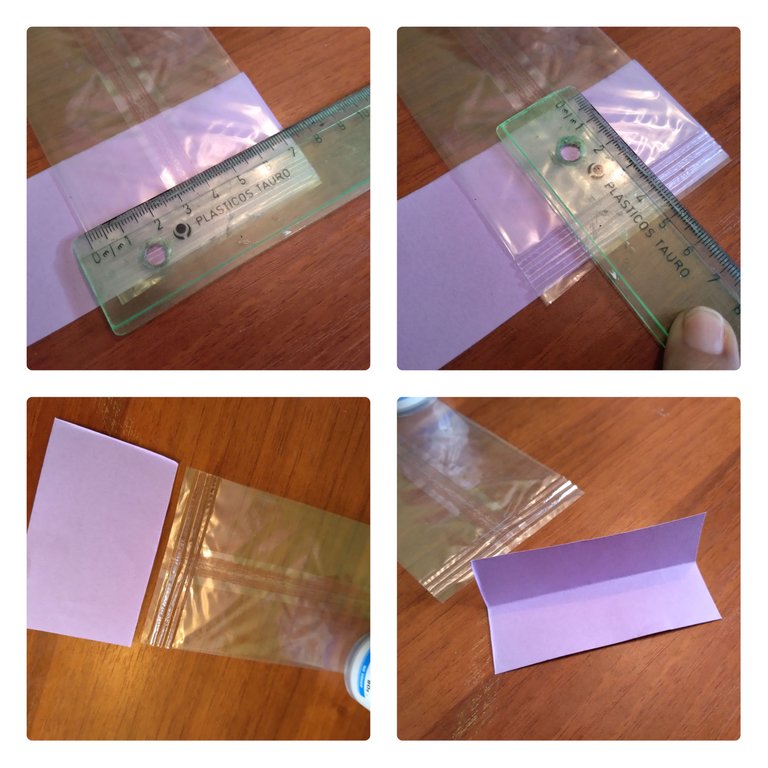
El primer paso es elegir el color de la cartulina con la que vamos a personalizar las bolsas.
Medimos la parte de abajo de la bolsa y la parte de arriba, tomamos nota del alto que vamos a cubrir con la cartulina y del ancho de la bolsa. La medida del alto la duplicamos porque vamos a usar la cartulina doblada.
- The first step is to choose the color of the cardboard with which we are going to personalize the bags.
- We measure the bottom of the bag and the top, we take note of the height we are going to cover with the cardboard and the width of the bag. We duplicate the height measurement because we are going to use the folded cardboard.
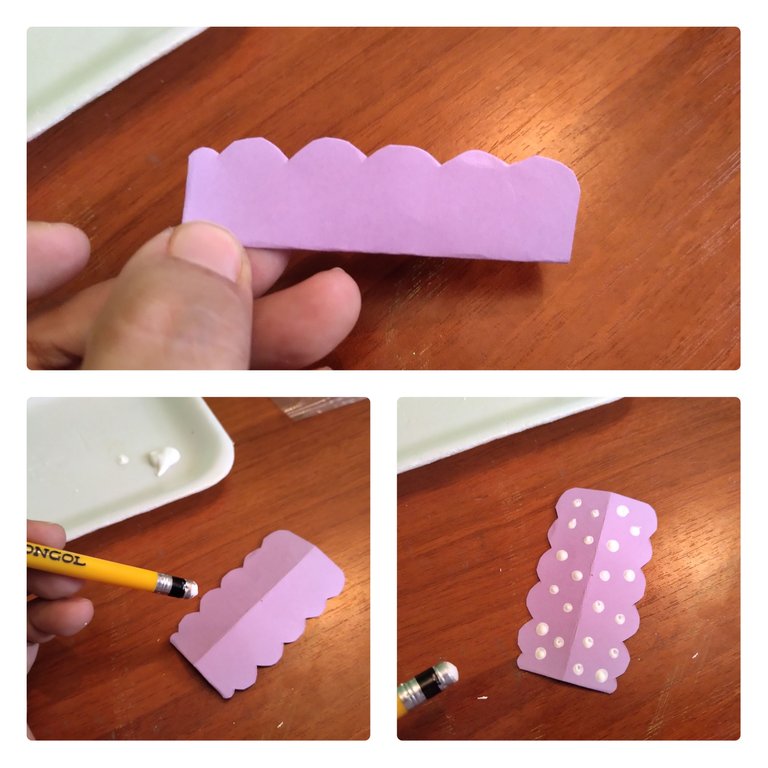
El siguiente paso es dar forma ondulada a la cartulina, con la tijera cortamos los dos lados separados que irán hacia arriba en la bolsita.
Ponemos un poco de pintura blanca en la bandeja y con el borrador del lapicero tomamos pintura y marcamos puntos sobre la cartulina. Esto lo hice en todos los recortes que usé.
- The next step is to give the cardboard a wavy shape, with the scissors we cut the two separate sides that will go up in the bag.
- We put some white paint in the tray and with the eraser of the pencil we take paint and mark dots on the cardboard. I did this on all the cutouts I used.
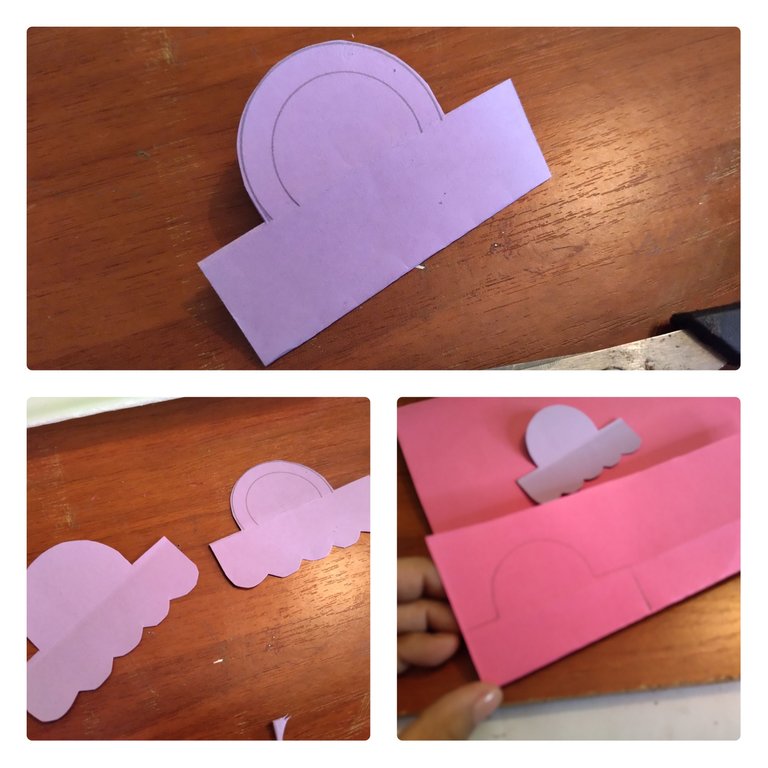
Para hacer las asas de la bolsa usé la misma medida de ancho, el ondulado lo realicé al contrario de la parte de abajo para que quedara hacia abajo de la bolsita.
Para sacar esta pieza se debe tener un trozo de cartulina con unos cm extras de altura porque el asa necesita más o menos 4 cm de alto. Hacemos en ese espacio un semicírculo. Recortamos y luego hacemos otro semicírculo adentro del primero, volvemos a recortar y así queda el asa. Estas serán dos piezas separadas.
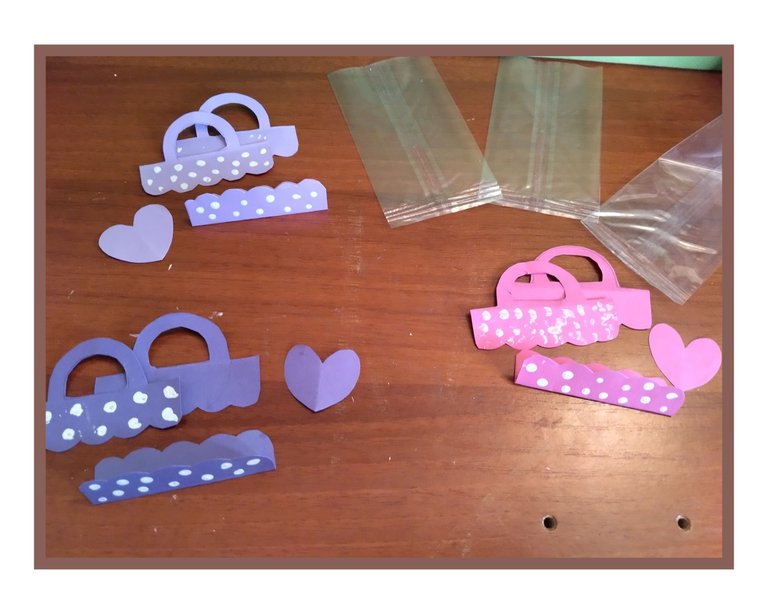
También le pintamos los puntos.
- To make the handles of the bag I used the same width measurement, I did the corrugation on the opposite side of the bottom so that it would be facing down the bag.
- To make this piece you must have a piece of cardboard with a few extra cm of height because the handle needs more or less 4 cm of height. We make a semicircle in this space. Cut it out and then make another semicircle inside the first one, cut it out again and that's how the handle looks like. These will be two separate pieces.
- We also paint the dots.
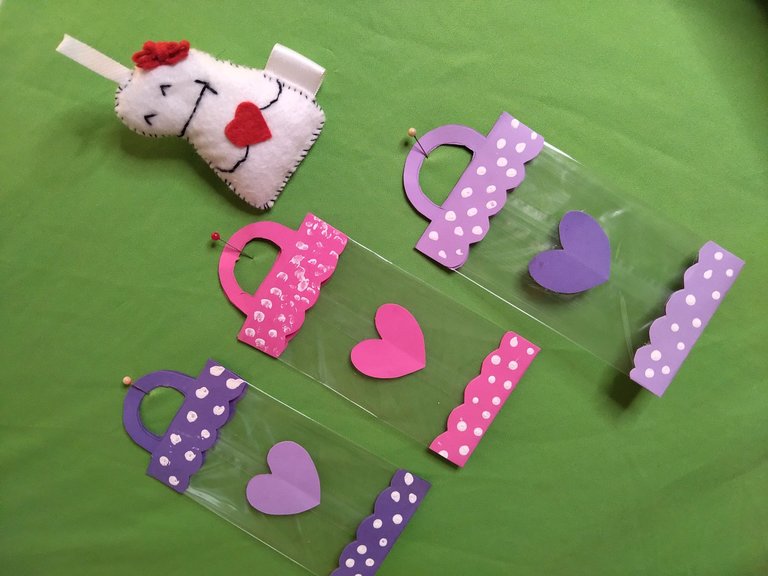
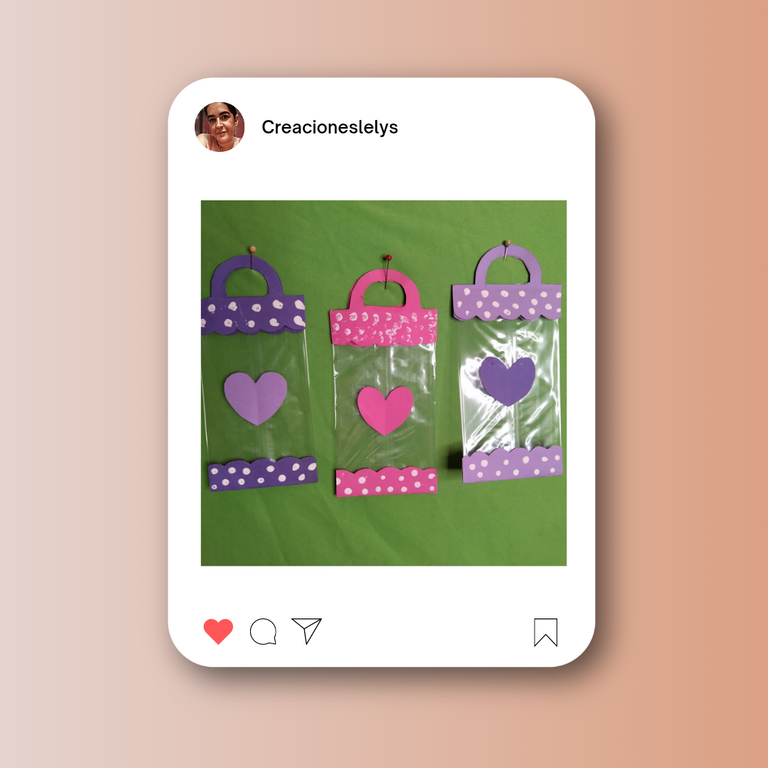
- Si es tu gusto puedes llegar alguna figura en el centro de la bolsita. Yo recorté corazones de cartulina para decorarlas.
- If you like, you can put a figure in the center of the bag. I cut out cardboard hearts to decorate them.
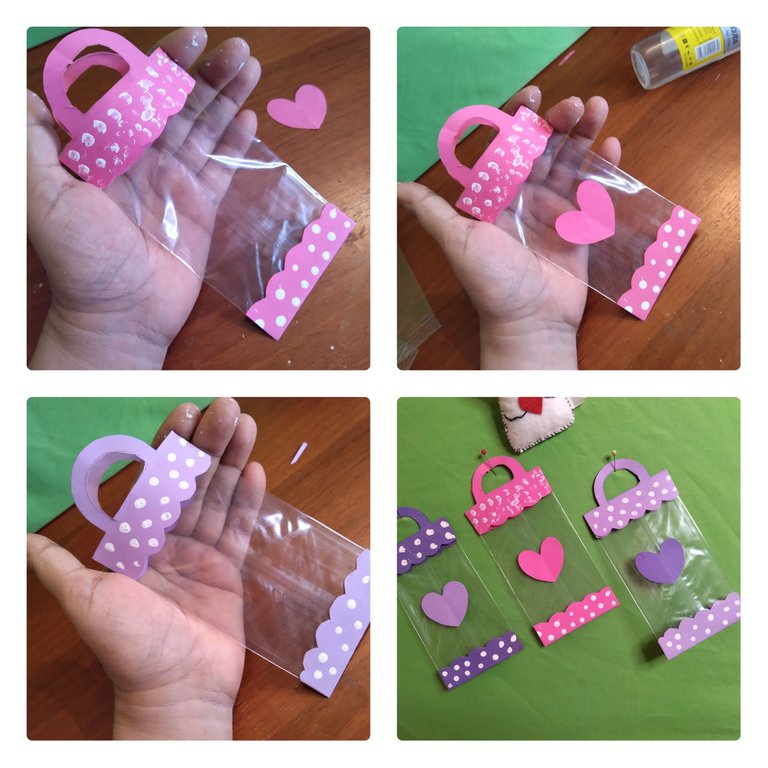
El último paso es colocar pegamento en cada una de las piezas de cartulina y pegarlas dónde corresponde. En caso de quedar algún sobrante a los lados se corta y listo.
Les digo que se ven muy lindas. A pesar que las hice sin mucho cuidado las bolsitas lucen muy bien. Ya con este primer intento estoy segura que al tener las cartulinas estampadas se verán muchísimo más bonitas.
- The last step is to put glue on each of the pieces of cardboard and glue them where they belong. If there are any leftovers on the sides, cut them off and that's it.
- I tell you that they look very nice. Although I made them without much care, the bags look very nice. With this first attempt I'm sure that having the cardstock printed on them will make them look much prettier.

Comparto con mucho cariño esta idea 😊 especialmente con la amiga @estefania3 ya que ella es una chica emprendedora dispuesta a aprender para poner en práctica. Espero que le gusten.
I share with much affection this idea 😊 especially with friend @estefania3 as she is an enterprising girl willing to learn to put into practice. I hope she likes them.
👇 Aquí les dejo lo que inicialmente sería la portada de la publicación. Editada en Canva. He tenido la fortuna de poder usar esta app y la verdad es que me ha permitido presentar mis creaciones desde diseños variados y llamativos.
Muchísimas gracias por la visita. Edité también con Polish. Usé el traductor de Deepl. Todas las fotos son de mi propiedad. Será hasta la próxima. Saludos a todos. Bendiciones 🙏
👇 Here is what initially would be the cover of the publication. Edited in Canva. I have been fortunate to be able to use this app and the truth is that it has allowed me to present my creations from varied and striking designs.
Thank you very much for the visit. I also edited with Polish. I used Deepl translator. All photos are my property. See you next time. Greetings to all. Blessings 🙏
#hive #posh #diy #handmade
https://twitter.com/obo2004/status/1659869471207575552?t=KIe95VmHpgwPRHSiLg-beA&s=19
Hermosas y super decorativas @creacioneslelys, además de ser útiles. Muchas gracias! Que tengas un hermoso sábado!❤️
Hola. Bien día. Gracias a ti.
Ya ocupé una bolsita para entregar un regalito. Más tarde lo entrego. Saludos.
Muy buena idea! Me encanta!😀
HOLA! ME HA ENCANTADO, SE VEN MUY BONITA . SEGURITO LA APLICARE.
Buen día. Me alegro que te hayan gustado. 🙋
Hola hermosa!! Que lindo trabajo, es una idea genial para los cotillones. Genial!
!discovery 20
!LADY
View or trade
LOHtokens.@chacald.dcymt, you successfully shared 0.1000 LOH with @creacioneslelys and you earned 0.1000 LOH as tips. (1/4 calls)
Use !LADY command to share LOH! More details available in this post.
Hola. Me alegra que te gusten. Se pueden personalizar bolsas de cualquier tamaño. 👍
This post was shared and voted inside the discord by the curators team of discovery-it
Join our Community and follow our Curation Trail
Discovery-it is also a Witness, vote for us here
Delegate to us for passive income. Check our 80% fee-back Program
Great idea and great creativity, really well presented.
Thanks You 👏
Your content has been voted as a part of Encouragement program. Keep up the good work!
Use Ecency daily to boost your growth on platform!
Support Ecency
Vote for new Proposal
Delegate HP and earn more
La felicito mi amiga realmente estuvo increíble ese tutorial, y las bolsitas hermosas y prácticas.
Hola. Muchísimas gracias 😊