[ESP-ENG] DIY. BELÉN GATEWAY OR THE HOLY FAMILY. // TUTORIAL. PORTAL DE BELÉN O LA SAGRADA FAMILIA.
Hola amigos de #hive 🙋 yo soy Lelys. Hoy me levanté con deseos de realizar una manualidad navideña 🤶 en realidad debía completar otro proyecto, pero me incliné más por hacer este. Desde hace días quiero utilizar unos rollos de papel que hemos ido guardando, ya no almacenamos cartones porque el año debe terminar con la casa limpia y saludable. Es tradición. Entonces decidí darles uso, son pocos y voy a reutilizarlos para hacer otras cositas antes de fin de año. Para empezar decidí recrear un Belén que ví en una de las bodegas de mi sector.
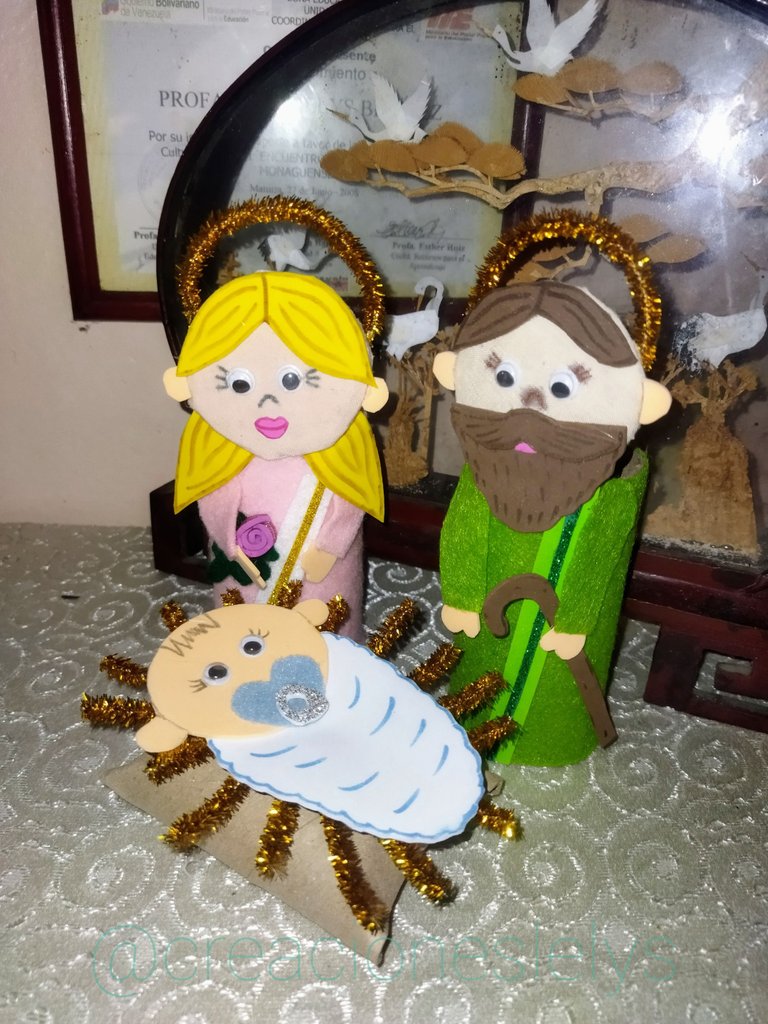
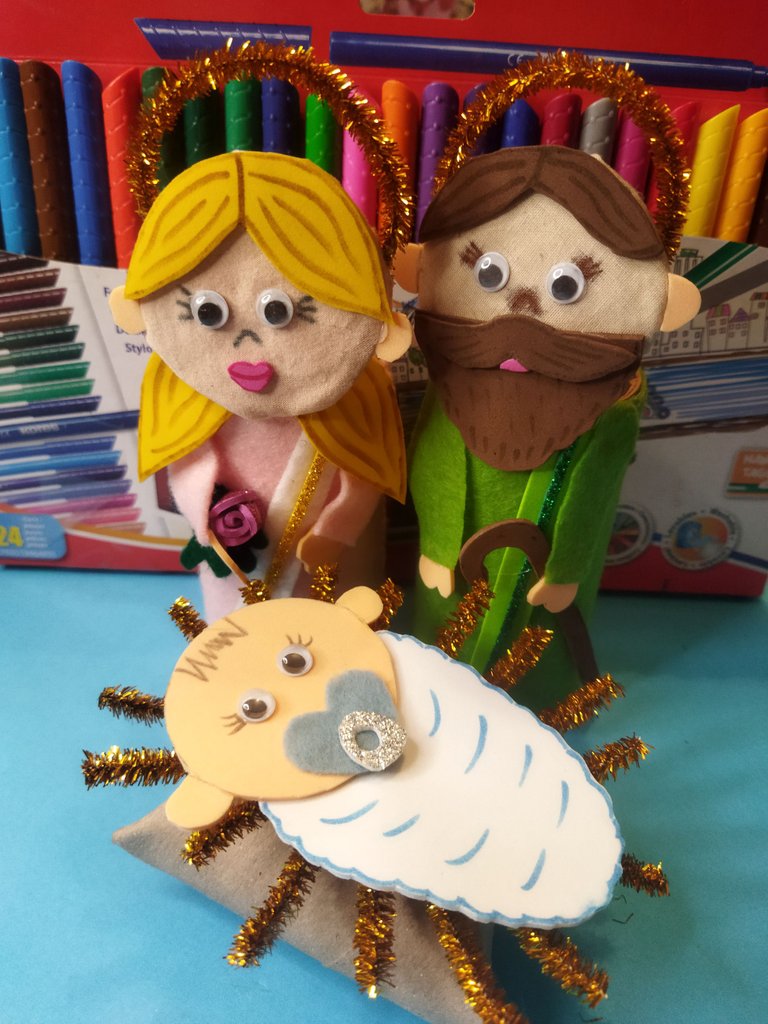
Ellos son Jesús, María y José. Muchos les denominan Belén, Portal de Belén, Sagrada Familia o Pesebre. Sabemos que al nacimiento de Jesús asistieron muchas personas y también animales, sin embargo mi proyecto está reducido a solo las tres sagradas personas.
Para realizarlo usé como materia prima los ROLLOS DE CARTÓN reciclados. Además cada uno de los materiales que fui encontrando en mi armario de reciclaje como telas y foami. También necesité pegamento frío y caliente. Las tijeras. Ojos movibles u ojos locos. Limpiapipas dorado. Marcadores y algunos retazos de cartón. Estos materiales podrás verlos más adelante en las fotografías del paso a paso.
Paso 1.
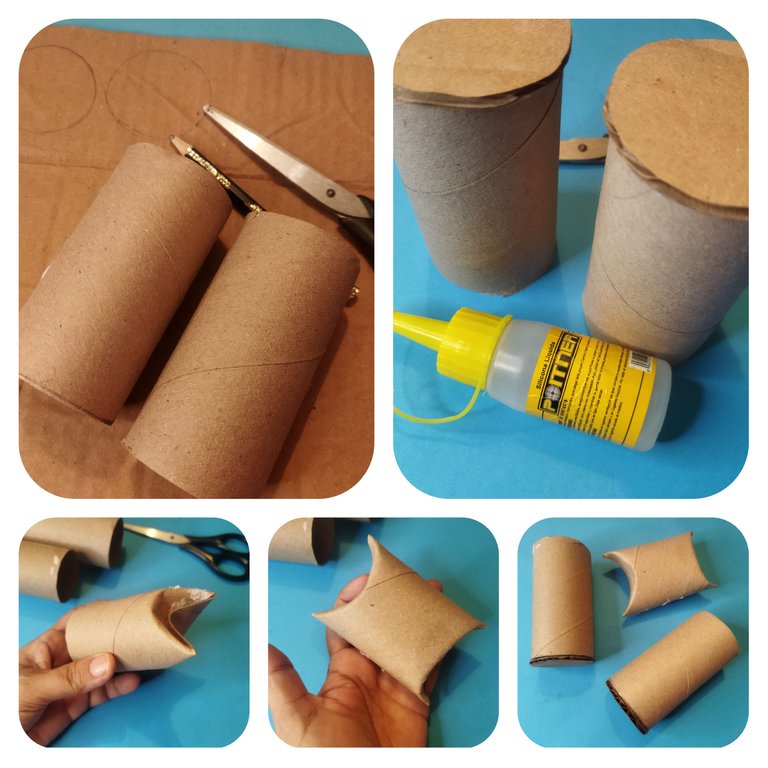
Preparar los rollos de cartón. Dos de ellos llevan para la base un círculo de cartón pegado a la medida. El otro rollo lo doblaremos en ambos extremos formando una especie de solapas o tapas.

Paso 2.
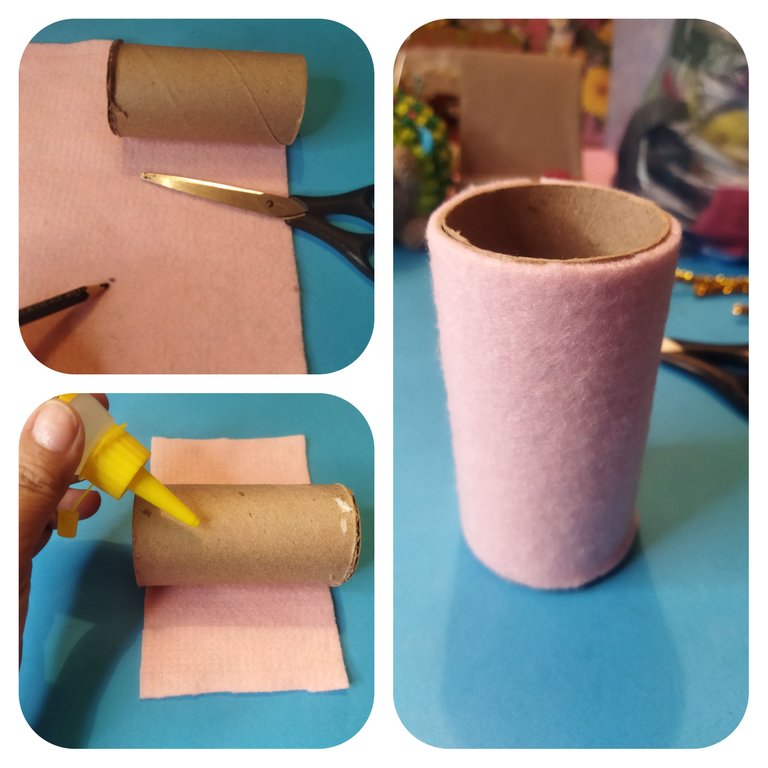
Forrar los rollos. Con tela de fieltro se mide, corta y pega en el rollo para cubrirlo. Usé silicón caliente para asegurarlo.
Paso 3.
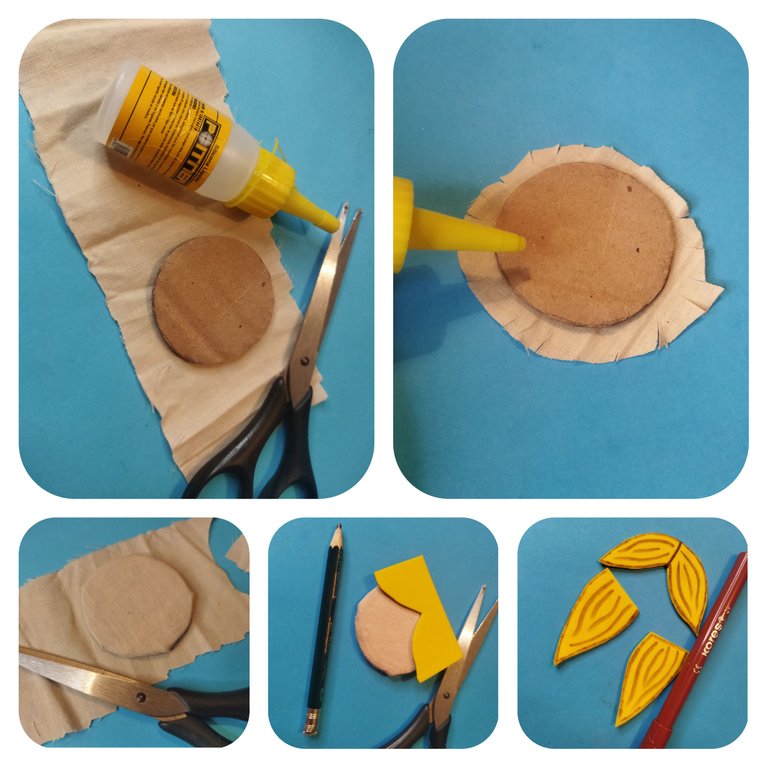
Realizar la cabeza. En un trozo de cartón se mide y se corta la cabeza de María y de José. Usé de guía uno de los rollos de cartón. Luego lo forré con tela de color beigs. Se corta un círculo más grande que el cartón y uno a la medida. Con ambos se cubre el cartón tal como verás en la foto.
Con foami amarillo se mide, corta y dibuja el cabello de María. Usando como guía la cabeza ya elaborada quedará muy bien. También se cortan dos moños o cabellos laterales.
Paso 4.
Hacer los brazos y el detalle de su manto. Para los brazos usé tela de fieltro. No usé moldes sino que mientras fui haciendo iba midiendo. Para el detalle del manto usé tela de fieltro y foami escarchado. Para las manos usé foami liso.
Paso 5.
Detalles decorativos. Con fieltro color verde realicé una hoja de olivo y con foami escarchado realicé una pequeña flor. En la foto puedes ver la forma que le dí al foami, después la enrollé y pegué en la punta.
Paso 6.
Unir piezas. Una vez completadas todas las partes de esta figura se comienzan a pegar donde correspondan. Primero se pegan los cabellos y los ojos en la cabeza para formar el rostro. Con marcador se dibuja la nariz. También se pegan las orejas que he realizado con foami beigs. Las manos se pegan a los brazos. Estas manitas también las realicé con foami. Fíjate bien en la dirección de los dedos antes de pegar.
Después pegamos el detalle de su manto. Enseguida pegamos los brazos, la hoja y la flor. Por último y calculando bien la altura pegamos la cabeza.
Paso 7.
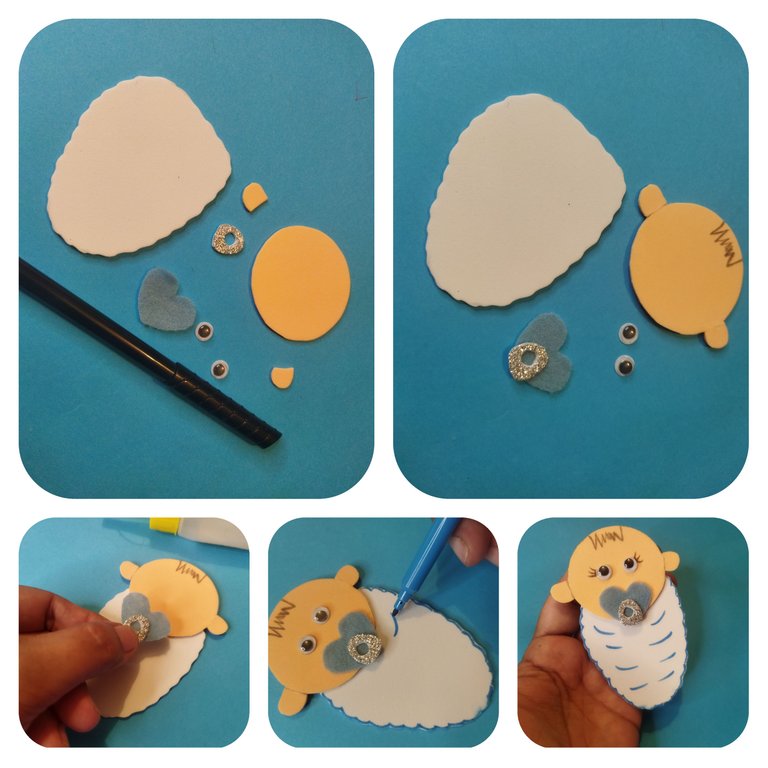
Hacer a Jesús en el pesebre. Sobre el cartón que hemos doblado se colocan en forma de cruz hasta rellenar el espacio varios bastones de limpiapipas. He cortado de varias medidas. Desde 10 cm hasta 5 cm. Usé pegamento caliente para pegarlos todos desde el centro.
Paso 8.
Para hacer a Jesús usé foami liso blanco y beigs. Además usé fieltro azul y foami escarchado. También corté las partes tomando la medida del pesebre ya terminado. Para medir la cabeza usé uno de los rollos, pero reduje la medida 1 cm. Pegué los ojos. Realicé un chupón con el fieltro azul y el foami escarchado. En foami beigs hice las orejas. Para simular el cabello dibujé unas líneas con marcador. Con marcador azul dibujé algunos detalles en la ropita de Jesús.
Paso 9.
En este paso repetiremos todos los anteriores haciendo a María, la diferencia es que José tiene sus propias características obviamente. Con el fieltro verde se forra el rollo. Usando el cartón circular y la tela beigs se hace la cabeza. Con foami liso marrón se hacen la barba, el cabello, el bigote y el bastón. Se hacen las orejas con foami beigs. El detalle de su manto se hace con foami verde y foami escarchado color plateado. Sus brazos se hacen con fieltro verde y las manos con foami beigs. Tanto para María como para José realicé la aureola con limpiapipas dorado. Tomé la medida usando un rollo de cartón, esta se pega detrás de la cabeza.
Paso 10.
Presentar el Belén o Sagrada familia. Escoger el mejor lugar de la casa para exhibirlo y contemplarlo diariamente durante esta hermosa temporada. Quizá no es igualito al que yo vi, pero estoy satisfecha con el resultado.
Muchas gracias por tu visita. Aprecio que hayas pasado por mi blog. Todas las fotos son de mi propiedad. Edité con Polish. Usé el traductor de DeepL. Gracias a @kattycrochet por los separadores. Bendiciones. Hasta luego.
ENGLISH.
Hi #hive friends 🙋 I'm Lelys. Today I woke up wanting to make a Christmas craft 🤶 actually I was supposed to complete another project, but I was more inclined to do this one. For days now I've been wanting to use some paper rolls we've been saving, we no longer store cartons because the year must end with a clean and healthy house. It is tradition. So I decided to use them, they are few and I will reuse them to make other things before the end of the year. To start I decided to recreate a Bethlehem that I saw in one of the warehouses in my area.
They are Jesus, Mary and Joseph. Many call them Bethlehem, Bethlehem Portal, Holy Family or Manger. We know that the birth of Jesus was attended by many people and also animals, however my project is reduced to only the three sacred persons.
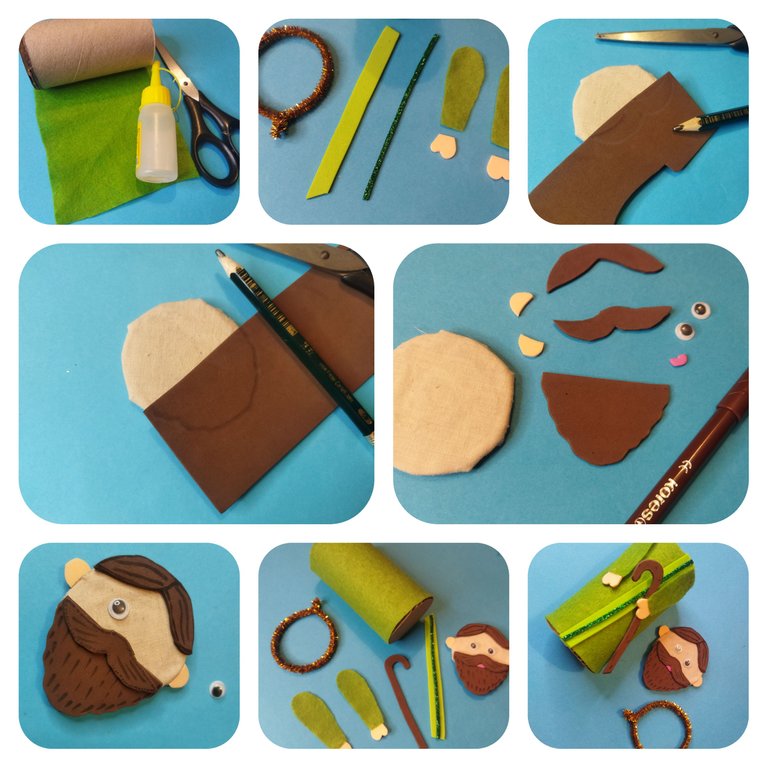
To make it I used recycled CARDBOARD ROLLS as raw material. In addition to each of the materials that I found in my recycling closet such as fabrics and foami. I also needed cold and hot glue. Scissors. Movable eyes or crazy eyes. Gold pipe cleaners. Markers and some cardboard scraps. You can see these materials below in the step by step pictures.
Step 1.
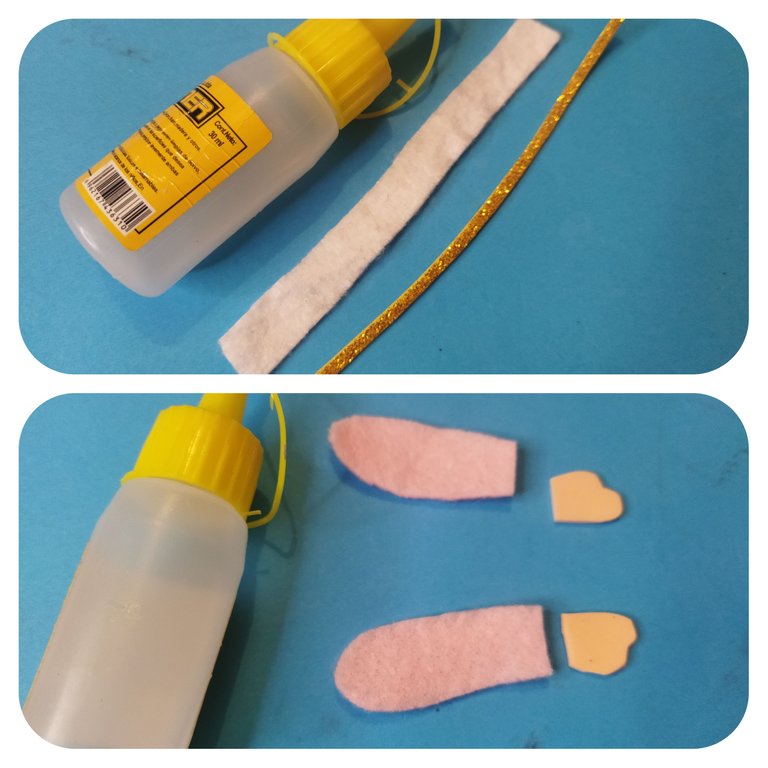
Prepare the cardboard rolls. Two of them have a cardboard circle glued to the base. The other roll we will fold it at both ends forming a kind of flaps or lids.
Step 2.
Line the rolls. Using felt fabric measure, cut and glue on the roll to cover it. I used hot silicone to secure it.
Step 3.
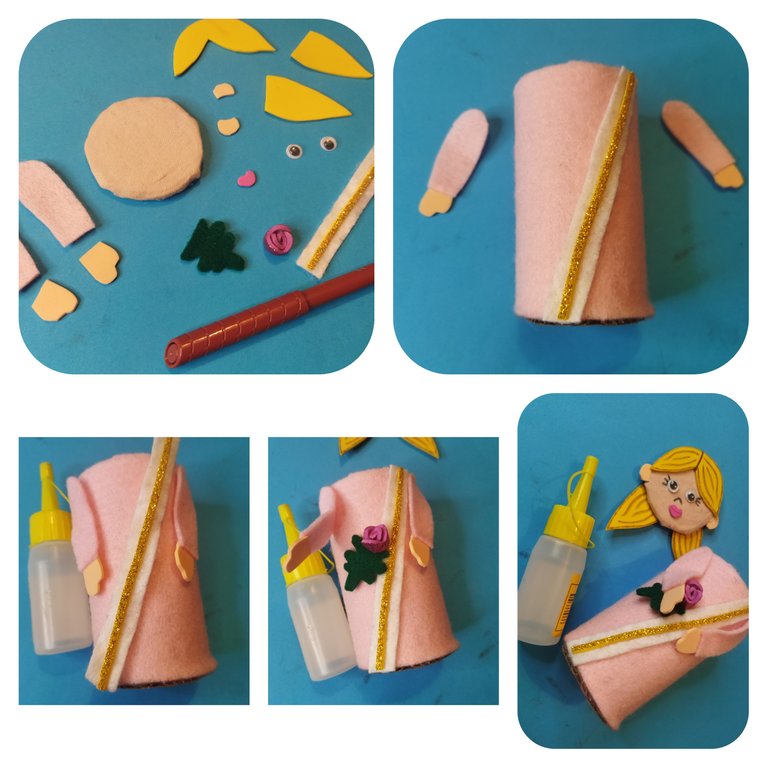
Make the head. On a piece of cardboard, measure and cut out the head of Mary and Joseph. I used one of the cardboard rolls as a guide. Then I lined it with beige fabric. Cut a circle larger than the cardboard and one to size. With both you cover the cardboard as you will see in the photo.
With yellow foami, measure, cut and draw Maria's hair. Using the already made head as a guide, it will look great. Also cut two buns or side hairs.
Step 4.
Make the arms and the detail of her mantle. For the arms I used felt fabric. I didn't use molds but as I was making them I was measuring. For the mantle detail I used felt fabric and frosted foami. For the hands I used plain foami.
Step 5.
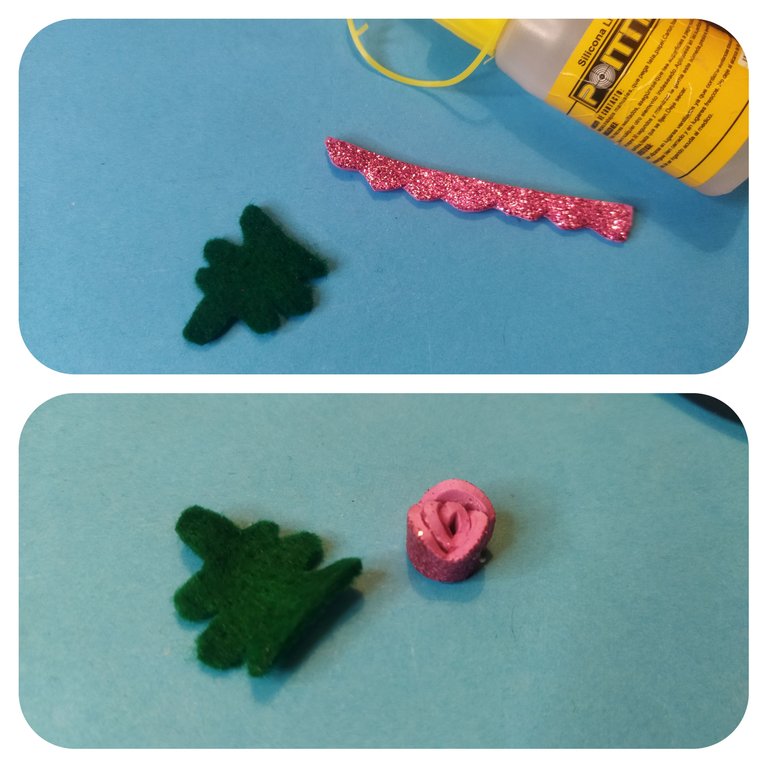
Decorative details. With green felt I made an olive leaf and with frosted foami I made a small flower. In the photo you can see the shape I gave to the foami, then I rolled it and glued it at the tip.
Step 6.
Join pieces together. Once all the parts of this figure are completed, start gluing them together. First glue the hair and eyes on the head to form the face. With a marker, draw the nose. Also glue the ears that I made with beige foami. The hands are glued to the arms. I also made these little hands with foami. Check the direction of the fingers before gluing.
Then we glue the detail of her mantle. Then we glue the arms, the leaf and the flower. Finally and calculating well the height we glue the head.
Step 7.
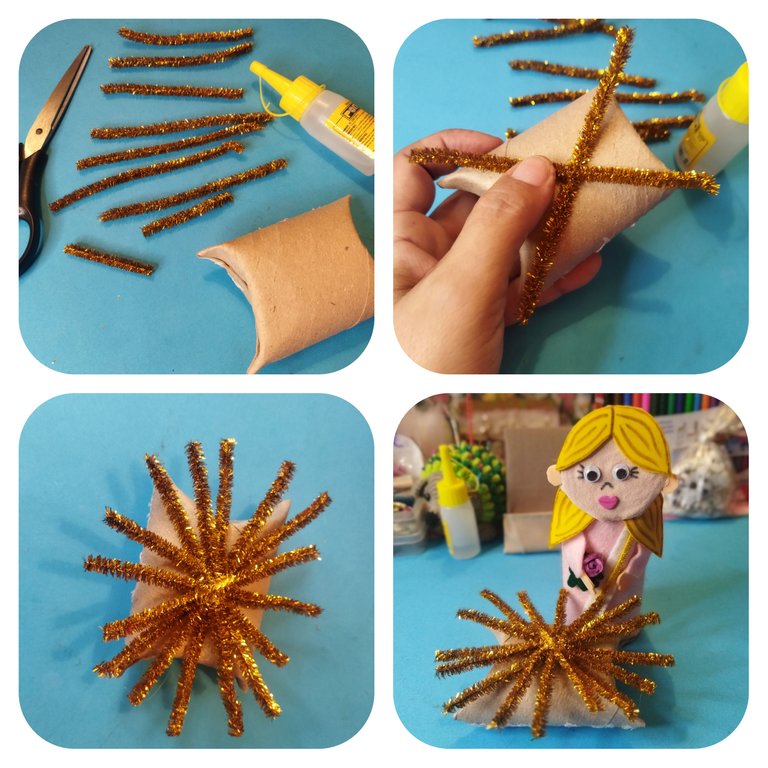
Make Jesus in the manger. On the cardboard that we have folded, place several pipe cleaner sticks in the shape of a cross until the space is filled. I cut them in different sizes. From 10 cm to 5 cm. I used hot glue to glue them all from the center.
Step 8.
To make Jesus I used plain white and beige foami, blue felt and frosted foami. I also cut the parts taking the measure of the finished nativity scene. To measure the head I used one of the rolls, but I reduced the size by 1 cm. I glued the eyes. I made a pacifier with the blue felt and the frosted foami. In beige foami I made the ears. To simulate the hair I drew some lines with marker. With blue marker I drew some details on Jesus' clothes.
Step 9.
In this step we will repeat all the previous ones making Mary, the difference is that Joseph has his own characteristics obviously. With the green felt the roll is lined. Using the circular cardboard and the beige fabric we make the head. With brown smooth foami we make the beard, the hair, the mustache and the cane. The ears are made with beige foami. The detail of his cloak is made with green foami and silver frosted foami. Her arms are made with green felt and her hands with beige foami. For both Mary and Joseph I made the halo with gold pipe cleaners. I took the measurement using a roll of cardboard, it is glued behind the head.
Step 10.
Present the Nativity Scene or Holy Family. Choose the best place in the house to display it and contemplate it daily during this beautiful season. It may not be the same as the one I saw, but I am satisfied with the result.
Thank you very much for your visit. I appreciate you stopping by my blog. All photos are my property. I edited with Polish. I used DeepL translator. Thanks to @kattycrochet for the dividers. Blessings. See you later.
Thank you for sharing this post in the DIYHUB Community!
Your content got selected by our fellow curator stevenson7 & you just received a little thank you upvote from us for your great work! Your post will be featured in one of our recurring compilations which are aiming to offer you a stage to widen your audience within the DIY scene of Hive. Stay creative & HIVE ON!
Please vote for our hive witness <3
Thanks you 🤗
You're welcome.
https://twitter.com/131481196/status/1597704364831178753
The rewards earned on this comment will go directly to the people( @creacioneslelys ) sharing the post on Twitter as long as they are registered with @poshtoken. Sign up at https://hiveposh.com.
Este proyecto está ideal para elaborar con los niños del prescolar, no sólo para adiestrarlos en cuanto a cortar y pegar sino para enseñarles valores y tradiciones. Me encantó. Te felicito, ojalá que lo vean muchas maestras.
Hola @linita 🙋
Me alegro que te haya gustado. Los niños disfrutarían y aprenderían varias cosas con este proyecto, especialmente a valorar la tradición 😉🎄🙋🤶🤗
Thanks you 🤗
Hey, hermoso pesebre amiga. Lo mejor de todo es que son muy fáciles de hacer; sería interesante trabajar con los niños de la familia. Un abrazo.
Hola amiga. ¡Que bueno leerte por aquí! La verdad es que es muy buena idea. Espero baje sirva de inspiración para las madres y abuelas.
Amiga no sabías que hacer con los ojitos y mira creaste algo muy hermoso, muy adecuada para estas fechas esta manualidad, te envío un fuerte abrazo.
Hola. Te cuento que estos ojos son más grandecitos. Los que mostré antes son más chiquitos...jejeje. Sé que pronto los usaré en algo.
A mí se me olvidan esos ojos. El día que los compré llegué súper contenta. Bueno! Ya empecé a usarlos. Muchas gracias por tu apoyo 😉 🌷☺️
Congratulations, your post has been upvoted by @dsc-r2cornell, which is the curating account for @R2cornell's Discord Community.
Enhorabuena, su "post" ha sido "up-voted" por @dsc-r2cornell, que es la "cuenta curating" de la Comunidad de la Discordia de @R2cornell.
Thank you 🤗
Me encantó, es sencillo de realizar y un trabajo muy lindo para decorar. Gracias por compartir el paso a paso.
🎆🎇🎉🎊🌧️💐✨🌾🌱🌹🌙🌿🍃🥀⚡🌺☘️🍀🌈🌷⭐🪴🌵🌸🌟💮🌴🌳💫☀️💮☔🌲🌳🌍🌌🌠☄️🏵️🐝🌻🌼🍄🐞🦋💙☕💜🍍🎆🎇🎉🎊🎆🎇🎉🎊🌧️💐✨🌾🌱🌹🌙🌿🍃🥀⚡🌺☘️🍀🌈🌷⭐🪴🌵🌸🌟💮🌴🌳💫☀️💮☔🌲🌳🌍🌌🌠☄️🏵️🐝🌻🌼🍄🐞🦋💙☕💜🍍🎆🎇🎉🎊
!PIZZA
Hola. Gracias a ti por visitar mi blog. 🤗☃️🥂
I gifted $PIZZA slices here:
@chacald.dcymt(2/5) tipped @creacioneslelys (x1)
Please vote for pizza.witness!
Wow amiga un bellísimo trabajo realizado con materiales reciclables. Un bello detalle que no puede faltar en muchos hogares en estás navidades. Amo los nacimiento. Gracias por compartir tan bella creación @creacioneslelys 😍🌹😘❤️🤗🥰✨🎄