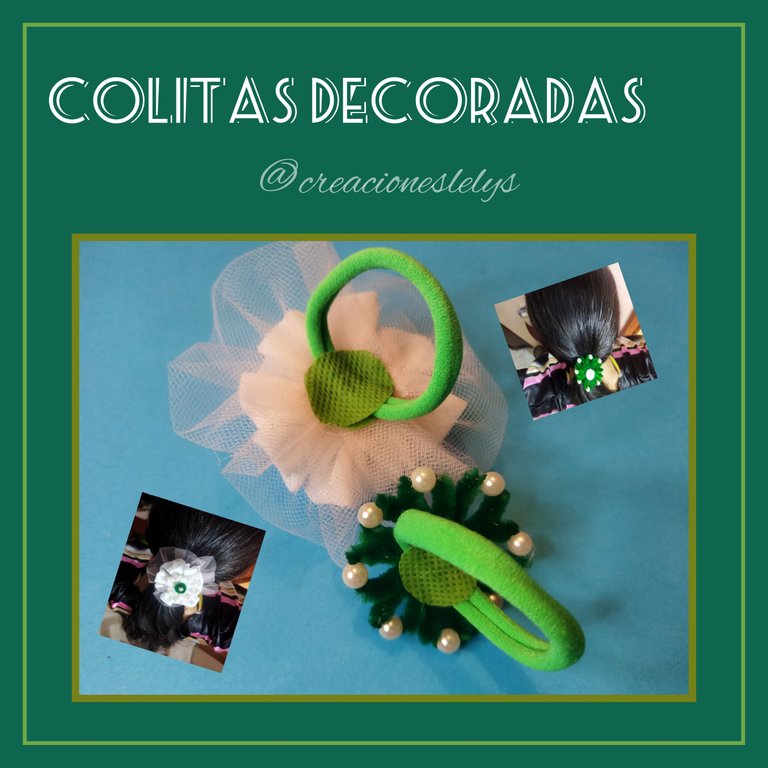
[ESP-ENG] 💚Tails decorated with chenille and pearls.💚
Hola mis lindos y apreciados amigos. El día de hoy vengo contentica a mostrarles dos modelos de decoración para sus colitas o ligas para el cabello. Desde hace algún tiempo empecé a usarlas porque mi mamá me mandó a comprarle varias. Yo soy más de usar ganchos ya que en las colitas dejo mucho cabello al quitármelas.
Estas colitas para mí son especiales, están elaboradas con una tela elástica muy suave, estiran bastante y duran muchísimo. Otro detalle de las colas es que podemos lavarlas y además son económicas. Cada vez que puedo compro uno o dos paquetes, cada paquete trae seis colitas, a veces vienen en pares de colores, tres de un color y tres de otro color y también suelen venir en diferentes colores por paquete. En mis ratos libres cuando quiero hacer alguna manualidad rápida las decoro con perlas, las empaqueto y allí las voy reuniendo por si alguien las quiere comprar.
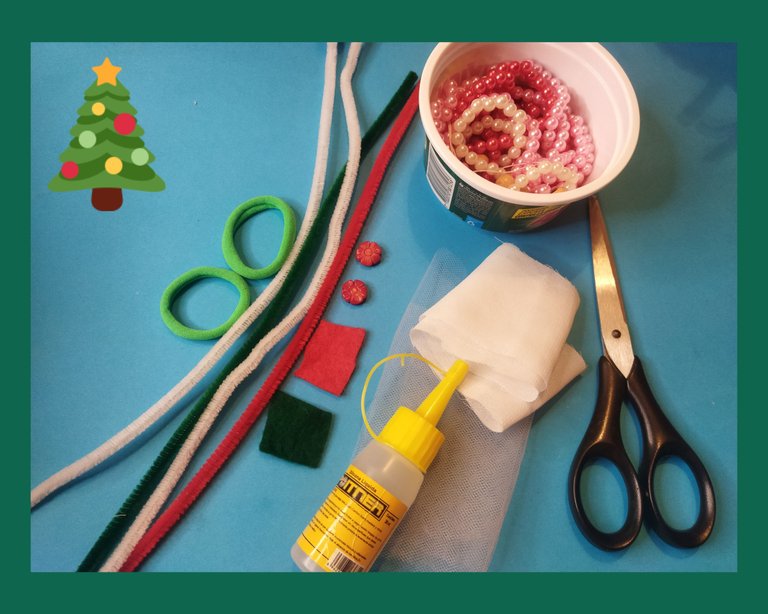
Quise aprender a realizar otros modelos. En estos que les traigo hoy invertí un poco más de tiempo. Están realizados con retazos de telas recicladas, chenil o limpiapipas, perlas número 4. Usé pegamento como silicón frío y caliente, tijeras, aguja de coser, hilo de coser color blanco.
Muchísimas gracias por todo el apoyo que han brindado a mi contenido. Hoy estoy súper contenta porque me ha llegado la insignia de mis primeros cuatro años de permanencia en #hive 💚 de verdad que estoy feliz de formar parte de la comunidad blockchain más hermosa entre todas.

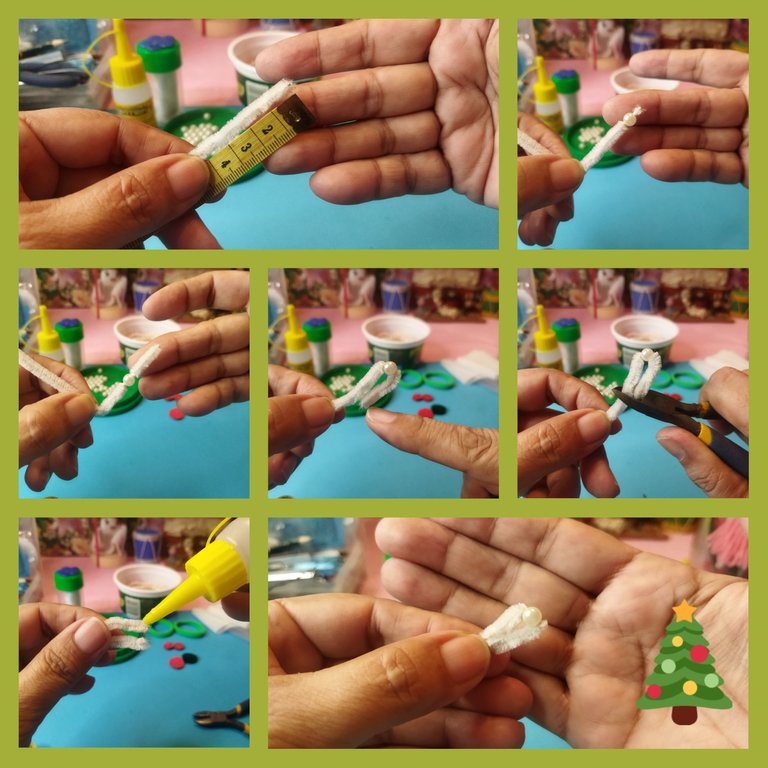
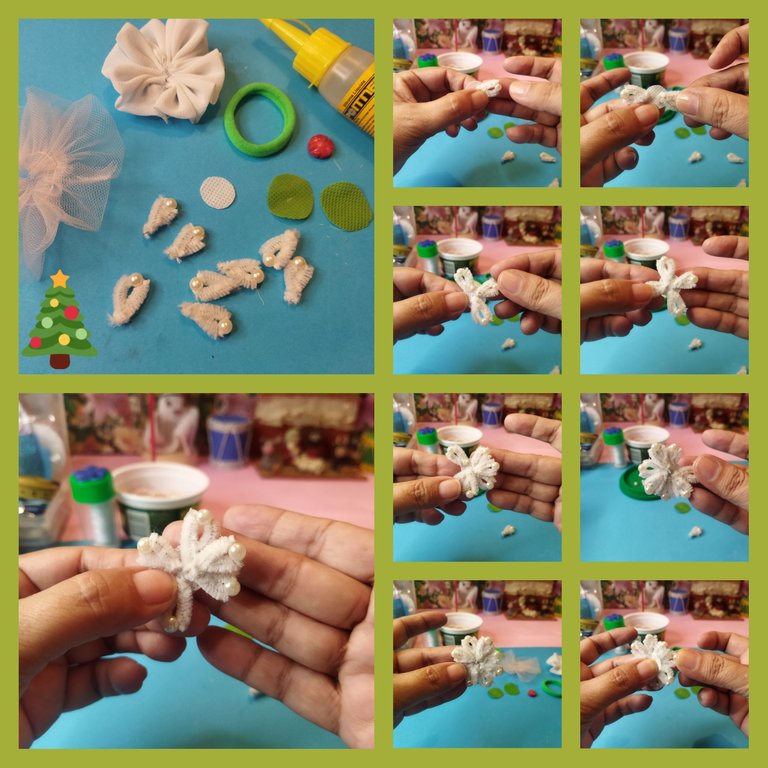
💚 Realizar este modelo es sencillo. Lo primero que haremos es medir y cortar ocho trocitos de chenil de 4 cm cada uno. El chenil o limpiapipas que estoy usando es el aterciopelado. Si no los conoces te los describo, son alambres muy delgados, moldeables, están cubiertos de pelucitas muy suaves que al tocarlas se sienten como terciopelo. Las venden de todos los colores.
💚 Luego de cortar vamos a meter el chenil por una de las perlas número 4, centrándola. Después vamos a doblar y unir las puntas con pegamento. Debemos hacer de este modo los ocho trocitos de chenil.
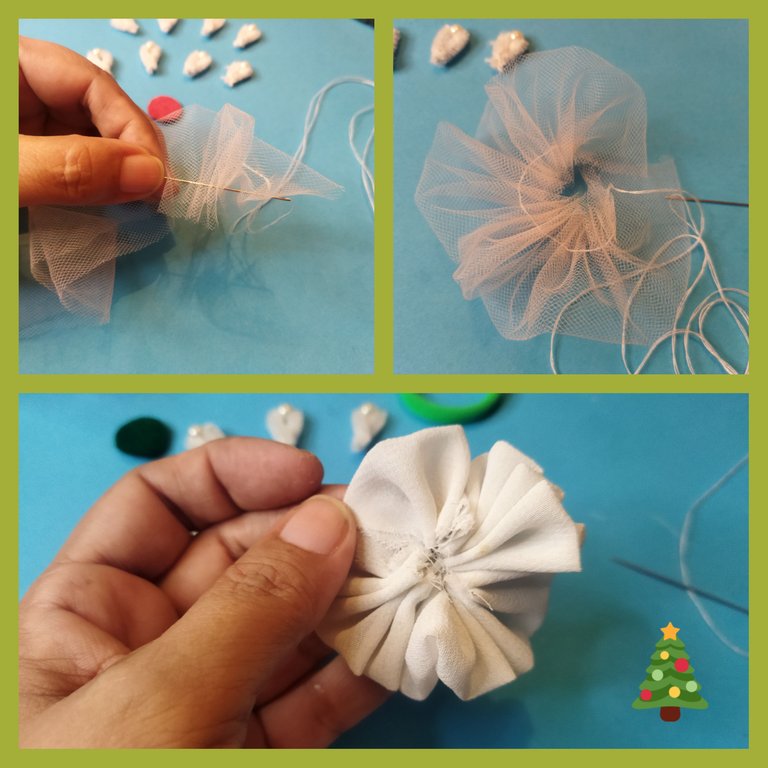
💚 Tomamos dos trozos de tela reciclada y formamos dos ruches circulares. Estas telas deben medir 50 cm de largo por 8 de ancho. Se doblan a la mitad a lo largo y se les pasa la costura para hacer el ruche. El tamaño también dependerá del que elijas para la flor de chenil.
💚 También con tela reciclada vamos a cortar dos círculos preferiblemente que la tela sea del color de la colita que vas a usar. También debes tener dos círculos del color de las telas de ruche.
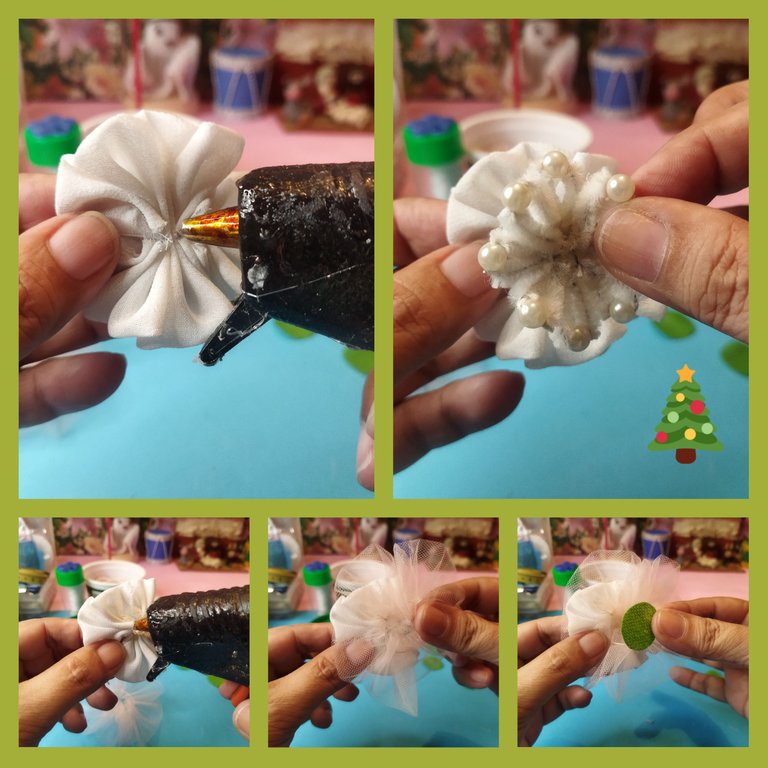
💚 En el círculo de color blanco vamos a pegar formando una flor, los ocho trocitos de chenil. Se empieza colocando los primeros cuatro en forma de cruz y luego se pegan los restantes entre los espacios vacíos.
💚 Luego de formar la flor la pegamos sobre uno de los ruches de tela. Después este ruche lo pegamos sobre el otro ruche que se verá mejor si usas tela de tol o parecida. Yo usé una que parece de mosquitero, no sé realmente el nombre.
💚 Para finalizar esta parte del armado colocamos en la parte de atrás del último ruche un círculo de tela de color verde. Usando pegamento.
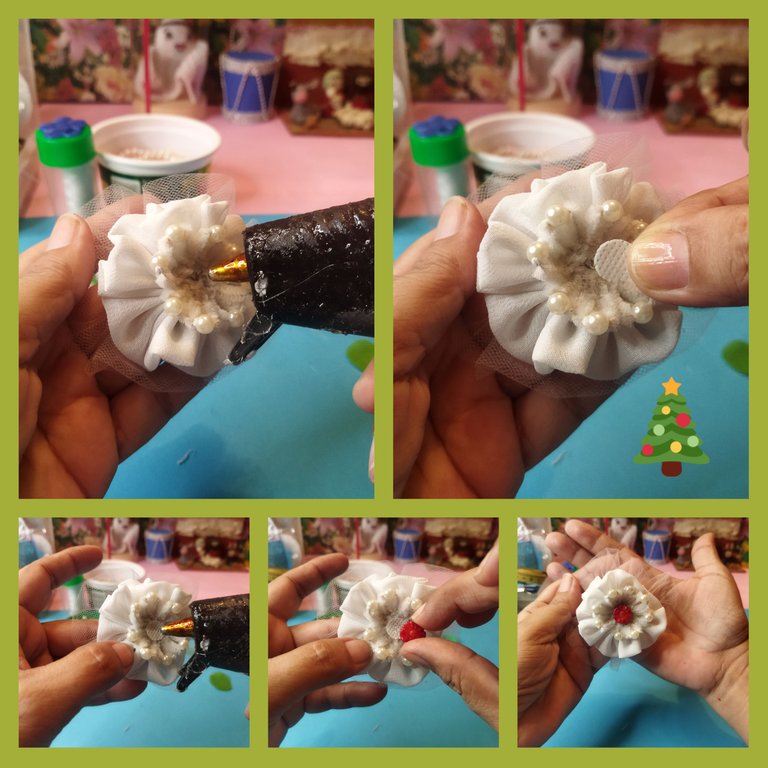
💚 Finalmente pegamos el otro círculo blanco en medio de la flor de chenil y sobre ella un adorno. Yo coloqué una flor roja, pero después la cambié por una perla envuelta con chenil.
💚 Corresponde montar la flor completa en la colita. Usando silicón pegamos la cola en la tela verde y después montamos el otro círculo verde sobre el primero que pegamos tapando también esa parte de la colita.
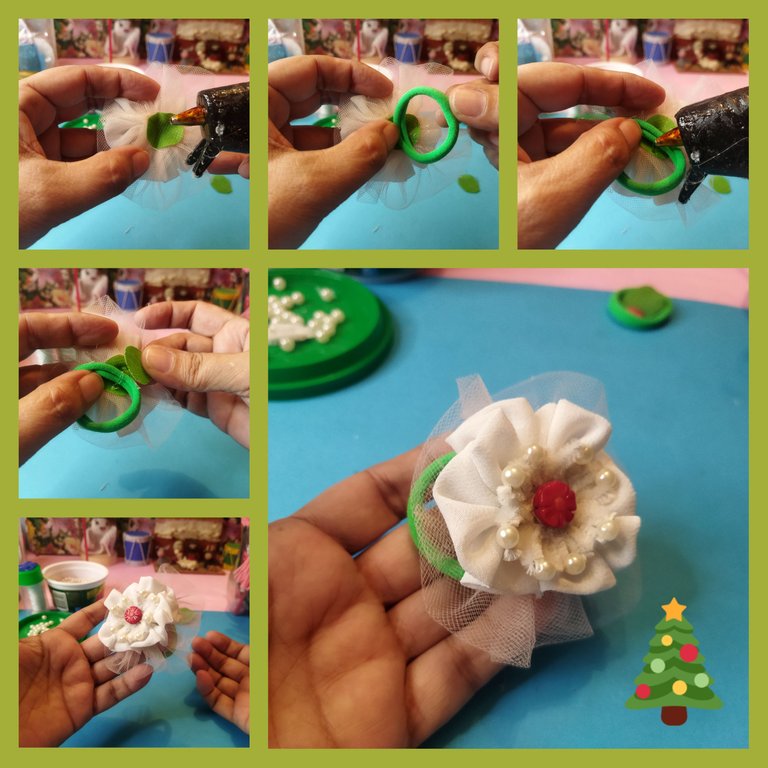
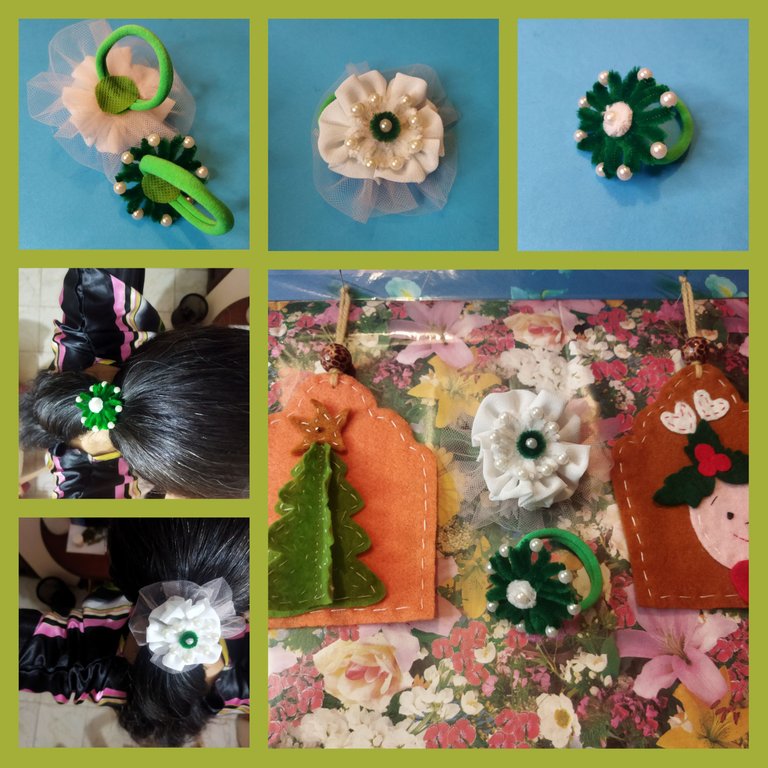
💚 Así se ve mi nueva cola. Pronto la estrenaré.
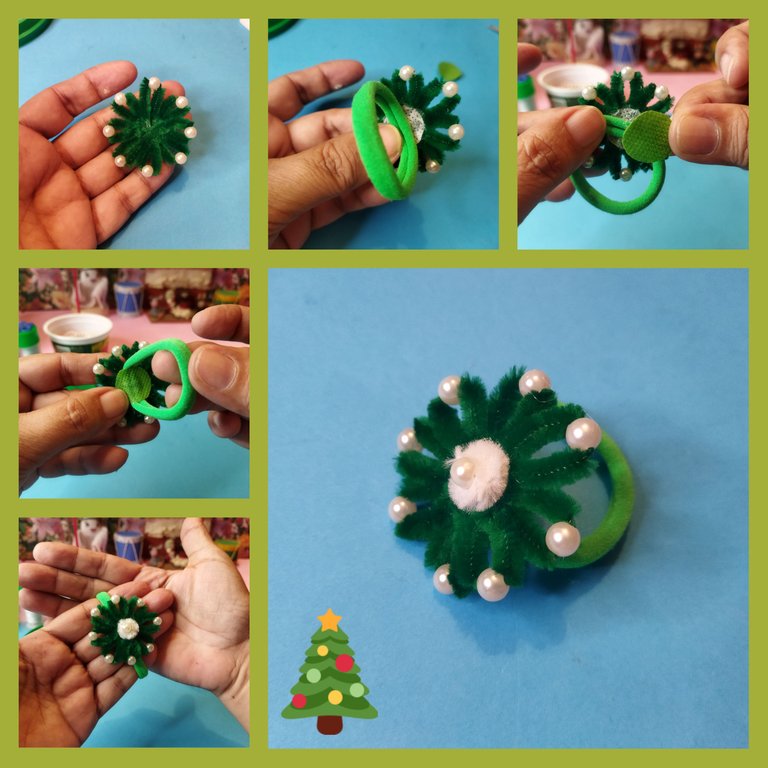
💚 El segundo modelo es más sencillo. Solo cortaremos los ocho trocitos de chenil y formaremos la flor. Esta vez en color verde. Seguimos los mismos pasos que en la anterior, pero no le colocaremos la tela ruchada. También se ve genial. Me encantó hacerla.
💚 Así se ve el segundo modelo. Ambas me gustan.
🎄 Son modelos muy bonitos que podemos usar en estos días de navidad. Combinando los chenil y las telas podremos hacer diseños hermosos. El adorno que coloqué en el centro de la flor se hace pasando el chenil por la perla y luego se envuelve en forma circular. No necesita pegamento en la punta.
💚🙋🎄 Espero que te haya gustado este proyecto y que te sea útil. Todas las fotos son de mi propiedad. Edité con Polish. Usé el traductor de DeepL. Mil gracias por tu apoyo. Bendiciones 🤗
English.
Hello my beautiful and dear friends. Today I am happy to show you two models of decorations for your ponytails or hair ties. Some time ago I started to use them because my mom sent me to buy several. I'm more of a clip-on kind of girl because I leave a lot of hair in my ponytails when I take them off.
These ponytails are special for me, they are made with a very soft elastic fabric, they stretch a lot and last a long time. Another detail of the tails is that we can wash them and they are also economical. Whenever I can I buy one or two packs, each pack has six tails, sometimes they come in pairs of colors, three of one color and three of another color and also usually come in different colors per pack. In my spare time when I want to make a quick craft I decorate them with pearls, I pack them and there I gather them in case someone wants to buy them.
I wanted to learn how to make other models. In these I bring you today I invested a little more time. They are made with scraps of recycled fabrics, chenil or pipe cleaners, number 4 beads. I used glue such as hot and cold silicone, scissors, sewing needle, white sewing thread.
Thank you so much for all the support you have given to my content. Today I'm super happy because I got the badge for my first four years of #hive tenure 💚 I'm really happy to be part of the most beautiful blockchain community among all.
💚 Making this model is simple. The first thing to do is to measure and cut eight small pieces of chenille of 4 cm each. The chenil or pipe cleaner I am using is the velvety one. If you don't know them, I will describe them to you, they are very thin wires, moldable, covered with very soft little hairs that feel like velvet when you touch them. They sell them in all colors.
💚 After cutting we are going to put the chenille through one of the beads number 4, centering it. Then we are going to bend and join the ends with glue. We should make in this way the eight little pieces of chenille.
💚 We take two pieces of recycled fabric and form two circular ruches. These fabrics should measure 50 cm long by 8 cm wide. They are folded in half lengthwise and stitched to make the ruche. The size will also depend on the size you choose for the chenille flower.
💚 Also with recycled fabric we are going to cut two circles preferably that the fabric is the color of the tail you are going to use. You should also have two circles of the color of the ruche fabrics.
In the white circle, we will glue the eight pieces of chenille in the shape of a flower. Start by placing the first four in the shape of a cross and then glue the remaining ones between the empty spaces.
💚 After forming the flower we glue it on one of the fabric ruches. Then this ruche we glue it on the other ruche which will look better if you use tol fabric or similar. I used one that looks like a mosquito net, I don't really know the name.
💚 To finish this part of the assembly we place on the back of the last ruche a circle of green fabric. Using glue.
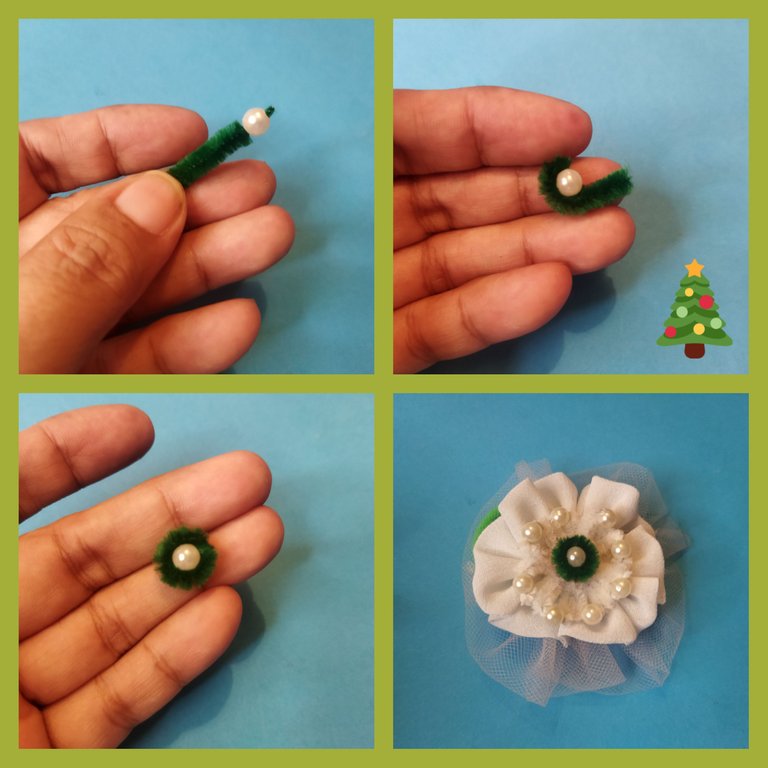
💚 Finally we glue the other white circle in the middle of the chenille flower and on it an ornament. I placed a red flower, but then changed it to a pearl wrapped with chenil.
💚 It's time to mount the whole flower on the tail. Using silicone we glue the tail on the green fabric and then mount the other green circle on top of the first one we glued covering also that part of the tail.
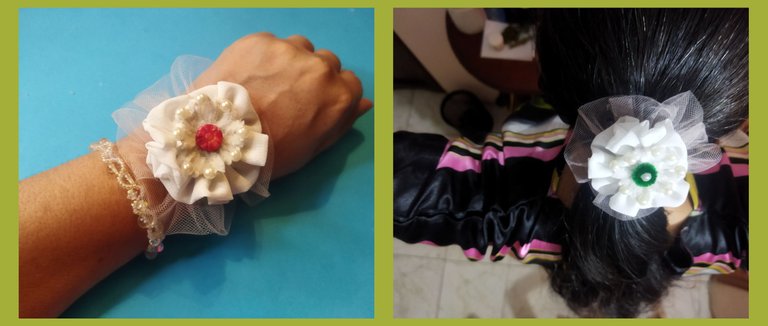
💚 This is what my new tail looks like. I'll be debuting it soon.
💚 The second model is simpler. We will just cut the eight little pieces of chenille and form the flower. This time in green color. We follow the same steps as in the previous one, but we won't put the ruched fabric on it. It also looks great. I loved making it.
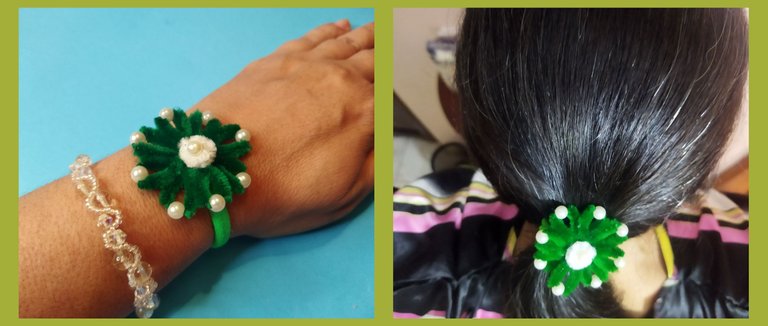
💚 This is what the second model looks like. I like both of them.
🎄 They are very nice models that we can wear in these Christmas days. Combining the chenille and fabrics we can make beautiful designs. The ornament I placed in the center of the flower is made by passing the chenille through the pearl and then wrapped in a circular shape. It does not need glue on the tip.
💚🙋🎄 I hope you liked this project and found it useful. All photos are my property. I edited with Polish. I used the translator from DeepL. Thousand thanks for your support. Blessings 🤗
https://twitter.com/131481196/status/1596117438525247488
The rewards earned on this comment will go directly to the people( @creacioneslelys ) sharing the post on Twitter as long as they are registered with @poshtoken. Sign up at https://hiveposh.com.
Muy bonito trabajo amiga @creacioneslelys , son muy versátiles se pueden usar también como pulseras ... Saludos
Hola. Creo que todas las hemos usado como pulseras alguna vez. Como dices son versátiles. Y fáciles de hacer amiga. Gracias por tu visita. Eres bienvenida 🥂
Congratulations, your post has been upvoted by @dsc-r2cornell, which is the curating account for @R2cornell's Discord Community.
Thanks you 🤗
Que bellas amiga, siempre sorprendes con algo diferente🌹🌷🍀💮💐🌼🌻🏵️🌺🌺🌷🌹🍀💮💐🌼🌻🏵️🌸🌺
Hola. Muchas gracias por tu apoyo 😉👆👏💙🐝
Hola amiga , quedaron bien bonitas , tuviste tremenda idea.
Hola. Me alegra que te gusten. Muchas gracias 🌷 por tu visita 🤗
Hola amiga, muy lindas y fáciles de hacer.
Gracias por compartir este bonito tutorial.
Saludos
A tí por apreciar esta creación. Me encantó hacerlas. Muchos saludos.
Honestamente, me encanta el proyecto que se usa principalmente para estacionamiento de cabello y solo mi hija pequeña puede tener uno.
Hola!
Gracias por pasar. Seguro que le quedaría linda a tu niña.
Bellas estas colas decoradas amiga, me gusta mucho la idea y este lindo paso a paso.
Que bueno!!!! Me alegro que te gusten. Son nuevos accesorios para embellecer el look de nuestros cabellos.
Están preciosas @creacioneslelys, haré varias para mi nieta pues le gusta mucho variar ese accesorio y a veces inventa cada cosa que para que te digo, de verdad están lindas saluditos.