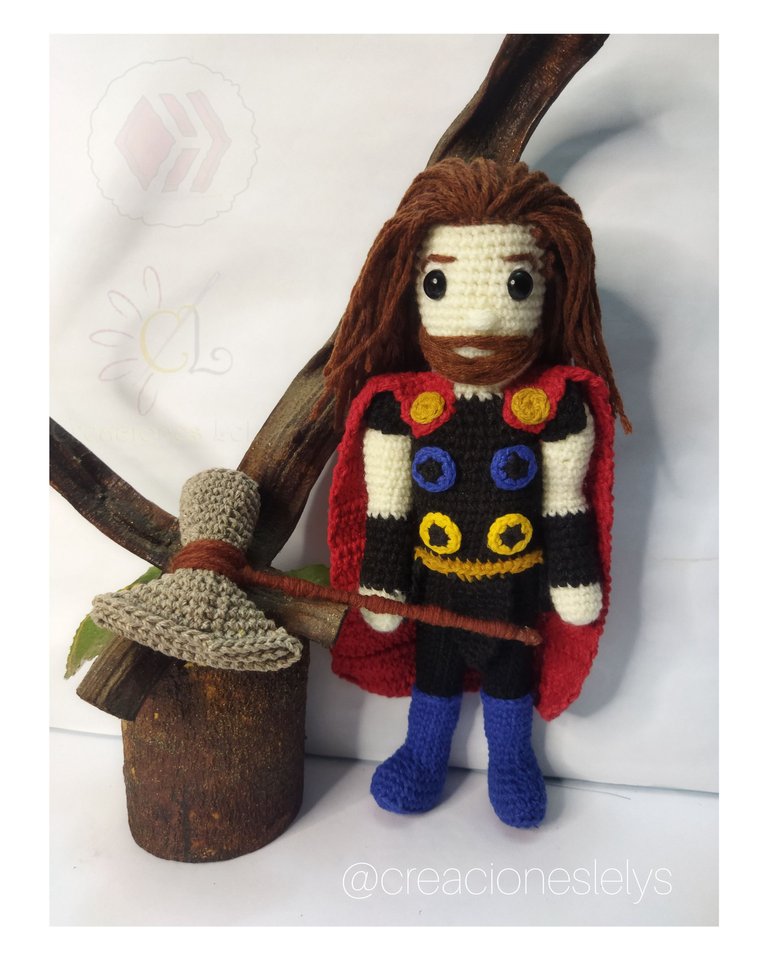
Tutorial: Thor Amigurumi y su Rompetormentas. ⚒️ Tutorial: Thor Amigurumi and his Stormbreaker.
Hola amigos 🌷 deseo que estén muy bien el día de hoy. Les envío un caluroso y afectivo abrazo. Ustedes son parte de mi día día, en cada una de mis creaciones están guardados muchos recuerdos, algunos de los comienzos o de mi llegada a #hive y otros que se visualizan para el futuro. Cuando planifico un proyecto es porque siento muchos deseos de hacerlo para ver el resultado, a veces creo que no soy capaz, pero hay ocasiones en los que me siento súper orgullosa de lo que he hecho, como en este caso porque me encanta como se ve el amigurumi de Thor.
Les prometo que les contaré en un próximo post cuáles fueron los motivos por los que elegí tejerlo. Ahora voy a presentarles el paso a paso ya que seguro querrán hacerlo. Este amigurumi pueden elaborarlo en dos o tres días, sin embargo si eres de las personas ansiosas y adelantas muchos de los oficios diarios quizás los hagas en 20 horas.
Hello friends 🌷 I hope you are very well today. I send you a warm and affectionate hug. You are part of my day to day, in each of my creations are stored many memories, some of the beginnings or my arrival to #hive and others that are visualized for the future. When I plan a project is because I feel a lot of desire to do it to see the result, sometimes I think I am not capable, but there are times when I feel super proud of what I have done, as in this case because I love how the Thor amigurumi looks like.
I promise I will tell you in a future post what were the reasons why I chose to knit it. Now I'm going to show you the step by step because I'm sure you'll want to do it. This amigurumi can be made in two or three days, however if you are an anxious person and you are ahead of many of the daily crafts you may be able to make it in 20 hours.
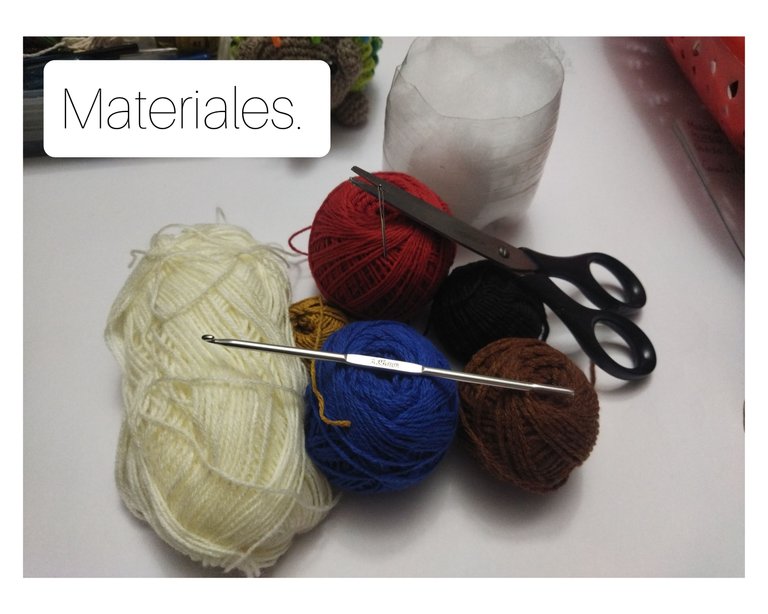
INDISPENSABLE MATERIALS TO ELABORATE A THOR. AMIGURUMI.
Para elaborar a Thor necesitamos tener a la mano hilos colores negro, azul rey, mostaza, blanco, rojo, beigs o color piel, marrón, algodón para rellenar, aguja de crochet de 2,5 mm, aguja lanera, tijeras, ojos de seguridad.
To make Thor, we need black, royal blue, mustard, white, red, beige or skin-colored yarn, brown, cotton for stuffing, 2.5 mm crochet needle, wool needle, scissors, safety eyes.
PROCEDURE TO ELABORATE THOR. AMIGURUMI.
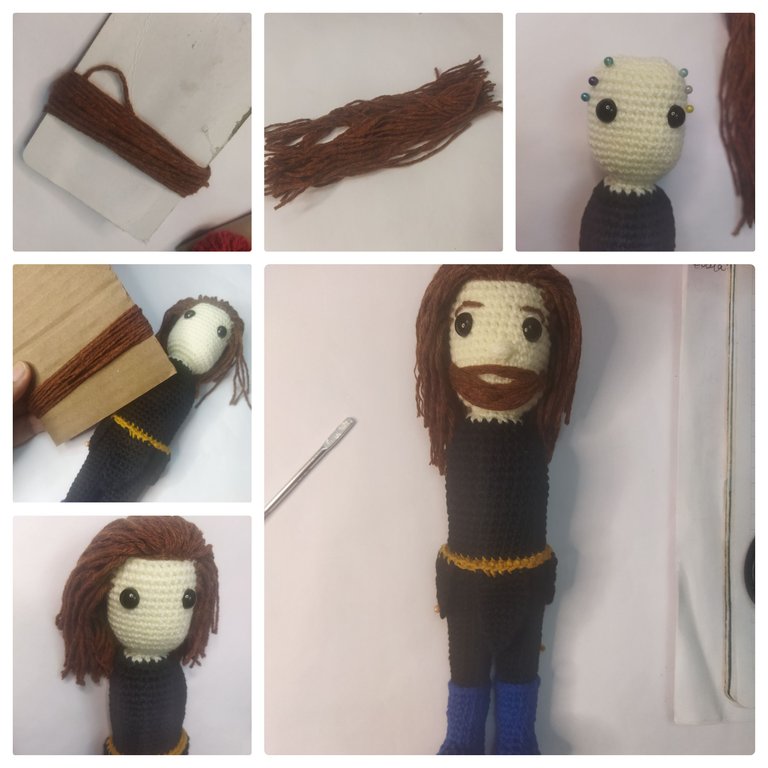
El proceso para la elaboración de este lindo amigurumi es bastante sencillo, me encantó tejerlo porque es el tipo de patrón que comienza por los pies y termina por la cabeza sin cortar la hebra. Así que podemos ir viendo la forma que va tomando a medida que va creciendo. Son 75 vueltas de tejido para completar los pies, piernas, cuerpo y cabeza.
The process for making this cute amigurumi is quite simple, I loved knitting it because it is the kind of pattern that starts at the feet and ends at the head without cutting the yarn. So we can see the shape it takes as it grows. There are 75 rounds of knitting to complete the feet, legs, body and head.
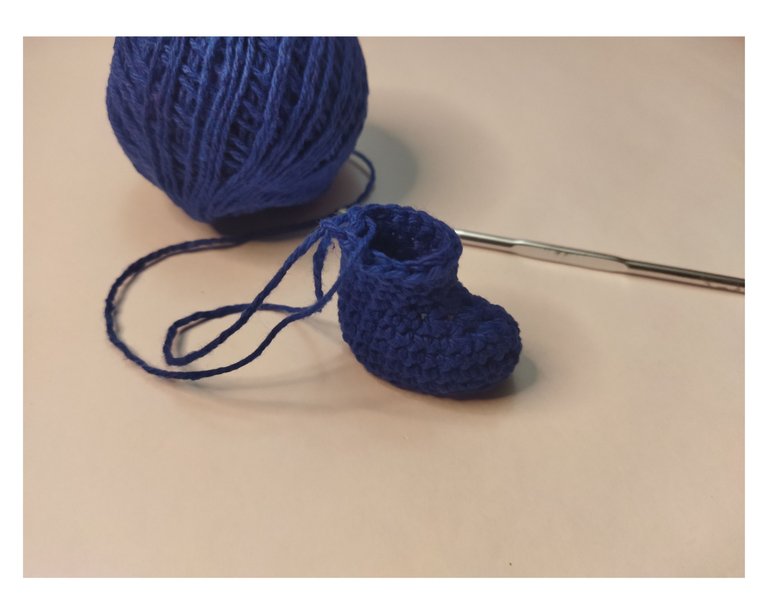
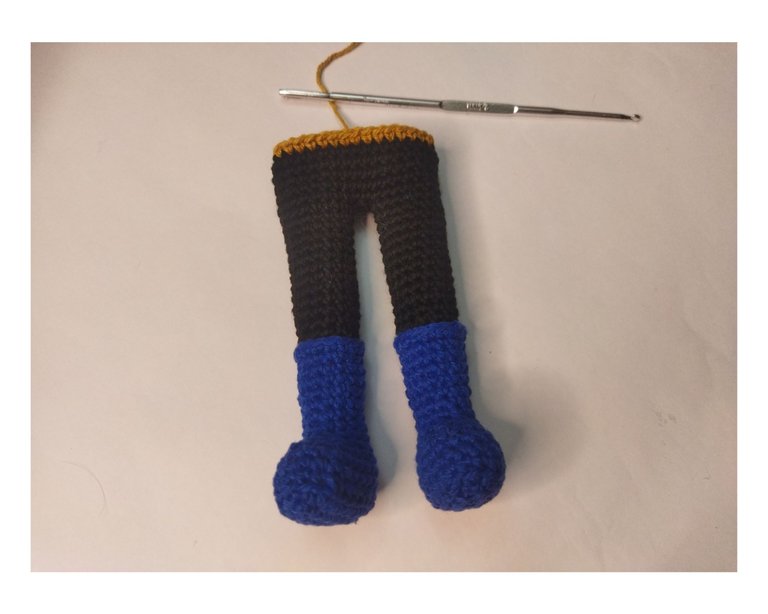
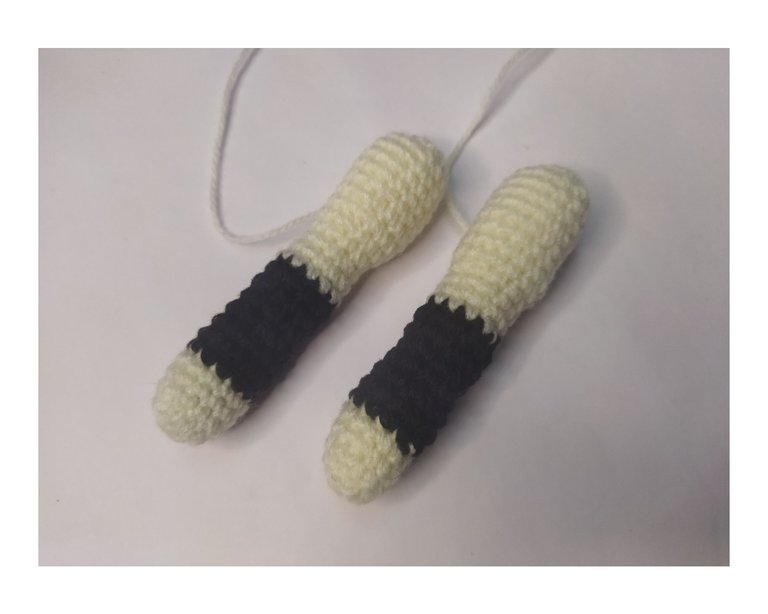
✍️ Empezamos tejiendo las botas en color azul rey.
1v: 8 cadenas.
2v: 6pb-3pbj-5pb-1aum.
3v: 1aum-5pb-3aum-5pb-2aum.
4v: 22pb solo por la hebra de atrás.
5-6v: 22pb.
7v: 7pb-4dism-7pb.
8v: 5pb-4dism-5pb.
9v: 5pb-2dism-5pb.
10-11v: 12pb.
12v: 3pb-1aum.
13-16v: 15pb.
17v: 15pb solo la hebra de adelante.
Cambiar a color negro.
1v: 8 strings.
2v: 6pb-3pbj-5pb-1aum.
3v: 1aum-5pb-3aum-5pb-2aum.
4v: 22bp only through the back strand.
5-6v: 22pb.
7v: 7pb-4dism-7pb.
8v: 5pb-4dism-5pb.
9v: 5pb-2dism-5pb.
10-11v: 12pb.
12v: 3pb-1aum.
13-16v: 15pb.
17v: 15pb just the front strand.
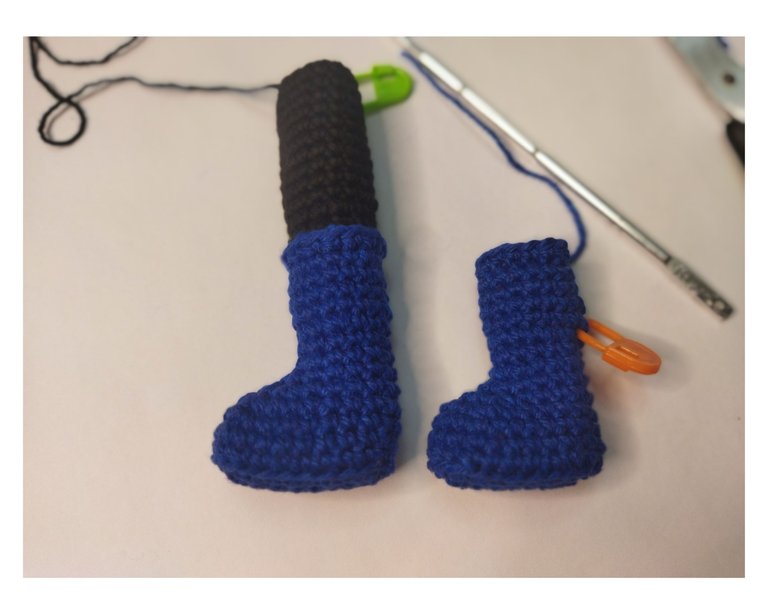
Change to black.
18v: 15pb tomando el bucle visible de la vuelta 17.
19v: 3pb-1dism.
20v: 3pb-1aum.
21-30v: 15pb.
Repetir el proceso para realizar otra igual. No cortar la hebra de una de las piernas.
18v: 15pb by picking up the visible loop of st 17.
19v: 3pb-1dism.
20v: 3pb-1aum.
21-30v: 15pb.
Repeat the process to make another one of the same yarn. Do not cut the strand of one of the legs.
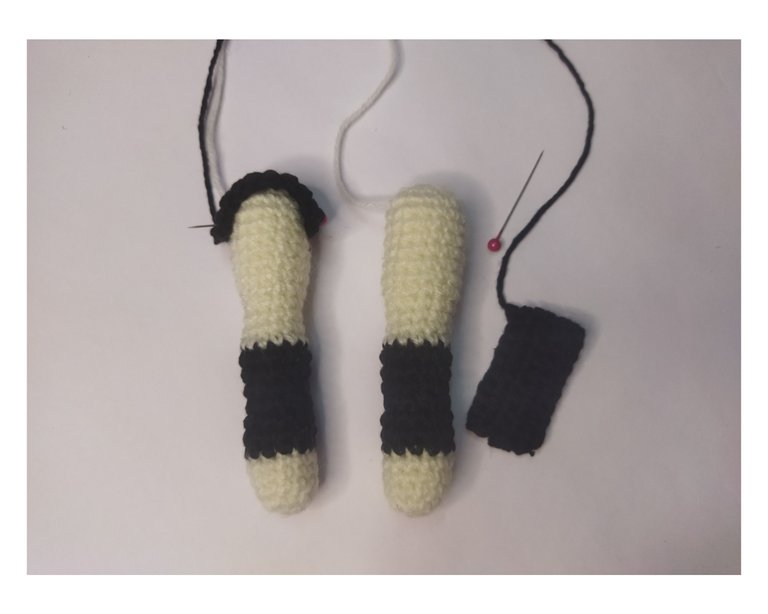
✍️ Unión de ambas piernas. Debemos ubicar el ganchillo en la parte de atrás hacia un lado de la pierna, luego tejer dos cadenas y tomar la otra pierna. Hacer 1pb para unirlas.
31v: 34pb.
32-36v: 34pb.
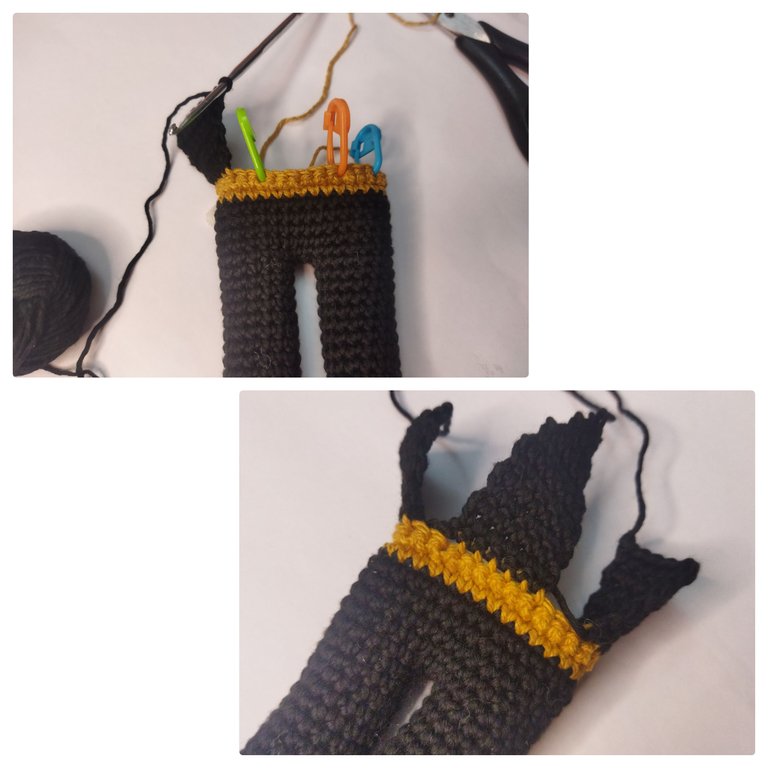
Cambiar a color mostaza.
37v: 7pb-1dism-16pb-1dism-7pb.
Para hacer el adorno de la cintura. Puedes cortar la hebra color mostaza y volver a engancharla o subes una cadena, giras el tejido, teje solo tomando la hebra de atrás.
✍️ Union of both legs. We must place the crochet hook in the back towards one side of the leg, then knit two chains and pick up the other leg. Make 1pb to join them together.
31v: 34bp.
32-36v: 34bp.
Change to mustard color.
37v: 7pb-1dism-1dism-16pb-1dism-7pb.
To make the waist trim. You can cut the mustard-colored strand and reattach it or bring up a chain, turn the weave, weave only taking the back strand.
✍️ Luego se marcan los puntos 7-12-15-20-22 y 27. En estos puntos tomando la hebra de atrás para empezar se tejen las solapas; una de cada lado y otra en el frente. En las laterales se teje en color negro desde el punto 7 marcado 6pb-1c-girar. Levantar hasta tener 7 vueltas. Cerrar y esconder la hebra. En la de enfrente se teje desde el punto 12. Se tejen siete vueltas de 6pb girando la labor. Después se hacen disminuciones hasta llegar a 1pb.
Then mark the stitches 7-12-15-20-22 and 27. On these stitches, taking the back yarn to begin with, knit the flaps; one on each side and one on the front. On the sides knit in black from stitch 7 marked 6pb-1c-turn. Pick up until you have 7 rows. Close and hide the yarn. Knit the front row from stitch 12. Knit seven rows of 6pb, turning. Then decrease until you reach 1pb.
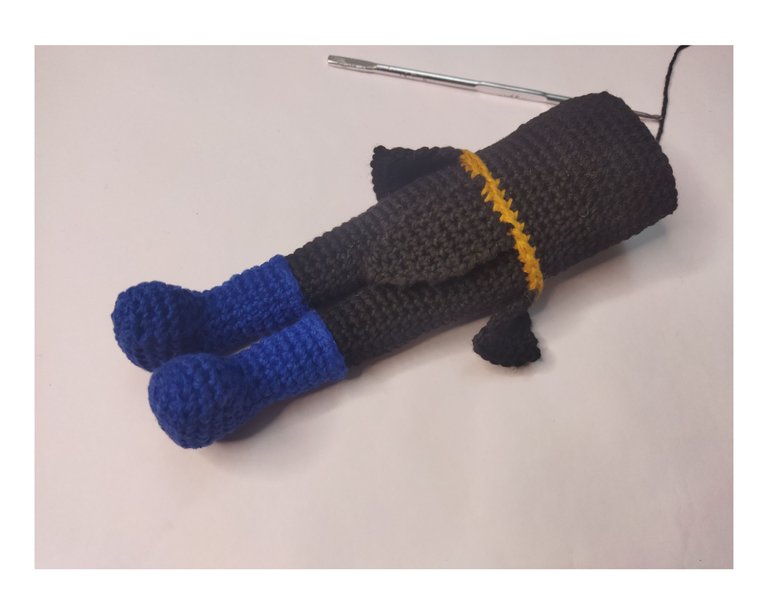
✍️ Tejer con hilo negro.
38v: 32pb por la hebra de atrás en la vuelta de color mostaza.
39-43v: 32pb.
44v: 8pb-1aum-14pb-1aum-8pb.
45-50v: 34pb.
51v: 7pb-2dism-13pb-2dism-6pb.
52v: 3pb-1dism.
53v: 2pb-1dism.
Cambiar a color piel o beigs.
✍️ Knit with black yarn.
38v: 32bp through the back yarn in the mustard color loop.
39-43v: 32pb.
44v: 8pb-1aum-14pb-1aum-8pb.
45-50v: 34pb.
51v: 7pb-2dism-13pb-2dism-6pb.
52v: 3pb-1dism.
53v: 2pb-1dism.
Change to skin color or beig.
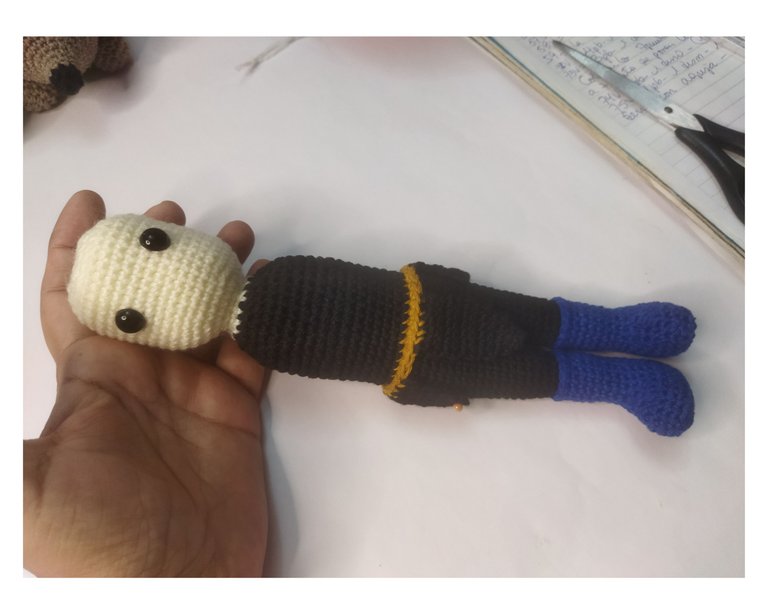
✍️ Se teje la cabeza.
54v: 1pb-1dism.
55v: 12pb.
56v: 12aum.
57v: 3pb-1aum.
58v: 4pb-1aum.
59-71v: 36pb.
72v: 4pb-1dism.
73v: 3pb-1dism.
A esta altura se colocan los ojos.
74v: 2pb-1dism.
Rellenar.
75v: 1pb-1dism.
Cerrar con aguja y esconder la hebra.
✍️ Head is knitted.
54v: 1pb-1dism.
55v: 12pb.
56v: 12aum.
57v: 3pb-1aum.
58v: 4pb-1aum.
59-71v: 36pb.
72v: 4pb-1dism.
73v: 3pb-1dism.
At this height the eyes are placed.
74v: 2pb-1dism.
Fill.
75v: 1pb-1dism.
Close with needle and hide the yarn.

SE DEBE IR RELLENANDO TODO EL CUERPO A MEDIDA QUE SE VA TEJIENDO.
THE WHOLE BODY SHOULD BE FILLED IN AS IT IS BEING KNITTED.
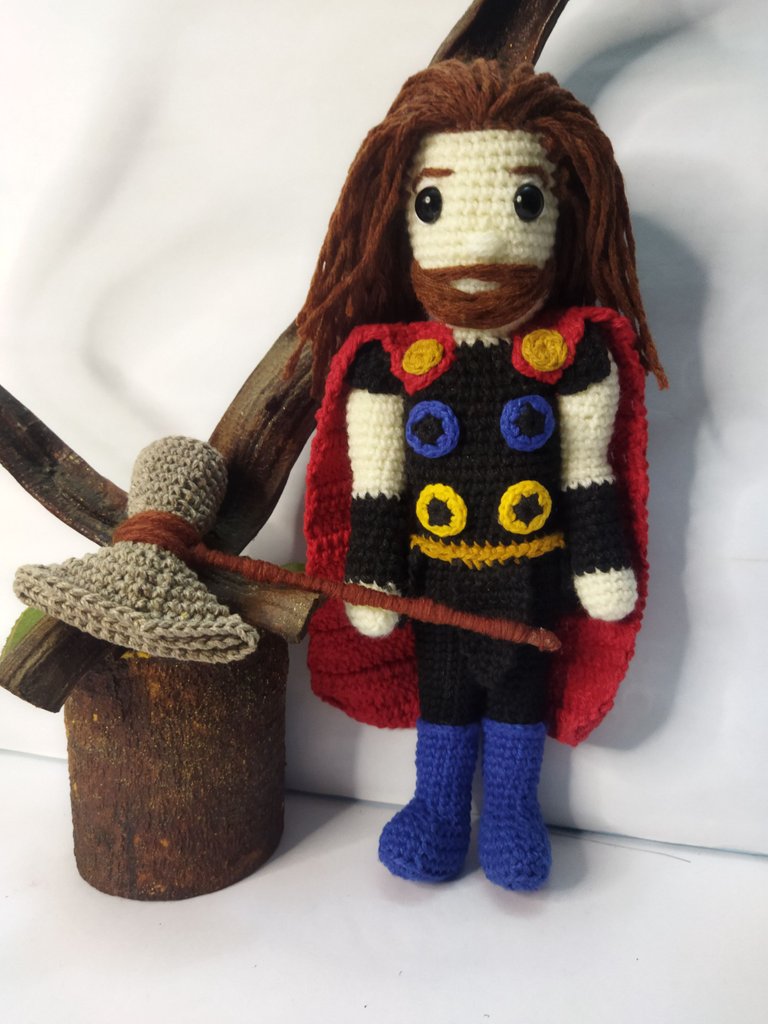
✍️ Ahora podemos adelantar los rasgos del Thor. Empezamos colocando el cabello. Con el hilo marrón cortaremos muchas hebras de más o menos 12 cm cada una. Estas las distribuiremos por la parte de arriba de la cabeza y por los laterales de enfrente para dar la forma que puedes ver en la fotografía. Además bordaremos las cejas, barba y bigote. Alrededor de cada ojo bordamos con hilo blanco. Con hilo beigs bordamos para hacer la nariz.
✍️ Now we can advance the Thor's features. We start by placing the hair. With the brown thread we will cut many strands of about 12 cm each. These we will distribute them on the top of the head and on the front sides to give the shape you can see in the picture. We will also embroider the eyebrows, beard and mustache. Around each eye we embroider with white thread. With beige thread we embroider to make the nose.
✍️ Empecemos a tejer los brazos.
1v: 6pb en am.
2v: 6aum de pb.
3-5v: 12pb.
Cambiar a color negro.
6-8v: 12pb
9v: 2pb-1dism.
10v: 2p-1aum.
11-12v: 12pb.
Cambiar a color beigs o piel.
13-14v: 12pb.
15v: 4pb-1dism.
16v: 4pb-1aum.
17v: 3pb-1aum.
18-23v: 15pb.
24v: 3pb-1dism.
25v: 2pb-1dism.
Rellenar. Cerrar con aguja.
✍️ Let's start knitting the arms.
1v: 6pb in am.
2v: 6aum of bp.
3-5v: 12bp.
Change to black.
6-8v: 12pb
9v: 2pb-1dism.
10v: 2p-1aum.
11-12v: 12pb.
Change to beig or skin color.
13-14v: 12pb.
15v: 4pb-1dism.
16v: 4pb-1aum.
17v: 3pb-1aum.
18-23v: 15pb.
24v: 3pb-1dism.
25v: 2pb-1dism.
Fill. Close with needle.
✍️ Sobrehombro color negro.
1v: 16 cadenas.
2-4v: 15pb.
Black over-shoulder.
1v: 16 chains.
Vamos a sostener con alfileres los brazos procurando que queden derechos para no estropear sus músculos. Igualmente los sobrehombros. Esto para asegurarnos de que queden bien posicionados antes de comenzar a coser. También será más cómodo tomar la medida para la capa.
We are going to hold the arms with pins, making sure that they are straight so as not to damage their muscles. The same goes for the over-shoulders. This is to make sure that they are well positioned before starting to sew. It will also be more comfortable to take the measurement for the cape.
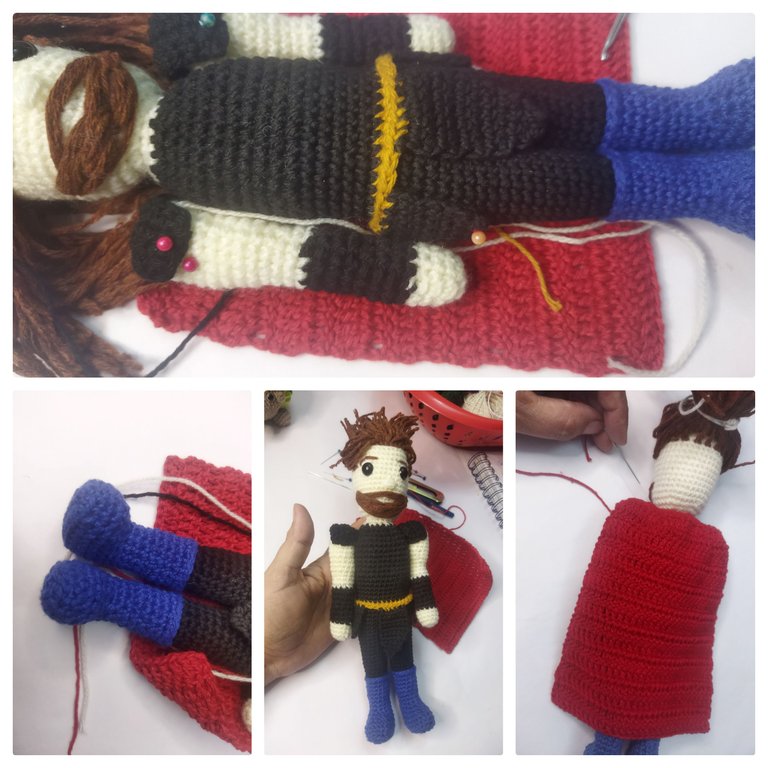
✍️ Tejeremos la capa.
1v: 22 cadenas.
2v: 3pa-1aum.
3v: 2c-4pa-1aum.
4-18v: 30pa.
Cerrar y rematar.
En la cadena de inicio tejer:
1v: 2pb-1dism- por toda la vuelta-girar
2v: 5pb-2c-girar
3v: 5pb-2c-girar
4v: 5pb-2c-girar
5v: 1dism-4pb.
6v: 1dism-3pb.
En la otra esquina del inicio debemos tejer igual desde la 2v.
✍️ We will knit the cape.
1v: 22 chains.
2v: 3pa-1aum.
3v: 2c-4pa-1aum.
4-18v: 30pa.
Close and finish off.
In the beginning chain knit:
1v: 2pb-1dism- all the way around-turn.
2v: 5pb-2c-twist
3v: 5pb-2c-turn
4v: 5pb-2c-turn
5v: 1dism-4pb.
6v: 1dism-3pb.
In the other corner of the beginning we must knit the same from the 2v.

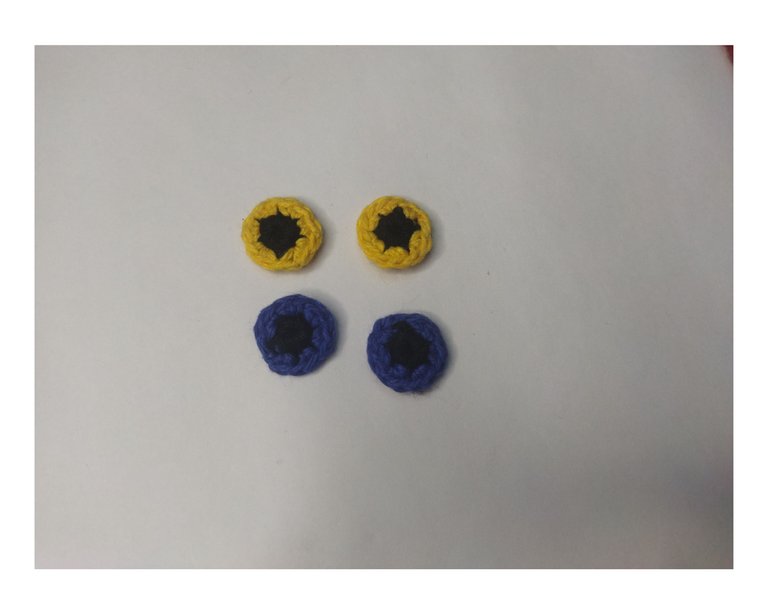
✍️ Adicional tejeremos algunos botoncitos para colocar en el traje.
1v: 6pb.
2v: 6aum de pb.
Additional we will knit some little buttons to put on the suit.
1v: 6pb.
2v: 6aum of bp.
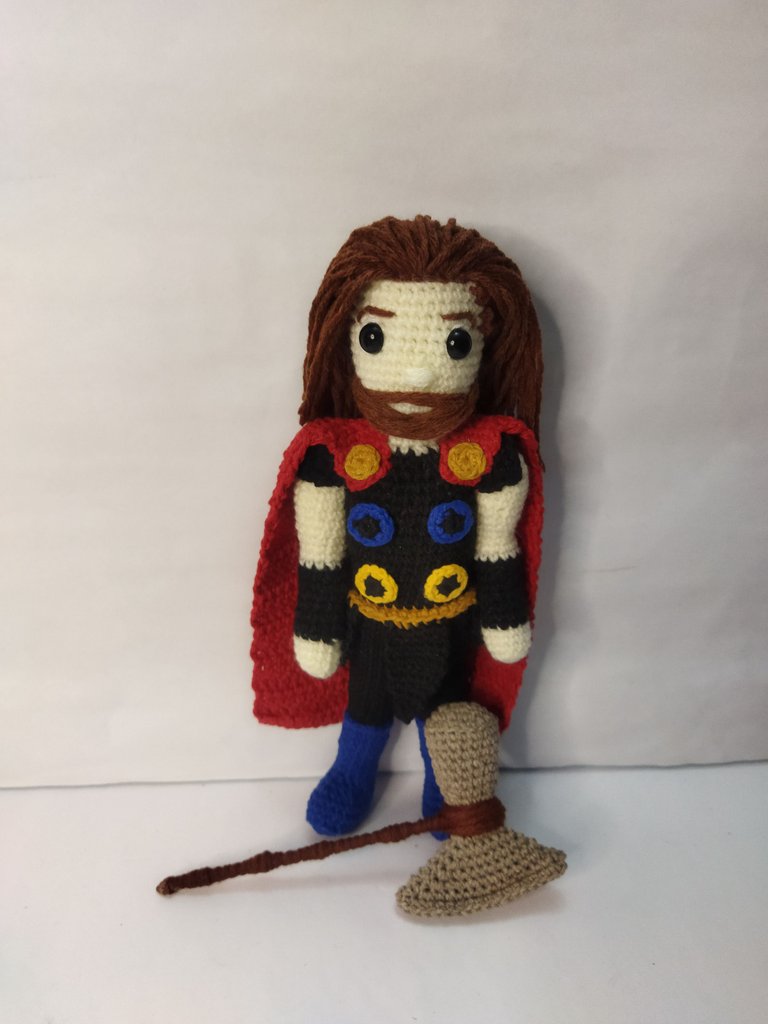
Entonces así completamos todo el atuendo de este personaje. Solo debemos coser cada pieza al cuerpo. Como pueden apreciar es un diseño sencillo, solo que amerita de dedicación y unas cuantas horas de tiempo para elaborarlo. Estoy contenta con el resultado. Pero para hacerlo aún más llamativo también le hice su Rompetormentas. Veamos.
✍️ Herramienta Rompetormentas de Thor.
1v: 8pb en am.
2v: 1pb-1aum.
3v: 2pb-1aum.
4v: 3pb-1aum.
5v: 20pb solo por la hebra de atrás.
6-7v: 20pb.
8v: 3pb-1dism.
9-11v: 16pb.
12v: 1dism-2pb.
13v: 12pb.
Rellenar un poco.
14v: 1dism-1pb.
15v: 1aum-1pb solo por la hebra de adelante.
16v: (1pb-1aum)×2-3pb-1aum-1pb-1aum-2pb.
17v: (1pb-1aum)×2-5pb-1aum-1pb-1aum-3pb.
18v: (1pb-1aum)×2-7pb-1aum-1pb-1aum-4pb.
19v: (1pb-1aum)×2-9pb-1aum-1pb-1aum-5pb.
20v: (1pb-1aum)×2-11pb-1aum-1pb-1aum-6pb.
21v: (1pb-1aum)×2-13pb-1aum-1pb-1aum-7pb.
22v: 7pb-1aum-1pb-1aum-15pb. Rellenar un poquito.
Para la unión se mete el gancho por la hebra de adentro de la vuelta anterior. En el primer punto se hace 1aum de pb, luego de tejen 19pb hasta unir totalmente el rompetormentas.
Then we complete the whole outfit of this character. We just have to sew each piece to the body. As you can see it is a simple design, but it requires dedication and a few hours of time to make it. I am happy with the result. But to make it even more eye-catching I also made her Stormbreaker. Let's see.
✍️ Thor's Stormbreaker Tool.
1v: 8pb in am.
2v: 1pb-1aum.
3v: 2pb-1aum.
4v: 3pb-1aum.
5v: 20pb just through the back strand.
6-7v: 20pb.
8v: 3pb-1dism.
9-11v: 16pb.
12v: 1dism-2pb.
13v: 12pb.
Fill in a little.
14v: 1dism-1pb.
15v: 1aum-1pb only through the front strand.
16v: (1pb-1aum)×2-3pb-1aum-1pb-1aum-2pb.
17v: (1pb-1aum)×2-5pb-1aum-1pb-1aum-3pb.
18v: (1pb-1aum)×2-7pb-1aum-1pb-1aum-4pb.
19v: (1pb-1aum)×2-9pb-1aum-1pb-1aum-5pb.
20v: (1pb-1aum)×2-11pb-1aum-1pb-1aum-6pb.
21v: (1pb-1aum)×2-13pb-1aum-1pb-1aum-7pb.
22v: 7pb-1aum-1pb-1aum-15pb. Fill in a little.
To join, slip the hook through the inside loop of the previous row. In the first stitch, knit 1aum of bp, then knit 19 bp until the storm breaker is completely joined.
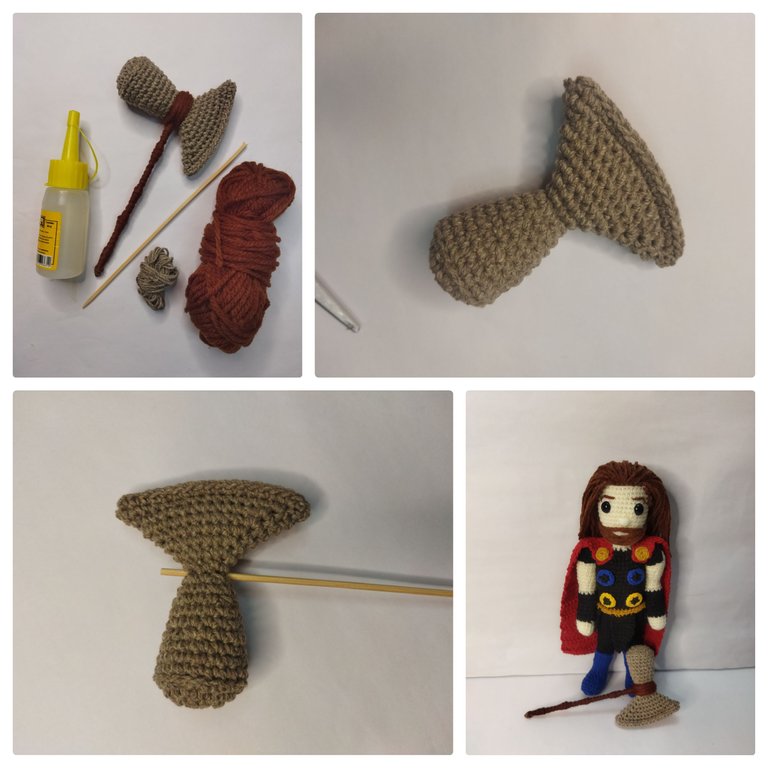
✍️ Para hacer el palo yo usé un palito de altura, con él atravesé el rompetormentas, previamente coloqué un poco de pegamento en ese espacio del palito. Después forré todo el palo con estambre color marrón.
To make the stick I used a tall stick, with it I went through the storm breaker, previously I put some glue in the space of the stick. Then I lined the whole stick with brown yarn.
Espero que les guste este proyecto y tal vez quieran hacerlo para regalar en estas fiestas. A mí me gusta para dar de Niño Jesús a mis sobrinos, pero tengo dos. Tal vez me anime a tejer a Luki. Todas las fotos son de mi propiedad. Edité con Polish. Usé el traductor de DeepL. Muchas gracias por tu apoyo 😉. Hasta pronto.
I hope you like this project and you may want to make it as a gift for the holidays. I like it to give as a baby Jesus to my nephews, but I have two. Maybe I will knit Luki. All photos are my property. I edited with Polish. I used the translator from DeepL. Thank you very much for your support 😉. See you soon.
https://twitter.com/131481196/status/1600228040218333184
The rewards earned on this comment will go directly to the people( @creacioneslelys ) sharing the post on Twitter as long as they are registered with @poshtoken. Sign up at https://hiveposh.com.
Hey! ¡Que genial! Creo que es de mis favoritos de todos los que nos has mostrado 😍 ¡Me encantó!
Hola. Gracias. Es muy lindo este personaje.
Thank you for sharing this post in the DIYHUB Community!
Your content got selected by our fellow curator desro & you just received a little thank you upvote from us for your great work! Your post will be featured in one of our recurring compilations which are aiming to offer you a stage to widen your audience within the DIY scene of Hive. Stay creative & HIVE ON!
Please vote for our hive witness <3
Thank you 🤗
Muchas gracias por su constante apoyo. ✅❤️😉✍️🙋😁🤗🙏☺️👏
QUEEEE 😱😱 ESTO ESTÁ ESPECTACULAR 😍😍 yo soy fan de los amigurumi, y de los superheroes de marvel, te quedo genial, y estoy consciente de la dedicación que hay que tener para hacerlos, cuando aprendí a tejer hice unos amigurumi pero super básicos y unicolores, fue cuando realmente aprendí a admirar realmente a las personas que hacen esto con tanto detalle y dedicación como este que hiciste, te super felicito tienes magia en tus manos sigue así esta hermoso 😍😍
Hola amiga. Me alegro que te guste y sepas apreciarlo. También me gusta que ya estés tejiendo AMIGURUMIS, sabes .uy buen lo que se siente mientras tejemos. Muchas gracias por tu apoyo 😉
Congratulations @creacioneslelys! You have completed the following achievement on the Hive blockchain And have been rewarded with New badge(s)
Your next target is to reach 13000 upvotes.
You can view your badges on your board and compare yourself to others in the Ranking
If you no longer want to receive notifications, reply to this comment with the word
STOPTo support your work, I also upvoted your post!
Check out the last post from @hivebuzz:
Support the HiveBuzz project. Vote for our proposal!
Que fabuloso!!!! Te quedo genial @creacioneslelys, todos los detalles super bonitos, te felicito!!❤️
Hola. Agradezco tus visitas. Disfruté mucho hacerlo. Tiene varios detalles, pero todos muy sencillos. 🤗
Pero que hermosooo!!! Me encantó. Los detalles diminutos te quedaron hermosos. Que bello trabajo.
Me mató de risa lo de si eres una persona ansiosa lo terminas en 20 horas 😅... Te comprendo me pasa seguido con mis proyectos.
🎆🎇🎉🎊🌧️💐✨🌾🌱🌹🌙🌿🍃🥀⚡🌺☘️🍀🌈🌷⭐🪴🌵🌸🌟💮🌴🌳💫☀️💮☔🌲🌳🌍🌌🌠☄️🏵️🐝🌻🌼🍄🐞🦋💙☕💜🍍🎆🎇🎉🎊🎆🎇🎉🎊🌧️💐✨🌾🌱🌹🌙🌿🍃🥀⚡🌺☘️🍀🌈🌷⭐🪴🌵🌸🌟💮🌴🌳💫☀️💮☔🌲🌳🌍🌌🌠☄️🏵️🐝🌻🌼🍄🐞🦋💙☕💜🍍🎆🎇🎉🎊
!PIZZA
Hola. No sabes lo que me cuesta posponer los proyectos, pero me ha tocado muchas veces por diferentes razones. Me alegra que te haya gustado este señor Thor ⚒️ 😁🙋☺️👏😉🤗
Ojalá y te animes con Luki 💜.
Lo estoy estudiando. Espero poder hacerlo pronto.
Es una ardía labor. Me encantan los amigurumis, de hecho he estado practicando con unos pequeños para ir agarrando experiencia porque quiero obsequiarle uno a mi cuñada pero hecho con mis manitos. Cada vez que veo los tuyos quisiera ya tener la experiencia y por supuesto los materiales para hacerlos pero todavía no me atrevo. Este Thor quedó genial, para los amantes de los súper héroes querrán tenerlos en sus colecciones. Saludos.
Hola. 🙋🤗😉👆 Gracias hermana. Estoy segura que te quedará muy bien tejido y bello ese regalo que harás para tu cuñada. Todo a su tiempo, los amigurumis llaman al artesano, ya lo verás, un día te pondrás y lo harás súper bellísimo.
Dear @creacioneslelys,
May I ask you to review and support the new HiveSQL Proposal so we can keep it free to use for the community?
You can do it on Peakd, ecency, Hive.blog or using HiveSigner
Thank you!
Congratulations, your post has been upvoted by @dsc-r2cornell, which is the curating account for @R2cornell's Discord Community.
Enhorabuena, su "post" ha sido "up-voted" por @dsc-r2cornell, que es la "cuenta curating" de la Comunidad de la Discordia de @R2cornell.
Thanks you ☺️