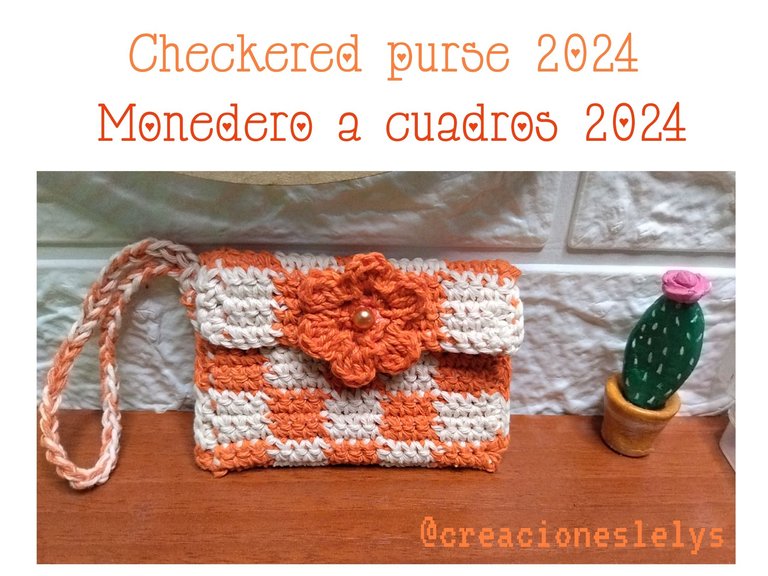
WALLET 2024 ❤️ TAPESTRY technique. 👛 [ESP-ENG]
Hola amigos 😀 espero que estén súper bien hoy y que estén pasando un excelente fin de semana. Yo por mi parte tenía planificada una salida, pero lamentablemente no se pudo ejecutar 😏 así que tomé mis hilos y mi aguja y empecé a tejer. Al principio no tenía ni idea de lo que haría, luego me fui acordando de otros proyectos y técnicas que no he realizado últimamente y me decidí por elaborar este bello MONEDERO empleando la técnica TAPESTRY, es una de las técnicas que más me gusta del crochet. Como podrán ver más adelante es un proceso de tejido minucioso y de concentración. Requiere de cierta habilidad con el manejo de los hilos ya que tejemos con dos o más hebras al mismo tiempo. También necesitamos más cantidad de hilo del acostumbrado porque para lograr el diseño debemos llevarnos todas las hebras de hilos (diferentes colores) por cada punto que tejemos.
Hi friends 😀 I hope you are super well today and having a great weekend. I for one had an outing planned, but unfortunately it couldn't be executed 😏 so I grabbed my yarns and needle and started knitting. At first I had no idea what I would do, then I remembered other projects and techniques that I haven't done lately and I decided to make this beautiful COIN PURSE using the TAPESTRY technique, it is one of the techniques I like the most in crochet. As you can see below, it is a process of meticulous knitting and concentration. It requires some skill with the handling of the yarns since we knit with two or more strands at the same time. We also need more yarn than usual because to achieve the design we must take all the strands of yarn (different colors) for each stitch we knit.

MONEDERO 2024 ❤️ técnica TAPESTRY.
WALLET 2024 ❤️ TAPESTRY technique.
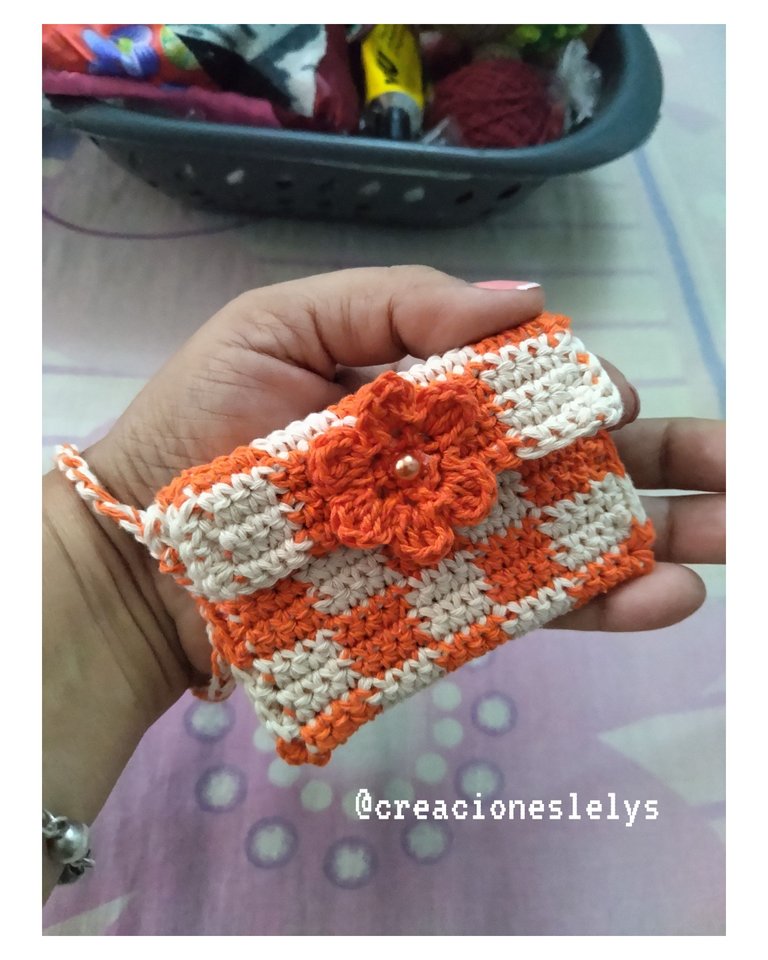
A mí me gusta llevar mi tarjeta de débito o crédito siempre bien protegida, sea en la mano, en el bolso o en el bolsillo de algún pantalón. Son instrumentos eléctricos que debemos cuidar porque aquí en el país solicitar una nueva, por daño o perdida es bastante difícil, la mayoría de las veces los bancos no cuentan con material para reponerlas. Es por ello que tengo varios tarjeteros, por supuesto 🙂 casi todos tejidos.
I like to carry my debit or credit card always well protected, either in my hand, in my purse or in a pants pocket. They are electrical instruments that we must take care of because here in the country requesting a new one, due to damage or loss is quite difficult, most of the time banks do not have the material to replace them. That is why I have several cardholders, of course 🙂 almost all of them woven.
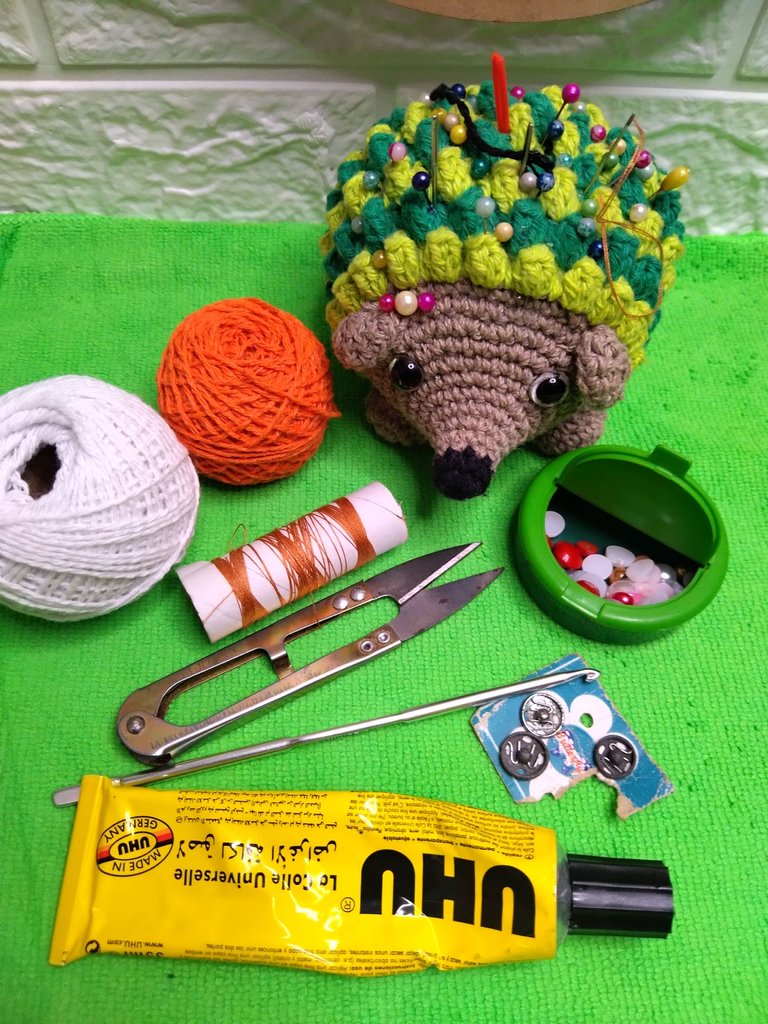
MATERIALES UTILIZADOS.
USED MATERIALS.
- Hilos pabilos color anaranjado y blanco.
- Aguja de crochet de 2,5mm.
- Aguja lanera.
- Tijeras.
- Broche pequeño.
- Medias perlas.
- Adorno tejido.
- Pegamento.
- Tarjeta para ir tomando las medidas.
- Orange and white wick yarns.
- Crochet needle of 2,5mm.
- Wool needle.
- Scissors.
- Small brooch.
- Half pearls.
- Knitted ornament.
- Glue.
- Card to take the measurements.
PROCEDIMIENTO.
PROCEDURE.
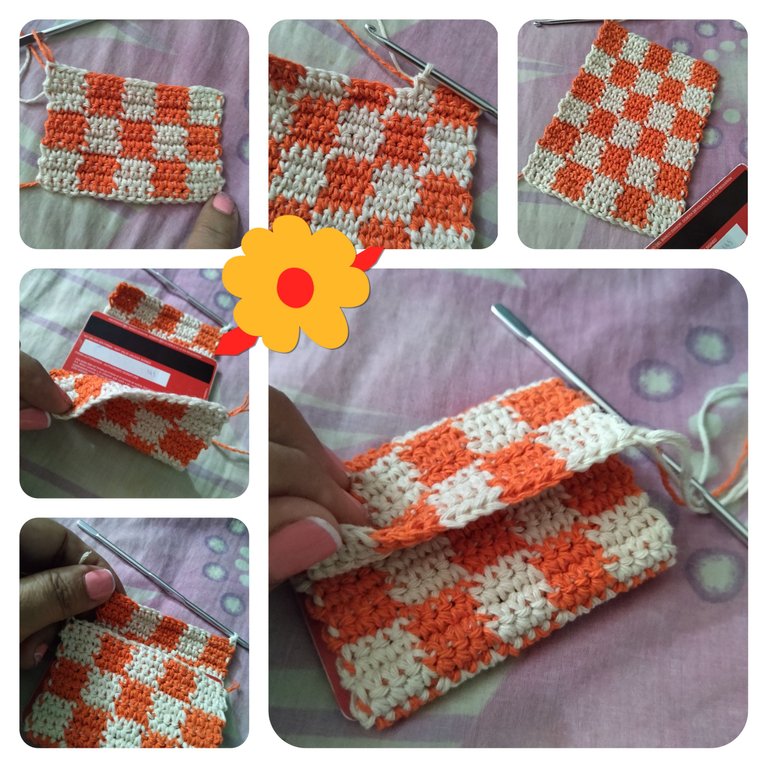
- Empezamos este proyecto tomando el hilo color blanco. Tejemos una cadena de 20 puntos (múltiplos de 4) más una cadena adicional.
- Tomamos el hilo color anaranjado y lo montamos sobre el punto que vamos a tejer. Hacemos allí el primer punto bajo sujetando el hilo color anaranjado el cual lo llevaremos siempre por sobre el tejido ya realizado.
- Haremos la primera línea del diseño: 4pb (puntos bajos) cerrando el cuarto punto con el hilo anaranjado.
- Tejemos 4pb con el hilo color anaranjado, llevándonos el hilo color blanco por sobre los puntos que vamos tejiendo. Cerramos el cuarto punto con la hebra color blanco.
- Este proceso lo vamos a repetir hasta finalizar la vuelta. Debemos terminar viendo tres dibujos en color blanco y dos en color anaranjado.
- Enseguida giramos el tejido, siempre tomando los dos colores de hilos, levantamos una cadena con el color blanco y repetimos dos veces más estos mismos pasos.
🪡 Finalizadas las 4 primeras vueltas, empezaremos a tejer del mismo modo, mismo patrón, pero invirtiendo los colores al iniciar. - Tejeremos cuatros vueltas iguales para cada diseño. Como pueden ver el diseño es tipo tablero de ajedrez.
- We start this project by taking the white yarn. We knit a chain of 20 stitches (multiples of 4) plus an additional chain.
- We take the orange yarn and mount it on the stitch we are going to knit. We make there the first low stitch holding the orange yarn which we will always carry it over the already knitted stitch.
- We will knit the first row of the design: 4 stitches (single crochet) closing the fourth stitch with the orange thread.
- We knit 4pb with the orange yarn, taking the white yarn over the stitches we are knitting. Close the fourth stitch with the white yarn.
- This process will be repeated until the end of the row. We should end up seeing three drawings in white color and two in orange color.
- Then we turn the fabric, always taking the two colors of yarns, we lift a chain with the white color and repeat these same steps two more times.
🪡 Once the first 4 rows are finished, we will start knitting in the same way, same pattern, but inverting the colors at the beginning.- We will knit four equal rows for each design. As you can see the design is a checkerboard pattern.
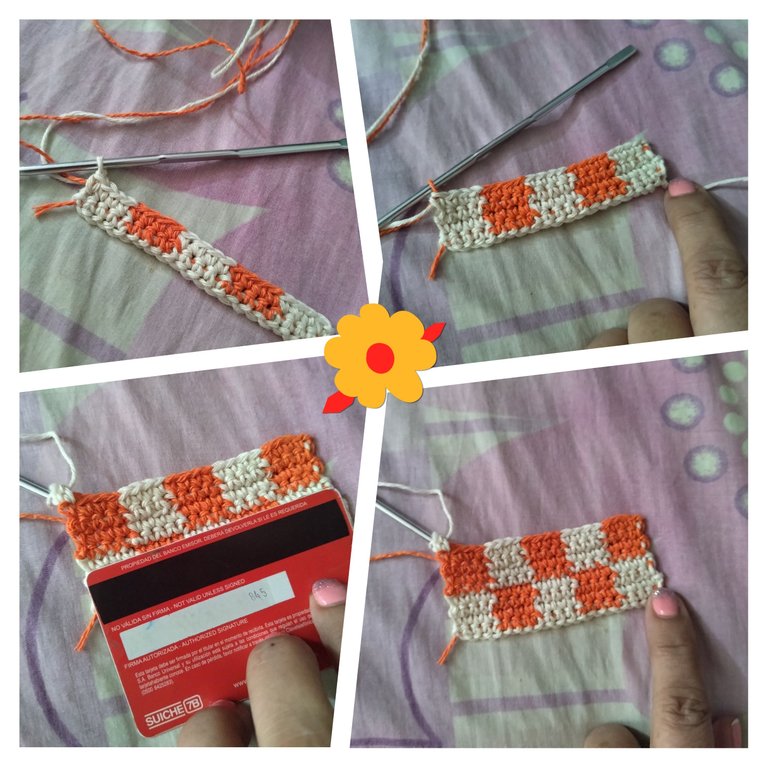
- Todo el proceso anterior lo vamos a repetir hasta lograr el tamaño adecuado de ancho y largo que necesitamos para guardar nuestra tarjeta. Siempre alternando el color de los hilos por cada cuatro vueltas de puntos bajos en tapestry.
- All the above process we are going to repeat it until we get the right size of width and length we need to keep our card. Always alternating the color of the yarns for every four rounds of low stitches in tapestry..
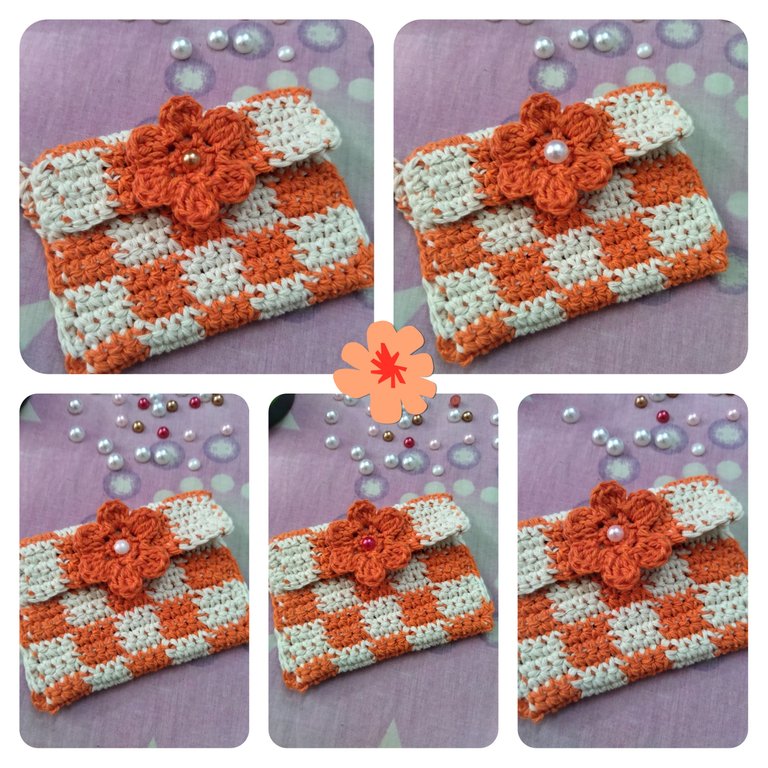
- Logrado el tamaño deseado definimos el tamaño que tendrá la solapa o pestaña de cierre del MONEDERO 👛. No cortamos las hebras.
- Once the desired size is achieved, we define the size that will have the flap or closing tab of the COIN PURSE 👛. We do not cut the threads.
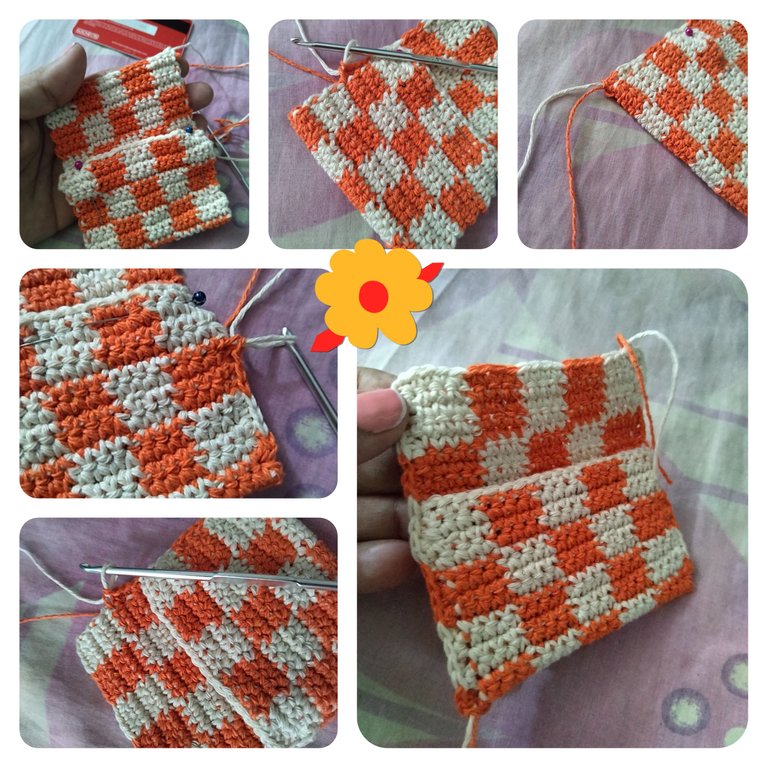
- Desde donde terminamos la última vuelta del diseño comenzaremos a realizar el borde y la unión para hacer el monedero en sí.
- En el punto de la esquina tejemos 2pb juntos, con el color de hilo que corresponda según el diseño y llevándonos el otro hilo por encima siempre.
- Al llegar a la parte del doblez (el cual sujetaremos con alfileres) haremos los pb tomando las dos tapas. De esta manera estaremos cosiendo para hacer el cuerpo del monedero. Al terminar la línea tejemos pd (punto deslizado) dejamos las hebras largas y cortamos.
- Para unir del otro lado repetimos el proceso, primero cosemos las dos tapas y luego tejemos los pb del borde hasta llegar al punto donde comenzamos. Allí tejemos 2pb-1pd y cerramos. Dejamos la hebra larga para que sea más fácil esconderlas.
- From where we finish the last row of the design we will begin to knit the edge and the join to make the purse itself.
- In the corner stitch we knit 2 stitches together, with the color of yarn that corresponds to the design and always taking the other yarn over the top.
- When we get to the fold part (which we will hold with pins) we will make the stitches taking the two covers. In this way we will be sewing to make the body of the purse. At the end of the line we knit pd (slipped stitch) we leave the long strands and cut.
- To join the other side we repeat the process, first we sew the two lids together and then we knit the edge stitches until we reach the point where we started. There we knit 2pb-1pd and close. We leave the long strand of yarn to make it easier to hide it.
🪡 Comenzaremos ahora con los detalles.
- El asa: tomamos las dos hebras de hilos, blanco y anaranjado, tejemos 25cadenas con el gancho de 2,5mm. (Para la medida de mi mano).
- Estas cadenas las vamos a fijar en una de las esquinas superiores del monedero. Pasamos el gancho y tejemos amabas puntas de la cadena con un 1pb en algunos de los puntos tejidos en esa esquina. Luego tejemos 1pd. Cortamos y escondemos las hebras.
🪡 We will now start with the details.
- The handle: we take the two strands of yarn, white and orange, we weave 25chains with the 2.5mm hook (For my hand size).
- We are going to fix these chains in one of the upper corners of the purse. We pass the hook and knit both ends of the chain with a 1pb in some of the stitches knitted in that corner. Then we knit 1pd. We cut and hide the strands.
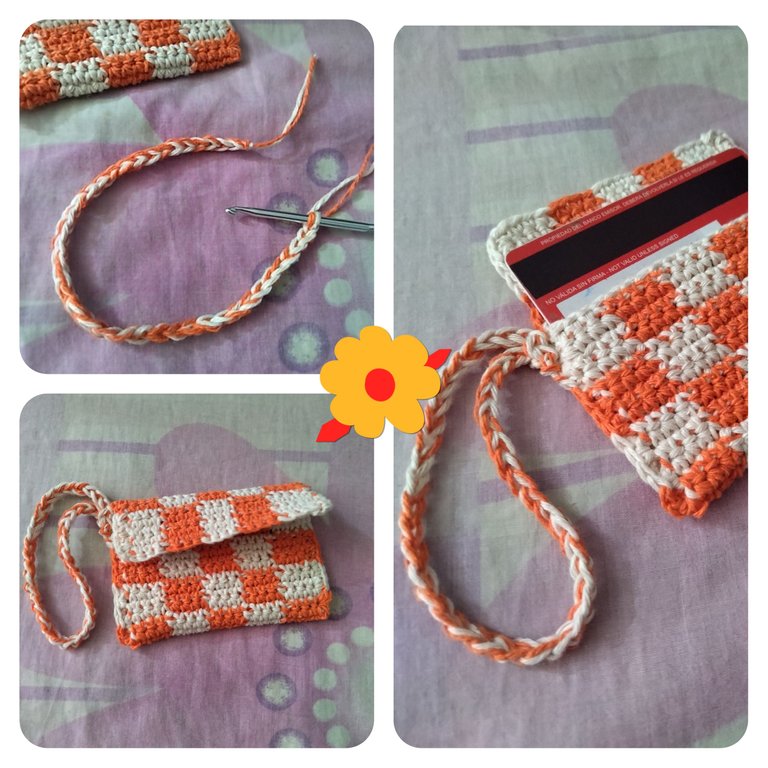
- El broche: colocamos el broche como corresponda según las partes macho y hembra. Calculamos la medida y comprobamos que estén bien posicionados. Luego cosemos con aguja e hilo de coser color anaranjado o blanco.
- The clasp: we place the clasp according to the male and female parts. We calculate the size and check that they are well positioned. Then we sew with needle and orange or white sewing thread.

- El adorno: para tapar u ocultar la pequeña costura que hicimos en el broche vamos a decorar esa parte del tejido con alguna aplicación, también puede ser un botón.
- Yo tengo flores y mariposas y quise hacer la presentación de cada una antes de decidir.
- The ornament: to cover or hide the small seam we made in the brooch we will decorate that part of the fabric with some application, it can also be a button.
- I have flowers and butterflies and I wanted to make the presentation of each one before deciding.
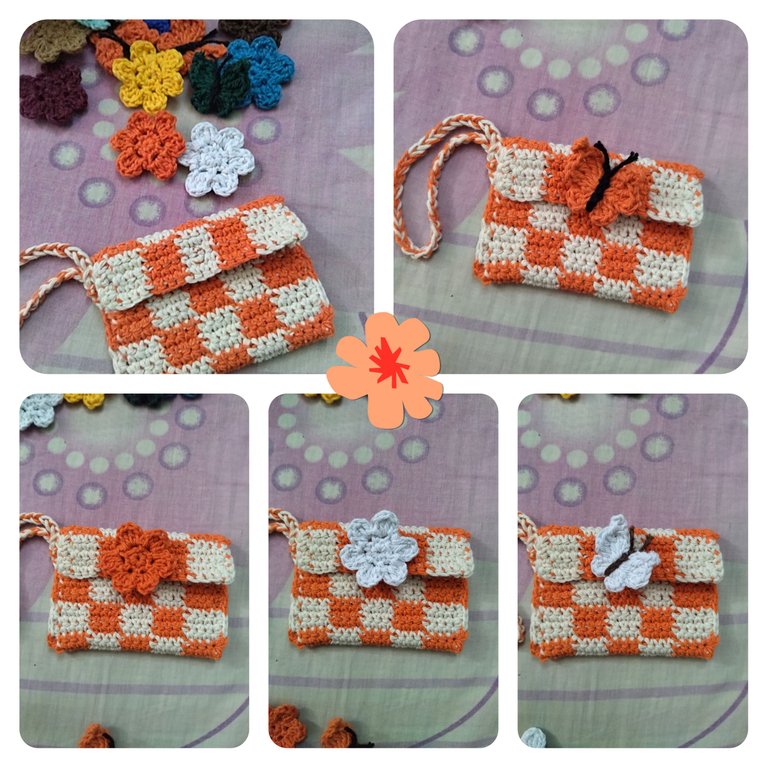
- Elegí la flor anaranjada. ¿Cuál hubieras elegido tu?
- La flor la fijé en el tejido justo sobre el broche, usé hilo y aguja de coser.
- I chose the orange flower, which one would you have chosen?
- I attached the flower to the fabric just in case of the brooch, I used thread and a sewing needle.
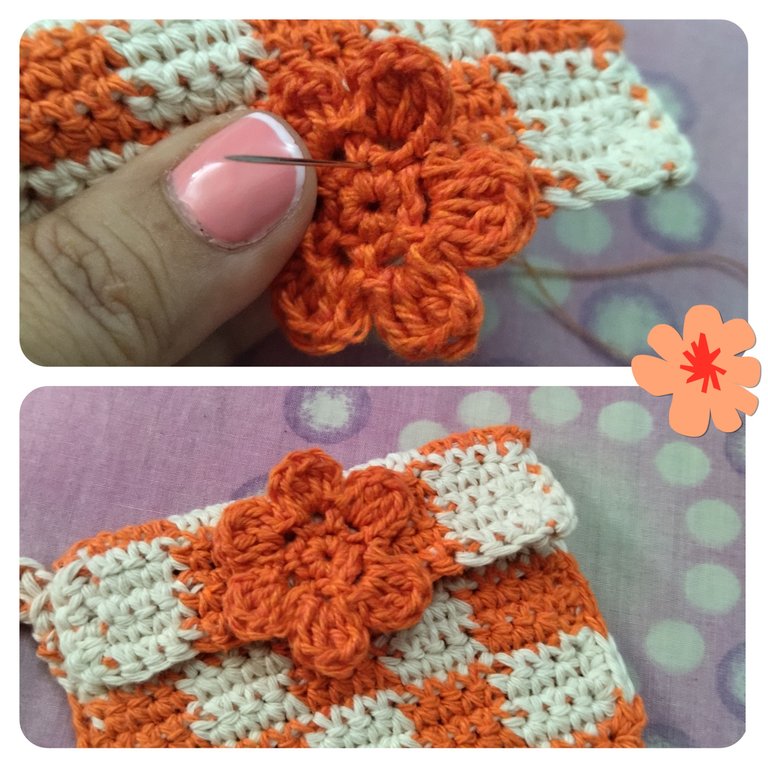
- Quise colocarle un adorno a la flor y opté por las medias perlas. Tengo de pocos colores y dudé en la combinación. Unas son blancas, otras color perla, bronce y rosadas claras.
- I wanted to add an ornament to the flower and I opted for half pearls. I have a few colors and I hesitated in the combination. Some are white, others pearl, bronze and light pink.
- Elegí una media perla color bronce. La fijé en medio de la flor con un punto de silicón frío.
- I chose a bronze colored half pearl. I fixed it in the middle of the flower with a cold silicone dot.
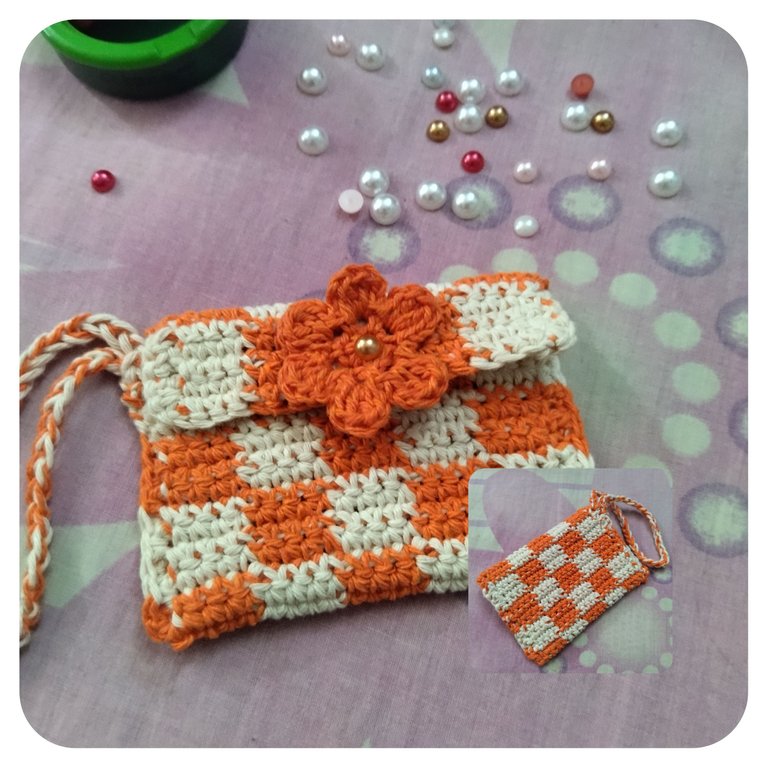
De esta forma dí por culminado mi proyecto. Guardé la tarjeta, la cual encajó perfecto y ahora espero salir de compras 🛒 para estrenarlo. Todas las fotos son de mi propiedad. Edité con Polish y Canva. Usé el traductor de Deelp. Bendiciones y muchas gracias por el apoyo 😊
This is how I finished my project. I kept the card, which fit perfectly and now I hope to go shopping 🛒 to use it for the first time. All photos are my property. I edited with Polish and Canva. I used Deelp translator. Blessings and thanks so much for the support 😊.
https://twitter.com/hivediy47901/status/1748811933380223099
Que belleza Lelys! Me gustó la combinación de colores y el resultado final esta muy alegre pero a la vez delicado, muy buen trabajo!❤️
Hola. Muchas gracias. También me encantó el resultado 👍
Que tengas linda tarde.
Igualmente Lelys! Buenas noches por aquí, hasta mañana!
¡Felicidades! Esta publicación obtuvo upvote y fue compartido por @la-colmena, un proyecto de Curación Manual para la comunidad hispana de Hive que cuenta con el respaldo de @curie.
Si te gusta el trabajo que hacemos, te invitamos a darle tu voto a este comentario y a votar como testigo por La Colmena.
Si quieres saber más sobre nuestro proyecto, te invitamos a acompañarnos en nuestro servidor de Discord.
MUCHAS gracias por el apoyo 🙋🏾♀️🫂😌🙂👍☺️🎉👋
!AFIT
For more info about tipping AFIT tokens, check out this link
Thanks You 🫂🇻🇪👍🏾🙋🏾♀️
🙏🏽🥰🤗🥂 it's a pleasure...
Hey @creacioneslelys, you just received 10 AFIT tip from @caleb-marvel!
For more info about tipping AFIT tokens, check out this link
Manos mágicas y puntadas certeras hacen posibles trabajos tan hermosos como este.
Hola 👋🏾 @edeyglezsosa qué tal estás?
Muchas gracias por apreciar esta creación. Me anima a seguir tejiendo y compartirles 😊
Para mi es un placer, estaré esperando con ansias ver futuras creaciones.
The color combination is impressive.
I'm glad you see it well. Thank you so much.
A nice wallet to keep your cart 😊 I love the color combination too. Well done for your great work 😍🎉
Hello 👋 I am very happy to know that you liked this wallet. Thank you very much 😌
ENG= Amazing job, I liked the mix of colors you have chosen to do it, I know it is a very difficult job, apart from seeing it in your publication I have also seen them in others, but it seems to be very complicated, in the end you have very good results, what a great job!
ESP= Asombroso trabajo, me gusto la mezcla de colores que has elegido para hacerlo, sé que es un trabajo muy difícil, aparte de verlo en tu publicación también las he visto en otras, pero pece a ser muy complicado, al final se tienen buenísimos resultados, qué buen trabajo!
Hola. Muchísimas gracias. Me da gusto saber que mi creación te ha gustado. Feliz día 🎉
¡¡¡Buen trabajo!!! Gracias por publicar tu excelente contenido en Hive Diy.