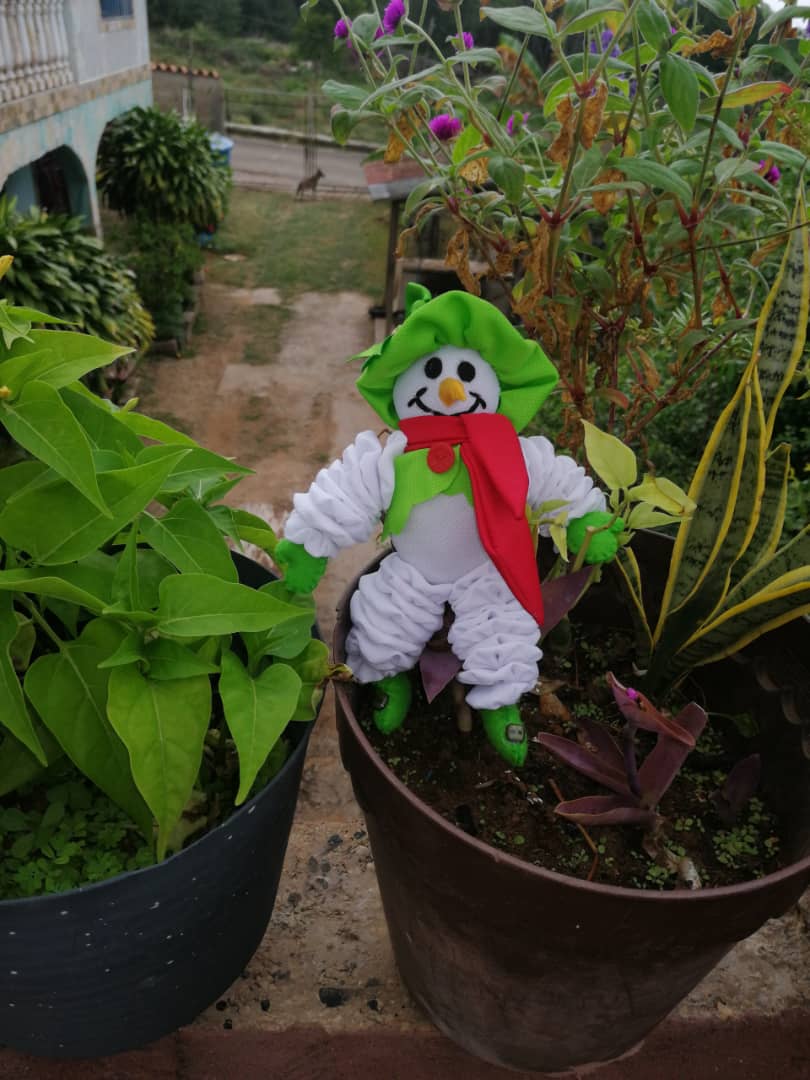
Muñeco de nieves realizado con Retazos de tela ☃️//snowman made with fabric scraps☃️
Feliz noches amigos amantes de la costura ya como estamos muy cerca a la época navideña que sin duda alguna para mí es la más bonita del año quise mostrarles un proyecto que me ayudó a realizar mi suegra y fue un bonito muñeco de nieves con retazos de tela que teníamos guardado así que ella tiene mucha imaginación y sabía cómo hacer unos lindos círculos que al final terminan con una linda forma perfecta para los brazos y piernas de nuestro muñeco , les quiero dejar el paso a paso de nuestra creación que para mi gusto quedaría excelente para colocarlo en el árbol de navidad o simplemente en la mesa .
Good night, friends who love sewing, since we are very close to the Christmas season, which is undoubtedly the most beautiful of the year for me, I wanted to show you a project that my mother-in-law helped me to make and it was a beautiful snowman with scraps of fabric. that we had saved so she has a lot of imagination and knew how to make some nice circles that in the end end up with a nice perfect shape for the arms and legs of our doll, I want to leave you the step by step of our creation that for my taste would be excellent to place it on the Christmas tree or simply on the table.
Los materiales que utilizamos fueron :
• retazos de tela blanca , roja ,verde ,negro y anaranjado.
• agujas y tijeras
• hilo de coser blanco, negro , azul .
• relleno
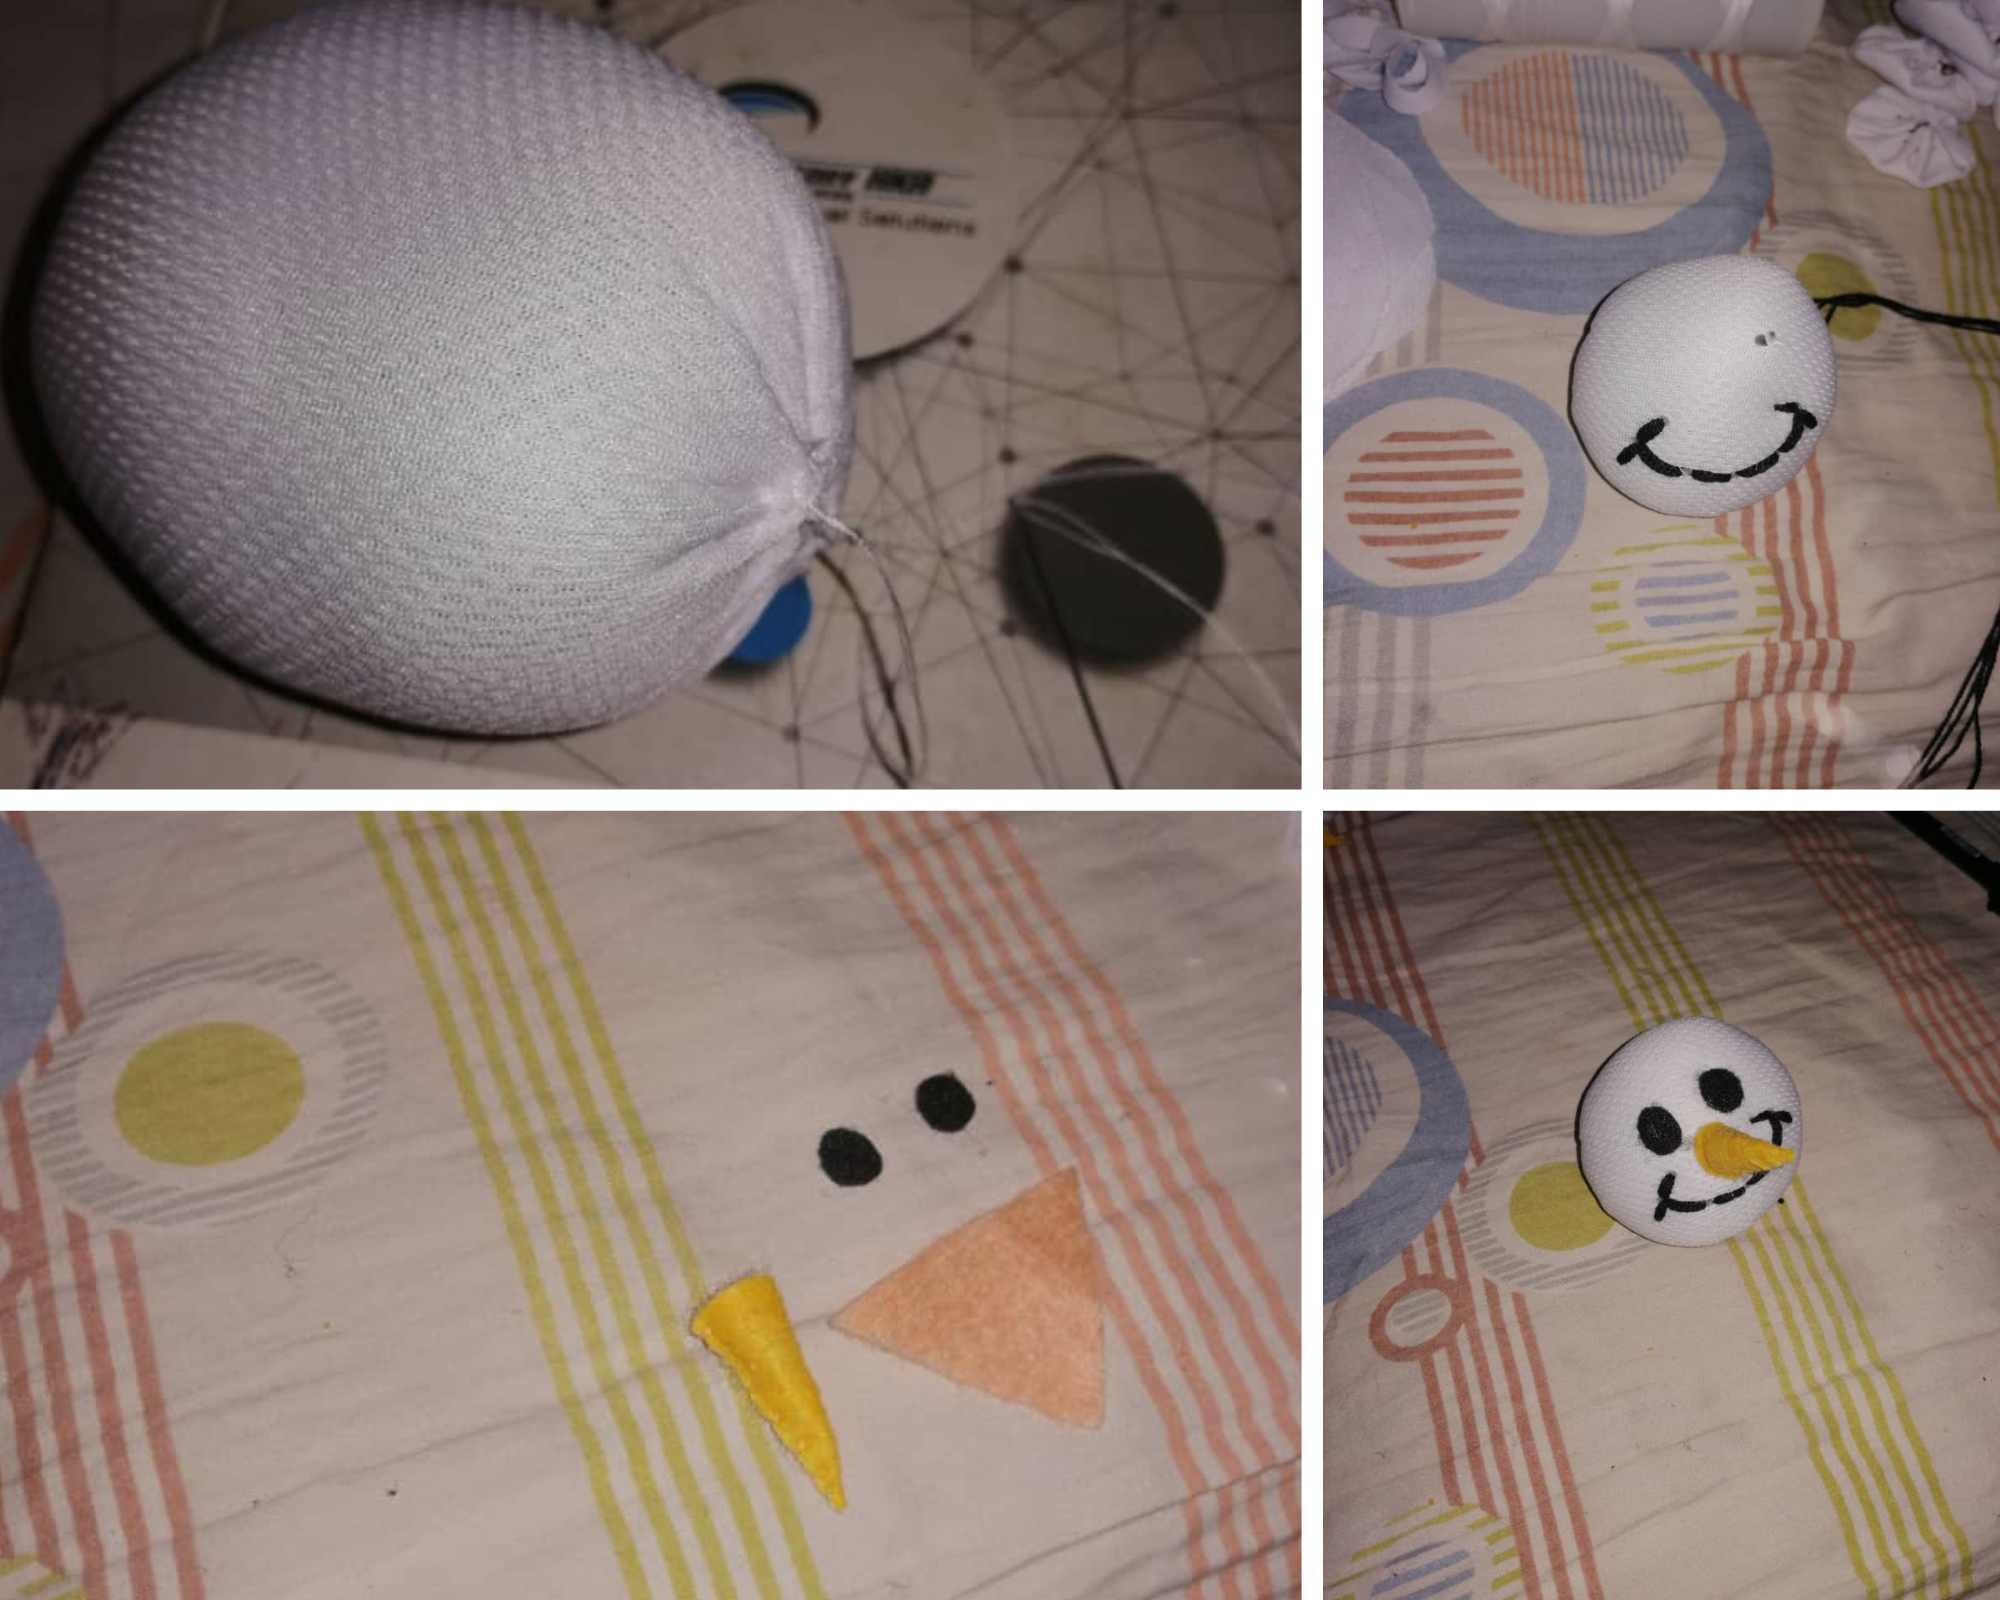
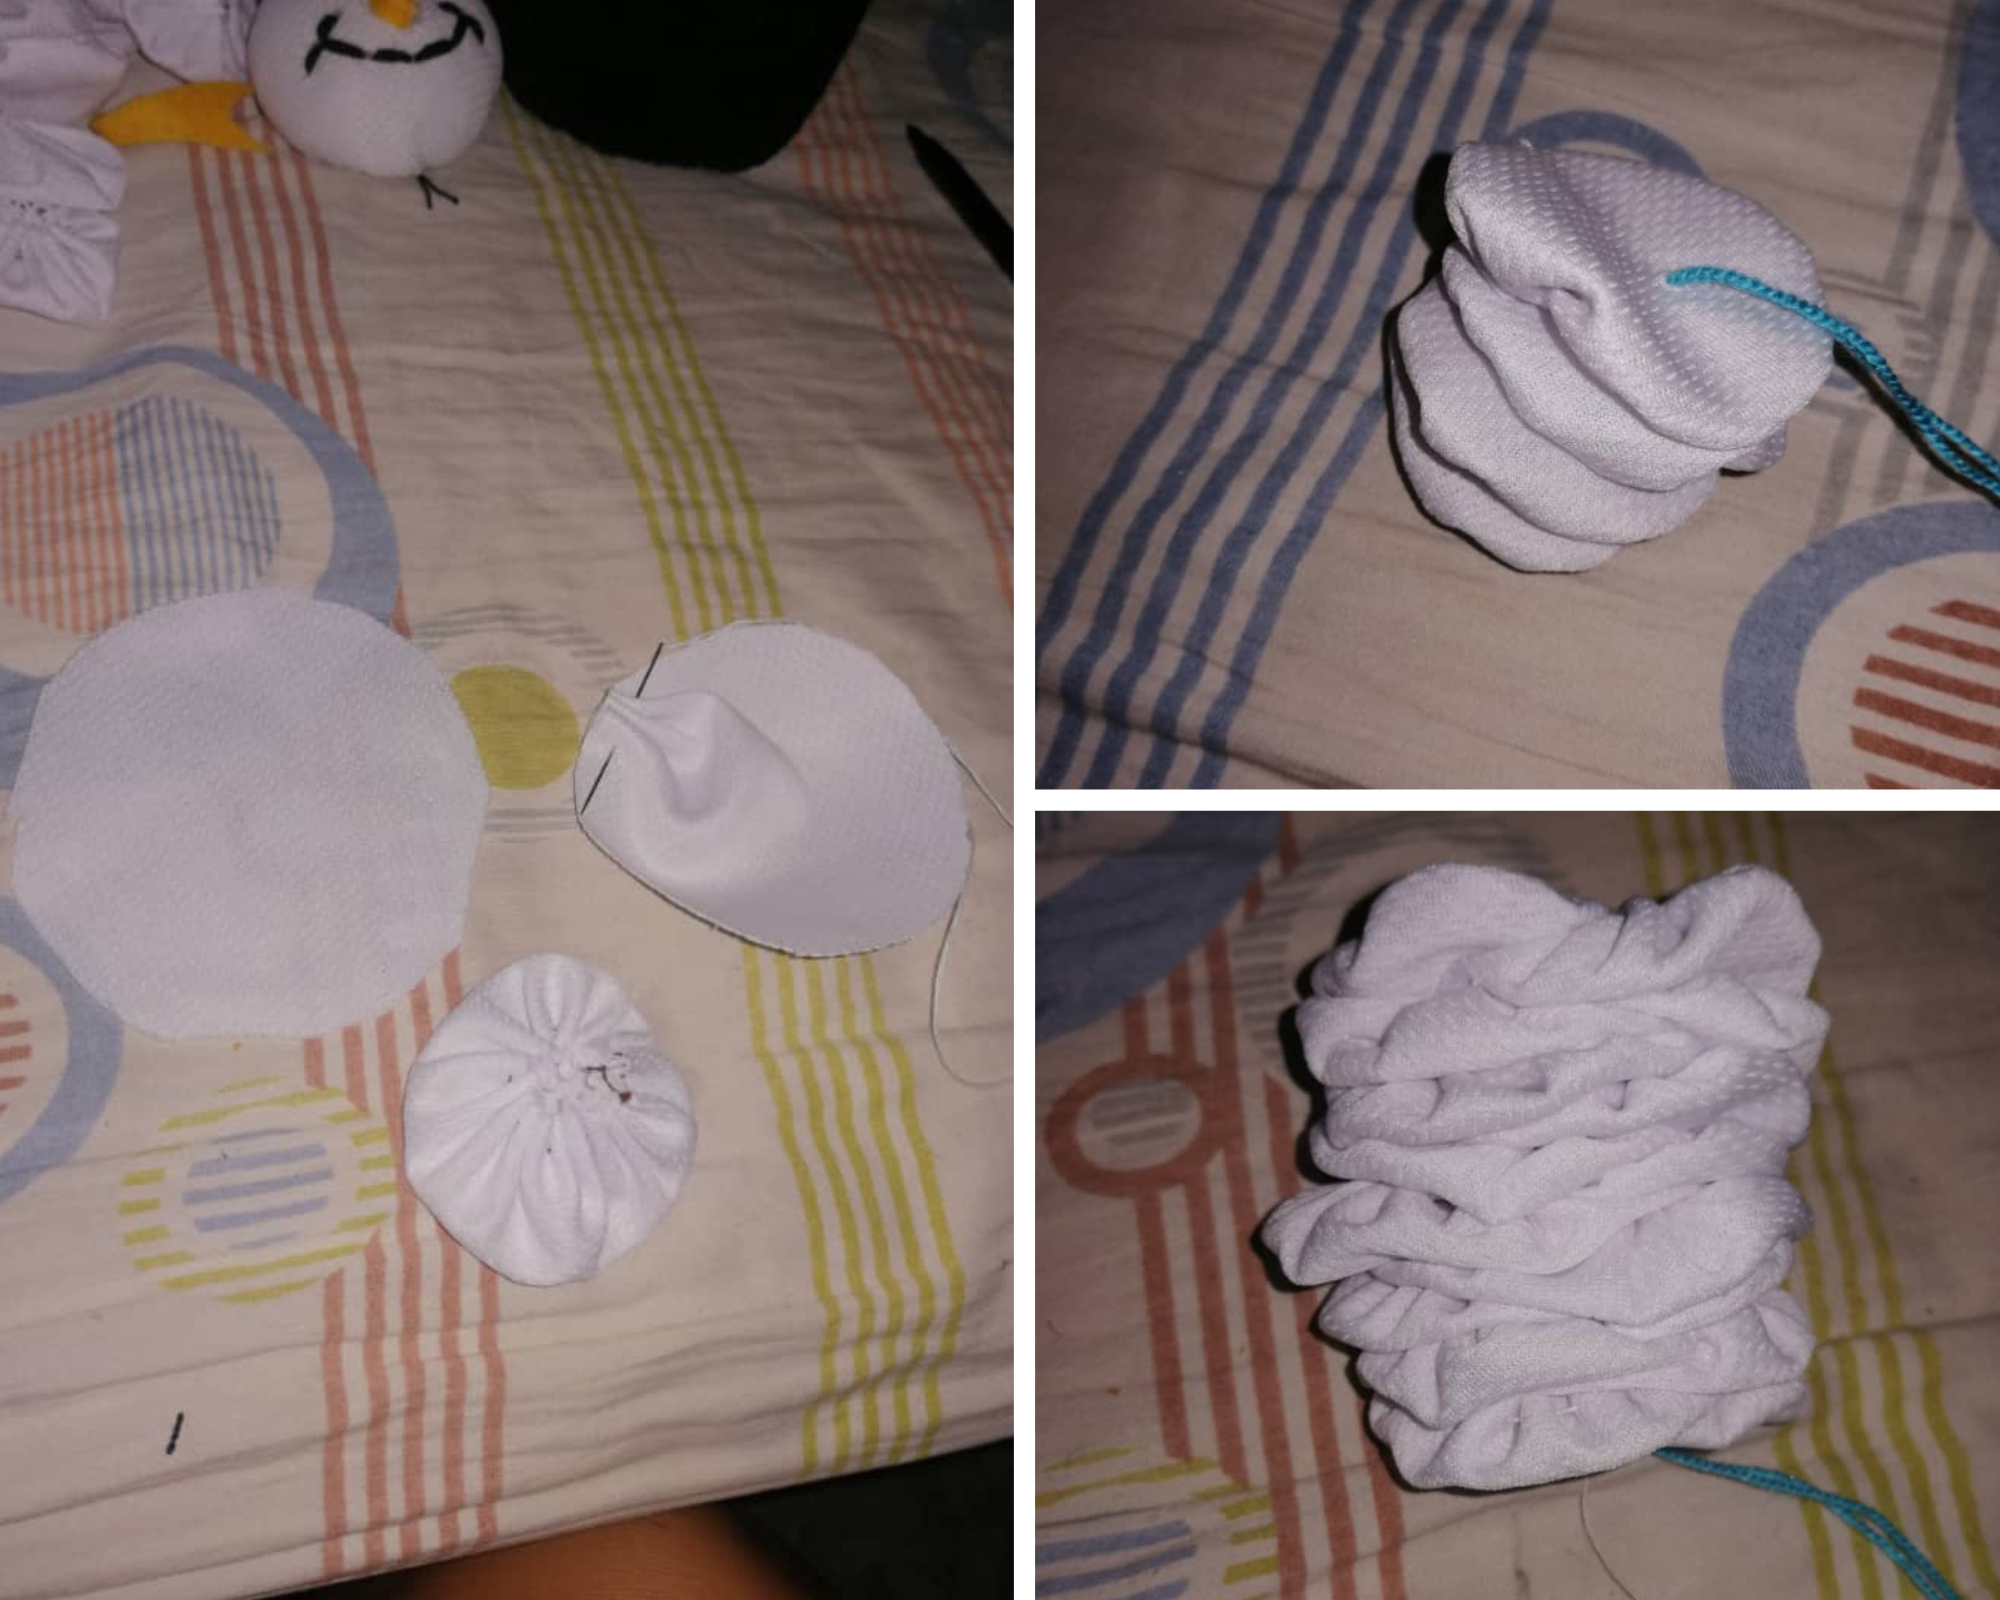
Para este proyecto iniciamos haciendo la cabeza de nuestro muñeco de nieves que para nosotras era lo principal para sacar las proporciones, cortamos dos círculos de tela uno más grande para el torso y uno más pequeño para la cabeza, unimos con aguja e hilo blanco las orillas y rellenamos luego cerramos hasta que nos quedaron las dos bolas a la proporción que nosotras queríamos.
The materials we used were:
• scraps of white, red, green, black and orange fabric.
• needles and scissors
• white, black, blue sewing thread.
• filling
For this project we started by making the head of our snowman, which for us was the main thing to get the proportions, we cut two circles of fabric, one larger for the torso and one smaller for the head, we joined the edges with a needle and white thread and we filled then we closed until we had the two balls left in the proportion that we wanted.
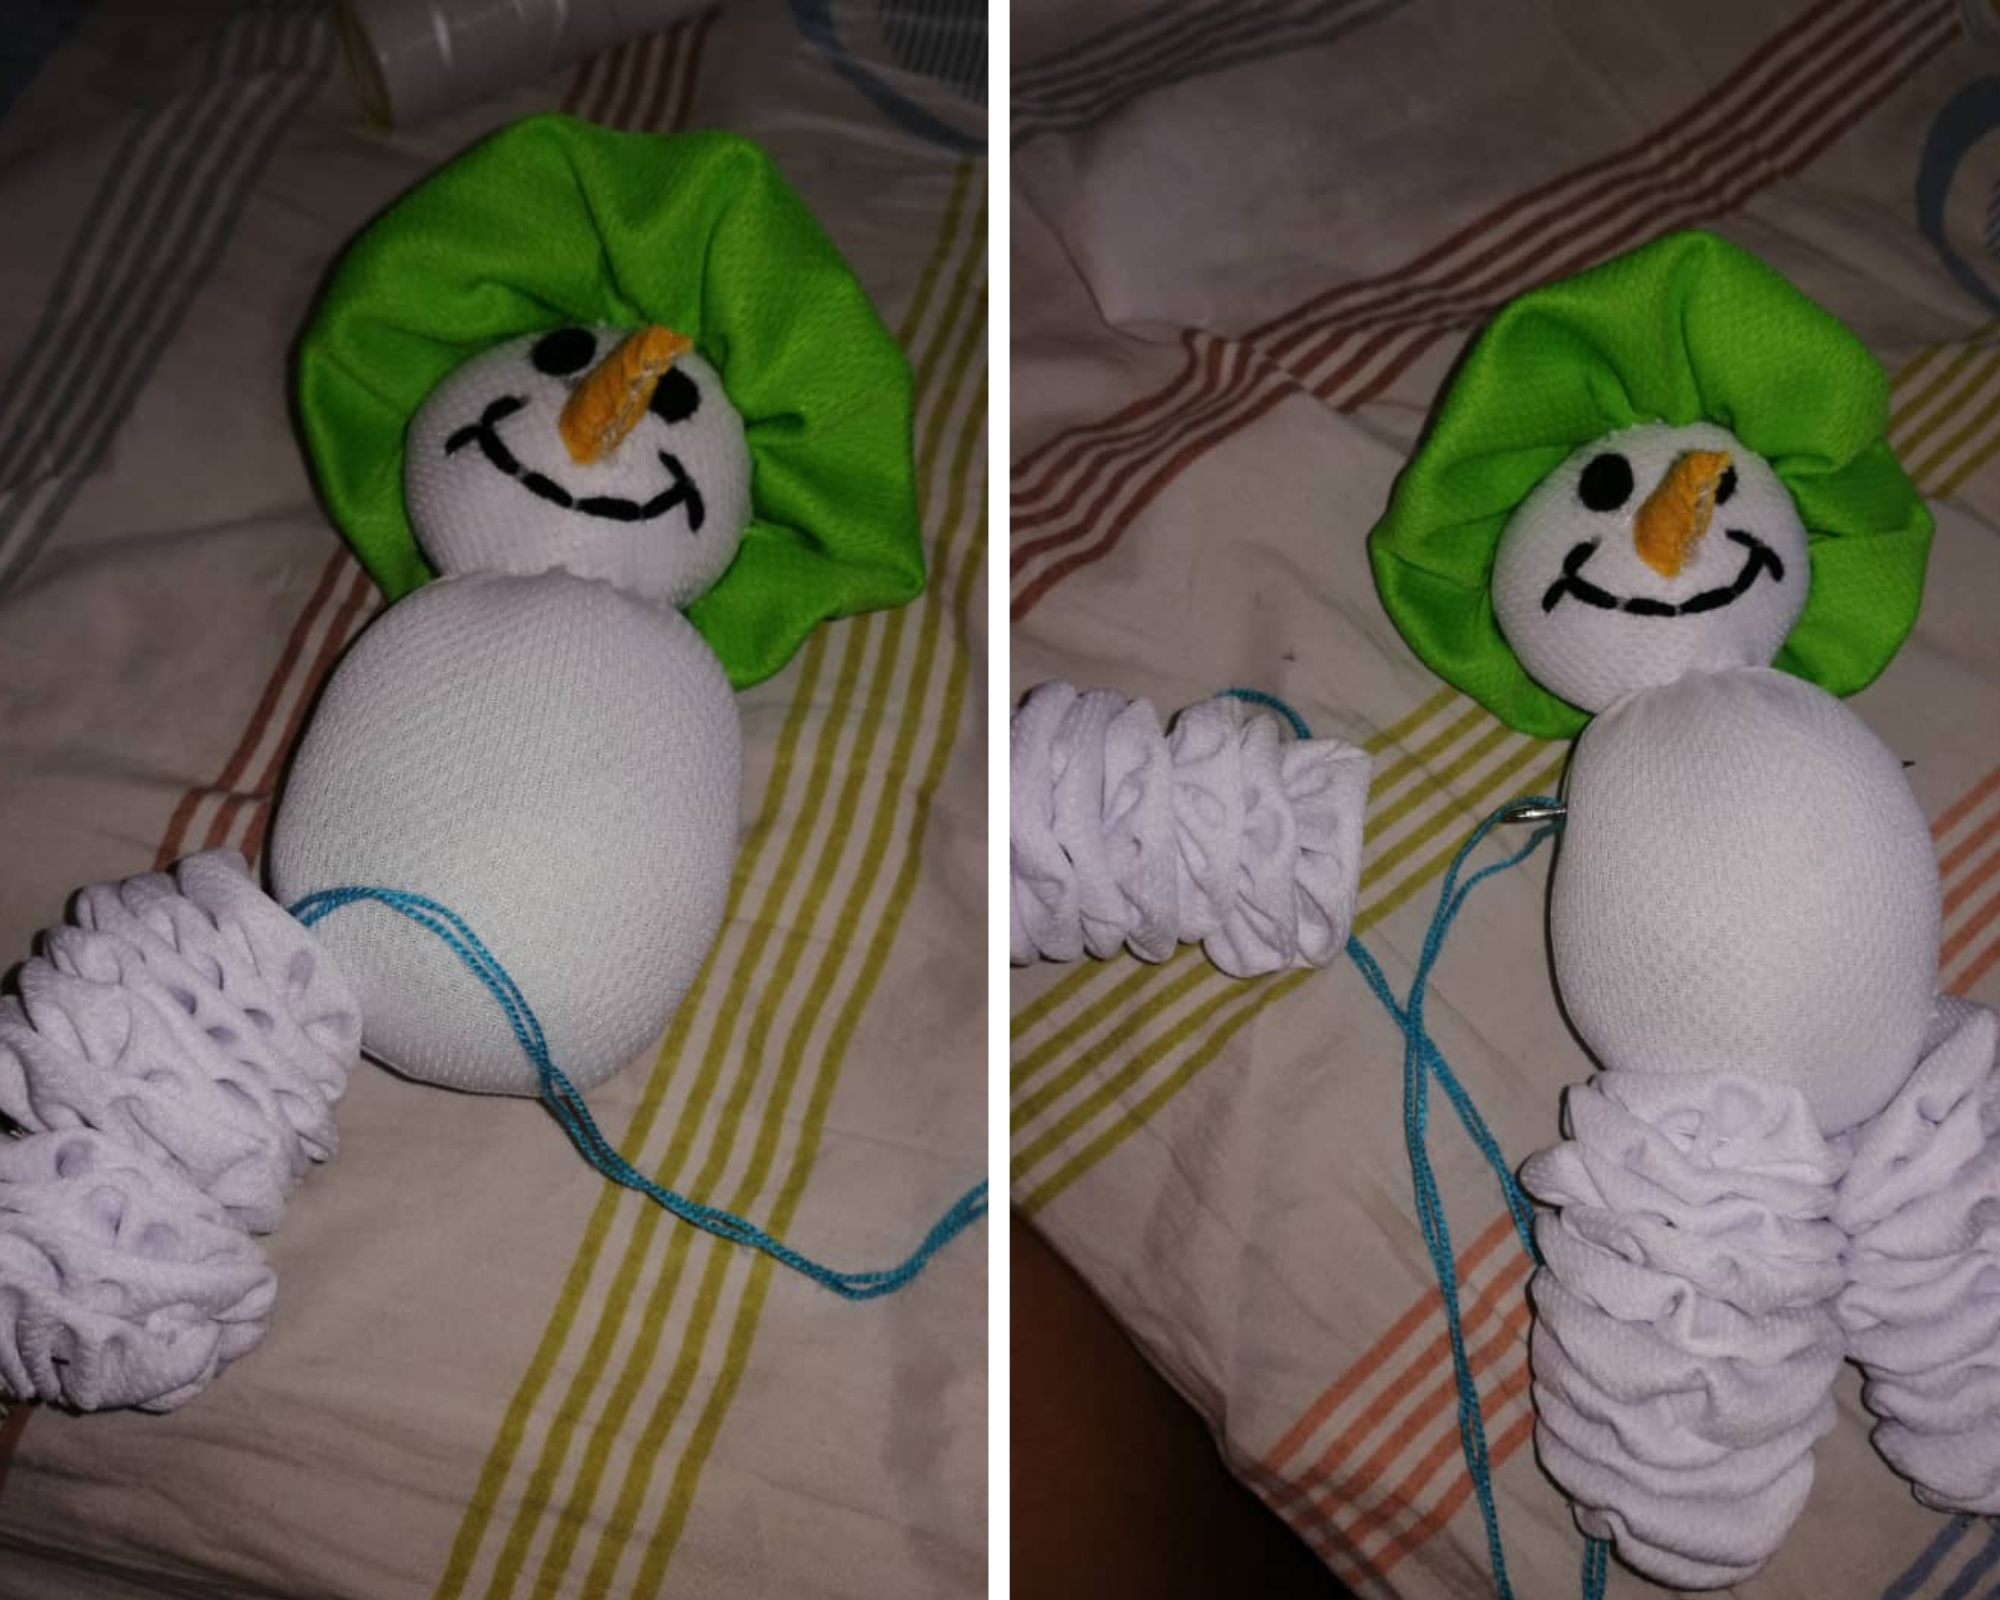
Luego hicimos los detalles de la cara, con un pequeño retazo de tela anaranjada cortamos en triángulo y unimos la esquina con unas puntadas rellenamos para que está fuera la típica nariz que parece una zanahoria y queríamos que nos quedará en 3D colocarle un poco de relleno le dio esa forma que deseábamos, cortamos dos círculos pequeños negros que serían los ojos . Una vez teníamos esto con ayuda de unas puntadas cosimos a la cabeza del muñeco de nieve los ojos y la nariz , para la boca quisimos con ayuda de hilo negro y aguja bordar una sonrisa y nos gustó mucho el resultado.
Then we made the details of the face, with a small piece of orange fabric we cut a triangle and joined the corner with some stitches we filled so that the typical nose that looks like a carrot is out and we wanted it to remain in 3D to put a little fill on it gave the shape we wanted, we cut two small black circles that would be the eyes. Once we had this with the help of some stitches we sewed the eyes and nose to the snowman's head, for the mouth we wanted to embroider a smile with the help of black thread and a needle and we really liked the result.
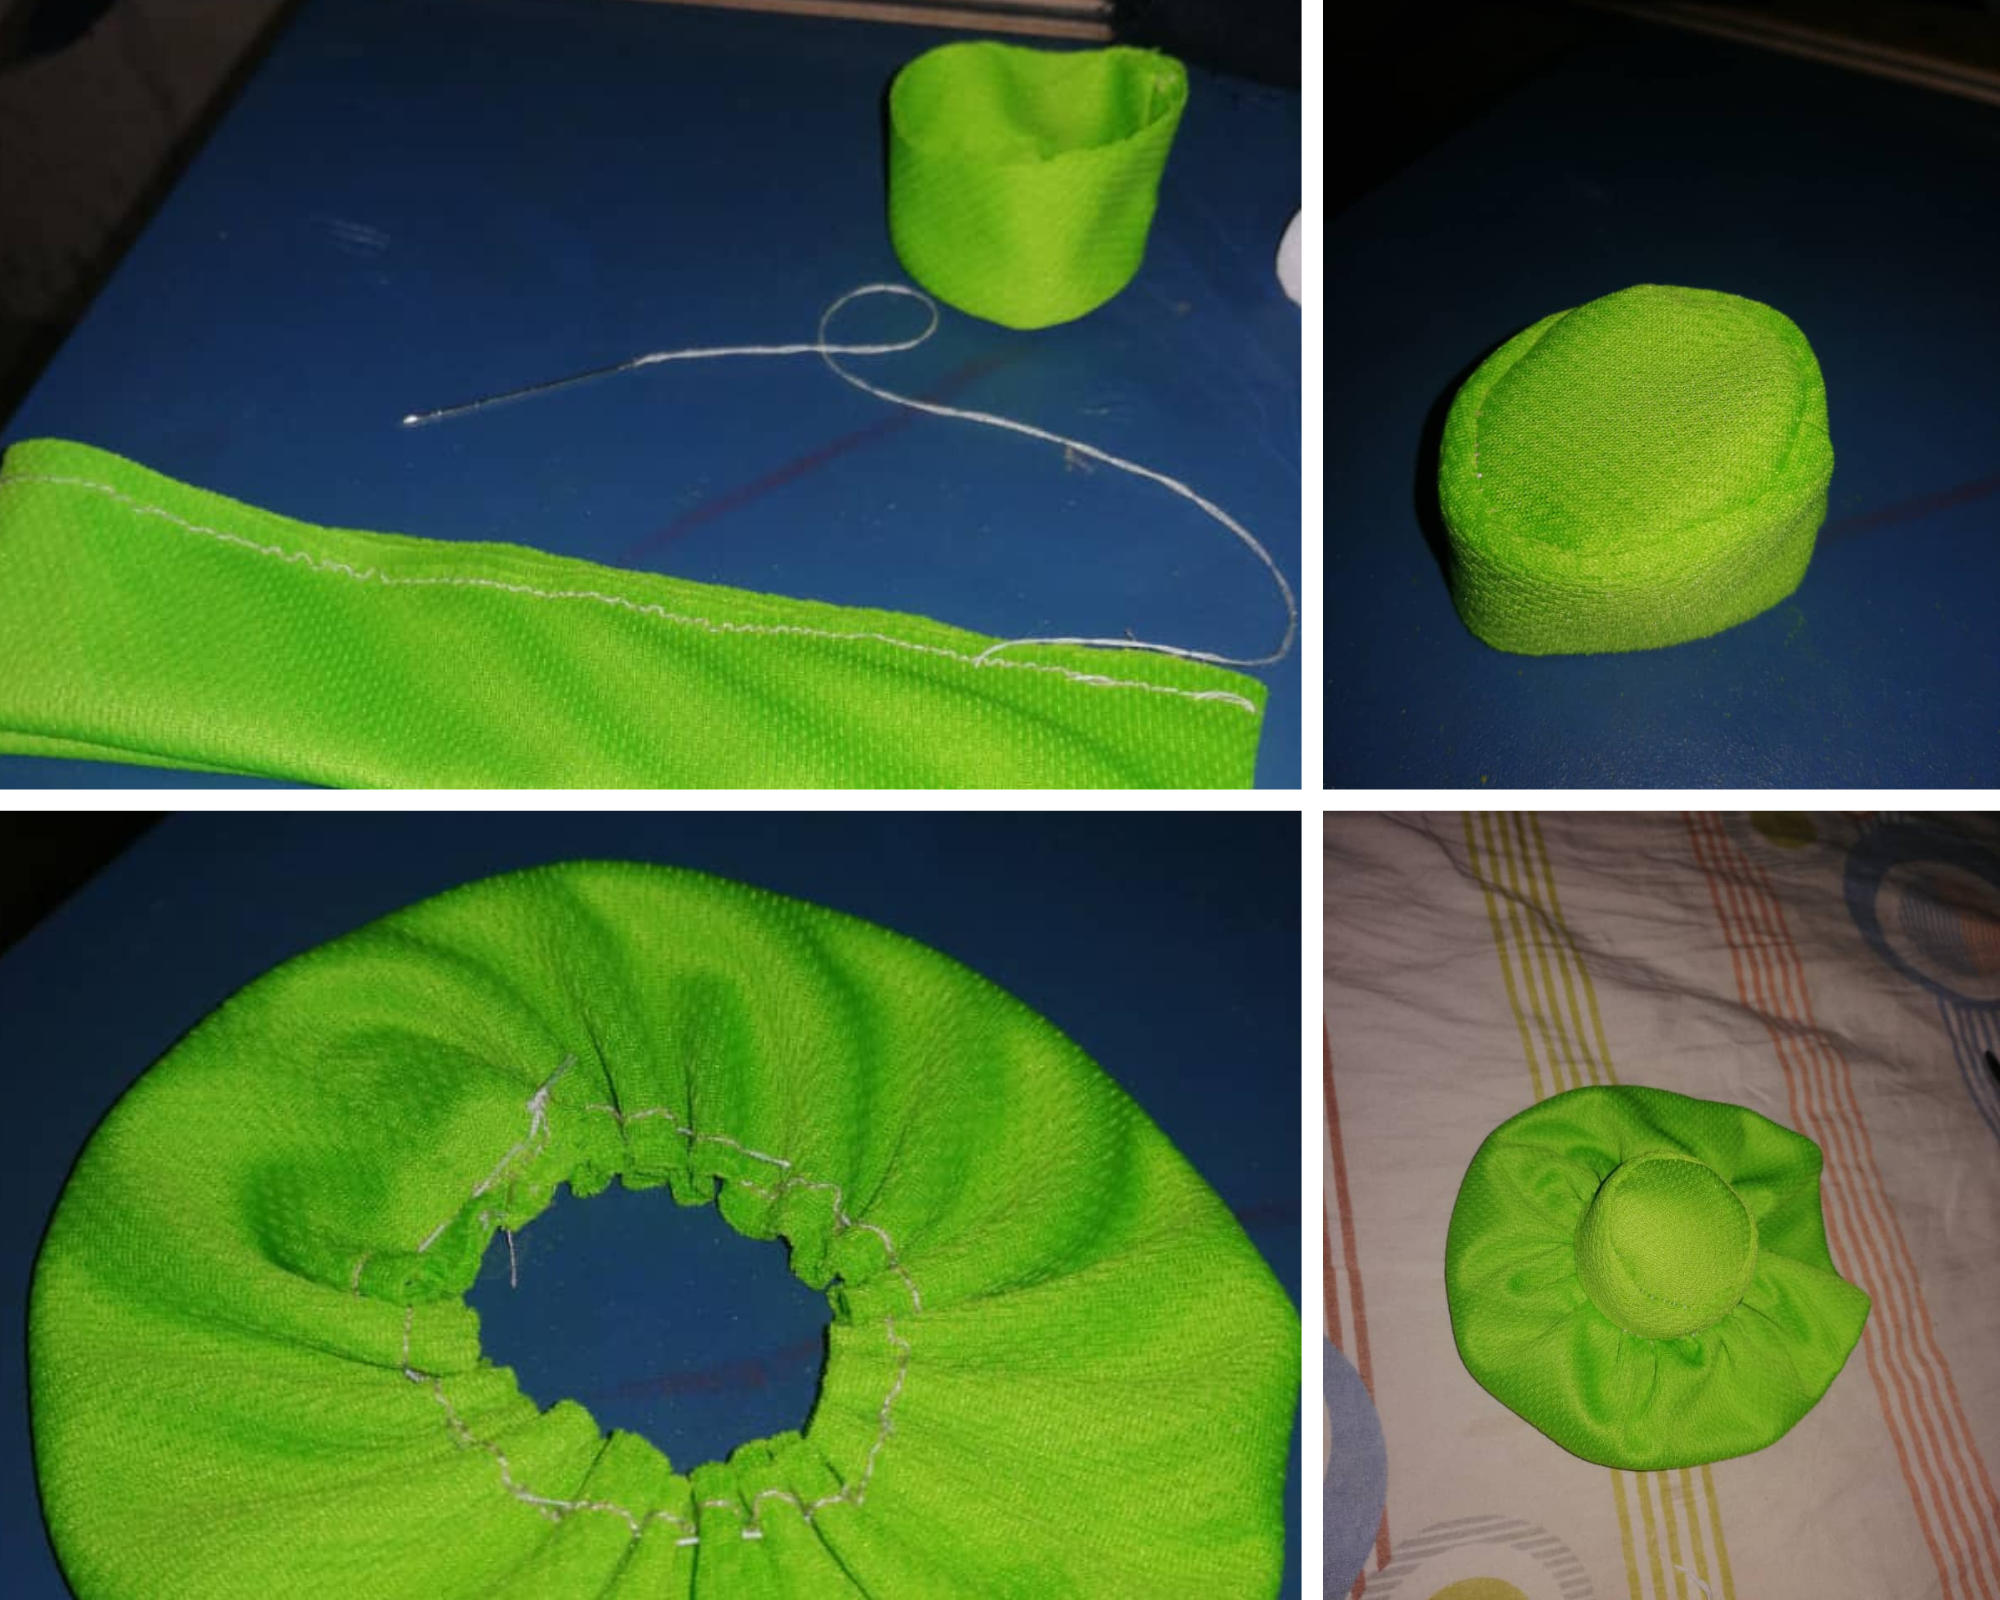
Para el sombrero hicimos una pequeña copa que sería el centro del sombrero , y luego recortamos una tira en forma de rectángulo lo unimos y arruchamos un poco y le dio un efecto de sombrero muy lindo .
For the hat we made a small cup that would be the center of the hat , and then we cut a strip in the shape of a rectangle , joined it and wrinkled it a little and it gave it a very nice hat effect .
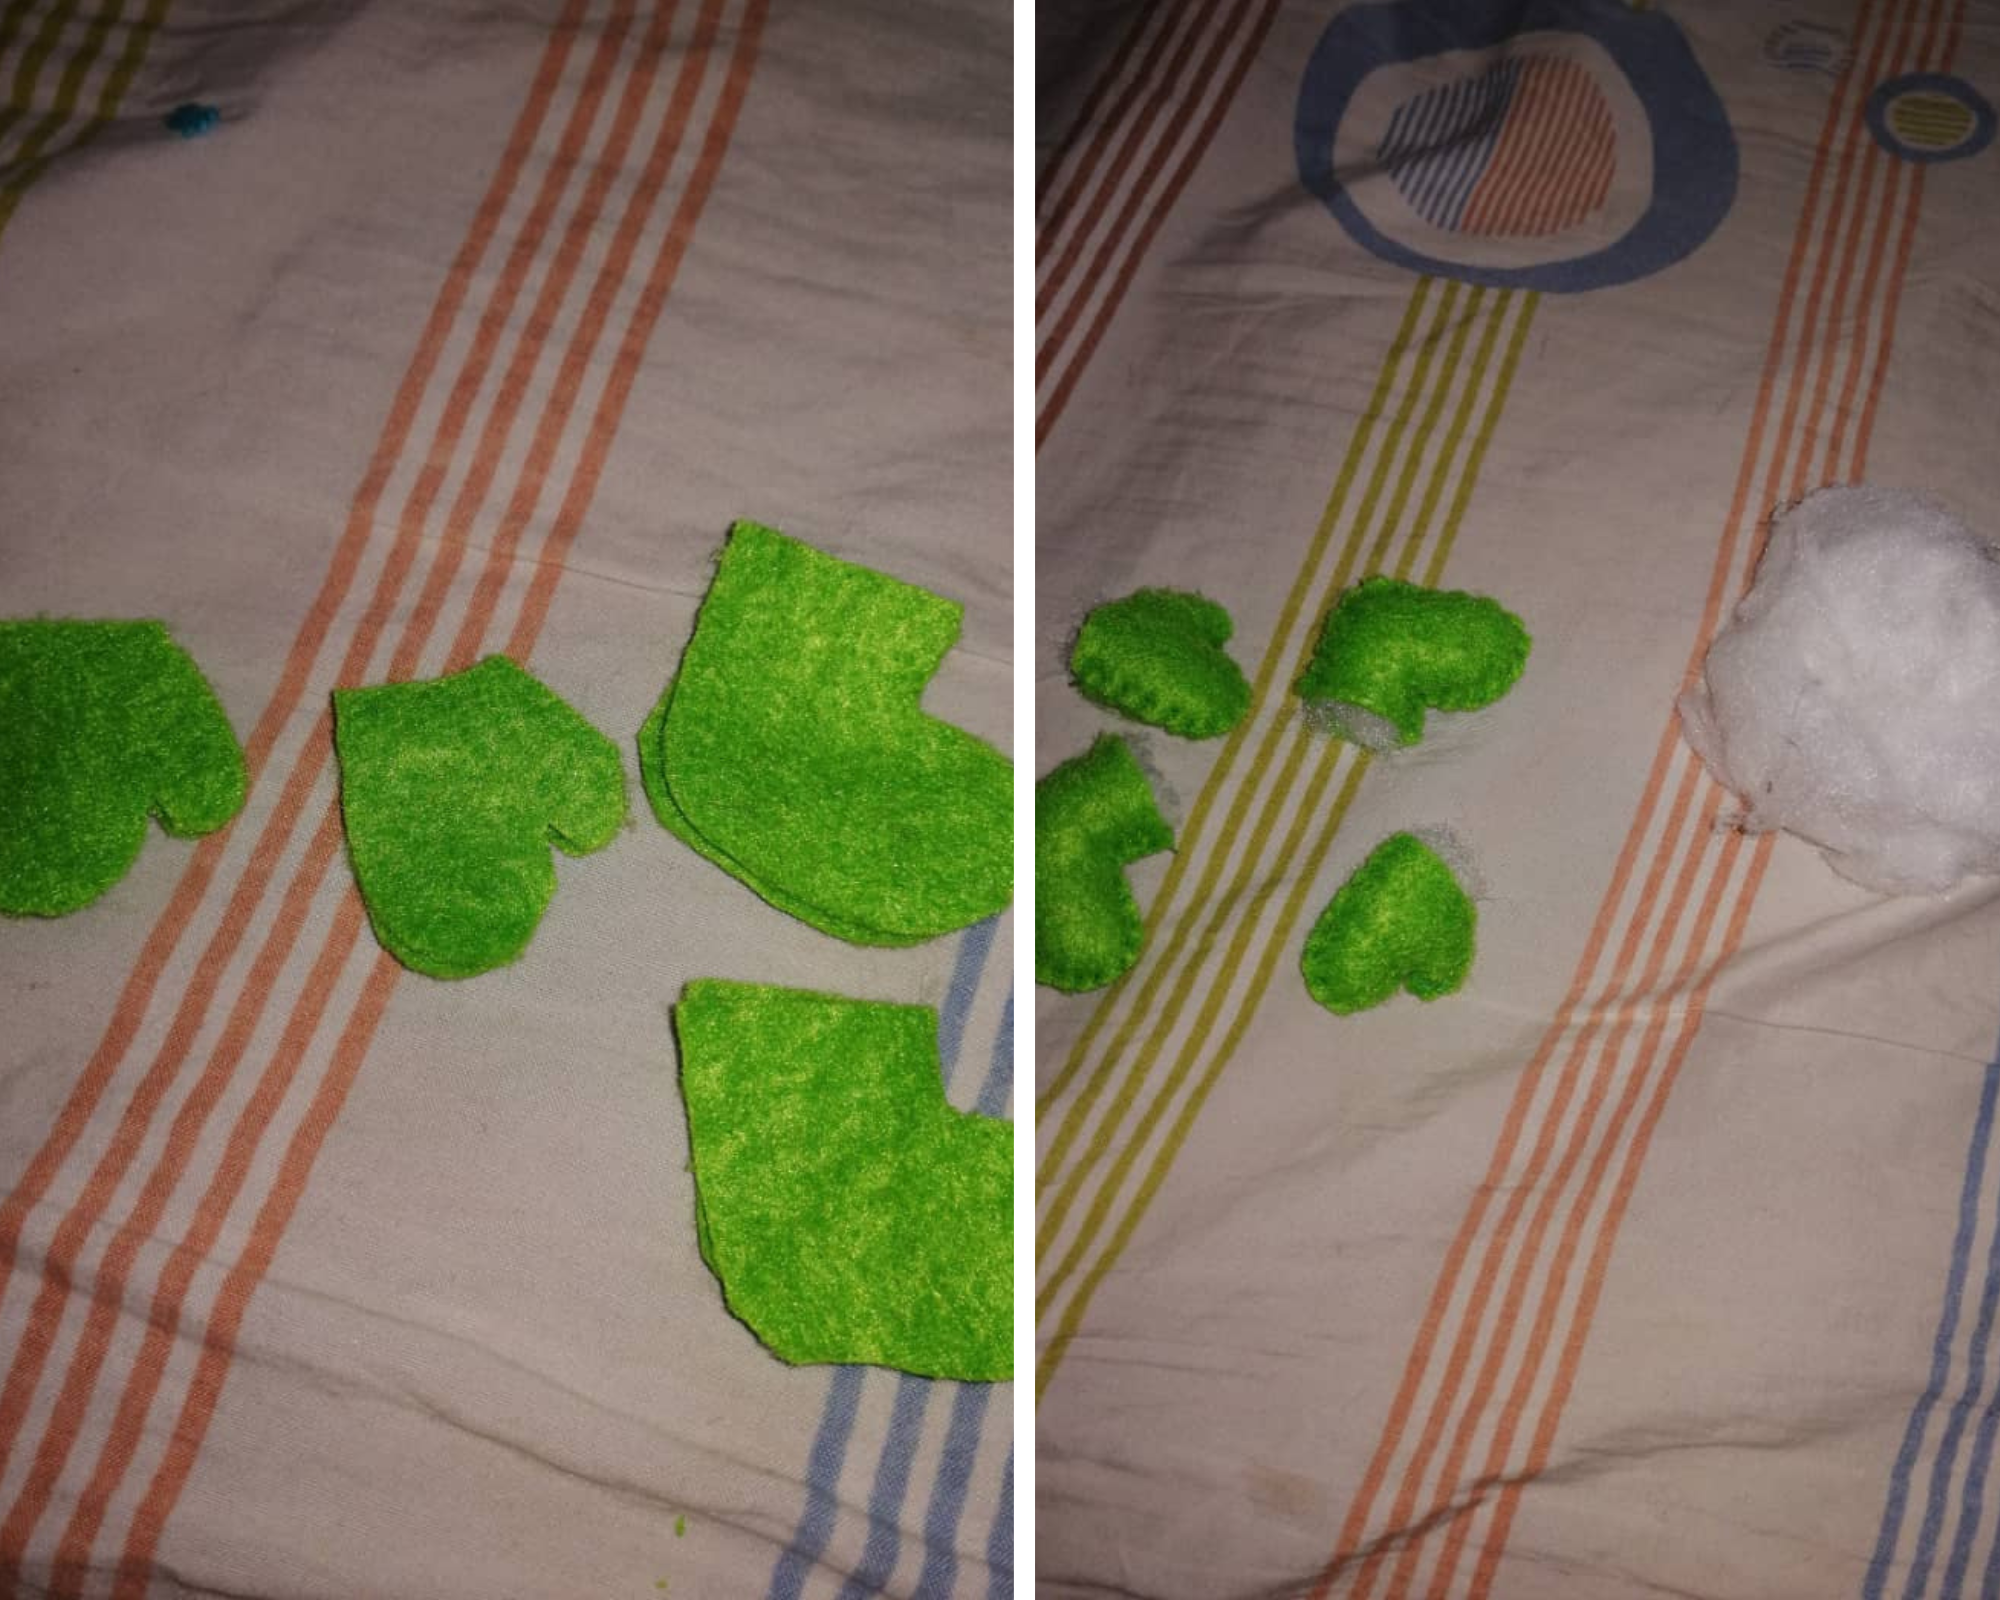
Como hicimos el sombrero verde decidimos que las manos y pies también irían de este color, con ayuda de un lápiz dibujamos en la tela la forma de las manos que queríamos fuera como unos guantes para el frío y unas botas , recortamos dos piezas por cada guante y cada bota en total fueron 8 piezas , unimos los dos lados de cada guante y cada bota con aguja e hilo y después rellenamos .
As we made the green hat, we decided that the hands and feet would also be this color, with the help of a pencil we drew on the fabric the shape of the hands that we wanted to be like gloves for the cold and boots, we cut out two pieces for each glove and each boot in total were 8 pieces, we joined the two sides of each glove and each boot with a needle and thread and then stuffed.
Para los brazos y piernas mi suegra tenia una buena idea para poder usar de mejor manera los Retazos que nos quedaban en blanco, ella me ayudó a recortar varios círculos 10 para cada pierna y 8 para cada brazo , luego con ayuda de hilo y aguja pasamos un borde por las esquinas de cada círculo y luego tiramos del hilo y así nos quedaba arruchado . Luego con un hilo un poco más grueso unimos las piezas como dije antes 8 para cada brazo y 10 para cada pierna.
For the arms and legs, my mother-in-law had a good idea to be able to use in a better way the pieces that were left blank, she helped me cut out several circles 10 for each leg and 8 for each arm, then with the help of thread and needle we passed a border by the corners of each circle and then we pulled the thread and thus it was wrinkled. Then with a slightly thicker thread we join the pieces as I said before, 8 for each arm and 10 for each leg.
Finalmente con el hilo pegamos las piezas , la cabeza al torso, los brazos y piernas al torso , colocamos el sombrero a la cabeza y cosimos los guantes y botas .
Finally with the thread we glue the pieces, the head to the torso, the arms and legs to the torso, we put the hat on the head and sew the gloves and boots.
Como detalle final le hicimos una bufanda roja y le pusimos una Linda chaqueta verde con un un círculo rojo como detalle , la verdad este proyecto nos tomo un par de días ya que cocer cada pieza para los brazos y piernas nos tomo algo de tiempo y yo soy algo lenta con la costura , el resultado fue el que queríamos un lindo muñeco de nieves y aún no sabemos si colocarlo en el árbol navideño o colocarlo en la mesa .
As a final detail we made a red scarf and we put a nice green jacket with a red circle as a detail, the truth is that this project took us a couple of days since cooking each piece for the arms and legs took us some time and I I'm a little slow with sewing, the result was that we wanted a cute snowman and we still don't know whether to place it on the Christmas tree or place it on the table.
Hasta aquí el post de hoy amigos espero que les gustará este lindo proyecto y espero compartirles muchos más pronto, nos vemos en un próximo post feliz noche.
So far today's post friends I hope you will like this nice project and I hope to share many more soon, see you in a next post happy night.
Te ha quedado muy lindo, es una idea muy práctica y creativa para decorar
Muchas gracias 🤗
https://twitter.com/1423889954275569665/status/1591983480845602821
The rewards earned on this comment will go directly to the people( @derppunk ) sharing the post on Twitter as long as they are registered with @poshtoken. Sign up at https://hiveposh.com.
Thank you for sharing this post on HIVE!
Your content got selected by our fellow curator rezoanulvibes & you just received a little thank you upvote from us for your great work! Your post will be featured in one of our recurring compilations which are aiming to offer you a stage to widen your audience within the DIY scene of Hive. Next time make sure to post / cross-post your creation within the DIYHub community on HIVE and you will receive a higher upvote ;) Stay creative & HIVE ON!
Que bonito y original te ha quedado
Muchas gracias, fue todo un reto y con ayuda de mi suegra quedo super lindo
Yay! 🤗
Your content has been boosted with Ecency Points, by @daifernandez0929.
Use Ecency daily to boost your growth on platform!
Support Ecency
Vote for new Proposal
Delegate HP and earn more
Lo mejor que tiene aprovechar los retazos es que le damos una segunda oportundad a algo que podría terminar en la basura. Este muñeco de nieve quedó muy tierno, que gusta que hayan pensado en la nariz de zanahoria porque es una de las cosas que caracteriza a este personaje.
Saludos, que tengas un buen día ❣️.
Me gusta siempre darle segunda oportunidad a todo lo que se pueda pues siento que con algo de creatividad puede salir algo muy lindo , gracias por tu comentario ❤️
Keep it up a great job weldone. You sewing work look so beautiful
Mucha gracias 💖