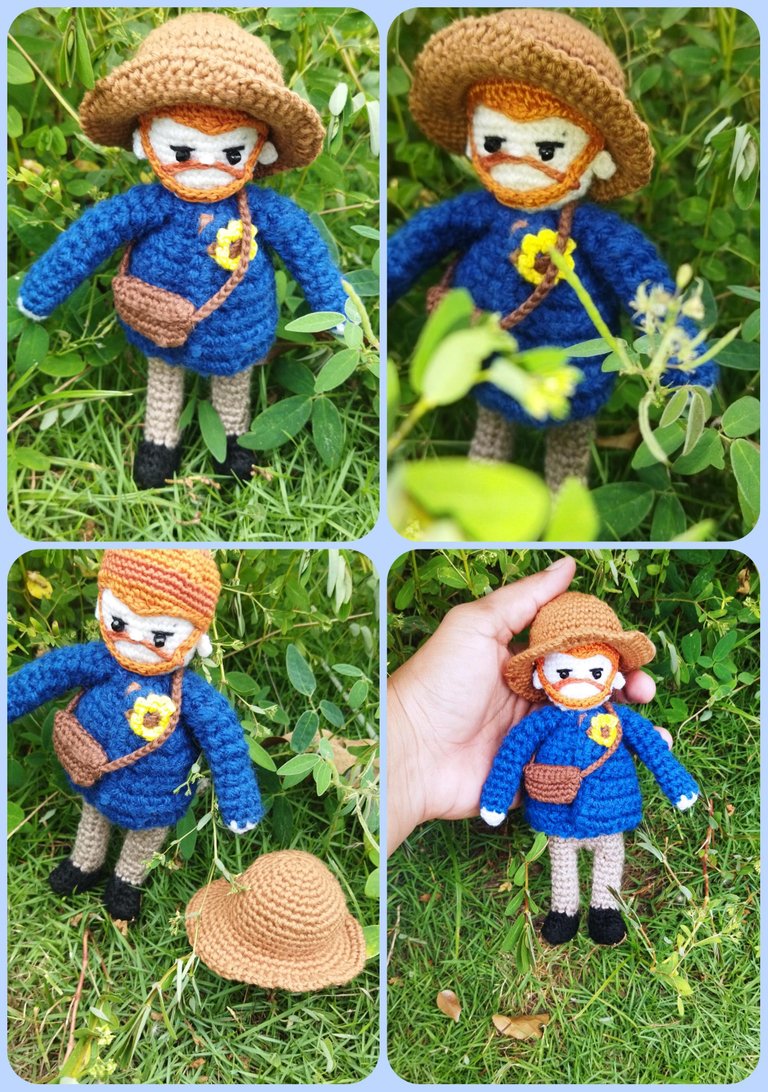
ENG/ ESP:The Little Vincent Van Gogh!!💙🌙🍃✨ El Pequeño Vincent Van Gogh!! By Danhyelita24
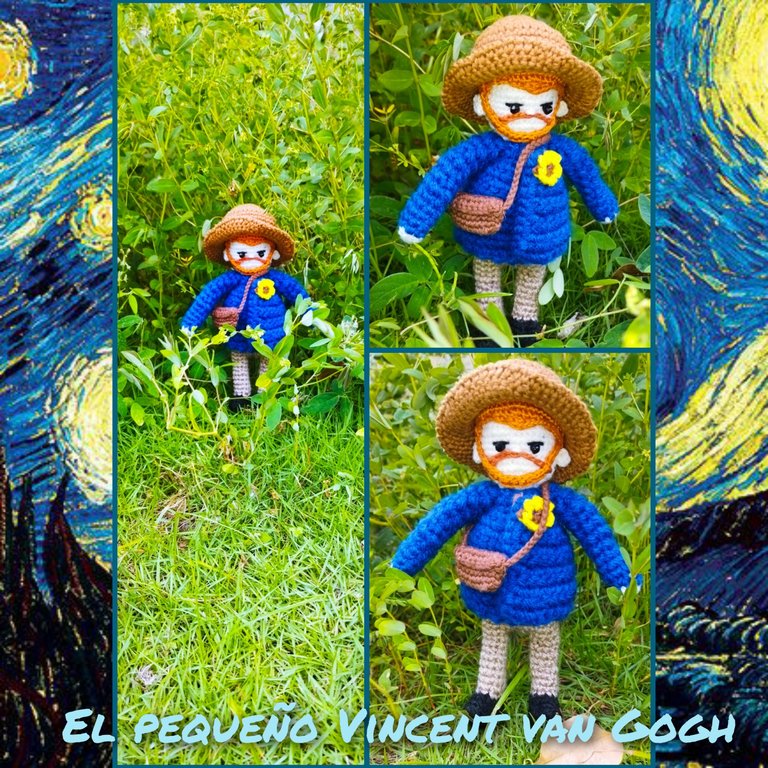
Hola hola qué tal queridas amigas y todos los usuarios que hacen vida en esta maravillosa comunidad, el día de hoy quiero compartir con ustedes una linda manualidad se trata de la realización a crochet del pequeño vicent van Gogh este personaje icónico mide aproximadamente 18 cm y está realizado con hilo de algodón. Tiene una particularidad muy especial que son sus accesorios desmontable como su bolsita y su sombrerito.

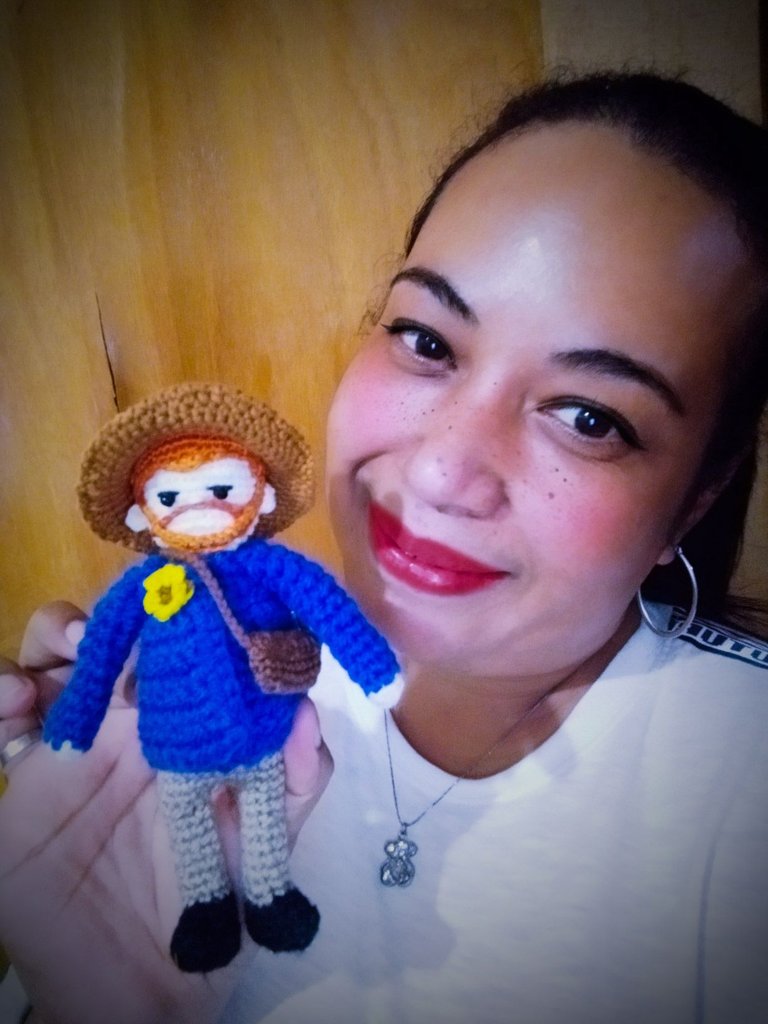
La realización de este personaje en lo personal me encantó ya que ha sido desde siempre uno de mis artistas favoritos y quise recrearlo para tener un recuerdo en mi colección personal.
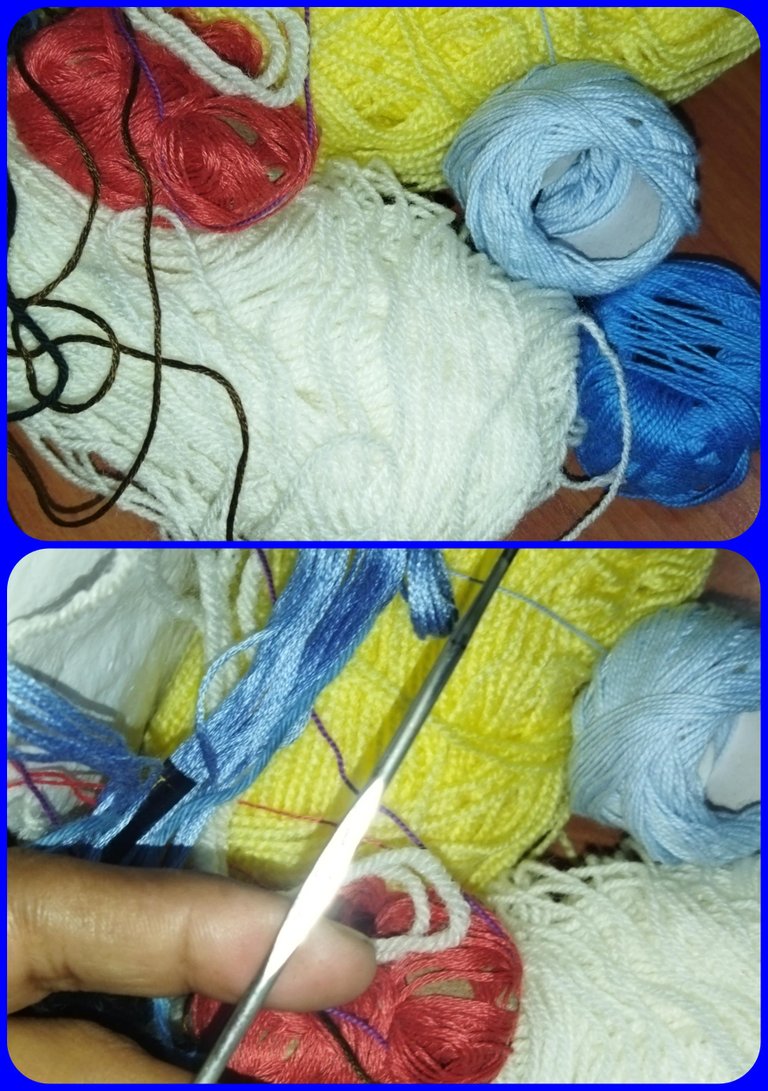
Los materiales utilizados fueron hilo de algodón en tonos: negro, gris claro, azul celeste, azul rey, piel, amarillo, marrón oscuro, naranja, algodón hipoalergénico, dos ojitos de seguridad,una aguja crochet número 3, una aguja para coser y tijera.
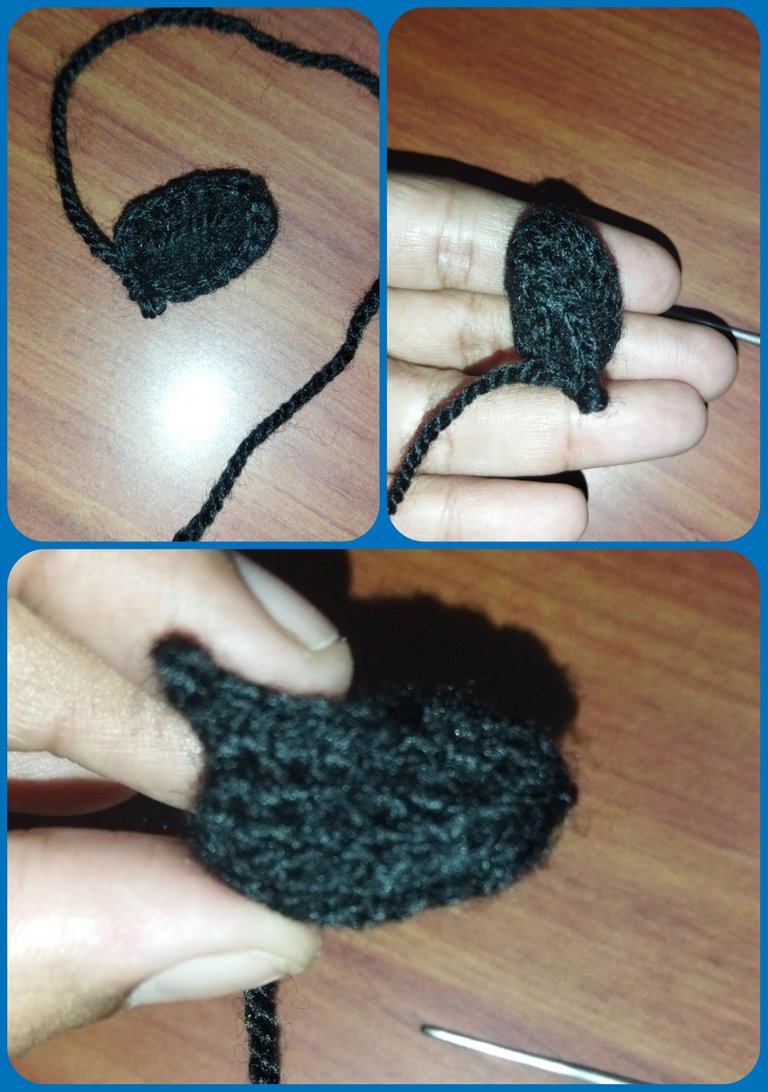
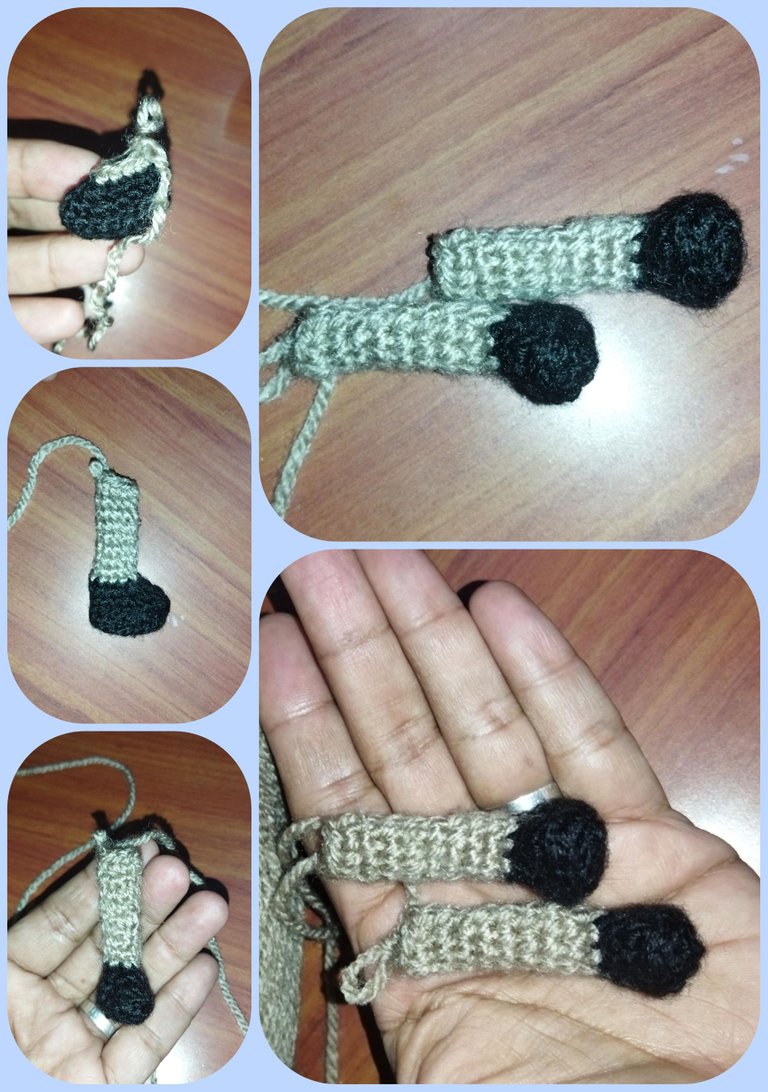
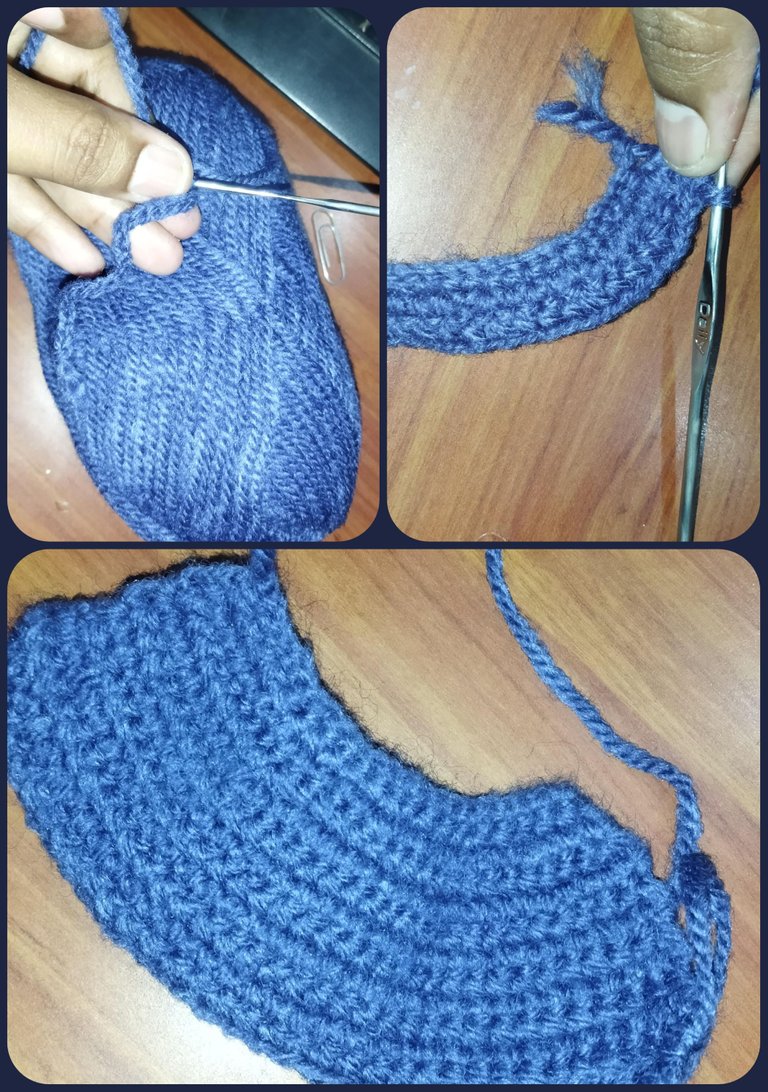
Vamos a comenzar haciendo los zapatitos en tono negro con una cadena de 7 puntos, En la segunda cadena vamos a hacer un aumento del punto bajo o sea dos puntos en el mismo punto. Luego vamos a hacer cuatro puntos bajos en cada cadena, en la última vamos a hacer tres puntos Bajos en la misma cadena o sea vamos a hacer un aumento triple estos puntos nos van a permitir girar el tejido y vamos a tejer por las hebras de la parte de atrás y vamos a hacer 5 puntos bajos uno en cada hebra y vamos a terminar esta vuelta con un total de 14 puntos bajos, ahora vamos a hacer la segunda vuelta voy a marcar con un hilito y vamos a empezar a haciendo aumentos un aumento del primer punto y un aumento en el segundo. Ahora en los cuatro puntos bajos uno en cada uno, llegamos a los tres puntos de la esquina de la vuelta anterior y vamos hacer un aumento en cada punto o sea tres aumentos seguidos, hacemos cuatro puntos Bajos en cada punto y el último punto que nos quedábamos hacer un aumento de punto bajo y esta vuelta la vamos a terminar con un total de 20 puntos. en la siguiente vuelta vamos a repetir los mismos 20 puntos bajos pero tomando solo la hebra de atrás del punto para formar la suela del zapato, en la vuelta siguiente vamos a empezar haciendo 6 puntos bajos y luego vamos a hacer cinco disminuciones seguidas bien apretadas para que después al momento de rellenar la pieza no se nos abran y se vea el relleno, luego hacemos cuatro puntos bajos para terminar la vuelta y vamos a tener un total de 15 puntos. En la vuelta que sigue vamos a empezar haciendo 5 puntos bajos, luego vamos a hacer tres disminuciones seguidas y luego hacemos 4 puntos bajos para terminar la vuelta y vamos a tener un total de 12 puntos, en este último punto voy a cambiar el color del pantalón en este caso voy a usar el color gris y vamos a seguir tejiendo en espiral 10 vueltas de los mismos 12 puntos bajos pero ahora en el color del pantalón. Vamos a hacer dos piezas iguales.
We are going to make five rows of the same 30 stitches we are going to make a single crochet in each stitch for the whole row for 5 rows, in the last stitch of this row we are going to change to light blue color and we are going to continue knitting the body and we are going to make six rows of the same 30 stitches but this time in light blue color we follow the sequence of 8 single crochets and a decrease for the whole row and at the end we will have a total of 27 stitches in this row we will repeat the same 27 stitches, we are going to make a single crochet in each stitch for the whole row, in the next row we are going to make the sequence of 7 single crochets and a decrease we repeat this sequence for the whole row and we are going to finish with a total of 24 stitches, now we are going to make two rows of the same 24 stitches we are going to make a single crochet in each stitch for 2 rows and of course don't forget to fill in the body as we are knitting, in the next row we are going to make the sequence of 6 single crochets and a decrease we repeat this sequence for the whole row and at the end we are going to have a total of 21 single crochets, in the next row we are going to make the sequence of 5 single crochets and a decrease for the whole row and at the end we will have a total of 18 stitches and we have to fill in the little body in the last decrease of this row we are going to incorporate the skin color to continue making the little head and in this row we are going to have the same 18 single crochets of the previous row.
Vamos a unir las piernas y vamos a hacer cinco puntos bajos para situarnos justo en la mitad de las piernas para que nos queden derechas, vamos a hacer tres cadenas al aire y nos vamos a unir en la otra pierna justito en la mitad y vamos a hacer 12 puntos bajos de la otra pierna, vamos a hacer un punto bajo en cada una de las tres cadenas que hicimos al aire y nos vamos a enganchar en la siguiente pierna, vamos a hacer los 12 puntos de esta y ahora vamos a hacer tres puntos pero por las hebras de atrás de las cadenas son tres nuevamente y con esto terminamos la vuelta ahí vamos a tener un total de 30 puntos.
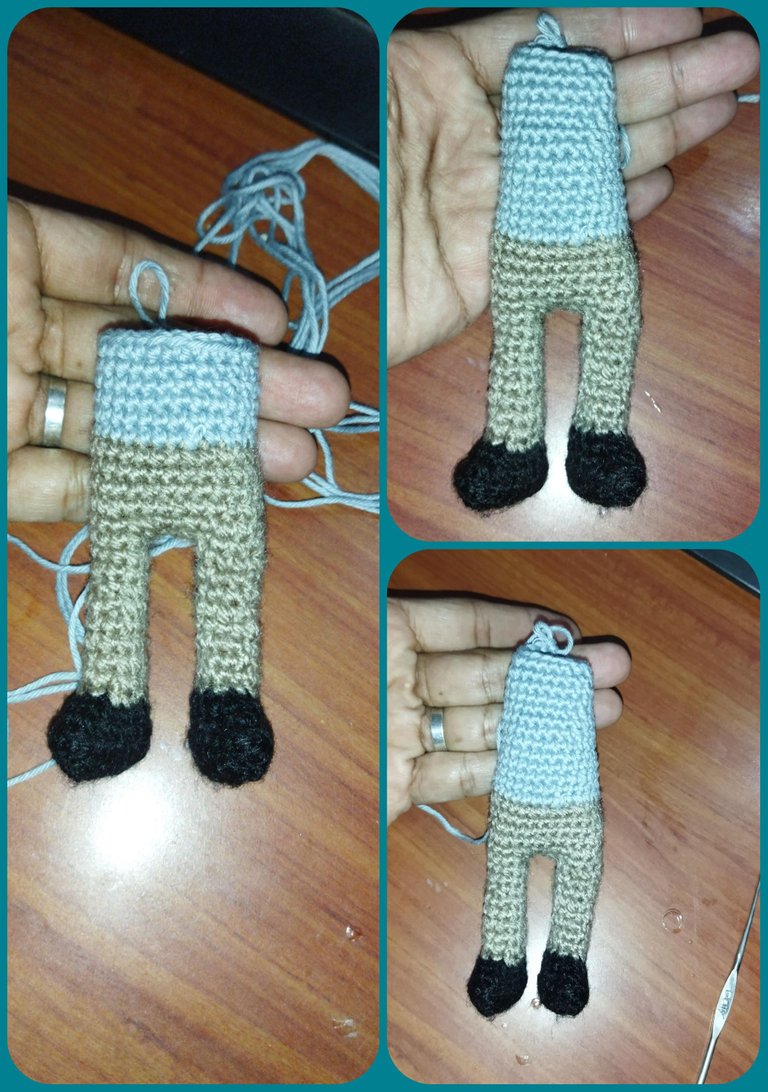
Vamos a hacer cinco vueltas de los mismos 30 puntos vamos a ir haciendo un punto bajo en cada punto por toda la vuelta durante 5 vueltas, en el último punto de esta vamos a cambiar al color celeste y vamos a continuar tejiendo el cuerpo y vamos a hacer seis vueltas de los mismos 30 puntos pero esta vez en color celeste se sigue la secuencia de 8 puntos bajos y una disminución por toda la vuelta y al final vamos a tener un total de 27 puntos en esta vuelta vamos a repetir los mismos 27 puntos, vamos a ir haciendo un punto bajo en cada punto por toda la vuelta, en la vuelta que sigue vamos a hacer la secuencia de 7 puntos Bajos y una disminución repetimos esta secuencia por toda la vuelta y vamos a terminar con un total de 24 puntos, ahora vamos a hacer dos vueltas de los mismos 24 puntos vamos a ir haciendo un punto bajo en cada punto durante 2 vueltas y por supuesto no se olviden de ir rellenando el cuerpito a medida que vamos tejiendo, en la vuelta que sigue vamos a hacer la secuencia de 6 puntos bajos y una disminución repetimos la secuencia por toda la vuelta y al final vamos a tener un total de 21 puntos bajos, en la siguiente vuelta vamos a hacer la secuencia de 5 puntos bajos y una disminución por toda la vuelta y al final vamos a tener un total de 18 puntos y tenemos que ir rellenando el cuerpito en la última disminución de esta vuelta vamos a incorporar el color piel para seguir haciendo la cabecita y en esta vuelta vamos a ser los mismos 18 puntos bajo de la vuelta anterior.
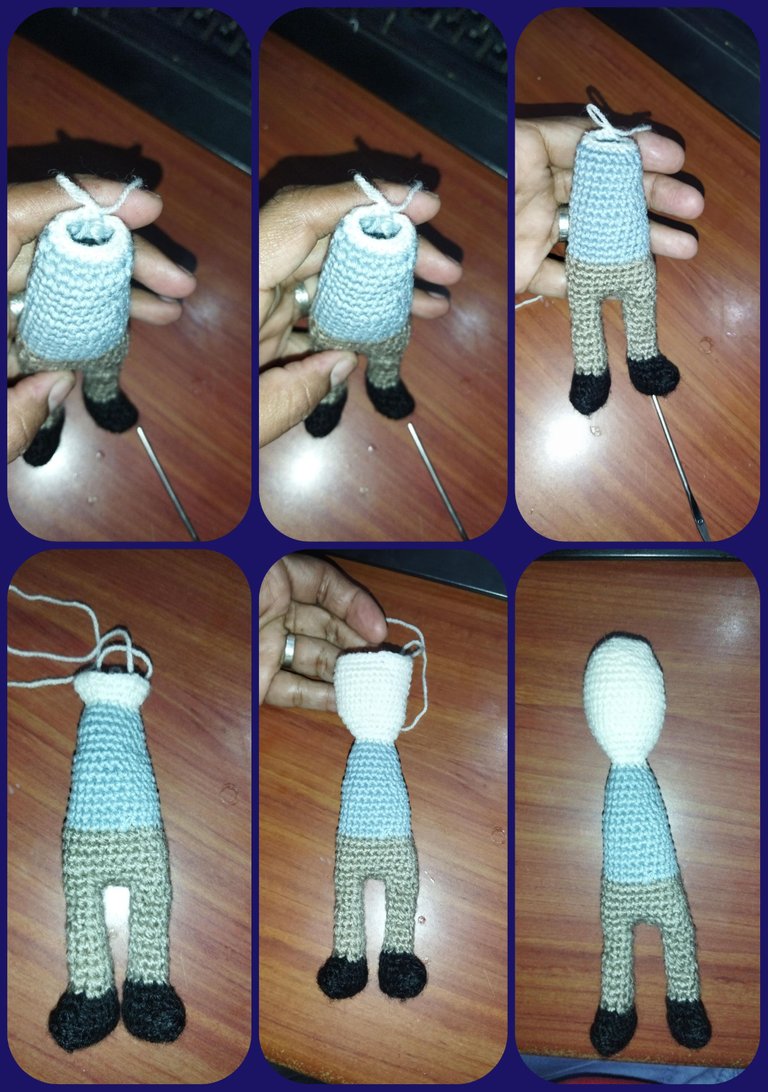
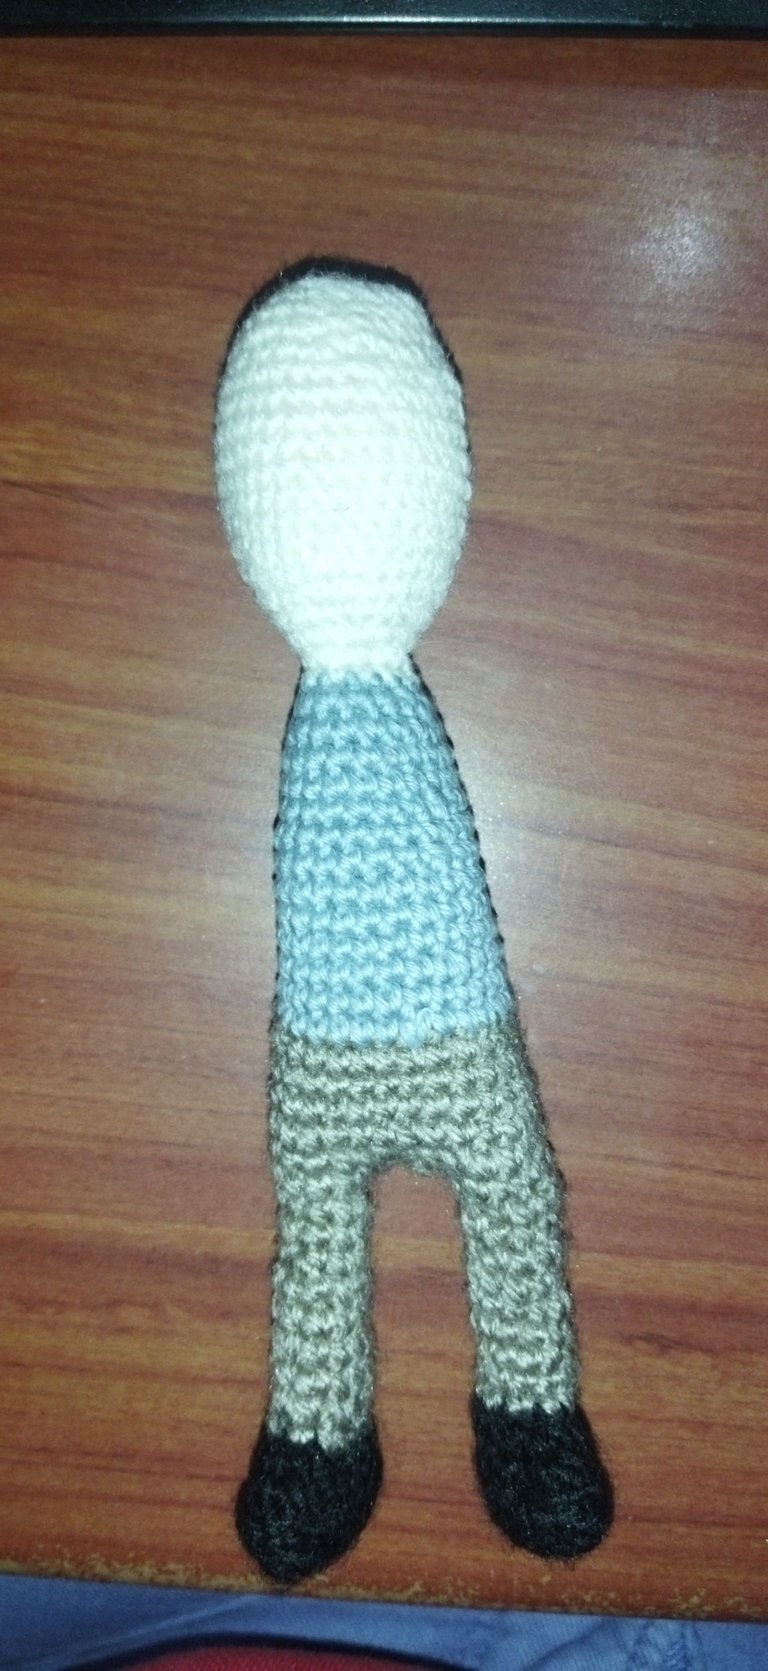
Vamos a ir haciendo un punto bajo en cada punto por toda la vuelta se termina la vuelta de 18 puntos bajo que está en el cuello y ahora vamos a hacer la secuencia de dos puntos bajos y un aumento repetimos esta secuencia por toda la vuelta y al final vamos a tener un total de 24 puntos Bajos, en la siguiente vamos a hacer la secuencia de tres puntos bajos y un aumento repetimos por toda la vuelta está secuencia y vamos a terminar con un total de 30 puntos bajos, en la siguiente vamos a hacer la secuencia de cuatro puntos bajos y un aumento repetimos esto y vamos a tener un total de 36 puntos Bajos, en esta vuelta tenemos que hacer la secuencia de 5 puntos bajos y un aumento repetimos por toda la vuelta y vamos a tener un total de 42 puntos Bajos, en la vuelta que sigue tenemos que hacer la secuencia de seis puntos bajo y un aumento repetimos hasta tener un total de 48 puntos, vamos a llegar a la parte más ancha de la cabecita y vamos a hacer 9 vueltas de los mismos 48 puntos bajos haciendo un punto en cada una durante 9 vueltas, al llegar a este punto vamos a colocar los ojitos entre las vueltas 5 y 6 con 8 puntos de separación entre cada hora vamos a proceder a cerrar la cabecita y en esta vuelta vamos a hacer la secuencia de 6 puntos bajos y una disminución por toda la vuelta y al final vamos a tener un total de 42 puntos, luego hacemos la secuencia de 5 puntos bajos y una disminución para un total de 36 puntos luego la secuencia de cuatro puntos bajos y una disminución para tener un total de 30 puntos la secuencia de tres puntos bajo y una disminución para un total de 24 puntos rellenamos la cabecita para continuar cerrando y la vuelta vamos a hacer la secuencia de dos puntos bajos y una disminución repetimos por toda la vuelta hasta obtener un total de 18 puntos bajos, en la siguiente vamos a hacer la secuencia de un punto bajo y una disminución por toda la vuelta y al final vamos a tener un total de 12 puntos en la vuelta que sigue vamos a hacer seis disminuciones y terminamos de cerrar con la aguja, culminando de esta forma el cuerpo de nuestro pequeño Vincent.
Para la realización de la chaqueta vamos a hacer un total de 23 cadena a partir de la segunda vamos a hacer el primer punto bajo y vamos a ir haciendo un punto en cada una de las cadena hasta el final y tenemos que tener un total de 22 puntos bajos, al terminar vamos a levantar una cadenita giramos Y empezamos haciendo 5 puntos Bajos en cada. En el siguiente punto Vamos a hacer un aumento, o sea dos puntos en el mismo punto, vamos a hacer 10 puntos bajos uno en cada punto. Después de los 10 puntos Bajos en el siguiente punto Vamos a hacer un aumento nuevamente y terminamos la vuelta con 5 puntos bajos uno en cada punto y en esta vuelta vamos a terminar con un total de 24 puntos, al terminar vamos a hacer una cadenita, giramos y vamos a hacer la secuencia de tres puntos bajos y un aumento por toda la vuelta, al final vamos a tener un total de 30 puntos, hacemos una cadenita giramos y ahora vamos a hacer la secuencia de 9 puntos Bajos y un aumento hasta el final y vamos a terminar con un total de 33 puntos bajos, levantamos una cadenita y giramos, ahora vamos a hacer la secuencia de 10 puntos bajo y un aumento hasta el final y vamos a terminar con un total de 36 puntos bajos al terminar levantamos una cadenita giramos vamos a ir a pidiendo los mismos 36 puntos bajos por un total de 8 vueltas hacemos los 36 puntos bajos uno en cada punto.
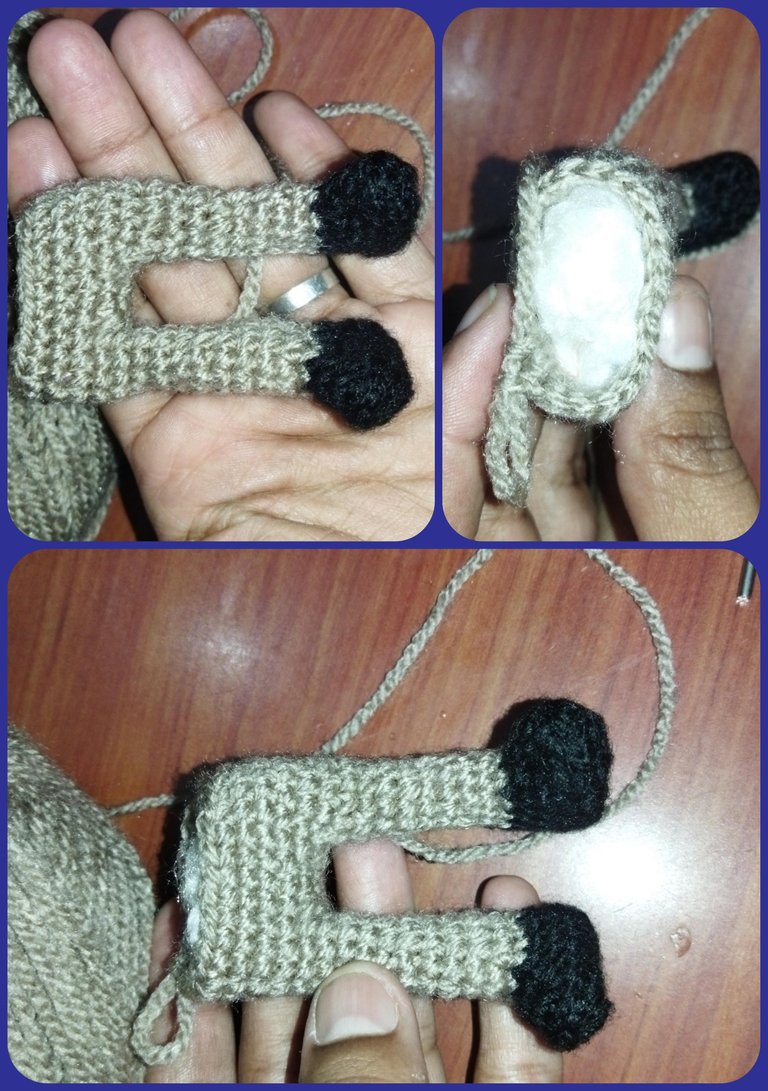
Para realizar los bracitos con color piel vamos hacer un anillo mágico de 5 puntos bajos, ajustamos y en la segunda vuelta vamos a hacer cinco aumentos y vamos a terminar la vuelta con un total de 10 puntos bajo, vamos a hacer dos vueltas de los mismos 10 puntos bajos y vamos a ir haciendo un punto bajo en cada punto durante 2 vueltas para formar la manito, en el último punto de esta vuelta vamos a cambiar a color azul rey qué sería la parte de la chaqueta de pintor y vamos a ir haciendo un punto bajo en cada punto. Tenemos que hacer un total de 12 vueltas de 10 puntos bajos y vamos a ir rellenando el bracito a medida que vamos tejiendo al terminar las 12 vueltas de 10 puntos vamos a cerrar por la mitad vamos a tomar el punto que sigue y el punto de atrás hacer un punto bajo y vamos a hacer cuatro abajo y cuatro puntos en total hacemos una cadenita dejamos un poco de hebra larga para coser y así tenemos listos los dos bracitos.
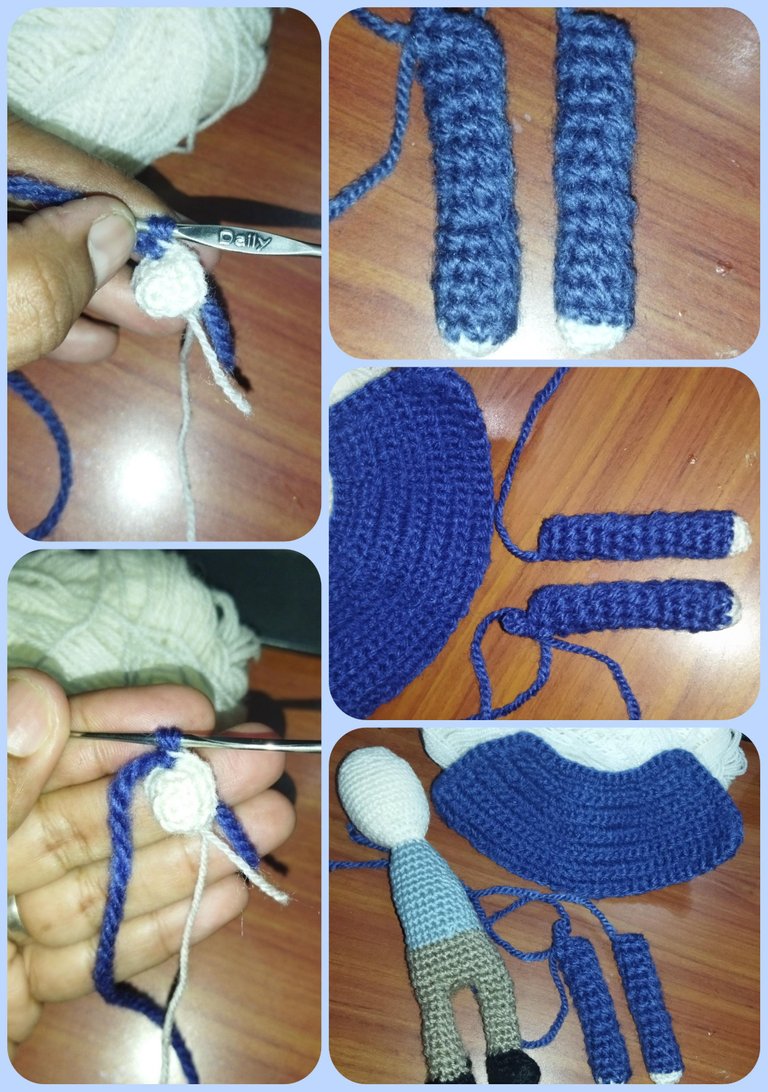
Para la realización del pelito vamos a empezar con un anillo mágico de 6 puntos bajos que vamos a ajustar y en la segunda vuelta vamos a hacer seis aumentos para terminar un total de 12 puntos Bajos. En la vuelta número tres vamos a hacer la secuencia de un punto bajo y un aumento repetimos esta secuencia por toda la vuelta y al final vamos a tener un total de 18 puntos Bajos, en la vuelta número cuatro vamos a hacer la secuencia de dos bajos y un aumento repetimos por toda la vuelta hasta obtener un total de 24 puntos Bajos, en la vuelta número cinco vamos a hacer la secuencia de tres puntos bajos y un aumento por toda la vuelta y al final vamos a tener un total de 30 puntos, en la vuelta número seis vamos a hacer la secuencia de cuatro puntos bajo y un aumento por toda la vuelta para un total de 36 puntos Bajos, en la vuelta número 7 Vamos a hacer la secuencia de cinco puntos Bajos y un aumento para un total de 42 puntos, en la vuelta número 8 vamos a hacer la secuencia de seis puntos Bajos y un aumento por toda la vuelta para un total de 48 puntos Bajos, en la vuelta número nueve vamos a hacer la secuencia de 7 puntos Bajos y un aumento para un total de 54 puntos bajos, luego hacemos 6 vueltas de los mismos 54 puntos bajos un punto en cada punto en la siguiente vuelta vamos a empezar haciendo 22 puntos deslizados pero vamos a soltar un poquito el hilo y no lo vamos a hacer tan apretado y después el pelito no le va a caber en la cabeza entonces vamos a hacer 22 puntos deslizados soltándola un poquito y lo hacemos después de los 22 puntos vamos a hacer dos puntos bajos uno en cada punto, Vamos a hacer dos medios alto uno en cada. Luego 2 puntos alto uno en cada punto Luego 2 puntos medios altos y uno en cada punto, Luego 2 puntos bajos uno en cada punto y así terminamos la vuelta con 22 puntos deslizados y ya está listo el pelito.
Para la barba hice 25 cadenas, a partir de la segunda cadena hacemos 5 puntos bajos luego 14 medios altos y 5 puntos bajos, y así está lista la barba. Para el bigote simplemente hacemos 14 cadenas y cerramos. Vamos a hacer la orejita simplemente vamos a hacer un anillo mágico de 5 puntos bajos, ajustamos el anillo Y en vez de cerrar uniéndonos en el siguiente punto Simplemente aquí vamos a hacer una cadenita y vamos a dejar la hebra larga. Para el parchecito de la oreja vamos a empezar con nuestro nudito y cuatro cadenas a partir de la segunda vamos a hacer el primer punto Bajo y vamos a hacer un punto bajo en cada cadena solo para un total de 3 puntos bajos, al terminar hacemos una cadenita, giramos y volvemos hacer tres puntos bajos, al terminar levantamos una cadenita giramos y volvemos a ser tres puntos, vamos ahora a tejer por toda la orilla puntos bajos.
For the bag we are going to take brown brown and we are going to start a knot and make 8 chains, in the second chain we are going to make an increase or two low stitches in the same stitch, we make 5 low stitches one in each chain and in the last chain we are going to make a low stitch or triple increase this will allow us to turn, now we are going to make 6 low stitches in each stitch, we finish the whole round and we should have a total of 18 low stitches, we make three rows of the same 18 single crochet stitches and we are going to make a single crochet in each stitch for 3 rows when we finish we raise a chain we turn and make eight single crochet stitches, we turn again and make the eight stitches when we finish we make a chain again we turn and we make the last row of 8 stitches and we leave the strand short because we are only going to hide it with the needle and now we are going to make the strap of the bag to make the strap of the bag we will make a total of 43 chains that we will fix to the part of the bag.
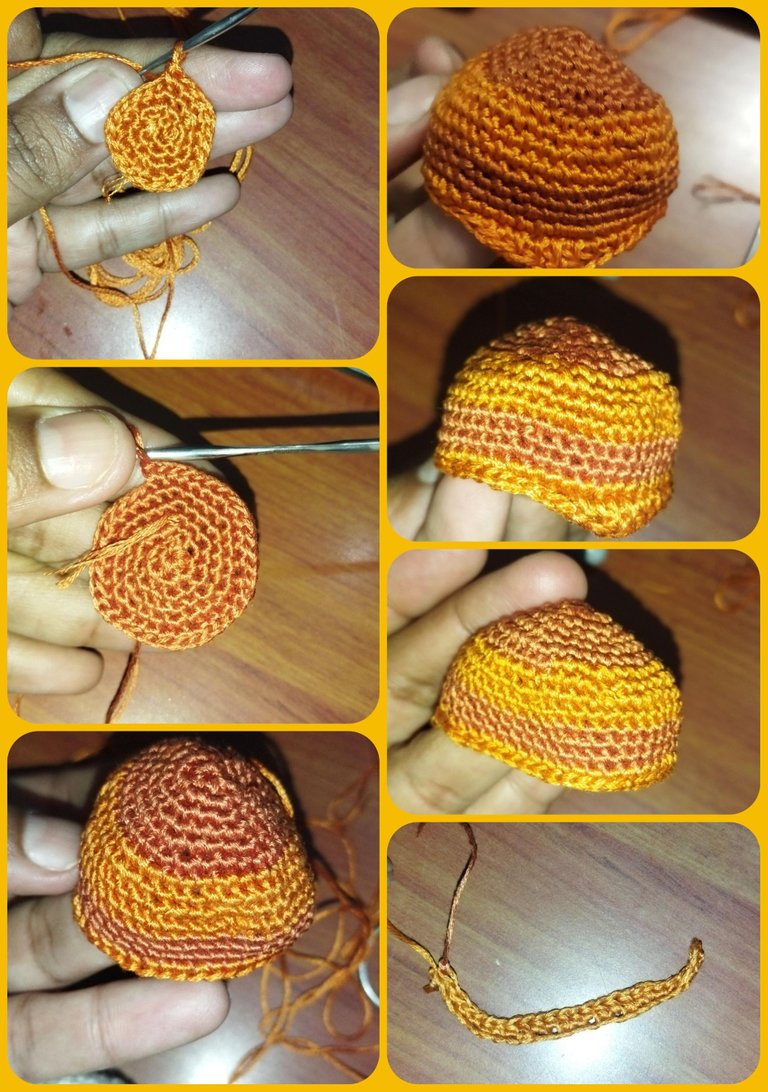
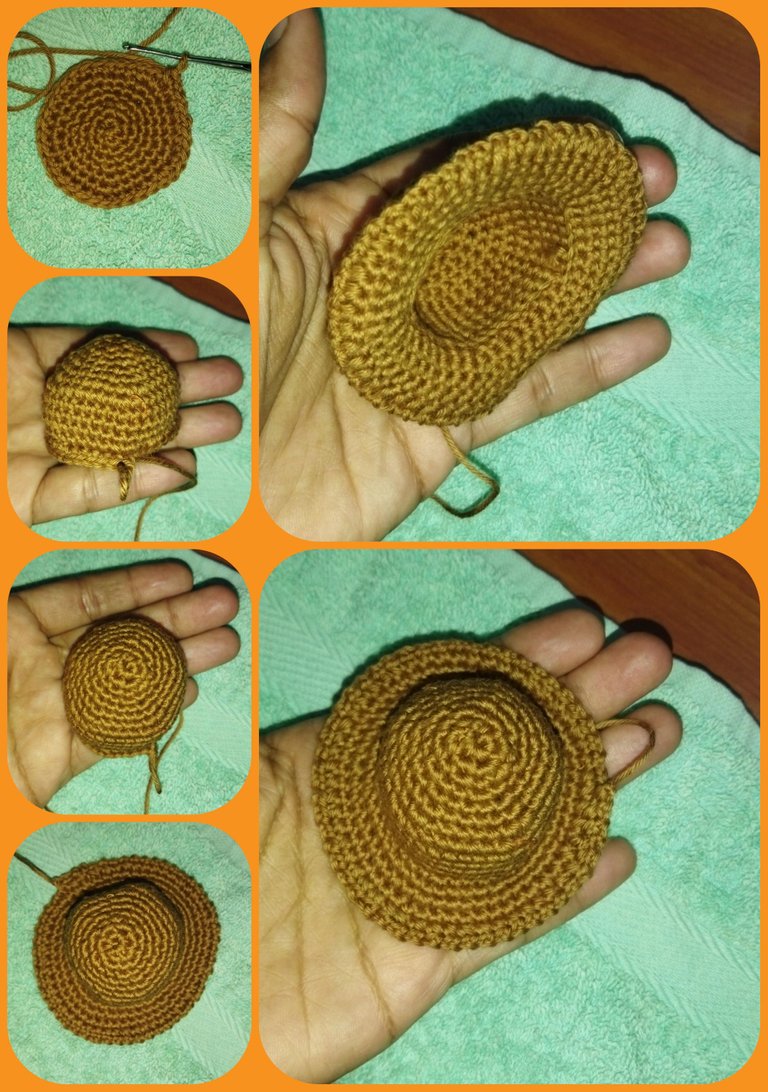
Para realizar el sombrerito vamos a hacer el mismo procedimiento que utilizamos para hacer el pelito, al llegar a la vuelta de 7 puntos bajos y un aumento por toda la vuelta y tenemos un total de 54 puntos exactamente igual que el procedimiento del pelito, vamos a hacer cinco vueltas de los mismos 54 puntos, y vamos a ir haciendo un punto bajo en cada punto Durante 5 vueltas, ahora vamos a trabajar tomando solo la hebra de adelante del punto y vamos a hacer la secuencia de 8 puntos bajos y un aumento por toda la vuelta y al final vamos a tener un total de 60 puntos, en la vuelta que sigue vamos a tomar los puntos de forma normal y vamos a hacer la secuencia de 9 puntos bajo y un aumento por toda la vuelta y al final vamos a tener un total de 66 puntos Bajos, en la vuelta que sigue vamos a hacer la secuencia de 10 puntos bajo y un aumento repetimos la secuencia por toda la vuelta y vamos al finalizar con un total de 72 puntos Bajos, en la vuelta que sigue vamos a repetir los mismos 72 puntos bajo y ahora vamos a ser la última vuelta para darle la orillita un toque especial y voy a hacer una cadena y un punto bajo hasta el final.
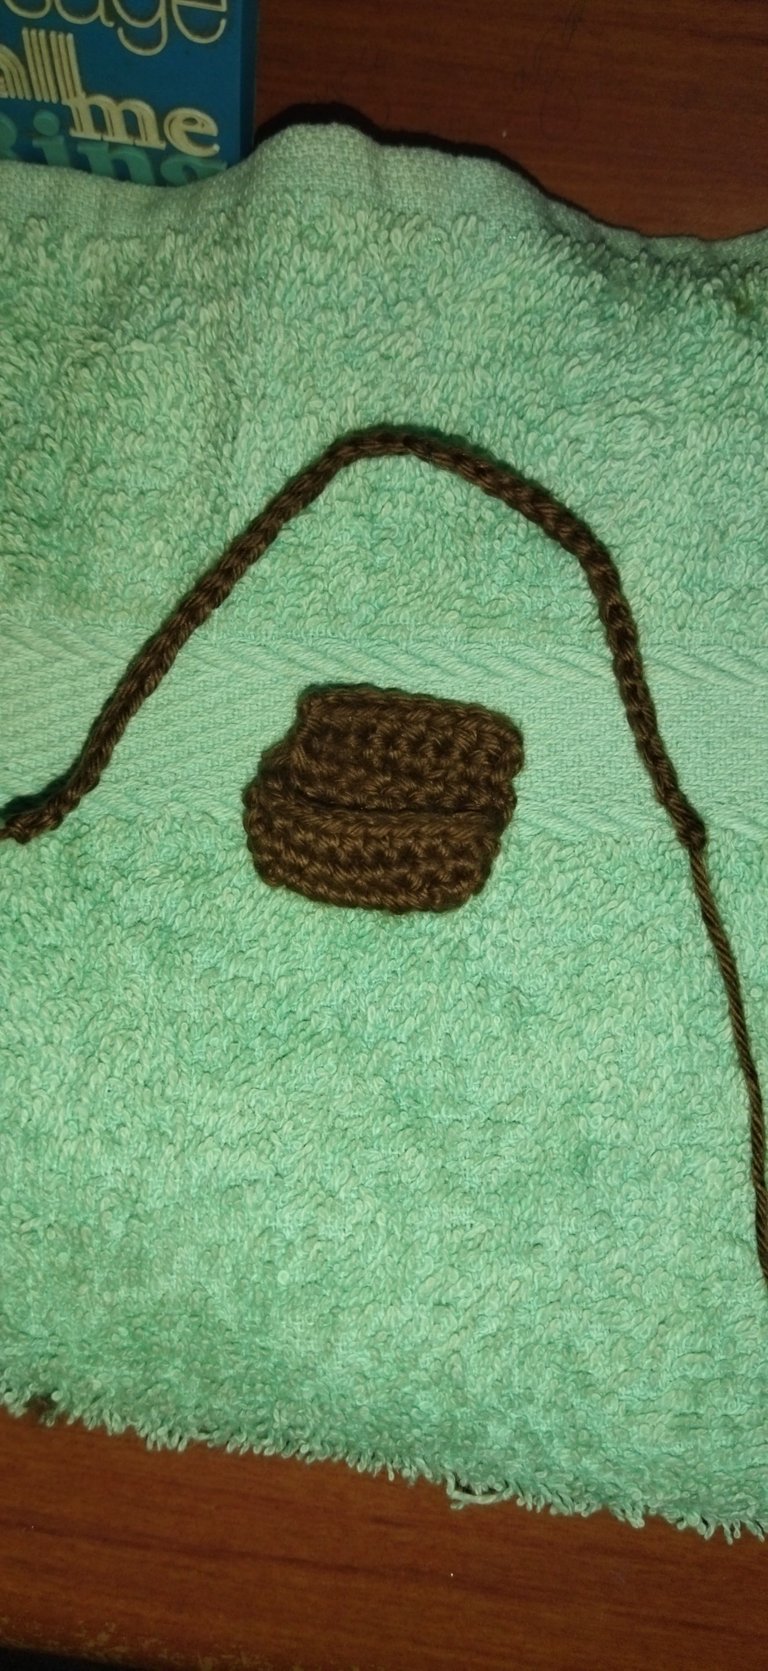
Para el bolsito vamos a tomar marrón café y vamos a iniciar un nudo y hacemos 8 cadenas, en la segunda cadena vamos a hacer un aumento osea dos puntos bajo en el mismo punto, Lo hacemos 5 puntos bajos uno en cada cadena y en la última vamos a hacer un punto Bajo o sea aumento triple esto nos va a permitir girar, ahora vamos a hacer 6 puntos bajos en cada punto, terminamos toda la vuelta y debemos tener un total de 18 puntos bajos, hacemos tres vueltas de los mismos 18 puntos bajos y vamos a ir haciendo un punto bajo en cada punto durante 3 vueltas al terminar levantamos una cadenita giramos y hacemos ocho puntos Bajos, volvemos a girar y volvemos hacer los ocho puntos al terminar volvemos hacer una cadenita giramos y hacemos ya la última vuelta de 8 puntos y dejamos la hebra cortita porque solo la vamos a esconder con la aguja y ahora vamos hacer el tirante del bolsito para hacer la correa del bolsito vamos a hacer un total de 43 cadenas que vamos a fijar a la parte del bolso.
Solo nos restaría realizar el último accesorio de este lindo muñequito que sería su emblemática flor amarilla vamos a empezar haciéndole con un anillo mágico de 5 puntos bajos, y vamos a enganchar en el primer puntos agregamos el color de los pétalos qué es el amarillo haciendo dos cadenas, y un punto medio alto en el mismo lugar, dos cadenas y un punto deslizado todo en el mismo punto y pasamos al siguiente punto Haciendo un punto deslizado y repetimos hasta cubrir la parte marrón de la flor.
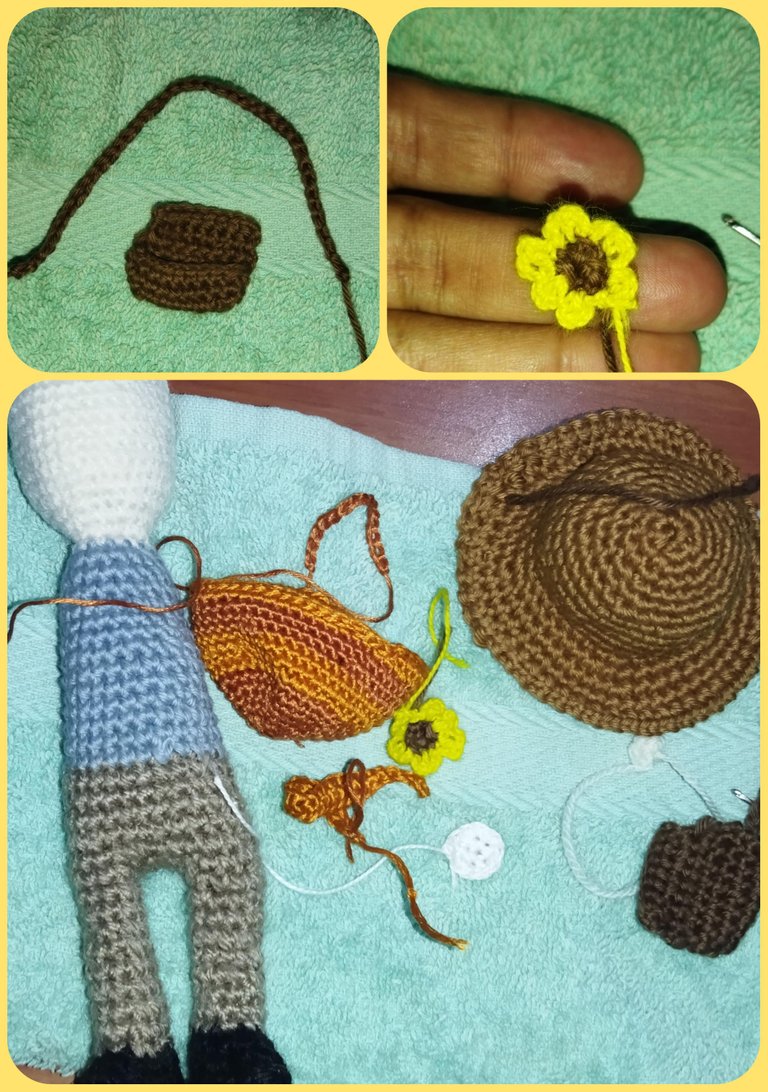
Ahora tenemos listo todos nuestras piezas y solo nos queda ensamblar nuestro muñequito lo primero que vamos a hacer es la carita haciéndole una pequeña nariz y ponemos las líneas sobre los ojos. Colocamos su barba su bigote su orejita súper Chito fijamos su chaqueta de pintor con su flor colocamos su sombrero y su bolsita.
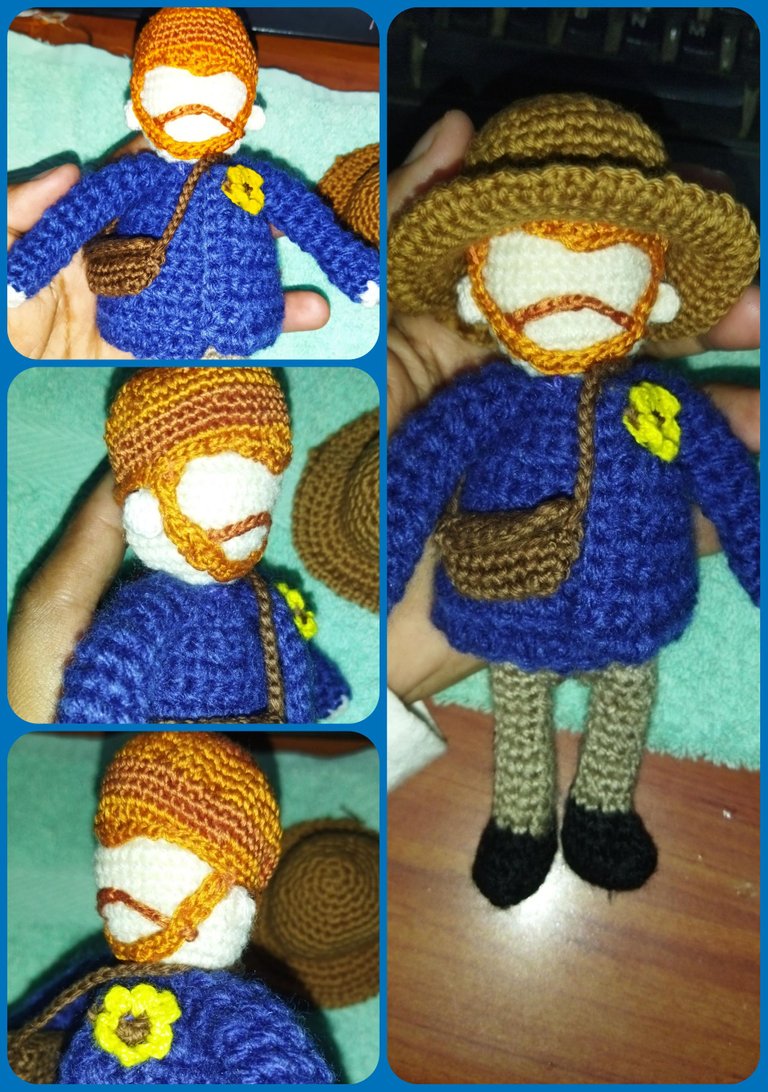
Y de esta manera tenemos culminado a este pequeño Vincent van Gogh bello me encantó el resultado y se ha convertido en uno de mis favoritos si te gustó házmelo saber en tus comentarios si tienes alguna recomendación por mi parte me despido agradeciendo todo tu apoyo y tu interés hasta una nueva oportunidad les deseo muchas bendiciones y éxitos saludos.
Todas las imágenes son de mi propiedad tomadas con Redmi 9t y editadas con Photoshop Express para Android y traducido con la aplicación Deepl para Android.
Hermoso.
Te felicito amiga, muy buen trabajo y muy delicado.
Gracias amiga saludos
Rayos esto quedó de otro nivel, realmente impresionante me encanto
Gracias 😀😀😀
Me encanta. Es tan cuchi.!!
!discovery 30
This post was shared and voted inside the discord by the curators team of discovery-it
Join our community! hive-193212
Discovery-it is also a Witness, vote for us here
Delegate to us for passive income. Check our 80% fee-back Program
WOW 🤩 ¡Este post es otro nivel! !No sabes cuánto me encanta Van Gogh, así que apenas ví el post tuve que clickear sobre él! 😻 Me encanta esta técnica con la que diseñaste el muñeco, me he dado cuenta de que últimamente está muy de moda.
Tienes un talento increíble. Ahora desbloqueé una nueva cosa que quiero: un Vincent Van Gogh de crochet 🥺
Gracias por compartir 💖😸
Graciass que gusto saber que fue de su agrado saludos!!!😘😘
¡Felicidades! Esta publicación obtuvo upvote y fue compartido por @la-colmena, un proyecto de Curación Manual para la comunidad hispana de Hive que cuenta con el respaldo de @curie.
Si te gusta el trabajo que hacemos, te invitamos a darle tu voto a este comentario y a votar como testigo por Curie.
Si quieres saber más sobre nuestro proyecto, acompáñanos en Discord: La Colmena.
Se ve muy lindo, Me encanto tu creatividad te felicito😮
Gracias ☺️☺️
De nadaa😁
Que trabajo tan bonito, esta muy lindo ✨
Muchas gracias amiga 😘😊😘