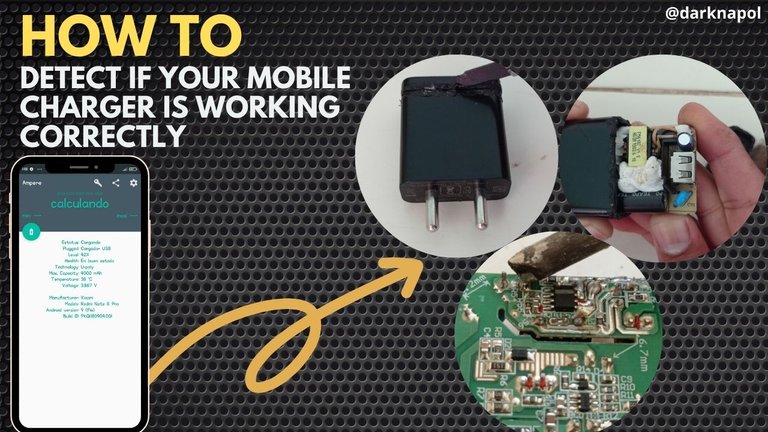
CÓMO DETECTAR SI EL CARGADOR DE TU MÓVIL FUNCIONA CORRECTAMENTE // HOW TO DETECT IF YOUR CELL PHONE CHARGER IS WORKING CORRECTLY [ES-EN]
ESPAÑOL
Hola colegas, empiezo este escrito deseándoles un buen día. Hoy quiero comentarles cómo es posible utilizar una aplicación para teléfonos móviles (App en lo adelante), que permite detectar si el cargador de la batería está en óptimas condiciones y proporcionando la corriente necesaria para cargarla correctamente.
Te diré cómo utilizar la App y como reparé mi cargador después de detectar un mal funcionamiento en el mismo mediante el uso de dicha App.
Hace poco tiempo empecé a notar que la batería de mi celular tardaba más de lo normal en cargarse, y en ocasiones no sobrepasaba cierto nivel del porcentaje de carga, por ejemplo a veces solo llegaba hasta el 30% sin importar el tiempo que estuviera conectado, por supuesto que empecé a sospechar del cargador o del cable que ya se le ha empezado a deteriorar el forro.
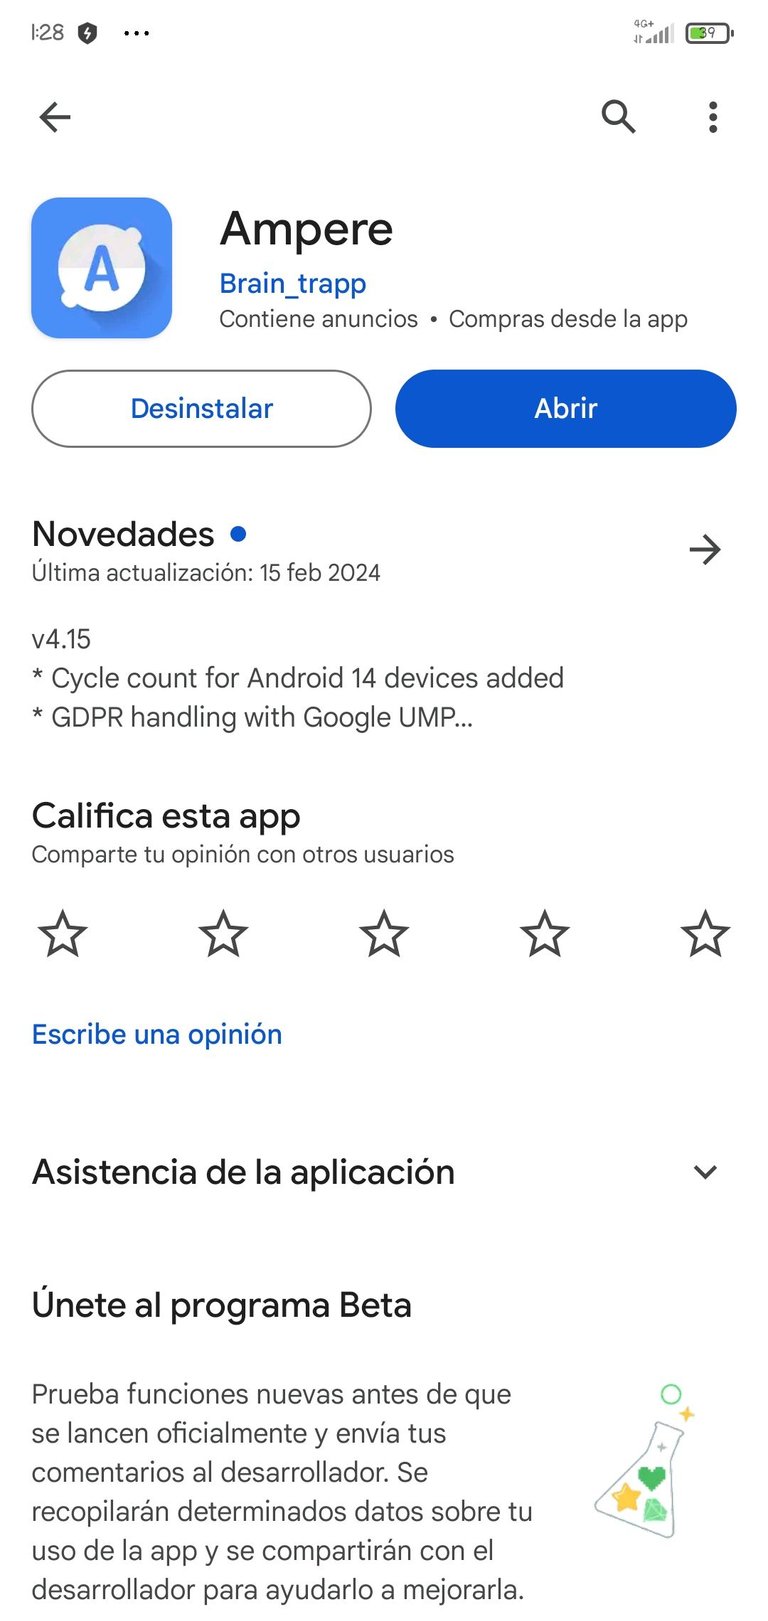
Al darme cuenta de esto descargué la aplicación Ampere desde la Play Store. Esta aplicación nos da una serie de información sobre el estado de carga y descarga de la batería del teléfono. También es capaz de dar la temperatura, el nivel de voltaje y el estado de vida de la batería, entre otras informaciones.
A continuación te comento cómo utilizar la App para determinar si el cargador del celular o el cable están en buen estado y como reparé mi cargador después de detectar un mal funcionamiento utilizando solo la App.
Pasos para emplear la app.
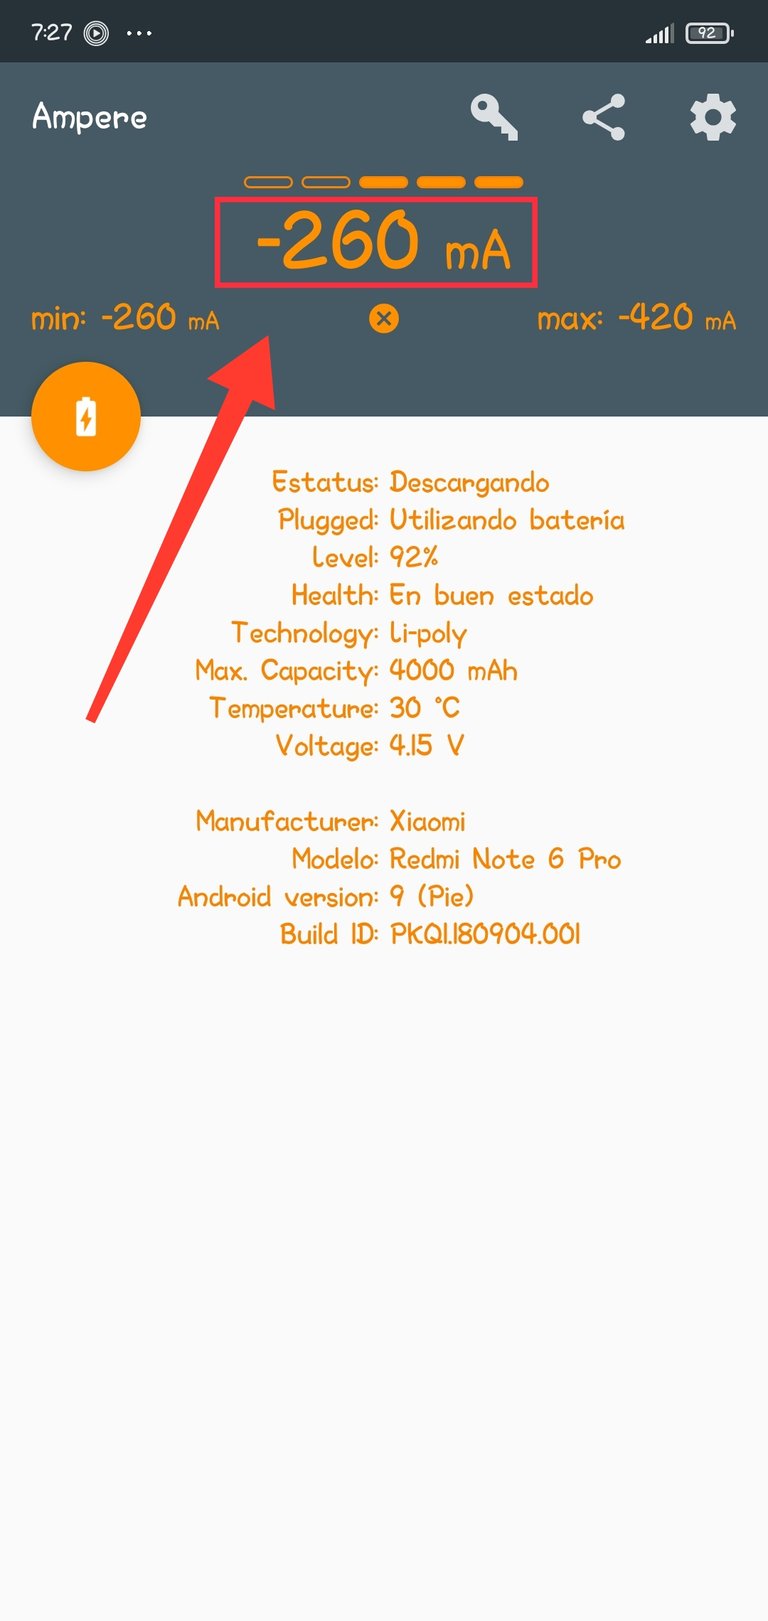
- Una vez descargada desde la Play Store la abrimos y automáticamente nos saldrá una pantalla donde se muestra toda la información respecto a la batería y el estado en qué se encuentra, ya sea cargándose o descargándose, así como la intensidad de corriente de carga o descarga, medidas en miliamperios (mA).
- Luego verificamos en los datos del cargador, cuál es su corriente máxima de salida.
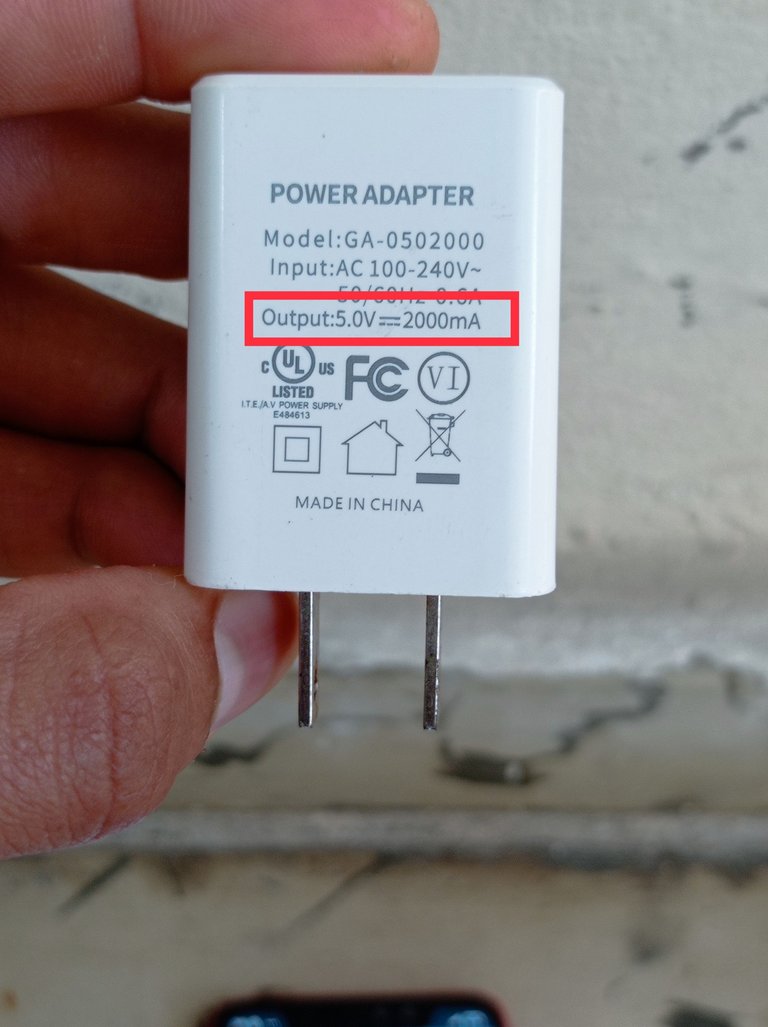
Ejemplo de los datos de un cargador con un voltaje de salida de 5 V y una corriente de 2000 mA.
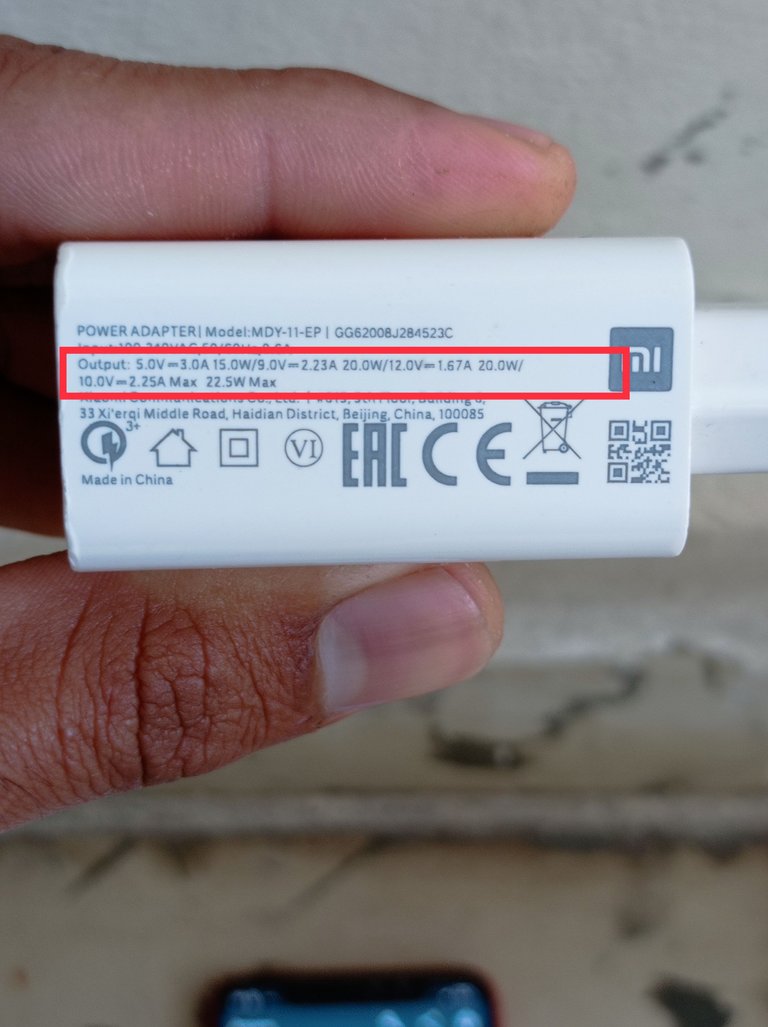
Ejemplo de los datos de otro cargador con un voltaje de salida de 5 V y una corriente de 3 A que equivalen a 3000mA
- Una vez se conoce la corriente máxima de salida del cargador, lo conectamos al celular y automáticamente nos aparece en pantalla la palabra calculando, hasta el momento en que se muestra la intensidad de corriente que le está proporcionando el cargador, (medida en mA).

- Verificamos que la intensidad de corriente que le está proporcionando el cargador a la batería tenga valores cercanos a la máxima corriente de salida del cargador. Este valor será más cercano al valor de la máxima corriente de salida del cargador mientras más descargada se encuentre la batería, e irá disminuyendo a medida que se vaya cargando la batería.
Por ejemplo, si se tiene la batería en 20% de carga, y se le conecta un cargador con una salida de 5 volts y 3 amperes (A), la corriente de carga inicial alcanzará valores cercanos a los 3A e irá disminuyendo a medida que valla aumentando el nivel de carga de la batería.
- En las siguientes imágenes expongo el ejemplo.
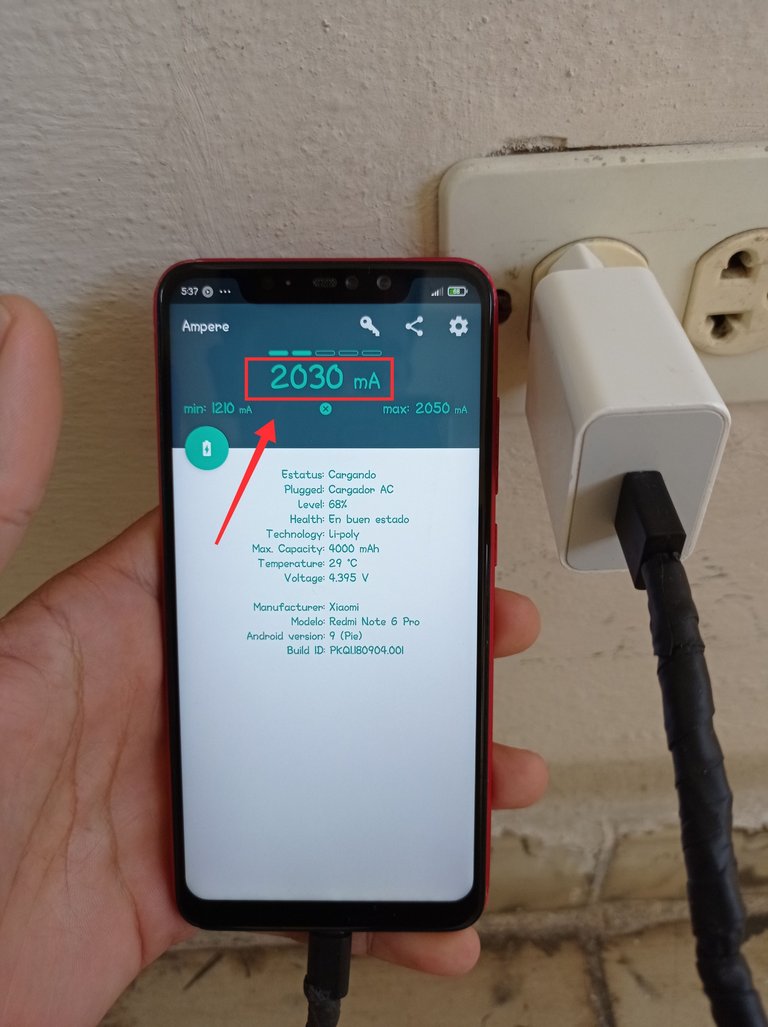
Teléfono conectado al cargador de 3000 mA, con un nivel de 68% de batería y recibiendo 2030 mA, este cargador está funcionando correctamente, está proporcionando valores cercanos a los 3000 mA.
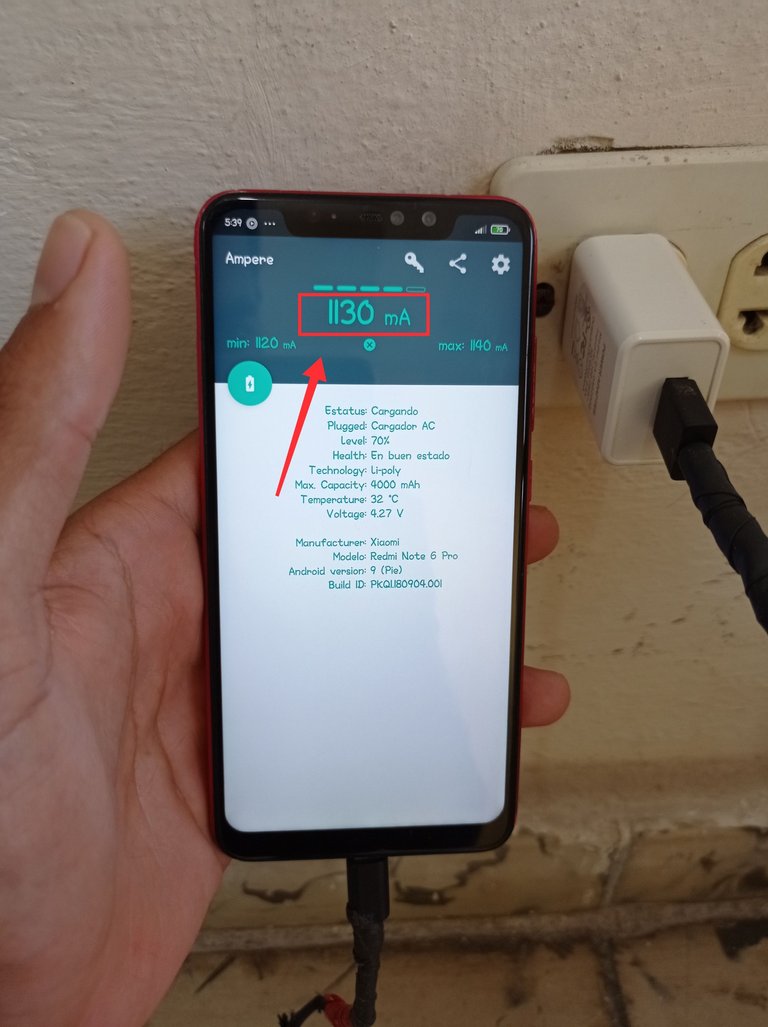
Teléfono conectado al cargador de 2000 mA, presenta un nivel de batería del 70% y recibiendo 1130 mA del cargador. Este cargador se encuentra en buen estado, ya que la intensidad de corriente que le proporciona es cercana a los 2000 mA.
En los dos ejemplos anteriores el teléfono se probó con dos cargadores en buen estado y con el mismo cable USB. Hay que destacar que para que el cargador proporcione esos valores de corriente como los del ejemplo, la batería debe de estar lo más descargada posible, ya que en ese momento será cuando mayor intensidad de corriente le proporcionara el cargador y por ende nos permitirá comprobar si está trabajando sin problemas.
Las pruebas anteriores las hice con los cargadores de los teléfonos de mi madre y mi esposa, los cuales funcionan correctamente. A continuación les muestro las pruebas que les hice al cargador de mi celular, el cual tiene una salida de 5 Volts con 2000 mA.
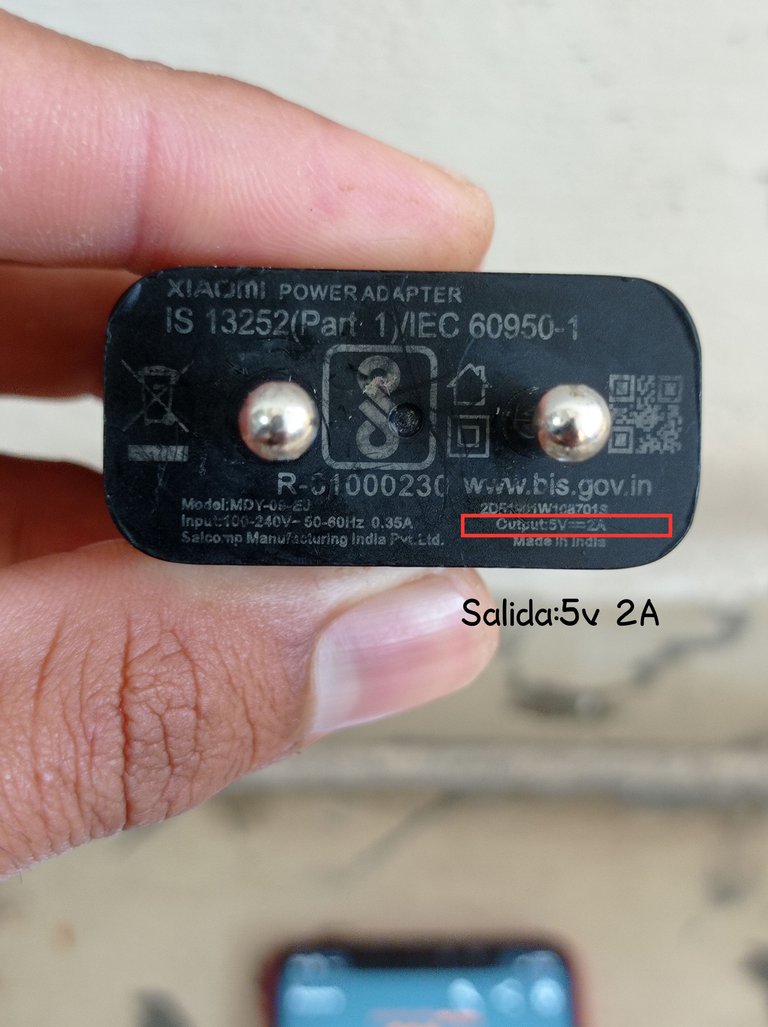
Cargador de mi celular, es capaz de proporcionar 2000 mA de corriente en su salida.
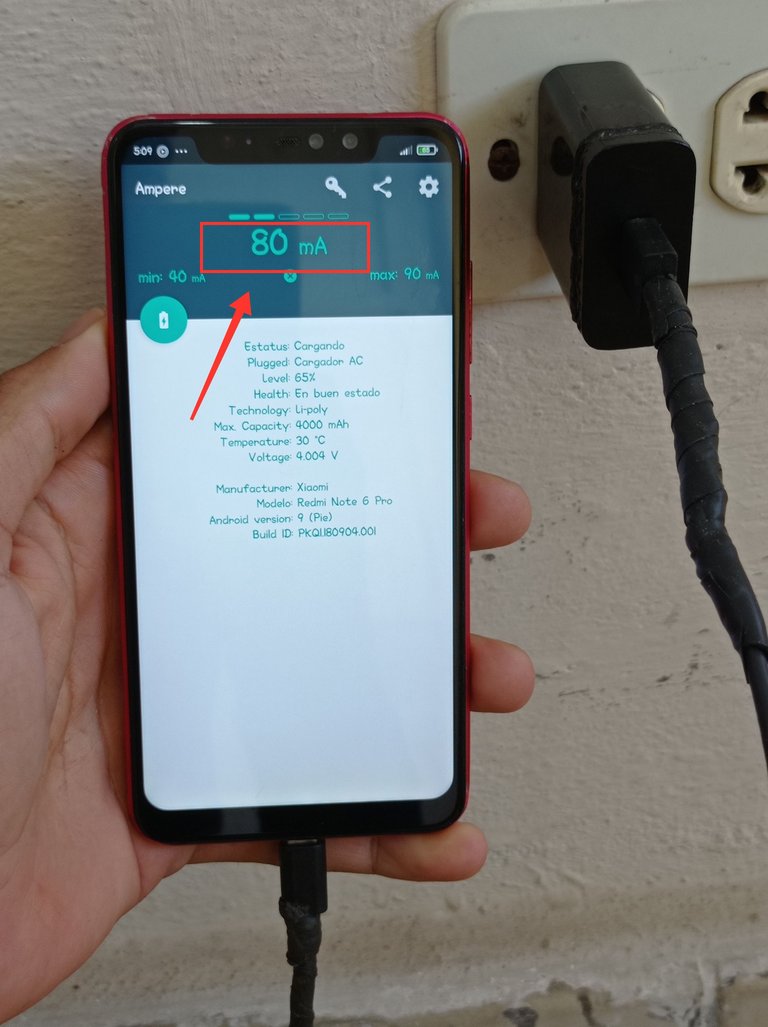
Mi cargador proporcionado solo 80 mA a la batería que se encuentra en 65%. Este comportamiento no es normal, ya que la intensidad de corriente es demasiado pequeña comparada con los 2000 mA que es capaz de proporcionar. Esos 80 mA no logran cargar la batería del teléfono.
Cómo se pudo apreciar en la imagen anterior, el cargador presenta problemas, y la baja intensidad de corriente que está proporcionando a su salida no logrará cargar efectivamente la batería. De esta forma y usando esta App me doy cuenta de la anomalía en el funcionamiento del cargador, por lo que tendré que abrirlo con la idea de repararlo.
Proceso de reparación.
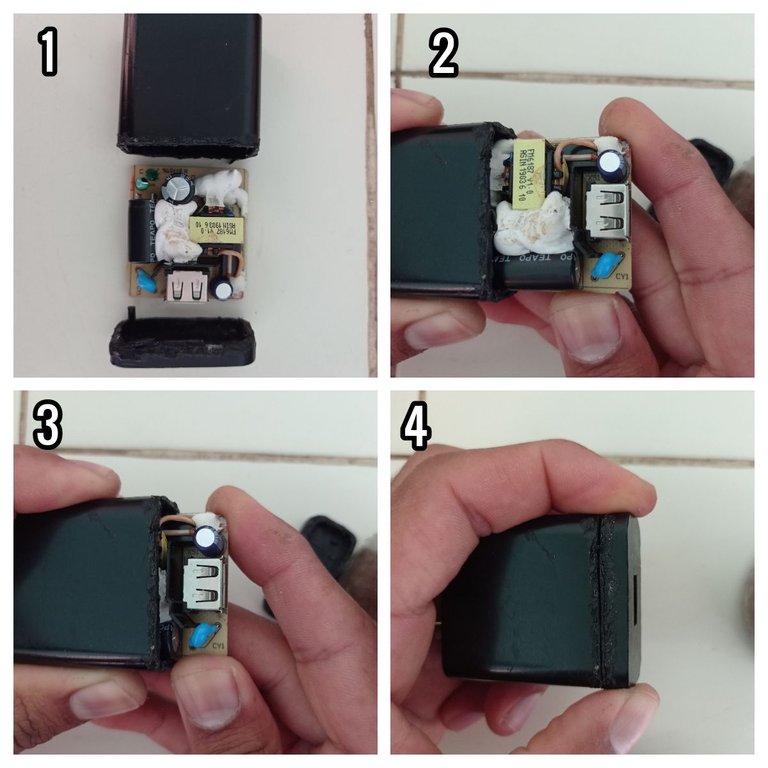
- Estos cargadores vienen sellados herméticamente, por lo que utilicé un cutter y una fosforera para abrirlo.
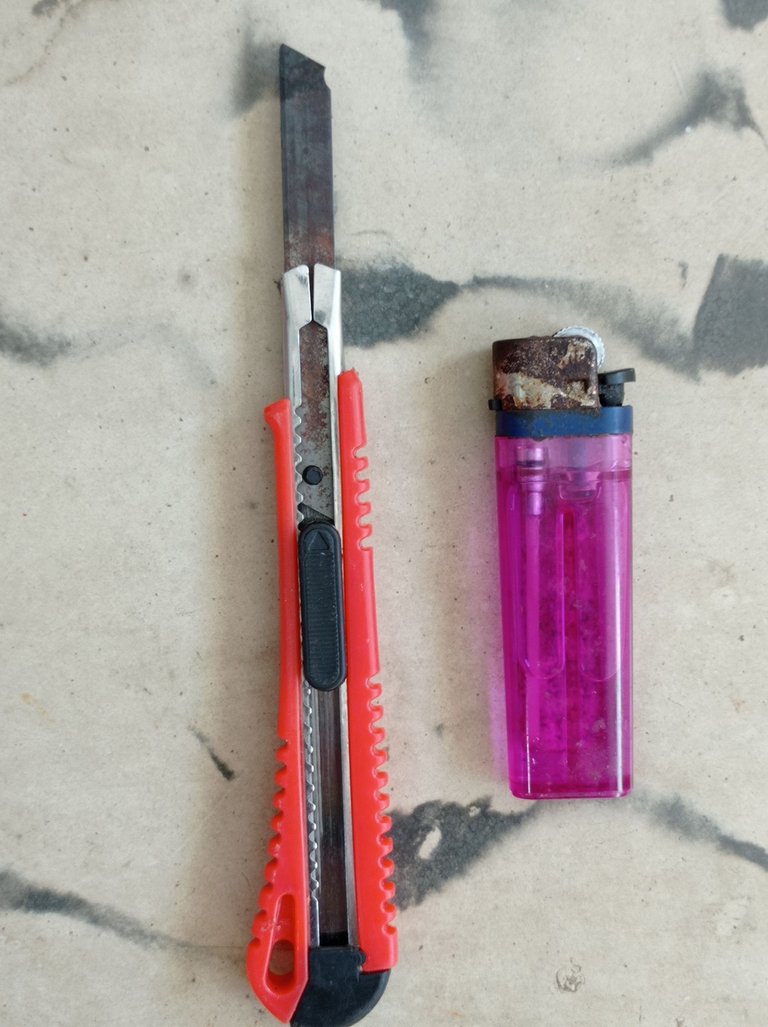
Materiales empleados para abrir el cargador.
- Primeramente, apliqué calor al cutter, luego abrí el cargador por el extremo opuesto a las tomas de corriente, cómo se describe en las siguientes imágenes.
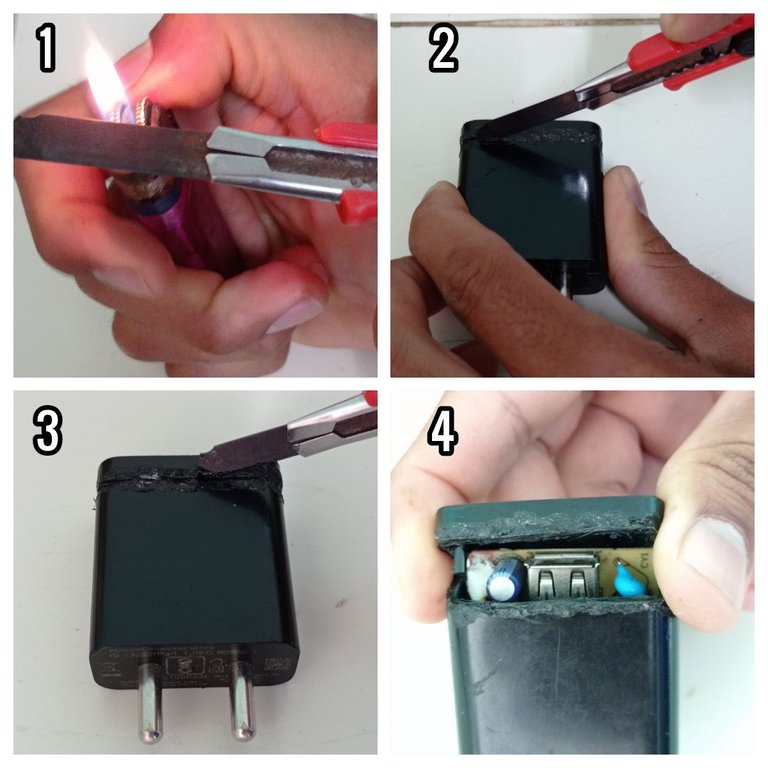
Proceso para abrir el cargador.

Proceso de extracción del circuito impreso.
- A partir de aquí el siguiente paso sería, como siempre les digo, realizar una buena inspección visual del circuito.
Casi siempre en toda reparación este primer paso nos da los argumentos suficientes para detectar la falla y la causa que la provoca.
Después de la revisión ocular pude detectar que existían soldaduras quebradas (soldaduras frías en un lenguaje técnico) en los pines del puerto USB de carga.
Estas soldaduras suelen quebrarse con frecuencia si no se tiene el cuidado suficiente a la hora de conectar el cable USB al puerto, también son provocadas por las caídas del cargador, estos golpes suelen partir los puntos de conexión, principalmente en los pines del transformador de pulso que por ser uno de los componentes que más pesa, al caer al piso desde una altura considerable se pueden quebrar con mayor facilidad las soldaduras de sus pines. En ocasiones estas partiduras son imperceptibles a la vista y hay que detectarlas con una lupa de aumento o mediante el multímetro.
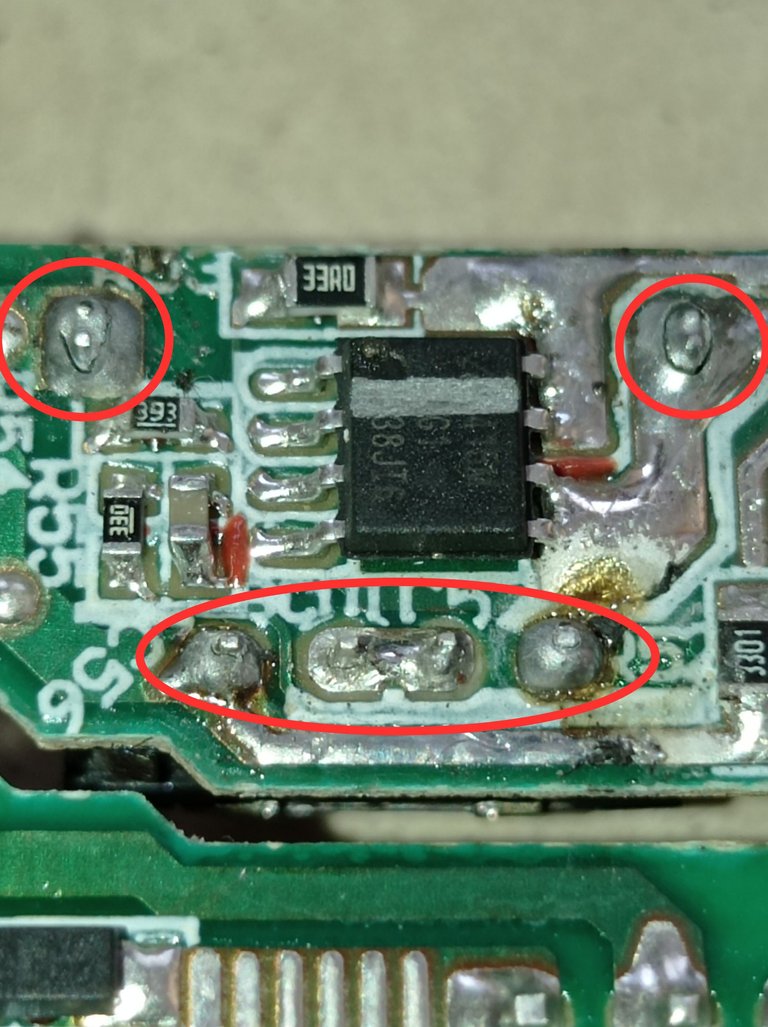
Señalada en los círculos se aprecian las soldaduras de los pines del puerto USB totalmente quebradas, esto provocaba una deficiente transferencia de energía hacia la batería del teléfono.
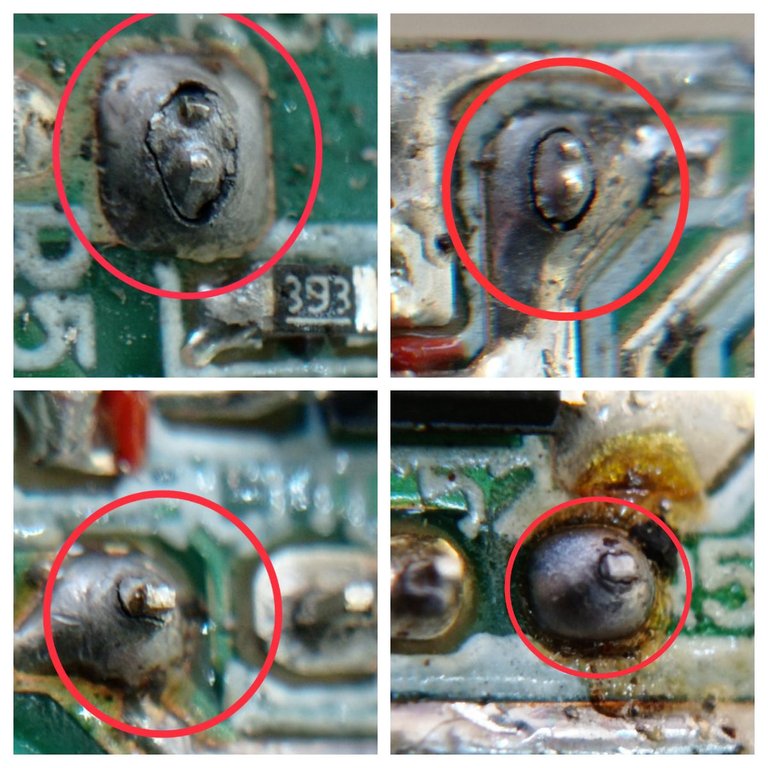
Aquí se aprecian con mayor nivel de detalle las soldaduras frías.
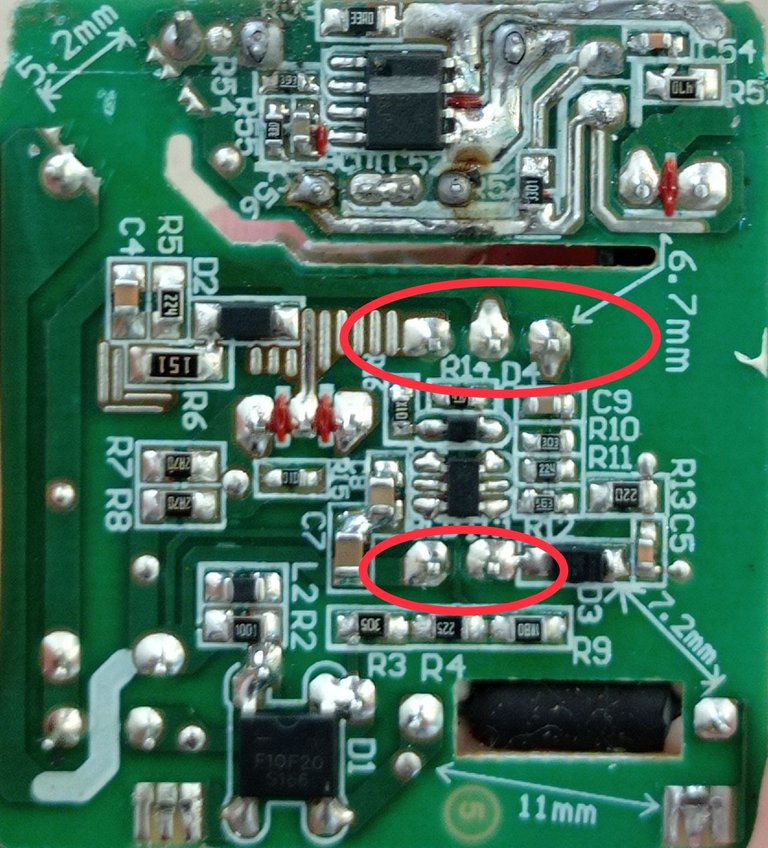
Aquí señalo los pines del transformador de pulso que suelen quebrarse durante las caídas del cargador
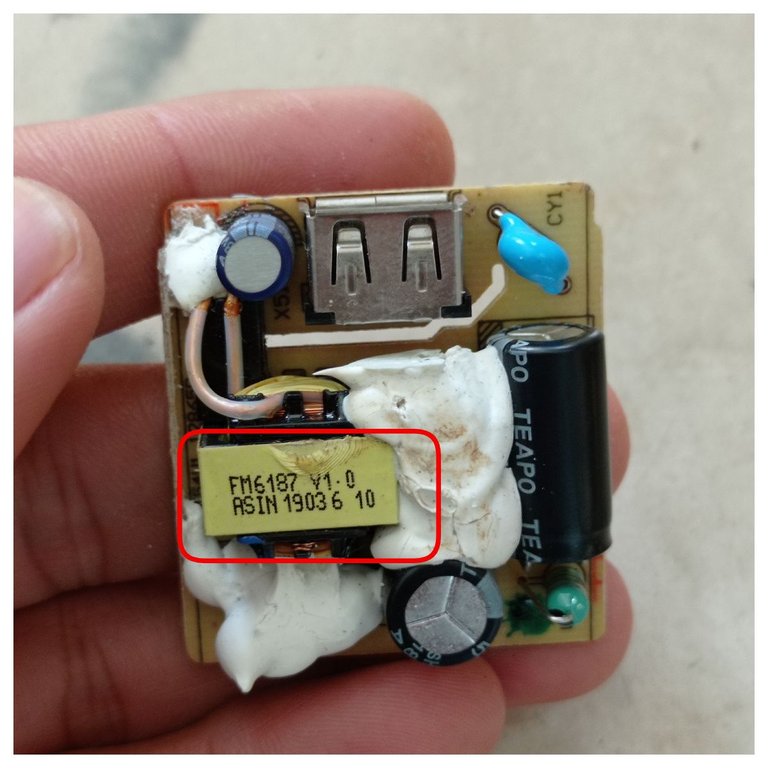
Aquí se aprecia el transformador de pulso.
- Después de localizar la causa de la falla, lo siguiente fue extraer el estaño de las soldaduras quebradas y volver a soldar los pines con el cautín.
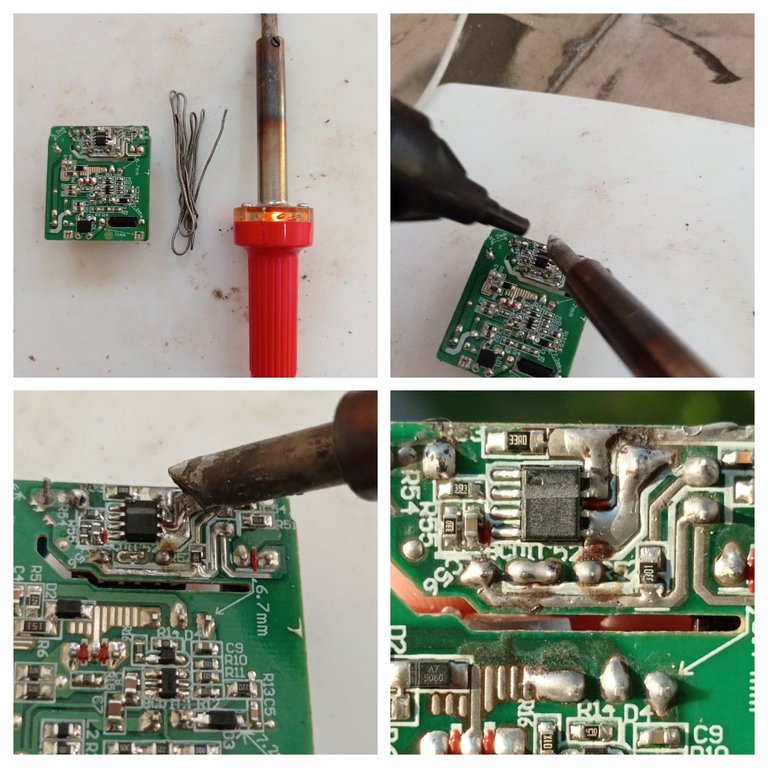
Soldando los pines del puerto USB.
- Luego de soldar los pines, regresé la placa a su carcasa para sellarla con calor, como se describe en las siguientes imágenes.
Regresar la placa a la carcasa.
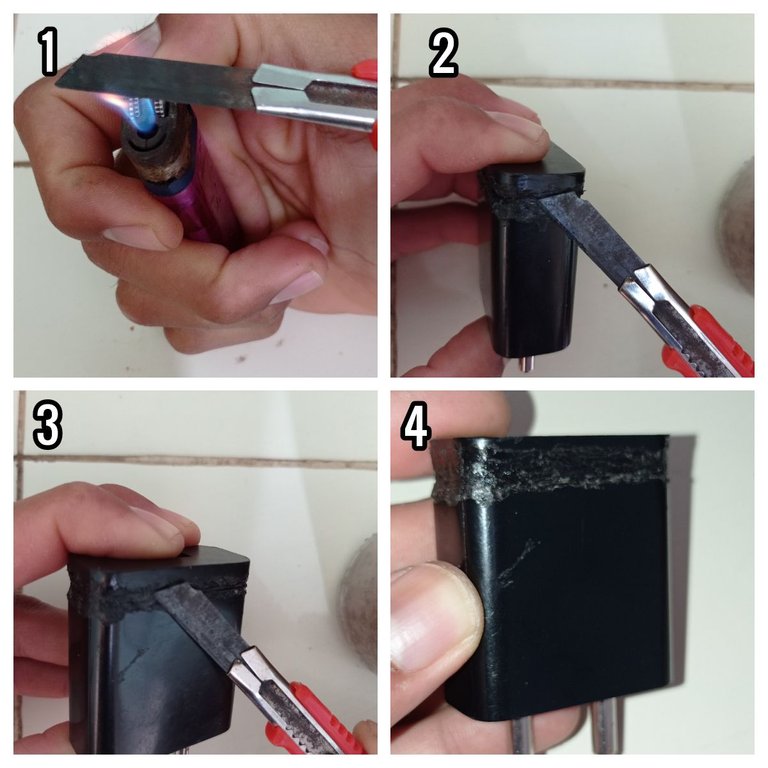
Sellaje del cargador con el cutter caliente.
PROBANDO EL CARGADOR.
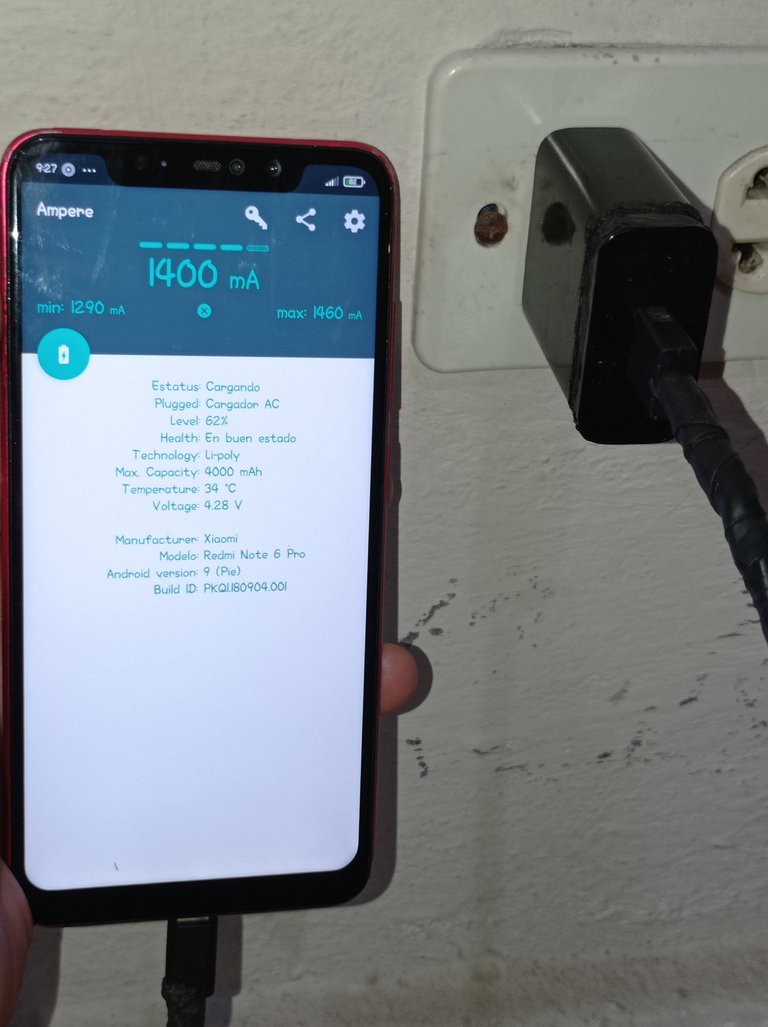
Cargador después de la reparación, nótese que se encuentra proporcionando una intensidad de corriente de 1400 mA, un valor cercano a los 2000 mA
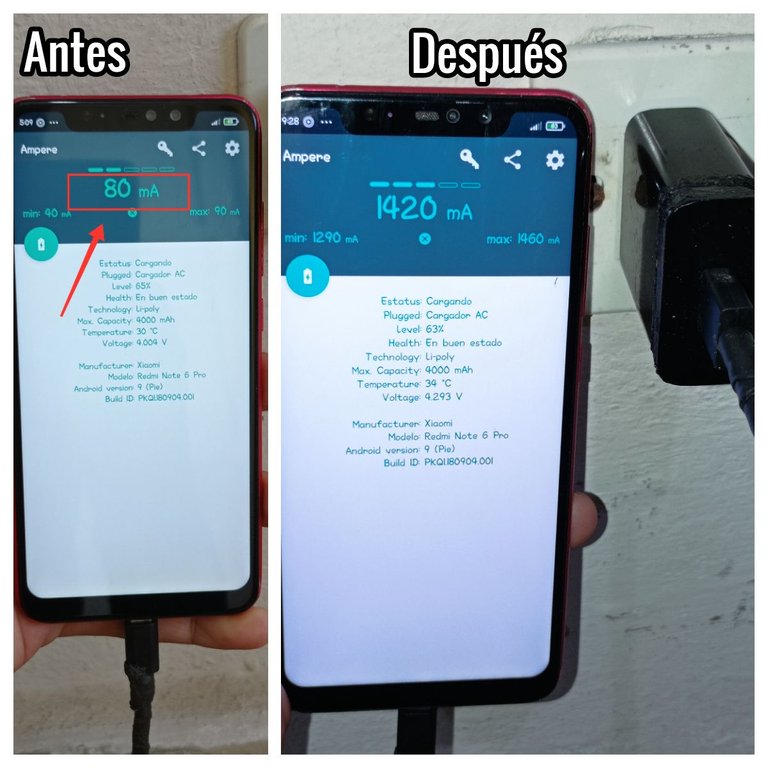
Aquí les muestro un antes y un después de la reparación.
Bueno, de esta forma logré reparar el cargador de mi celular, empleando recursos accesibles. Como consejo para evitar este tipo de fallas les digo que eviten insertar el cable USB bruscamente en el cargador, así como en la toma micro USB del teléfono, así evitan quebrar las soldaduras. Además, es de fundamental importancia evitar las caídas y los golpes al cargador.
Espero que mi descripción paso a paso de todo el proceso haya sido de tu interés. Ya me despido de ustedes.
Saludos y hasta la próxima,😉.
Las imágenes son de mi autoría y fueron tomadas con un celular Xiaomi Redmi 9.
Imágenes editadas en la aplicación web fotojet
Texto traducido al inglés en el traductor Deepl.
Puedes verme en Facebook
ENGLISH
Hello colleagues, I start this writing wishing you a good day. Today I want to tell you how it is possible to use an application for cell phones (App hereinafter), which allows to detect if the battery charger is in optimal conditions and providing the necessary current to charge it properly.
I will tell you how to use the App and how I repaired my charger after detecting a malfunction in it by using the App.
Recently I began to notice that my cell phone battery was taking longer than usual to charge, and sometimes it did not exceed a certain level of percentage of charge, for example sometimes it only reached 30% no matter how long it was connected, of course I began to suspect the charger or the cable that has already begun to deteriorate the lining.
Realizing this I downloaded the Ampere app from the Play Store. This application gives us a series of information about the charge and discharge status of the phone's battery, It is also able to give the temperature, voltage level and battery life status, among other information.
Here's how to use the App to determine if the cell phone charger or cable is in good condition and how I repaired my charger after detecting a malfunction using only the App.
Steps to use the App.
- Once downloaded from the Play Store we open it and automatically we will get a screen where all the information about the battery and the state in which it is, either charging or discharging, as well as the intensity of charge or discharge current, measured in milli amperes (mA).
- Then we check in the charger data, what is its maximum output current.
Example of data from a charger with an output voltage of 5 V and a current of 2000 mA.
Example of data from another charger with an output voltage of 5 V and a current of 3 A, equivalent to 3000 mA.
- Once the maximum output current of the charger is known, we connect it to the cell phone and automatically the word calculating appears on the screen, until the current intensity that the charger is providing (measured in mA) is displayed.
- We verify that the current intensity that the charger is providing to the battery has values close to the maximum output current of the charger. This value will be closer to the value of the maximum output current of the charger the more the battery is discharged, and will decrease as the battery is charged.
For example, if the battery is at 20% charge, and a charger with an output of 5 volts and 3 amperes (A) is connected to it, the initial charge current will reach values close to 3A and will decrease as the battery charge level increases.
- In the following images I show the example.
Phone connected to the 3000 mA charger, with 68% battery level and receiving 2030 mA, this charger is working properly, it is providing values close to 3000 mA.
The telephone connected to the 2000 mA charger has a battery level of 70% and is receiving 1130 mA from the charger. This charger is in good condition, since the current intensity provided is close to 2000 mA.
In the two previous examples the phone was tested with two chargers in good condition and with the same USB cable. It should be noted that for the charger to provide these current values as in the example, the battery should be as discharged as possible, since at that time will be when the charger will provide the highest current intensity and thus allow us to check if it is working without problems.
The previous tests were made with the chargers of my mother's and my wife's phones, both of which work correctly. Here are the tests I did on my cell phone charger, which has an output of 5 Volts with 2000 mA.
My cell phone charger is capable of providing 2000 mA of current at its output.
My charger provided only 80 mA to the battery which is at 65%. This behavior is not normal, as the current intensity is too small compared to the 2000 mA it is capable of providing. Those 80 mA are not able to charge the phone's battery.
As it could be appreciated in the previous image, the charger presents problems, and the low current intensity that it is providing at its output will not be able to charge the battery effectively. In this way and using this App I realize the anomaly in the operation of the charger, so I will have to open it with the idea of repairing it.
Repair process.
- This type of charger is hermetically sealed, so I used a cutter and a matchbox to open it.
Materials used to open the charger.
- First, I applied heat to the cutter, then I opened the charger from the end opposite the sockets, as described in the following images.
Process for opening the charger.
Printed circuit extraction process.
- From here the next step would be, as I always say, to make a good visual inspection of the circuit.
Almost always in any repair this first step gives us enough arguments to detect the fault and the cause that provokes it.
Upon ocular examination I was able to detect that there were broken solder joints (cold solder joints in technical parlance) on the pins of the USB charging port.
These welds tend to break frequently if you are not careful enough when connecting the USB cable to the port, they are also caused by the falls of the charger, these blows tend to break the connection points, mainly in the pins of the pulse transformer that being one of the components that weighs more, when falling to the floor from a considerable height can break more easily the welds of its pins. Sometimes these partitions are imperceptible to the eye and must be detected with a magnifying glass or by means of a multimeter.
The circles show the soldering of the USB port pins completely broken, which caused a poor transfer of power to the phone's battery.
Here the cold welds can be seen in greater detail.
Here I point out the pulse transformer pins that often break during charger drops.
The pulse transformer is shown here.
- After locating the cause of the failure, the next step was to remove the tin from the broken solder joints and re-solder the pins with the soldering iron.
Soldering the pins of the USB port.
- After soldering the pins, I returned the board to its housing for heat sealing, as described in the following pictures.
Return the plate to the housing.
Sealing of the magazine with the hot cutter.
TESTING THE CHARGER.
Charger after repair, note that it is providing a current intensity of 1400 mA, a value close to 2000 mA.
Here is a before and after picture of the repair.
Well, in this way I managed to repair the charger of my cell phone, using accessible resources. As a tip to avoid this type of failures, I would like to tell you to avoid inserting the USB cable sharply into the charger, as well as into the micro USB socket of the phone, in order to avoid breaking the soldering. In addition, it is of fundamental importance to avoid falls and shocks to the charger.
I hope that my step-by-step description of the whole process has been of interest to you. I bid you farewell.
Greetings and see you next time,😉.
The images are my own and were taken with a Xiaomi Redmi 9 cell phone.
Images edited in the web application fotojet
Text translated to English in Deepl translator.
Puedes verme en Facebook
This post has been manually curated by @steemflow from Indiaunited community. Join us on our Discord Server.
Do you know that you can earn a passive income by delegating to @indiaunited. We share more than 100 % of the curation rewards with the delegators in the form of IUC tokens. HP delegators and IUC token holders also get upto 20% additional vote weight.
Here are some handy links for delegations: 100HP, 250HP, 500HP, 1000HP.
100% of the rewards from this comment goes to the curator for their manual curation efforts. Please encourage the curator @steemflow by upvoting this comment and support the community by voting the posts made by @indiaunited.
Hello, thanks for the support, Regards
Wow, the last time I saw these pieces like a transformer or soldering the broken joints was when my father used to fix electrical appliances. Well, maybe my husband also did a few "surgeries" haha, but definitely this post reminds me of the little workshop my dad had. Btw, last week we went on a trip and my phone charger decided to give up on woking exactly there while travelling 😂
Hello friend, it's good that my publication managed to bring back good memories for you haha, that makes me happy. Yes, indeed when we need things the most is when they start to fail 🤣. I imagine that your husband can take the charger to the surgery room and try to repair it haha, I hope he manages to save the patient 😁. Greetings
Well, I use now another charger so the patient is still in the waiting room of the hospital 😂
🤣🤣🤣ok ,At some point your turn will come. Greetings
I found the step-by-step guide to check if the charger is working correctly very useful, but my favorite was the detailed repair process, which demonstrates your technical skills and your ability to tackle and solve problems.
Hola hermano, que bueno que te gustó el paso paso, me gusta dar la mayor cantidad de detalles aunque me demore más tiempo en la creación del post, o incluso en la reparación pues a veces se me dificulta tirar las fotos yo solo, pero me gusta que se entienda lo mejor posible ya que una imagen a veces da una mejor idea de lo que pueda dar una explicación teórica. Gracias por pasar y comentar. Saludos bro.
Congratulations @darknapol! You have completed the following achievement on the Hive blockchain And have been rewarded with New badge(s)
Your next target is to reach 3000 upvotes.
You can view your badges on your board and compare yourself to others in the Ranking
If you no longer want to receive notifications, reply to this comment with the word
STOPCheck out our last posts:
¡¡¡Buen trabajo!!! Gracias por publicar tu excelente contenido en Hive Diy, excelente trabajo, no sabía que existían aplicaciones que nos ayuden a detectar el amperaje de los cargadores, de verdad que es muy útil, gracias por compartir.
Tu comunidad artesana ahora es testigo

Hola, es un placer compartir este contenido en la comunidad, Sí, "Ampere" no es la única aplicación que existe, si haces una búsqueda te darás cuenta que existen otras muy buenas también que dan este tipo de información, son útiles para chequear inclusive la tasa de descarga de la batería, así sabemos si se está drenando demasiada energía de la batería cuando aparentemente no tenemos ningúna aplicación en segundo plano, y tenemos el teléfono en modo avión por ejemplo, en esas condiciones la intensidad de corriente que suministra la batería debería ser mínima, de no ser así pudiera existir una avería en el hardware del teléfono, pudiera ser un componente electrónico en corto. Es un ejemplo, pero existen otros parámetros que son útiles, nivel de voltaje, temperatura Etc. Gracias por el apoyo, saludos amigo.
Estoy muy sorprendido con esta app, no savia que se podían utilizar este tipo de programas para poder detectar el amperaje de los cargadores, de verdad que son muy útiles, ya que app tener para poder comprobar si uno de mis cargadores falla
Hola amigo, así es, estás app, son muy útiles, también te sirve para detectar si los cables USB están en buen estado, en ocasiones el cargador funciona pero el causante del problema en un caso donde no se cargue correctamente la batería es debido al cable, claro el amperaje máximo del cargador y la capacidad de la batería influyen en la carga y en el tiempo en que está culmina. La verdad es que estás app son muy útiles pues dan informaciones de gran interés. Gracias por comentar amigo, saludos.
Vaya!! Pero usted también es amante de la electrónica y las reparaciones. Que buena esta herramienta que compartes en tu blog.
Muy útil para medir el amperaje y también para ver si el fabricante dice la verdad de lo que vende, porque hay cargadores que indican que son de 2A o 3A y resulta que es falso.
Si hermano me encanta la electrónica, ya somos dos jjj. Es como dices, la app se pude emplear de muchas formas pues brinda unos cuantos datos de interés. Gracias por pasar y comentar, saludos
Ahora no me siento solo, así me motivó más y comparto mis reparaciones en esta comunidad.
Exactamente hermano, acá estamos, saludos
Hola amigo muy interesante su paso a paso, de la solución al problema de carga con su cargador. A mí padre le pasa lo mismo, el teléfono lo pone a cargar se le demora, incluso no pasa del porciento de carga. Por lo que toma el mío muchas veces, estoy más seguro que tiene ese mismo problema. Saludos 👋🏻
Hola amigo, me alegro que la publicación halla sido de su interés, Respecto al cargador de su padre es muy probable que le suceda algo similar y si es de más de 1 Ampere quizás este sucediendo lo que describo, así que ya tienes una herramienta para comprobar lo que le sucede y hasta intentar repararlo si te animas. Si tines dudas, o necesitas ayuda sin problemas me contactas, estamos en el mismo grupo de Hivecuba. Saludos hermano.
Que bueno que hayas podido arreglar el cargador tengo un problema similar con mi teléfono, tarda mucho en cargarse y la batería no puede ser porque es nueva . Tengo que probar está app a ver qué tal. Muy interesante tu post muchas gracias por compartir tu conocimiento
Hola amiga, gracias por pasar y comentar, Bueno amiga te explico que si tú cargador es el original del teléfono o por lo menos es de más de 1 Ampere sin embargo aún así persiste el problema entonces sigue el paso a paso y comprueba con la aplicación la intensidad de corriente con la que se está cargando. Estoy en la disposición de ayudarte sin ningún tipo de problemas, puedes contactarme y preguntarme las dudas que desees, Saludos.
Bueno; el que sabe sabe.
Tremendo trabajo...
Saludos.
Jjj, gracias por el apoyo y el reconocimiento, Saludos hermano
Vi su publicación muy tarde y es una pena, en verdad, es un excelente trabajo. Un dato, si usted envuelve el cargador en un paño y con un martillo de bola va golpeando con cuidado sobre la línea de borde, logrará separar la tapa sin necesidad de cortar o usar calor.
Así el trabajo, cuando usted arme la caja del cargador, tendrá una excelente presentación.
Es cosa de practicar un poco y verá el resultado, también sirve para los cargadores de laptop.
Hola hermano que tal? La verdad ese truco que me das nunca lo había pensado, tendré que probarlo la próxima vez que tenga que abrir algún cargador, de esa forma queda con más presencia el trabajo como bien me comentas. Gracias por pasar y comentar, saludos hermano.