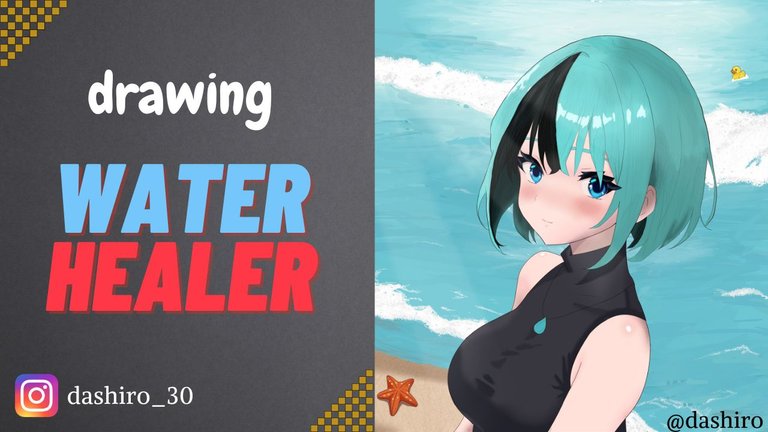
Walter Healer - Holozing FanArt (Eng-Esp)
Hello everyone and welcome to my blog! Today I'm sharing with you my newest creation, the digital illustration of the Water Healer. It's been a while since my last post, as I was in the final week of my second term of classes.
During this week, I had numerous exams, exhibitions, and paper submissions. However, now that I have finished this term, I will be devoting more time and effort to bring you even more interesting content.
¡Hola a todos y bienvenidos a mi blog! Hoy comparto con ustedes mi más reciente creación, la ilustración digital de la Sanadora del Agua. Ha pasado un tiempo desde mi última publicación, ya que estaba en la semana final de mi segundo lapso de clases. Durante esta semana, hice numerosos exámenes, exposiciones y entregas de trabajos. Sin embargo, ahora que he terminado este lapso, estaré dedicando más tiempo y esfuerzo para traerles aún más contenido interesante.
Inicio / Start:
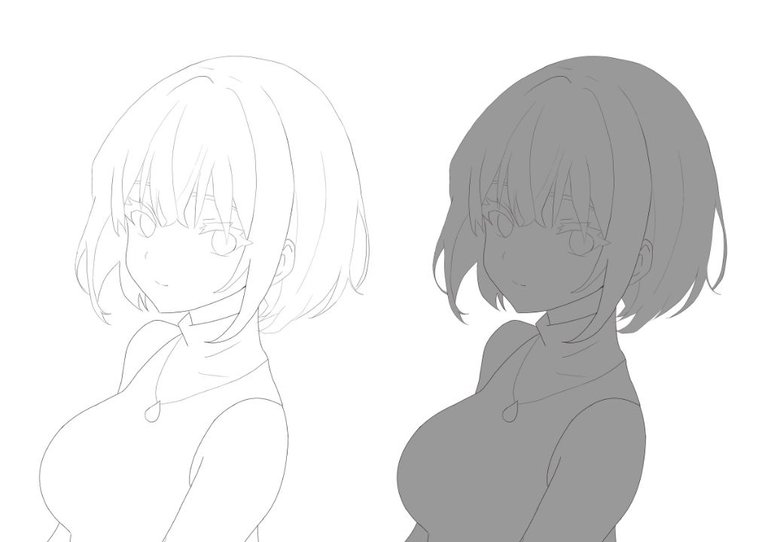
I started by making the base structure from which to guide me to make the sketch. After making the structure I started to make the sketch with a red color to differentiate the structure from the sketch.
Comencé haciendo la estructura base de la cual guiarme para hacer el boceto. después de hacer la estructura empecé a hacer el boceto con un color rojo para diferenciar la estructura de el boceto.

After finishing the sketch, I started to make the lineart or outline with a black color. With the lineart ready I gave a base coat of gray color to the whole character including hair, clothes, skin and details.
Después de terminar el boceto, inicie a hacer el Lineart o delineado con un color negro. Con el Lineart listo le di una capa base de color gris a todo el personaje incluyendo el cabello, la ropa, la piel y detalles.
I shaded it with a gray a little darker than the base to give it not so strong shadows and continued with a darker gray than the previous one to give it darker shadows.
Le di sombras con un gris un poco mas oscuro que el base para darle sombras no tan fuertes y continúe con un un gris mas oscuro que el anterior para darle sombras mas oscuras.

After that I gave a layer of lights to the whole character including the skin, hair, clothes and details.
After giving all the lights and shadows I colored the whole drawing not including the eyes as I will give details later.
Después de eso le si una capa de luces a todo el personaje incluyendo la piel, el cabello, la ropa y a detalles.
Después de darle todas las luces y sombras le di color a todo el dibujo sin incluir los ojos ya que le daré detalles mas adelante.

Once I gave color to the drawing I continued giving details to the character such as lights, shadows, blush and a black tuft characteristic of the character.
Ya que le di color al dibujo proseguí dándole detalles al personaje como luces, sombras, rubor y un mechón negro característico del personaje.
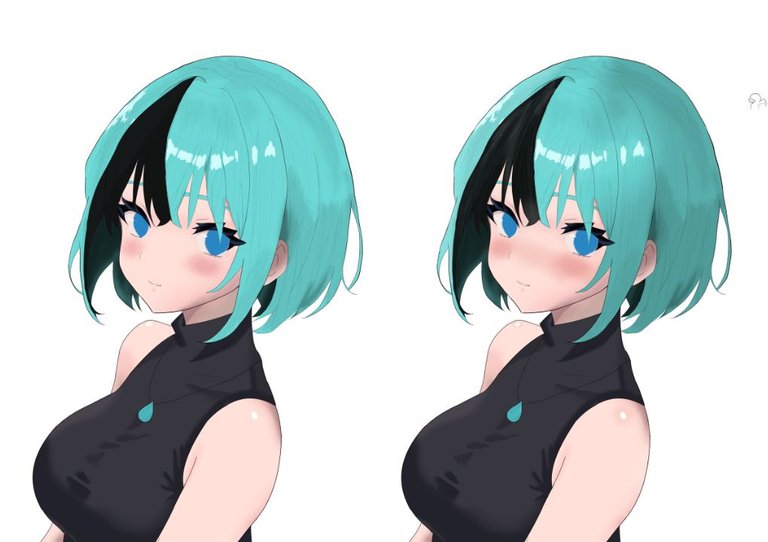
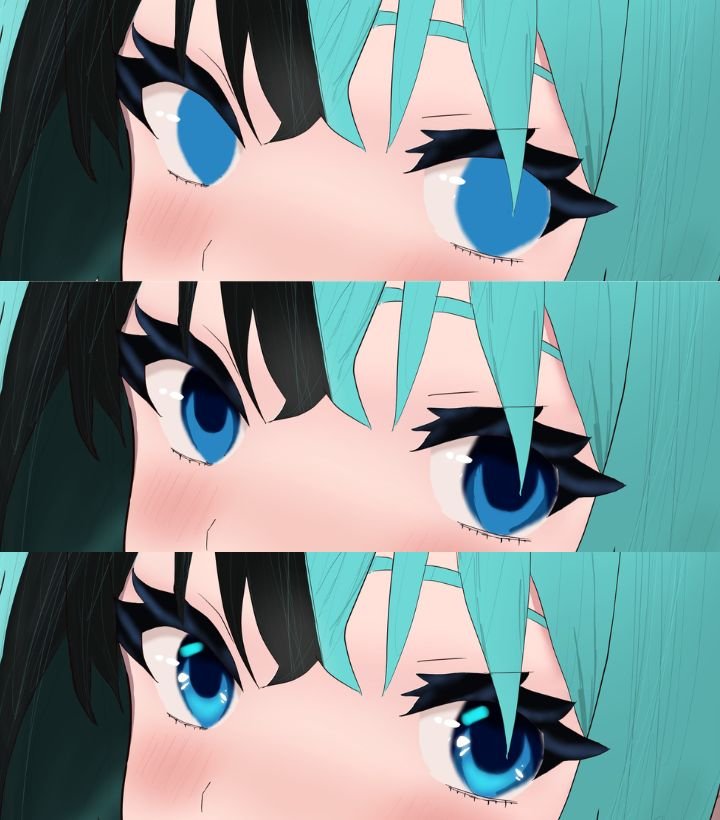
Once I finished giving color to the illustration I proceeded to make the eyes with all its details, I gave lights, shadows, gradients and glows as seen in the images.
Ya que termine de darle color por completo a la ilustración procedí a hacer los ojos con todos sus detalles, le di luces, sombras, degradados y brillos como se ve en las imágenes.
After that I wanted to make a beach background with the sea in the background so I was giving details little by little, it should be noted that I rarely make backgrounds in my illustrations but this time I wanted to try and I looked for videos and guides to make backgrounds so this would be one of my first illustrations that I make a detailed background, I used multiple layers to give as many details to the beach.
Después de eso quise hacer un fondo de playa con el mar de fondo así que le fui dando detalles poco a poco, cabe aclarar que yo pocas veces hago fondos en mis ilustraciones pero esta ves lo quise intentar y busque videos y guías para hacer fondos así que este seria una de mis primeras ilustraciones que le hago un fondo detallado, use múltiples capas para darle la mayor cantidad de detalles a la playa.

I kept adding details to the background like waves, foam and glitter until I finished the background. I also added some details like a starfish and a rubber ducky.
Le seguí dando detalles al fondo como a las olas, a la espuma y brillos hasta que termine el fondo. También le agregue unos detalles como una estrella de mar y un patito de goma.

Resultado Final / Final Result:
And this would be the final result I hope you liked it and I will continue bringing you more illustrations.
Y este seria el resultado final espero les allá gustado y les seguiré trayendo mas ilustraciones.

El dibujo fue hecho por mi, en mi computadora con una tableta gráfica con el programa Clip Studio Paint
Para la miniatura use la aplicación Canva en su versión Pro.
Para la versión inglesa utilice el traductor DeepL/ The drawing was made by me, on my computer with a graphic tablet with the Clip Studio Paint program.For the thumbnail I used the Canva application in its Pro version.For the English version I used the translator DeepL.
Congratulations @dashiro! You have completed the following achievement on the Hive blockchain And have been rewarded with New badge(s)
Your next target is to reach 1250 upvotes.
You can view your badges on your board and compare yourself to others in the Ranking
If you no longer want to receive notifications, reply to this comment with the word
STOPDefinitivamente te quedo hermoso, gran trabajo en digital...
Éxitos
!DIY
You can query your personal balance by
!DIYSTATS