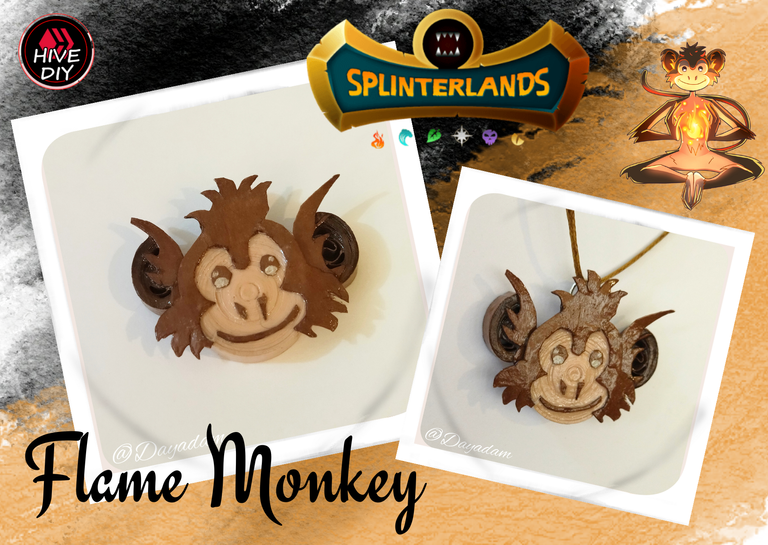
Flame Monkey // 3D Necklace Charm Quilling Technique // Splinterlands Social Media Challenge [Eng-Esp]
Hello everyone... 🐒
Hello to my dear Hivers and the dear community of artists HiveDIY, as always very pleased and excited to be here again, showing you my work made with love and especially for you.
Greetings to the Splinterlands community, and everyone who lives there, I'm here to join the Splinterlands Social Media Challenge!.
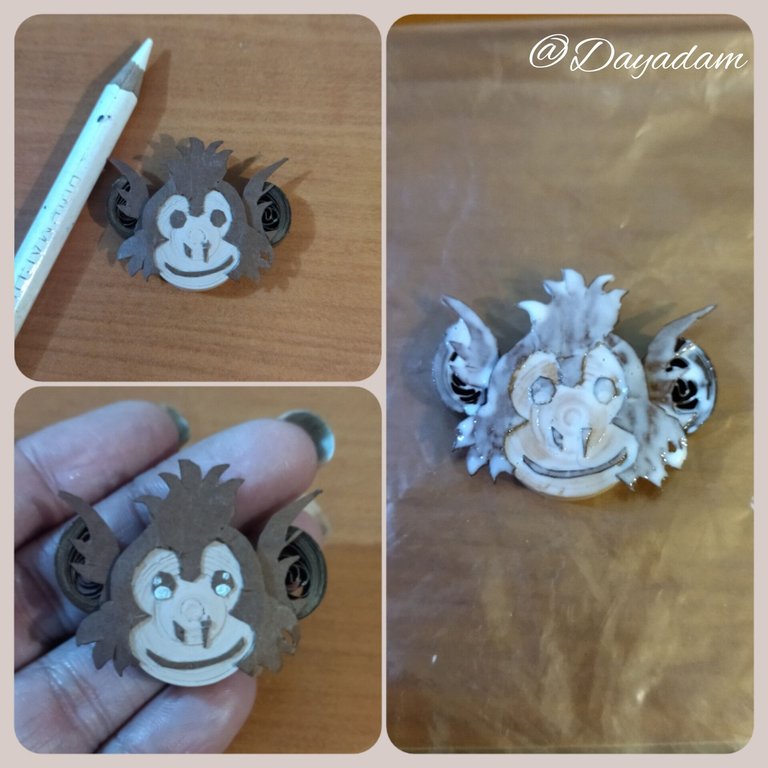
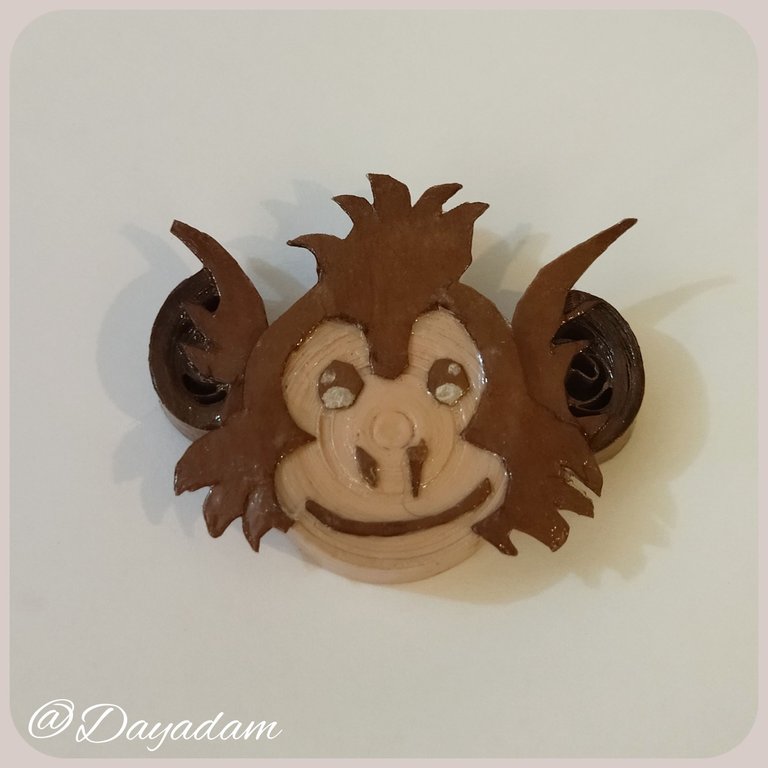
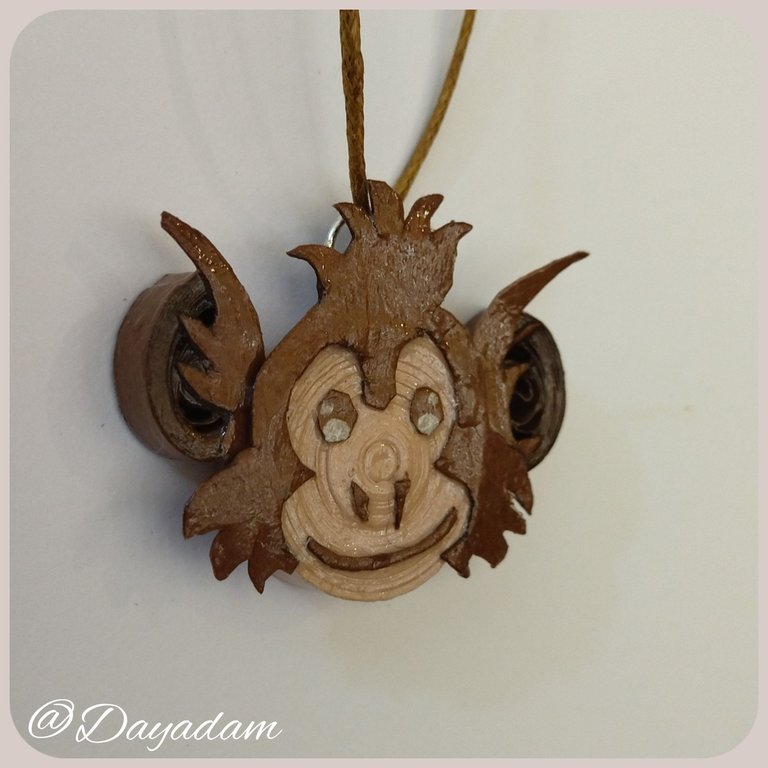
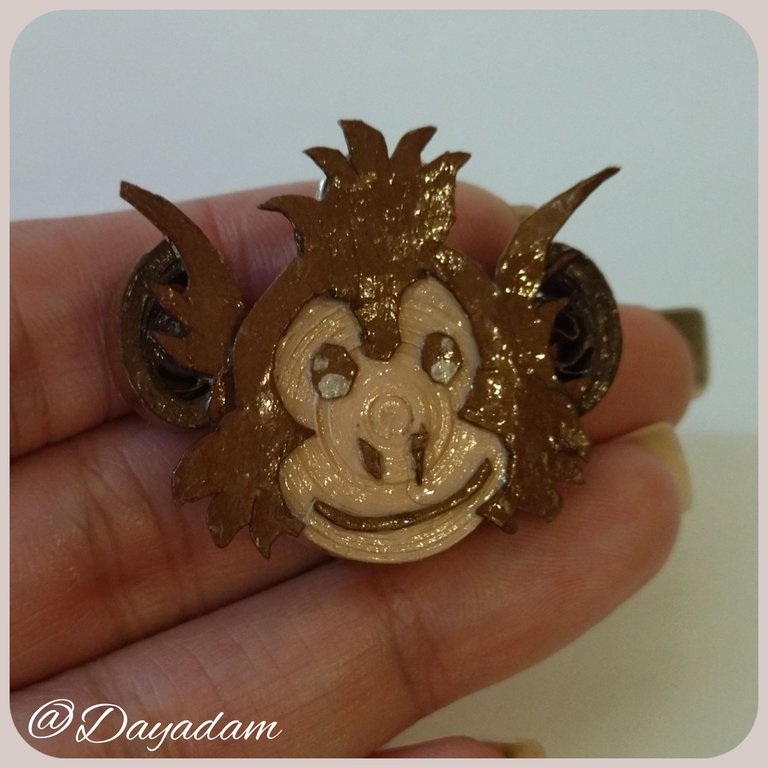
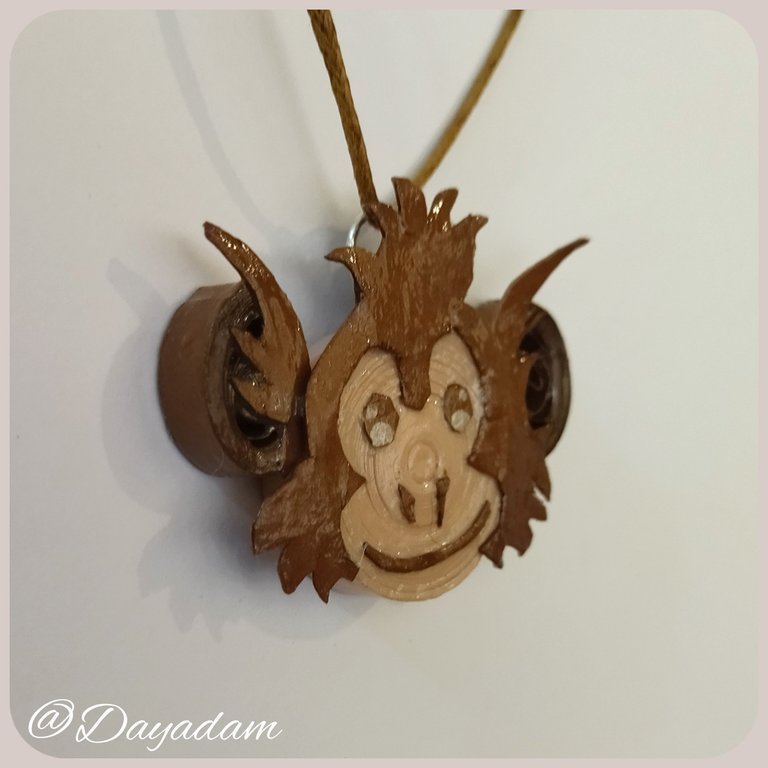
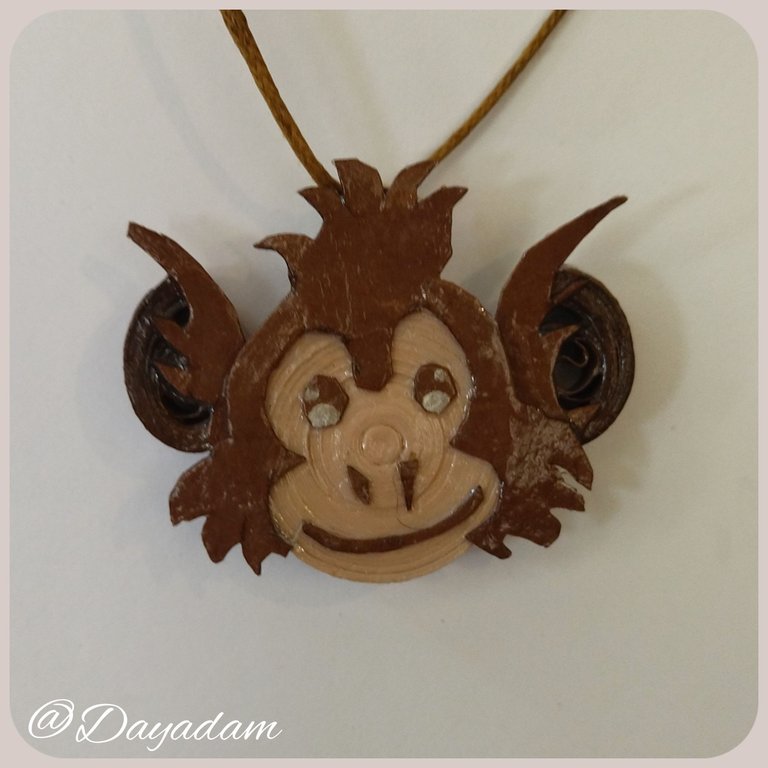
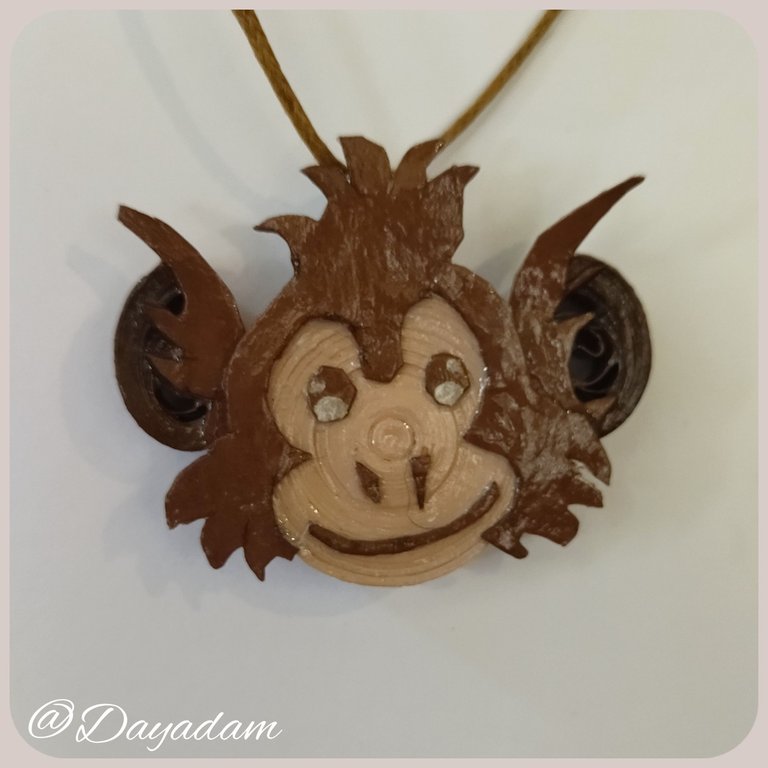
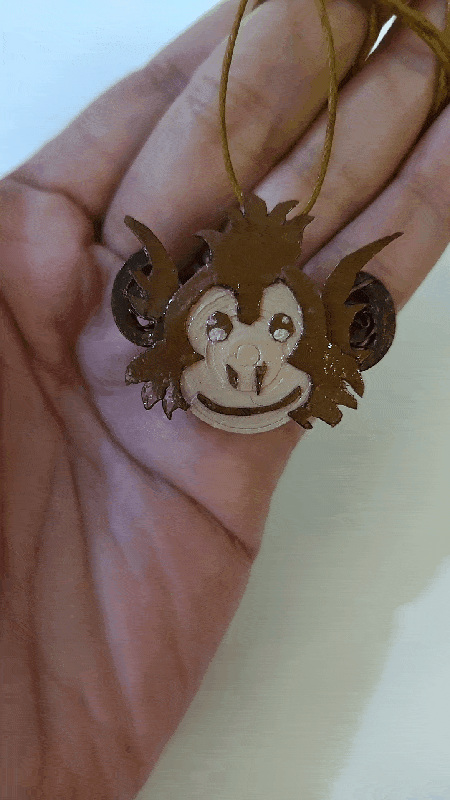
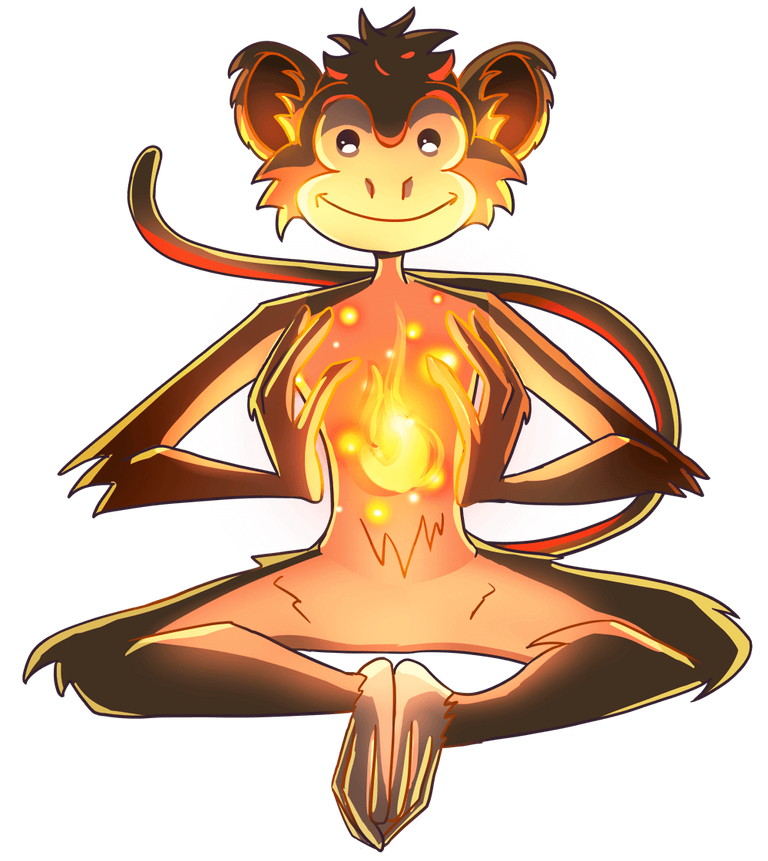
Today I bring you another work under the inspiration of this concept that I love as it is the world of Splinterlands, I chose in this case the card "Flame Monkey", with which I made a small pendant for necklace trying to materialize the face of the character, as I usually do I carried out in the quilling technique in combination with some flat details with cardboard trying to give a 3D effect to the piece.
Every day I continue to contemplate this diversity of cards, colors and splinterlands fantasy which inspires me to continue to bring you more creations under this concept.
If you want to know more about the game, I leave you my reference link to enter it and navigate through this wonderful world: https://splinterlands.com?ref=dayadam
Hoping you like my work, without further ado, I leave you with my creative process.
Let's start:😃

Hola a Todos...🐒
Hola a mis queridos Hivers y a la querida comunidad de artistas HiveDIY, como siempre muy complacida y emocionada de encontrarme por acá nuevamente, mostrándole mi trabajo hecho con mucho amor y especialmente para ustedes.
Un saludo para la comunidad de Splinterlands, y todos los que hacen vida por allí, estoy por acá para unirme al reto Splinterlands Social Media Challenge!.
Para hoy les traigo otro trabajo bajo la inspiración de este concepto que me encanta como lo es el mundo de Splinterlands, escogí en este caso la carta "Flame Monkey", con la cual realice un pequeño dije para collar tratando de materializar la cara del personaje, como usualmente lo hago lo lleve a cabo en la técnica de quilling en combinación con algunos detalles planos con cartulina tratando de dar un efecto 3D a la pieza.
Sigo cada día que pasa contemplando esta diversidad de cartas, colores y fantasía de splinterlands lo cual me inspira a seguir regalándoles más creaciones bajo este concepto.
Si quieren saber más con respecto al juego les dejo mi enlace de referencia para que ingresen en él, y naveguen por este maravilloso mundo: https://splinterlands.com?ref=dayadam
Esperando les guste mi trabajo, sin más preámbulos, les dejo mi proceso creativo.
Comencemos:😃

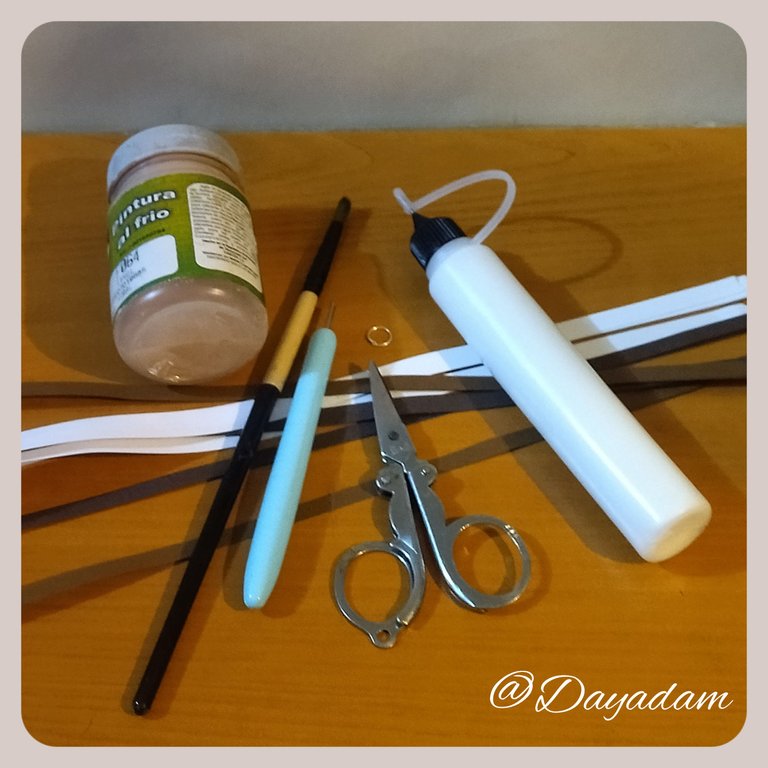
• Cintas de quilling de 6mm de ancho con diversas tonalidades.
• Cartulina marrón.
• Lápiz.
• Aguja para quilling.
• Pega blanca extra fuerte (de carpintería).
• Regla con diversas medidas de circunferencia.
• Argolla mediana de bisutería.
• Tijera.
• Pincel.
• Collar de tu preferencia.
- 6mm wide quilling ribbons in various shades.
- Brown cardboard.
- Pencil.
- Quilling needle.
- Extra strong white glue (carpentry glue).
- Ruler with different circumference measurements.
- Medium-sized costume jewelry ring.
- Scissors.
- Paintbrush.
- Necklace of your choice.

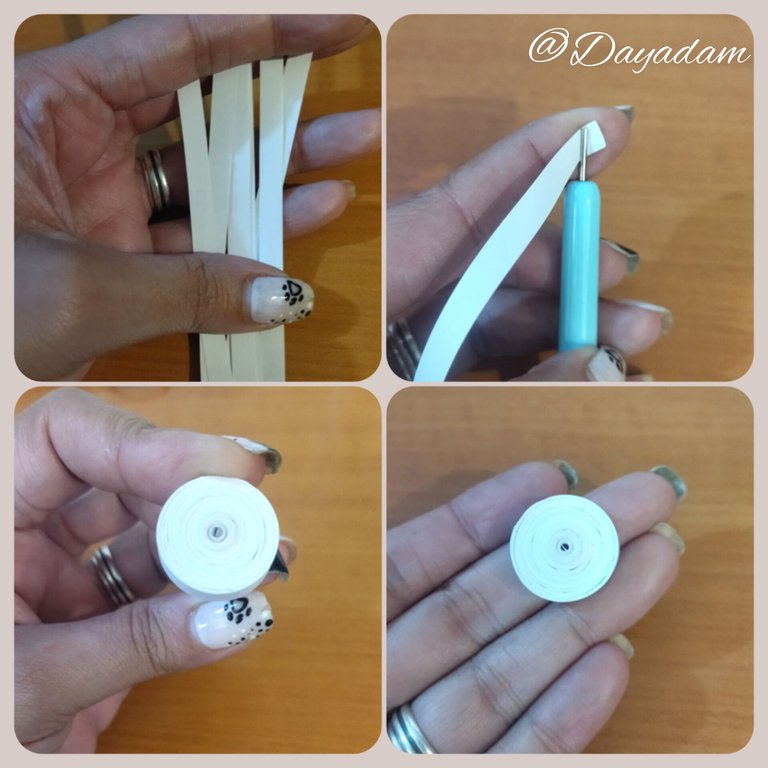
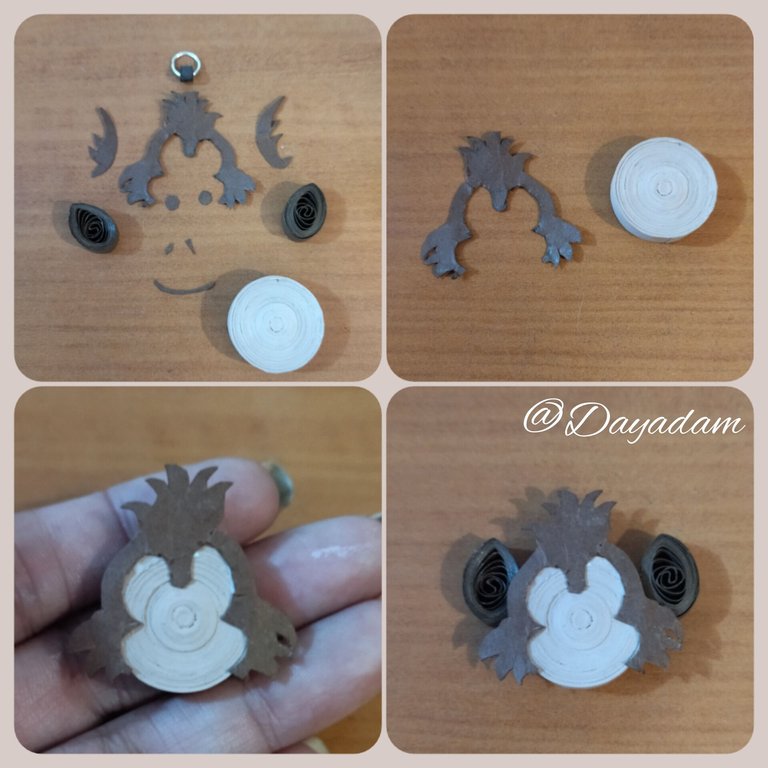
- We are going to take ribbons of 6mm wide white color x 300cms long, we roll with the quilling needle until we reach the end of the ribbon, we seal with glue, we are going to obtain a closed circle.
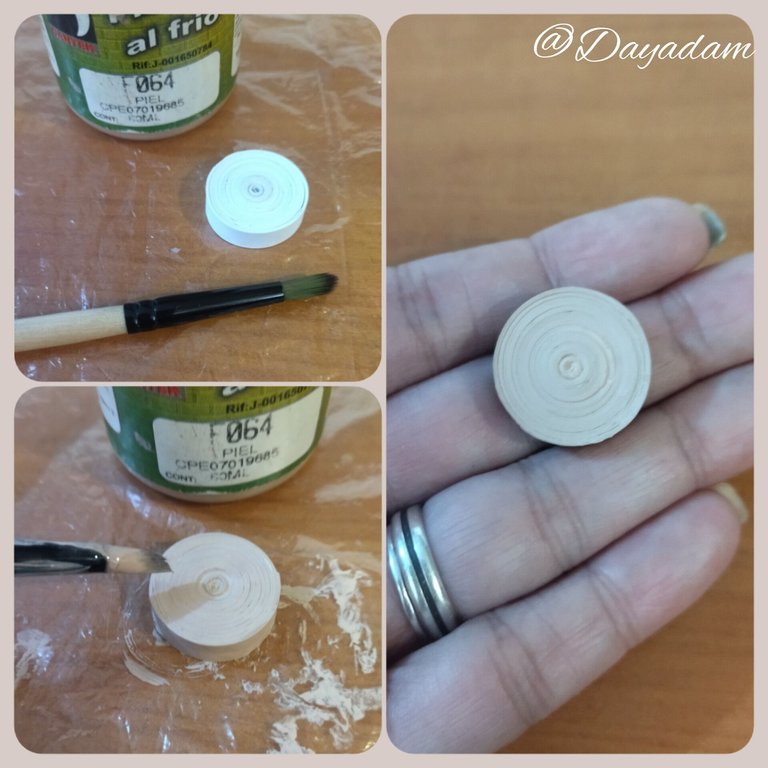
- We will take the closed circle and apply with a brush cold paint skin color until it is completely covered, let it dry very well.

• Vamos a tomar cintas de 6mm de ancho color blanco x 300cms de largo, enrollamos con la aguja para quilling hasta llegar al final de la cinta, sellamos con pega, vamos a obtener un círculo cerrado.
• Tomaremos el círculo cerrado y aplicaremos con un pincel pintura al frio color piel hasta que quede totalmente cubierta, dejaremos secar muy bien.
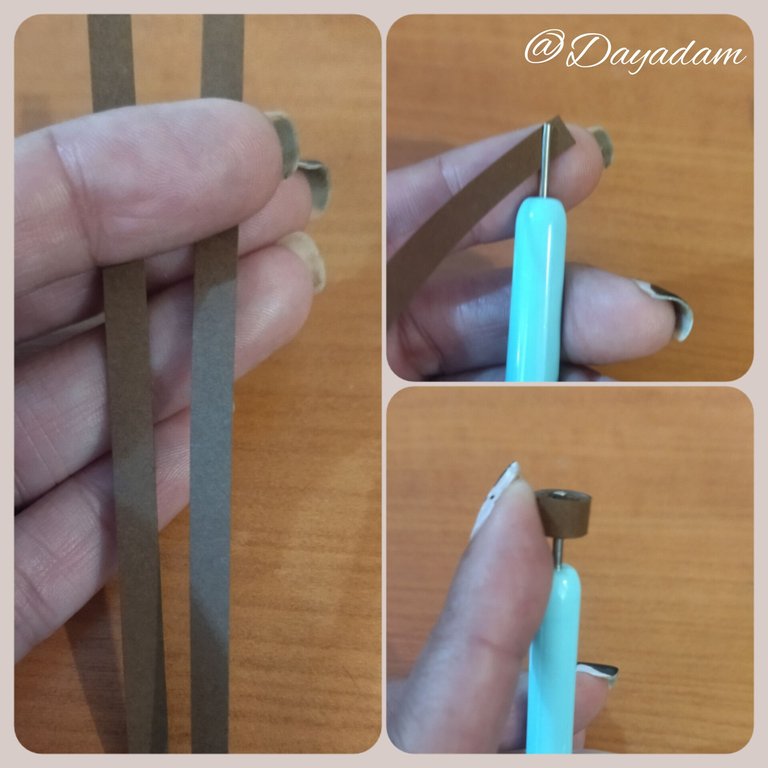
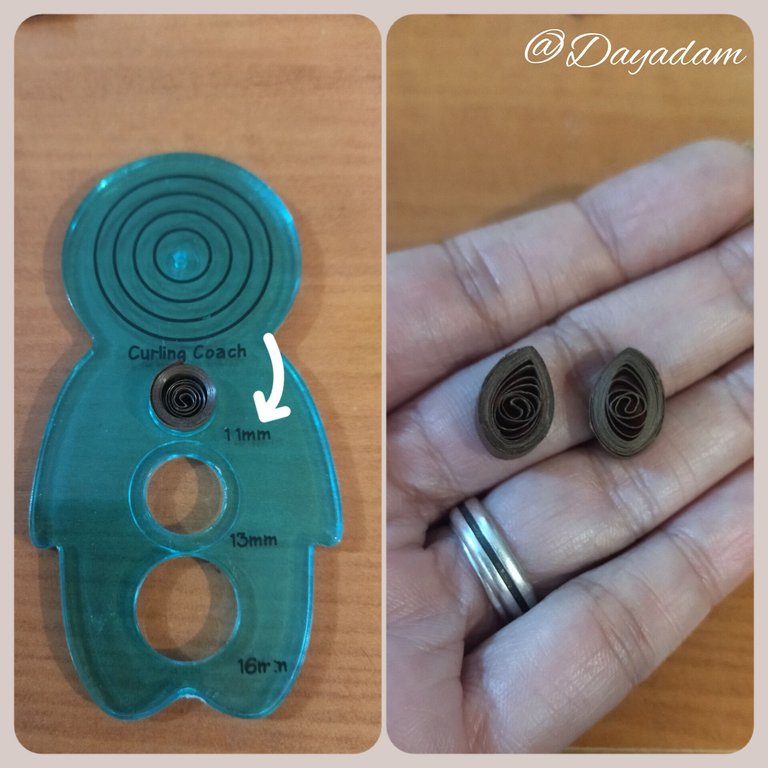
- Now I will make the ears, with a 6mm wide x 20cms long brown ribbon, we will roll it with the quilling needle, at the end we take it out of the needle, and proceed to measure it in a mold for circles in number 11mm, we take it out of the mold we seal it with glue and we will mold it in the shape of a drop. We will need 2 of the same.
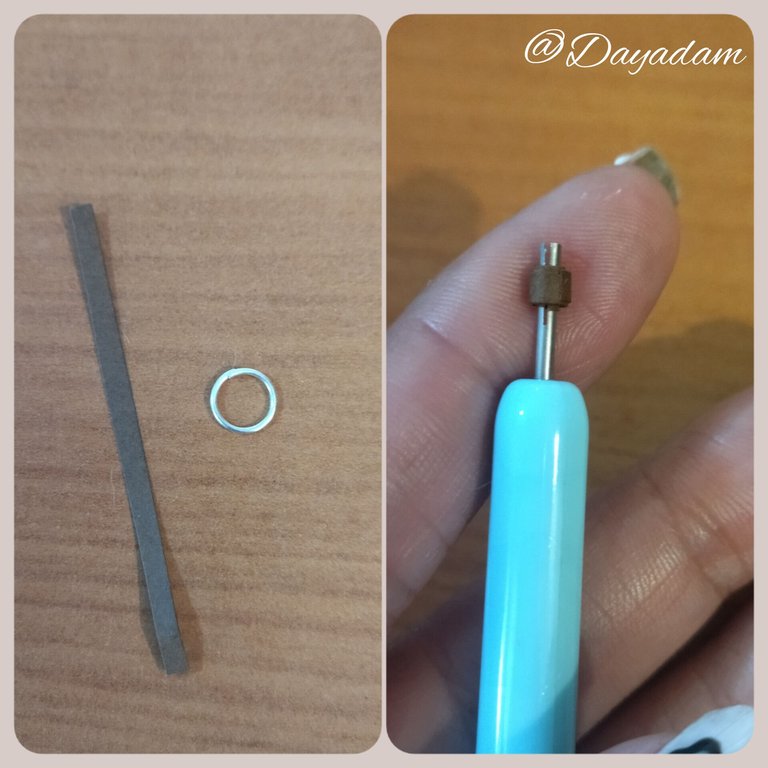
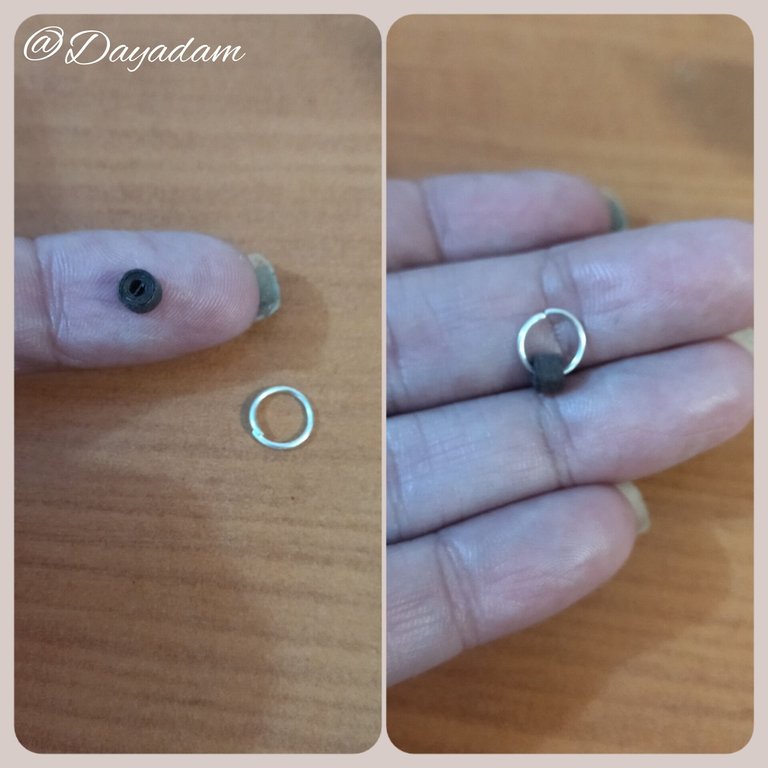
- With a small piece of brown ribbon 3mm wide, we will make a small closed circle to which we will incorporate a costume jewelry ring.
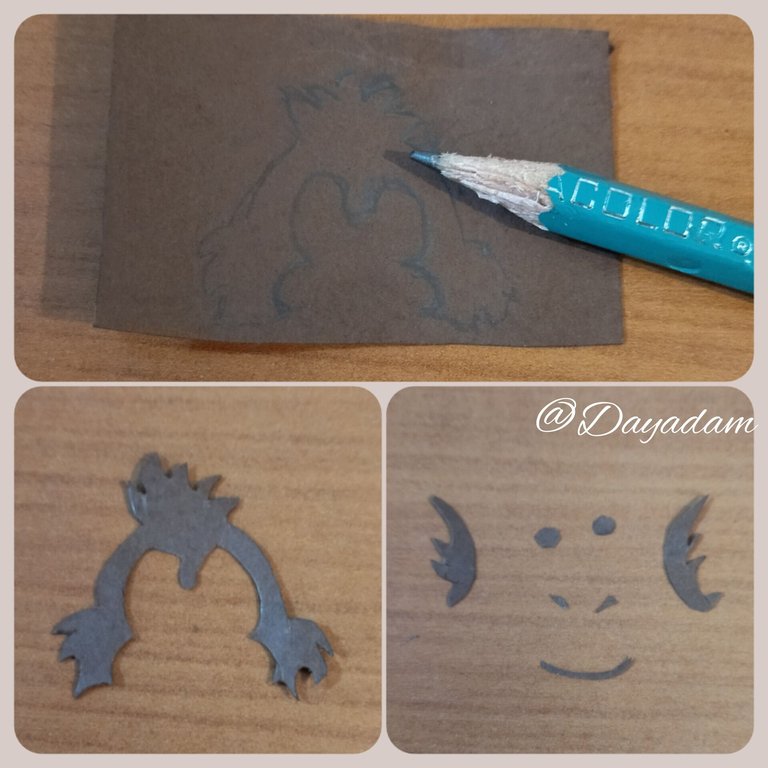
- I took brown cardboard, and with it I proceeded to cut out several shapes according to what I saw on the card and wanted to add to the face, hair, eyes, nose, mouth and a detail for the ears, which I cut out with scissors very carefully, since there were very small pieces.
• Ahora realizare las orejas, con una cinta de 6mm de ancho x 20cms de largo color marrón, está la enrollaremos con la aguja para quilling, al finalizar sacamos de la aguja, y procedí a medirla en un molde para círculos en el número 11mm, sacamos del molde sellamos con pega y moldearemos en forma de gota. Necesitaremos 2 iguales.
• Con un pequeño trozo de cinta marrón de 3mm de ancho, realizaremos un pequeño círculo cerrado al cual le incorporaremos una argolla de bisutería.
• Tome cartulina color marrón, y con ella procedí a recortar varias formas de acuerdo con lo que observaba en la carta y quería añadir al rostro, cabellos, ojos, nariz, boca y un detalle para las orejas, los cuales recorte con una tijera de manera muy cuidadosa, ya que había piezas muy pequeñas.
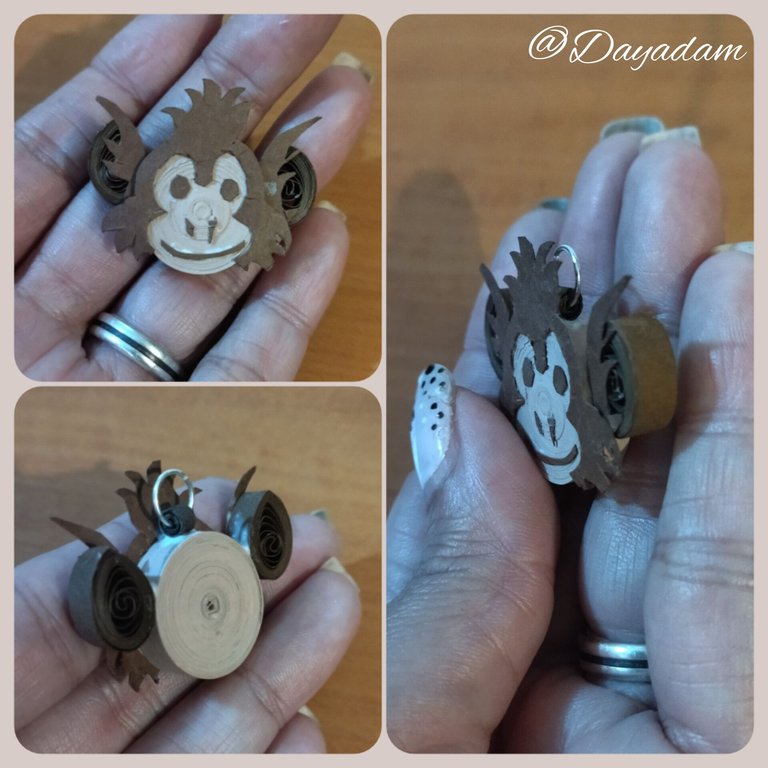
- I proceeded to assemble my pendant by gluing each piece one by one as shown in the pictures.
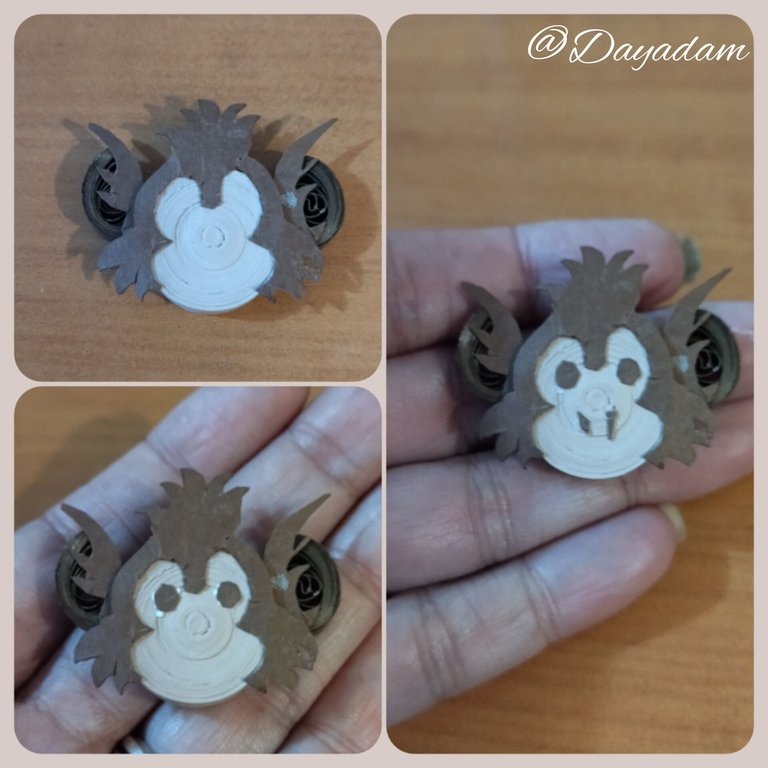
- Once all the pieces were glued I made some small details to the eyes, with a white pencil.
- Finally I applied with a brush several coats of extra strong white carpentry glue to protect, letting it dry between coats.
• Procedí a armar mi dije pegando una a una cada pieza tal como indican las imágenes.
• Una vez pegadas todas las piezas les realice unos pequeños detalles a los ojos, con un lápiz de color blanco.
• Por ultimo aplique con un pincel varias capas de pega blanca extra fuerte de carpintería para proteger, dejando secar entre una capa y otra.


What did you think, did you like it?
I hope you did, I hope you liked my explanation, procedure and photos, I made them with love for you.
"Let out that muse that inspires you, and let your imagination fly".
Thank you all, see you next time.
¿Que les pareció, les gustó?
Espero que sí, que les haya gustado mi explicación, procedimiento y fotos, los hice con mucho cariño por y para ustedes.
"Deja salir esa musa que te inspira, y deja volar tu imaginación".
Gracias a todos, nos vemos en la próxima.
Todas las fotos usadas en este post son de mi autoría y han sido sacadas en mi celular personal un Redmi 9T y editadas en Canva y en Inshot Fuente Carta Flame Monkey Banner y separador hecho por mí en Canva Traducido con la ayuda de DeepL

Thanks for the supported @splinterboost 🐒
Querido amigo @dayadam muy bonito te ha quedado el dije, has elegido una tarjeta preciosa, felicidades, feliz noche 🌹🌷🌺🌻💮🌼🌸💐🪷💐🪷🏵️☘️
Dear friend @dayadam very nice pendant, you have chosen a beautiful card, congratulations, happy evening 🌹🌷🌺🌻💮🌼🌸💐🪷💐🪷🏵️☘️
Gracias mi bella, me alegra mucho que te haya gustado, en efecto la carta es muy llamativa y bonita, da mucho mas para inspirar, quizás pronto saque algo mas. 🐒
Bello día @taniagonzalez 🌈
🌹🌷
Hola, te quedó muy bonito☺️, y eso que las piezas eran muy pequeñas. Felicidades 🎊
Gracias por tus palabras, me alegra que te haya gustado, a veces no es fácil trabajar con piezas tan pequeñas, pero lo importante es lograrlo y que el resultado sea satisfactorio.
Que tengas lindo día @carl05 🌈
https://leofinance.io/threads/dayadam/re-dayadam-lpg6azvq
The rewards earned on this comment will go directly to the people ( dayadam ) sharing the post on LeoThreads,LikeTu,dBuzz.
Thanks @poshthreads ✨
Con piezas pequeñas logras esta perfección . Me sorprende tanto que parecen piezas de plástico ...es increible. Felicidades una vez más te superas 😊💜..un abrazo infinito y bendiciones para tus manos creadoras.
!VSC
!discovery 40
@chacald.dcymt has sent VSC to @dayadam
This post was rewarded with 0.1 VSC to support your work.
Join our photography communityVisual Shots
Check here to view or trade VSC Tokens
Be part of our Curation Trail
@chacald.dcymt ha enviado VSC a @dayadam
Éste post fue recompensado con 0.1 VSC para apoyar tu trabajo.
Únete a nuestra comunidad de fotografía Visual Shots
Consulte aquí para ver o intercambiar VSC Tokens
Se parte de nuestro Trail de Curación
Gracias mi bella por tus palabras, siempre para mi un honor viniendo de ti que eres una grandiosa creadora en todo sentido.
Me alegra mucho que te gustara esta dijesito.
Mil bendiciones para ti mi linda @chacald.dcymt ✨
😊❤️🐒
This post was shared and voted inside the discord by the curators team of discovery-it
Join our Community and follow our Curation Trail
Discovery-it is also a Witness, vote for us here
Delegate to us for passive income. Check our 80% fee-back Program
Thanks @chacald.dcymt and @discovery-it ✨
Wow hasta pareciera hecho de madera 😲 que bien que trabajas con esta tecnica para lograr esos efectos. Viendo la carta y tu trabajo, te quedo identico ❤️ felicidades.
Gracias hermosa por tus palabras, siempre complacida de leerlas mi linda.
Que tengas un hermoso día @elbuhito ✨
Siempre tan creativa 🥰. Gracias por compartir. Feliz domingo.
Gracias bella. Feliz, y bendecido domingo para ti también @mdrguez ✨
Ese monito quedó hermoso,me encanta lo bien detallado que lo elaborastes te felicito de todo corazón
Gracias mi Sra. @laabuelita por sus lindas palabras hacia mi trabajo, me complace mucho, me alegra que le haya gustado.
Abrazos y bendiciones. Que tenga un bello domingo ✨
Congratulations @dayadam! You have completed the following achievement on the Hive blockchain And have been rewarded with New badge(s)
Your next target is to reach 13000 comments.
You can view your badges on your board and compare yourself to others in the Ranking
If you no longer want to receive notifications, reply to this comment with the word
STOPTo support your work, I also upvoted your post!
Check out our last posts:
se ve bien feliz 🐵
Esta muy feliz jajaja 🐒💕
Precioso monito a mi encanta todo lo que haces con tu arte nunca dejes de compartirlo.
Gracias mi linda por tus palabras. Un gran abrazo para ti y mil bendiciones... ✨
Amiga saludos éxitos para ti
Muchísimas gracias, igual para ti. Que tengas un bello día 🌈
Thanks for sharing! - @alokkumar121

Thank you very much for your support @alokkumar121 and @steemmonsters ✨