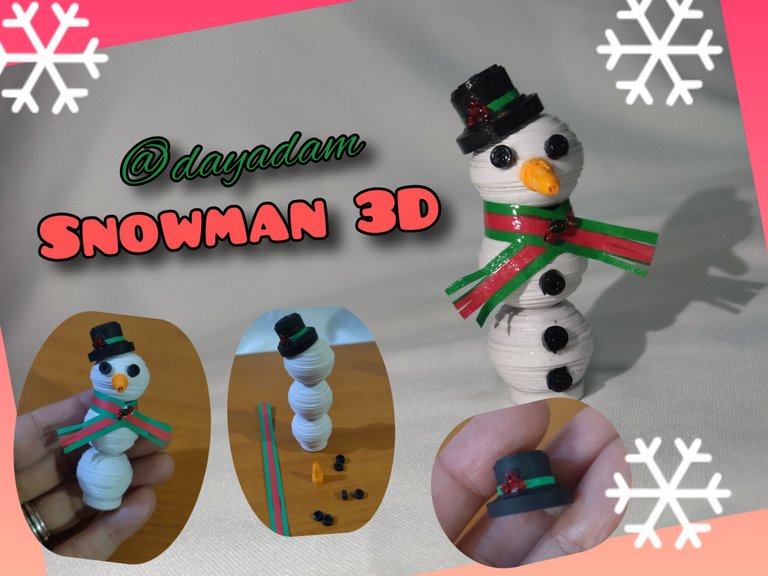
3D Snowman With Top Hat // Quilling Technique [Eng-Esp]
Hello everyone... 🎄⛄️✨
Hello to my dear Hivers and the dear community of artists #HiveDIY, as always very pleased and excited to be here again, showing you my work made with love and especially for you.
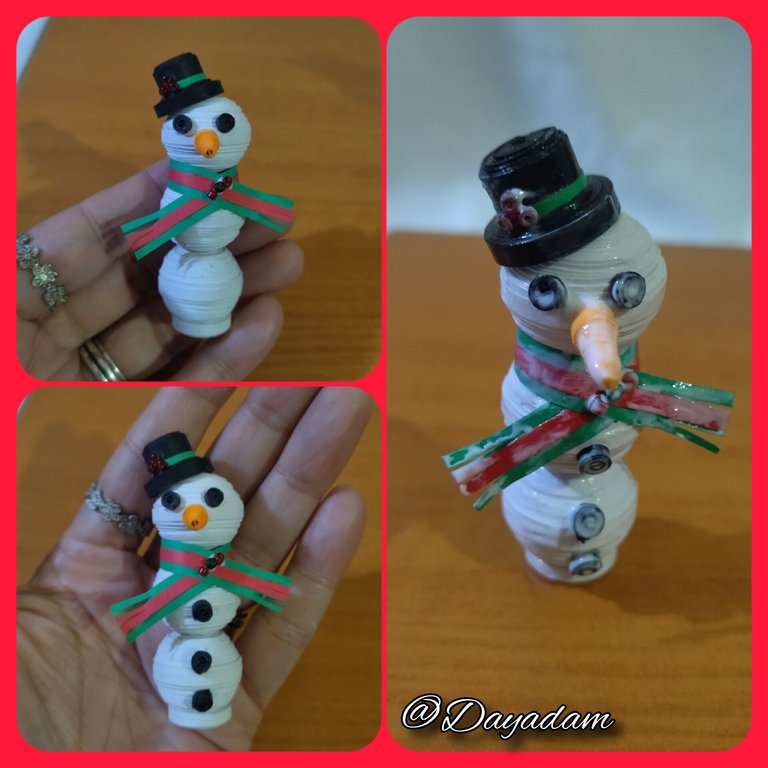
A few days ago I made a small hanging snowman ideal for decorating trees or the space of your choice, for today I wanted to make a different model of a snowman in 3D, with which you can decorate the space of your choice or give a small detail to that special person this Christmas. You will be able to see that the process is very easy, you need few materials and you can decorate it as you prefer.
Hoping you like it, I leave you my creative process:
Let's start:😃

Hola a Todos... 🎄⛄️✨
Hola a mis queridos Hivers y a la querida comunidad de artistas #HiveDIY, como siempre muy complacida y emocionada de encontrarme por acá nuevamente, mostrándole mi trabajo hecho con mucho amor y especialmente para ustedes.
Hace unos días realice un pequeño muñeco de nieve colgante ideal para adornar arbolitos o el espacio de tu preferencia, para hoy quise realizar un modelo diferente de un muñeco de nieve en 3D, con el cual puedes decorar el espacio de tu preferencia o dar un pequeño detalle a esa persona especial en esta navidad. Van a poder observar que el proceso es muy fácil, necesitas pocos materiales y puedes decorarlo como mas prefieras.
Esperando que sea de su agrado, les dejo mi proceso creativo:
Comencemos:😃

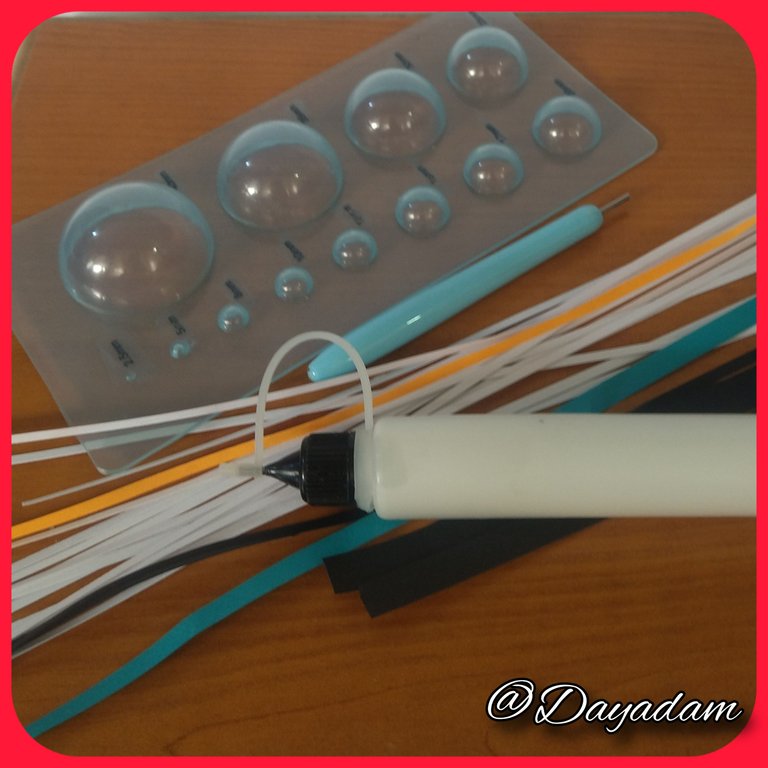
• Cintas de quilling de diversos mm de ancho de diversos colores.
• Apliques color de diferentes colores pequeños.
• Aguja para quilling.
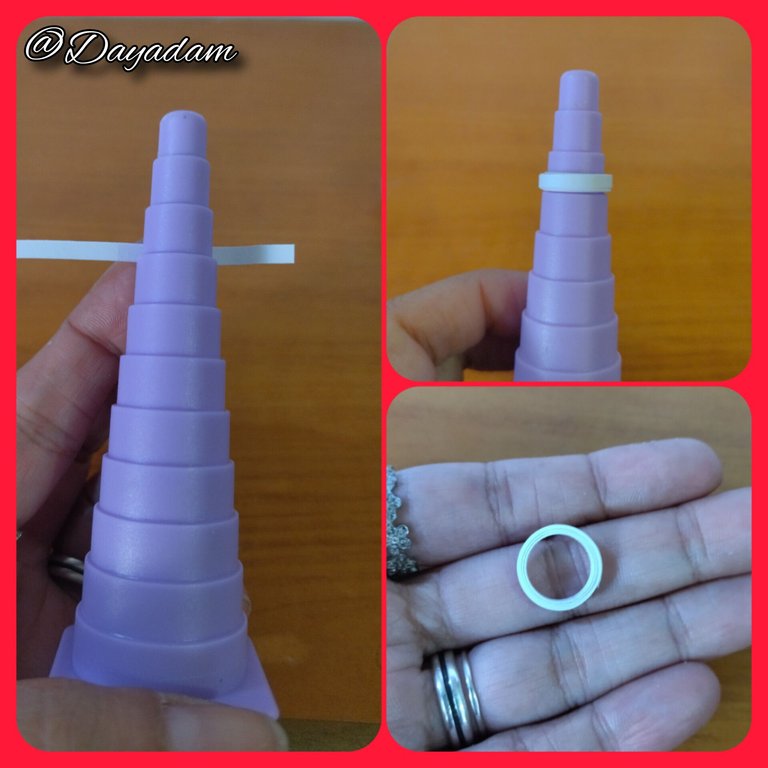
• Molde para círculos.
• Plantilla para círculos.
• Pega blanca extra fuerte (de carpintería).
• Tijera.
• Pincel.
- Quilling ribbons of different widths in different colors.
- Small black appliques.
- Needle for quilling.
- Mold for circles.
- Template for circles.
- Extra strong white glue (carpentry glue).
- Scissors.
- Paintbrush.

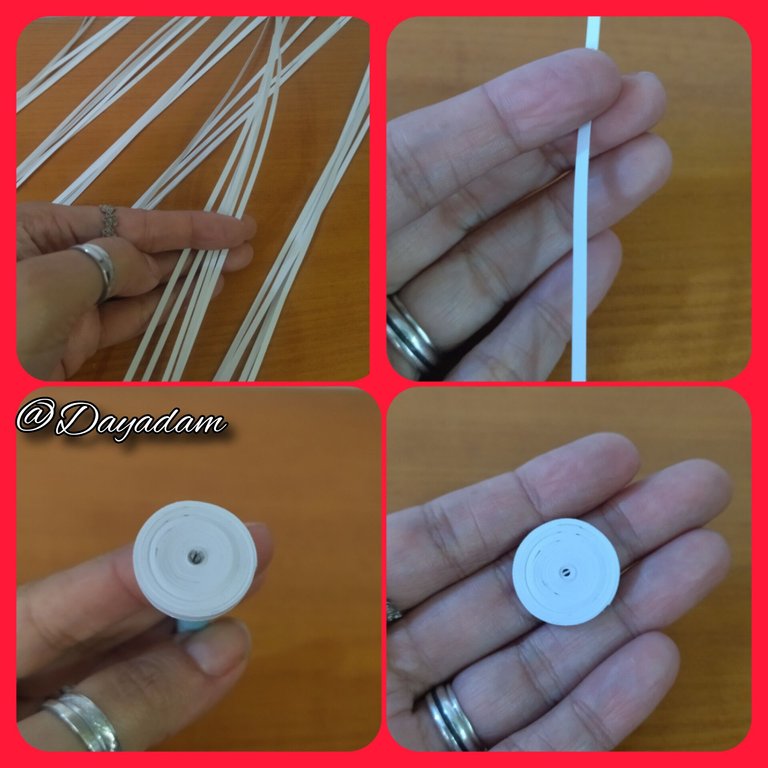
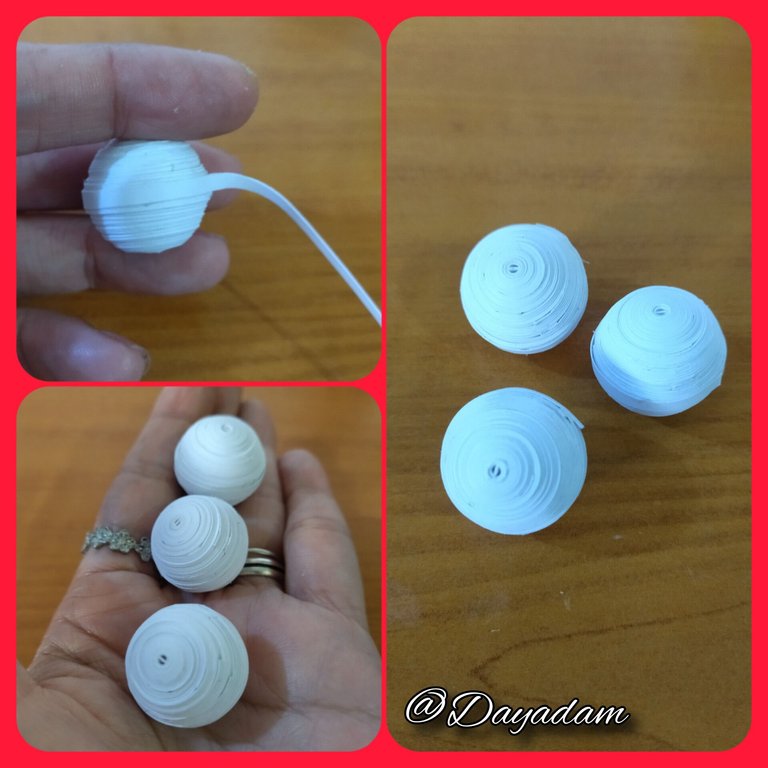
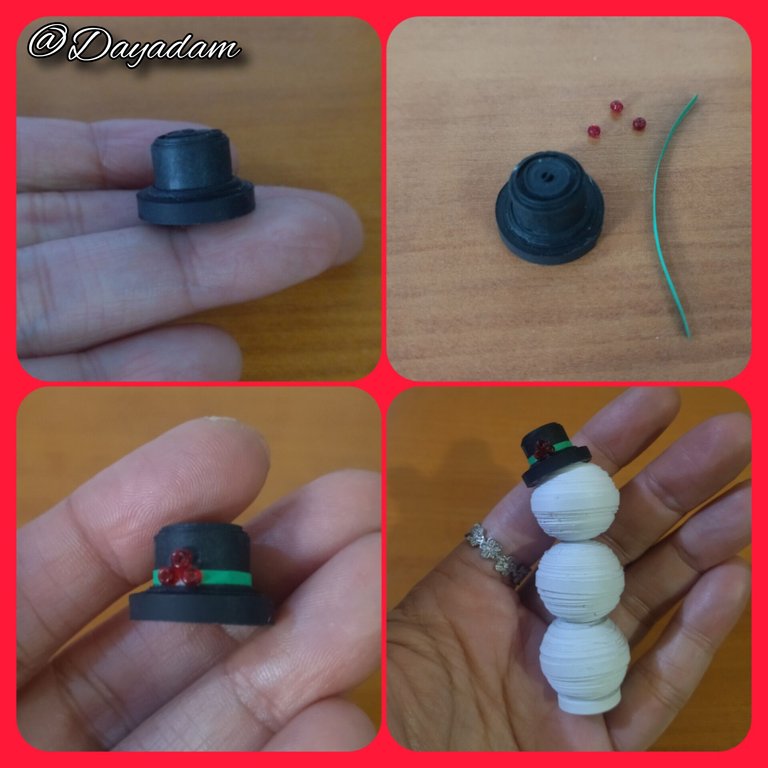
- We start taking white quilling ribbons, we will join a 3mm wide strip to form a 150cms long, we will roll with the help of the quilling needle until we reach the end of the ribbon, we seal with extra strong white glue, we take out of it, we will get a closed circle, we will need 5 more like this for a total of 6.
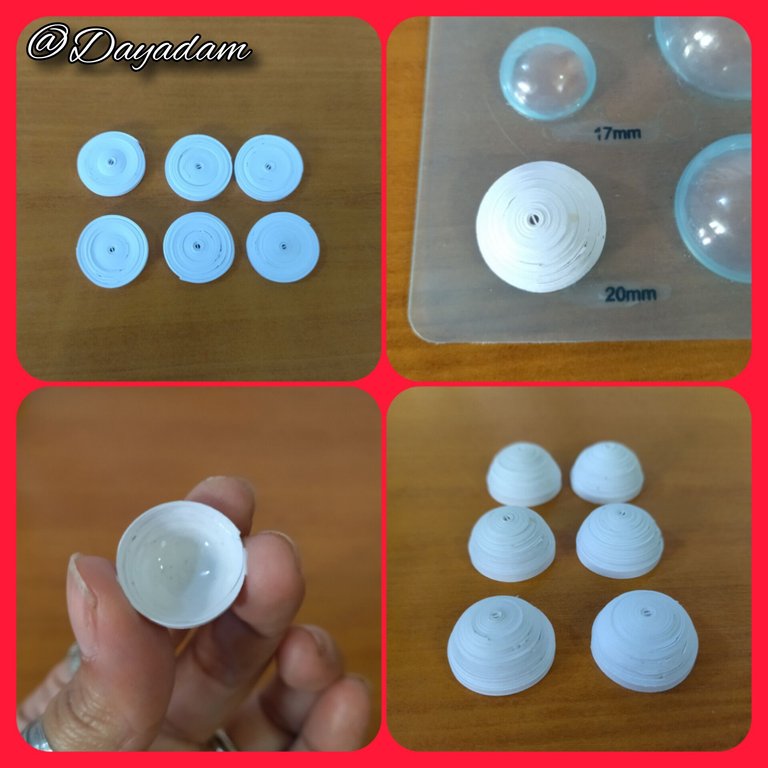
- We are going to mold the circles, placing the piece in the circle template in the 20mm measure (take into account that if we don't have this mold we can do it with our fingers trying to make it as round as possible), on the inside we add a little glue and let it dry to prevent the pieces from moving.
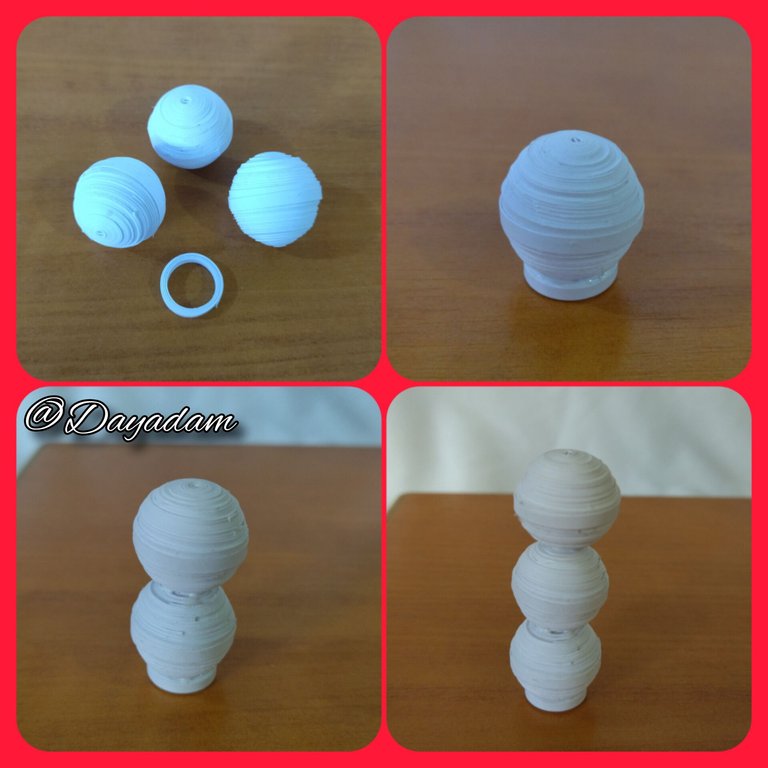
- We are going to take a small piece of white quilling tape, 3mm wide to join the 2 pieces that we made, so we will do with the remaining 4 pieces we will join 2 by 2, we couple both passing the tape through the middle with extra strong white glue, in this way we will have 3 balls in 3D.
- Make a small base to place the doll, taking a 3mm wide white quilling ribbon and roll it around a circle template to form a hollow circle.

• Comenzamos tomando cintas para quilling de color blanco, vamos a unir una tira de 3mm de ancho hasta formar una de 150cms de largo, enrollaremos con la ayuda de la aguja para quilling hasta llegar al final de la cinta, sellamos con pega blanca extra fuerte, sacamos de la misma, obtendremos un círculo cerrado, vamos a necesitar 5 más como este para un total de 6.
• Vamos a moldear los círculos, colocando la pieza en la plantilla de círculos en la medida 20mm (tomemos en cuenta que si no tenemos este molde podemos hacerlo con los dedos tratando de que quede lo más redonda posible), en la parte de adentro agregamos un poco de pega y dejamos secar para evitar que se muevan las piezas.
• Vamos a tomar un pequeño trozo de cinta de quilling blanca, de 3mm de ancho para unir las 2 piezas que elaboramos, así haremos con las 4 piezas restantes uniremos de 2 en 2 acoplamos ambas pasando la cinta por el medio con pega blanca extra fuerte, de esta manera tendremos 3 bolitas en 3D.
• Realice una pequeña base para colocar el muñeco, tomando una cinta blanca de quilling de 3mm de ancho la cual enrolle un una plantilla para círculos, para formar un círculo hueco.
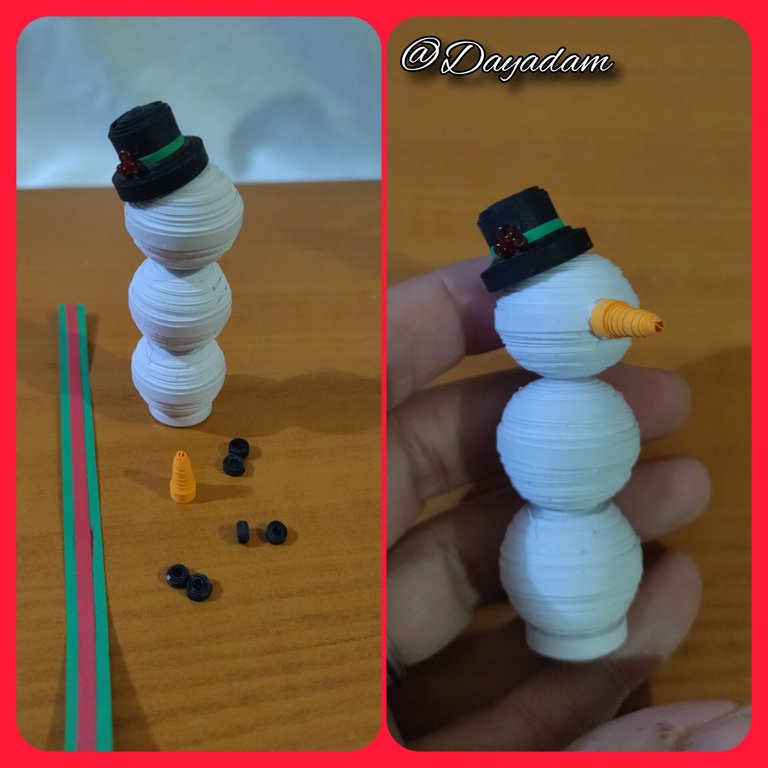
- We will glue the 3 circles one on top of the other and starting from the base I made previously.
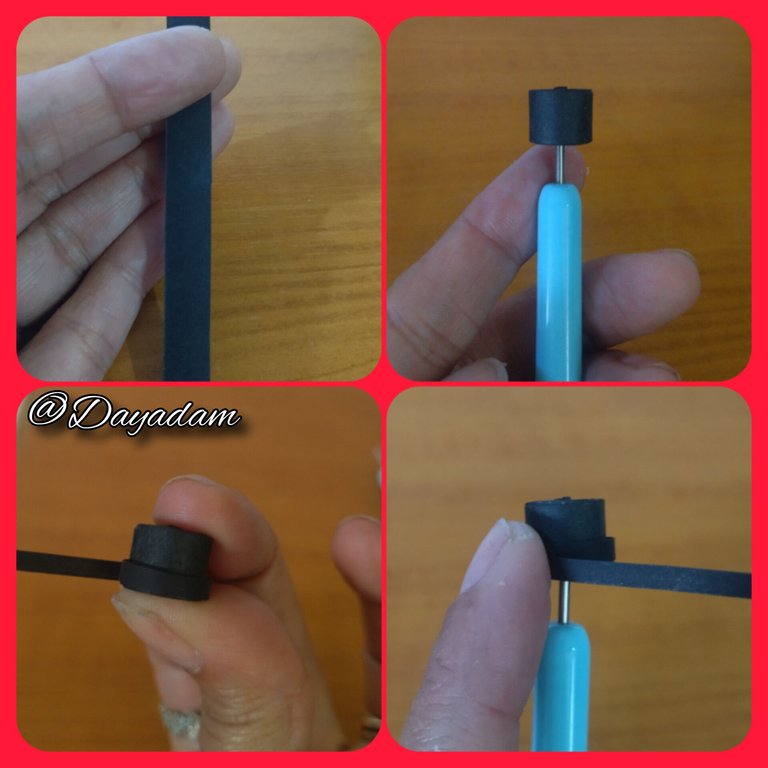
- We will take a piece of black quilling 1cms wide x 30cms long, we will roll it with the quilling needle at the end we will seal it with glue, then we will take a piece of black quilling ribbon 3mm wide and we will pass through the bottom of the wide circle that we made, this will be the edge of the hat.
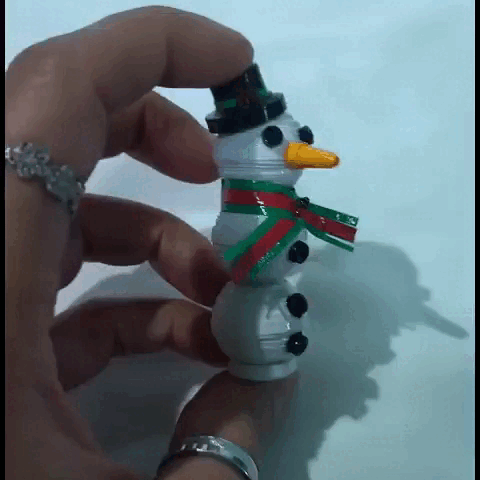
- Decorate the hat by placing a small piece of green ribbon around it and some red beads.
- Glue the hat on the doll's head as you like.
- For the nose we will take a piece of orange ribbon, we will make a closed circle which we will raise a little with some object to give it a pointed shape, we add a little glue on the inside so that it does not deform.
• Pegaremos los 3 círculos uno encima de otro y empezando por la base que hice previamente.
• Tomaremos un trozo de quilling negro de 1cms de ancho x 30cms de largo, enrollaremos con la aguja para quilling al finalizar sellaremos con pega, luego tomaremos un trozo de cinta para quilling negra de 3mm de ancho y pasaremos por la parte de abajo del circulo ancho que realizamos, este será el borde el sombrero.
• Adorne el sombrero colocando un pequeño trozo de cinta verde alrededor y unos canutillos rojos.
• Pegamos el sombrerito de la cabeza del muñeco a nuestro gusto.
• Para la nariz tomaremos un trozo de cinta naranja, haremos un círculo cerrado el cual subiremos un poco con algún objeto para darle forma puntiaguda, agregamos un poco de pega por la parte interna para que no se deforme.

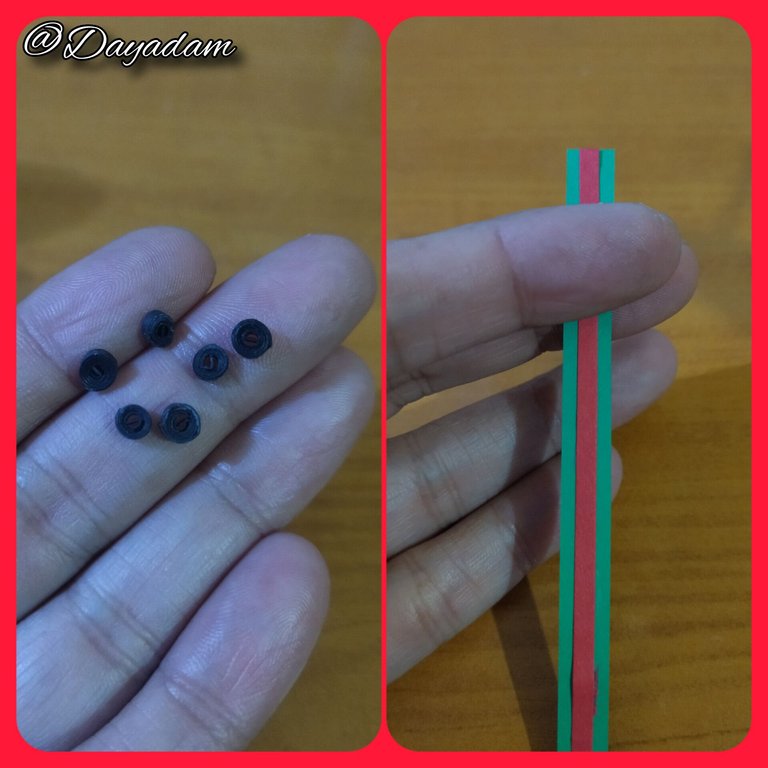
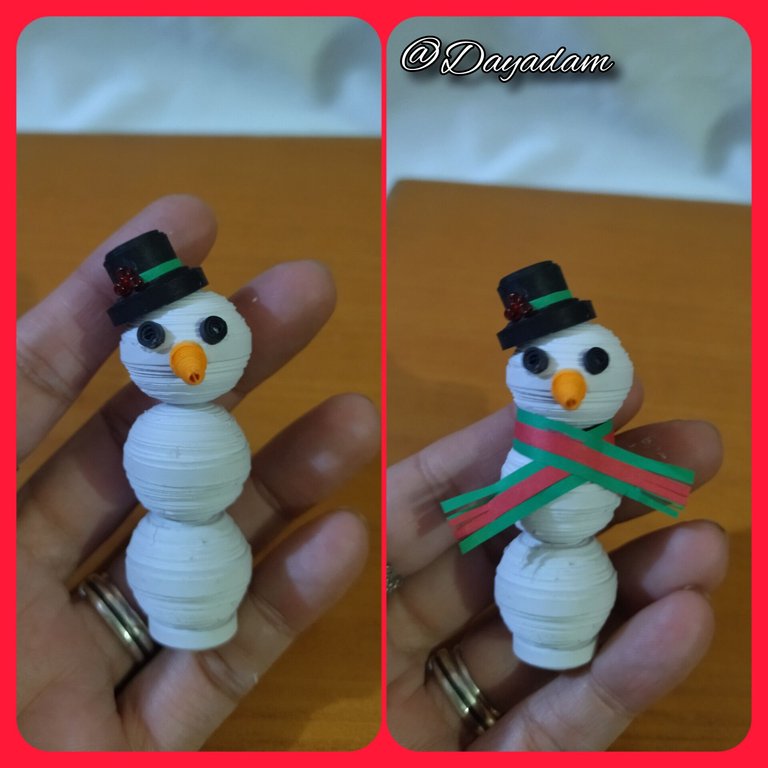
- Make several closed circles with 1 mm wide black ribbon to decorate the body and another one for the eyes.
- For the scarf take 6mm wide green ribbon, place a 3mm wide red ribbon in the middle, this will be the scarf.
- Glue all the remaining elements, eyes, nose, scarf and body buttons.
- Finally apply some white glitter glue on some parts of the doll to give it a little shine.
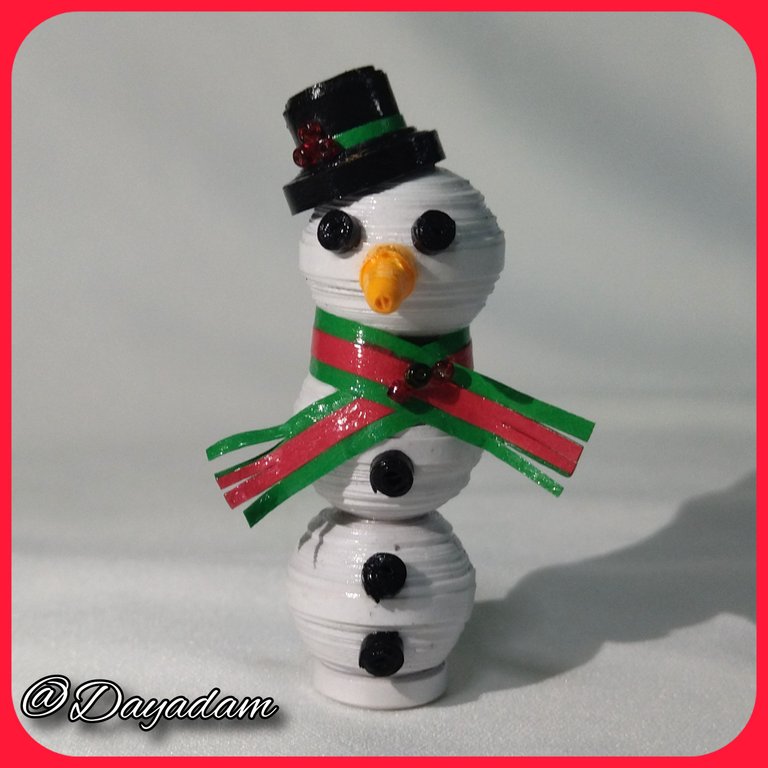
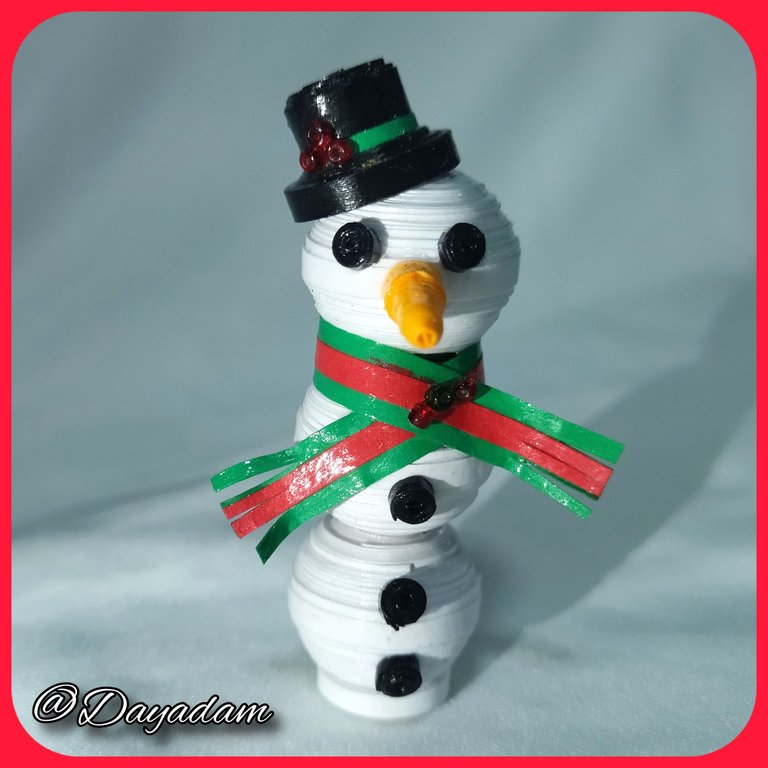
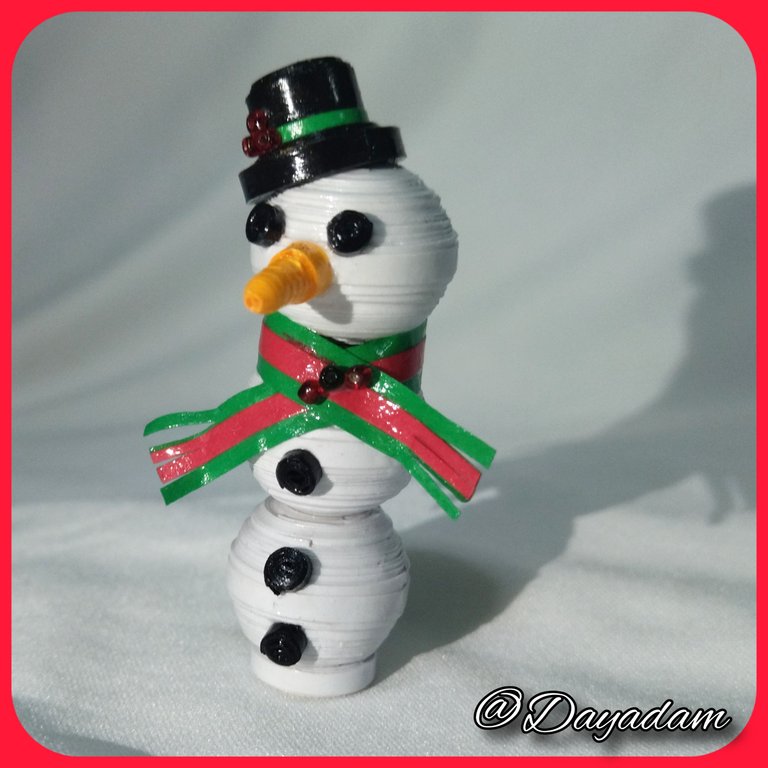
***In this way we have this new decorative snowman in 3D, so you can decorate your spaces or give a small detail to that loved one this Christmas.
• Realice varios círculos cerrados con cinta negra de 1 mm de ancho, para decorar el cuerpo y otro para los ojos.
• Para la bufanda tome cinta verde de 6mm de ancho, le coloque en medio una cinta roja de 3mm de ancho esta será la bufanda.
• Pegamos todos los elementos restantes, ojos, nariz, bufanda y botones del cuerpo.
• Para finalizar aplique un poco de pega blanca brillante en algunas partes del muñeco para darle un poco de brillo.
De esta manera tenemos este nuevo muñeco de nieves decorativo en 3D, para que decores tus espacios o des un pequeño detalle a ese ser querido en esta navidad.


What did you think, did you like it?
I hope you did, I hope you liked my explanation, procedure and photos, I made them with love for you.
"Let out that muse that inspires you, and let your imagination fly".
Thank you all, see you next time 🎄⛄️✨.
¿Qué les pareció, les gustó?
Espero que sí, que les haya gustado mi explicación, procedimiento y fotos, los hice con mucho cariño por y para ustedes.
"Deja salir esa musa que te inspira, y deja volar tu imaginación".
Gracias a todos, nos vemos en la próxima.🎄⛄️✨
Todas las fotos usadas en este post son de mi autoría y han sido sacadas en mi celular personal un Redmi 9T, editadas en InShot y Canva Banner y separador hecho por mí en Canva Traducido con la ayuda de DeepL

Que cuchis te quedo 😍 ese muñequito de nieve esta diciendo "quiero decorar con mi belleza un hogar, amenme" jaja
Esta muy bonito y muy bien hecho ❤️
Ainssss tan linda, y créeme que si, estará decorando un hogar, se lo regale a alguien muy querido que se lo sabrá apreciar.
Gracias preciosa @elbuhito 💕
Wow, this work is amazing. Simple but beautiful. I really enjoyed the dedication you put into every detail and I loved that you gave it that shine at the end, I wasn't expecting it, it looks very professional. The way you present the publication is excellent, great photos and editing, congratulations...
Thank you very much for your nice words towards my work and support, I'm glad you liked it. And as you say, simple work, but full of love to inspire others to materialize it.
Blessings @jesuslnrs ✨
!LUV
@dayadam sent you LUV 🙂 (1/1)
Made with LUV by crrdlx
Ohhh .. qué lindo te quedó, saluditos amiga !
Gracias cariño. Saluditos @bayondalways1 ⛄️
Que lindo quedó! felicitaciones por tu trabajo y muchas gracias por compartirlo.
Bendiciones.
Gracias mi corazón por apreciar mi trabajo. Bello día para ti @elmundodebetty ✨
Esta muy bonito. Yo nunca había visto algo así. Me gusta 🌈🧁
Muchísimas gracias, me alegra mucho que te haya gustado mi trabajo. Bienvenida a mi blog, en el puede ver mas trabajos en esta técnica, cualquier duda estoy a la orden.
Que tengas lindo día @elmundodemiri ✨
Congratulations, your post has been upvoted by @dsc-r2cornell, which is the curating account for @R2cornell's Discord Community.
Enhorabuena, su "post" ha sido "up-voted" por @dsc-r2cornell, que es la "cuenta curating" de la Comunidad de la Discordia de @R2cornell.
Gracias por el apoyo @dsc-r2cornell ✨
https://twitter.com/hivediy47901/status/1734288439846023401
Gracias por el apoyo @hive-130560 💖
Que belleza de trabajo 😍...me encantó su pequeño sombrero y la bufanda. Me enamoré de este personaje.
@dayadam una vez más te superaste. Un trabajo impecable y hermoso. Bendiciones para tus manos creadoras
!VSC
!LUV
@chacald.dcymt has sent VSC to @dayadam
This post was rewarded with 0.1 VSC to support your work.
Join our photography communityVisual Shots
Check here to view or trade VSC Tokens
Be part of our Curation Trail
@chacald.dcymt ha enviado VSC a @dayadam
Éste post fue recompensado con 0.1 VSC para apoyar tu trabajo.
Únete a nuestra comunidad de fotografía Visual Shots
Consulte aquí para ver o intercambiar VSC Tokens
Se parte de nuestro Trail de Curación
@chacald.dcymt sent you LUV 🙂 (1/1)
Made with LUV by crrdlx
Gracias mi hermosa @chacald.dcymt, por tus palabras siempre tan hermosas hacia mi trabajo y por tu gran apoyo, sabes que res inspiración para mi.
Mil bendiciones... 💖
!LADY
!PIZZA
View or trade
LOHtokens.@dayadam, you successfully shared 0.1000 LOH with @chacald.dcymt and you earned 0.1000 LOH as tips. (1/3 calls)
Use !LADY command to share LOH! More details available in this post.
$PIZZA slices delivered:
@dayadam(1/5) tipped @chacald.dcymt
Congratulations @dayadam! You have completed the following achievement on the Hive blockchain And have been rewarded with New badge(s)
Your next target is to reach 14000 comments.
You can view your badges on your board and compare yourself to others in the Ranking
If you no longer want to receive notifications, reply to this comment with the word
STOPCheck out our last posts:
Gracias @hivebuzz ✨
¡Eso es genial @dayadam! ¡Estamos emocionados de ver tus logros en Hive! ¡Sigue adelante y logra este nuevo objetivo!
Hola Daya! Muy buenos días ♥️ Te quedó súper súper lindo este proyecto, desde la portada me intriga cómo haces las partes redondas del diseño, me pregunté si no eran muy pesadas al ser puro papel enrollado o comprimido 👀 y veo que usas un molde (o sea que la pieza es hueca, es fascinante!), puedes decirme por favor dónde adquiriste el tuyo? O como puedo ubicarlo tipo en MercadoLibre? 💕
Hola mi bella, disculpa lo tardía de mi respuesta, me alegra que te haya gustado.
Con respecto a los moldes si supieras, me canse de buscarlos por todos lados y nunca los conseguí, y resulta que por este medio una bendición me llego, una Hiver me envió desde España un estuche con cintas, moldes, reglas, etc.
Esto fue lo que me envió: https://www.amazon.ca/Quilling-Kits-Tools-Supplies-Crimper/dp/B07Q49DCPJ
Gracias por pasar hermosa. Éxitos para ti...
¡No te preocupes! No importa lo poco o mucho que tardes jajaja mas bien muchas gracias por atender mi duda 🫂 🫂 🫂 ¡Súper agradecida por el link! Y me hace muy feliz saber que una Hiver de otro país tuvo ese detalle tan espectacular contigo 💖 Gracias a ti y por tus buenos deseos 🥰
Contáctenos para saber más del proyecto a nuestro servidor de Discord.
Si deseas delegar HP al proyecto: Delegue 5 HP - Delegue 10 HP - Delegue 20 HP - Delegue 30 HP - Delegue 50 HP - Delegue 100 HP.
Looks so good! Awesome work!