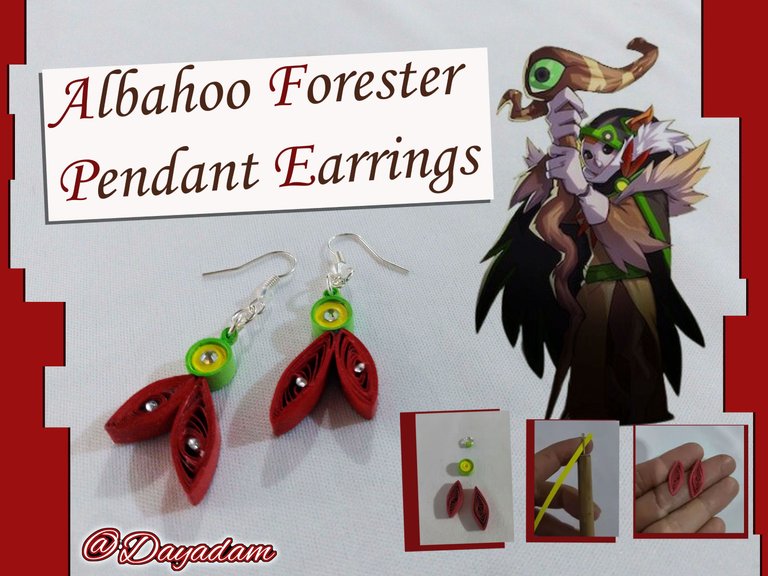
Albahoo Forester // Pendant earrings Quilling Technique [Eng-Esp]
Hello everyone... ✨
Hello to my dear Hivers and the dear community of artists Jewelry, as always very pleased and excited to be here again, showing you my work made with love and especially for you...
Greetings to the Splinterlands community, and everyone who lives there, I am pleased to be here to participate in the Splinterlands Art Contest Week 288.
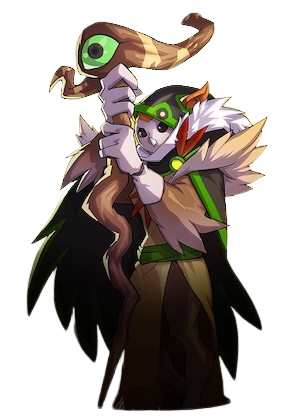
Last week I visualized a beautiful card from Rebellion called "Albahoo Forester " of which several elements caught my attention, because first of all I materialized the spectacular eye that stands out in the cane that the main character carries in his hands in a pendant for necklace that I made in 3D in the quilling technique. If you want to see my previous work here is the link.
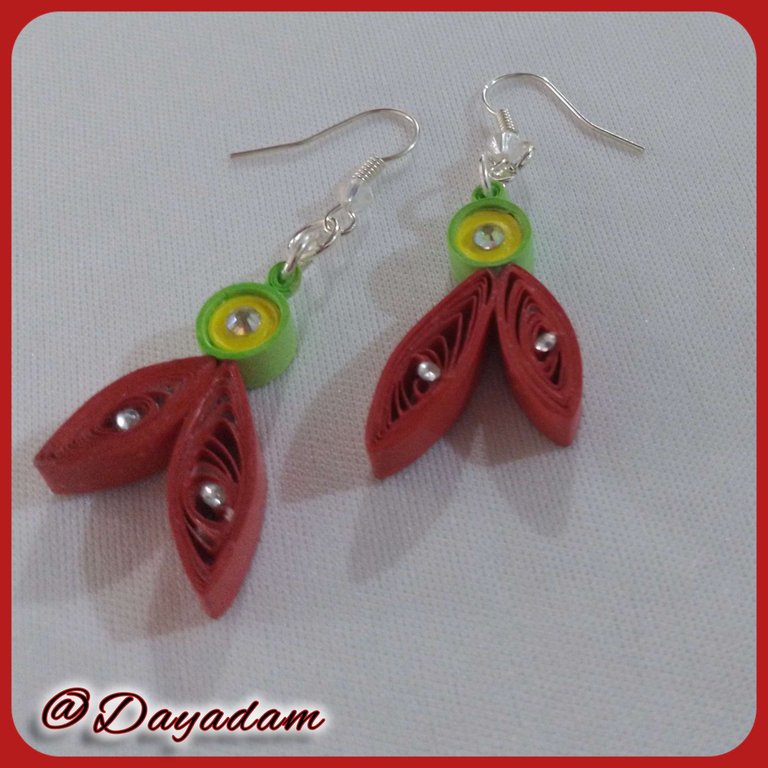
For today I wanted to complete a set of accessories by making a pair of hanging tendrils, this time with another element of the card, a striking ring with a pair of feathers that adorn the character's clothing.
If you want to know more about the game, I leave you my reference link to enter it and navigate through this wonderful world: https://splinterlands.com?ref=dayadam
Hoping you like my work, without further ado, I leave you with my creative process.
Let's start:😃

Hola a Todos...✨
Hola a mis queridos Hivers y a la querida comunidad de artistas Jewelry, como siempre muy complacida y emocionada de encontrarme por acá nuevamente, mostrándole mi trabajo hecho con mucho amor y especialmente para ustedes.
Un saludo para la comunidad de Splinterlands, y todos los que hacen vida por allí, me gratifica estar por acá para participar en el Splinterlands Art Contest Week 288.
La semana pasada visualice una hermosa carta de Rebellion llamada "Albahoo Forester" de la cual me llamaron la atención varios elementos, pues en primer lugar materialice el espectacular ojo que resalta en el bastón que lleva en sus manos el personaje principal en un dije para collar que elabore en 3D en la técnica de quilling. Si quieren ver mi trabajo anterior por acá les dejo el link.
Para hoy quise completar un conjunto de accesorios elaborando un par de zarcillos colgantes, esta vez con otro elemento de la carta, un llamativo aro con un par de plumas que adornan la vestimenta del personaje.
Si quieren saber más con respecto al juego les dejo mi enlace de referencia para que ingresen en él, y naveguen por este maravilloso mundo: https://splinterlands.com?ref=dayadam
Esperando les guste mi trabajo, sin más preámbulos, les dejo mi proceso creativo.
Comencemos:😃

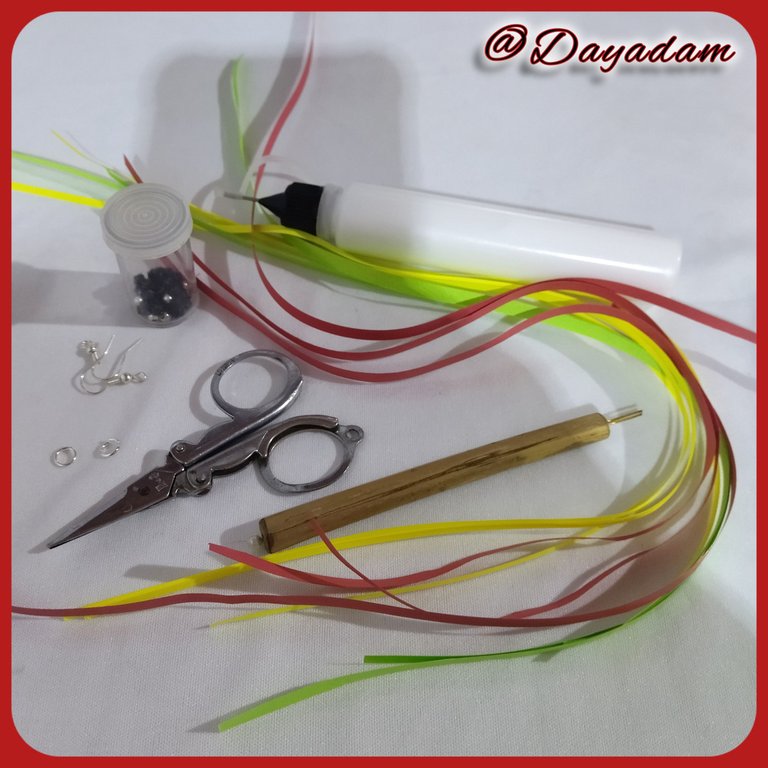
• Cintas de quilling de diversos colores.
• Aguja para quilling.
• Bases para zarcillo colgantes (anzuelos).
• Argollas de bisutería medianas.
• Cristales de bisutería de diversos tamaños.
• Cristales Checos negros.
• Pega blanca extra fuerte (de carpintería).
• Tijera.
• Pincel.
- Quilling ribbons of different colors.
- Quilling needle.
- Bases for hanging tendrils (hooks).
- Medium-sized costume jewelry rings.
- Costume jewelry crystals of various sizes.
- Black Czech crystals.
- Extra strong white glue (carpentry glue).
- Scissors.
- Paintbrush.

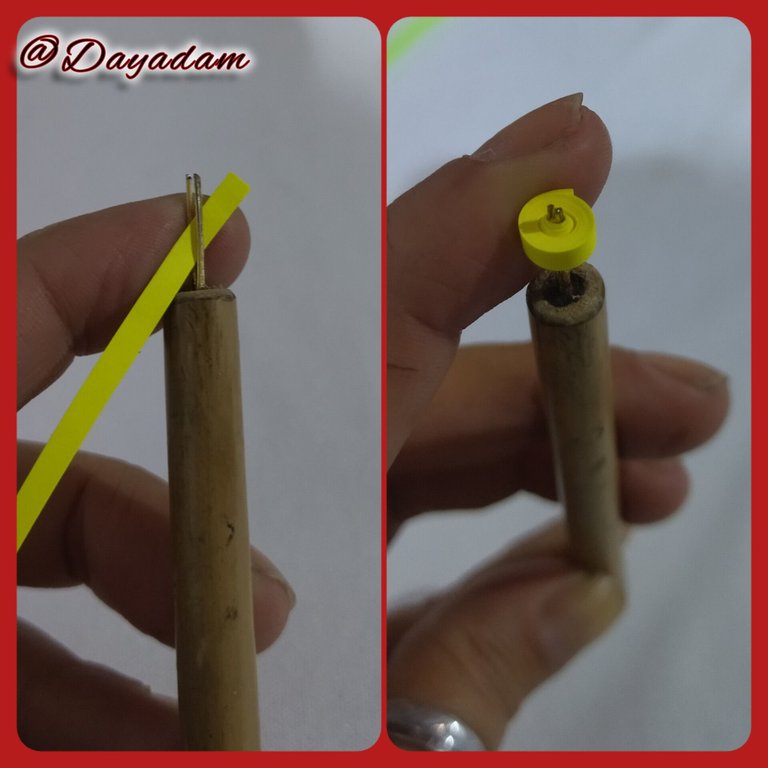
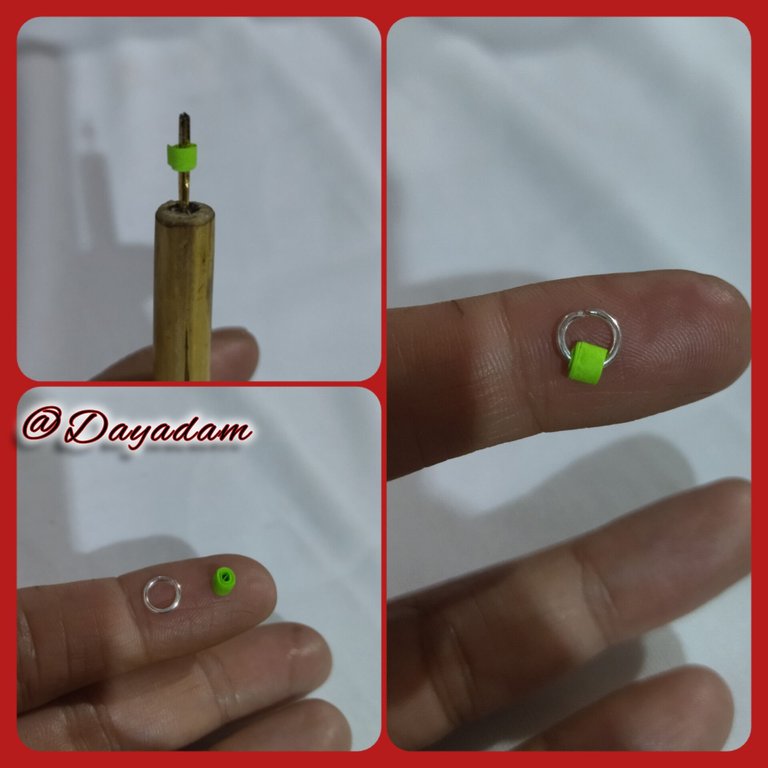
- We are going to start by taking a 3mm wide yellow quilling tape, with the help of the quilling needle we will roll it up to the end of the tape, we will seal it with some glue.
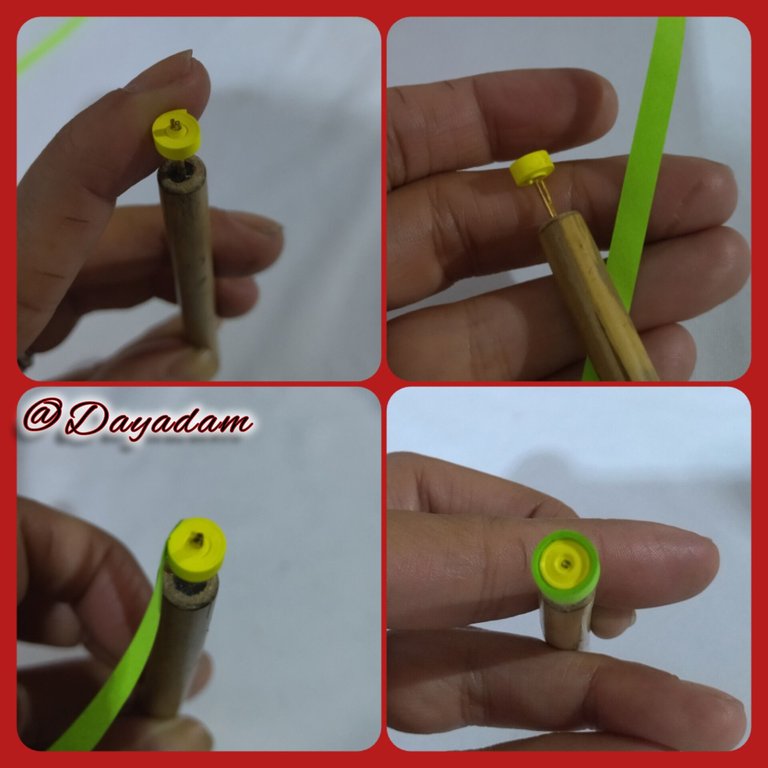
- Then we will take a piece of quilling tape of 5mm wide green color, we will stick it in the center of the yellow tape, we will roll it until the end of the tape and seal it with extra strong white glue.
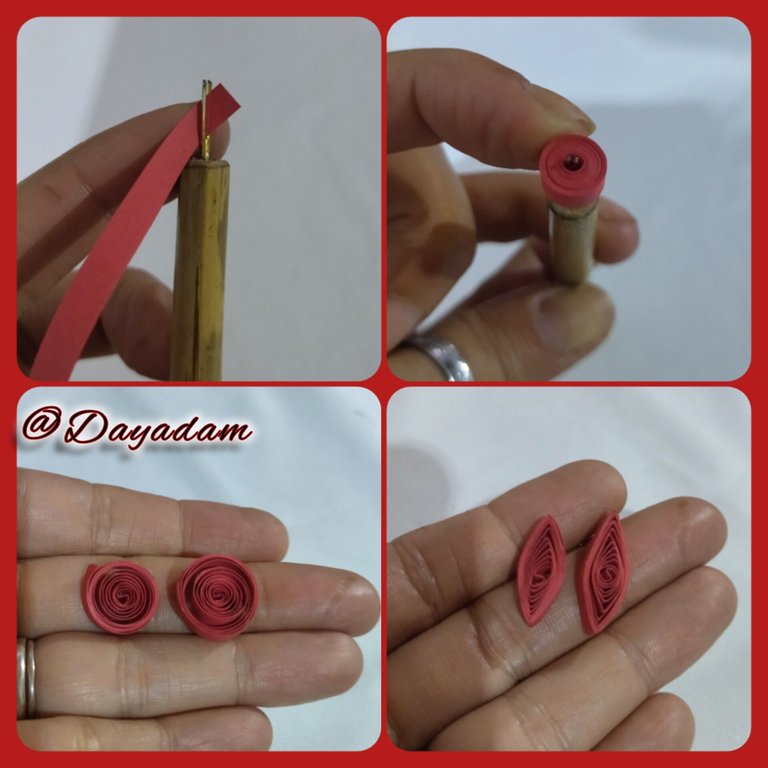
- We will make the feathers by taking a 5mm wide red quilling tape, with them we will make 2 open circles, one a little bit bigger than the other, we will shape them flattening both ends forming a kind of leaf.

• Vamos a comenzar tomando cinta para quilling de color amarilla de 3mm de ancho, con ayuda de la aguja para quilling enrollaremos hasta finalizar con la cinta, sellaremos con un poco de pega.
• Luego tomaremos un trozo de cinta para quilling de 5mm de ancho color verde, esta la pegaremos en el centro de la cinta color amarilla enrollaremos hasta finalizar con la misma sellaremos con pega blanca extra fuerte.
• Las plumas las realizaremos tomando cinta para quilling de color rojo de 5mm de ancho, con ellas realizaremos 2 círculos abiertos uno un poco mas grande que el otro, moldearemos aplanando en sus dos extremos formando una especie de hoja.
- At this point we will make a small piece that will hold the tendrils next to the ring to be able to place the base of the same, we will take a piece of green ribbon 1mm wide and roll it to form a small closed circle once ready we will incorporate the ring.
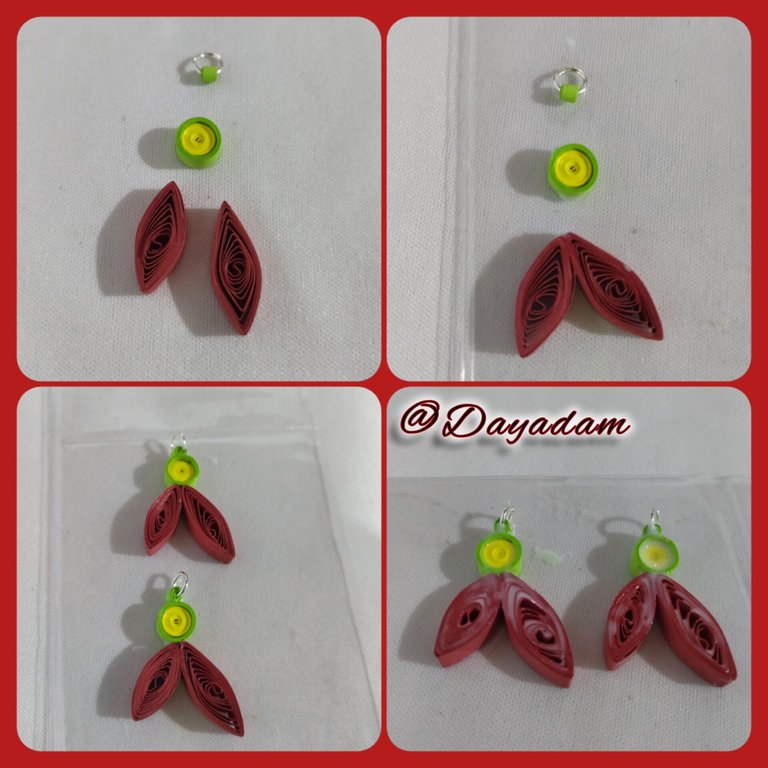
- We are going to join the pieces, we will glue the 2 feathers, once dry we will glue the yellow circle with the green border and finally we will place the piece with the ring on top.
- Once the pieces are joined I decided to laminate them by applying several layers of extra strong white glue, letting it dry between one layer and another, to give protection and a touch of brightness to the tendril.
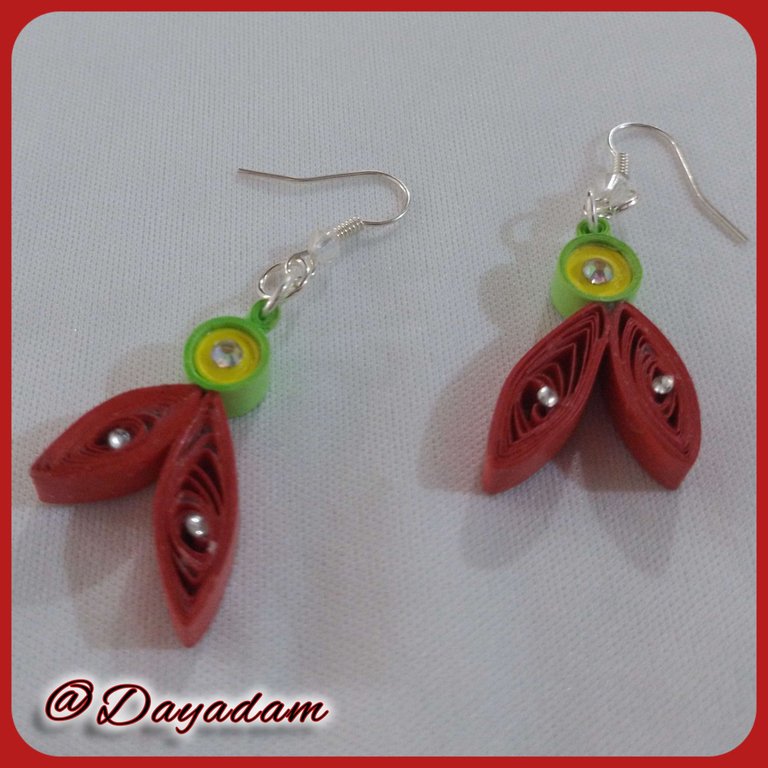
- I decorated the piece placing in some points jewelery crystals of various sizes.
- Finally I proceeded to place the hanging base (hook), to which I previously placed a transparent Czech glass to give it more colorfulness.
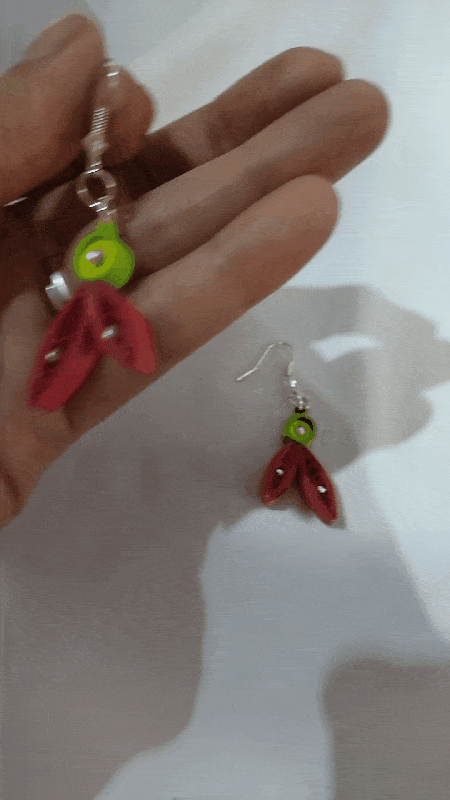
This way we have ready this pair of earrings that I made to complete a set of accessories inspired by the Rebellion card "Albahoo Forester "..
• En este punto realizaremos una pequeña pieza que sera la que sostendrá los zarcillos junto a la argolla para poder colocar la base de los mismos, tomaremos un trozo de cinta color verde de 1mm de ancho enrollaremos para formar un pequeño circulo cerrado una vez listo incorporaremos la argolla.
• Vamos a unir las piezas, pegaremos las 2 plumas, una vez secas pegaremos del circulo amarillo con el borde verde y por ultimo colocaremos arriba la pieza con la argolla.
• Unidas las piezas decidí de una vez plastificar aplicando varias capas de pega blanca extra fuerte dejando secar entre una capa y otra, para darle protección y un toque de brillo al zarcillo.
• Decore la pieza colocando en algunos puntos cristales de bisutería de diversos tamaños.
• Por ultimo procedí a colocar la base colgante (anzuelo), al que previamente le coloque un cristal checo transparente para darle mayor vistosidad.
De esta manera tenemos listo este par de zarcillos que realice para completar un conjunto de accesorios inspirado en la carta de Rebellion "Albahoo Forester".


What did you think, did you like it?
I hope you did, I hope you liked my explanation, procedure and photos, I made them with love for you.
"Let out that muse that inspires you, and let your imagination fly".
Thank you all, see you next time.
¿Que les pareció, les gustó?
Espero que sí, que les haya gustado mi explicación, procedimiento y fotos, los hice con mucho cariño por y para ustedes.
"Deja salir esa musa que te inspira, y deja volar tu imaginación".
Gracias a todos, nos vemos en la próxima.

Gracias por el apoyo amigo @edwing357 ✨
🤗🤗😊 saludos amiga feliz y bella noche
https://inleo.io/threads/dayadam/re-dayadam-36ghss3sr
The rewards earned on this comment will go directly to the people ( dayadam ) sharing the post on LeoThreads,LikeTu,dBuzz.
Amiga muy hermoso excelente trabajo, te deseo mucha suerte🌹🌹🌹
Gracias mi linda, un gusto que te haya gustado. Agradecida por tus deseos. Abrazos ✨
Supongo que el quilling es un material como cuerina o foami... Al menos, yo estaba en la unidad la haría con tiras de foami picadas a una misma medida para que tuviera ese mismo efecto.
Tengo que buscar el post donde hiciste dije porque me intriga saber cuál es el juego de este par de aretes
Hola bella. El quilling son tiras de papel que puedes moldear a tu gusto, para bisutería hay que plastificar para proteger el accesorio.
Acá en el post hay una foto del dije que hace juego con los zarcillos, al igual que deje el link de dicho trabajo.
Gracias por pasar. Saluditos...
Checkout our BDVoter Daily Hive Showcase & Participate into our Daily giveaway to win various prize.
Thanks for the support @bdvoter.cur ✨
Me encanta, quedo muy bonito. Saludos ☺️