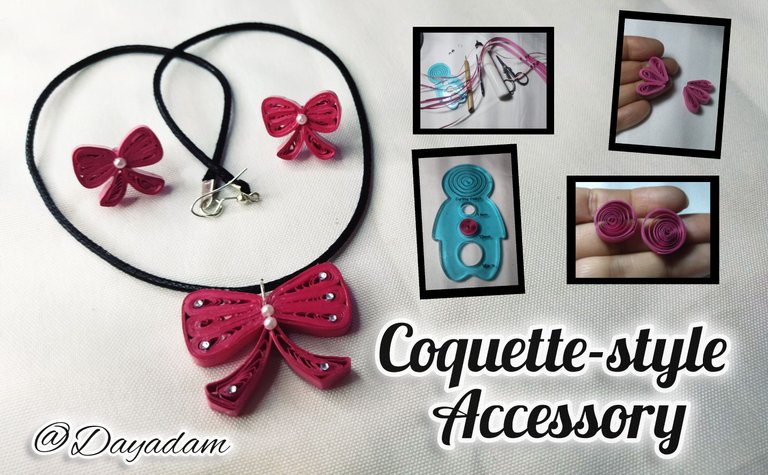
Coquette Style Accessory // Quilling Technique [Eng-Esp]
Hello everyone... 💕
Hello to my dear Hivers and the dear community of artists Jewelry, as always very pleased and excited to be here again, showing you my work made with love and especially for you.
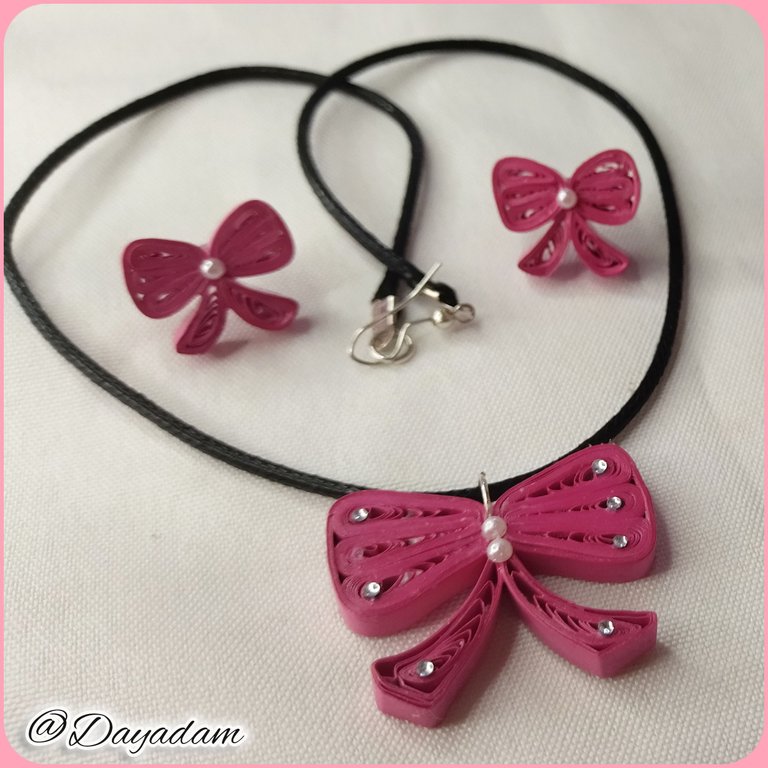
I have noticed that for some time now there is a style which has become very fashionable, this trend is called Coquette, so I wanted to materialize it in a set of accessories, necklace pendant and earrings fixed with pink ribbons in the quilling technique.
Hoping you like it, I leave you my creative process:
Let's get started:😃

Hola a Todos... 💕
Hola a mis queridos Hivers y a la querida comunidad de artistas Jewelry, como siempre muy complacida y emocionada de encontrarme por acá nuevamente, mostrándole mi trabajo hecho con mucho amor y especialmente para ustedes.
He notado que de un tiempo para acá se está nombrando mucho un estilo el cual se ha puesto muy de moda, está tendencia lleva por nombre Coquette, por esto quise materializarla en un conjunto de accesorios, dije para collar y zarcillos fijos de unos lacitos rosados en la técnica de quilling.
Esperando que sea de su agrado, les dejo mi proceso creativo:
Comencemos:😃

• Cintas de quilling rosadas.
• Aguja para quilling.
• Cristales de bisutería.
• Argolla de bisutería mediana.
• Base para zarcillos fijas.
• Pega blanca extra fuerte (de carpintería).
• Tijera.
• Pincel.
- Pink quilling ribbons.
- Quilling needle.
- Costume jewelry crystals.
- Medium size costume jewelry earrings.
- Fixed tendrils bases.
- Extra strong white glue (carpentry glue).
- Scissors.
- Paintbrush.

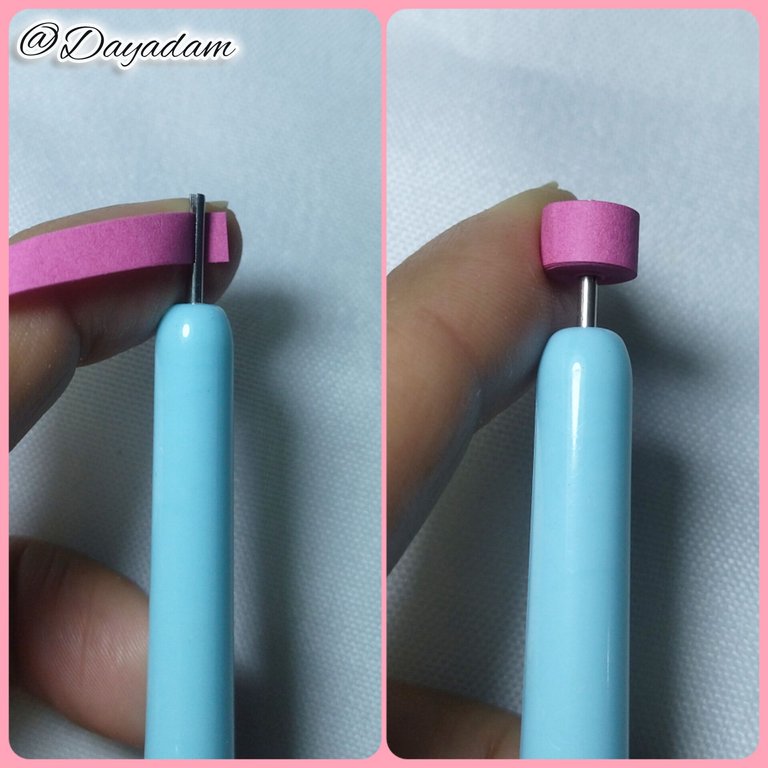
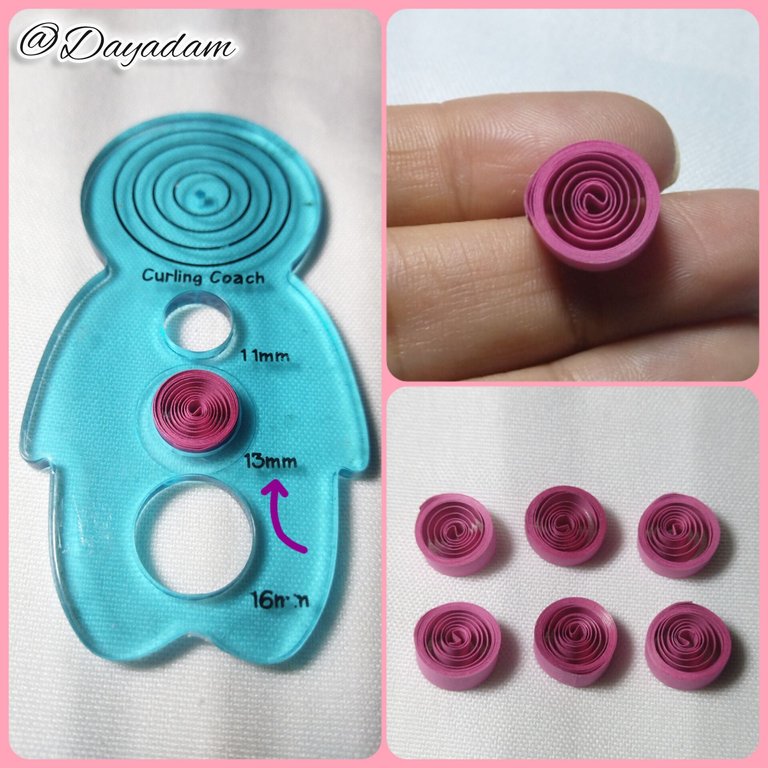
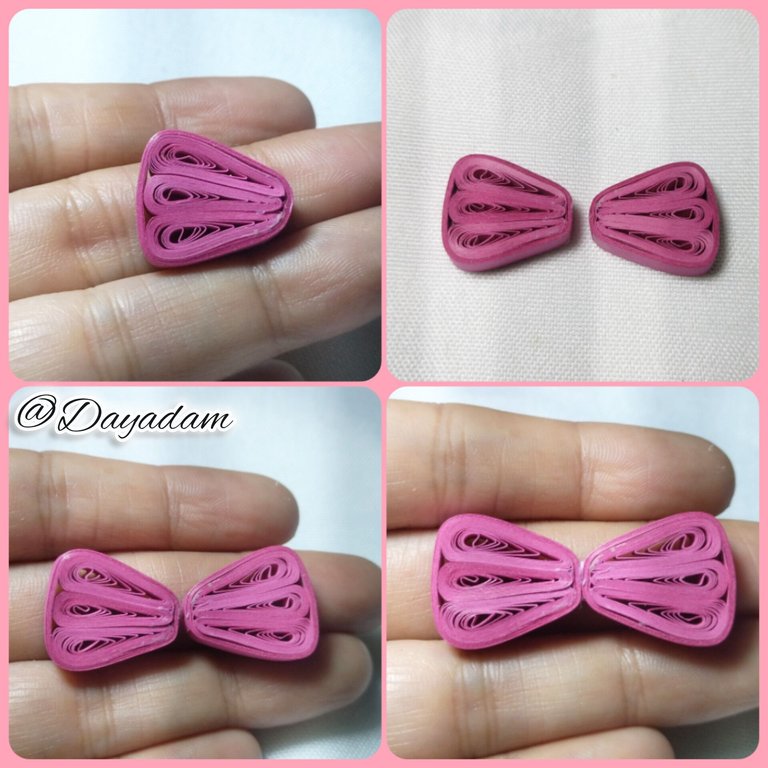
- We start taking quilling tape 5mm wide pink x 40mm long, with the help of the quilling needle we will roll up to the end of the tape, we take out the needle and measure in a mold of circumferences in the measure number 13mm, we take out the mold and seal with extra strong white glue, in this way we will get an open circle, like this we will need 6 for each loop we want to make, 3 for each side.
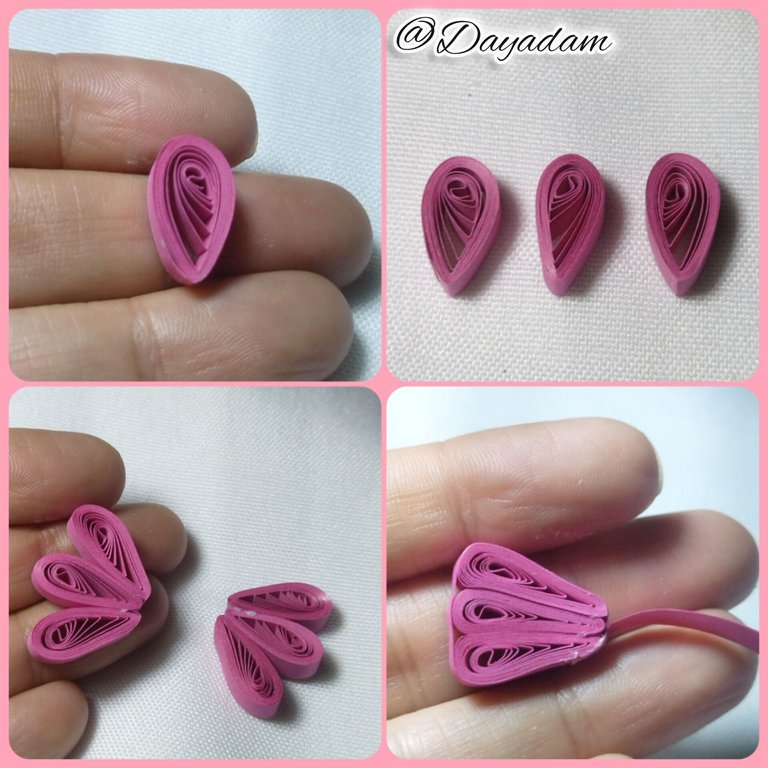
- Once the circles are ready, we proceed to mold them in the shape of drops, we will join them in groups of 3, then we will put a piece of pink ribbon around each of the pieces we made, to finish this phase, we will join them with extra strong white glue.

• Comenzamos tomando cinta para quilling de 5mm de ancho color rosado x 40mm de largo, con la ayuda de la aguja para quilling enrollaremos hasta llegar al final de la cinta, sacamos de la aguja y meditemos en un molde de circunferencias en la medida número 13mm, sacamos del molde sellamos con pega blanca extra fuerte, de esta manera conseguiremos un círculo abierto, como este necesitaremos 6 por cada lazo que queramos hacer, 3 para cada lado.
• Listos los círculos procedemos a moldear en forma de gotas, uniremos en grupos de 3, luego pasaremos un trozo de cinta rosada alrededor de cada una de las piezas que realizamos, para finalizar con esta fase, las uniremos con pega blanca extra fuerte.
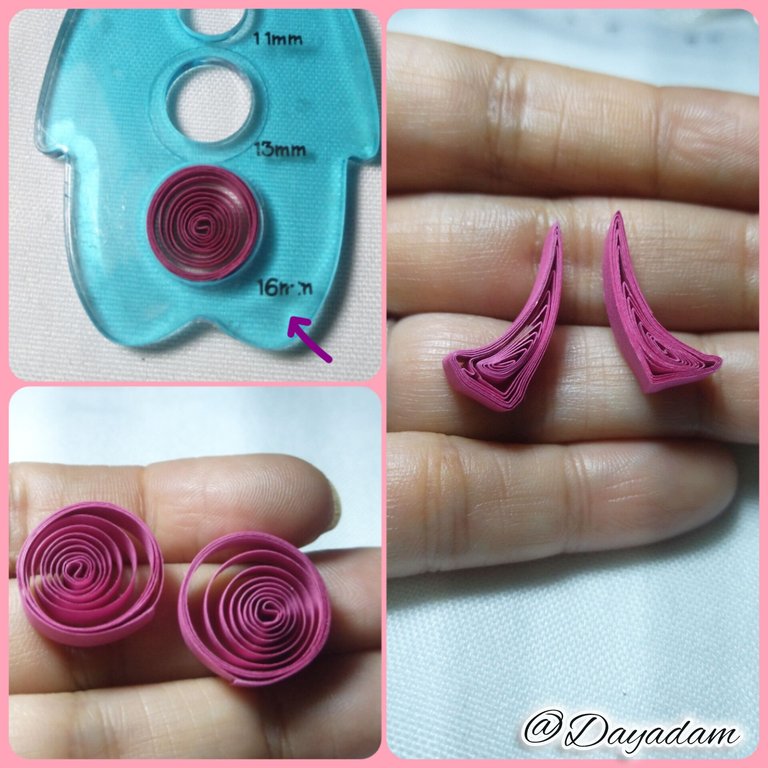
- Under the same previous parameters we will make two open circles with a 5mm wide x 20mm long ribbon, we will measure in the mold in the measure number 16mm, we will need 2 equal ones which we will mold in the shape of a kind of flattened half moon below, we will join them both and we will glue the piece together from the bottom of the ribbon.
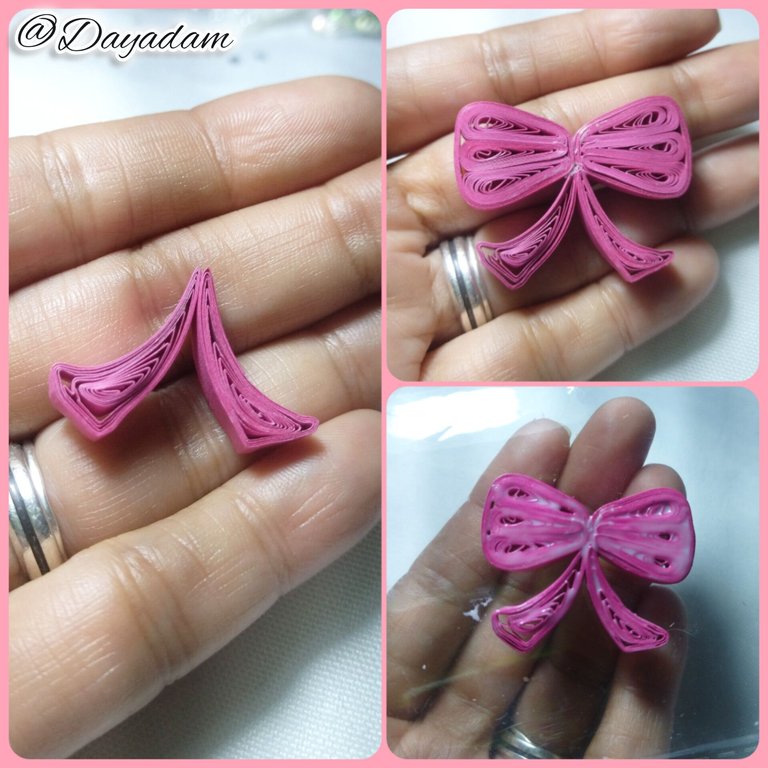
- Before decorating I proceeded to protect the piece (plasticized), applying several layers of extra strong white glue, letting it dry between one layer and another.
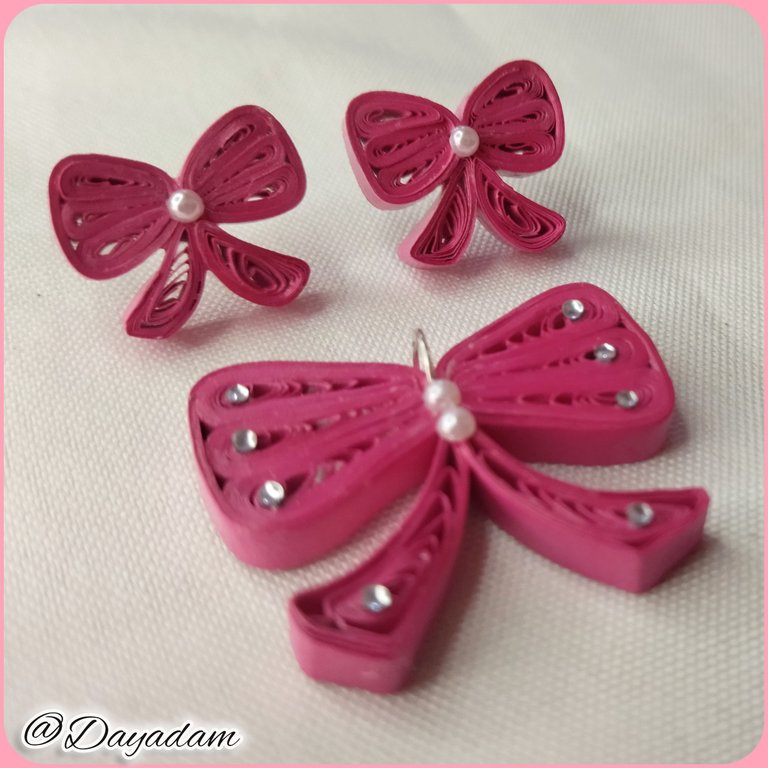
- Once the piece was dry, decorate it with some crystals and costume jewelry pearls, place a medium size ring at the top of the bow, to be able to place it on a necklace.
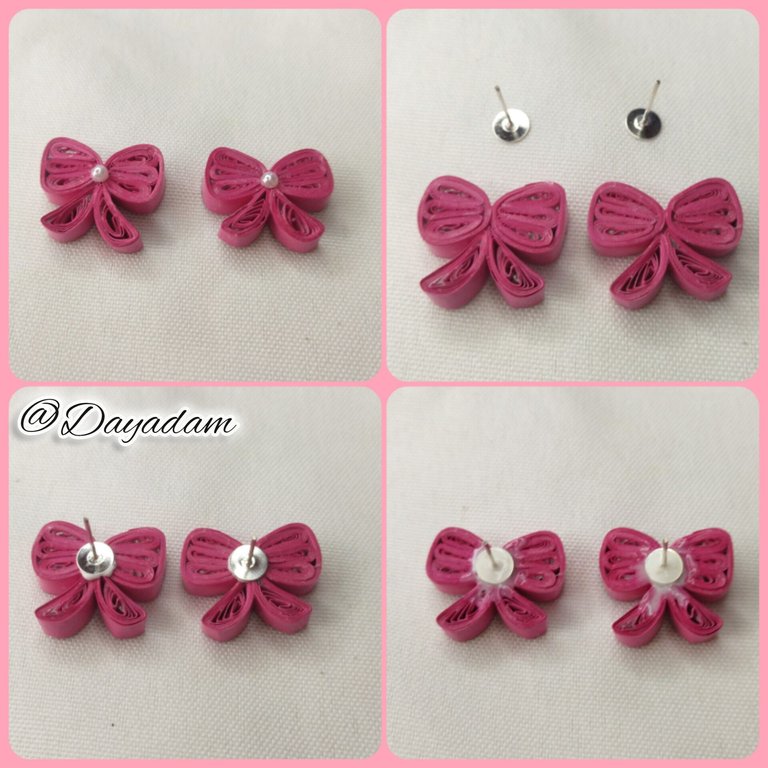
- I also made a pair of fixed tendrils, I made them smaller by reducing the size of the ribbons, decorate only with a pearl in the middle and glue their respective bases for fixed tendrils.
This way we have ready this set of coquette💕 style accessories.
• Bajo los mismos parámetros anteriores realizaremos dos círculos abiertos con una cinta de 5mm de ancho x 20mm de largo, mediremos en el molde en la medida número 16mm, necesitaremos 2 iguales los cuales moldearemos en forma de una especie de media luna aplanada abajo, los uniremos ambos y pegaremos la pieza unida de la parte de abajo del lazo.
• Antes de adornar procedí a proteger la pieza (plastificado), aplicando varias capas de pega blanca extra fuerte dejando secar entre una capa y otra.
• Una vez seca la pieza, adorne con algunos cristales y perlas de bisutería, coloque una argolla mediana en la parte de arriba del lazo, para poder colocarlo en un collar.
• También realice un par de zarcillos fijos, los hice más pequeños reduciendo el tamaño de las cintas, adorne solo con una perla en el medio y le pegue sus respectivas bases para zarcillos fijas.
De esta manera tenemos listo este juego de accesorios estilo coquette💕


What did you think, did you like it?
I hope you did, I hope you liked my explanation, procedure and photos, I made them with love for you.
"Let out that muse that inspires you, and let your imagination fly".
Thank you all, see you next time. 💕
¿Qué les pareció, les gustó?
Espero que sí, que les haya gustado mi explicación, procedimiento y fotos, los hice con mucho cariño por y para ustedes.
"Deja salir esa musa que te inspira, y deja volar tu imaginación".
Gracias a todos, nos vemos en la próxima. 💕
Todas las fotos usadas en este post son de mi autoría y han sido sacadas en mi celular personal un Redmi 9T, editadas en InShot y Canva Banner y separador hecho por mí en Canva Traducido con la ayuda de DeepL

https://reddit.com/r/blogs/comments/1aokud3/here_are_some_accessories_in_the_coquette/
The rewards earned on this comment will go directly to the people( @dayadam ) sharing the post on Reddit as long as they are registered with @poshtoken. Sign up at https://hiveposh.com.
Estos lazos al estilo coquette quedaron hermosos, muy bien realizados, sin duda el color y la forma que les sistema co la técnica quilling quedaron perfectos, gracias por tu buen tutorial.
Muchísimas gracias mi querida comunidad @hive-189504 por sus palabras hacia mi trabajo y el apoyo. Bendiciones 💕
¡Felicidades! Esta publicación obtuvo upvote y fue compartido por @la-colmena, un proyecto de Curación Manual para la comunidad hispana de Hive que cuenta con el respaldo de @curie.
Si te gusta el trabajo que hacemos, te invitamos a darle tu voto a este comentario y a votar como testigo por La Colmena.
Si quieres saber más sobre nuestro proyecto, te invitamos a acompañarnos en nuestro servidor de Discord.
Gracia por el apoyo @la-colmena 💕
Bello tu trabajo me encanta tu técnica y lo limpio que queda...genial
Gracias cariño un placer que te guste mi trabajo. Que pases un bello carnaval... 💕
Congratulations, your post has been upvoted by @dsc-r2cornell, which is the curating account for @R2cornell's Discord Community.
Enhorabuena, su "post" ha sido "up-voted" por @dsc-r2cornell, que es la "cuenta curating" de la Comunidad de la Discordia de @R2cornell.
Gracias por el apoyo @dsc-r2cornell 💕
Qué bello! amiga te ha quedado super hermoso. Jajajaj creo que ahora tengo una fijación por los lazos.
Bendiciones para ti.
Gracias mi hermosa por tus palabras y por tu apoyo. Es un honor para mí que te haya gustado, si supieras que mientras los hacía pensé mucho en ti, jajajaja
Mil bendiciones para ti de vuelta. Que pases unos bellos días de carnaval amiga bella @equipodelta 💕
!LUV
!LADY
View or trade
LOHtokens.@dayadam, you successfully shared 0.1000 LOH with @equipodelta and you earned 0.1000 LOH as tips. (1/3 calls)
Use !LADY command to share LOH! More details available in this post.
equipodelta, dayadam sent you LUV. 🙂 (1/1) tools | trade | connect | daily
Made with LUV by crrdlx.
A mí me encantan , un trabajo maravilloso muy bien realizado , te felicito.
Gracias cariño. Me alegra que te gustaran. Saludos y un bello día para ti 💕
Muy lindo trabajo.
Gracias Cariño 💕
Excellent craftsmanship and a very well structured post with an understandable and well illustrated process to learn how it was made!... Goot work @dayadam friend!
!discovery 25
!VSC
!PIZZA
@jlinaresp has sent VSC to @dayadam
This post was rewarded with 0.1 VSC to support your work.
Join our photography communityVisual Shots
Check here to view or trade VSC Tokens
Be part of our Curation Trail
@jlinaresp ha enviado VSC a @dayadam
Éste post fue recompensado con 0.1 VSC para apoyar tu trabajo.
Únete a nuestra comunidad de fotografía Visual Shots
Consulte aquí para ver o intercambiar VSC Tokens
Se parte de nuestro Trail de Curación
Gracias amigo me alegra mucho que te haya gustado mi trabajo y mi paso a paso. Mil gracias por el apoyo @jlinaresp ✨
This post was shared and voted inside the discord by the curators team of discovery-it
Join our Community and follow our Curation Trail
Discovery-it is also a Witness, vote for us here
Delegate to us for passive income. Check our 80% fee-back Program
$PIZZA slices delivered:
@jlinaresp(1/10) tipped @dayadam
Bellísimos. Son perfectos.
Está tendencia es muy femenina. Ideal para quienes les gusta lucir coquetas.
La forma en que vas armando cada pequeño detalle, es fantástica.
Gracias hermosa @artsugar, por tu comentario, realmente es una tendencia muy linda y coqueta. Abrazos y que tengas un bello carnaval...
Me gusta mas el dije del collarcito, quedo muy bonito amiga
wow! jewelry quilling! I've never seen it before, looks so professional;)
we had our first quilling lesson with my son as well;))
A pleasure that you liked it. I saw your post and I loved that you were interested in the technique and that you enjoyed the process of creating that first quilling decoration with your child.Successes. Here to order if you have any questions. Welcome to my blog @taliakerch ✨💕