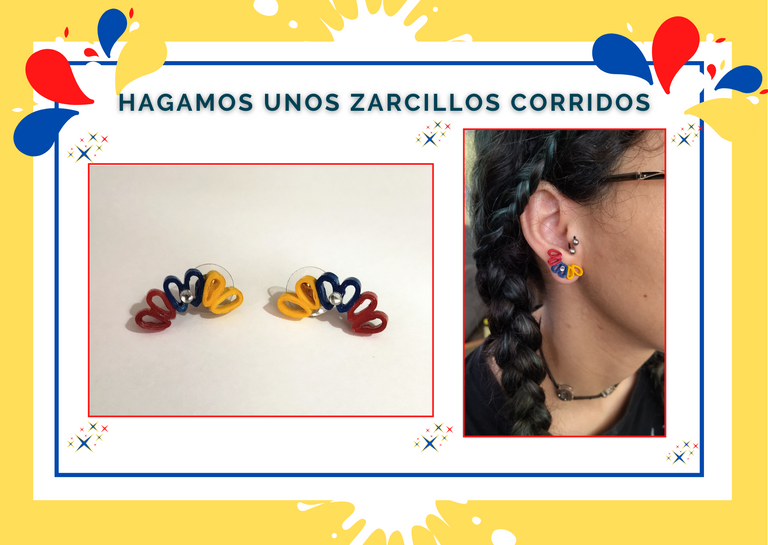
🌈 Hagamos unos zarcillos corridos / Tutorial. // 🌈 Let's make some earrings / Tutorial.

Hola a todos... 🐱🐾💕
Hola a mis queridos Hiver y a la querida comunidad de #Jewelry, ante todo un saludo muy especial lleno de bendiciones para los creadores, administradores, moderadores y por supuesto para los que hacen vida en esta bonita comunidad. Estoy muy contenta de encontrarme nuevamente por acá para mostrarles otro de mis trabajos, realizado con mucho cariño y especialmente para ustedes.
En esta oportunidad les traigo la elaboración de unos bonitos zarcillos corridos con el tricolor de mi bello país Venezuela, en la técnica de quilling art, con un paso a paso, muy sencillo que sé que todos van a poder realizar.
Estos bonitos zarcillos los pueden realizar del color y combinación de su preferencia, y aprovechando que ya se acerca el día de las madres pueden aprovecharlos para dar ese obsequio especial y fácil de hacer, y que mejor que realizado con nuestras propias manos. Esperando sea de su agrado.

Hello everyone... 🐱🐾💕
Hello to my dear Hiver and the dear community of #Jewelry, first of all a very special greeting full of blessings to the creators, administrators, moderators and of course to those who make life in this beautiful community. I am very happy to be here again to show you another of my works, made with love and especially for you.
This time I bring you the elaboration of some beautiful tendrils with the tricolor of my beautiful country Venezuela, in the technique of quilling art, with a very simple step by step that I know that everyone will be able to make.
These beautiful tendrils can be made in the color and combination of your preference, and taking advantage of the fact that Mother's Day is approaching, you can use them to give that special and easy to make gift, and what better than to make it with our own hands. We hope you like it.
Comencemos:😃
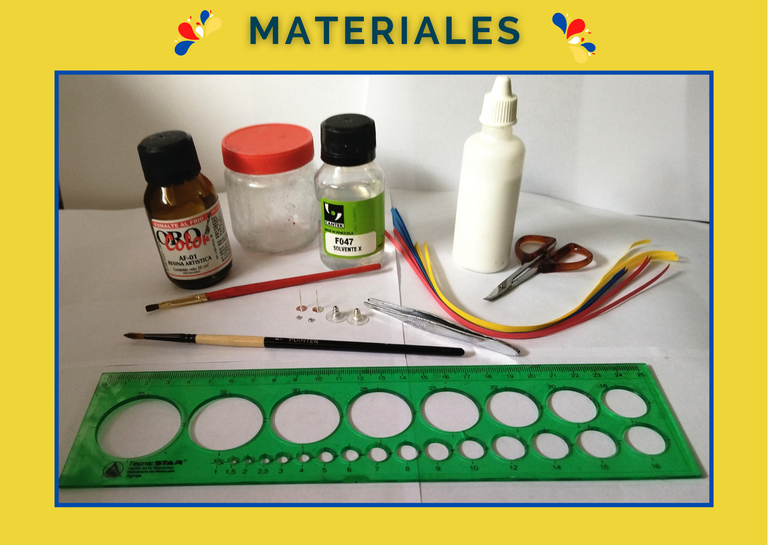
Materiales:📏✏️✂️
• Quilling de 3mm de ancho color amarillo, azul y rojo, (o los colores de tu preferencia).
• Palito redondo con una circunferencia de 3mm de ancho.
• Pega blanca.
• Tijera.
• Regla de circunferencia.
• Cristales de bisutería
• Pinza punta fina.
• Base para zarcillos fija antialérgica, con tapa con protector de silicón.
• Resina artística.
• Solvente x.
• Frasco de vidrio.
• Pincel.
Let's get started: 😃
Materials:📏✏️✂️
- 3mm wide quilling in yellow, blue and red (or the colors of your choice).
- Round stick with a circumference of 3mm wide.
- White glue.
- Scissors.
- Circumference ruler.
- Costume jewelry crystals
- Fine tip tweezers.
- Base for antiallergic fixed tendrils, with silicone protector cover.
- Artistic resin.
- Solvent x.
- Glass bottle.
- Brush.
Paso a paso:💖
• Medidas de las cintas: ✨
• Para comenzar vamos a necesitar cintas de quilling amarillas, azul y rojas, de 3mm de ancho x 14cms de largo.
Step by step:💖
- Ribbon measurements: ✨
- To start we will need yellow, blue and red quilling ribbons, 3mm wide x 14cms long.
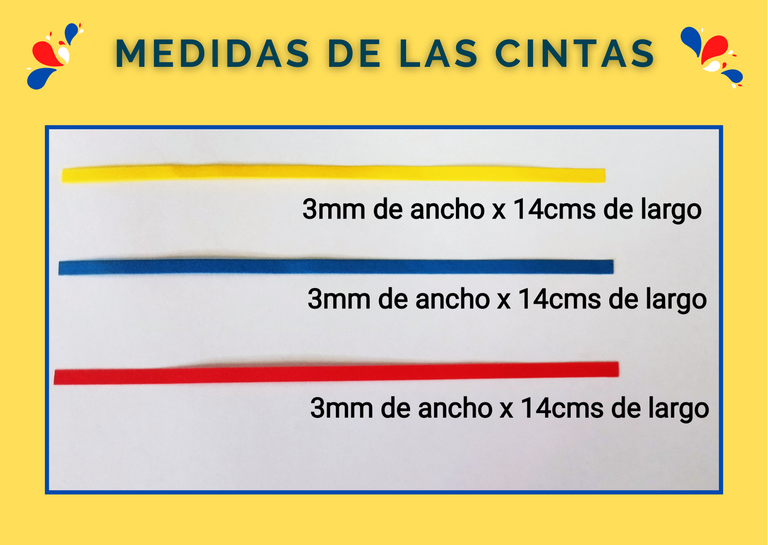
• Para el trabajo que vamos a realizar que serán un par de zarcillos corredizos, para completar ambas piezas necesitaremos 4 cintas de cada color, con las medidas antes mencionadas.
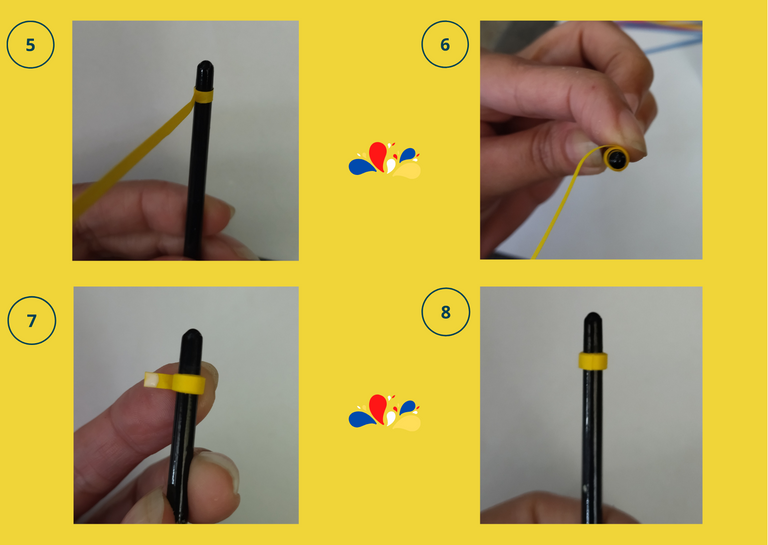
• Para comenzar necesitaremos un palito con una circunferencia de 3mm de ancho, en mi caso utilice un pincel el cual su punta tenía la medida que necesitaba, para cerciorarme utilice la regla de circunferencia en la medida correspondiente, que sería el circulo de 3mm de ancho.
For the work we are going to do, which will be a pair of sliding tendrils, to complete both pieces we will need 4 ribbons of each color, with the measures mentioned above.
To start we will need a stick with a circumference of 3mm wide, in my case I used a paintbrush whose tip had the measure I needed, to make sure I used the circumference ruler in the corresponding measure, which would be the circle of 3mm wide.
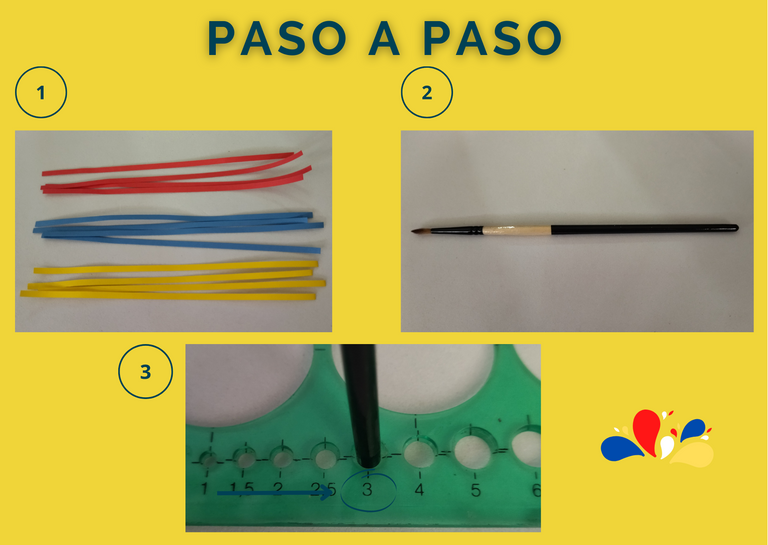
• Para empezar a elaborar las piezas de nuestro zarcillo, tomemos una de las cintas amarillas, y vamos a dar una vuelta alrededor de la punta del pincel, colocaremos un punto de pega en la cinta para sellarla y de esta manera darle firmeza a la cinta para que no se mueva, luego de esto seguiremos enrollando la cinta hasta llegar al final de la misma, añadiremos un punto de pega para culminar y sellar.
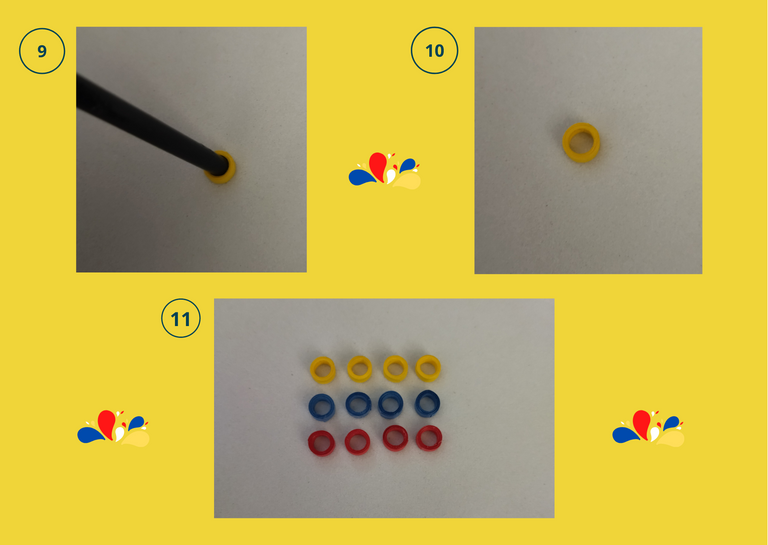
• Una vez sellada la cinta, procederemos a sacar del pincel con sumo cuidado de no dañar la pieza que acabamos de realizar.
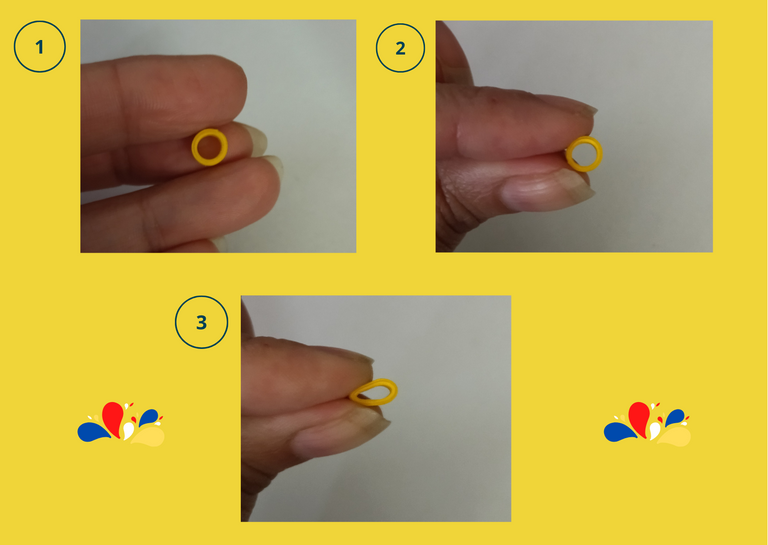
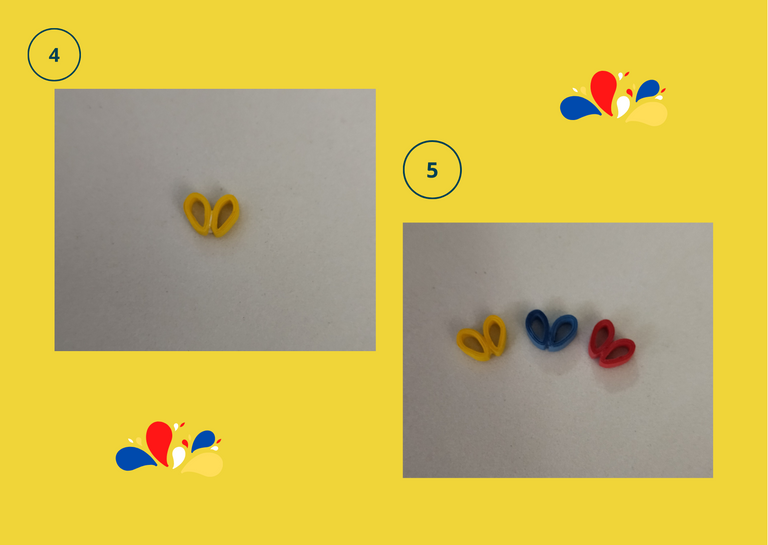
• Vamos a repetir el mismo procedimiento con todas las cintas que tenemos reservadas, para obtener 4 círculos amarillos, 4 azules y 4 rojos.
To start making the pieces of our tendril, let's take one of the yellow ribbons, and we will make a turn around the tip of the brush, we will place a dot of glue on the ribbon to seal it and thus give firmness to the ribbon so that it does not move, after this we will continue rolling the ribbon until we reach the end of it, we will add a dot of glue to finish and seal.
Once the tape is sealed, we will proceed to remove it from the brush being very careful not to damage the piece we have just made.
We will repeat the same procedure with all the ribbons we have reserved, to obtain 4 yellow, 4 blue and 4 red circles.

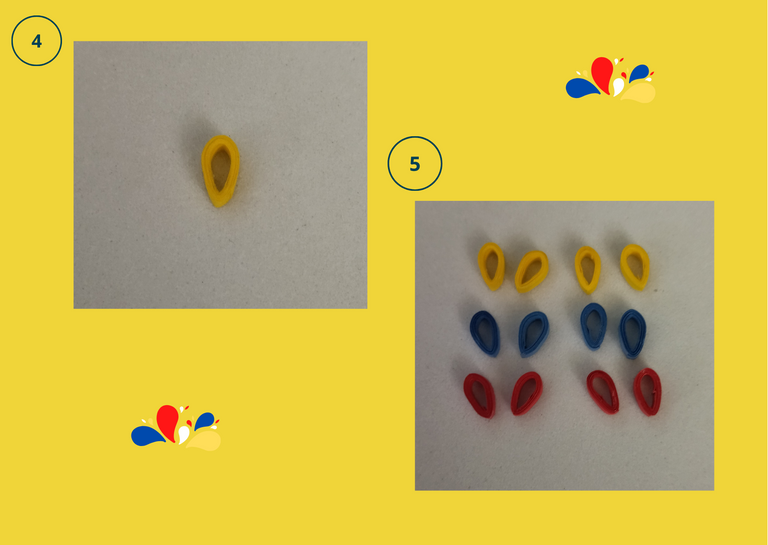
• Ahora vamos a darle forma a nuestros círculos, en este caso vamos a darle forma de hoja o lagrima, tomamos nuestro circulo y con la ayuda de nuestros dedos índice y pulgar pellizcamos en la punta, de esta forma obtendremos esa forma. De esta misma manera vamos a repetir con todos los círculos restantes.
- Now we are going to shape our circles, in this case we are going to shape it as a leaf or teardrop, we take our circle and with the help of our index finger and thumb we pinch the tip, in this way we will get that shape. In this same way we will repeat with all the remaining circles.
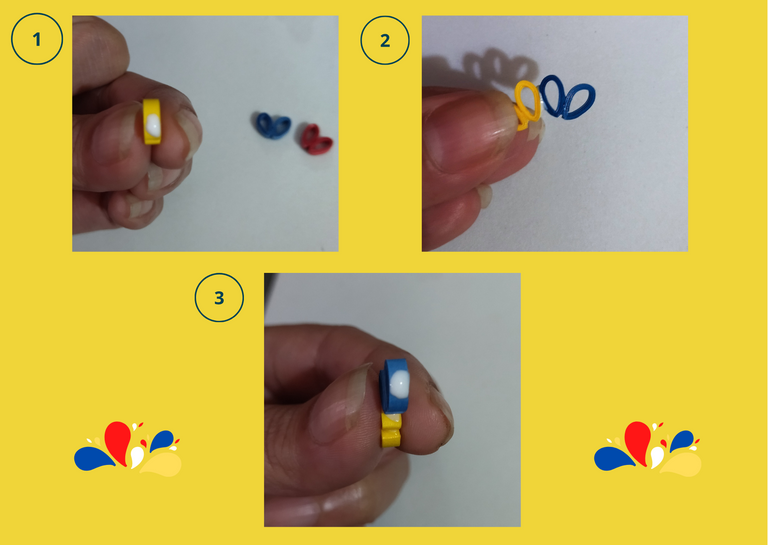
• Vamos a comenzar a unir nuestras piezas, lo haremos de dos en dos, tomamos primero dos gotas amarillas añadiremos un toque de pega en su parte lateral, uniremos ambas formando una especie de forma de corazón, de esta misma manera lo haremos con las piezas restantes.
- Let's start joining our pieces, we will do it two by two, first we will take two yellow drops and add a touch of glue on the side, we will join both forming a kind of heart shape, in the same way we will do it with the remaining pieces.

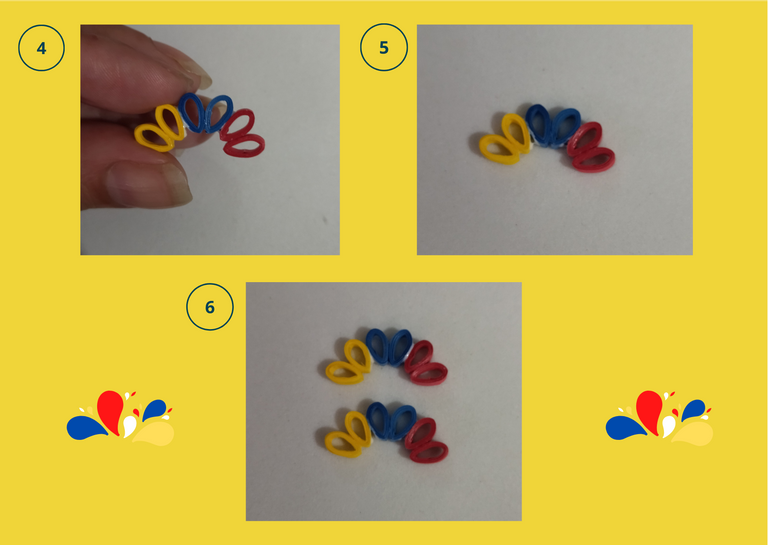
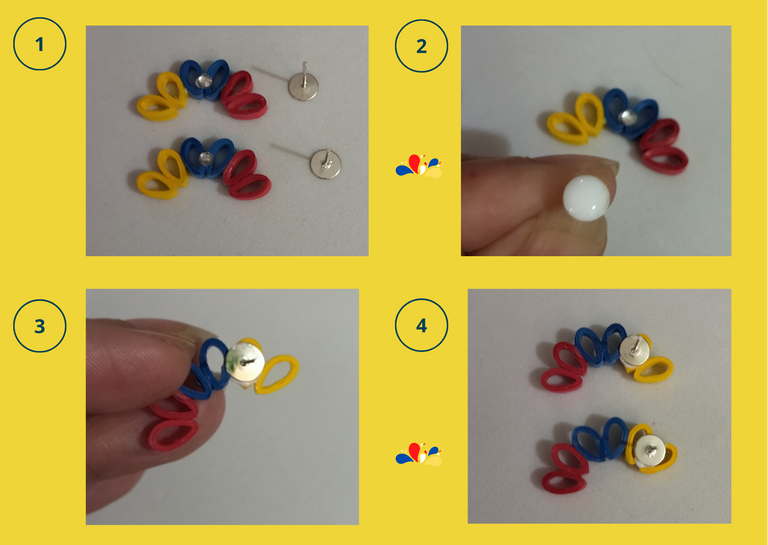
• Llegado a este punto vamos a unir todas nuestras piezas para formar una sola y obtener nuestro zarcillo, tomaremos una pieza de dos amarillas, una azul y una roja, en su parte lateral le colocaremos un punto de pega y uniremos en una especie de forma de arco como lo indica la foto, esto es para darle un poco la forma redondeada que tiene nuestra oreja, de la misma manera repetiremos con las piezas restantes para formar el otro zarcillo.
- At this point we will join all our pieces to form one and get our tendril, we will take a piece of two yellow, one blue and one red, on the side we will place a point of glue and join in a kind of arc shape as shown in the photo, this is to give a little rounded shape that has our ear, in the same way we will repeat with the remaining pieces to form the other tendril.
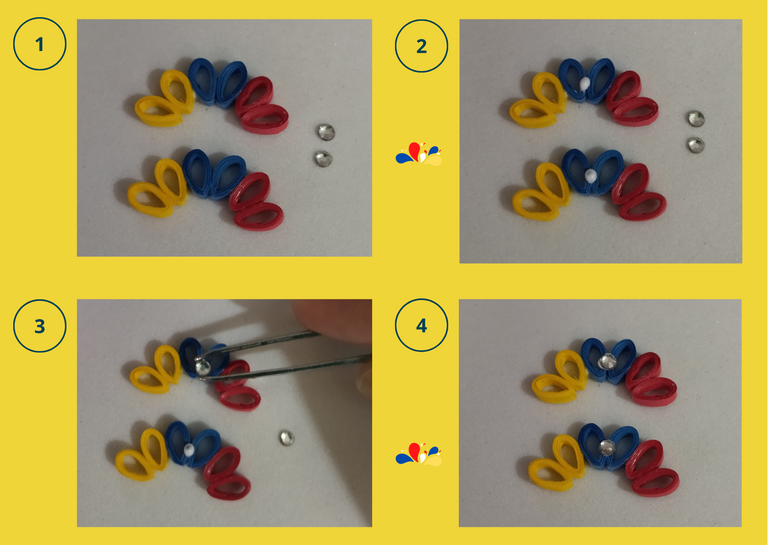
• Teniendo ya los zarcillos formados vamos a colocarle el cristal de bisutería para darle un detalle de brillo a nuestra pieza, con la ayuda de la pinza punta fina tomamos el cristal y lo colocaremos justo en medio de las piezas azules con un punto de pega.
- Having already formed the tendrils we are going to place the costume jewelry crystal to give a detail of brightness to our piece, with the help of the fine tip tweezers we take the crystal and we will place it right in the middle of the blue pieces with a point of glue.
• Ahora colocaremos la base fija a nuestros zarcillos, tomemos una de las bases añadiremos pega y la colocaremos en el zarcillo por la parte de segunda pieza amarilla, tomemos en cuenta que ambas deben ir en el mismo lugar, para que los zarcillos queden en armonía al colocarlos en la oreja.
- Now we will place the fixed base to our earrings, take one of the bases, add glue and place it on the earring by the part of the second yellow piece, take into account that both must be in the same place, so that the earrings are in harmony when placed in the ear.
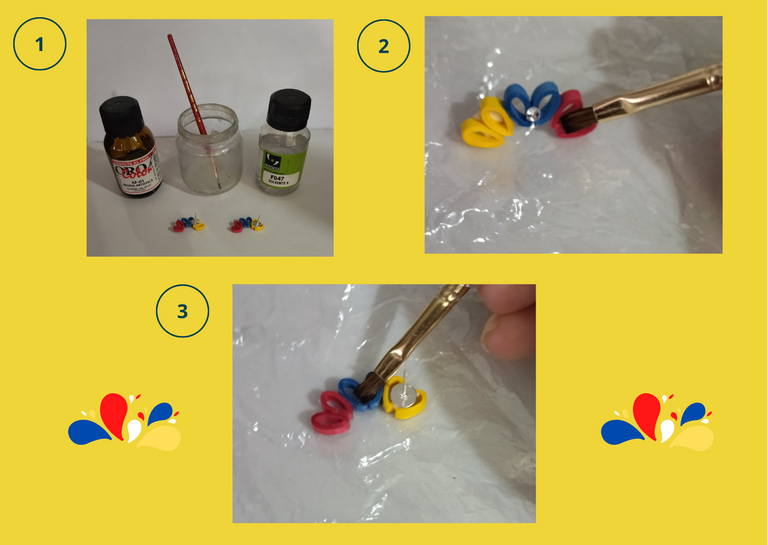
• Por ultimo vamos a darle su protección liquida a los zarcillos, tomemos en frasco de vidrio y añadimos una parte de resina artística, otra de solvente x, revolvemos con el pincel, aplicamos a las piezas por ambos lados y dejamos secar, de esta misma manera repetiremos de 3 a 4 veces para que nuestros zarcillos queden totalmente protegidos y plastificados ya que esta pieza es algo delicada y de esta manera va a quedar totalmente resistente sin riesgo de romperse, dejamos secar de un día para otro.
- Finally we are going to give liquid protection to the tendrils, take a glass jar and add a part of artistic resin, another part of solvent x, stir with the brush, apply to the pieces on both sides and let dry, in this same way we will repeat 3 to 4 times so that our tendrils are fully protected and plasticized as this piece is somewhat delicate and in this way it will be fully resistant without risk of breaking, let dry overnight.
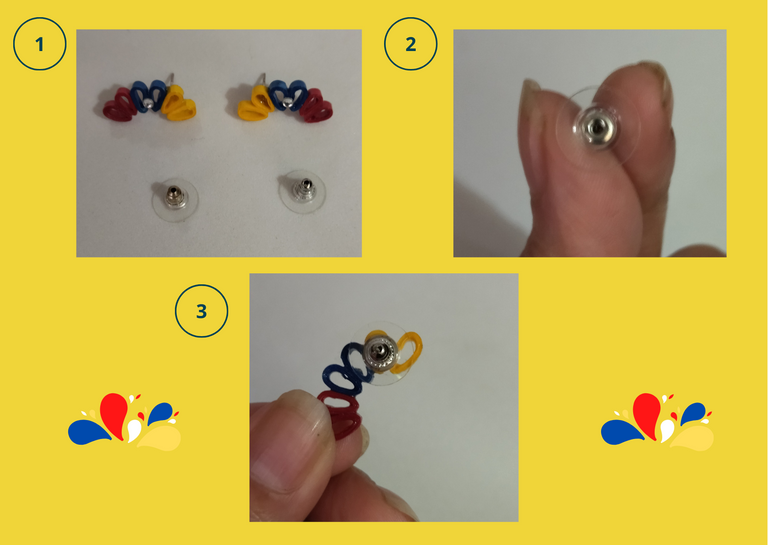
• Una vez secas nuestras piezas, le colocaremos a la base del zarcillo su tapa, quise recalcar la parte de la tapa ya que utilice una adecuada para este tipo de pieza, porque es una tapa grande con una base de silicón, que hace que el zarcillo quede totalmente ajustado a la oreja y no se mueva cuando lo vayamos a lucir.
• De esta manera ya tenemos nuestros zarcillos listos para su uso.
Once our pieces are dry, we will place the lid on the base of the earring, I wanted to emphasize the lid part since I used a suitable one for this type of piece, because it is a large lid with a silicone base, which makes the earring to be totally adjusted to the ear and not to move when we are going to wear it.
This way we already have our earrings ready for use.
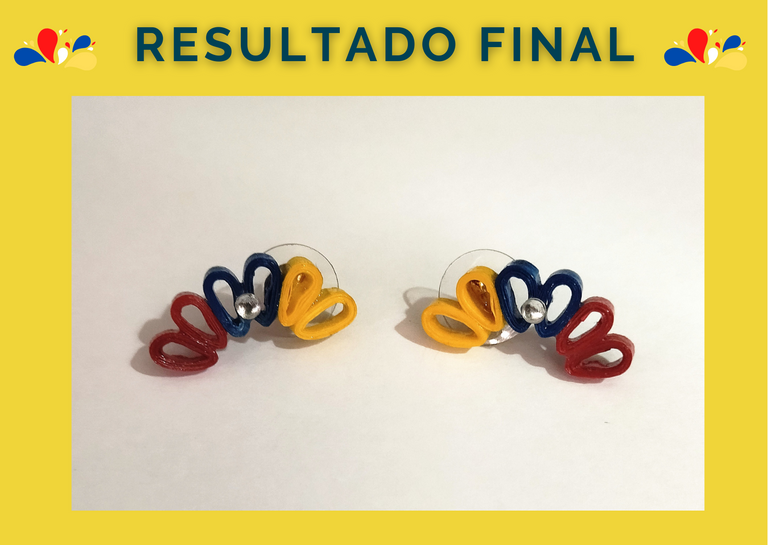
Resultado Final:💕
Final Result:💕
¿Que les pareció, les gustó?
Espero que sí, que les haya gustado mi explicación, procedimiento y fotos, los hice con mucho cariño por y para ustedes.
"Deja salir esa musa que te inspira, y deja volar tu imaginación".
Gracias a todos, nos vemos en la próxima. 🐾🐱💕
What did you think, did you like it?
I hope you did, I hope you liked my explanation, procedure and photos, I made them with love for you.
"Let out that muse that inspires you, and let your imagination fly".
Thank you all, see you next time. 🐾🐱💕
All photos used in this post are of my authorship and have been taken on my personal cell phone a Redmi 9T and edited in Canva Dividers and banner made by me in Paint Tool Sai Translated with the help of DeepL


Congratulations @dayadam! You have completed the following achievement on the Hive blockchain and have been rewarded with new badge(s):
Your next target is to reach 800 comments.
You can view your badges on your board and compare yourself to others in the Ranking
If you no longer want to receive notifications, reply to this comment with the word
STOPTo support your work, I also upvoted your post!
Check out the last post from @hivebuzz:
Support the HiveBuzz project. Vote for our proposal!
https://twitter.com/Darcy1387/status/1520570241599918082
The rewards earned on this comment will go directly to the person sharing the post on Twitter as long as they are registered with @poshtoken. Sign up at https://hiveposh.com.
Soy fan de los topitos! Me encantan
Gracias amiga @andr3apat1no. Me alegra que te hayan gustado. Besos... 💕
Congratulations @dayadam! You received a personal badge!
Wait until the end of Power Up Day to find out the size of your Power-Bee.
May the Hive Power be with you!
You can view your badges on your board and compare yourself to others in the Ranking
Check out the last post from @hivebuzz:
Support the HiveBuzz project. Vote for our proposal!
Realmente hermosos, una técnica muy sencilla que hace lucir elegante, gracias por ese paso a paso tan completo en la comunidad.
Me alegra que te hayan gustado. Mil gracias a ustedes por su apoyo. Gracias por pasar por mi post @hive-189504 Saludos.💕
Muchísimas gracias por el apoyo... 💕
Delightful!
Thanks for sharing @dayadam
Thank you very much for visiting me. I'm glad you loved it. Regards @kerrislravenhill... 💖
Wowwww, mil gracias por el apoyo @sancho.panza. Mil bendiciones. Saludos a todo el equipo 💕