Let's make some Sunflowers 🌻 Paper quilling technique/ Tutorial [Eng- Eng]
Hello everyone... 🐱🐾💕
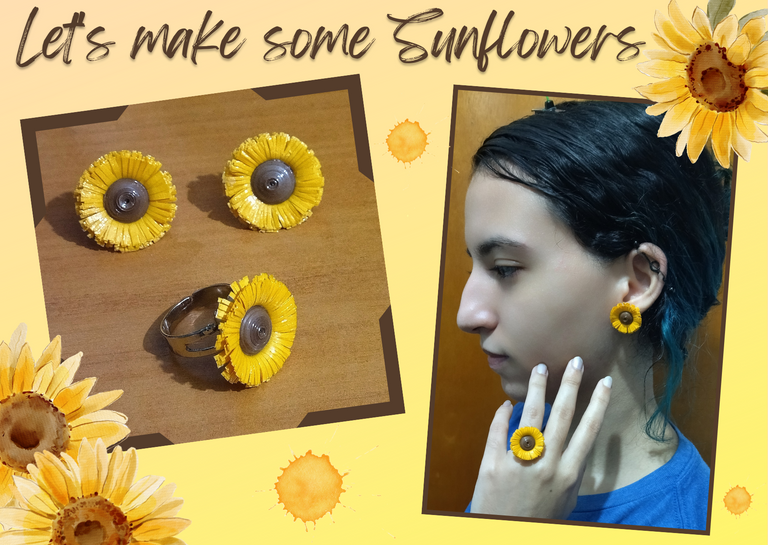
Hello to my beautiful people of Hive, and especially to all the #Jewelry community, wishing you first of all to have a weekend full of blessings, abundance, love, peace and prosperity, I am here to show you a new and simple work, full of love for you.
For today I thought of making some tendrils and ring with an imitation "Sunflower Flower"🌻, so I chose colors that resemble it, thinking of later making a sunflower that has individual petals (you will see that soon I will take them out to present them to you).
For this day I will leave you with a tutorial that is quite quick and easy to make. You will see how in a matter of minutes you will have some beautiful tendrils and rings to show off and the best thing is that they are not complicated to make. I decided as I said before to make them with the colors of a sunflower, but you can let your imagination fly and make them combining the colors of your preference.
I always make quite detailed and long tutorials, this is not going to be the exception with respect to the detail, I wanted to bring you something shorter, the process of elaboration is quite fast, but it takes longer to dry the piece hahahahahah.
I really enjoy sharing my knowledge so that you can put it into practice, so you can sell or give a nice detail made with your own hands.💖
Let's get started:😃

- Light brown quilling tape 3mm wide, and tan yellow quilling tape 9mm wide.
- Quilling needle.
- Scissors.
- White glue.
- Silicone gun.
- Base for large fixed tendrils.
- Ring base.
- Anti-allergic earring covers.
- Artistic resin.
- Solvent x.
- Glass bottle.
- Brush.

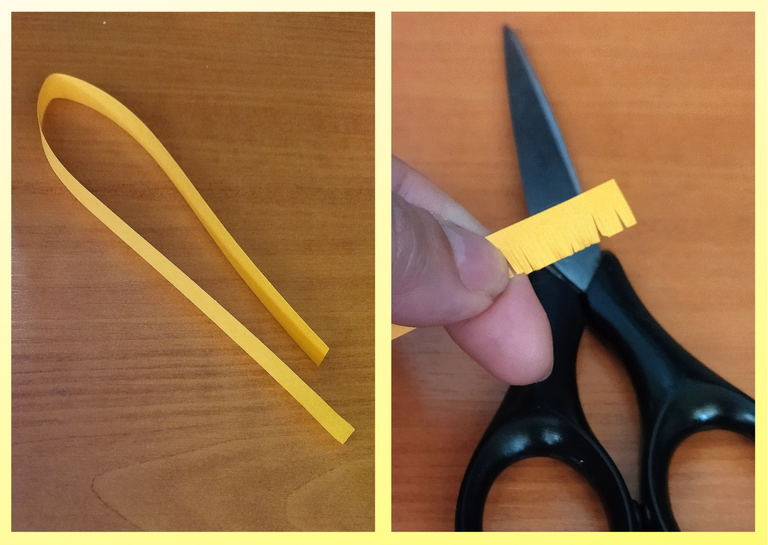
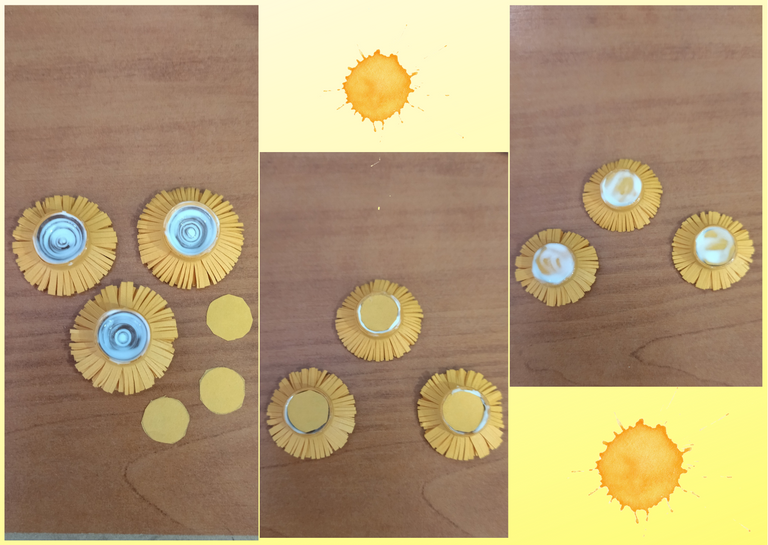
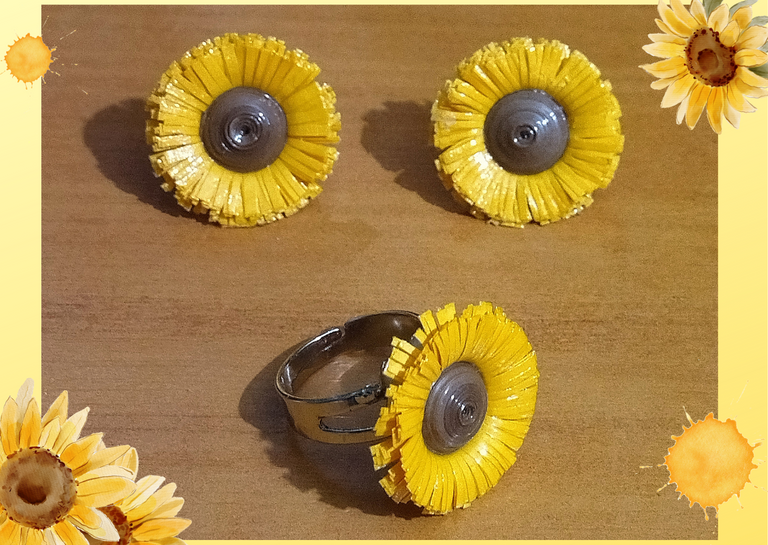
- We are going to craft three pieces, that is a pair of tendrils and a ring. I am going to give you the measurements of what we will need to elaborate each piece, you according to the number that is to your liking elaborate repeat as many times as necessary. So for each one we will need 1 light brown quilling ribbon 3mm wide x 75cms long and 1 yellow quilling ribbon 9mm wide x 28cms long.
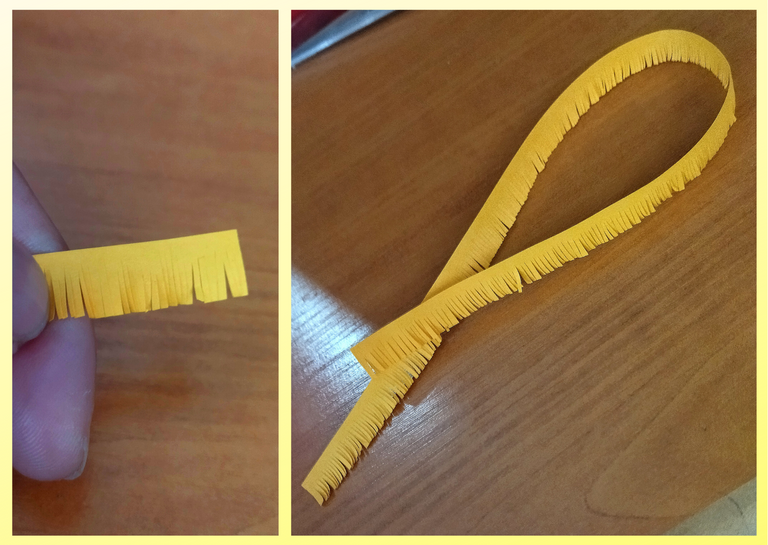
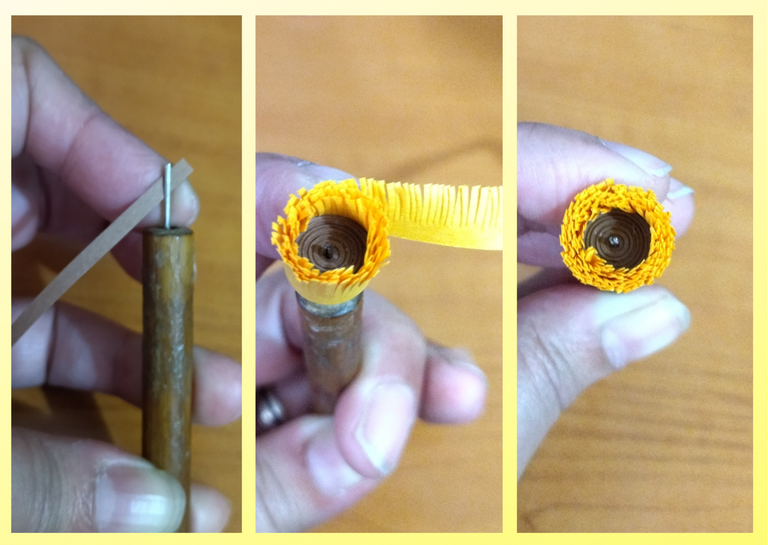
- We are going to begin by taking the 9mm wide x 28cms long toasted yellow ribbon, we will take the scissors and with great care not to break the ribbon we will cut in vertical strips species without reaching the end of the ribbon, with a separation of approximately 0.5mm wide, we will do this until we finish with all the ribbon.
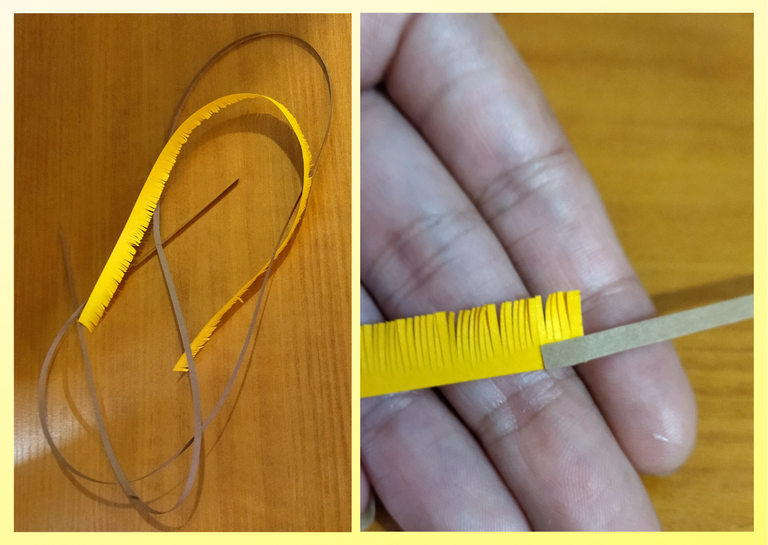
- Now we have the toasted yellow ribbon cut, we take the light brown ribbon 3mm wide x 75cms long, and with a touch of glue we join it with the yellow ribbon at the end that is not cut.
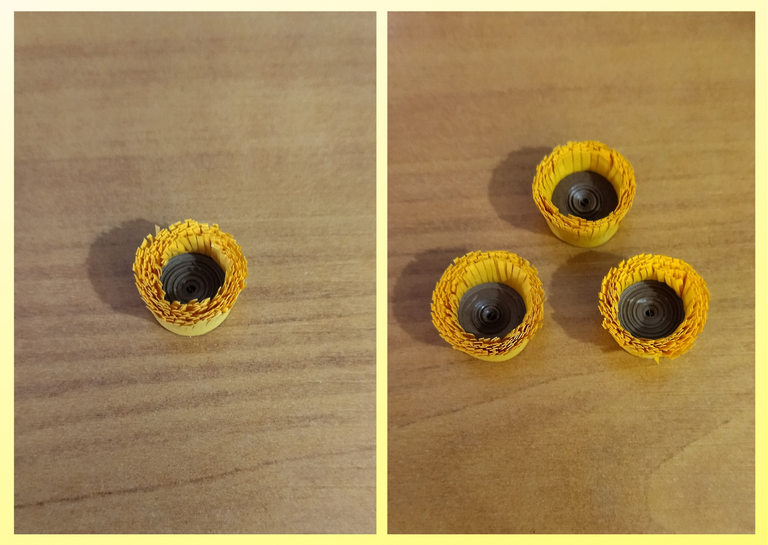
- Once the ribbons are glued, we will take our quilling needle and we will proceed to roll, we will start at the end of the light brown ribbon and that the yellow strips face upwards, we will roll very carefully until we reach the end of the yellow ribbon that is cut into strips, this process must be done very carefully so as not to break the ribbon that is cut into strips, when we reach the end of this we seal with glue and remove the quilling needle. All the previous process we repeat it to have the three pieces of our pair of tendrils and ring.

Hola a todos... 🐱🐾💕
Hola a mi gente bella de Hive, y en especial a toda la comunidad de #Jewelry, deseándoles ante todo que tengan un fin semana llena de bendiciones, abundancia, amor, paz y prosperidad, me encuentro por aquí para mostrarle un nuevo y sencillo trabajo, lleno de cariño para ustedes.
Para hoy pensé en elaborarles unos zarcillos y anillo con una flor imitación de "Girasol"🌻, por ello escogí colores que la asemejen, pensando en más adelante realizarles un girasol que tenga pétalos individuales (verán que pronto las sacare para presentárselas ustedes).
Para este día les dejare un tutorial bastante rápido y sencillo de elaborar. Verán como en cuestión de minutos tendrán unos bonitos zarcillos y anillos para lucir y lo mejor es que no son nada complicados de hacer. Yo decidí como les dije anteriormente hacerlos con los colores de un girasol, pero ustedes puedes dejar volar su imaginación y hacerlas combinando los colores de su preferencia.
Siempre hago tutoriales bastantes detallados y largos, este no va a ser la excepción con respecto al detalle, quise tráeles algo más corto, el proceso de elaboración es bastante rápido, más se tarda el secado de la pieza jajajaj.
Disfruto mucho compartir mis conocimientos para que se animen a ponerlos en práctica, así puedan vender o regalar un bonito detalle realizado con sus propias manos.💖
Comencemos:😃

• Cinta de quilling de color marrón claro de 3mm de ancho, y cinta de quilling amarillo tostado de 9mm de ancho.
• Aguja para quilling.
• Tijera.
• Pega blanca.
• Pistola de silicón.
• Base para zarcillos fija grandes.
• Base para anillo.
• Tapas para zarcillos antialérgicas.
• Resina artística.
• Solvente x.
• Frasco de vidrio.
• Pincel.

- Vamos a elaborar tres piezas, es decir un par de zarcillos y un anillo. Les voy a dar las medidas de lo que necesitaremos para elaborar cada pieza, ustedes según el número que sea de su gusto elaborar repetirán cuantas veces sea necesario. Entonces para cada una necesitaremos 1 cinta de quilling marrón claro de 3mm de ancho x 75cms de largo y una cinta de quilling amarillo tostado de 9mm de ancho x 28cms de largo.
• Vamos a comenzar tomando la cinta amarillo tostado de 9mm de ancho x 28cms de largo, tomaremos la tijera y con mucho cuidado de no romper la cinta iremos cortando en vertical especies de tiras sin llegar al final de la cinta, con una separación de aproximadamente 0,5mm de ancho, esto lo haremos hasta terminar con toda la cinta.
• Ya tenemos la cinta amarillo tostado cortada, ahora tomamos la cinta marrón claro de 3mm de ancho x 75cms de largo, y con un toque de pega la unimos con la cinta amarilla por el extremo que no está cortado.
• Pegadas las cintas, vamos a tomar nuestra aguja para quilling y vamos a proceder a enrollar, comenzaremos por el extremo de la cinta marrón claro y que las tiras de la amarilla den hacia arriba, enrollaremos con mucho cuidado hasta llegar al final de la cinta amarilla que está cortada en tiras, este proceso hay que realizarlo con mucha cautela para no romper la cinta que está cortada en tiras, al llegar al final de esta sellamos con pega y sacamos de la aguja para quilling. Todo el proceso anterior lo repetimos para poder tener las tres piezas de nuestro par de zarcillos y anillo.
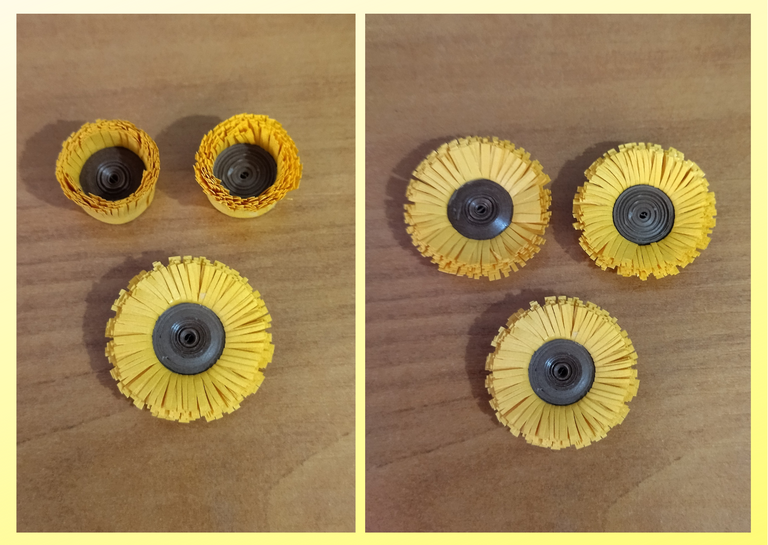
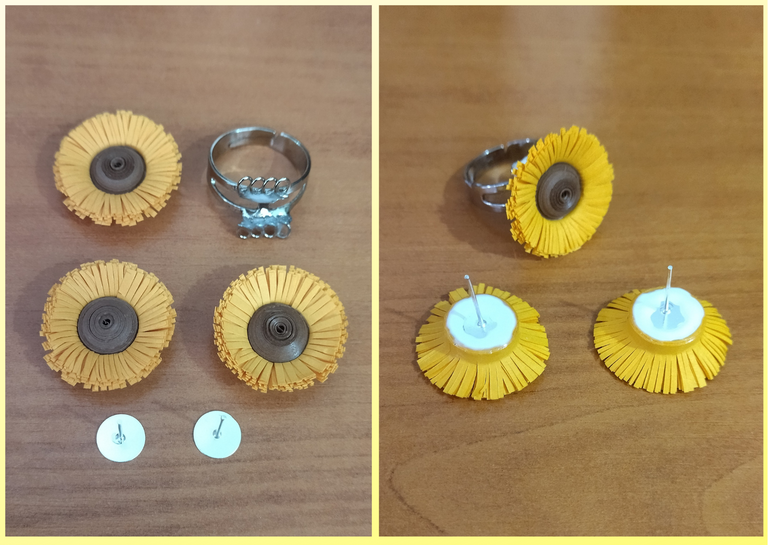
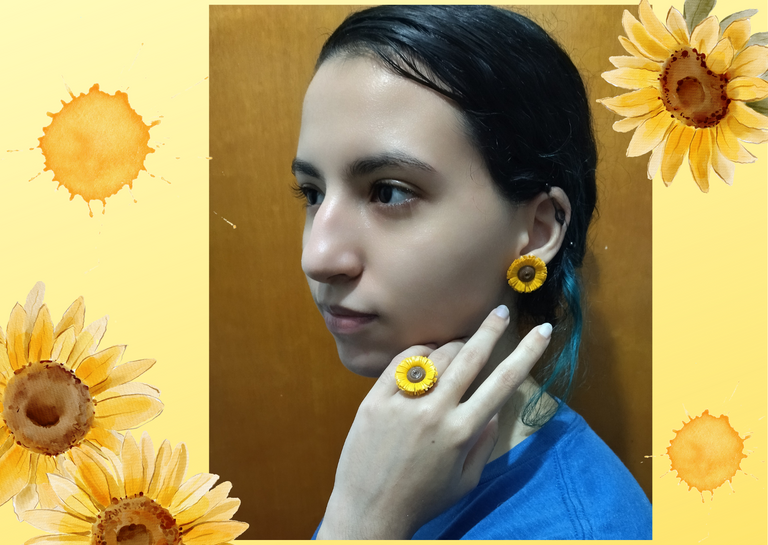
- Let's shape the flower, as you will see it looks like a kind of bud, with the help of our fingers we will proceed to open the sides of what will be the petals and mold them, in this way we will give the shape that we like, repeat with the other pieces.
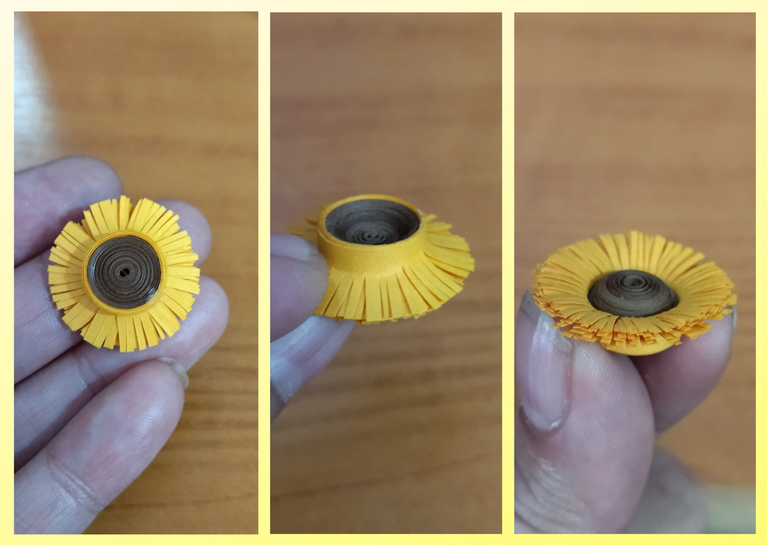
- I decided to take out a little the center of the flower pushing out a little with my finger to give it a 3D effect, then I added a little white carpentry glue on the back, so that the shape does not move and at the same time I put some circles of yellow quilling and put glue once placed, to recover the flat shape and thus to place the bases for tendrils and ring, you decide whether to do it or leave the center flat, I think it looks very nice when it protrudes.
- Now we have our flowers ready, we are going to place their fixed tendril bases and the ring base, we put some extra strong carpentry glue and fix our bases on the back of the tendril, with the ring base we will fix the flower with hot silicone and let it dry.
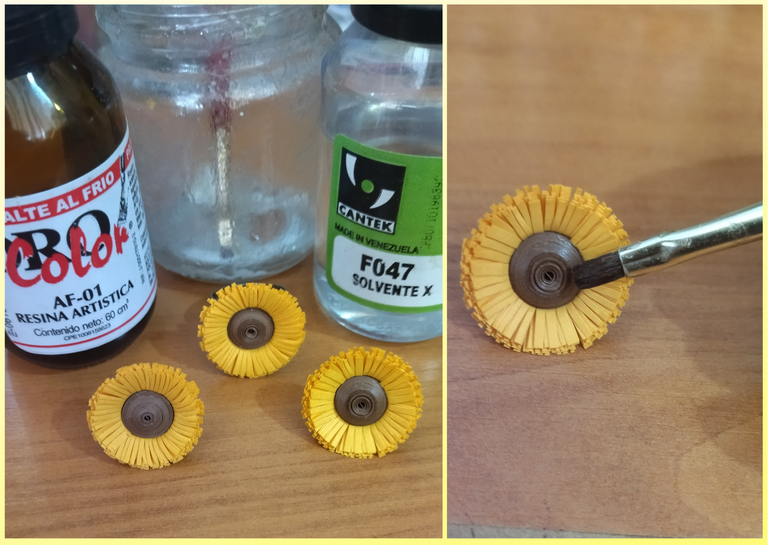
- Finally we are going to place its liquid protection, (plasticized), we take the glass bottle, we place a part of artistic resin, another part of solvent X, and with the brush we add to the flower by all its parts, we let dry.
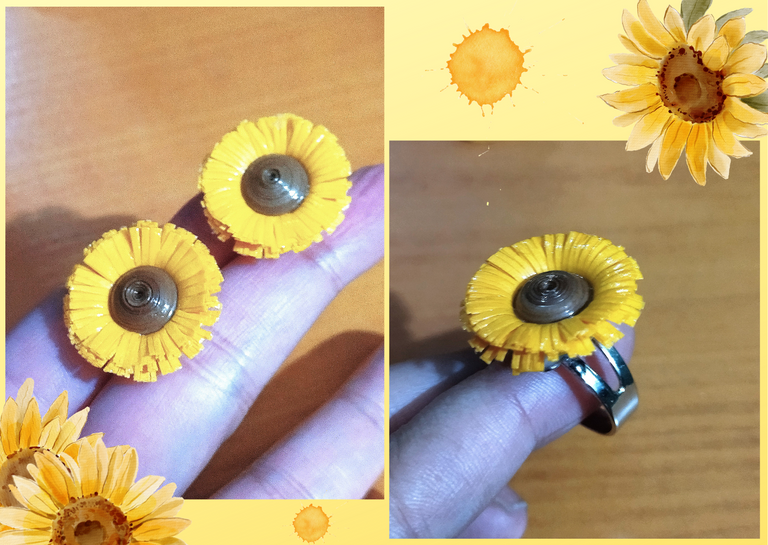
In this way we already have our flowers imitation of sunflowers ready to use. Soon I hope to be able to present you the other model I have in mind of sunflowers, I personally love this flower and I know that many people also like them very much.🌻💕
• Vamos a darle forma a la flor, como verán se ve como especie de un capullo, con la ayuda de nuestros dedos procederemos a abrir a los lados lo que serán los pétalos y moldearlos, de esta manera le daremos la forma que más nos guste, repetimos con las otras piezas.
• Decidí sacar un poco el centro de la flor empujando un poco hacia afuera con el dedo para que se le vea un efecto 3D, luego añadí un poco de pega blanca de carpintería por la parte trasera, para que no se mueva la forma y al mismo tiempo le coloque unos círculos de quilling amarillo tostado y le coloque pega una vez colocados, para recuperar la forma plana y de esta manera poder colocar las bases para zarcillos y de anillo, ustedes deciden si hacerlo o dejar el centro plano, a mí me parece que luce muy bonito cuando sobresale.
• Ya tenemos nuestras flores listas, vamos a colocarle sus bases para zarcillos fijas y la base para anillo, colocamos un poco de pega extra fuerte de carpintería y fijamos nuestras bases por la parte de atrás del zarcillo, con la base para anillo fijaremos la flor con silicón caliente dejaremos secar.
• Por ultimo vamos a colocarle su protección liquida, (plastificado), tomamos el frasco de vidrio, colocamos una parte de resina artística, otra de solvente X, y con el pincel añadimos a la flor por todas sus partes, dejamos secar.
De esta manera ya tenemos nuestras flores imitación de girasoles listas para su uso. Pronto espero poder presentarles el otro modelo que tengo en mente de girasoles, a mí en lo personal me encanta esa flor y sé que a muchas personas también le agradan mucho.🌻💕

What did you think, did you like it?
I hope you did, I hope you liked my explanation, procedure and photos, I made them with love for you.
"Let out that muse that inspires you, and let your imagination fly".
Thank you all, see you next time. 🐾🐱💕
¿Que les pareció, les gustó?
Espero que sí, que les haya gustado mi explicación, procedimiento y fotos, los hice con mucho cariño por y para ustedes.
"Deja salir esa musa que te inspira, y deja volar tu imaginación".
Gracias a todos, nos vemos en la próxima. 🐾🐱💕
Todas las fotos usadas en este post son de mi autoría y han sido sacadas en mi celular personal un Redmi 9T y editadas Canva Banner y separador hecho por mí en Canva Traducido con la ayuda de DeepL

Quiero aprender a hacer cositas así. Evidentemente no tengo los materiales pero yo soy de regalar muchas cosas y es genial poder hacer detallitos así para regalar. La verdad me encanta como hizo todo como un conjunto de anillo con zarcillos, quedó genial.
!discovery 30
Que esperas cariño, inténtalo. Para eso hago todos esos tutoriales bien detalladitos, y fíjate que ya varias personas me han etiquetado porque se han inspirado en mis trabajos y se han entusiasmado en sacar cosas en esta técnica, quiere decir que mis tutoriales resultan y los estoy haciendo bien jajajaja.
No necesitas tener tiras o cintas compradas, revisa mi primer tutorial, allí están las figuras básicas y como hacer tu propio quilling. Yo a veces uso cartulina, hojas de cualquier color, he usado hojas de revistas, he realizado piezas y las pinto con pintura al frio si no tengo el color. Puedes usar todo el papel que tengas disponible encasa. Y fíjate que hoy hice una flor aparte y le puse pega blanca de carpintería para probar y a pesar de lo espesa ahorita la estoy viendo y quedo brutal, idéntica que la que le puse resina y sin olor químico que me tranque el pecho.
Cualquier cosa que desees saber estamos a la orden, puedes preguntarme lo que desees que yo te puedo guiar según lo que quieras hacer. Aparte tu eres un artista escultor, no vas a poder moldear una cinta de papel, se que te va a quedar de maravilla lo que hagas.
Saludos, abrazos y mil bendiciones @gaboamc2393 ✨
Mil gracias por el apoyo @gaboamc2393 💖
This post was shared and voted inside the discord by the curators team of discovery-it
Join our community! hive-193212
Discovery-it is also a Witness, vote for us here
Delegate to us for passive income. Check our 80% fee-back Program
Thanks @discovery-it ✨
Your content has been voted as a part of Encouragement program. Keep up the good work!
Use Ecency daily to boost your growth on platform!
Support Ecency
Vote for new Proposal
Delegate HP and earn more
Thanks @ecency ✨
Un espectáculo de accesorios, te ha quedado hermoso como siempre amiga @dayadam los zarcillos y anillos es una gran combinación, gracias por esa explicación tan bien explicada, felicidades por tu post 😉
Muchísimas gracias @hive-189504 por el apoyo sus comentarios de gran valor ✨🌻✨
You have just made another awesome tutorial today again. Nice to see the steps and how beautiful the earring and ring turned to shine.
Thank you very much friend @apunawu for your nice comment. Success and blessings to you ✨🌻✨
@dayadam great post about your sunflower paper quilling technique. In inviting you to the official ecency hangout today at the ecency discord https://discord.gg/AZ9AyqCBUM

Thank you very much friend for your nice comment @blackman15. Success and blessings to you ✨🌻✨
Blessings and more creative ideas to you too. Hope to see you on Saturday
Gracias por apoyarnos en Twitter
!PIZZA
!ALIVE
@dayadam! You Are Alive so I just staked 0.1 $ALIVE to your account on behalf of @celf.support. (3/10)
The tip has been paid for by the We Are Alive Tribe through the earnings on @alive.chat, feel free to swing by our daily chat any time you want.

Mil gracias por su apoyo a mi trabajo @celf.support. Que sigan los éxitos en su proyecto ✨🌻✨
PIZZA Holders sent $PIZZA tips in this post's comments:
@celf.support(3/10) tipped @dayadam (x1)
Learn more at https://hive.pizza.
Very creative tutorial and great result!
Thank you very much @mikezillo. Beautiful day to you ✨🌻✨
Ah... the sun flowers are outstanding!
Very beautiful.
It will brighten a day of anyone wearing them.
Pretty @dayadam !
!LADY 😍🌺🤙
View or trade
LOHtokens.@silversaver888, you successfully shared 0.1000 LOH with @dayadam and you earned 0.1000 LOH as tips. (5/30 calls)
Use !LADY command to share LOH! More details available in this post.
Thank you very much friend. Always with your beautiful words towards my work. I will make a more elaborate and prettier sunflower soon. The model in my post is my beautiful daughter.
Thanks for stopping by, have a beautiful and blessed day @silversaver888 ✨🌻✨
Once again very creative art. It's loveable
💞💞
Thank you very much @meta007. Have a nice day ✨🌻✨
Que bonito trabajo @dayadam como siempre, estoy tratando de aprender esa técnica me gusta mucho , gracias por compartir los pasos tan detalladamente, saludos😘 😍❤️
Gracias amiga @lileisabel. Que bueno que deseas aprender y que te guste mi trabajo. Por aquí estamos a la orden ante cualquier duda. Que tengas bello día. ✨🌻✨
I really like the photos you take for the explanations @dayadam it looks very well the step by step that in this type of elaborations is very important, to me it would not be enough with indications without being able to appreciate exactly how you do the folds, cuts and assembly.
It is incredible the power of the resin hahaha it gives a super professional look to the final piece, in my ignorance I would think that it is a work done with a different material and even by a machine.
With this I not only want to say that your work is great, but I can see the dedication and effort you put into it, you have incredible hands!
Gracias mi bella @ninaeatshere por tu bellísimo comentario, me gratifican mucho tus palabras. Estas son las cosas que me hacen querer seguir adelante, mejorar, y dar lo mejor de mi.
Y si, trato en la medida de mis posibilidades hacer un post que luzca bonito, bien explicativo y con una pieza bien elaborada, cada día espero sea mejor.
Un fuerte abrazo, bendiciones y mil éxitos para ti bella. Que tengas un maravilloso día. ✨🌻✨
Who doesn't Love sunflowers 🌻
And to wear them in earrings and rings, that is really awsome.
I loved this, really creative my friend. Thank you for sharing and have a wonderful weekend.
Cheers 🌹
Thank you very much for your beautiful comment and for visiting my humble blog, you are welcome whenever you want. It makes me happy that you liked my work. Have a beautiful and blessed day @saffisara ✨🌻✨
Qué hermoso trabajo amiga @dayadam, me encantan los girasoles y el resultado con el anillo me ha encantado.
Mil gracias cariño. Me encanta que te haya gustado. Un fuerte abrazo y mil bendiciones para ti. Bello día @enclassecu ✨🌻✨
Me encanta el resultado que lograste, @dayadam
Muchísimas gracias amiga @mllg. Que bueno que le haya gustado. Que tenga maravilloso día ✨🌻✨
♥♥♥
Gracias por unirte a nuestra iniciativa de Celf radio y la curación en vivo "Espacio de apertura"
Muchísimas gracias por su excelente espacio y su gran apoyo @celf.magazine. Que sigan los éxitos en su proyecto. Bendiciones ✨🌻✨
Congratulations, your post has been upvoted by @dsc-r2cornell, which is the curating account for @R2cornell's Discord Community.
Enhorabuena, su "post" ha sido "up-voted" por @dsc-r2cornell, que es la "cuenta curating" de la Comunidad de la Discordia de @R2cornell.
Thank you very much for your support @dsc-r2cornell ✨
Amiga @dayadam , hermoso proyecto 🤗, saludos🦋
Muchísimas gracias amiga. Que bueno que te gusto. Que tengas bello día @anamariag ✨🌻✨
Thank you for sharing this amazing post on HIVE!
Your content got selected by our fellow curator @priyanarc & you just received a little thank you via an upvote from our non-profit curation initiative!
You will be featured in one of our recurring curation compilations and on our pinterest boards! Both are aiming to offer you a stage to widen your audience within and outside of the DIY scene of hive.
Join the official DIYHub community on HIVE and show us more of your amazing work and feel free to connect with us and other DIYers via our discord server: https://discord.gg/mY5uCfQ !
If you want to support our goal to motivate other DIY/art/music/homesteading/... creators just delegate to us and earn 100% of your curation rewards!
Stay creative & hive on!
Thank you very much for supporting my work @priyanarc and @diyhub . May you continue to be successful in your wonderful project ✨🌻✨
Que hermosa esas prendas amiga @dayadam, ojalá y estuvieras cerca para deleitarme con tu hermosos detalles.
Yo siento que soy muy básica y no tengo creatividad pero admiro mucho tus hermosos y perfectos trabajos.
Saludos y fuerte abrazo mi bella amiga
Encantada siempre de visitar tus publicaciones, siempre espectacular 💕
Gracias mi corazón @sylregne 😘🥰🤗✨🌻
Demasiado bellísimo @dayadam me encanta esta técnica! Y tu manera de explicarlo es maravillosa 😂
Gracias bella @marleyn ☺️😘🥰🤗✨🌻

Gracias por el apoyo amigo @joalheal ✨
Post votado por la Curación de la Comunidad de Mundo Virtual. Recibes algunos Huesos
Gracias por el apoyo @mv-curacion ✨
They're beautiful! ❤️