Pikachu 3D Decorative Quilling Technique [Eng-Esp]
Hello everyone... 🐱🐾💕
Hello to my dear Hivers and the dear community of artists #DIYHub, as always very pleased and excited to be here again, showing you my work made with love and especially for you.
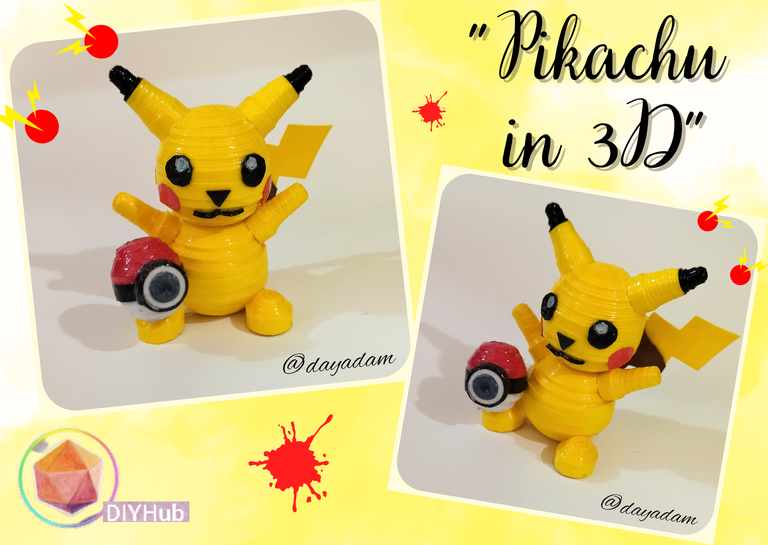
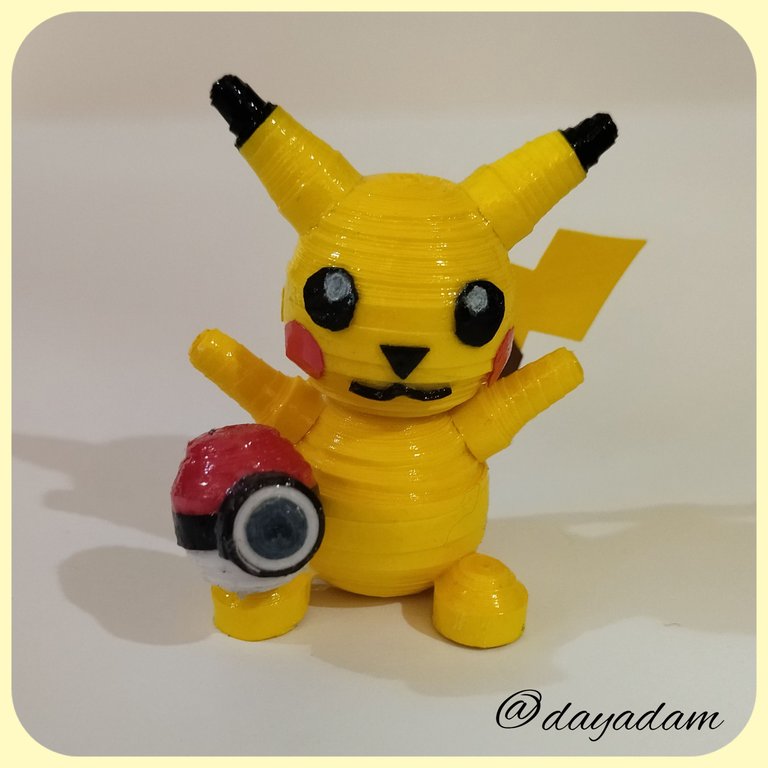
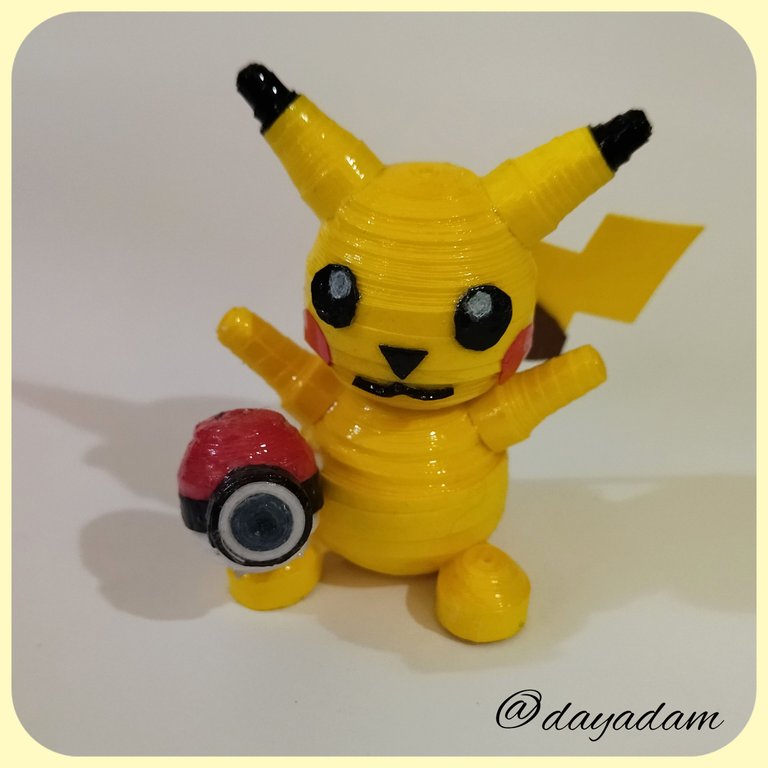
For a long time I have had in mind to elaborate this project, it seems to me that there was something that said do it, you have to do it, I saw many people talking about it in various posts, on twitter, every day I keep seeing more and more, either through games, drawings, and endless things, Well today I had to do it because a little princess daughter of a great friend is having a birthday and the little girl likes the character in question, she loves it I would say, so I decided not to wait any longer, and today I bring you materialized, a Small decorative 3D Pikachu in the quilling technique, a symbolic gift that I made with all the love in the world ....
Note that I wanted to make it to decorate, but it can be used as a keychain, a pendant or even a pendant for necklace and earrings if it is made smaller.
I hope you like the work, join me in this creative process.
Let's get started:😃

Hola a Todos... 🐱🐾💕
Hola a mis queridos Hivers y a la querida comunidad de artistas #DIYHub, como siempre muy complacida y emocionada de encontrarme por acá nuevamente, mostrándole mi trabajo hecho con mucho amor y especialmente para ustedes.
Desde hace mucho tiempo he tenido en mente elaborar este proyecto, me parece que había algo que decía hazlo, tienes que llevarlo a cabo, veía mucha gente hablando del tema en diversos post, en twitter, cada día sigo observando más y más, ya sea mediante juegos, dibujos, y un sin fin de cosas, pues ya hoy tenía que hacerlo porque una princesita hija de una gran amiga esta de cumpleaños y la chiquita le gusta el personaje en cuestión, le encanta diría yo, entonces decidí no esperar más, y para hoy les traigo materializado, Un pequeño Pikachu en 3D decorativo en la técnica de quilling, un regalito simbólico que realice con todo el amor del mundo…
Tomen en cuenta que yo lo quise realizar para decorar, pero puede ser utilizado como un llavero, un colgante o hasta un dije para collar y zarcillos si se elabora más pequeño.
Espero sea de su agrado el trabajo, acompáñenme en este proceso creativo.
Comencemos:😃

• Cintas de quilling de diversos mm de ancho amarillas, negras.
• Cartulina negra, roja, marrón, amarilla.
• Aguja para quilling.
• Lápiz de color blanco.
• Pega blanca extra fuerte (de carpintería).
• Tijera.
• Palito de altura.
• Pincel.
• Alicate punta fina.
- Quilling ribbons of different widths, yellow, black.
- Black, red, brown, brown, yellow cardboard.
- Quilling needle.
- White pencil.
- Extra strong white glue (carpentry glue).
- Scissors.
- Height stick.
- Paintbrush.
- Fine-nosed pliers.

Head and Body:
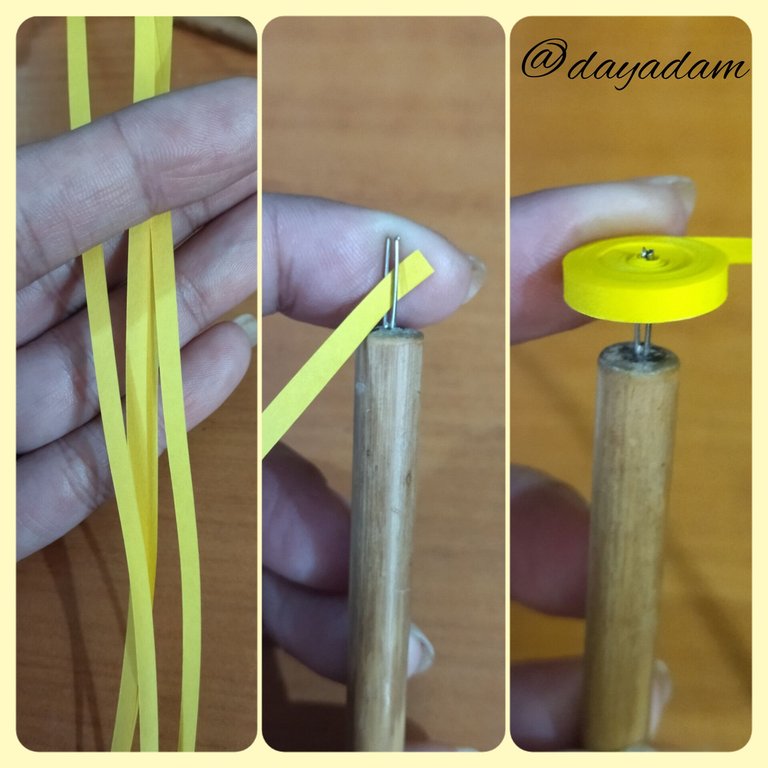
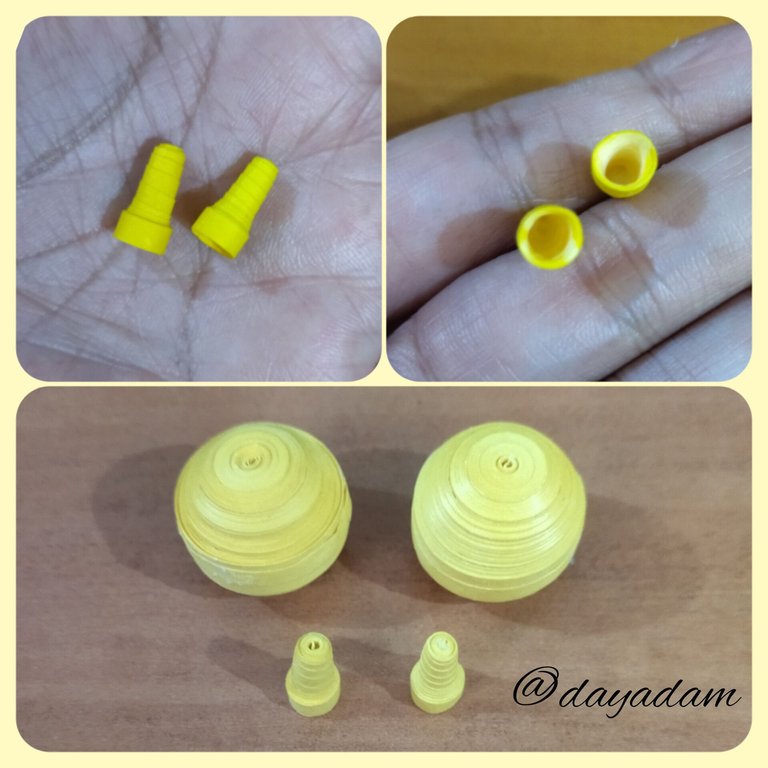
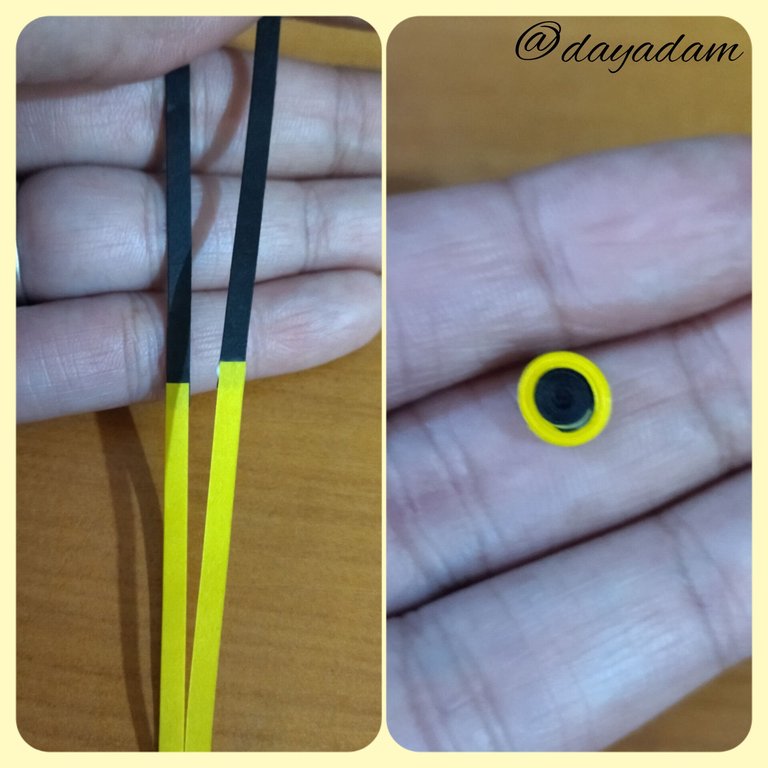
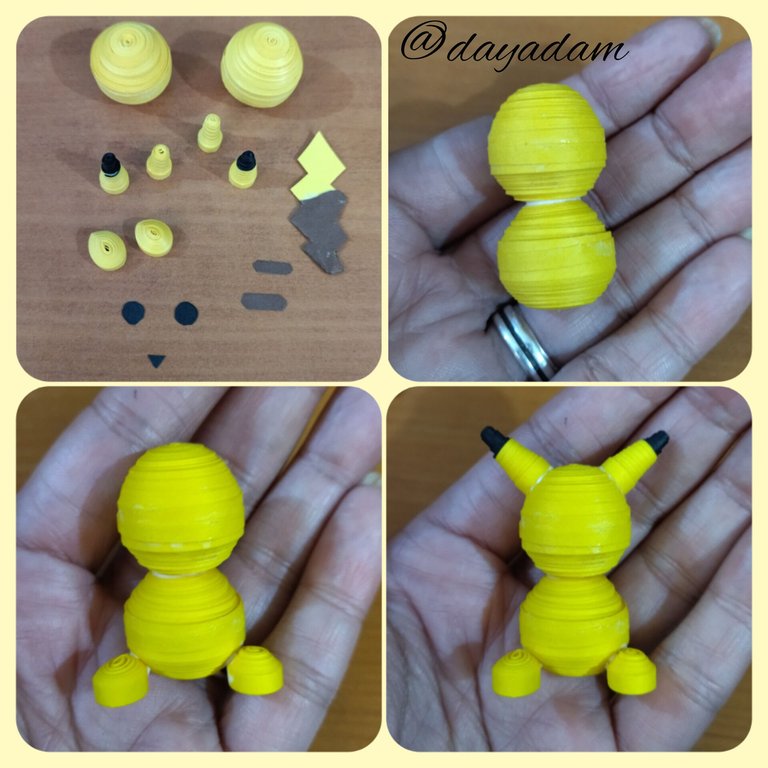
- We start by taking yellow quilling tape and we are going to join a strip of 3mm wide x 150cms long, we roll with the quilling needle until we reach the end of the tape, we seal with extra strong white glue, we take out of the needle, we will obtain a closed circle, we are going to need 3 more equal. For each doll we want to make we will repeat the same process.
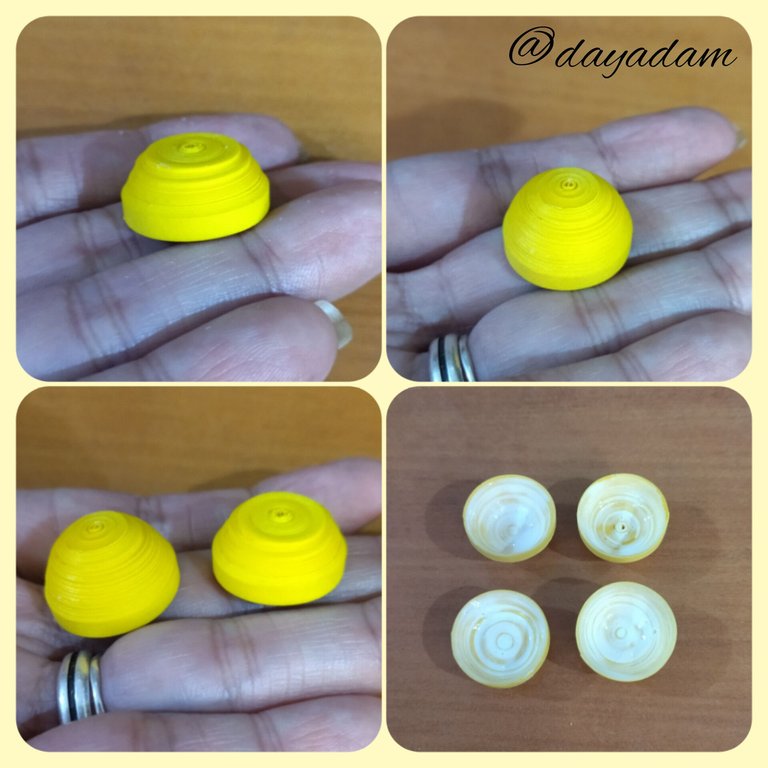
- We are going to mold the circles, with the help of our fingers we are going to push outwards until we get the necessary shape for the head and body of the pikachu, with the only difference that two should be more flattened and the other two more rounded, when we finish on the inside we add a little glue and let it dry to prevent the pieces from moving.
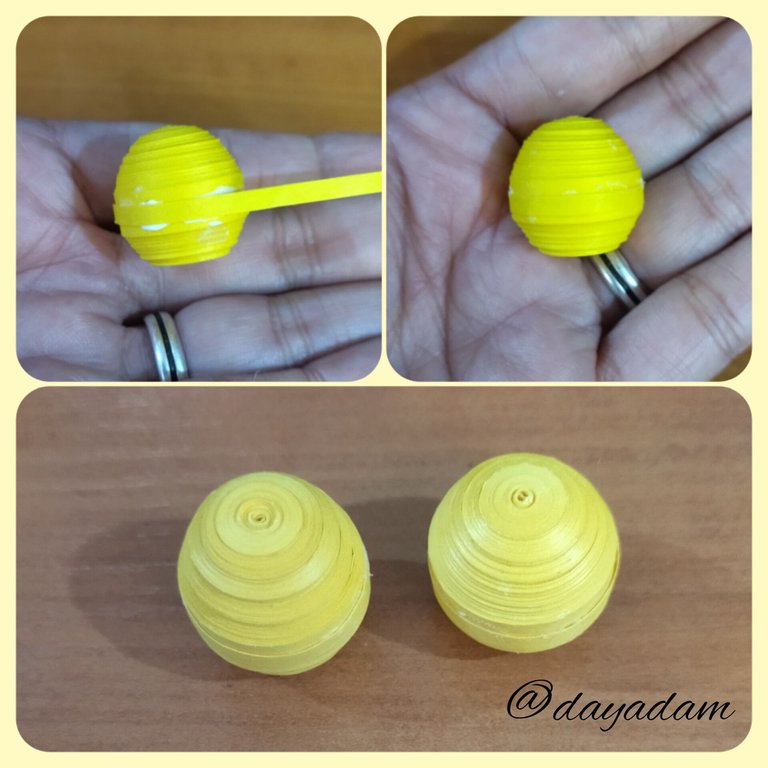
- We are going to take a small piece of yellow quilling tape, 3mm wide to join the pieces we made, we join both pieces passing the tape through the middle with extra strong white glue (reserve). We will get 2 pieces which will be the head and the body of the pikachu.

Cabeza y Cuerpo:
• Comenzamos tomando cinta para quilling amarilla y vamos a unir una tira de 3mm de ancho x 150cms de largo, enrollamos con la aguja para quilling hasta llegar al final de la cinta, sellamos con pega blanca extra fuerte, sacamos de la aguja, obtendremos un círculo cerrado, vamos a necesitar 3 más iguales. Por cada muñeco que queramos hacer vamos a repetir el mismo proceso.
• Vamos a moldear los círculos, con la ayuda de los dedos vamos a empujar hacia afuera hasta conseguir la forma necesaria para la cabeza y cuerpo del pikachu, con la única diferencia que dos deben quedar más aplanados y los otros dos más redondeados, al finalizar en la parte de adentro agregamos un poco de pega y dejamos secar para evitar que se muevan las piezas.
• Vamos a tomar un pequeño trozo de cinta de quilling amarilla, de 3mm de ancho para unir las piezas que elaboramos, acoplamos ambas pasando la cinta por el medio con pega blanca extra fuerte (reservamos). Vamos a obtener 2 piezas las cuales serán la cabeza y el cuerpo del pikachu.

Arms:
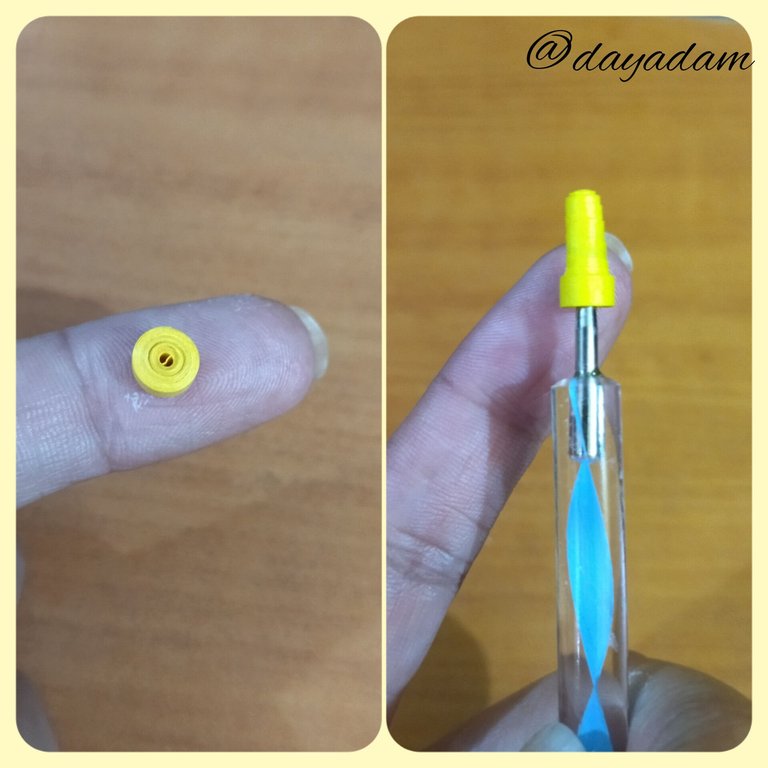
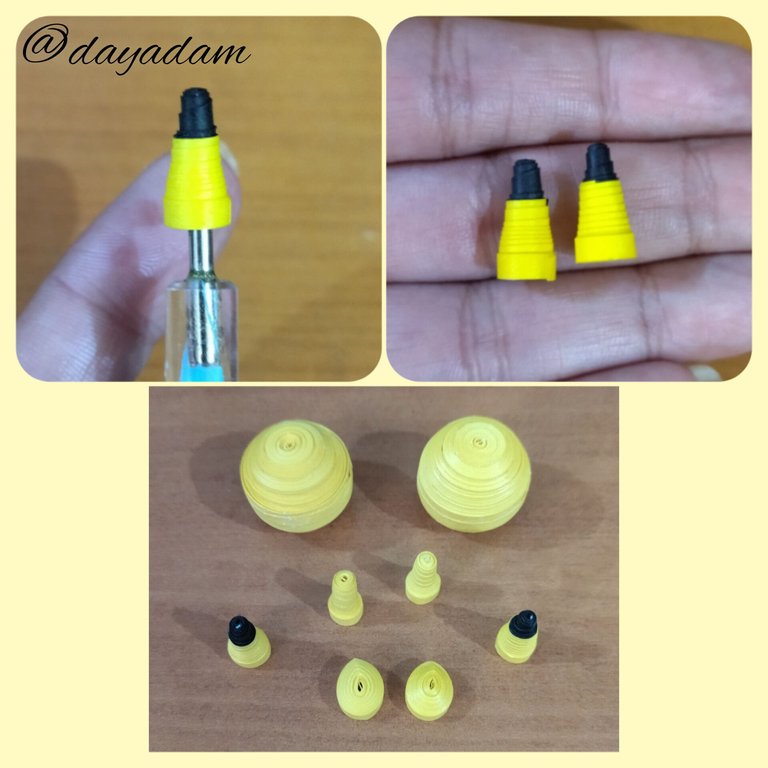
- We will take a piece of yellow quilling tape 3mm wide x 25cms long we will roll with the quilling needle to form a closed circle, we seal at the end with glue, we will mold in the shape of a cone taking outwards with a brush or stick high, on the inside we will also place glue so that the piece is not deformed. We will need 2 pieces like this.
Legs:
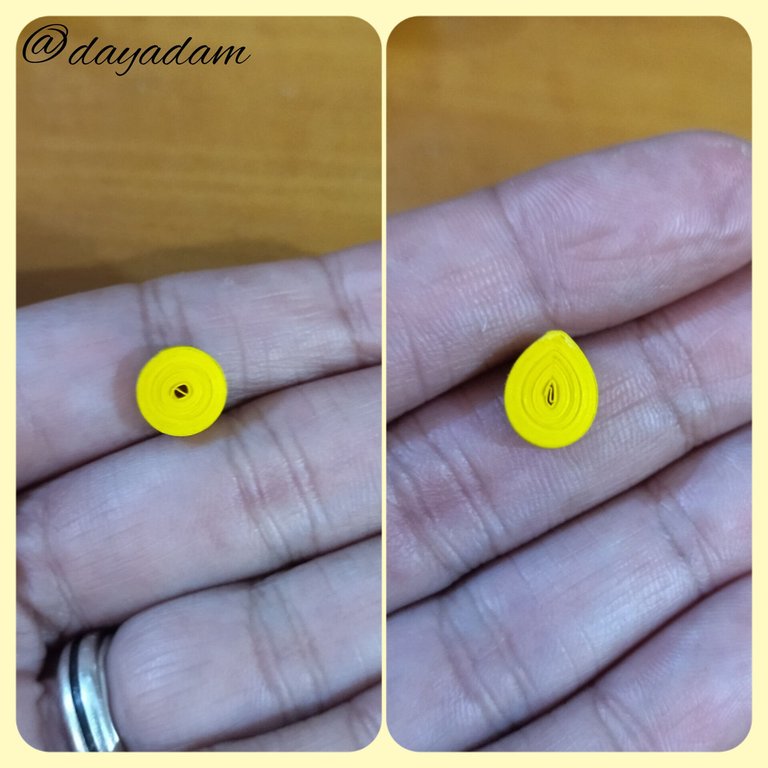
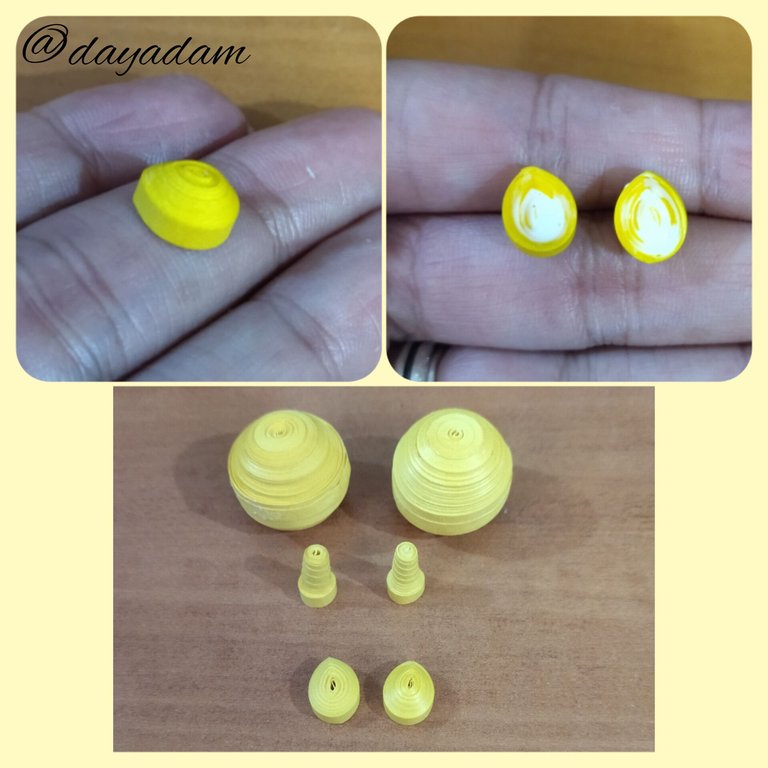
- For these we will take a yellow ribbon 3mm wide x 20cms long, we roll with the needle, but try not to squeeze too much, when we finish we seal with glue, we take out of the needle and pinch the tip to give it a drop shape, then with the help of the fingers we will mold taking a little outward, we add a little glue to the hollow part so that it is not deformed.
Brazos:
• Tomaremos un trozo de cinta de quilling amarilla de 3mm de ancho x 25cms de largo enrollaremos con la aguja para quilling para formar un círculo cerrado, sellamos al finalizar con pega, moldearemos en forma de cono sacando hacia afuera con un pincel o palito de altura, en la parte de adentro también colocaremos pega para que la pieza no se deforme. Necesitaremos 2 piezas como esta.
Patas:
• Para estas tomaremos una cinta amarilla de 3mm de ancho x 20cms de largo, enrollamos con la aguja, pero tratamos de no apretar en exceso, al culminar sellamos con pega, sacamos de la aguja y pellizcaremos la punta para darle forma de gota, luego con la ayuda de los dedos moldearemos sacando un poco hacia afuera, agregamos un poco de pega a la parte hueca para que no se deforme.
Ears:
- We will take yellow quilling tape 3mm wide x 20cms long and black 3mm wide x 5cms long, we will join to form a single tape, we will roll with the quilling needle starting with the black color, to form a closed circle, we seal at the end with glue, we will mold in a cone shape pulling outwards with a brush or stick high (just as we did with the arms), on the inside we will also place glue so that the piece is not deformed. We will need 2 pieces like this one.
Eyes, nose, cheeks:
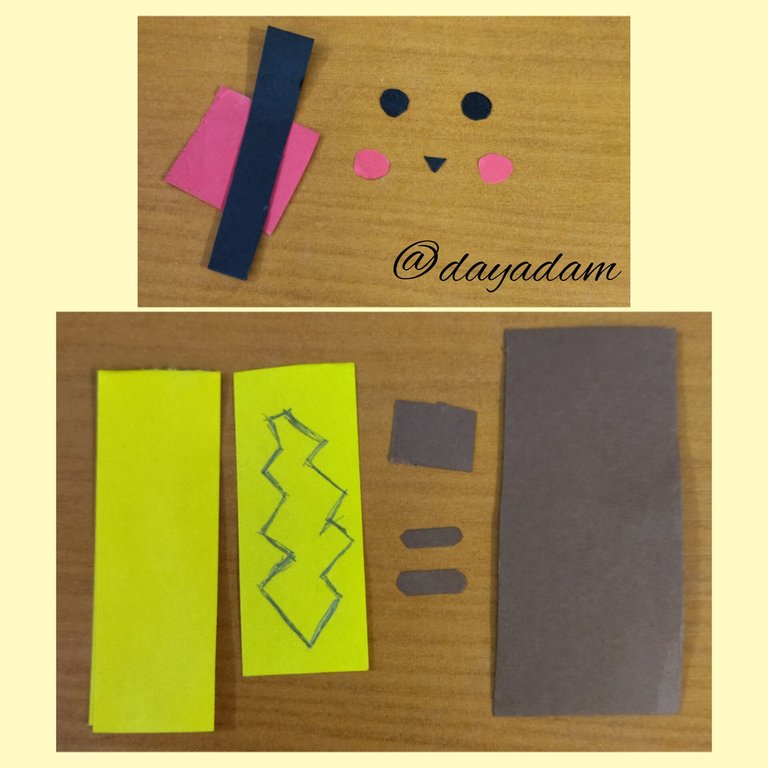
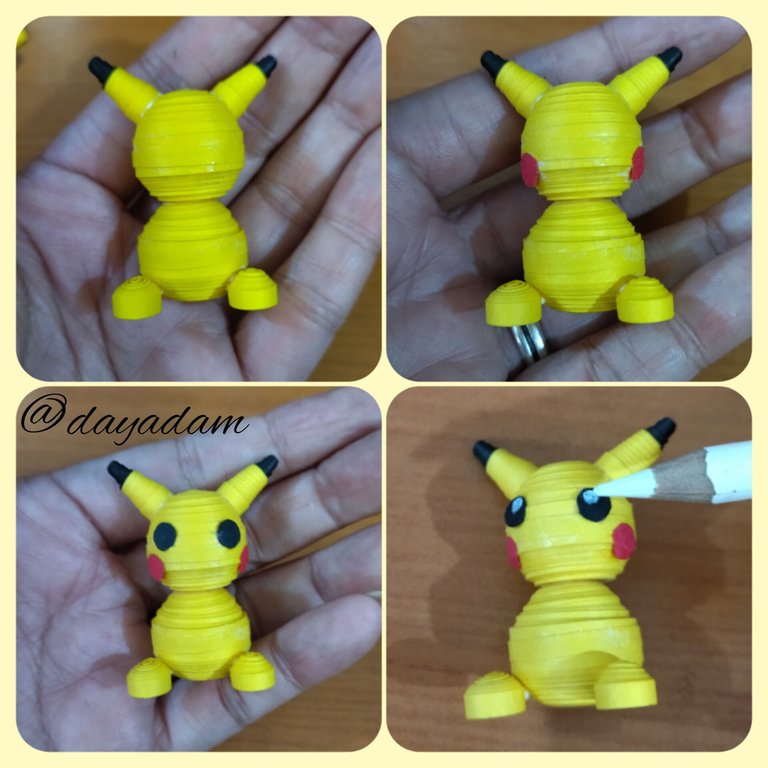
- The eyes we will make by cutting two small cardboard circles of approximately 4mm in diameter, the cheeks two red cardboard circles of approximately 5mm in diameter, the nose 1 small black triangle of 1mm in diameter.
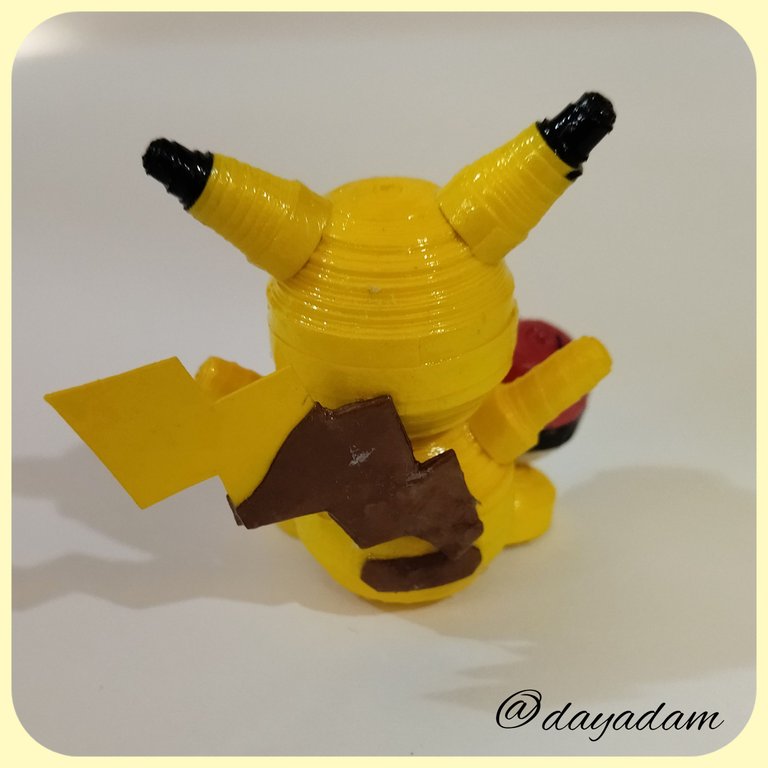
Tail:
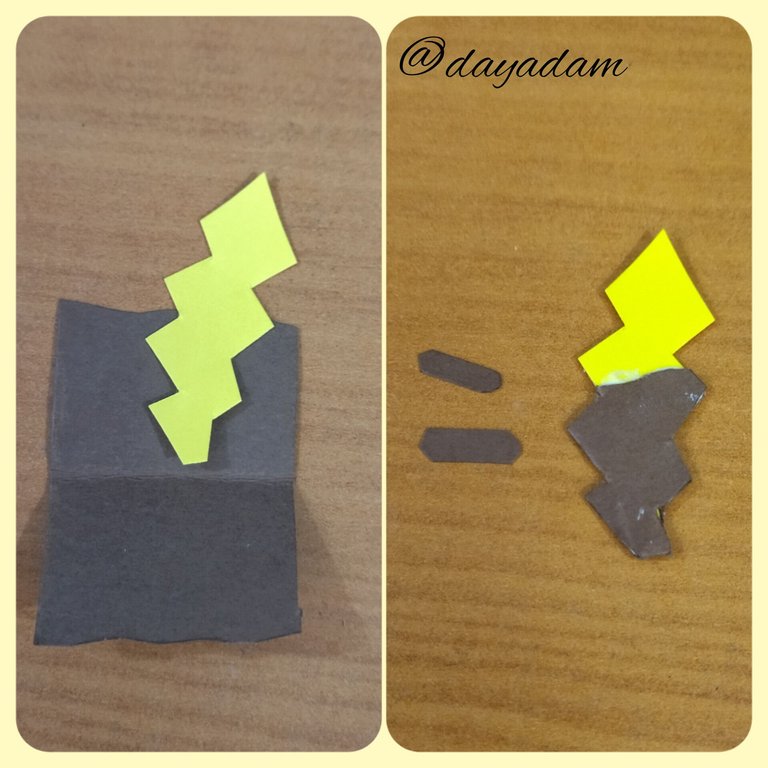
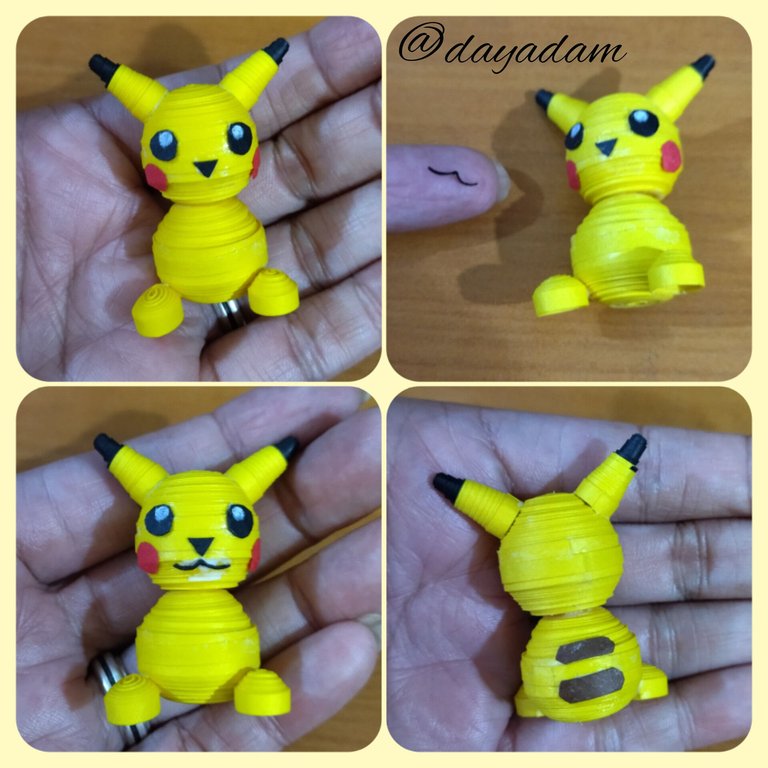
- For the tail first chop two small brown spots with cardboard, then paint a kind of lightning bolt on yellow cardboard, cut out and small a piece of brown on the bottom which I also cut out according to the shape of the lightning bolt.
Orejas:
• Tomaremos cinta de quilling amarilla de 3mm de ancho x 20cms de largo y negra de 3mm de ancho x 5cms de largo, uniremos para formar una sola cinta, enrollaremos con la aguja para quilling empezando por el color negro, para formar un círculo cerrado, sellamos al finalizar con pega, moldearemos en forma de cono sacando hacia afuera con un pincel o palito de altura (tal como hicimos con los brazos), en la parte de adentro también colocaremos pega para que la pieza no se deforme. Necesitaremos 2 piezas como esta.
Ojos, nariz, mejillas:
• Los ojos los realizaremos cortando dos pequeños círculos de cartulina de aproximadamente 4mm de diámetro, las mejillas dos círculos de cartulina roja de aproximadamente 5mm de diámetro, la nariz 1 pequeño triangulo negro de 1mm de diámetro.
Cola:
• Para la cola primero pique dos pequeñas manchas marrones con cartulina, luego pinte una especie de rayo en una cartulina amarilla, recorte y peque un trozo de marrón en la parte de abajo la cual también recorte según la forma del rayo.
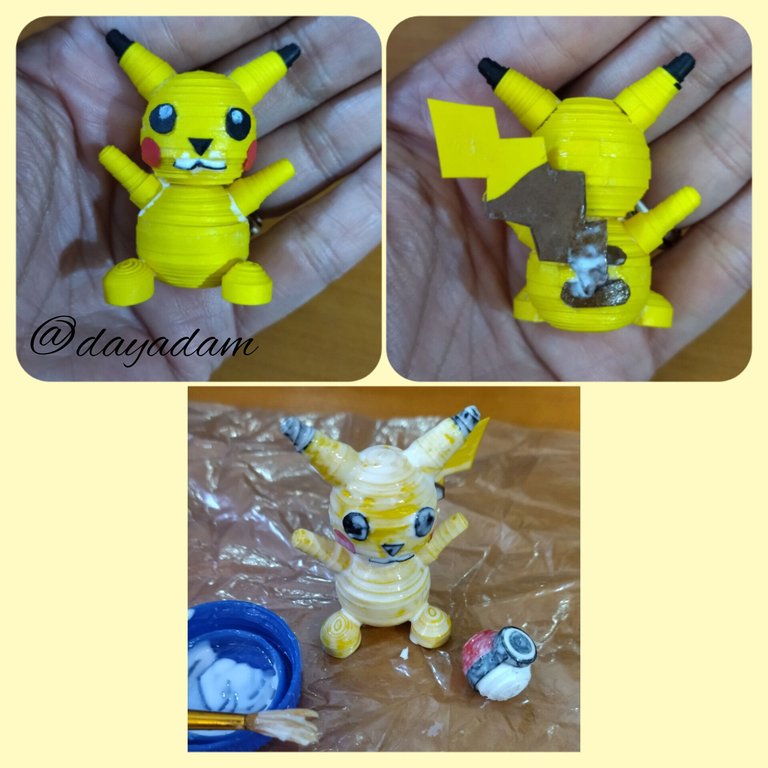
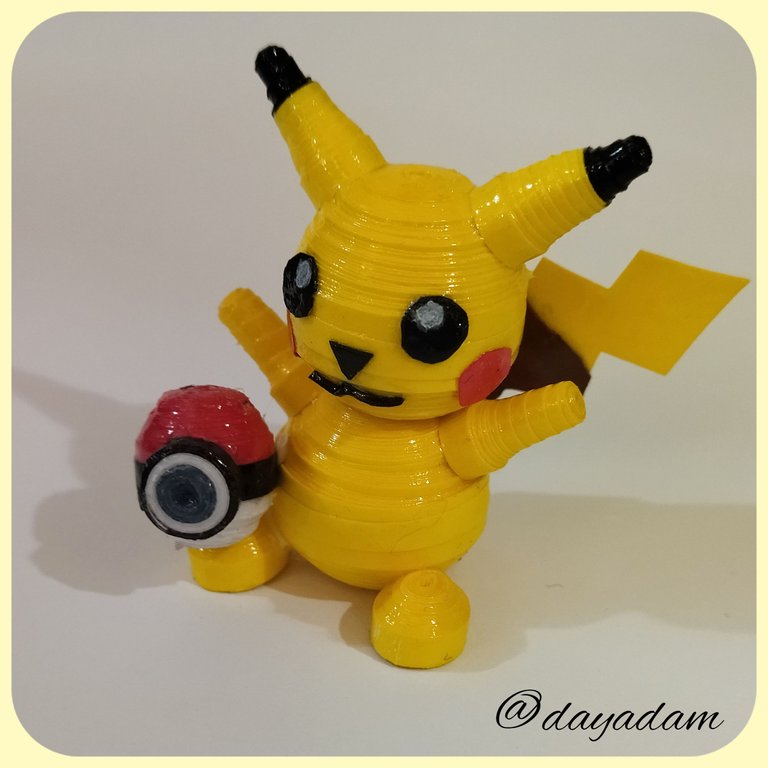
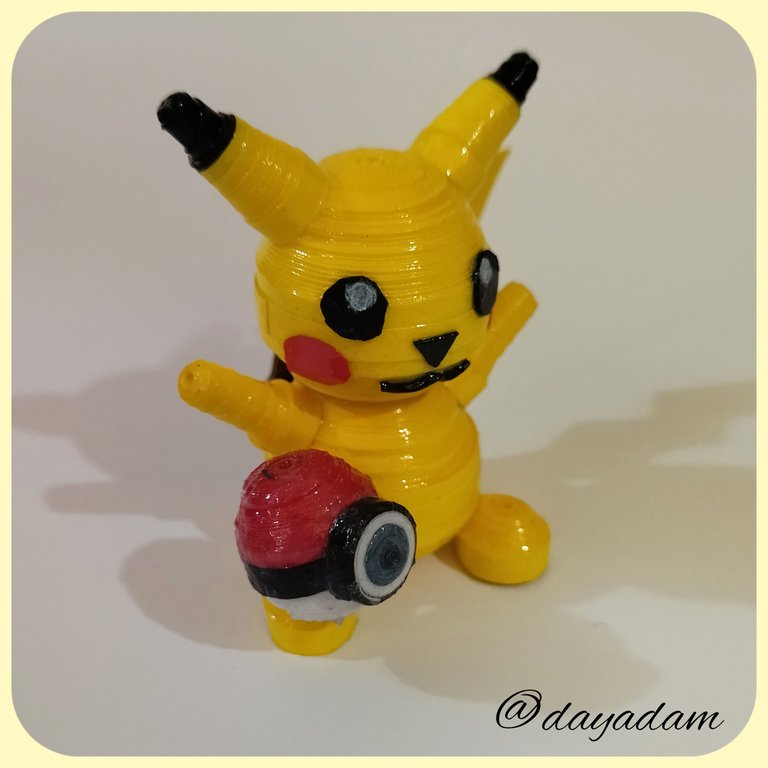
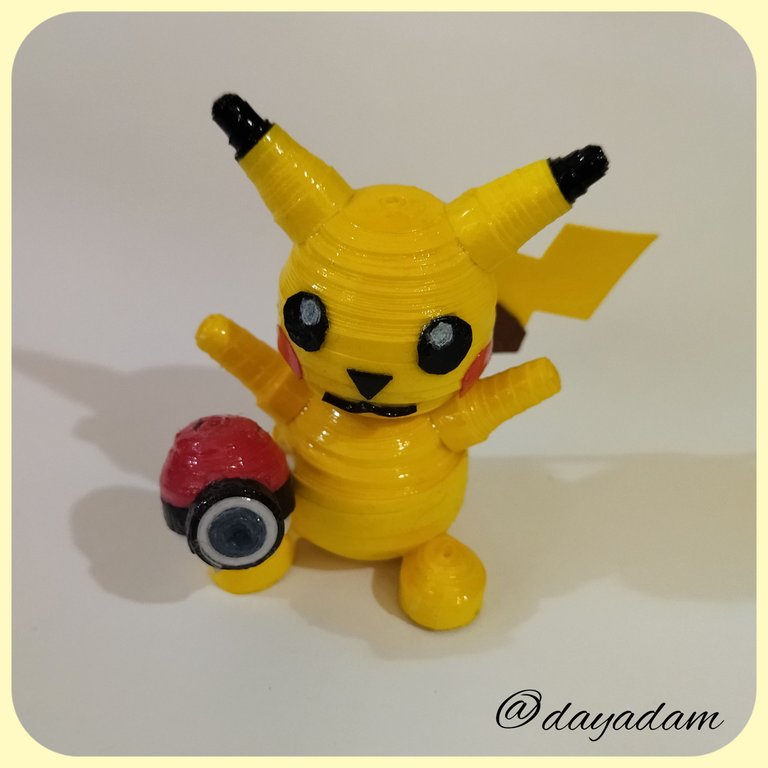
- Once all the pieces are ready we are going to join them as shown in the images, it is worth mentioning that once the eyes are placed I painted with a white color two small circles and for the mouth I took a small strip of 1mm of black quilling which I molded in a rounded shape and glued to the face of the pikachu.
- Once our pikachu is assembled, all that remains is to apply an optional layer of liquid protection (plasticized), applying extra strong white carpentry glue, letting it dry very well.
Optionally I made a small pokeball to place it decoratively to the pikachu, and once I made a keychain of a pokeball, if you want to see the step by step here I leave the link: Pokeball Tutorial.
So this way we have this decorative pikachu ready...💕
• Listas todas las piezas vamos a unirlas tal como indican en las imágenes, cabe destacar que una vez que coloque los ojos le pinte con un color blanco dos pequeños círculos y para la boca tome una pequeña tira de 1mm de quilling color negra la cual moldee de forma redondeada y pegue a la carita del pikachu.
• Armado nuestro pikachu no queda más que colocarle de manera opcional una capa de protección liquida (plastificado), aplicando pega blanca extra fuerte de carpintería, dejando secar muy bien.
De manera opcional hice una pequeña pokeball para colocarla decorativamente al pikachu, ya en una oportunidad realice un llavero de una pokeball, si deseas ver el paso a paso por acá te dejo el link : Pokeball Tutorial.
Pues de esta manera tenemos este pikachu decorativo listo…💕


What did you think, did you like it?
I hope you did, I hope you liked my explanation, procedure and photos, I made them with love for you.
"Let out that muse that inspires you, and let your imagination fly".
Thank you all, see you next time.
¿Que les pareció, les gustó?
Espero que sí, que les haya gustado mi explicación, procedimiento y fotos, los hice con mucho cariño por y para ustedes.
"Deja salir esa musa que te inspira, y deja volar tu imaginación".
Gracias a todos, nos vemos en la próxima.
Todas las fotos usadas en este post son de mi autoría y han sido sacadas en mi celular personal un Redmi 9T y editadas en Canva y en Inshot Banner y separador hecho por mí en Canva Traducido con la ayuda de DeepL

Este Pikachu te quedó hermoso @dayadam ...me encanta como armas los cuerpos en 3 D de tus figuras. Mi parte favorita fueron las orejas 🥹. Quedó precioso.
!VSC
!DIY
@chacald.dcymt has sent VSC to @dayadam
This post was rewarded with 0.1 VSC to support your work.
Join our photography communityVisual Shots
Check here to view or trade VSC Tokens
Be part of our Curation Trail
@chacald.dcymt ha enviado VSC a @dayadam
Éste post fue recompensado con 0.1 VSC para apoyar tu trabajo.
Únete a nuestra comunidad de fotografía Visual Shots
Consulte aquí para ver o intercambiar VSC Tokens
Se parte de nuestro Trail de Curación
Thanks @visualbot ✨
Gracias bella por tu gran apoyo y por tus palabras hermosas. Un abrazo inmenso @chacald.dcymt 🤗❤️
😘💜
You can query your personal balance by
!DIYSTATS✨
!ALIVE | !BBH | !PGM | !LADY
BUY AND STAKE THE PGM TO SEND A LOT OF TOKENS!
The tokens that the command sends are: 0.1 PGM-0.1 LVL-0.1 THGAMING-0.05 DEC-15 SBT-1 STARBITS-[0.00000001 BTC (SWAP.BTC) only if you have 2500 PGM in stake or more ]
5000 PGM IN STAKE = 2x rewards!
Discord
Support the curation account @ pgm-curator with a delegation 10 HP - 50 HP - 100 HP - 500 HP - 1000 HP
Get potential votes from @ pgm-curator by paying in PGM, here is a guide
I'm a bot, if you want a hand ask @ zottone444
@dayadam! Your Content Is Awesome so I just sent 1 $BBH (Bitcoin Backed Hive) to your account on behalf of @vocup. (2/20)
@dayadam! You Are Alive so I just staked 0.1 $ALIVE to your account on behalf of @ vocup. (2/20)
The tip has been paid for by the We Are Alive Tribe through the earnings on @alive.chat, feel free to swing by our daily chat any time you want, plus you can win Hive Power (2x 50 HP) and Alive Power (2x 500 AP) delegations (4 weeks), and Ecency Points (4x 50 EP), in our chat every day.

View or trade
LOHtokens.@vocup, you successfully shared 0.1000 LOH with @dayadam and you earned 0.1000 LOH as tips. (1/4 calls)
Use !LADY command to share LOH! More details available in this post.
Thanks @vocup 🤗✨
Que lindurita más tierna 😍😍😍 hasta hiciste la pokebola 😁😁
Gracias mi querido artista. Bueno te cuento que me encantó como quedó es todo Cuchi y mini y la PokeBall ni se diga jajajaja. Me encanta verte por aquí, abrazos @fixie 🤗❤️
Hermosimo @dayadam de verdad esas figuras te quedan geniales, no me atrevo hacer una porque voy a pasar pena,🤭 cada vez admiro más tu trabajo, un 🤗
Jajaja no digas eso, querer es poder y tú haces cosas muy lindas. Gracias por pasar y por tus palabras. Saludos @nhaydu 🤗❤️
¡Felicidades! Esta publicación obtuvo upvote y fue compartido por @la-colmena, un proyecto de Curación Manual para la comunidad hispana de Hive que cuenta con el respaldo de @curie.
Si te gusta el trabajo que hacemos, te invitamos a darle tu voto a este comentario y a votar como testigo por La Colmena.
Si quieres saber más sobre nuestro proyecto, te invitamos a acompañarnos en nuestro servidor de Discord.
Gracias por el apoyo @la-colmena ✨
Definitivamente que hermoso amiga! me encanta Pikachu! Saludos.
Gracias mi linda. Abrazos @divergente1 🤗❤️
Pero que preciosidad 😍 💕 me encanta, te la comiste
Gracias bella, que lindo que te haya gustado. Mil gracias por tus palabras. Un abrazote @irenenavarroart 🤗❤️
https://leofinance.io/threads/dayadam/re-dayadam-2g9xwzedq
The rewards earned on this comment will go directly to the people ( dayadam ) sharing the post on LeoThreads,LikeTu,dBuzz.
Thanks @poshthreads ✨
¡Qué lindo Pikachu! Y con pokebola incluida! ¡Qué detalles tan bien logrados, amiga! Ah, me fijé que tienes aguja nueva, ¿no? O soy yo que estoy desactualizada? 😁 Un beso mi reina, solecito venezolano. 💋
Gracias mi hermosa @ylaffittep. Me alegra un mundo verte por aquí, me encanta que te haya gustado este pequeñito Pikachu y la mini PokeBall.
La aguja es la misma, pero te cuento que hay una sorpresa en camino creo que tuviste una visión de algo jajajaja.
Abrazos, besos y bendiciones infinitas para ti, mi hermosa guerrerita 🤗❤️
So this is quilling. What a cute artwork.
Hello @glecerioberto , yes this is quilling, they are paper ribbons that I transform into pieces by molding them as required, it is a beautiful and versatile technique, with which you can do wonderful things, it is what I have been excelling in hive since I started a year and a half ago. I'm glad you liked this little pikachu. Now it's just that there are things left to do, and to show. Thank you for your comment and for stopping by my humble blog. Greetings, have a nice day... 🌈
Aww, your Pikachu looks so cute and well crafted. I see there's a pokeball as well. Great work.
Thank you very much for your support and for your words. I'm glad you liked my little pikachu and his cute pokeball @diyhub ✨
I liked it very much, especially the way it shines in the end. This is very beautiful.
!diy
Thank you so much how nice, I'm so glad you liked it. Regards ✨
You are very much welcome
You can query your personal balance by
!DIYSTATSHola, me pareció muy bello el trabajo, y por supuesto que me gustó jj, felicidades eres buena en lo que haces.Me gusta mucho cundo aplicas el plastificado, le da el toque y la belleza final. Saludos
Gracias amigo me alegra verte por acá, me gratifican mucho tus palabras. La verdad yo estoy bastante satisfecha con el resultado final, quedo muy cuchi jajaja. Saludos @darknapol ✨
Amiga está increíble
ha quedado genial el resultado, los colores son vibrantes y el proceso se ve sencillo y los materiales pueden hallarse para lograr algo similar, felicidades.
Gracias amigo. Me alegra mucho que te gustara. Bueno el proceso se ve algo sencillo porque me gusta hacerlo ver así, la idea es que muchos lo intenten y materialicen. Lindo día para ti...
Te tomare la palabra para realizar otros, ya no solo es petición tuya, ya hay varios en cola jajajja.
¡Qué preciosidad tu Pikachu! Este personaje me causa ternura y tu versión es súper cuquiii. Me encanta. ♥️🤗
Te envío un poco de !PIZZA y !LUV
@dayadam, @palomap3(2/10) sent LUV. | connect | community | HiveWiki | NFT | <>< daily
! help(no space) to get help on Hive. InfoGracias mi bella @palomap3, la verdad es que yo misma quede encantada con el resultado final jajaja, es una mini cuchitura. Me alegra que te haya gustado. Gracias por la !PIZZA y el !LUV. Te doy un poquito de vuelta. Abrazos...
@palomap3, @dayadam(1/1) sent LUV. | connect | community | HiveWiki | NFT | <>< daily
! help(no space) to get help on Hive. Info$PIZZA slices delivered:
palomap3 tipped dayadam
@dayadam(1/5) tipped @palomap3
Te felicito , me encanta se ve de lejos como si fuese de plastico, definitivamente te aplicaste mucho esta vez, se ve demasiado tierno!
Me encanto tu tutorial de pikachu esta chulo. Mi criterio es que esta bien logrado, es un trabajo super detallista, por que tiene muchas piezas diferentes lo que lleva tiempo componerlas. Tengo experiencia en el tema por por la parte del macrame. Segundo se nota la pasión y el amor que le dedicaste a este proyecto. El tutorial esta super entendible, bien equilibrado, apoyado de una buena redaccion y decoración acompañando el tema elegido. Estoy super emocionado, tremendo talento tienes y supercreativa tu imaginación vuela, disfrutare trabajar en conjunto con tigo y la comunidad DIYHub.