Scarred Llama Mage // Necklace pendant Quilling Technique [Eng-Esp]
Hello everyone... ✨
Hello to my dear Hivers and the dear community of artists Jewelry, as always very pleased and excited to be here again, showing you my work made with love and especially for you...
Greetings to the Splinterlands community, and everyone who lives there, I'm here to join the Splinterlands Social Media Challenge!
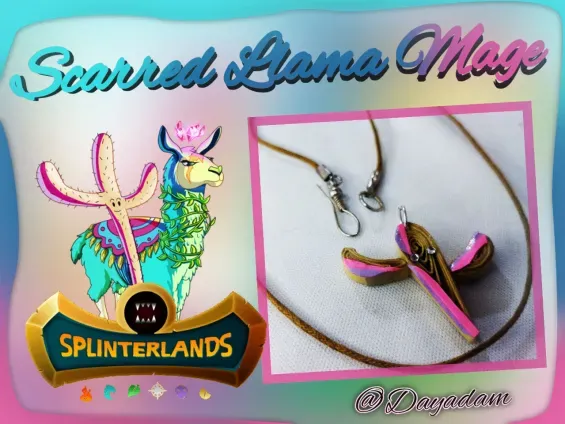
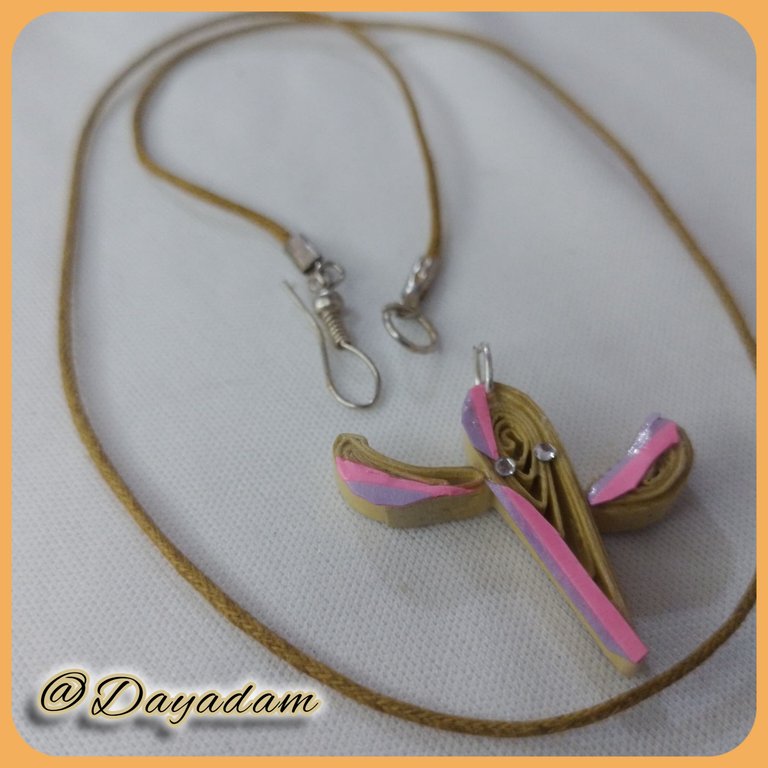
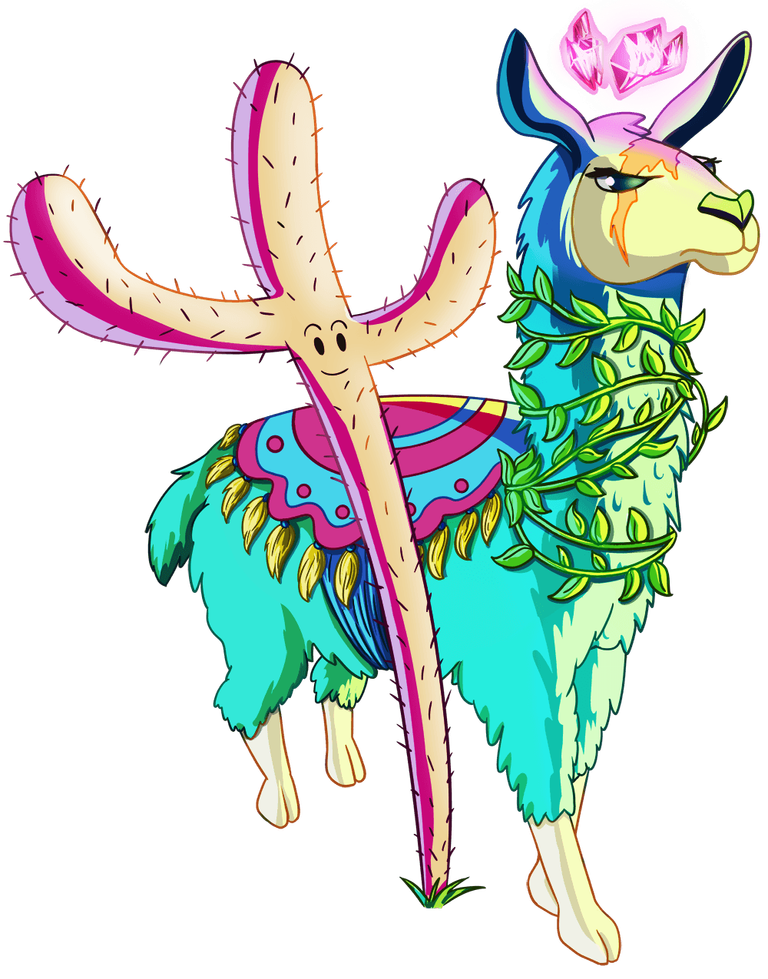
Today I bring you a fan-art of one of the elements of the card "Scarred Llama Mage " of which I decided to make a necklace charm in the quilling technique of the cactus that accompanies the main character.
If you want to know more about the game, I leave you my reference link to enter it and navigate through this wonderful world: https://splinterlands.com?ref=dayadam
Hoping you like my work, without further ado, I leave you with my creative process.
Let's start:😃

Hola a Todos...✨
Hola a mis queridos Hivers y a la querida comunidad de artistas Jewelry, como siempre muy complacida y emocionada de encontrarme por acá nuevamente, mostrándole mi trabajo hecho con mucho amor y especialmente para ustedes.
Un saludo para la comunidad de Splinterlands, y todos los que hacen vida por allí, estoy por acá para unirme al reto Splinterlands Social Media Challenge!.
Hoy les traigo un fan-art de uno de los elementos de la carta "Scarred Llama Mage" de la cual decidí hacer un dije para collar en la técnica de quilling del cactus que acompaña al personaje principal.
Si quieren saber más con respecto al juego les dejo mi enlace de referencia para que ingresen en él, y naveguen por este maravilloso mundo: https://splinterlands.com?ref=dayadam
Esperando les guste mi trabajo, sin más preámbulos, les dejo mi proceso creativo.
Comencemos:😃

• Cintas de quilling de diversos colores.
• Aguja para quilling.
• Pega blanca extra fuerte (de carpintería).
• Tijera.
• Pincel.
• Alicate punta fina.
• Argolla mediana de bisutería.
• Cristales pequeños de bisutería.
• Pinza punta fina.
- Quilling ribbons of different colors.
- Quilling needle.
- Extra strong white glue (carpentry glue).
- Scissors.
- Paintbrush.
- Fine-nosed pliers.
- Medium size costume jewelry ring.
- Small costume jewelry crystals.
- Fine tip tweezers.

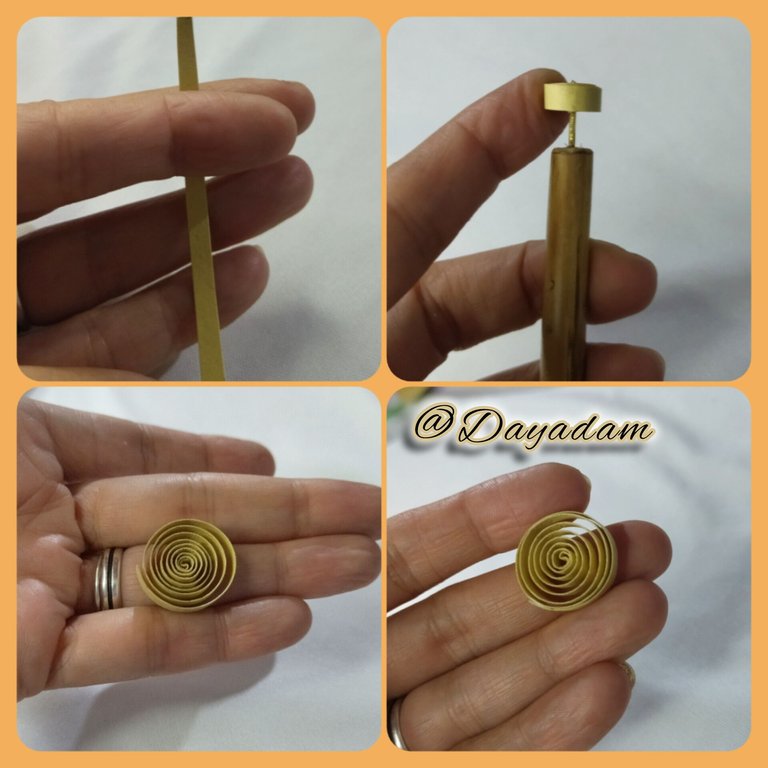
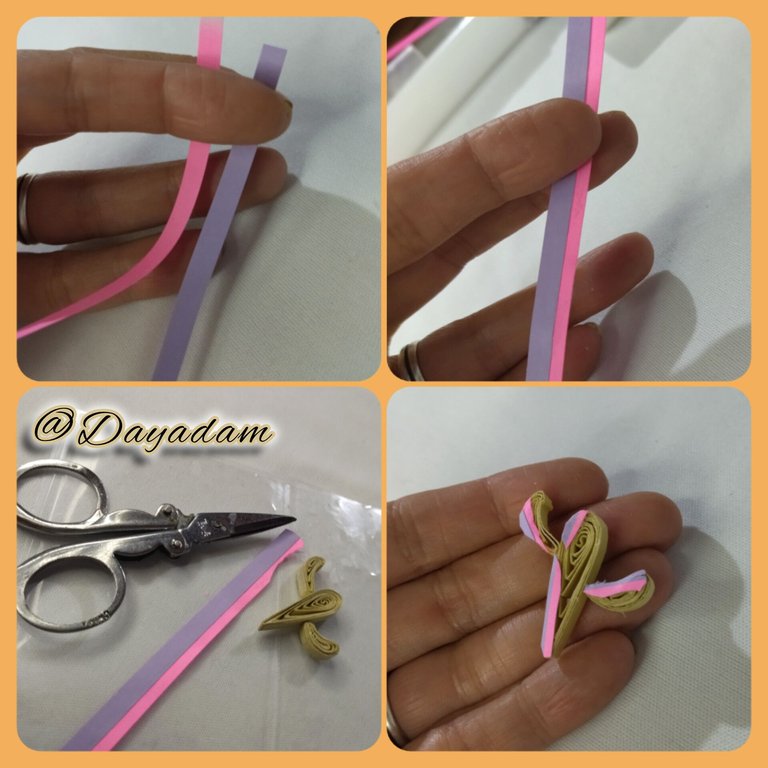
- We take quilling tape 4mm wide beige color, with the quilling needle we will roll up to the end of the tape, we take out the needle, we will release a little to obtain an open circle, we will seal it with extra strong glue. Once the circle is ready, we proceed to mold it in the shape of a kind of elongated drop.
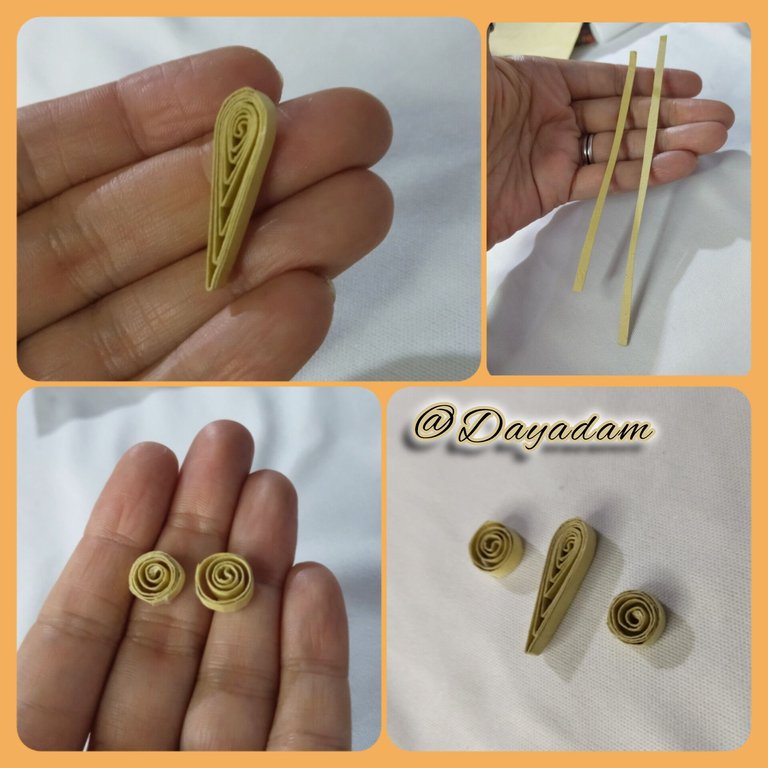
- For the pieces of the sides we will elaborate following the previous parameters 2 open circles, one bigger than the other, once finished we will mold according to the figure that we want to obtain that in my case is the cactus, you can observe in detail in the image.
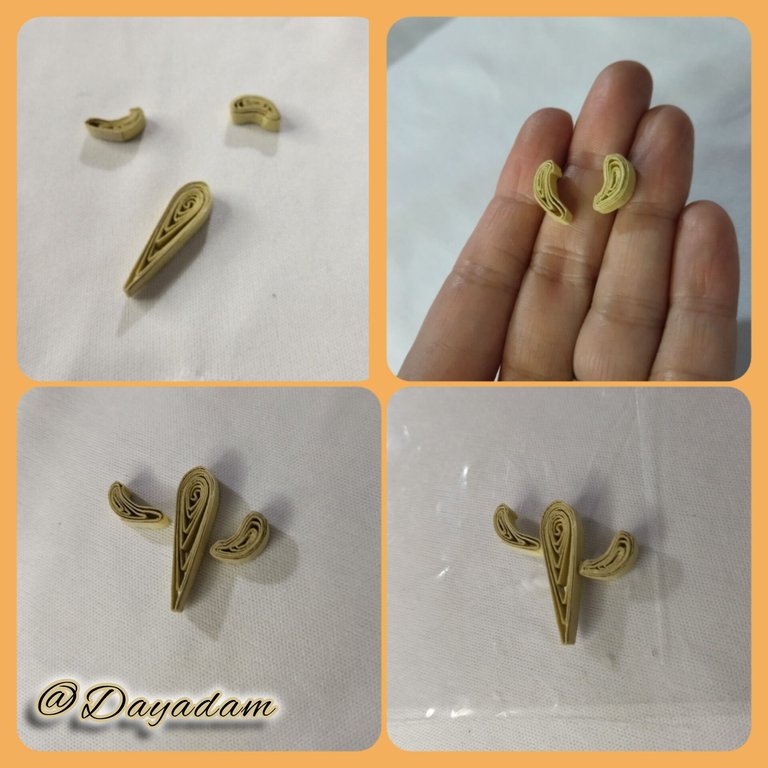
- We will join the 3 pieces with extra strong white glue.

• Vamos a tomar cinta para quilling de 4mm de ancho color beige, con la aguja para quilling enrollaremos hasta llegar al final de la cinta, sacamos de la aguja, soltaremos un poco para obtener un circulo abierto, sellaremos con pega extra fuerte. Listo el circulo procedemos a moldear en forma de una especie de gota alargada.
• Para las piezas de los lados elaboraremos siguiendo los parámetros anteriores 2 círculos abiertos, uno mas grande que otro, una vez terminados moldearemos según la figura que queremos obtener que en mi caso es el cactus, pueden observar detalladamente en la imagen.
• Uniremos las 3 piezas con pega blanca extra fuerte.
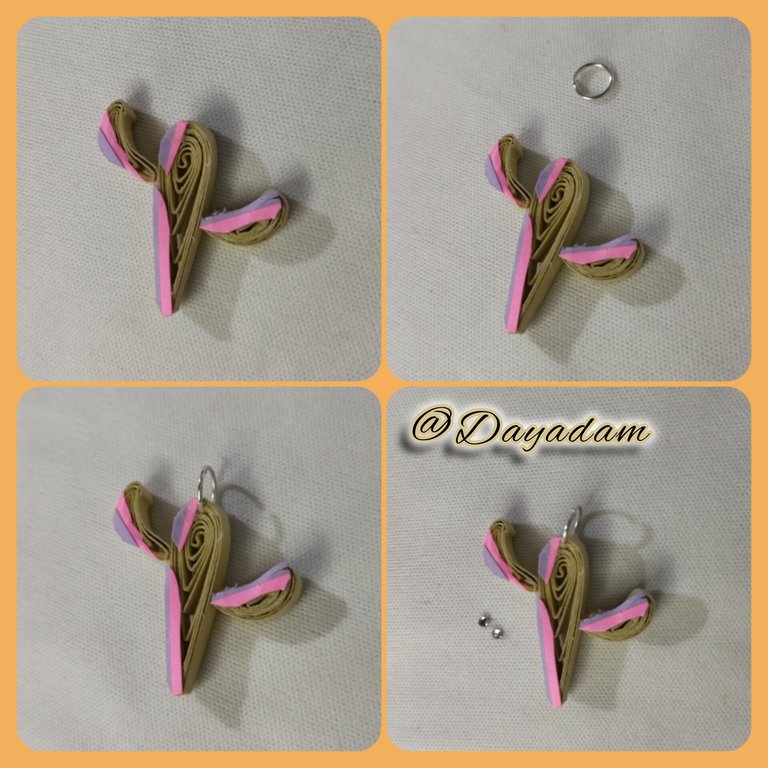
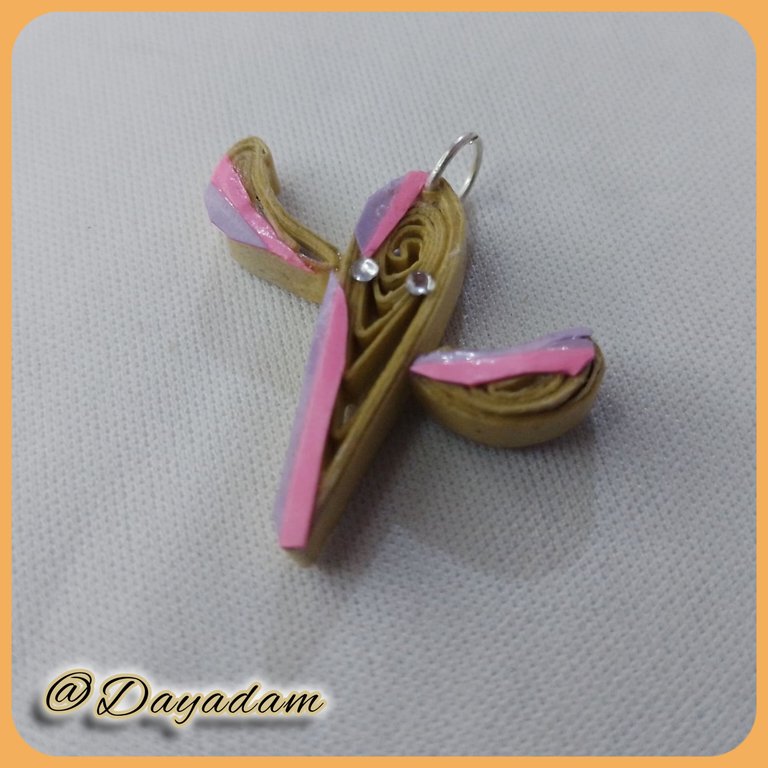
- To make the decoration that is on the edges of the cactus, take quilling ribbons of 4mm wide purple and fuchsia color, join both ribbons sideways with extra strong glue, cut with a fine tip scissors some pieces of the same and place them in the corresponding places.
- Place a medium size costume jewelry ring on the top of the cactus, and to decorate and resemble the eyes of the one that appears on the card, place 2 small costume jewelry crystals in the center of the cactus,
- To finish and give protection, shine and plasticization to the pendant, apply several coats of extra strong white glue, letting it dry between coats.
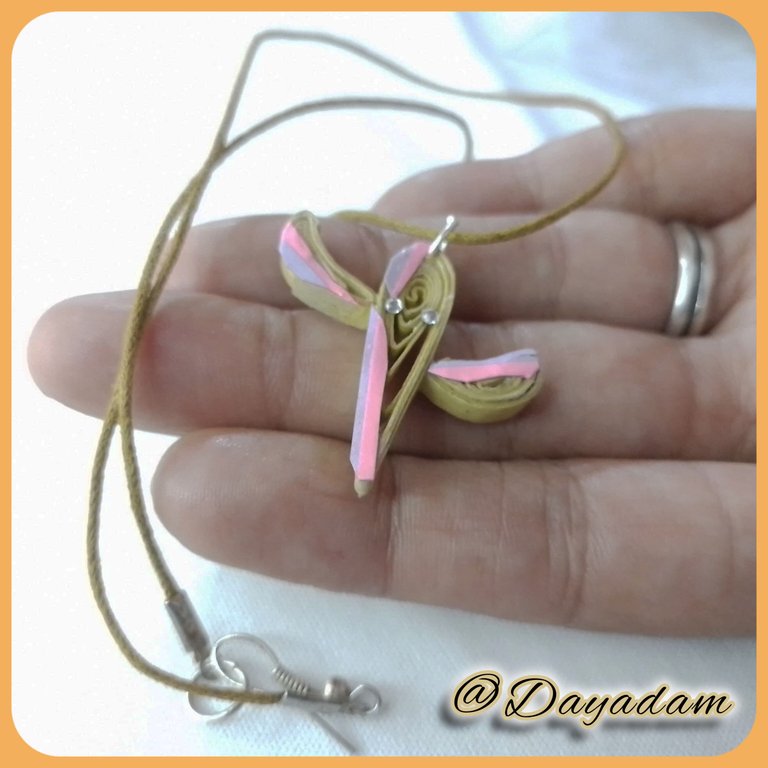
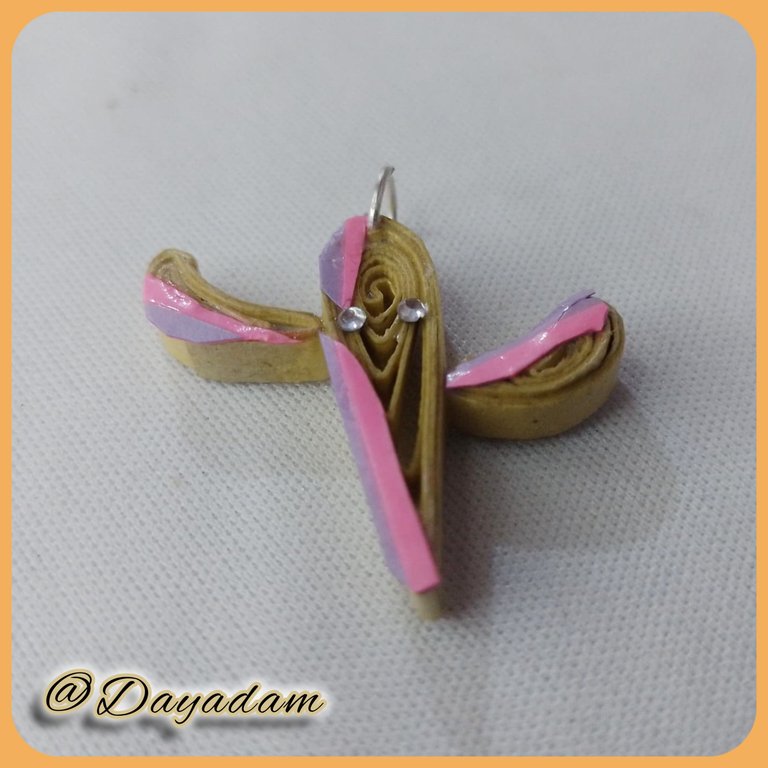
This way this little pendant that I made from the cactus that appears in the card "Scarred Llama Mage" is ready to use.
• Para hacer la decoración que esta en los bordes del cactus, tome cintas para quilling de 4mm de ancho color morado y fucsia, uní ambas cintas de manera lateral con pega extra fuerte, corte con una tijera punta fina algunos trozos de la misma y coloque en los lugares correspondientes.
• Coloque una argolla mediana de bisutería en la parte de arriba del cactus, y para decorar y hacer semejanza con los ojitos del que aparece en la carta coloque 2 pequeños cristales de bisutería en el centro del mismo.,
• Para finalizar y darle protección, brillo y plastificado a el dije aplique varias capas de pega blanca extra fuerte dejando secar entre una capa y otra.
De esta manera está listo este pequeño dije que realice del cactus que aparece en la carta "Scarred Llama Mage".


What did you think, did you like it?
I hope you did, I hope you liked my explanation, procedure and photos, I made them with love for you.
"Let out that muse that inspires you, and let your imagination fly".
Thank you all, see you next time.
¿Que les pareció, les gustó?
Espero que sí, que les haya gustado mi explicación, procedimiento y fotos, los hice con mucho cariño por y para ustedes.
"Deja salir esa musa que te inspira, y deja volar tu imaginación".
Gracias a todos, nos vemos en la próxima.
Todas las fotos usadas en este post son de mi autoría y han sido sacadas en mi celular personal un Redmi 9T y editadas en Canva y en Inshot Scarred Llama Mage Sourse/ Fuente Banner y separador hecho por mí en Canva Traducido con la ayuda de DeepL

Thanks for the support @splinterboost ✨
A beautiful pendant. Your quiling skill is impressive.
Thank you very much for the support and words towards my work, it is a pleasure for me @diyhub ✨
Un hermoso dije se parece .ucho al de la carta, lindo trabajo amigo @dayadam mucho éxito wn el concurso
Gracias mi bella @yolimarag por tus palabras y deseos, un trabajo sencillo pero realizado con mucho cariño.
Feliz de que te haya gustado ✨
Es una excelente manualidad, una presentación muy bonita
!discovery 40
Muchas gracias mi corazón por el apoyo, me alegra que te haya gustado mi trabajo.
Abrazos 💙
This post was shared and voted inside the discord by the curators team of discovery-it
Join our Community and follow our Curation Trail
Discovery-it is also a Witness, vote for us here
Delegate to us for passive income. Check our 80% fee-back Program
Congratulations @dayadam! You have completed the following achievement on the Hive blockchain And have been rewarded with New badge(s)
Your next target is to reach 100000 upvotes.
You can view your badges on your board and compare yourself to others in the Ranking
If you no longer want to receive notifications, reply to this comment with the word
STOPCheck out our last posts:
Gracias @hivebuzz ✨
¡Eso es genial @dayadam! ¡Estamos emocionados de ver tu participación en Hive! ¡Sigue así!
Lindo collar, me encanto el resultado. Exitos en el concurso.
Gracias mi linda un placer que te haya gustado...
Bello día para ti ✨
Me encanta la técnica que utilizas para realizar tus diseños.
Gracias mi linda. Me alegra que te haya llamado la atención la técnica y el tiempo resultado final ✨
Quedó genial!!! Me encantó ese toque con brillos. Buen trabajo
!DIY
Gracias mi hermosa,siempre es un gran placer leerte y sobre todo que te haya gustado mi trabajo 💗
You can query your personal balance by
!DIYSTATSMe parece una creación super divertida, jamás se me hubiera ocurrido algo parecido, eres muy especial ✨❤
Gracias mi preciosa @sylregne, un placer verte por acá, y sobre todo leer tus agradables palabras hacia mi trabajo, y créeme que si se hubiese ocurrido eso y mas, acabo de ver unas mariposas que hiciste en quilling que te quedaron de ensueño.
Un abrazo mi niña...
!HUG
I sent 1.0 HUG on behalf of @dayadam.
(1/3)
Checkout our BDVoter Daily Hive Showcase & Participate into our Daily giveaway to win various prize.
Wow, so lovely
Thanks for sharing! - @alokkumar121
