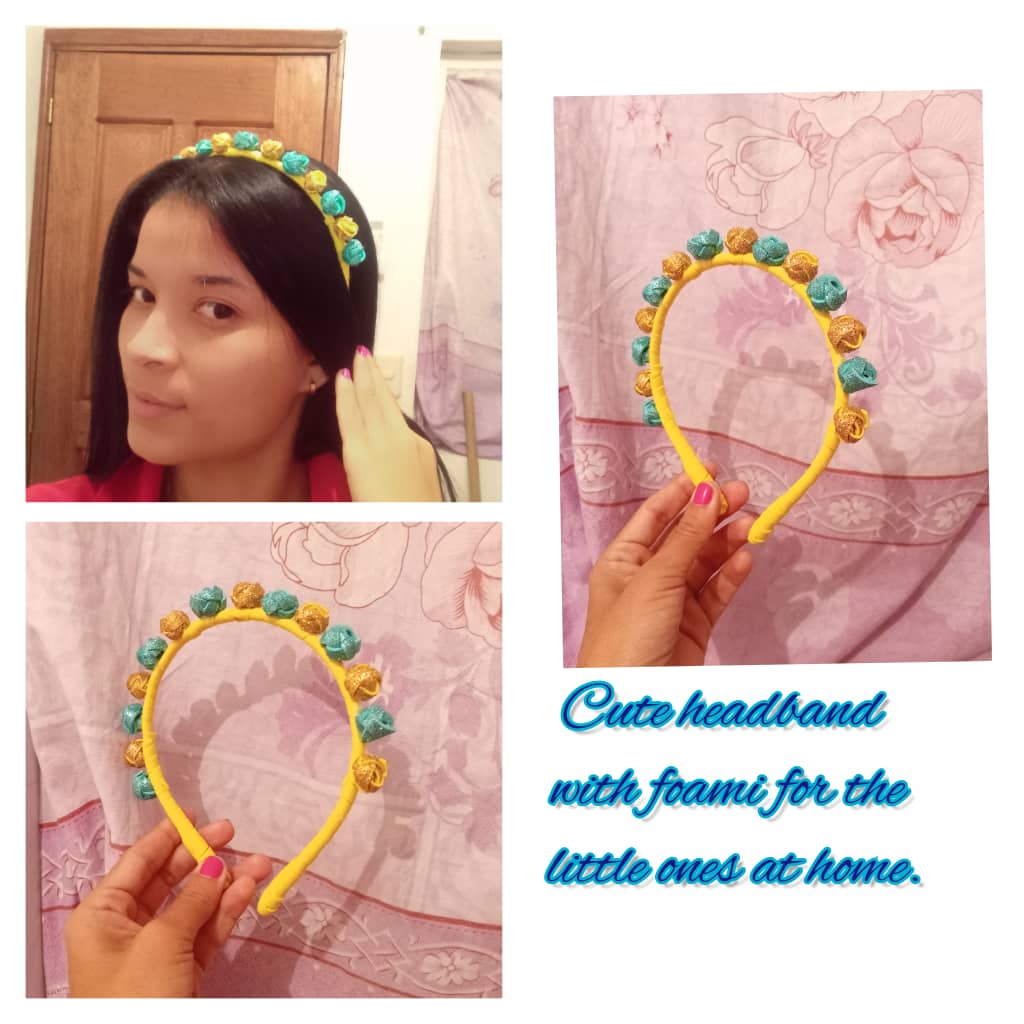
Beautiful headband with a piece of frosted foami for princesses. || [ESP/ENG]❤️❤️
Welcome to my Blog.
Hola amigos un caluroso abrazo para todos mis Hivers amigos creativos, Deseo de corazón que se encuentren bien, es un placer para mí estar una vez más compartiendo mis trabajos en esta maravillosa comunidad de @jewelry dónde una vez más aplaudo el talento desbordado. En está oportunidad les quiero mostrar un sencillo tutorial de cómo elaborar una Diadema con retazos de foami escarchado y liso, ideal para consentir a las princesas de la casa y que luzcan hermosas en todo momento, lo decore con unas lindas mini rositas de color dorado y verde, y el cintillo forrado de color amarillo usted puede elegir el color de su preferencia, combinarlo de acuerdo a sus gustos. Atrévete a realizar este bello accesorios en muy pocos pasos y con resultados maravillosos, Darle vida a esos retazos de materiales reciclables creando accesorios que te sorprenderán sin grandes gastos económicos amigos. A continuación les indico los siguientes pasos a seguir para tomar en cuenta en está linsa creación:
Hello friends, a warm hug for all my Hivers creative friends, I sincerely hope that you are well, it is a pleasure for me to be once again sharing my work in this wonderful community of @jewelry where once again I applaud the overflowing talent. In this opportunity I want to show you a simple tutorial on how to make a Headband with pieces of frosted and smooth foami, ideal to pamper the princesses of the house and that they look beautiful at all times, decorate it with some cute mini roses of gold color and green, and the yellow lined headband you can choose the color of your choice, combine it according to your tastes. Dare to make these beautiful accessories in just a few steps and with wonderful results. Give life to those remnants of recyclable materials by creating accessories that will surprise you without great financial expenses, friends. Below I indicate the following steps to take into account in this beautiful creation:

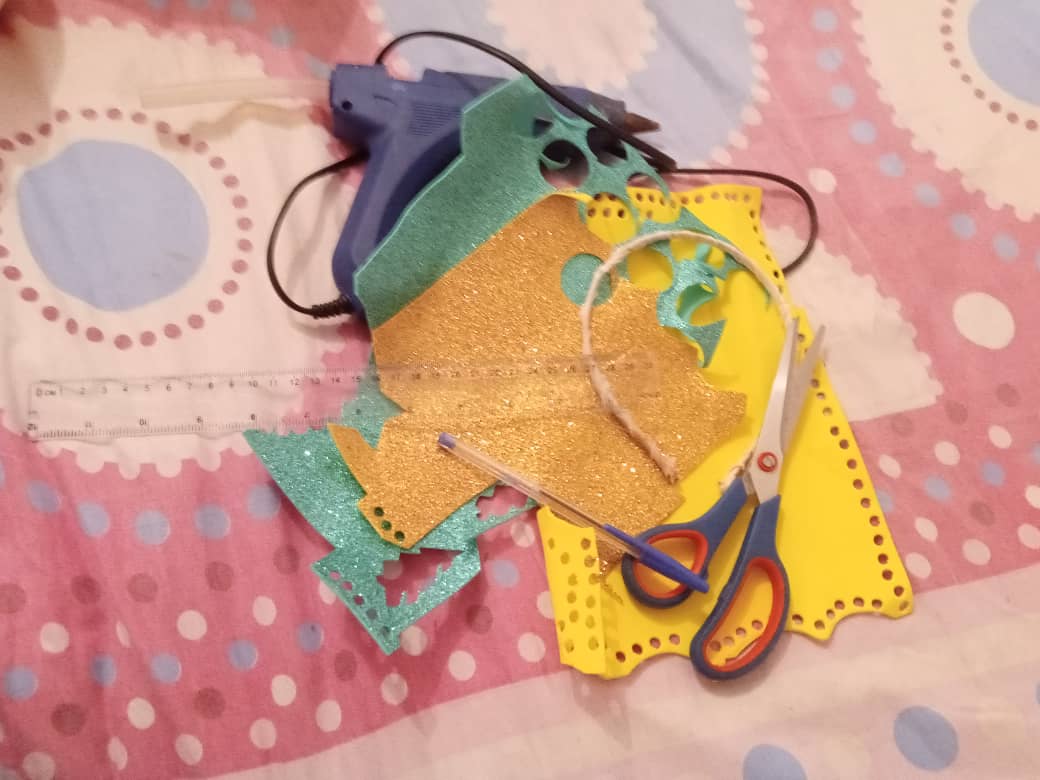
Materiales:
❤️Retazos de foami de su preferencia.
💜Tijera.
❤️Silicón caliente.
💜Cintillo delgado.
❤️Regla o cinta métrica
💜lápiz.
Materials:
❤️Scraps of foami of your choice.
💜Scissors.
❤️Hot silicone.
💜Thin headband.
❤️ Ruler or tape measure.
💜pencil.
Step by Step || Pasó a paso:
1er paso: Bueno mis Hivers creativos vamos iniciaremos tomando los retazos de foami de acuerdo a su gusto en cuanto a su combinación, en mi cajón tenía estos colores verde escarchado y dorado y me encantaron, tomaremos la regla o cinta métrica y marcamos las siguientes medidas de aproximadamente 8 centímetros de largo por 1 centímetros de ancho en ambos colores y cortamos, eso va a variar dependiendo su tamaño deseado, yo no las queria tan grande.
1st step: Well, my creative hivers, let's start by taking the pieces of foami according to your taste in terms of their combination, in my drawer I had these frosty green and gold colors and I loved them, we will take the ruler or tape measure and mark the following measurements approximately 8 centimeters long by 1 centimeter wide in both colors and cut, that will vary depending on your desired size, I did not want them so big.
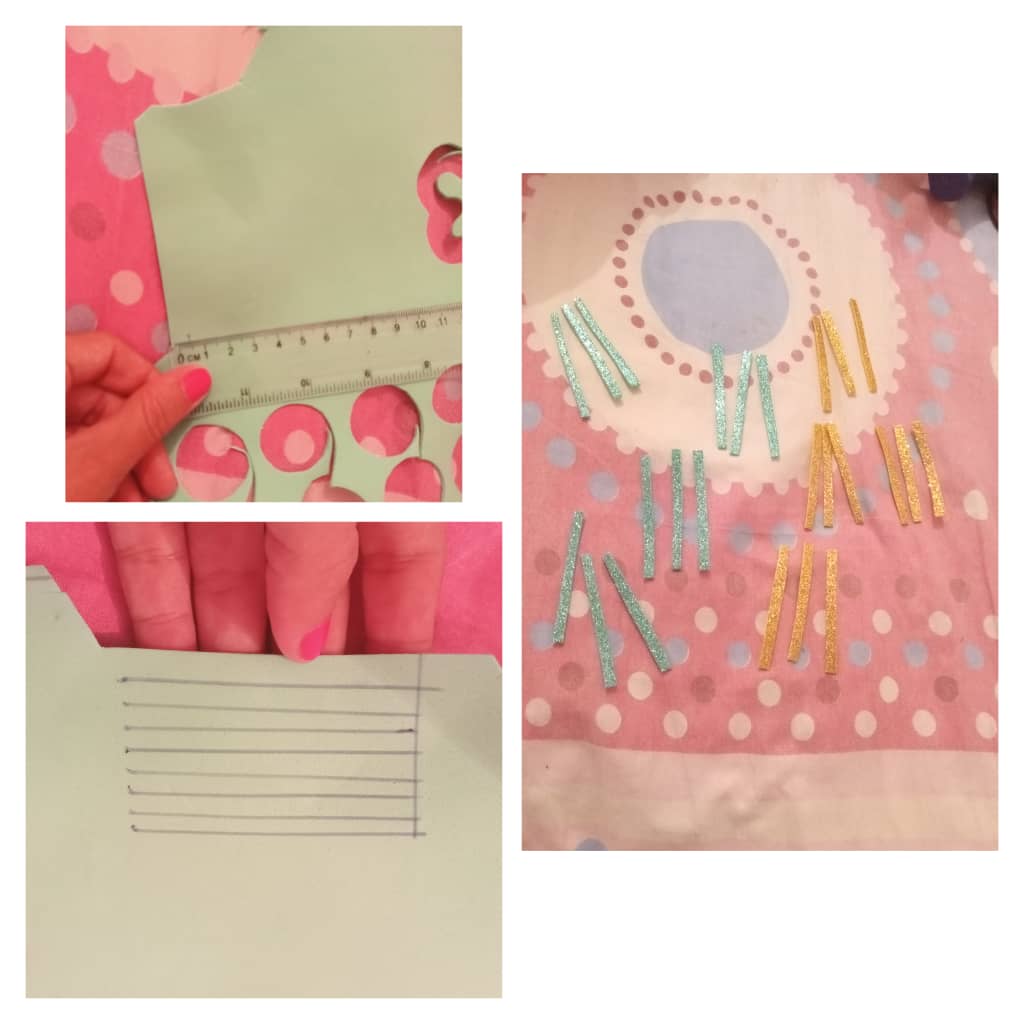
*2do paso: Luego de tener listo ambos listones de un total de 42 entre ambos colores, tomaremos y comezamos a uniendo en trío del mismo color y pegamos las puntas como se pueden observar en las imágenes para ir tejiendo en forma de un trenzado y sellamos al finalizar, así nos quedarán.
2nd step: After having both strips of a total of 42 between both colors ready, we will take and begin to join a trio of the same color and glue the ends as can be seen in the images to weave in the form of a braid and seal the finish, that's how they will stay.
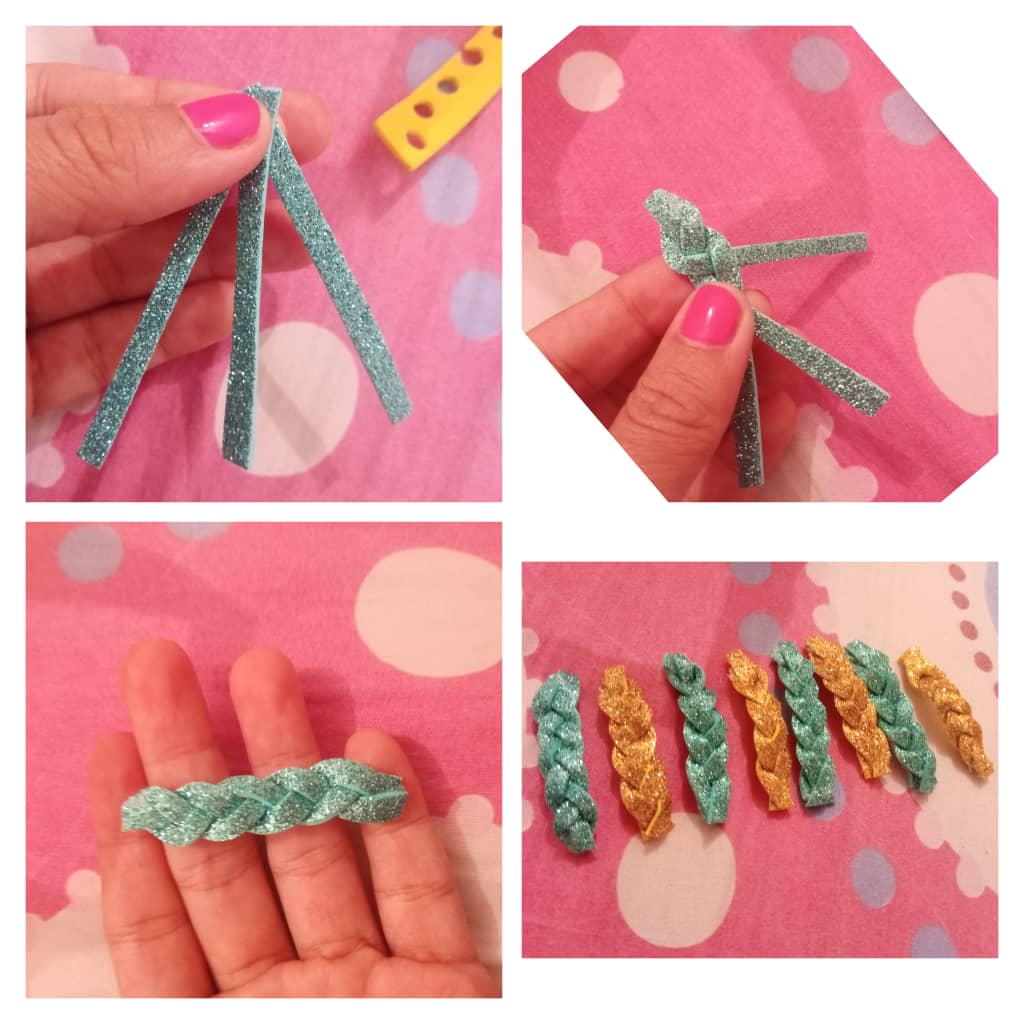
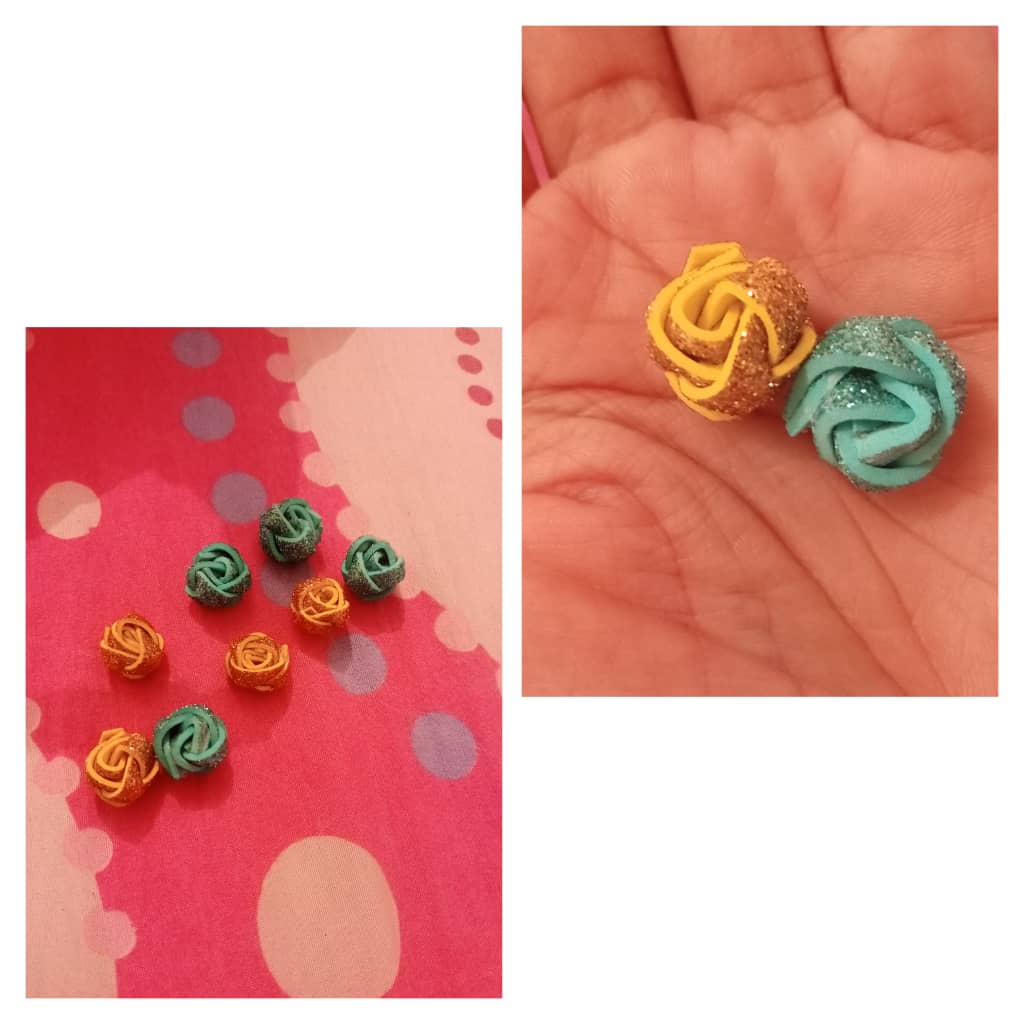
3er paso: A continuación amigos procedemos a tomar las piezas ya trenzadas y enrollaremos desde el centro e ir pegando para formar las rositas cómo se aprecia en las imágenes para un total de 14 rositas en total en ambos colores mis creativos, si usted quiere les puede colocar la cantidad que desee.
3rd step: Next, friends, we proceed to take the already braided pieces and we will roll from the center and stick to form the rosettes, as can be seen in the images for a total of 14 rosettes in total in both my creative colors, if you want you can place the amount you want.
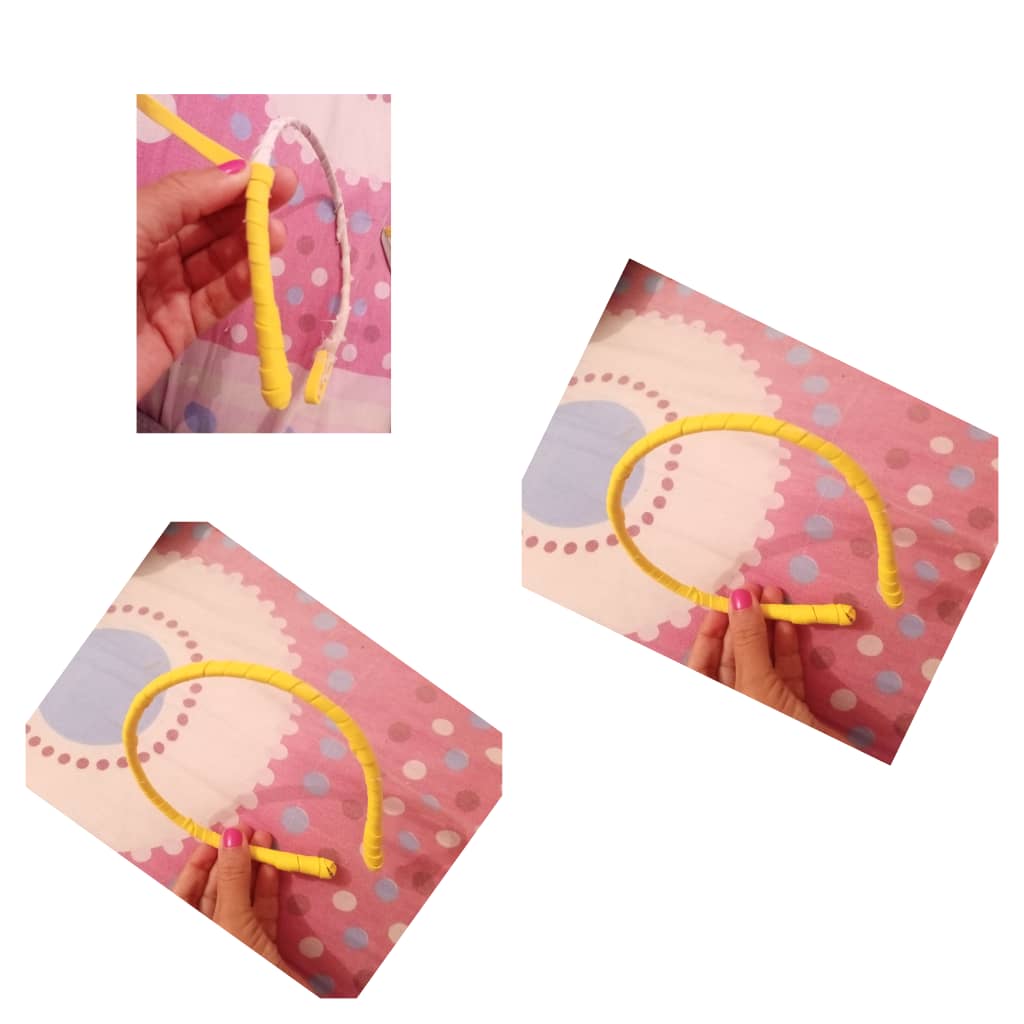
4to paso: Luego marcamos y recortamos dos listones de 4 centímetros cada uno por 1 centrimetro de ancho de color amarillo liso y pegar en ambos extremos del cintillo, luego de haber culminado cortamos 2 listones de 35 centímetros cada uno del mismo color y vamos a forrar nuestro cintillo de principio a fin pegando con el silicón nos aseguramos de sellar bien.
4th step: Then we mark and cut two strips of 4 centimeters each by 1 centimeter wide of plain yellow color and paste on both ends of the headband, after having finished we cut 2 strips of 35 centimeters each of the same color and we are going to line our headband from beginning to end by sticking with the silicone we make sure to seal well.
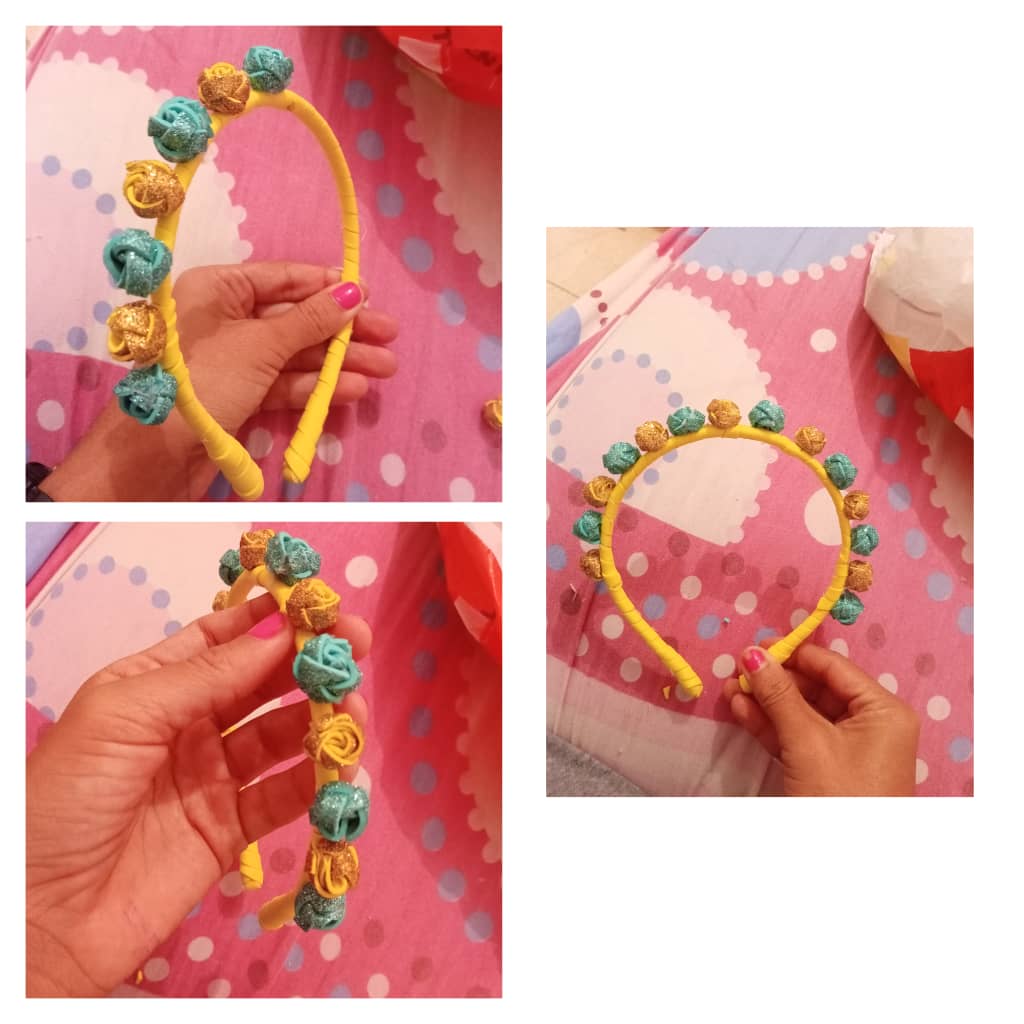
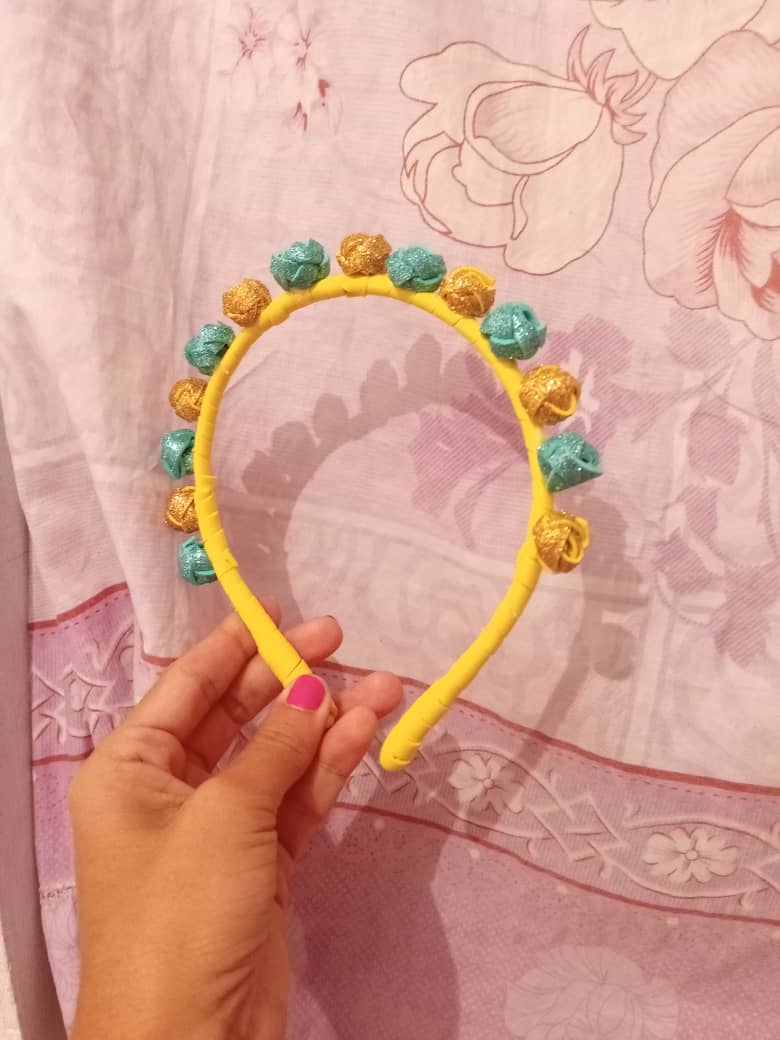
5to paso: Seguidamente de haber forrado todo el cintillo vamos a ir pegando las rositas en mi caso una al lado de la otra al alrededor del cintillo dejando una distancia de 4 centímetros al inicio, usted la puede colocar de acuerdo a su gusto, en lo particular a mi me encantó como luce esta bella combinación, tiene mucho brillo y es hermosa. Así quedó esta bella Diadema.
5th step: After having covered the entire headband, we are going to stick the roses, in my case one next to the other around the headband, leaving a distance of 4 centimeters at the beginning, you can place it according to your taste, as far as I particularly loved how this beautiful combination looks, it has a lot of shine and is beautiful. This is how this beautiful Diadema was.
Espero les haya gustado está linda creación y se animen a intentarlo para consentir a las hermosuras de la casa, este detalle lo elaboré para mi sobrina Camila que hoy cumplió un añito más de vida así que quise consentirla cómo siempre luciendo uno de mis trabajos con mucho cariño para ella. Mis Hivers amigos cómo siempre es un gusto formar parte de este grupo de amigos que hacen vida en este espacio maravillosa que nos regala la comunidad de @jewelry, espero de corazón que estén bien y les deseo múltiples bendiciones para todos. Saludos 🤗
I hope you liked this beautiful creation and are encouraged to try it to pamper the beauties of the house, I made this detail for my niece Camila who today turned one more year old so I wanted to pamper her as always wearing one of my works with much love for her If you have girls make her a nice accessories. My Hivers friends, how it is always a pleasure to be part of this group of friends who make life in this wonderful space that the @jewelry community gives us, I sincerely hope that you are well and I wish you all many blessings. Greetings 🤗
Muchas gracias por visitar mi Blog
Thank you very much for visiting my Blog.

ESTA MUY LINDO PARA LA PRINCESA DE LA CASA
Muchas gracias amiga por visitar y dejar tu lindo comentario. Saludos 🤗💖💖
Un gran trabajo, el foami queda hermoso, las forew se ven increíble, y lo mejor es que es forrado totalmente en foami, un material muy versátil.
Muchas gracias @hive-189504 por el apoyo brindado. Espero se encuentren bien. Saludos y bendiciones 💖💖
https://twitter.com/1503343212819369990/status/1591023875613110272
The rewards earned on this comment will go directly to the people sharing the post on Twitter as long as they are registered with @poshtoken. Sign up at https://hiveposh.com.
Te quedó lindo @delvallecedeno, ya imagino a Camila; preciosa con tu creación! Saluditos.
Muchas gracias por la visita amiga @nhaydu, un fuerte abrazo 🤗💖💖
Un trabajo hermoso @delvallecedeno, realmente al principio no me percate que eran rositas de foami, se ven bellísimas! De verdad que bello tu trabajo, gracias por la explicación.
Hola amiga @marleyn muchas gracias por visitar mi blog y dejar tu lindo comentario, es grato para mi saber que te gustó mucho. Un fuerte abrazo 🤗💖 Saludos ❤️💖
Que hermoso. Las flores estás celestiales. Sabes, hay quienes piensan que trabajar con foami es sencillo, pero por experiencia se que se necesita mucha paciencia y pericia para tener un resultado hermoso de lo contrario se notan mucho las imperfecciones y el trabajo no se ve tan bonito. Pero a ti esto te quedó admirable. Te felicito.
Bendiciones
Gracias amiga @artsugar por visitar mi blog y dejar tu lindo comentario como siempre es grato para mi. Así es amiga por más sencillo que parezca no lo es, siempre trato de dar lo mejor de mi en mis tutoriales. Tus trabajos también son hermosos❤️❤️💖, te envío un cálido abrazo espero te encuentres bien saludos 🤗💖💖 Feliz y bendecida noche 😘
Me ha gustado mucho la técnica que empleaste para hacer las rosas, a mí siempre me cuesta hacer rosas así que tendré esta técnica en mente de ahora en más.
Hola @jennyzer gracias por la visita, que bueno que te haya gustado está técnica de rositas y la puedas implementar al momento de elaborar cualquier trabajo. Un caluroso abrazo 🤗💖