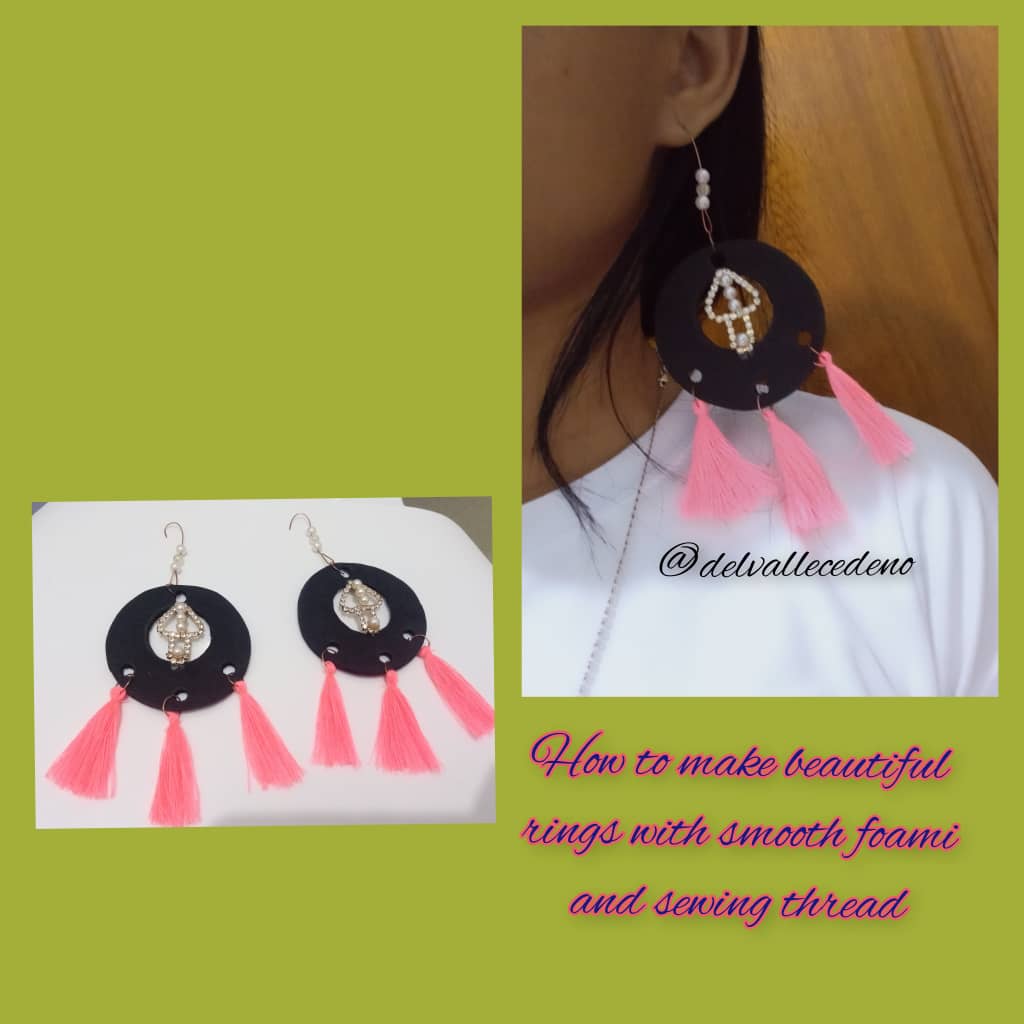
How to make beautiful rings with smooth foami and sewing thread|| [ESP/ENG]☘️☘️💖💖
Welcome to my Blog.
Hola amigos, feliz martes espero hayan tenido un espléndido y maravilloso Día en familia colmado de muchas bendiciones y sobre todo disfrutando de los que más les guste hacer, es un placer estar una vez más compartiendo con todos ustedes mis Hivers creativos, en esta bella comunidad de @Jerwely, Hoy les traigo un tutorial que espero les guste se trate de unas argollas elaboradas con foami y hilo ideal para estar a la moda las puedes usar en ocasiones que más le guste, o puede ser para ir a la playa, lo mejor de todo es que es muy fácil de realizar y con pocos materiales que tenemos a la mano amigos así que anímate y combínalo a tu gusto y atrevete a usar estas estupendas argollas.
Hello friends, happy Tuesday, I hope you had a splendid and wonderful family day full of many blessings and above all enjoying what you like to do the most, it is a pleasure to be once again sharing with all of you my creative Hivers, in this beautiful community. from @Jerwely, Today I bring you a tutorial that I hope you like, it is about hoops made with foami and ideal thread to be fashionable, you can use them on occasions that you like the most, or it can be to go to the beach, the best After all, it is very easy to make and with few materials that we have at hand, friends, so go ahead and combine it to your liking and dare to use these wonderful rings.
Desde niña siempre me gustó crear, renovar, reutilizar, darle un nuevo uso a los objetos por eso me apasiona tanto el reciclaje trato siempre de estar inventando nuevas creaciones, eso si adicionando ese toque personal a los trabajos, estás argollas están elaboradas con foami liso de color negro con unos flecos colgante de color rosa de hilo de coser en la parte superior y en el centro ese toque de brillo con unas perlitas de color blanco al igual en la parte superior de nuestra argolla, espero les guste y se puedan animar a elaborar, usted es libre de elegir los colores y apliques. A continuación mis amigos les voy a explicar los siguientes pasos a seguir para que tomen en cuenta los materiales a necesitar:
Since I was a child I always liked to create, renovate, reuse, give a new use to objects, that is why I am so passionate about the recycling treatment, always inventing new creations, that is, adding that personal touch to the works, these rings are made with foami plain black with some pink sewing thread pendant fringes at the top and in the center that touch of brightness with some white pearls as well as at the top of our ring, I hope you like it and you can cheer it up to elaborate, you are free to choose the colors and appliqués. Then, my friends, I am going to explain the following steps to take into account the materials you will need:

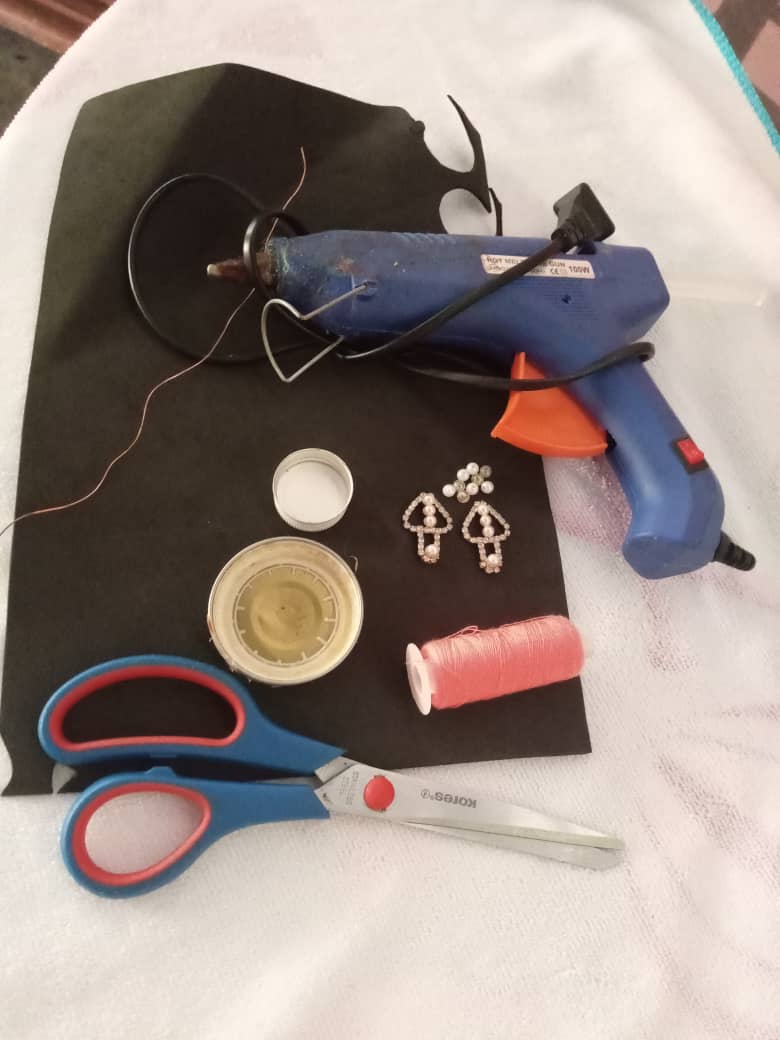
Materiales:
🍀Retazo de foami de color negro.(liso)
🍀Tijera.
🍀Silicón caliente.
🍀Alambre de cobre.
🍀Mostacillas.
🍀Apliques.
🍀Perforadora de huecos.
🍀Hilo de color rosa.
🍀Tapa de frasco compota.
🍀Tapa de medicamento.
🍀Lápiz.
🍀Hoja de papel.
Materials:
🍀Piece of black foami. (smooth)
🍀Scissors.
🍀Hot silicone.
🍀Copper wire.
🍀Beads.
🍀Applique.
🍀Hole punch.
🍀Pink thread.
🍀Compote jar lid.
🍀Medication cap.
🍀Pencil.
🍀Paper sheet.
Step by Step || Pasó a paso:
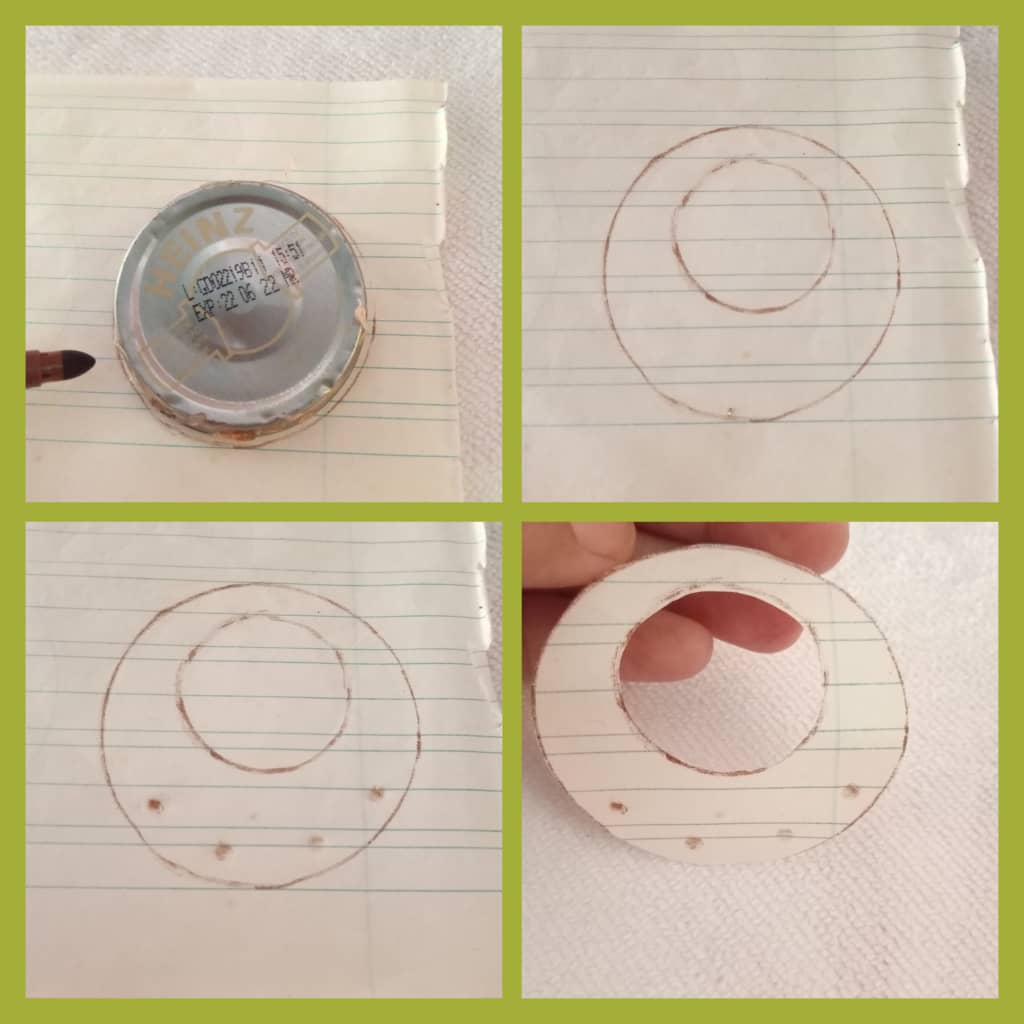
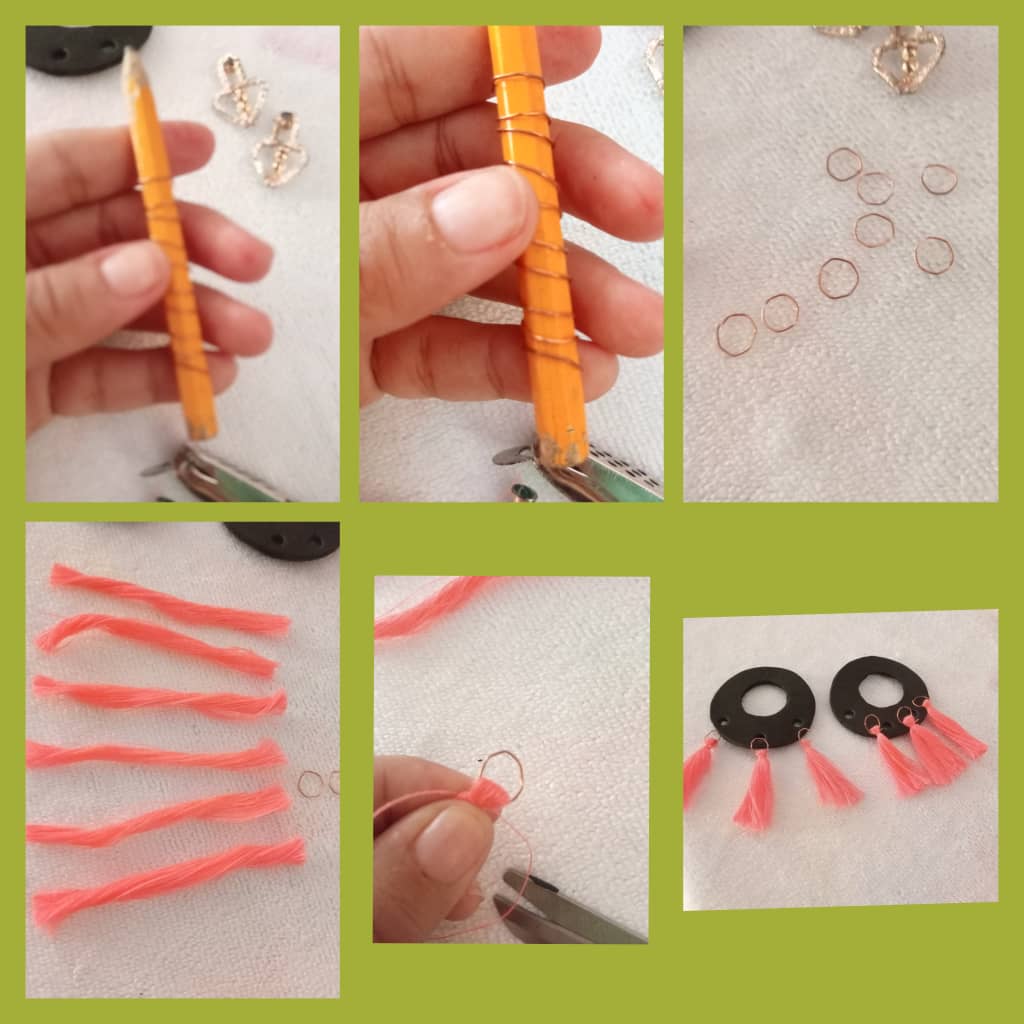
1er paso: Bueno mis hivers amigos para dar inicio vamos a tomar nuestra hoja de papel y el lápiz y plasmar en la hoja el molde a necesitar marcar la tapa de compota como nuestra primera base y encima de ella la tapa de medicamentos un poco mas arriba del centro de la ante mencionada recortamos y listo para marcar al foami, a mi en lo particular me gusto este tamaño usted lo puede hacer de su preferencia.
1st step: Well my hivers friends to start we are going to take our sheet of paper and pencil and capture on the sheet the mold we need to mark the compote lid as our first base and on top of it the medication lid a little higher From the center of the aforementioned suede we cut and ready to mark the foami, I particularly liked this size you can make it of your preference.
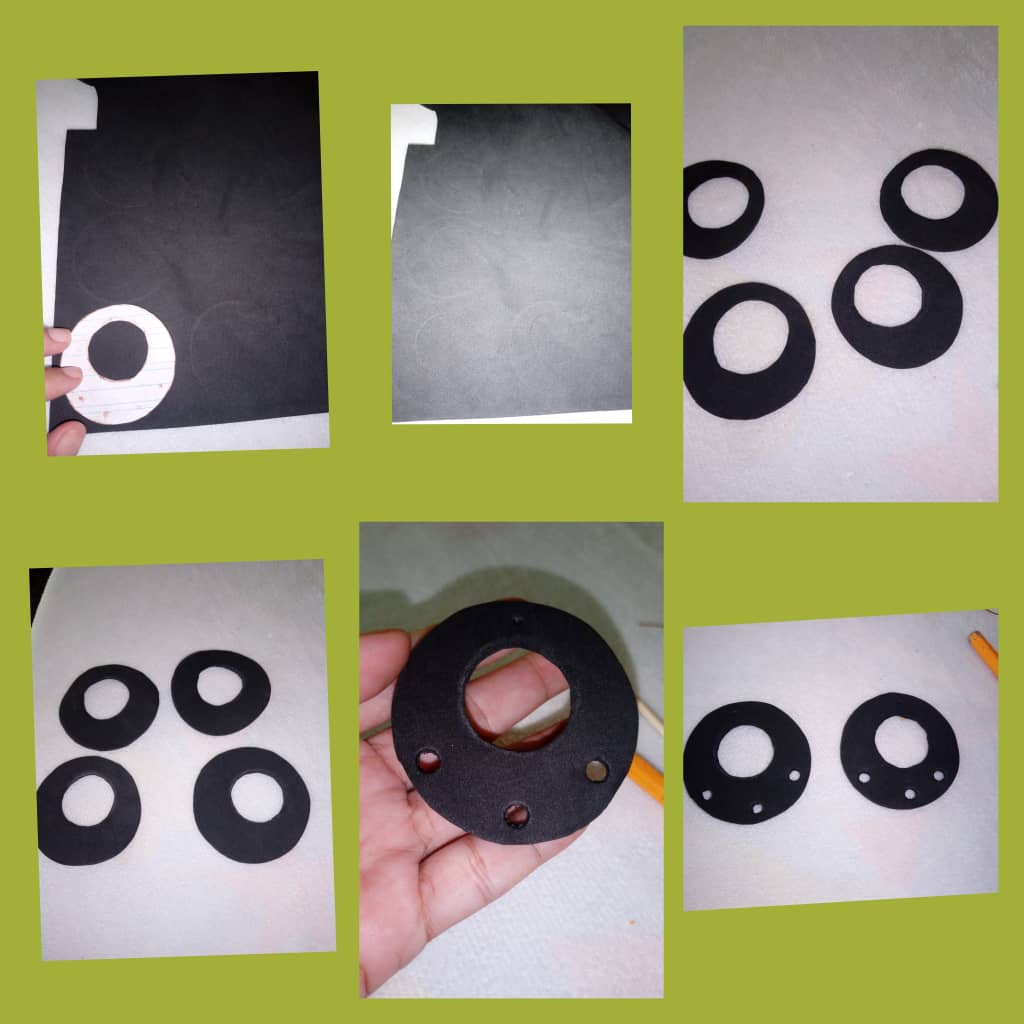
2do paso: Una vez listo el patrón vamos a marcar en el foami y recortar, necesitaremos 4 piezas como se puede observar, seguidamente procedemos a pegar en parejas con el silicón y con ayuda de una regla o un objeto marcar en ambos extremos y el centro de la parte inferior y perforar como lo pueden apreciar.
2nd step: Once the pattern is ready we are going to mark on the foami and cut out, we will need 4 pieces as you can see, then we proceed to glue in pairs with the silicone and with the help of a ruler or an object mark on both ends and the center from the bottom and drill as you can see.
3er paso: Luego mis hivers amigos continuamos con la ayuda de un lápiz enrollando un pedazo de alambre de cobre de 25 cm aproximadamente para hacer pequeñas argollitas y cortar. Seguidamente procedemos a tomar en hilo de color rosa y con ayuda de un objeto de 4cm de alto dar vuelta varias veces para hacer los flequillos que serán colgados en la parte superior de las argollas como se aprecia, unimos a las argollitas y anexamos.
3rd step: Then my hivers friends continue with the help of a pencil winding a piece of copper wire of approximately 25 cm to make small rings and cut. Then we proceed to take the pink thread and with the help of a 4cm high object turn several times to make the fringes that will be hung on the top of the rings as shown, we join the rings and annex.
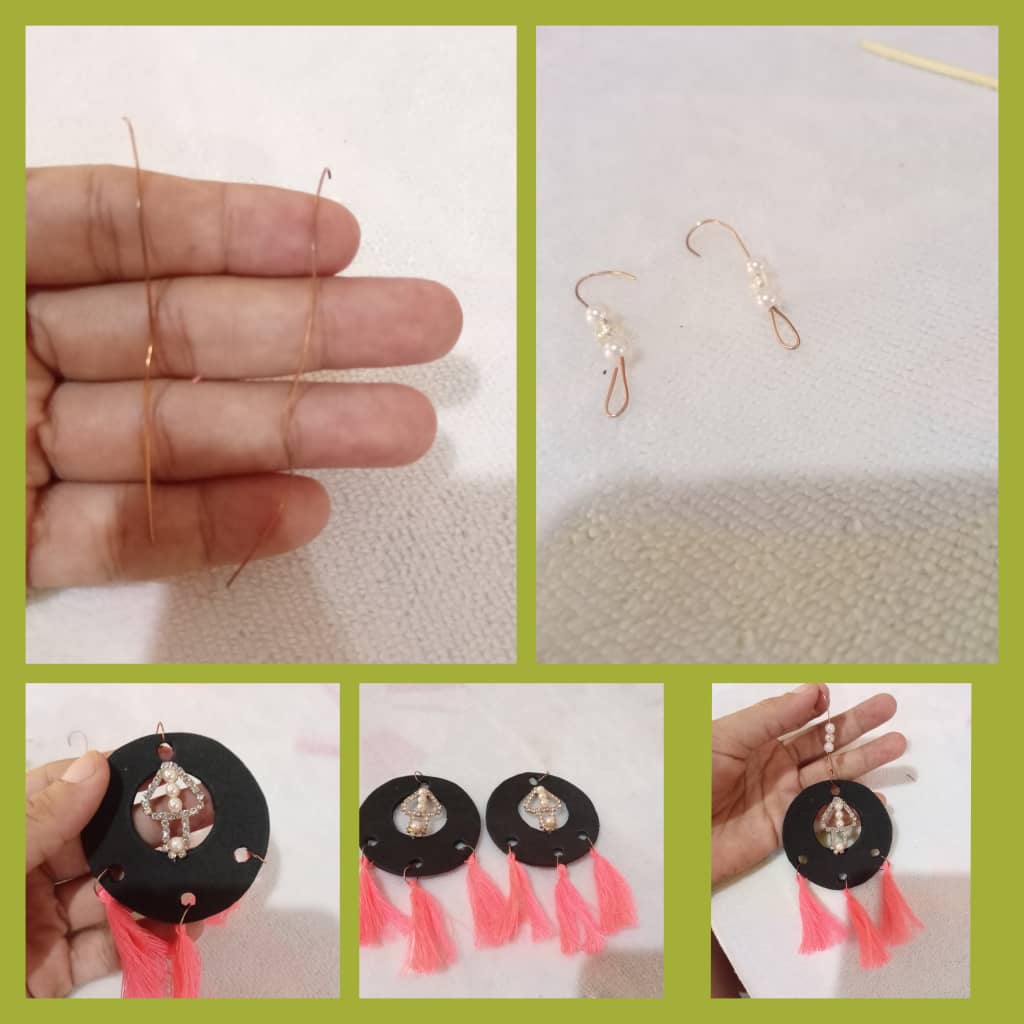
4to paso: Para finalizar procedemos a pegar los apliques en el centro de nuestra argolla, luegos vamos a necesitar dos pedazos de alambre de cobre de 3cm cada uno para doblaremos en la parte baja e introducir las mostacillas 3 en ambos lados para darle un lindo toque al acabado los sujetadores de nuestras argollas y listo mis amigos.
4th step: To finish we proceed to glue the appliqués in the center of our ring, then we will need two pieces of copper wire of 3cm each to bend at the bottom and insert the 3 beads on both sides to give it a nice touch. to finish the fasteners of our rings and ready my friends.
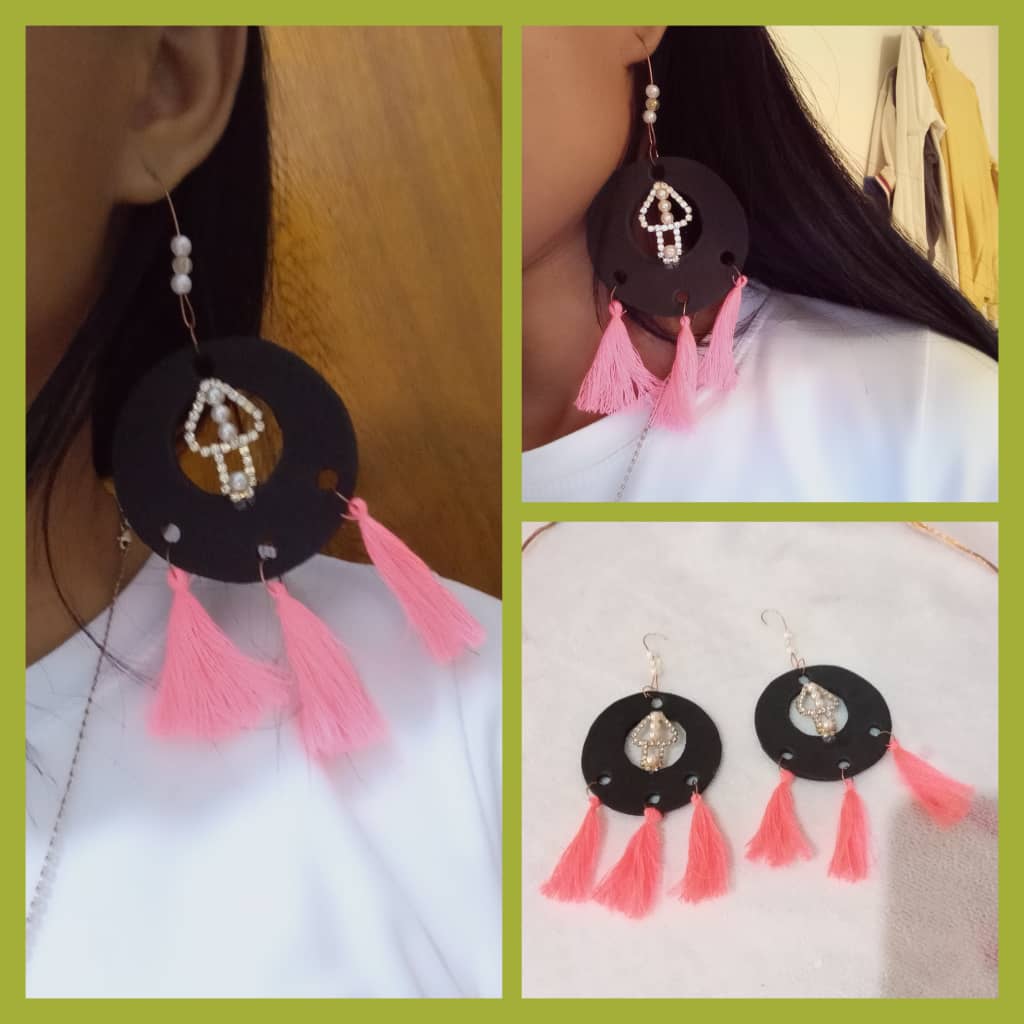
Como se pudieron dar cuenta no son complicados al momento de elaborar, asi que animate si te gusto mi trabajo del día de hoy, puedes realizar al tamaño de tu preferencia, use la base de color negro porque asi lo puedes combinar con los flequillos que más te guste al momento de llevar algún Outfis, lo sustituye por otro color y listo, es un gusto una vez más compartir mi tutorial con ustedes, Saludos y les deseo muchas Bendiciones hoy y siempre!! Saludos mis creativos!
As you could see, they are not complicated at the time of elaboration, so cheer up if you liked my work today, you can make it to the size of your preference, use the black base because that way you can combine it with the fringes that you prefer. you like it when you wear an Outfis, replace it with another color and that's it, it's a pleasure once again to share my tutorial with you, Greetings and I wish you many Blessings today and always!! Greetings my creatives!
Muchas gracias por visitar mi Blog
Thank you very much for visiting my Blog.

Que lindos te que quedaron @delvallecedeno
Muchas gracias @aksurevm89, Saludos 🤗💖
Te quedaron.muy lindos los zarcillos en foami amiga @delvallecedeno las borlas le dan un toque especial, gran trabajo.con el paso a paso.
Me alegra que le haya gustado @hive-189594, muchas gracias por la visita. Saludos 🤗💖💖