DIY: Flowered fence to hang on the wall. // Valla floreada para colgar en la pared. [ENG+ESP]
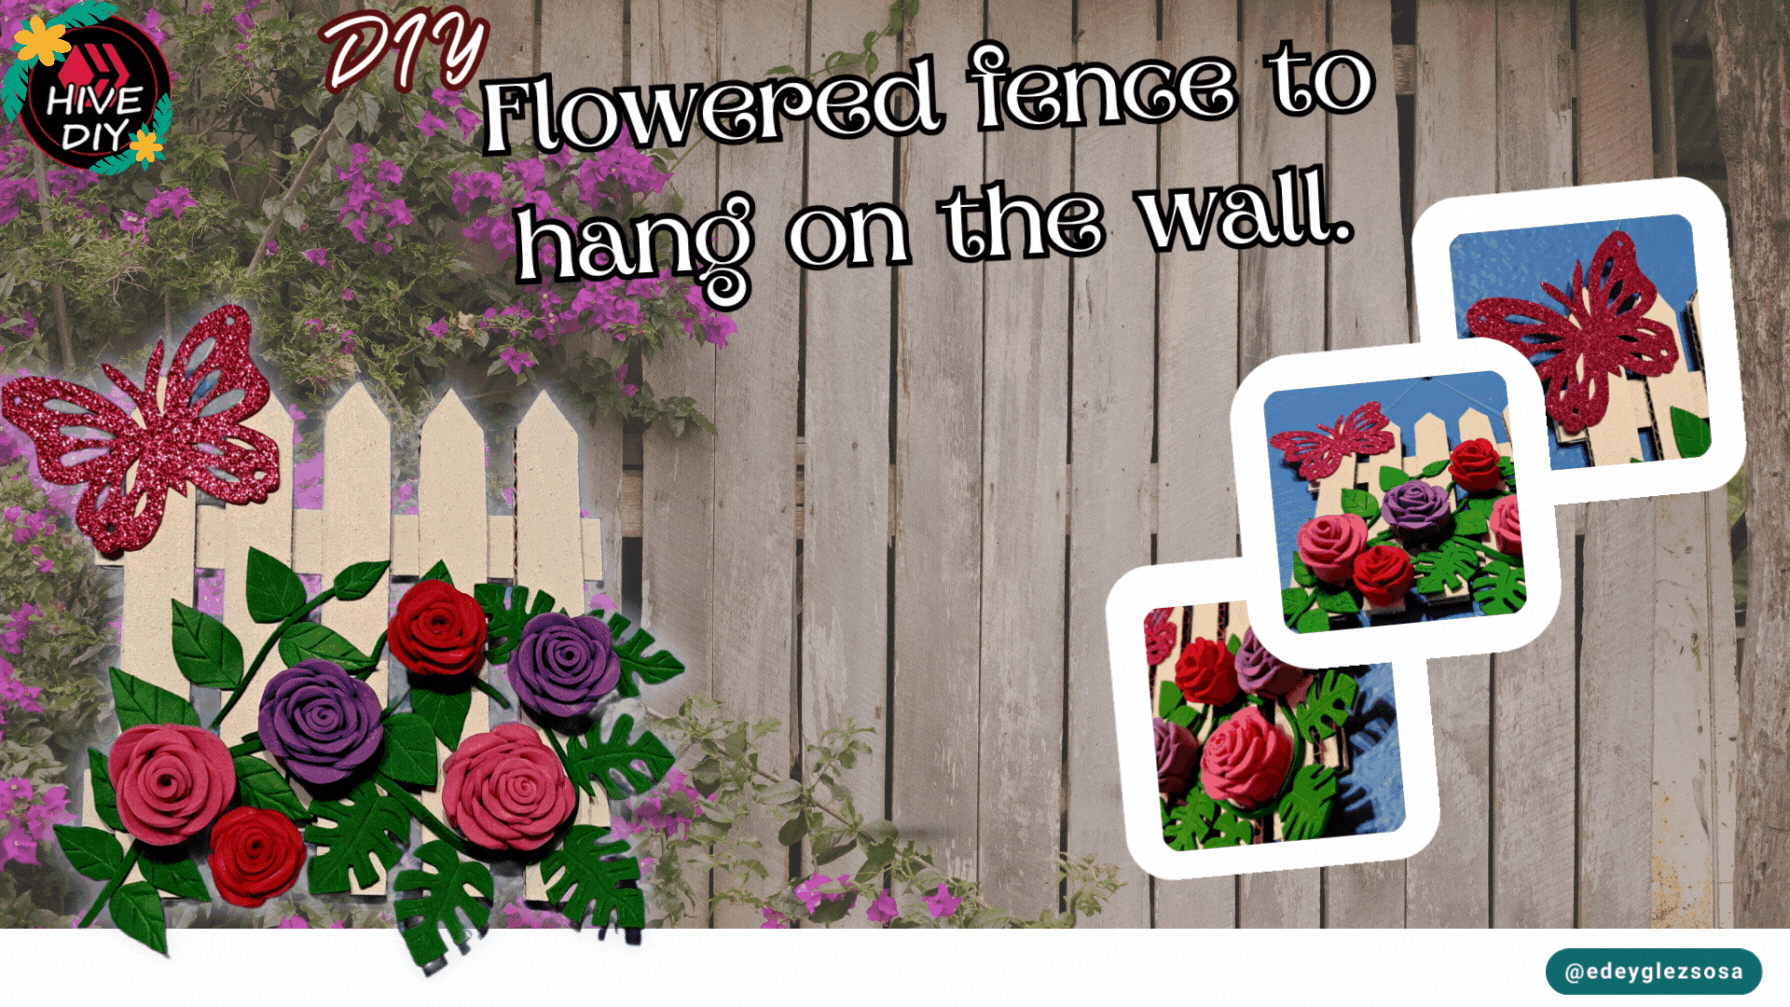
Greetings fellow creators. Today I bring you a very easy to make ornament that incorporates common materials such as fomi and also adds an eco-friendly touch when it comes to recycling cardboard. The ornament in question is a white floral fence, which can be placed on a metal surface if you add a magnet or, on the other hand, can be hung on a wall as in the case of this one.
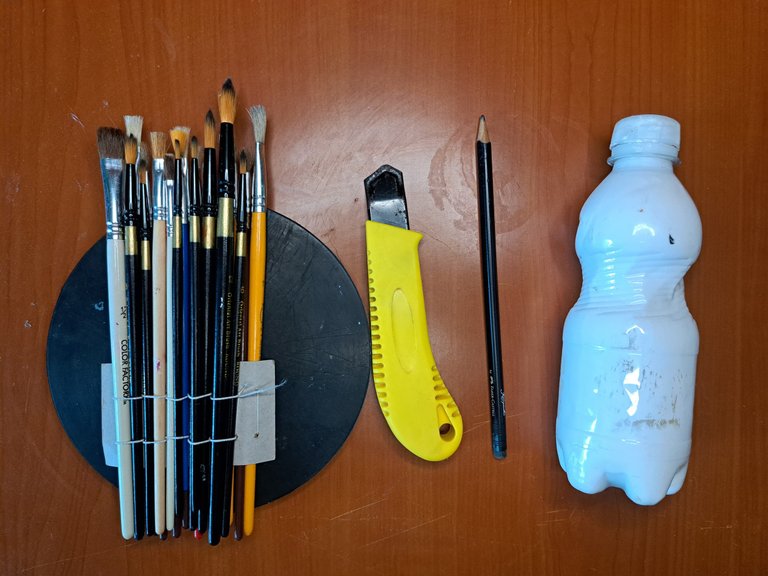
Now let's get to know the materials and tools to start the tutorial.
! [Spanish Version Here]
Saludos amigos creadores. El día de hoy les traigo un adorno muy fácil de hacer que incorpora materiales comunes como el fomi y también añade un toque ecológico a la hora de reciclar el cartón. El adorno en cuestión es una valla blanca floreada, la cual puede ser colocada en una superficie metálica si se le añade un imán o, por otro lado, puede ser colgada en una pared como es el caso de esta.Ya entrados en materia pasemos a conocer los materiales y herramientas para dar inicio al tutorial.
 |
 |
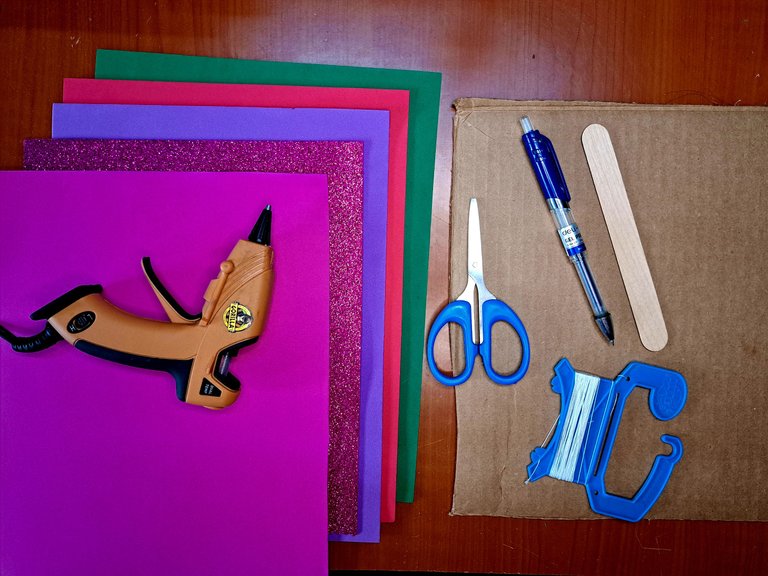
Materials // Materiales
| ✔️ Green, red, lilac and pink plain fomi | ✔️ Fomi liso de color verde, rojo, lila y rosado |
| ✔️ Frosted fuchsia fomi | ✔️ Fomi escarchado fucsia |
| ✔️ Silicone gun | ✔️ Pistola de silicona |
| ✔️ Cardboard | ✔️ Cartón |
| ✔️ Pencil and fine tip marker | ✔️ Lapiz y marcador de punta fina |
| ✔️ Tongue depressor | ✔️ Supresor lingual (sacalenguas) |
| ✔️ Skein of fine twine | ✔️ Madeja de cordel fino |
| ✔️ Scissors and straight blade | ✔️ Tijeras y cuchilla recta |
| ✔️ Paintbrushes | ✔️ Pinceles |
| ✔️ White paint | ✔️ Pintura blanca |
 |
 |
Step by step // Paso a paso
1️⃣ To start we use the tongue depressor and a blade to mark and cut out 7 pieces of cardboard of equal length and width. You can use a pencil or simply cut the cardboard using the suppressor as a ruler.
! [Spanish Version Here]
1️⃣ Para empezar utilizamos el supresor lingual y una cuchilla para marcar y recortar 7 piezas de cartón de igual largo y ancho. Se puede utilizar un lápiz o simplemente ir cortando el cartón utilizando como regla el supresor.
 |
 |
 |
 |
|
2️⃣ Of the 7 pieces of cardboard, 5 will have their tips cut off, as these will be the top of the fence. Once all the cardboard pieces are cut, paint them white on both sides.
! [Spanish Version Here]
2️⃣ De las 7 piezas de cartón a 5 se les recortará la punta, ya que estas serán la parte superior de la valla. Una vez que estén cortadas todas las piezas de cartón procedemos a pintarlas de blanco por ambos lados.
 |
 |
 |
 |
 |
 |
 |
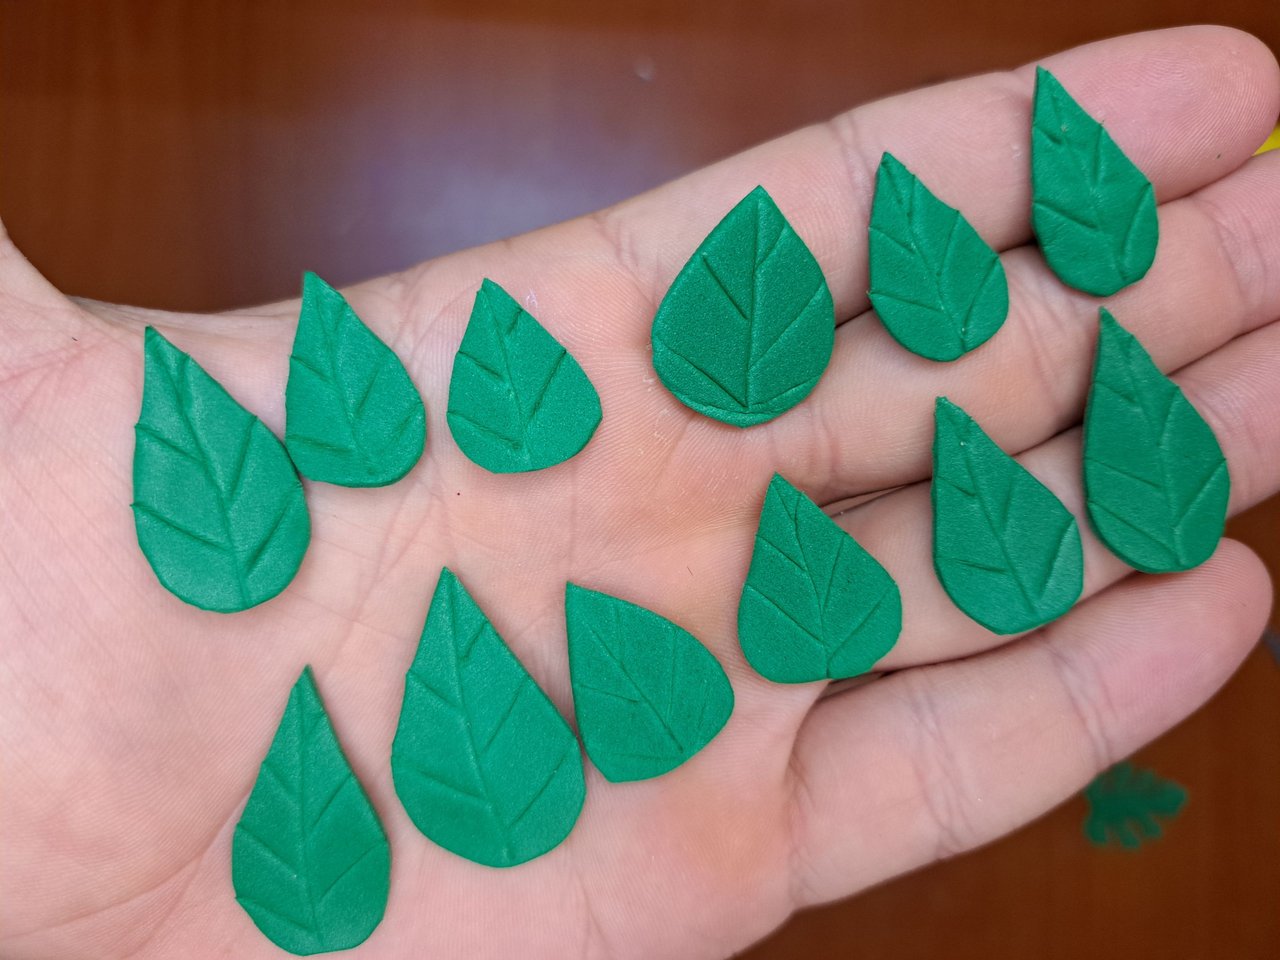
3️⃣ While the paint dries, we will move on to work on the fomi pieces. First, we will mark and cut the leaves on a green fomi sheet. This ornament consists of two types of leaves, the first is the type of rose leaf that we commonly see in crafts, but the second is a type of vine leaf that in my country is known as "malagueta". Additionally, we will also cut thin strips of green fomi that will be the vines where the leaves will be attached.
! [Spanish Version Here]
3️⃣ Mientras la pintura seca, pasaremos a trabajar las piezas de fomi. Primeramente, marcaremos y cortaremos las hojas en una hoja de fomi verde. Este adorno consta de dos tipos de hojas, la primera es el tipo de hoja de rosa que vemos comúnmente en las manualidades, pero la segunda es un tipo de hoja de enredadera que en mi país se conoce como “malagueta”. Adicionalmente, también cortaremos finas tiras de fomi verde que serán las enredaderas donde irán sujetas las hojas.
 |
 |
 |
 |
 |
 |
4️⃣ After the leaves we move on to the flowers. On this occasion, the flowers will be made without the need to apply thermoforming techniques. The way to make these flowers is very simple. First, we cut out several small circles of some color (red, lilac and pink). Then we glue each of the circles side by side, but only overlapping the edge. Next, we wrap the entire strip of circles to form the flower.
I know I said not to use thermoforming, but to make them look better, you can choose to heat and fold the edges of the petals using the silicone gun.
! [Spanish Version Here]
4️⃣ Luego de las hojas pasamos a las flores. En esta ocasión, las flores las haremos sin necesidad de aplicar técnicas de termoformado. La forma de hacer estas flores es muy sencilla. Primeramente, recortamos varios círculos pequeños de algún color (rojo, lila y rosado). Luego pegamos cada uno de los círculos uno al lado del otro, pero solo superponiendo el borde. A continuación, envolvemos toda la tira de círculos hasta formar la flor.Sé que dije que no había que usar termoformado, pero para que queden mejor, pueden optar por calentar y doblar los bordes de los pétalos utilizando la pistola de silicona.
 |
 |
 |
 |
 |
 |
 |
5️⃣ And as the last part of the ornament we will make a butterfly. For the butterfly you can use a free design, it can be any size or shape you want. I only know how to draw this design well, so this is the one I always use 😅. We draw the design on a sheet of paper and cut it out and then use it as a template to mark and cut out the butterfly in frosted fomi.
! [Spanish Version Here]
5️⃣ Y como última parte del adorno haremos una mariposa. Para la mariposa se puede utilizar u diseño libre, puede ser del tamaño o forma deseado. Yo solo sé dibujar bien este diseño, así que es el que siempre uso 😅. Dibujamos el diseño en una hoja de papel y la recortamos para luego usarlo como plantilla para marcar y recortar la mariposa en fomi escarchado.
 |
 |
 |
 |
6️⃣ With all the parts ready, we start assembling the ornament. We start with the cardboard pieces that make up the fence. We place the two rectangular pieces horizontally and then we will glue the other pieces perpendicularly to them. Taking advantage of the fact that the structure of the fence is ready, we will add the vines and then the leaves.
! [Spanish Version Here]
6️⃣ Con todas las partes listas, damos inicio al armado del adorno. Comenzamos con las piezas de cartón que conforman la valla. Colocamos las dos piezas rectangulares horizontalmente y luego iremos pegando las demás piezas perpendicularmente a estas. Aprovechando que ya la estructura de la valla esté lista, le añadiremos las enredaderas y posteriormente las hojas.
 |
 |
 |
 |
 |
7️⃣ Next we will add the flowers one by one until we have covered most of the blank spaces left by the leaves. And finally on the back we will add a thin string to hang the ornament.
! [Spanish Version Here]
7️⃣ A continuación iremos añadiendo las flores una por una hasta tener cubiertos la mayoría de los espacios en blanco que dejaron las hojas. Y para finalizar en la parte trasera añadiremos un cordel fino para poder colgar el adorno.
 |
 |
 |
 |
 |
 |
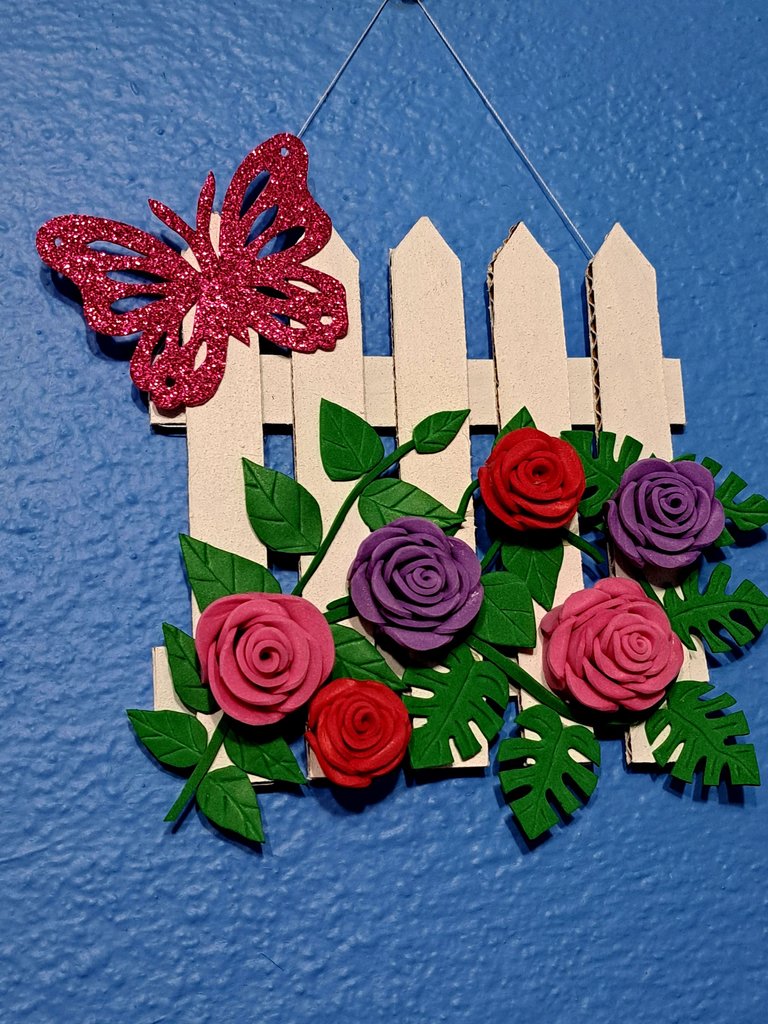
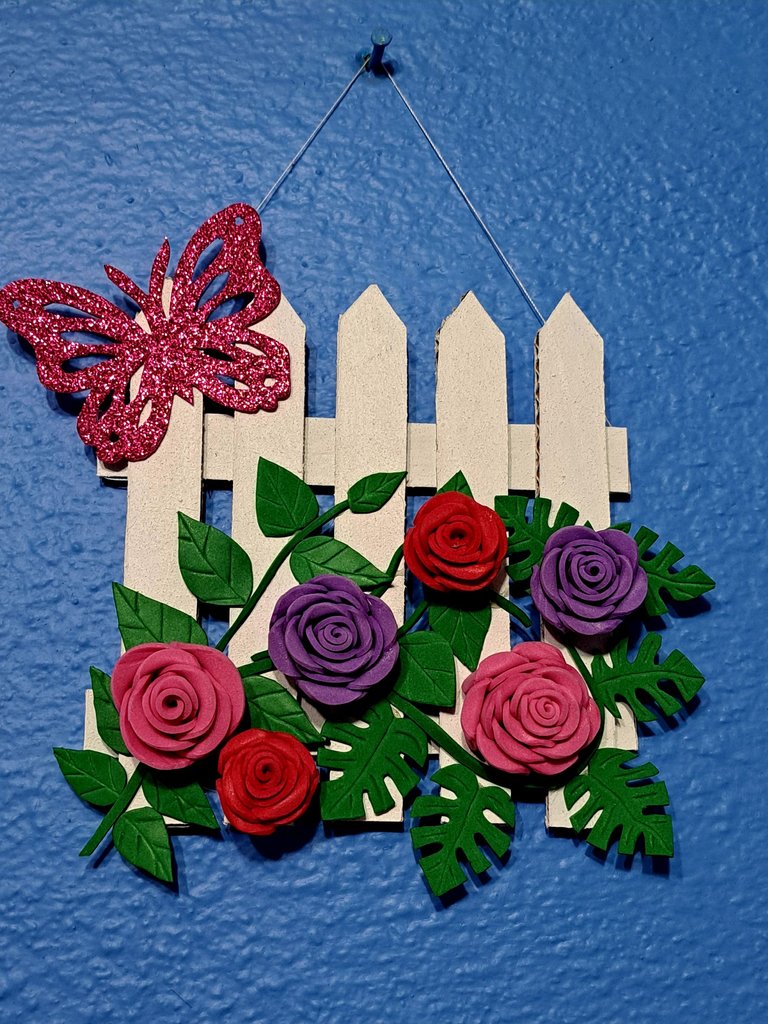
And that's all, I hope you liked it and I hope you find the tutorial very useful in case you dare to make it yourselves. For my part I am very happy with the result and I hope to bring you soon new pieces of my creative world.
! [Spanish Version Here]
Y pues esto sería todos, espero que les haya gustado y les sea muy útil el tutorial en caso de que se animen a realizarla ustedes mismos. Por mi parte estoy muy contento con el resultado y espero próximamente traerles nuevos pedacitos de mi mundo creativo.
Final Result // Resultado Final
 |
 |
 |
 |

Thank you very much for reading my post. If you liked it, please leave a comment and consider following me so you don't miss my next posts. I'd love to know your opinion and your thoughts about the topic I discussed in this post, see you in the next one!
! [Spanish Version Here]
Muchas gracias por leer mi post. Si te gustó, por favor deja un comentario y considera seguirme para no perderte mis próximas publicaciones. Me encantaría saber tu opinión y tus ideas sobre el tema que traté en este post. ¡Nos vemos en el próximo!
Cover page created in Canva Pro
Translated by DeepL


Amazing art work. So creative. Its nice to see our hardwork getting displayed.
You're right, and the best part of hard work is when you get satisfying results.
Thank you for your words. I'm very happy to hear that you liked it
Hermoso! Luce muy lindo este adorno y te felicito por la forma tan impecable en la que trabajas el foami.
Muchísimas gracias 🤗 por tus palabras. Saludos y bendiciones.
When you presented the instructions look easy but I know that’s required effort eehehe
Thanks for the compliments. It is because they require effort that I try to make the tutorials easy. And I hope I am succeeding.
Te quedó precioso. Súper creativo
Gracias Yanet 🤗
It looks very beautiful and they are very beautifully designed.💞 By seeing this, your hard work can be estimated💫✨
!LUV
edeyglezsosa, sahi1 sent you LUV. 🙂 (1/1) tools | trade | connect | wiki | daily
Made with LUV by crrdlx.
Wow, looks so cute!
Thank you very much
Otra hermosa y elegante creacion ❤️ felicidades por otro bonito trabajo colorido con unas preciosas flores 😊
Muchísimas gracias por tus hermosas palabras. Eres de esas personas que me da mucho animo para seguir creando.
Que precioso, me encantó, yo lo quería 😍🥰
Jaja, tú sabes que si así lo deseas te hago uno exactamente igual.
wow that looks so great thanks a lot for sharing. you are amazing
Thanks to all of you for all the support you provide.
Muy bonito la verdad, me gusto el diseño de la mariposa, la combinación de colores, muy creativo, te felicito, saludos.
Muchísimas gracias 🫂
Wow this is super beautiful, I love it
Thank you I appreciate it very much