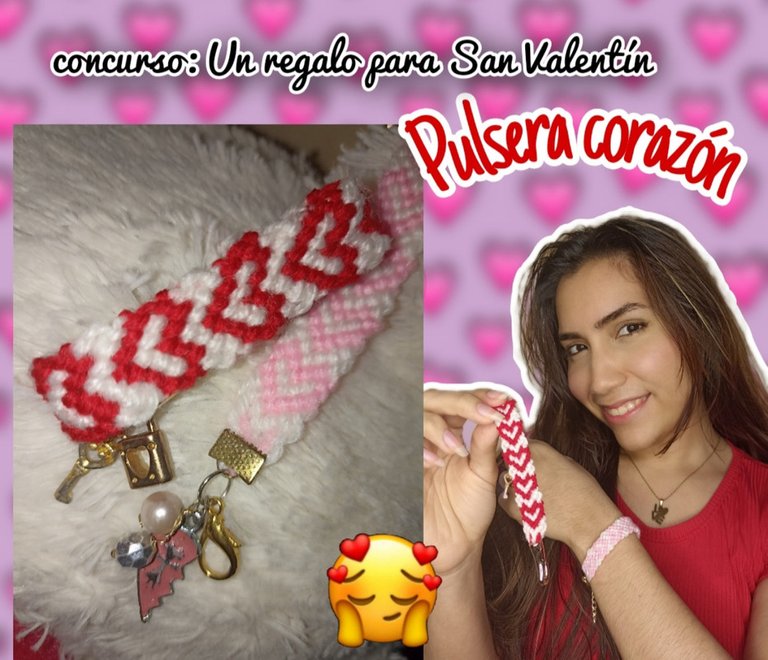
Contest: A gift for Valentine's Day - Pulsera nudo corazón técnica micromacrame ✨|| Bracelet heart knot technique micro macrame ✨ [ESP/ENG]


Hola amigos de Hive y amantes de la joyas 💎❤️, hoy me uno al concurso pospuesto por la comunidad de #jewelry inspirado en el mes del amor y la amistad gracias a la invitación de nuestro talentoso amigo @alexanderflx para compartir un regalo de nuestra parte dedicado a un ser especial y por el cual sentimos mucho sentimiento bien sea de amor o amistad. En mi caso, el proyecto que les compartiré es un regalo hacia una amiga para conmemorar todos los años que llevamos de conocernos, un lindo detalle que me gustaría tener con ella en forma de accesorio que simbolizara nuestros mejores momentos, anécdotas y vivencias conservando a día de hoy una bonita amistad. Lo más gracioso y curioso es que hace días atrás tuve una pequeña conversación con ella en dónde le preguntaba (con intención), que le gustaría como regalo, le enseñe mis modelos y éste en concreto le encantó, un hermoso diseño de corazones en color rojo y blanco tejidos con la técnica de micro macramé, una pieza con nudos un tanto complejos y un poco complicados pero que creo que valen la pena y el desafío de hacerlo cuando el interés de alegrar a mi amiga está de por medio. Adicional a esto les quise compartir un tutorial en un detallado paso a paso para realizar esta técnica y se atrevan hacerlo porque de verdad que queda muy lindo y como regalo vendría súper bien. Si te gusta, te animo a que me acompañes y aprendas junto a mi a realizarlo, y ahora sí, sin más que agregar... Comencémos!!


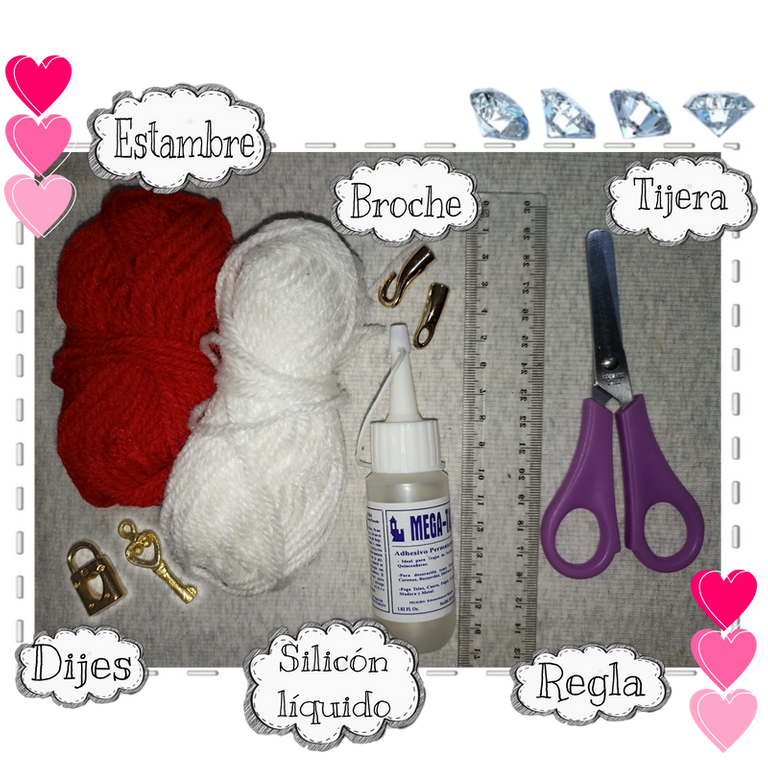
- 2 hebras de hilo de lana o estambre de 1,90cm (color blanco)
- 2 hebras de hilo de lana o estambre de 1,90cm (color rojo)
- 2 Dijes (de amor y amistad)
- Tijera
- Regla
- 2 Argollas
- 2 Broches
- Silicón liquido

Primero vamos a tomar nuestras cuatro hebras y las doblamos a la mitad para tener un total de ocho hilos, cuando tengamos todas las hebras dejaremos un espacio de seis a ocho centímetros y hacemos un nudo simple, lo llevamos todo a la tabla y tratamos de acomodar con la pinza una secuencia de colores que será " blanco, rojo, blanco, rojo - rojo, blanco, rojo, blanco", y así hacernos más cómodo a la hora de tejer.

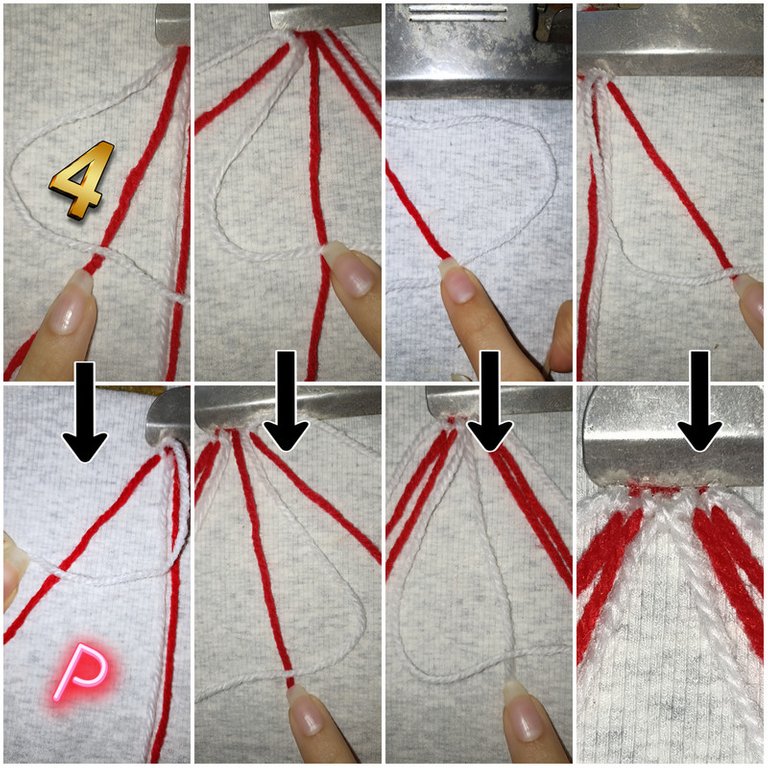
Una vez ubicados los hilos, comenzamos a tejer la primera línea, de izquierda a derecha, hacemos con la primera hebra del extremo una forma de (4) y luego una (P) sobre el segundo hilo, luego con la tercera hebra haremos dos (4) sobre la siguiente hebra roja. Repetimos lo mismo del otro lado, pero ahora de derecha a izquierda, haciendo una (P) luego un (4), y luego dos (P). Hecho esto nos quedarían los dos hilos blancos en el centro, aquí haremos simplemente un nudo sencillo a la derecha, es decir, dos (4).
Para la siguiente línea vamos a dejar libre el primer hilo blanco y tejemos con el siguiente que será de color rojo, con este haremos nudos sencillos, dos (4), con el resto de hebras hasta llegar al centro. Repetimos lo mismo del otro lado, solo que en lugar de hacer dos (4) vamos hacer dos (P), y ya ubicados en el centro cerramos esta línea con nudos simples de dos (4).

Para terminar la parte de arriba del corazón, vamos hacer con la misma hebra roja anterior, de izquierda a derecha, un nudo sencillo de dos (P), igualmente del otro lado, pero cambiando la dirección por dos (4). Ahora lo siguiente será hacer el relleno del corazón, para ello vamos a tejer con el hilo blanco nudos sencillos de dos (4) para el resto de hebras hasta llegar al centro, lo del otro lado, haciendo dos (P), y ya nos quedaría para cerrar dos nudos sencillos de dos (4).
Para realizar las dos líneas diagonales de nuestro corazón, simplemente vamos a tejer con la hebra roja que nos quedó libre en el extremo, nudos sencillos de dos (4) sobre el resto de hebras hasta llegar al centro, lo mismo haremos del otro lado, cambiando ahora la dirección haciendo nudos sencillos de dos (P) hasta llegar al centro y tener las dos hebras juntas del mismo color, y ya ubicadas allí realizamos nuevamente un nudo sencillo de dos (4) para cerrar la línea y el corazón.

Para tejer la separación entre cada corazón, vamos hacer primero con el hilo blanco, una pequeña "V", para ello haremos de derecha a izquierda un nudo en reversa que sería un (4) y luego una (P), después con el tercer hilo blanco vamos a tejer otro nudo en reversa sobre el hilo rojo anterior que sería primero una (P) y luego un (4). Siguiendo con el mismo hilo, solo nos quedaría hacer un nudo sencillo de dos (4) con el siguiente hilo rojo para que nos quede en el medio. Repetimos lo mismo del otro lado, solo que para el primer nudo haremos lo contrario, primero una (P) y luego un (4), después un (4) y luego una (P), y así terminaríamos en el centro con un nudo sencillo de dos (4) para cerrar esta línea.
Para la siguiente y última línea del patrón corazón, vamos a tomar la hebra del extremo de color blanco y haremos un solo nudo en reversa, es decir, un (4) y luego una (P), y hacemos lo mismo del otro extremo cambiando la dirección de los hilos, primero una (P) y luego un (4). A partir de aquí se repite el patrón desde el tercer paso para continuar la secuencia de corazones hasta obtener el largo deseado.
Cuando tengamos el tejido listo, cortamos el sobrante de hilo y aplicamos silicón en los broches para pegarlos dentro, aquí nos podemos ayudar con un palillo para introducir las hebras. Ya una vez haya secado, pasarla ahora agrrgarle detalles, cómo esta pulsera será un regalo personalizado para mi amiga, le agregué algunos dijes que simbolicen nuestra relación y que tambien vayan en combinación con el resto de la pulsera con lindos y llamativos tonos dorados, para ello lo sujeto con un par de argollas y con ayuda de las pinzas las coloco en los broches.

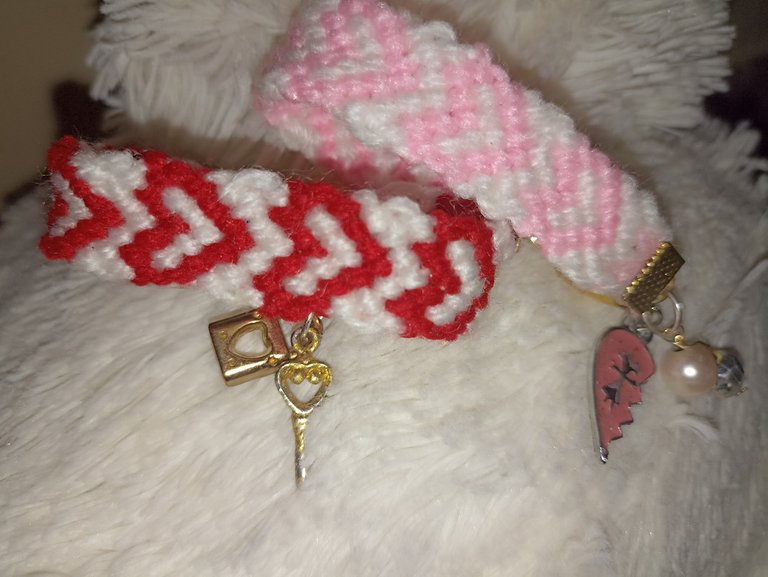
Y aquí les muestro la pulsera terminada!!. Cómo ven, aquí les muestro otra en otro color para compartirla con mi amiga, ella usará la de corazones rojos porque es su color favorito y yo usaré la rosada con un dije muy especial que ella me regaló hace muchos años cuando recién empezaba nuestra amistad 🥹🥰💕. Puedes seguir mi guía tutorial y practicar o puedes dejar volar tu imaginación y hacerlo combinando los colores, piedras y cristales que quieras... La creatividad es tuya y por supuesto un toque secreto de amor para que el trabajo quede con el mejor acabado 🥰 que mejor para hacerlo en este mes del amor y la amistad.!! si te gusto te animo a que lo intentes, me gustaría invitar al concurso a @angelys, @andryscarias01 y @eveyese1312 😁...espero compartirles muy pronto nuevos trabajos, con mucho cariño me despido y será hasta la próxima !!💕


Hello friends of Hive and jewelry lovers 💎❤️, today I join the contest postponed by the #jewelry community inspired by the month of love and friendship thanks to the invitation of our talented friend @alexanderflx to share a gift from us dedicated to a special person and for whom we feel a lot of feeling either love or friendship. In my case, the project that I will share with you is a gift to a friend to commemorate all the years that we have known each other, a nice detail that I would like to have with her in the form of an accessory that symbolizes our best moments, anecdotes and experiences preserving today a beautiful friendship. The funny and curious thing is that a few days ago I had a little conversation with her where I asked her (with intention), what she would like as a gift, I showed her my models and she loved this one in particular, a beautiful design of hearts in red and white woven with the technique of micro macramé, a piece with knots somewhat complex and a little complicated but I think they are worth the challenge of doing it when the interest of making my friend happy is in the middle. In addition to this I wanted to share a tutorial in a detailed step by step to perform this technique and dare to do it because it really looks very nice and as a gift would come in handy. If you like it, I encourage you to join me and learn with me how to do it, and now, without further ado.... Let's get started!

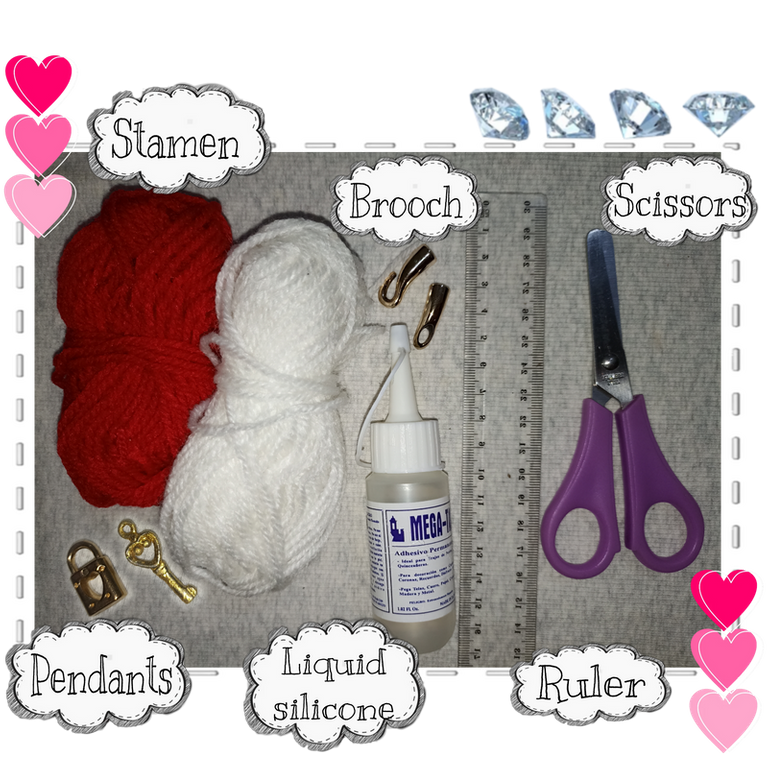
- 2 strands of wool or worsted yarn of 1,90cm (white color)
- 2 strands of wool or worsted yarn of 1,90cm (red color)
- 2 charms (love and friendship)
- Scissors
- Ruler
- 2 rings
- 2 brooches
- Liquid Silicone

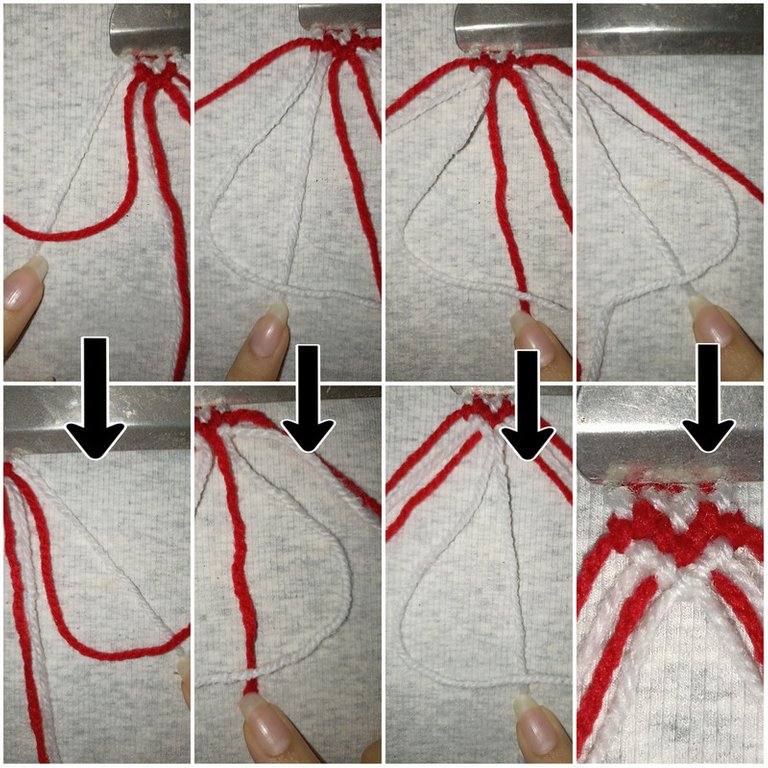
First we will take our four strands and fold them in half to have a total of eight threads, when we have all the strands we will leave a space of six to eight centimeters and make a simple knot, we take it all to the table and try to accommodate with the clamp a sequence of colors that will be "white, red, white, red - red, white, red, white", and thus make us more comfortable at the time of weaving.
Once the yarns are placed, we start weaving the first row, from left to right, we make with the first strand of the end a (4) and then a (P) over the second strand, then with the third strand we make two (4) over the next red strand. We repeat the same on the other side, but now from right to left, making a (P) then a (4), and then two (P). Once this is done, we will have the two white strands in the center, here we will simply tie a single knot on the right, that is, two (4).
For the next row we are going to leave the first white thread free and we weave with the next one which will be red, with this one we will make simple knots, two (4), with the rest of the strands until we reach the center. We repeat the same on the other side, only instead of making two (4) we will make two (P), and already located in the center we close this line with simple knots of two (4).
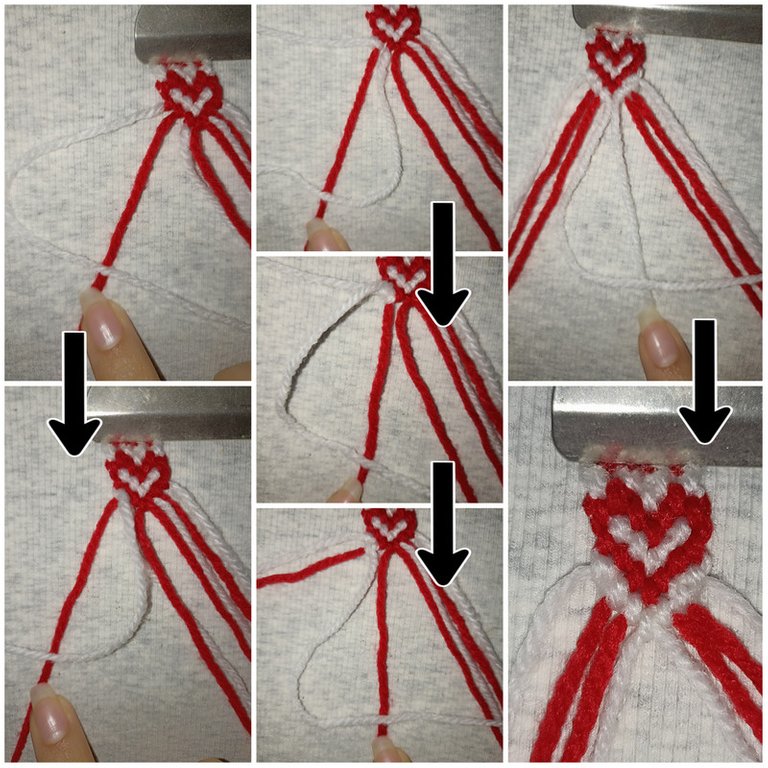
To finish the top of the heart, we are going to make with the same red yarn as before, from left to right, a single knot of two (P), also on the other side, but changing the direction to two (4). Now the next step is to make the filling of the heart, for this we are going to weave with the white thread simple knots of two (4) for the rest of the strands until we reach the center, on the other side, making two (P), and we would be left to close two simple knots of two (4).
To make the two diagonal lines of our heart, we are simply going to weave with the red strand that was left free at the end, simple knots of two (4) over the rest of the strands until we reach the center, we will do the same on the other side, changing the direction now making simple knots of two (P) until we reach the center and have the two strands together of the same color, and already located there we make again a simple knot of two (4) to close the line and the heart.
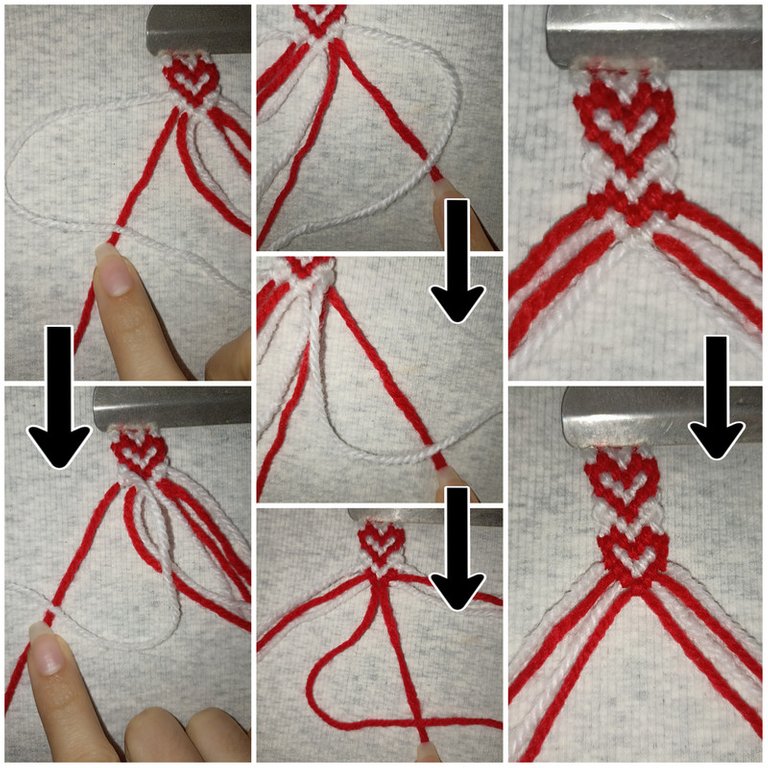
To weave the separation between each heart, we will first make with the white thread, a small "V", for this we will make from right to left a reverse knot that would be a (4) and then a (P), then with the third white thread we will weave another reverse knot over the previous red thread that would be first a (P) and then a (4). Continuing with the same yarn, we would only have to make a simple knot of two (4) with the next red yarn so that it will be in the middle. We repeat the same on the other side, only that for the first knot we will do the opposite, first a (P) and then a (4), then a (4) and then a (P), and so we would finish in the center with a single knot of two (4) to close this line.
For the next and last row of the heart pattern, we are going to take the white end strand and make a single reverse knot, that is, a (4) and then a (P), and we do the same on the other end changing the direction of the strands, first a (P) and then a (4). From here the pattern is repeated from the third step to continue the sequence of hearts until the desired length is obtained.
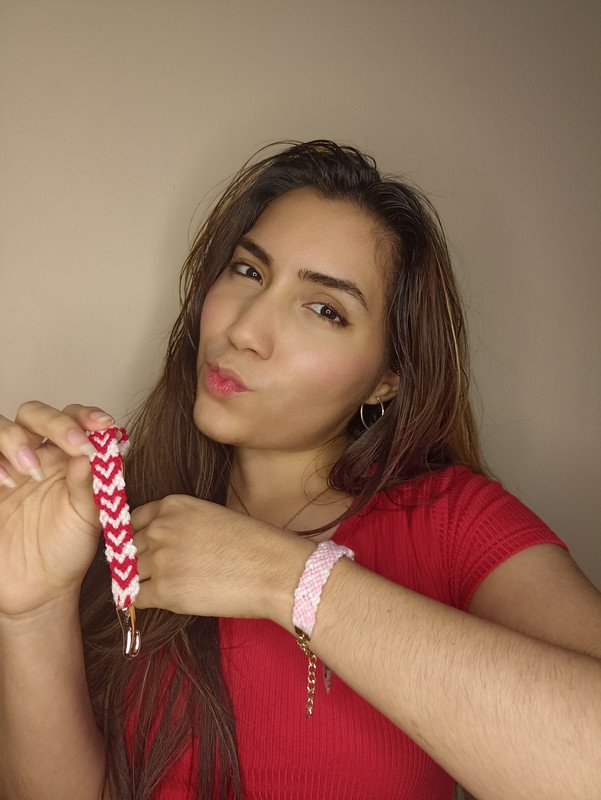
When we have the weave ready, we cut the excess thread and apply silicone on the clasps to glue them inside, here we can help us with a toothpick to introduce the strands. Once it has dried, now add details, as this bracelet will be a personalized gift for my friend, I added some charms that symbolize our relationship and also go in combination with the rest of the bracelet with beautiful and striking golden tones, for this I hold it with a pair of rings and with the help of the tweezers I place them on the clasps.
And here I show you the finished bracelet. As you can see, here I show you another one in another color to share it with my friend, she will use the one with red hearts because it's her favorite color and I will use the pink one with a very special charm that she gave me many years ago when our friendship was just starting 🥹🥰💕. You can follow my tutorial guide and practice or you can let your imagination run wild and make it combining any colors, stones and crystals you want..... The creativity is yours and of course a secret touch of love so that the work is with the best finish 🥰 what better to do it in this month of love and friendship.!!! if you like I encourage you to try it, I would like to invite to the contest @angelys, @andryscarias01 and @eveyese1312 😁...I hope to share very soon new works, with much love I say goodbye and will be until next time !!!💕
Todo el contenido es de mi autoría y las imágenes son de mi propiedad
Cámara: Redmi note 10s
Uso un aro de luz LED como base para mi teléfono y tomarme las fotos
All content is my own and images are my property
Camera: Redmi note 10s
I use an LED light ring as a base for my phone to take pictures of myself

Edición y Separador|Editing and Separator
App PicMonkey - App Picsart - App Canva
Traductor|Translator
DeepL


Excelente tejido amiga @edwarlyn11 quedan hermosas con la forma de corazones, excelente tutorial muy bien explicado, cualquiera lo podría realizar siguiendo estos pasos 👍
Muchas gracias por apreciar y valorar mi trabajo 🤗...me encantó ponerme a prueba con este tejido 😅 aunque valió la pena con el resultado que la verdad queda muy lindo, y no solo valdría para pulsera sino para cualquier accesorio que quieras como un choker o llavero..me alegra que les haya gustado y que cualquiera se anime hacerlo 🥰 un saludito equipo @hive-189504 !!💎
Que hermosura @. Ame el tejido y la pulsera. Éxitos cariño. 💕
!PIZZA
I gifted $PIZZA slices here:
@dayadam(1/5) tipped @edwarlyn11 (x1)
Please vote for pizza.witness!
Muchas gracias por su apoyo!! 🤗💕
https://twitter.com/1241409678543904770/status/1623897794779009025
https://twitter.com/1617177478350397443/status/1624017545085812736
https://twitter.com/3063466861/status/1624548117982101505
https://twitter.com/1491299868391919620/status/1625468568828628992
The rewards earned on this comment will go directly to the people( @gaboamc2393, @mariamglow, @virtualgrowth, @baned ) sharing the post on Twitter as long as they are registered with @poshtoken. Sign up at https://hiveposh.com.
Thank you for sharing this post on HIVE!
Your content got selected by our fellow curator ashikstd & you just received a little thank you upvote from us for your great work! Your post will be featured in one of our recurring compilations which are aiming to offer you a stage to widen your audience within the DIY scene of Hive. Stay creative & HIVE ON!
Please vote for our hive witness <3
Aaaww qué bonita quedó!! Gracias por mostrarnos el paso a paso. Te deseo éxitos en el concurso. Saludoss!!💕
Awww que linda 🤗🐱 muchas gracias por tus deseos y tu lindo comentario...me alegra mucho que te gustara, un placer para mí compartir y aprendan hacer cositas nuevas junto a mi☺️...un saludito para ti también amiga !!🤗💕
💗💗💗💗
Hola que linda pulsera te felicito💕🌹♥️❤️😉😍☺️👑👑👑👑
Hoola amigo🤗 Muchas gracias ..me alegra verte y que te haya gustado mi trabajo!! Un saludito y feliz día para ti 💕🤗🍓🌻🌸🐱💜🧡💖