DIY- 3 ideas de pulseras súper fáciles de hacer en tonos amarillos ✨ paso a paso || 3 super easy to make bracelet ideas in shades of yellow ✨ step by step [ESP/ENG]
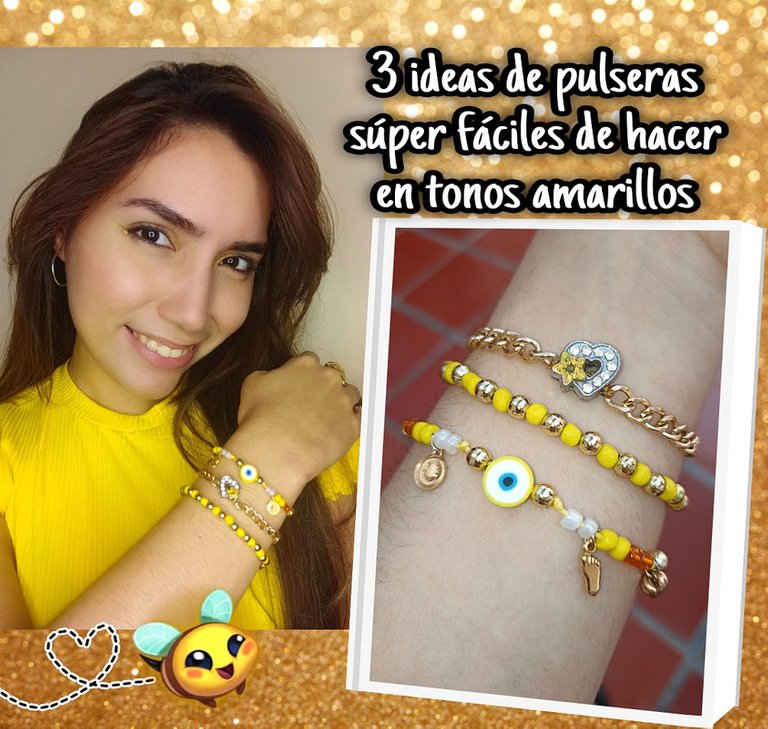


Hola amigos de Hive ❤️ hoy les quiero compartir un pequeño tutorial para realizar 3 pulseras súper fáciles en lindos tonos amarillos y dorados usando algunas cuentas, perlas y dijes brillantes a juego. Este tipo de pulseras me gusta mucho y también están muy de moda porque puedes jugar y crear tantos diseños como quieras según el color que prefieras. Si te gusta, te animo a que me acompañes, aprendas junto a mi a realizarlo y no te quedes sin la tuya, y ahora sí, sin más que agregar... Comencémos!!

Texto sin editar
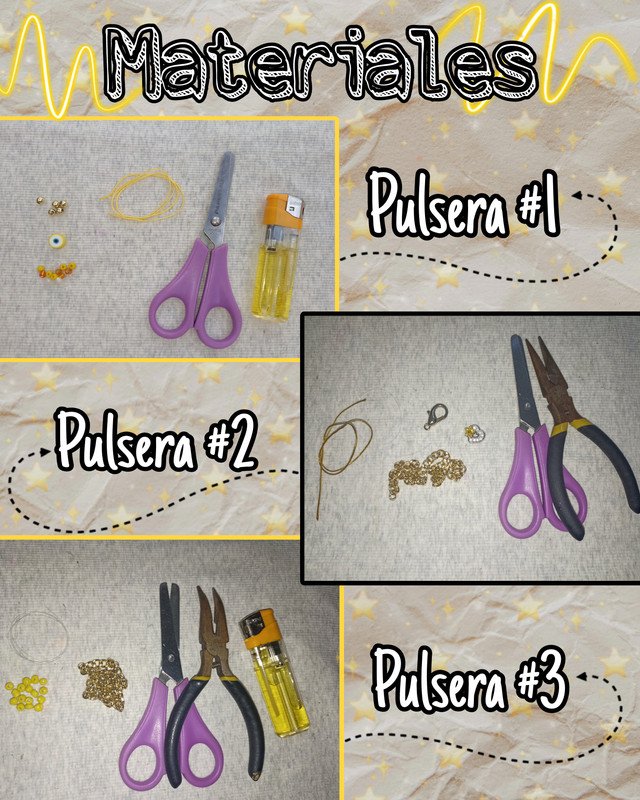
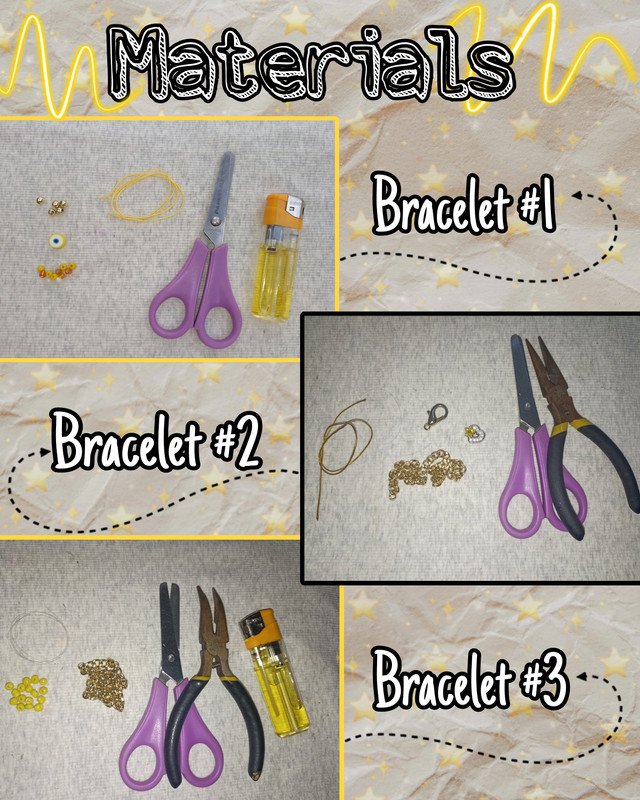
Materiales:
- Hilo Chino 60cm
- Hilo Nylon 1m
- Cadena
- Cuentas amarillas, naranjas, blancas
- Perlas doradas
- Dijes decorativos
- Tranca/aro
- Tijera
- Pinza
- Encendedor

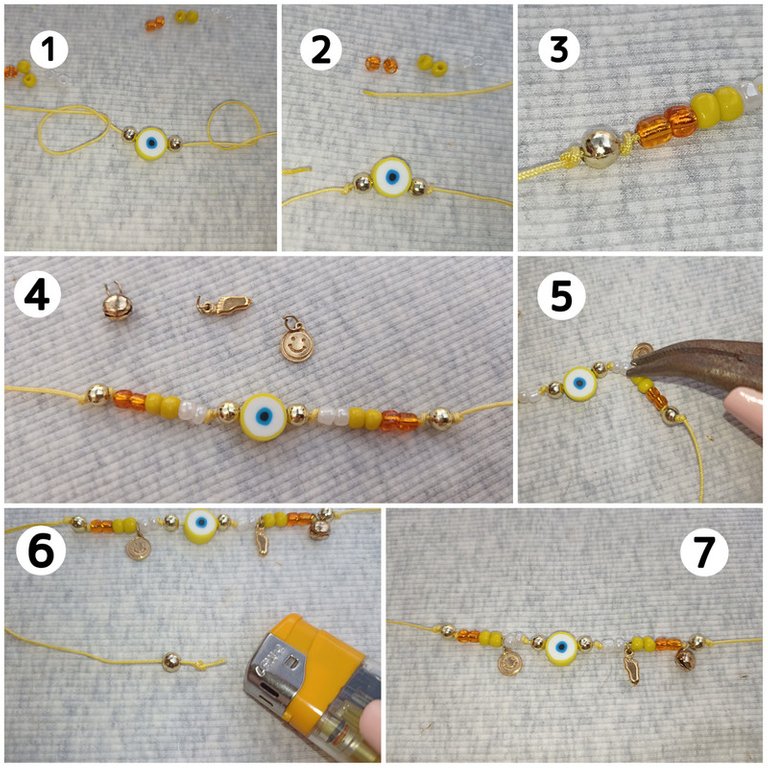
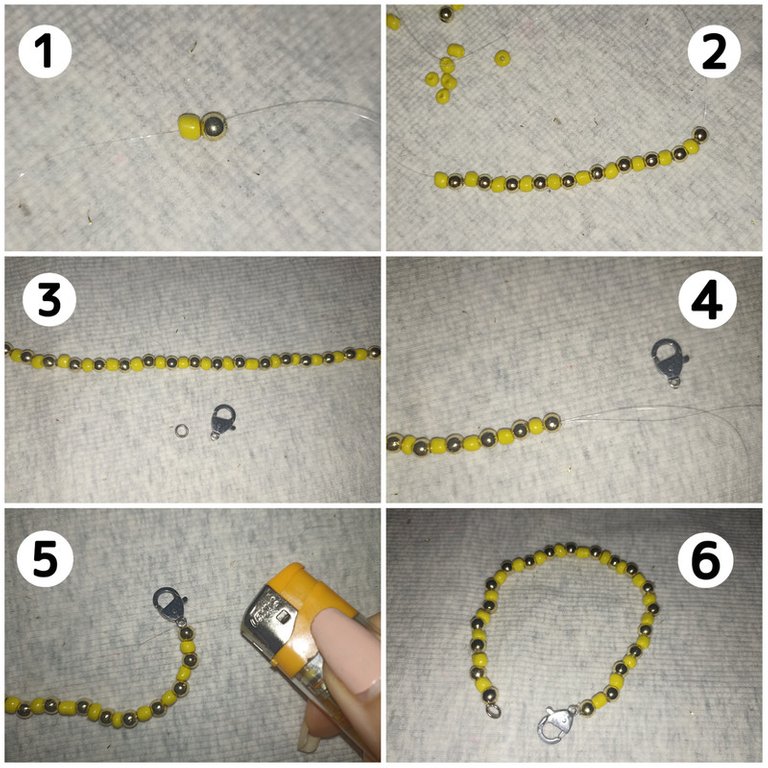
Para la primera pulsera voy a usar algunos dijes para crear una con un estilo de buena vibra y suerte, para ello voy a usar el hilo chino de 60 cm y colocaré un cuenta de ojo turco en el centro, luego dos perlas doradas a los lados y realizaré un nudo simple a cada lado nuevamente para asegurar. Seguidamente voy a insertar una sucesión de cuentas jugando con los colores para que combine, en este caso use dos blancas, dos amarillas y dos naranjas, nuevamente hago un nudo, inserto una perla y repito el mismo nudo. Hecho esto por ambos lados vamos a colocarle algunos dijes y lo aseguramos con unas pinzas, y para el hilo sobrante de la pulsera voy a colocar una perla y aseguro nuevamente con un nudo sinple, corto el sobrante y quemo la punta con un encendedor.
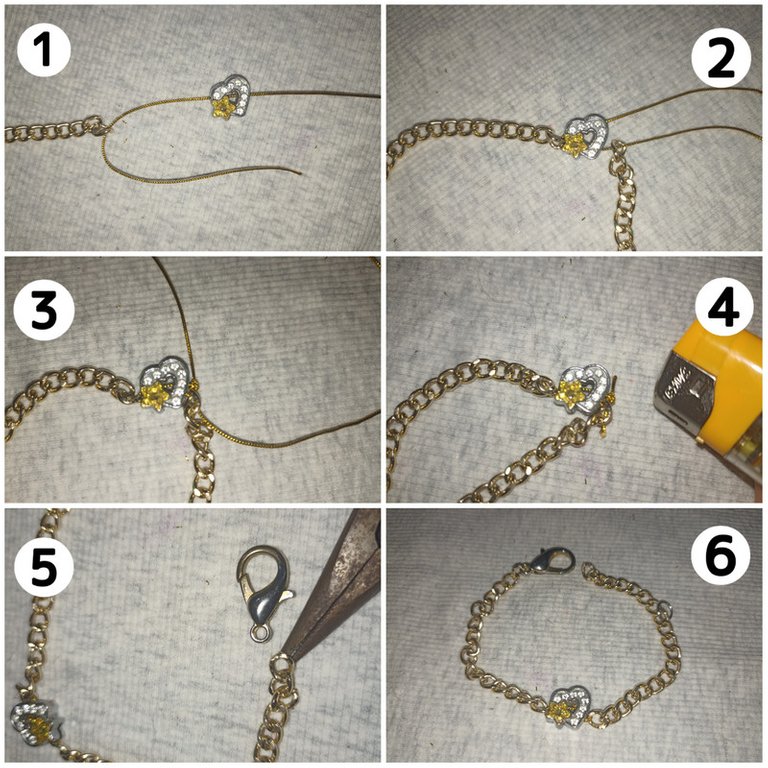
Para la siguiente pulsera vamos a necesitar una cadena que mida aproximadamente un poco más de la circunferencia de nuestra muñeca, luego la cortamos a la mitad tratando que ambas cadenas midan igual, luego vamos a unir el dije con uno de los hilos y aseguramos con un nudo. Cortamos el sobrante, quemamos y ocultamos el nudo en el centro. Para terminar agregamos la tranca y un aro a cada lado respectivamente y nos ayudamos con las pinzas.
Para nuestra tercera y última pulsera es mucho más sencilla, solo vamos a necesitar 1m o menos de hilo nylon y haremos un nudo a una de las trancas o cerradura de gancho y empezaremos a insertar una secuencia de cuentas amarillas y perlas hasta dar con el largo deseado, volvamos hacer otro nudo al aro, cortamos y quemamos las puntas para asegurar.

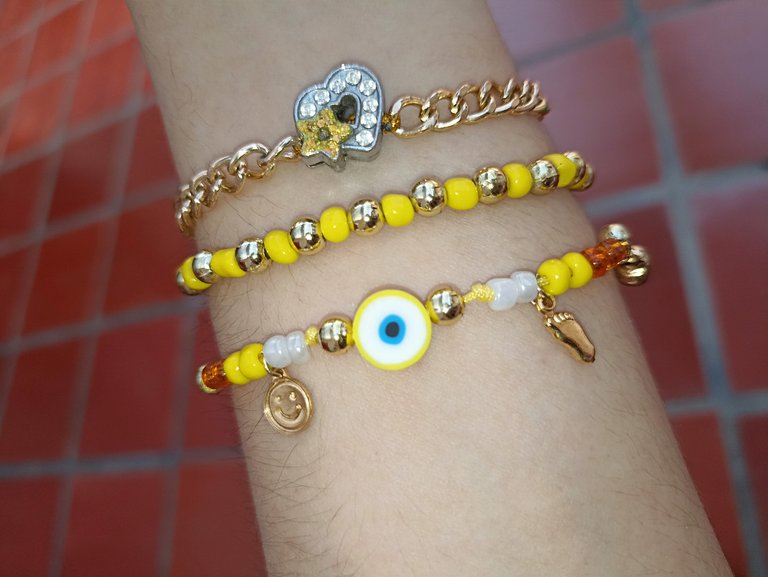
Y aquí les muestro las tres pulseras terminadas!!. Tal como les dije al principio con ellas podemos crear cualquier diseño que se nos ocurra, unico y del color de nuestro gusto. Puedes seguir mi guía tutorial o puedes dejar volar tu imaginación y hacerlo combinando los colores, piedras, cristales y el diseño que quieras... La creatividad es tuya y por supuesto un toque secreto de amor para que el trabajo quede con el mejor acabado 🥰.!! si te gusto te animo a que lo intentes, me encantó mostrarles este pequeño tutorial, sencillo, fácil súper juvenil y con colores que vienen muy bien en esta temporada, para tu uso personal, emprender o para regalar 😁...espero compartirles muy pronto nuevos trabajos, con mucho cariño me despido y será hasta la próxima !!💕


Hi Hive friends ❤️ today I want to share with you a little tutorial to make 3 super easy bracelets in cute yellow and gold tones using some beads, pearls and matching shiny charms. I really like this kind of bracelets and they are also very trendy because you can play and create as many designs as you want depending on the color you prefer. If you like it, I encourage you to join me, learn with me to make it and do not run out of yours, and now yes, without further ado.... Let's start! 😊
Unedited text
Materials:
- Yellow Chinese thread 60cm
- Nylon thread 1m
- Chain
- Yellow, orange, white beads
- Golden beads
- Decorative charms
- Lock / ring
- Scissors
- Tweezers
- Lighter

For the first bracelet I will use some charms to create one with a style of good vibes and luck, for this I will use the 60 cm Chinese thread and I will place a Turkish eye bead in the center, then two golden pearls on the sides and I will make a simple knot on each side again to secure. Next I am going to insert a succession of beads playing with the colors to match, in this case I used two white, two yellow and two orange, again I tie a knot, insert a bead and repeat the same knot. Once this is done on both sides we are going to place some charms and secure it with tweezers, and for the excess thread of the bracelet I am going to place a pearl and secure it again with a sinple knot, cut the excess and burn the tip with a lighter.
For the next bracelet we will need a chain that measures approximately a little more than the circumference of our wrist, then we cut it in half trying that both chains measure the same, then we will join the pendant with one of the threads and secure it with a knot. Cut the excess, burn and hide the knot in the center. To finish, we add the chain and a ring on each side respectively and we help ourselves with the tweezers.
For our third and last bracelet is much simpler, we will only need 1m or less of nylon thread and we will tie a knot to one of the hook lock and start inserting a sequence of yellow beads and pearls until we reach the desired length, we will tie another knot to the ring, cut and burn the ends to secure.
And here I show you the three finished bracelets. As I said at the beginning, with them we can create any design we can think of, unique and in the color of our choice. You can follow my tutorial guide or you can let your imagination fly and do it combining colors, stones, crystals and the design you want .... The creativity is yours and of course a secret touch of love so that the work is with the best finish 🥰.!!! if you like I encourage you to try it, I loved to show you this little tutorial, simple, easy, super youthful and with colors that come very well in this season, for your personal use, undertake or to give away 😁...I hope to share very soon new works, with much affection I say goodbye and will be until next time!
Todo el contenido es de mi autoría y las imágenes son de mi propiedad
Cámara: Redmi note 10s
Uso un aro de luz LED como base para mi teléfono y tomarme las fotos
All content is my own and images are my property
Camera: Redmi note 10s
I use an LED light ring as a base for my phone to take pictures of myself

Edición y Separador|Editing and Separator
App PicMonkey - App Picsart - App Canva
Traductor|Translator
DeepL


These are actually good bracelets that you have made and believe me, the yellow and gold charming stones gave it a touch. Congratulations dear.
Hii friend @apunawu 🤗 thank you very much for saying so, the truth is that I love how they combine the yellow and gold color.. they are super youthful but at the same time give that sophisticated and bright touch as you say. Thanks for visiting me a greeting to you too sweetie 💕.
Thank you for sharing this post on HIVE!
Your content got selected by our fellow curator sharminmim & you just received a little thank you upvote from us for your great work! Your post will be featured in one of our recurring compilations which are aiming to offer you a stage to widen your audience within the DIY scene of Hive. Stay creative & HIVE ON!
Please vote for our hive witness <3
@tipu curate 2
Upvoted 👌 (Mana: 0/55) Liquid rewards.
Hi friend @sharminmim !! Thank you so much for the support.
Greetings💕
You're welcome :)
Tres pulseras que hacen una combinación perfecta, nos encantan los 3 modelos sencillos de realizar, siempre los dijes le dan ese toque especial a los accesorios, buen trabajo.
Hoola comunidad @hive-189504 🤗 me alegro que les gustara!! Tienen mucha razón, por más sencillo que sea el accesorio, un bonito dije le dará ese lindo toque final 😸.. una vez más muchas gracias por apreciar mi trabajo y apoyarme 💕
Preciosas las tres y fíjate que yo no soy amante del color amarillo pero se ven muy lindas además de ser sencillas de hacer.
Muy bonitas las tres!
Hoola querida @rlathulerie 🤗 muchas gracias por tu comentario, aprecio mucho ver que te gustaron... jaja y quizás a primera vista parezca un poco llamativo el color pero créeme que un vez puestas se ven super lindas, y la idea de hacer tres fue precisamente por su fácil diseño para que al ponerlas no se vea sobrecargado. Un Saludito amiga!!💕
Hola... esta muy bonito y súper colorido el juego de pulseras que elaboraste... te felicito