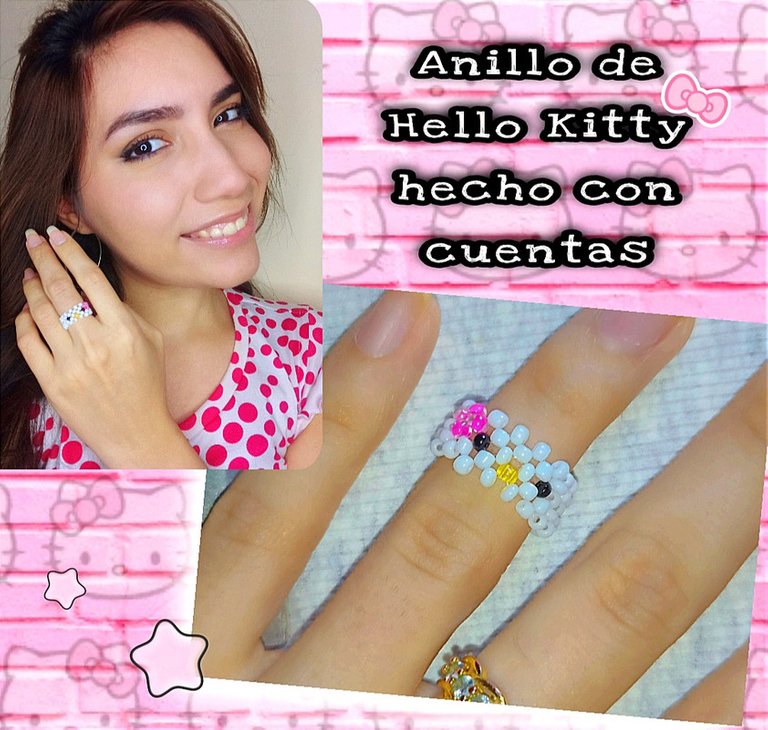
DIY - Anillo de Hello Kitty hecho con cuentas 💕 paso a paso || Hello Kitty ring made with beads 💕 step by step [ESP/ENG]


Hola amigos de Hive ❤️ hoy les voy a compartir un tierno anillo de Hello Kitty hecho solo con cuentas, aprovechando que se acerca el cumpleaños de un pequeña niña (mi prima), y como es muy fan de éste personaje, me animé hacerlo para regalarselo y de paso compartirles el tutorial para que también lo aprendan hacer, les aseguro que es super sencillo una vez sigues el patrón del diseño de nuestro personaje que tampoco es tan complicado. Así que si te gusta, te animo a que me acompañes, y ahora sí, sin más que agregar... Comencémos!!

Texto sin editar
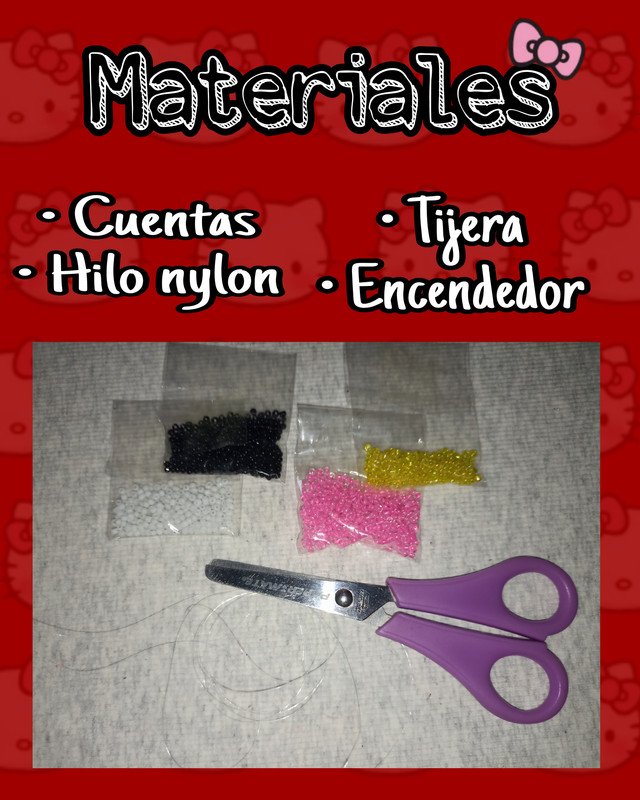
Materiales:
- 2 dedales de Cuentas (blanco, negro, amarillo, rosa)
- 60cm de hilo nylon
- Tijera
- Encendedor

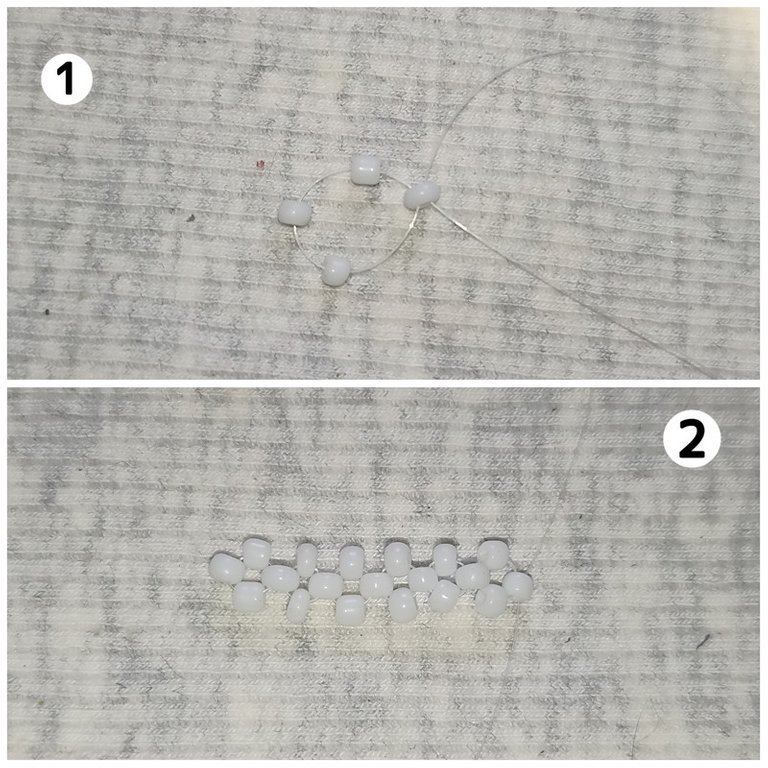
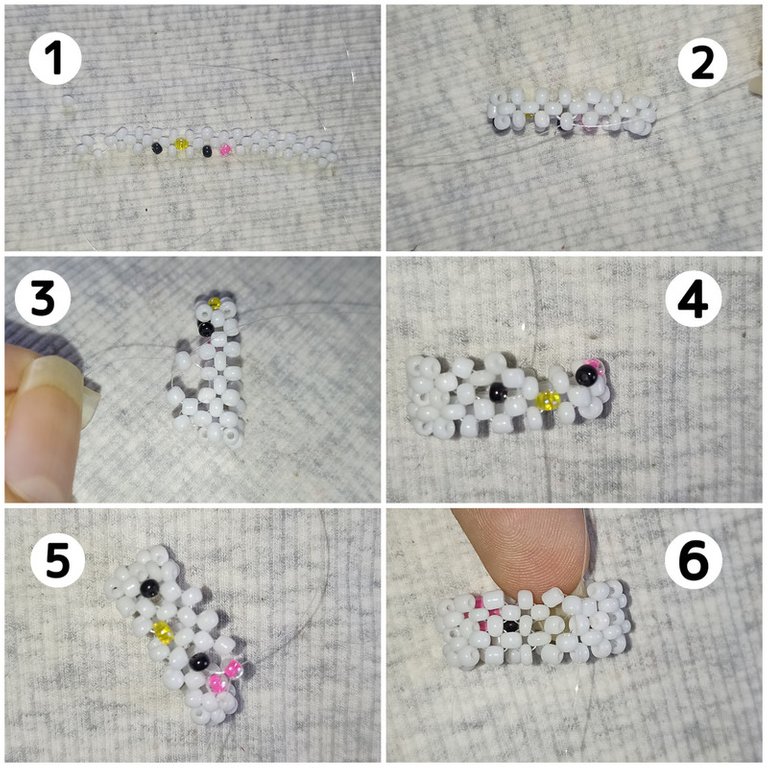
Primero vamos a comenzar insertando por nuestro hilo nylon 3 cuentas blancas y cruzando por otra, luego por cada hebra insertamos una cuenta y cruzamos nuevamente por otra, y así vamos a continuar hasta completar una hilera según la mitad de la medida de nuestro dedo.
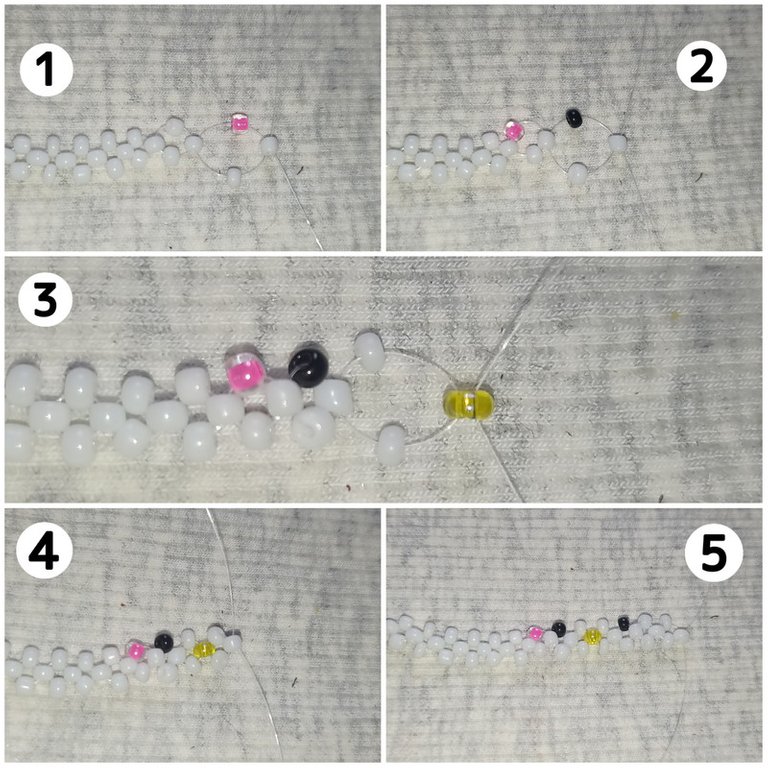
Lo siguiente que haremos será formar la cara de nuestro Hello Kitty, para ello vamos a insertar una cuenta rosa y una cuenta blanca y nos cruzamos por otra blanca, luego metemos una cuenta negra por una hebra y una cuenta blanca por otra y nos cruzamos por otra blanca. Luego insertamos dos cuentas blancas y nos cruzamos con una amarilla, y repetimos insertando dos cuentas blancas y cruzamos con otra, insertaremos nuevamente una negra por una hebra y una blanca por otra y nos cruzamos por una blanca. Hecho esto continuamos repitiendo el patrón hasta completar el resto del anillo.
Lo siguiente sera cerrar el anillo y para ello insertaremos por cada hebra una cuenta blanca y nos cruzamos con la primera del inicio, una vez alli, nos pasamos a las cuentas superiores para comenzar a tejer la segunda hilera de nuestro anillo. Tal como les muestro en las imágenes, una vez lleguemos a la parte de la cara, vamos a completar el diseño siguiendo el mismo patrón insertando dos cuentas y cruzando en otra. Cuando lleguemos al final nos cruzamos por la cuenta inicial para cerrar por completo nuestro anillo.
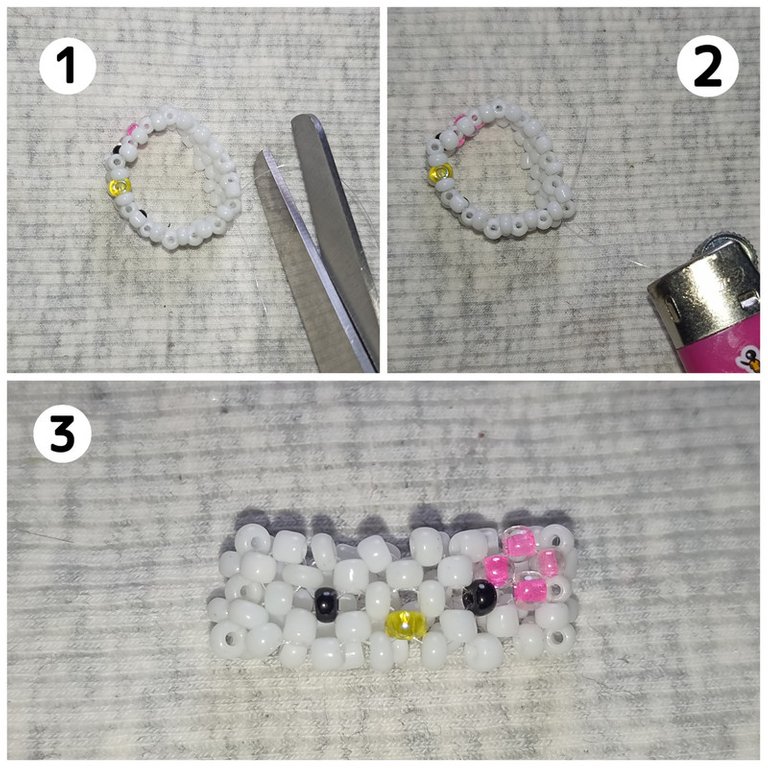
Haremos varios nudos para asegurar, cortamos el hilo sobrante y quemamos las puntas con nuestro encendedor.

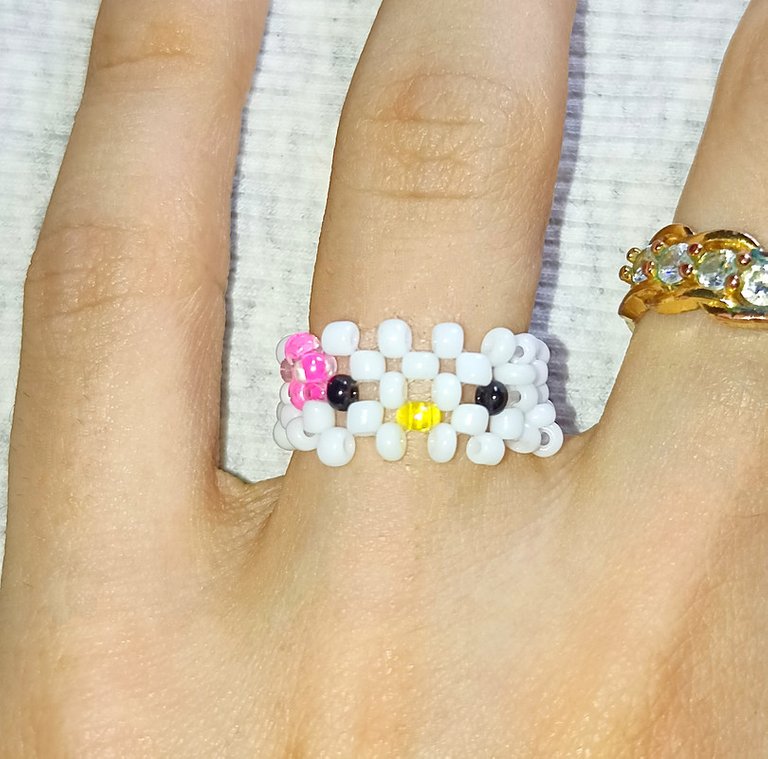
Y aquí les muestro el anillo terminado!!. Siguiendo un poco con mis trabajos anteriores como les había comentado, trabajar con cuentas es súper sencillo y además se pueden crear con el muchas bellezas en cuanto accesorios, y lo mejor que son super asequibles y fácil de conseguir. Puedes seguir mi guía tutorial o puedes dejar volar tu imaginación y hacerlo combinando los colores... La creatividad es tuya y por supuesto un toque secreto de amor para que el trabajo quede con el mejor acabado 🥰.!! si te gusto te animo a que lo intentes, me encantó mostrarles este pequeño tutorial de este anillo de Hello Kitty para enamorar a nuestras pequeñas de la casa ☺️...espero compartirles muy pronto nuevos trabajos, con mucho cariño me despido y será hasta la próxima !!💕


Hello friends of Hive ❤️ today I am going to share with you a cute Hello Kitty ring made only with beads, taking advantage of the approaching birthday of a little girl (my cousin), and as she is a big fan of this character, I decided to do it to give it to her and share with you the tutorial so you can also learn how to make it, I assure you that it is super simple once you follow the pattern of the design of our character that is not so complicated. So if you like it, I encourage you to join me, and now yes, without further ado .... Let's get started!

Unedited text
Materials:
- 2 thimbles of beads (white, black, yellow, pink)
- 60cm of nylon thread
- Scissors
- Lighter

First we are going to begin by inserting 3 white beads through our nylon thread and crossing over another one, then through each strand we insert a bead and cross over another one, and so we are going to continue until we complete a row according to half the size of our finger.
The next thing we will do is to form the face of our Hello Kitty, for this we will insert a pink bead and a white bead and cross with another white bead, then we insert a black bead through one strand and a white bead through another and cross with another white bead. Then we insert two white beads and cross with a yellow one, and we repeat inserting two white beads and cross with another one, we will insert again a black bead through one strand and a white bead through another one and cross with a white one. Once this is done, we continue repeating the pattern until we complete the rest of the ring.
The next step is to close the ring and for this we will insert a white bead for each strand and cross it with the first one at the beginning, once there, we move to the upper beads to start weaving the second row of our ring. As I show you in the pictures, once we get to the face part, we will complete the design following the same pattern inserting two beads and crossing in another one. When we reach the end we cross over the initial bead to completely close our ring.
We will tie several knots to secure, cut the excess thread and burn the ends with our lighter.
And here I show you the finished ring. Following a little with my previous works as I had told you, working with beads is super simple and you can create with it many beautiful accessories, and the best thing is that they are super affordable and easy to get. You can follow my tutorial guide or you can let your imagination fly and do it by combining colors .... The creativity is yours and of course a secret touch of love so that the work is with the best finish 🥰.!!! if you like I encourage you to try it, I loved to show you this little tutorial of this Hello Kitty ring to love our little ones at home ☺️...I hope to share with you very soon new works, with much love I say goodbye and will be until next time !!!💕
Todo el contenido es de mi autoría y las imágenes son de mi propiedad
Cámara: Redmi note 10s
Uso un aro de luz LED como base para mi teléfono y tomarme las fotos
All content is my own and images are my property
Camera: Redmi note 10s
I use an LED light ring as a base for my phone to take pictures of myself

Edición y Separador|Editing and Separator
App PicMonkey - App Picsart - App Canva
Traductor|Translator
DeepL
Fuente anillo Hello Kitty|Hello Kitty ring source


Hermoso anillo de Hello Kitty, nos encanta como hiciste para hacer cada detalle, hasta el lazo, gran trabajo.
Hoola @hive-189504 🤗🤗 muchas gracias por su comentario, me encanta trabajar con cuentas porque es súper fácil, ideal para las que deseen iniciarse en este mundo de la bisutería y accesorios...un saludito y gracias por su apoyo!!!💕
Hola ,feliz noche muy lindo ese anillo está muy coqueto te felicito 👍🌹❤️❤️🌹🌹
Hoola @alexanderflx 🤗🤗feliz tarde amigo, muchas gracias por visítarme y dejarme tu lindo comentario..lo aprecio mucho.. un saludito y gracias por tu apoyo 💕🍓🍓🌹🌹☺️
Congratulations @edwarlyn11! You have completed the following achievement on the Hive blockchain and have been rewarded with new badge(s):
Your next target is to reach 65000 upvotes.
You can view your badges on your board and compare yourself to others in the Ranking
If you no longer want to receive notifications, reply to this comment with the word
STOPCheck out the last post from @hivebuzz:
Support the HiveBuzz project. Vote for our proposal!
SALUDOS. ME ENCANTO, SEGURO Y ME ANIMO HACER UNO, ADEMAS SE TE VE MUY BONITO.
Hoola @carolycesar15 un saludito para ti también 🤗💕 muchas gracias por tu comentario!! me alegra mucho ver que te gusto mi trabajo y que ahora te animes hacerlo también, estoy segura te quedará hermoso!! Feliz día amiga💕
😍 una hermosura