DIY- Llavero de cola de sirena tejida en macramé ✨ paso a paso || Macrame woven mermaid tail keychain ✨ step by step [ESP/ENG]


Hola amigos de Hive ❤️ después de salir y mirar muchos accesorios para decorar nuestros llaveros, me animé a compartirles una idea que me pareció súper linda realizando unos cuantos nudos con la técnica del Macramé. Me refiero a un diseño con apariencia de una cola de sirena combinando varios colores de hilo, en este caso, estambre, pero si deseas puedes usar el que quieras, al final esto dependerá el tamaño y el grosor que tendrá la cola. El nudo que estaremos realizando es el nudo alondra, que en mi opinión es uno de los más sencillos, y aunque quizás les parezca complicado, una vez le agarras el truco resulta bastante sencillo hacer. Si eres principiante y no te quieres arriesgar, puedes usar pocas hebras, la cantidad y variedad de colores dependerá los tonos que al final tendrá el diseño. Así que si te gusta y te llama la atención ☺️, te animo a que me acompañes y aprendas junto a mi a realizarlo, y ahora sí, sin más que agregar... Comencémos!!

Texto sin editar
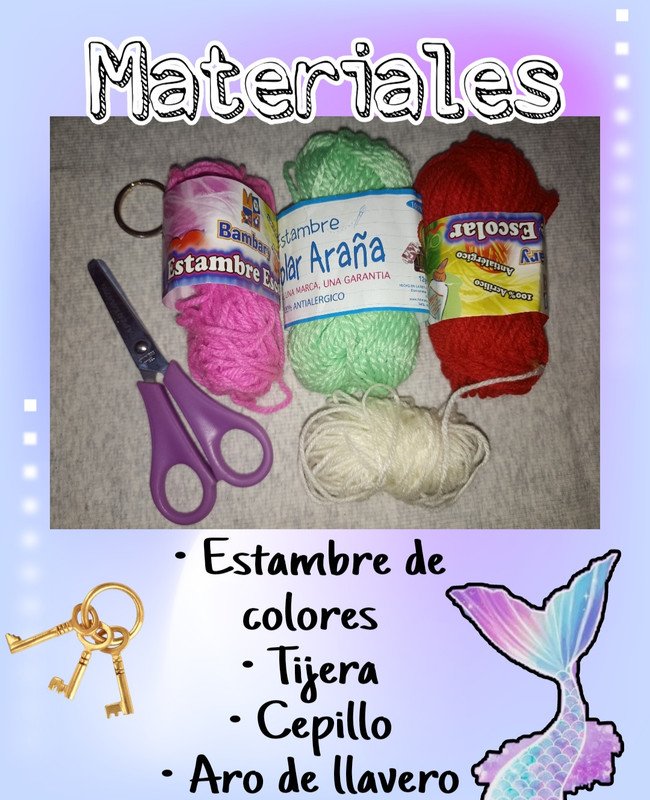
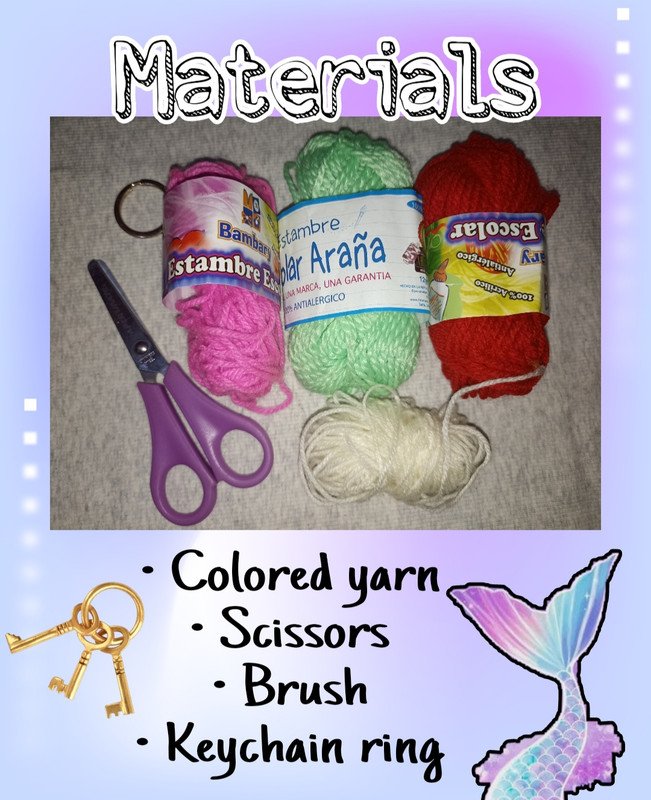
Materiales:
- 200cm de estambre (varios colores)
- Aro de llavero
- Tijera
- Cepillo

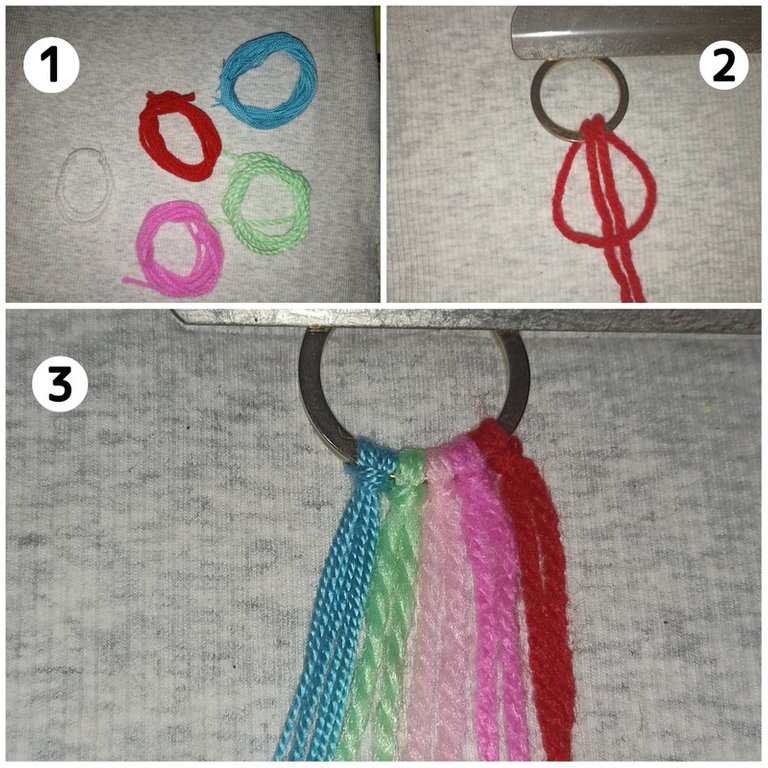
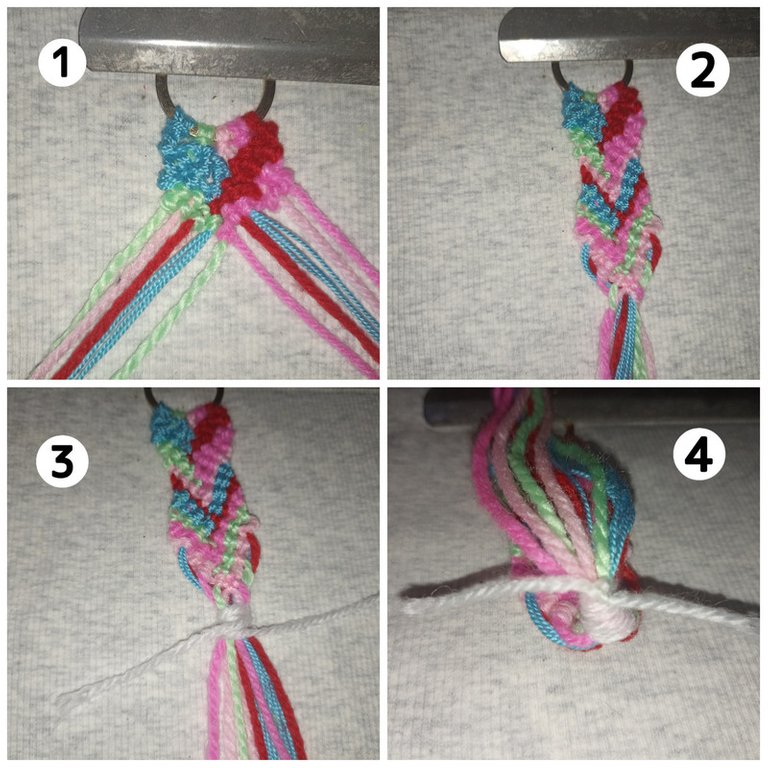
Primero vamos a tomar cada hebra de cada color y la incorporamos al aro con el nudo alondra, aquí podemos jugar con la posición de colores para formar la combinación del diseño de nuestra cola que más nos guste. Puedes elegir una gama del mismo color o usar varios tonos diferentes como yo 😸.
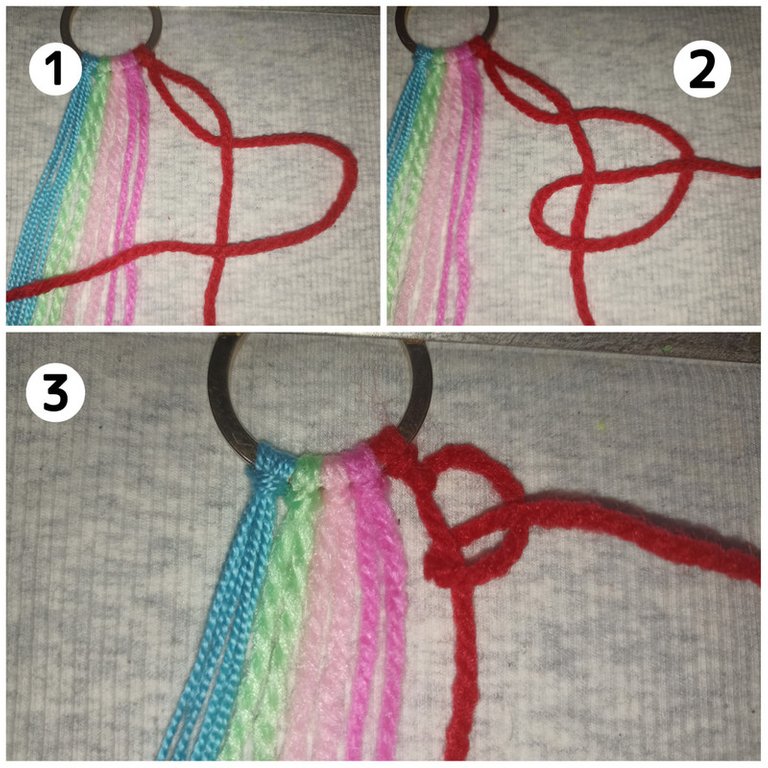
Para los nudos voy a tomar como guía las dos hebras rojas de los extremos. La externa y la interna, en este caso iremos de derecha a izquierda así que la hebra interna será siempre la que formara la media luna sobre la hebra externa, formando el nudo pasando por debajo, por arriba, luego por debajo otra vez, saliendo por el agujero y así cubriendo esa hebra con su color tal como les muestro en las fotos. Una vez hecho esto dos veces, repetimos el mismo proceso con el resto de hebras, hasta que el color de esa hebra, en este caso roja, llegué al centro.
Ahora haremos lo mismo del otro lado, pero esta vez las hebras guía interna y externa cambian de dirección, es decir, de izquierda a derecha, realizando siempre el mismo paso hasta que el color de esa hebra llegué al centro igualmente. Una vez tengamos ambas hebras en el centro decidimos hacer el nudo en la dirección que queramos, aquí no influirá en el patrón del diseño, simplemente debemos repetirlo sin cambiar de dirección hasta terminar.
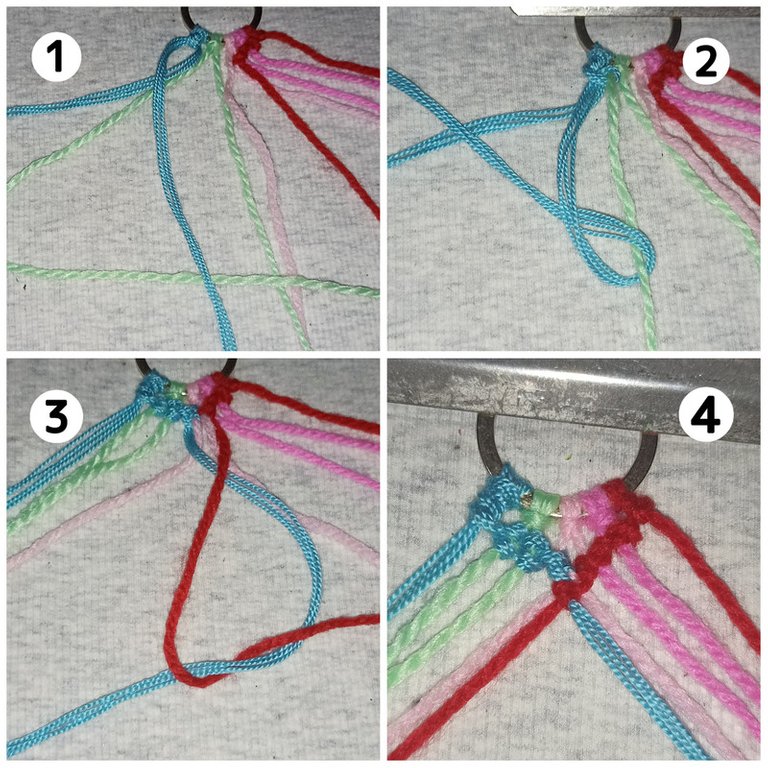
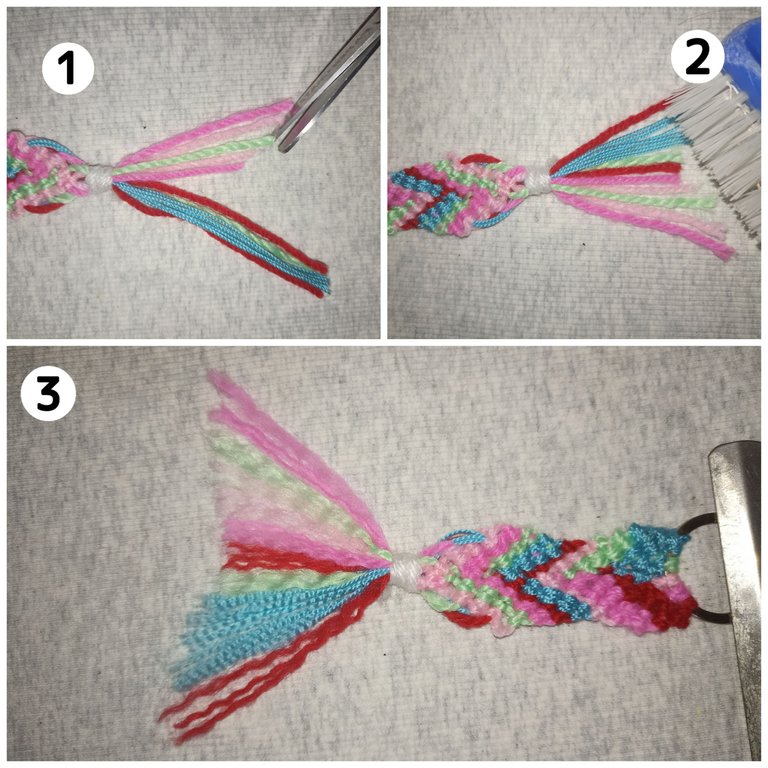
Continuamos con el resto de hebras y notaremos cómo iremos formando una "v" con los nudos, esto lo repetimos hasta obtener el largo de la cola deseado, y una vez terminemos, tomamos todas las hebras y las unimos, luego con otra hebra, en este caso blanca, las amarrare dando varias vueltas alrededor y finalmente un nudo simple para asegurar, cortamos el sobrante y lo escondemos dentro para que no se note.
Con el sobrante de las hebras voy a cortarlas en forma de aleta, una v invertida con ayuda de una tijera. Luego con un cepillo, despeinare las hebras para darle volumen, relieve y mucho detalle a la cola.
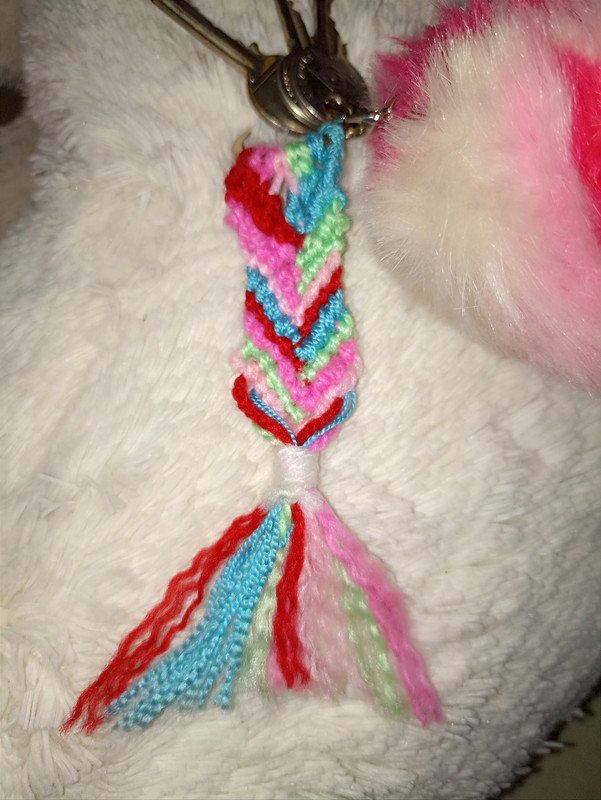
Y aquí les muestro el llavero terminado!!. Con mucha paciencia repitiendo el patrón del mismo nudo pero en diferentes direcciones logramos realizar este lindo diseño de cola de sirena, siguiendo mi guía tutorial o dejando volar tu imaginación y hacerlo combinando tus colores favoritos, incluso agregando piedras y cristales que quieras... La creatividad es tuya y por supuesto un toque secreto de amor para que el trabajo quede con el mejor acabado 🥰.!! si te gusto te animo a que lo intentes, me encantó mostrarles este pequeño tutorial, para tu uso personal o para regalar 😁...espero compartirles muy pronto nuevos trabajos, con mucho cariño me despido y será hasta la próxima !!💕


Hello friends of Hive ❤️ after going out and looking at many accessories to decorate our keychains, I decided to share with you an idea that I found super cute making a few knots with the Macramé technique. I mean a design that looks like a mermaid's tail combining several colors of thread, in this case, yarn, but if you want you can use whatever you want, in the end this will depend on the size and thickness that will have the tail. The knot that we will be making is the lark knot, which in my opinion is one of the simplest, and although it may seem complicated, once you get the hang of it, it is quite easy to do. If you are a beginner and do not want to risk, you can use few strands, the amount and variety of colors will depend on the tones that the design will have at the end. So if you like it and it catches your attention ☺️, I encourage you to join me and learn with me how to do it, and now, without further ado.... Let's start!
Unedited text
Materials:
- 200cm of yarn (various colors)
- Keychain ring
- Scissors
- Brush

First we are going to take each strand of each color and incorporate it into the hoop with the lark knot, here we can play with the position of colors to form the combination of our tail design that we like the most. You can choose a range of the same color or use several different shades like me 😸.
For the knots I will take as a guide the two red strands at the ends. The external and the internal, in this case we will go from right to left so the internal strand will always be the one that will form the half moon over the external strand, forming the knot going under, over, then under again, coming out through the hole and thus covering that strand with its color as I show you in the pictures. Once this is done twice, repeat the same process with the rest of the strands, until the color of that strand, in this case red, reaches the center.
Now we will do the same on the other side, but this time the inner and outer guide strands change direction, that is, from left to right, always doing the same step until the color of that strand reaches the center as well. Once we have both strands in the center we decide to make the knot in the direction we want, here it will not influence the pattern of the design, we must simply repeat it without changing direction until we finish.
We continue with the rest of the strands and we will notice how we will form a "v" with the knots, we repeat this until we obtain the desired length of the tail, and once we finish, we take all the strands and join them together, then with another strand, in this case white, we tie them giving several turns around and finally a simple knot to secure, we cut the excess and hide it inside so that it is not noticed.
With the leftover strands I will cut them in the shape of a fin, an inverted v with the help of a scissors. Then with a brush, I will tousle the strands to give volume, relief and a lot of detail to the tail.
And here I show you the finished keychain! With a lot of patience repeating the pattern of the same knot but in different directions we managed to make this cute mermaid color design, following my tutorial guide or letting your imagination fly and make it combining your favorite colors, even adding stones and crystals you want..... The creativity is yours and of course a secret touch of love so that the work is with the best finish 🥰.!!! if you like it I encourage you to try it, I loved to show you this little tutorial, for your personal use or to give as a gift 😁...I hope to share very soon new works, with much affection I say goodbye and will be until next time !!!💕
Todo el contenido es de mi autoría y las imágenes son de mi propiedad
Cámara: Redmi note 10s
Uso un aro de luz LED como base para mi teléfono y tomarme las fotos
All content is my own and images are my property
Camera: Redmi note 10s
I use an LED light ring as a base for my phone to take pictures of myself

Edición y Separador|Editing and Separator
App PicMonkey - App Picsart - App Canva
Traductor|Translator
DeepL


Que bonito quedó. Me parece un trabajo muy delicado y también que requiere de mucha paciencia para no equivocarse entre todos los amarres que se hacen.
Hermoso.
Le deseo mucho éxito y bendiciones a tu post 🙏
Muchas gracias @artsugar 🤗 si la verdad se necesita paciencia y mucha concentración para no equivocarte jaja..gracias por tu apoyo un gusto verte por mi blog 💕
Super hermoso te quedó el llavero de cola de sirena, justo veía esa técnica de macrame ayer gran trabajo @edwarlyn11.
!discovery 35
Hola @mili2801 🤗 jaja si yo también ya venía viendo y estudiando estos accesorios con estos nudos y después de mucho practicar me animé y la verdad quedan muy lindos...muchas gracias por tu visita y tú apoyo😸💕 un saludito amiga Mili!!!
This post was shared and voted inside the discord by the curators team of discovery-it
Join our community! hive-193212
Discovery-it is also a Witness, vote for us here
Delegate to us for passive income. Check our 80% fee-back Program
Está hermoso, y con esos hermosos colores podemos encontrar fácilmente nuestras llaves. ❤️
Hoola !!🤗 Sii la verdad que con estos colores en particular las encontraríamos fácilmente jaja aunque lo mejor de esto es que puedes jugar con las combinaciones de colores que más prefieras 😸...un saludito amiga y muchas gracias por visitar 💕
Te quedo hermoso el tejido amiga felicidades 👏, me encantan los colores que utilizaste y el paso a paso, tal cual una gorra de sirena.
Hoola !! @yolimarag 🤗 muchas gracias por tu bonito comentario, me alegra que te haya gustado!!...incluso creo que si en lugar de tejer con estambre lo hacemos con un hilo brillante realmente quedaría como una cola de sirena 😍💕 un saludito y muchas gracias otra vez por pasarte y dejarme tu apoyo amiga!!!
¡Enhorabuena!
✅ Has hecho un buen trabajo, por lo cual tu publicación ha sido valorada y ha recibido el apoyo de parte de CHESS BROTHERS ♔ 💪
♟ Te invitamos a usar nuestra etiqueta #chessbrothers y a que aprendas más sobre nosotros.
♟♟ También puedes contactarnos en nuestro servidor de Discord y promocionar allí tus publicaciones.
♟♟♟ Considera unirte a nuestro trail de curación para que trabajemos en equipo y recibas recompensas automáticamente.
♞♟ Echa un vistazo a nuestra cuenta @chessbrotherspro para que te informes sobre el proceso de curación llevado a diario por nuestro equipo.
Cordialmente
El equipo de CHESS BROTHERS