DIY- Pulsera con técnica macrame realizando el nudo amistad 💖 || Bracelet with macrame technique, making the friendship knot 💖 [ESP/ENG]
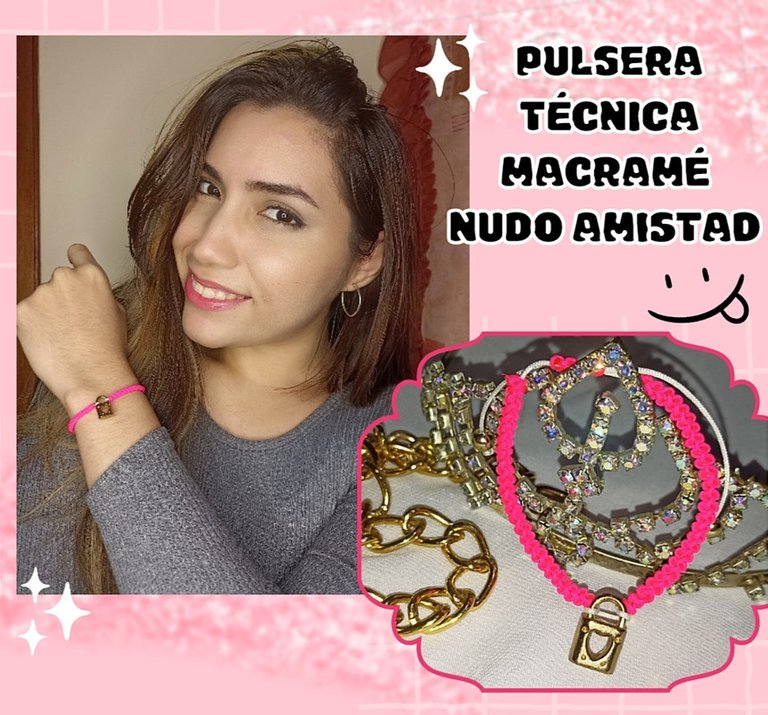


Hola amigos de Hive ❤️ aprovechando que se acerca el mes del amor y la amistad, me animé a practicar una nueva técnica con nudos macramé que me encantan como lucen, y justo revisando ideas encontré un nudo con un nombre que me venía ideal para lo que quería hacer, esta técnica se llama nudo de amistad, así que pensé en crear una linda pulsera realizando este nudo agregándole cómo detalle especial un dije en forma de candado y corazón para regalar en esas próximas fechas para esa persona especial. Esta técnica me pareció bastante sencilla, y es un tanto parecido al nudo plano, lo único que cambia es la dirección de uno de los hilos. Si te gusta, y también quieres animarte hacerlo para un regalo especial, te invito a que me acompañes y aprendas junto a mi a realizarlo, y ahora sí, sin más que agregar... Comencémos!!

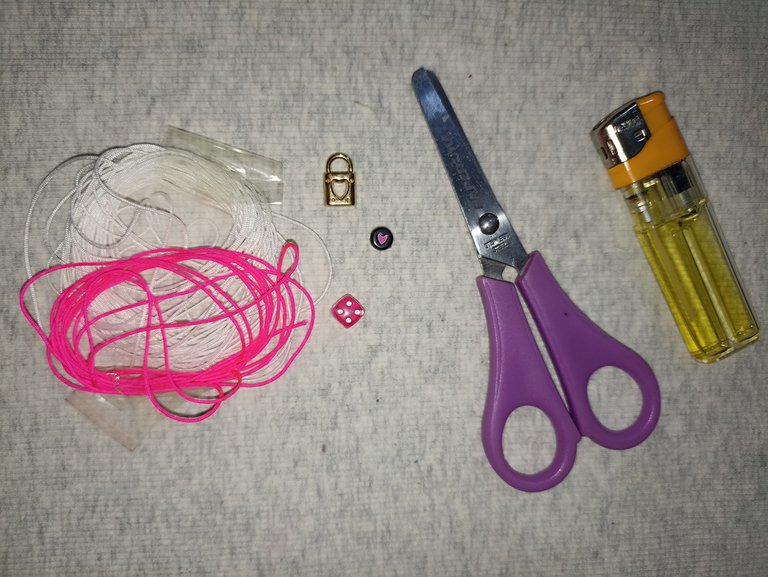
Materiales:
- Hilo chino (blanco, fucsia)
- Dije en forma de candado y corazón
- Tijera
- Encendedor

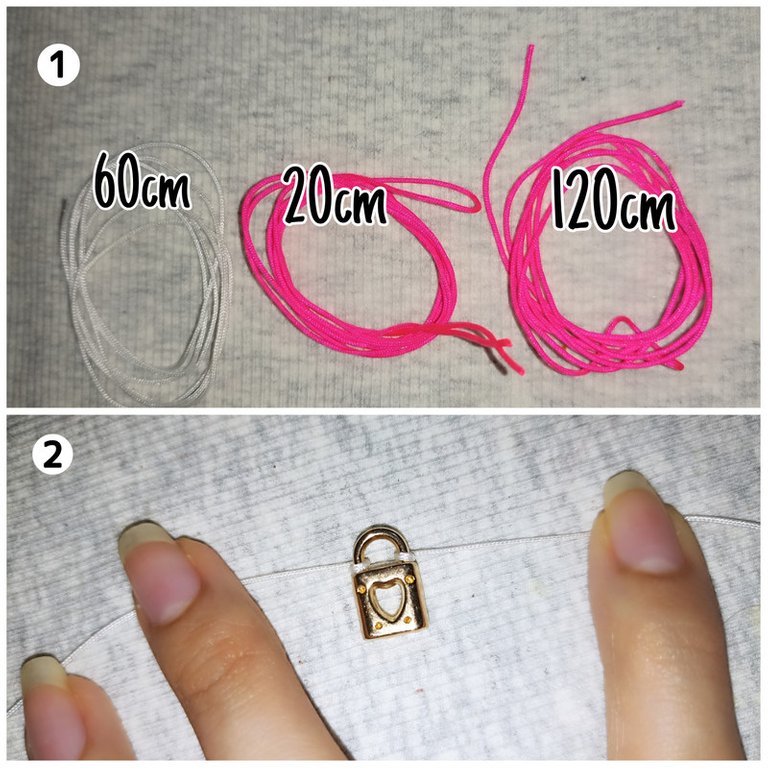
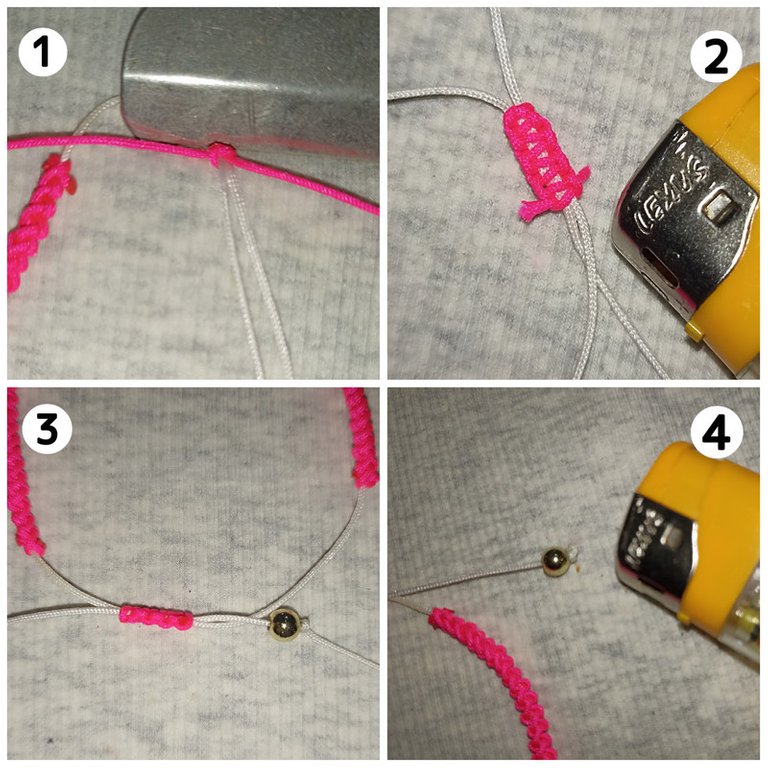
Para empezar primero voy a necesitar 3 hebras de hilo chino, una de un color, en este caso blanco, de 40cm a 60cm aproximadamente, éste será nuestro hilo central, también vamos a usar dos hebras de 60cm a 70cm aproximadamente de otro color, éstos van a ser los hilos con los que vamos a tejer. Cómo sobrante luego reservamos otra hebra para cerrar nuestra pulsera de unos 20cm aproximadamente.
Con el mismo Hilo central vamos hacer un nudo alondra en el dije y que éste nos quede en medio. Una vez ubicado empezaremos a tejer de cada lado nuestro nudo.
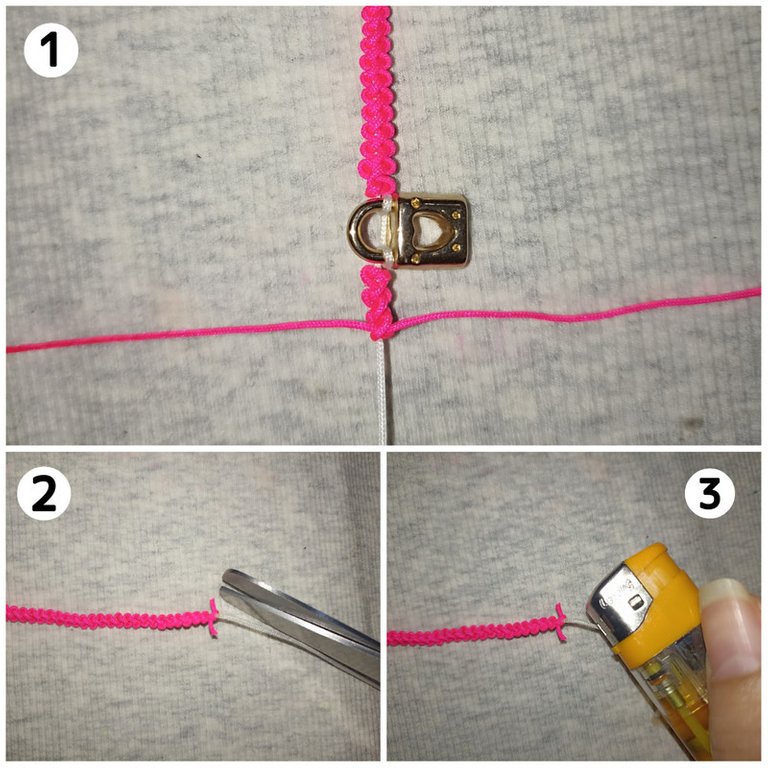
Ahora sí para realizar la técnica del nudo amistad vamos tomar una de las hebras de tejer y formaremos una S sobre el hilo central, luego con la otra hebra, la pasaremos por encima de la S que formamos anteriormente, luego la pasamos por debajo del hilo central y después lo sacamos por el segundo agujero, jalamos ambas hebras para apretar un poco y así iríamos formando el nudo repitiendo el mismo proceso hasta obtener el largo deseado.

Cuando hayamos terminado de un lado, cortamos el hilo y quemamos las puntas, y repetimos todo el proceso del otro lado.
Ya para cerrar nuestra pulsera tomaremos nuestra hebra de 20 cm y haremos sobre el hilo central 4 a 5 nudos planos, volvemos a cortar las puntas y quemamos para asegurar. Y como lindo detalle extra le podemos agregar un par de perlas en las hebras que nos sobran haciendo unos nudos simples y ya estaría lista para usar!! ☺️
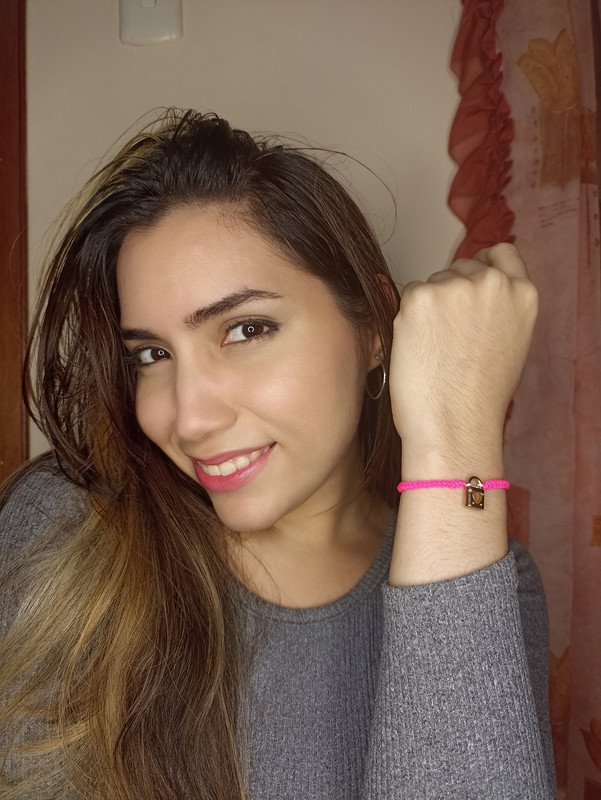
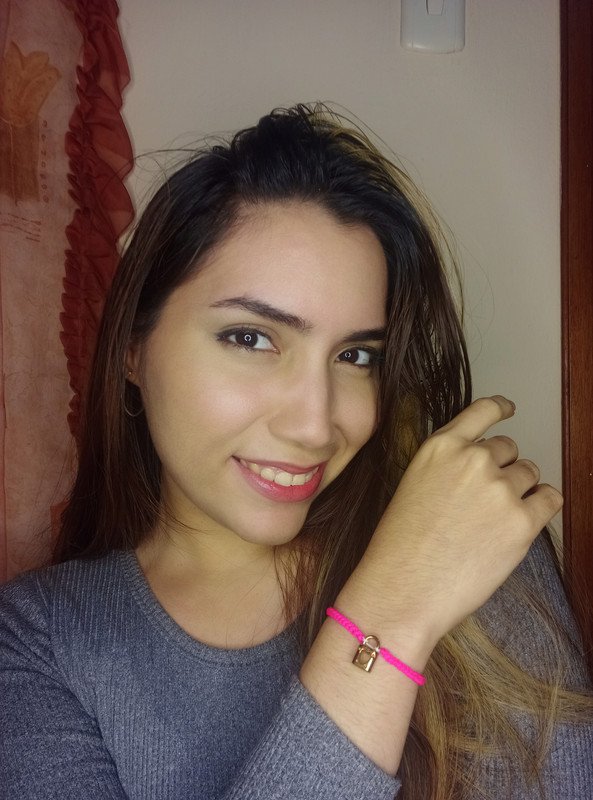
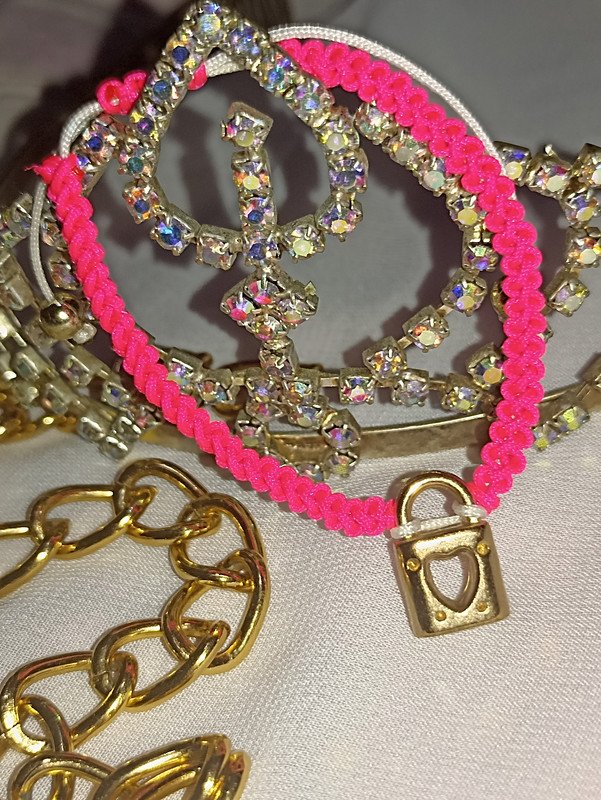
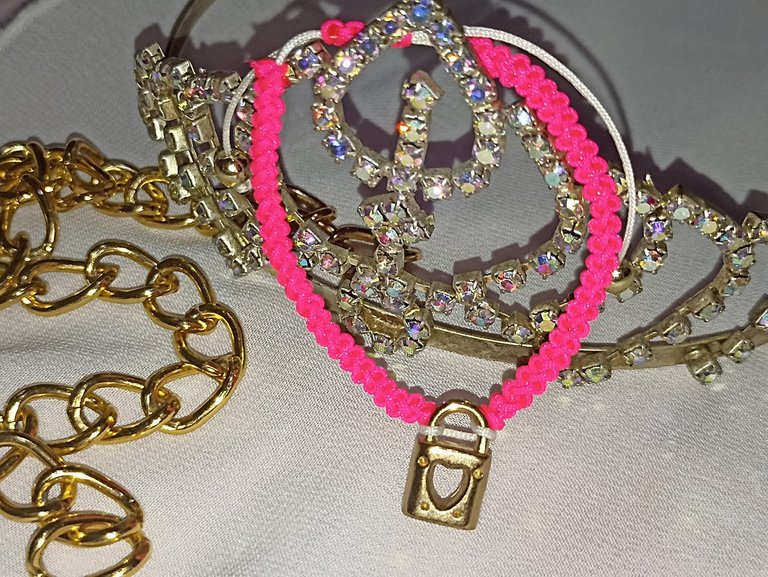
Y aquí les muestro la pulsera terminada!!. Con esta técnica creamos nuevos diseños unicos y a nuestro gusto. Puedes seguir mi guía tutorial o puedes dejar volar tu imaginación y hacerlo combinando los colores, piedras, cristales y el diseño que quieras... La creatividad es tuya y por supuesto un toque secreto de amor para que el trabajo quede con el mejor acabado 🥰.!! si te gusto te animo a que lo intentes, me encantó mostrarles este pequeño tutorial con este dije que creo le viene súper bien al nudo que realizamos, para tu uso personal o para regalar en ese día especial 😁...espero compartirles muy pronto nuevos trabajos, con mucho cariño me despido y será hasta la próxima !!💕


Hi friends of Hive ❤️ taking advantage of the approaching month of love and friendship, I decided to practice a new technique with macrame knots that I love how they look, and just reviewing ideas I found a knot with a name that was ideal for what I wanted to do, this technique is called friendship knot, so I thought of creating a nice bracelet making this knot adding as a special detail a pendant in the form of a padlock and heart to give away in these upcoming dates for that special person. I found this technique quite simple, and it is somewhat similar to the flat knot, the only thing that changes is the direction of one of the threads. If you like it, and you also want to do it for a special gift, I invite you to join me and learn with me how to make it, and now, without further ado.... Let's get started!
Materials:
- Chinese thread (white, fuchsia)
- Heart and padlock pendant
- Scissors
- Lighter

To start first I will need 3 strands of Chinese thread, one of a color, in this case white, from 40cm to 60cm approximately, this will be our central thread, we will also use two strands of 60cm to 70cm approximately of another color, these will be the threads with which we are going to weave. As leftover then reserve another strand to close our bracelet about 20cm approximately.
With the same central thread we will make a lark knot in the pendant and that it is in the middle. Once located we will begin to weave on each side of our knot.
Now to perform the technique of the friendship knot we will take one of the weaving strands and we will form an S on the central thread, then with the other strand, we will pass it over the S that we formed previously, then we pass it under the central thread and then we take it out through the second hole, we pull both strands to tighten a little and thus we would be forming the knot repeating the same process until we obtain the desired length.
When we have finished on one side, we cut the thread and burn the ends, and repeat the whole process on the other side.
Now to close our bracelet we will take our 20 cm strand and we will make 4 to 5 flat knots on the central thread, cut the ends again and burn to secure. And as a nice extra detail we can add a couple of pearls in the strands that we have left over by making a few simple knots and it would be ready to use! ☺️
And here I show you the finished bracelet. With this technique we create new unique designs and to our liking. You can follow my tutorial guide or you can let your imagination fly and do it combining colors, stones, crystals and the design you want .... The creativity is yours and of course a secret touch of love so that the work is with the best finish 🥰.!!! if you like I encourage you to try it, I loved to show you this little tutorial with this pendant that I think comes super well to the knot that we made, for your personal use or to give away on that special day 😁...I hope to share very soon new works, with much affection I say goodbye and will be until next time!
Todo el contenido es de mi autoría y las imágenes son de mi propiedad
Cámara: Redmi note 10s
Uso un aro de luz LED como base para mi teléfono y tomarme las fotos
All content is my own and images are my property
Camera: Redmi note 10s
I use an LED light ring as a base for my phone to take pictures of myself

Edición y Separador|Editing and Separator
App PicMonkey - App Picsart - App Canva
Traductor|Translator
DeepL


https://twitter.com/1048398048240566273/status/1616187020727943170
https://twitter.com/2774723569/status/1616199598250332175
The rewards earned on this comment will go directly to the people( @kristal24 ) sharing the post on Twitter as long as they are registered with @poshtoken. Sign up at https://hiveposh.com.
Muy hermosa tu pulsera amiga, me encantó el detalle del dije, super lindo!
Feliz tarde, un saludo. @edwarlyn11
Gracias mi querida @kristal24 ☺️ me alegra que te gustara...un saludito y feliz noche igualmente 🤗💕
Muy bonito trabajo y el fucsia es mi favorito, así que lo amé. Yo aún no me siento a intentar éste tejido aunque he visto a algunas chicas que han mostrado trabajos muy lindos aquí.
Hola amiga 🤗 muchas gracias me alegra que te gustara el color a mi también me encanta y es uno de mis favoritos 💖. Creo que todo es cuestión de intentar y practicar y al final te das cuenta que es más fácil de lo que imaginas☺️. Un saludito y feliz día!!💕