🌺🐈🐱Tutorial: How to Decorate a Cat-Themed Note Blog 🐱🐈🌺[Eng/Esp]
Greetings to everyone on this hive platform and @Diyhud community.
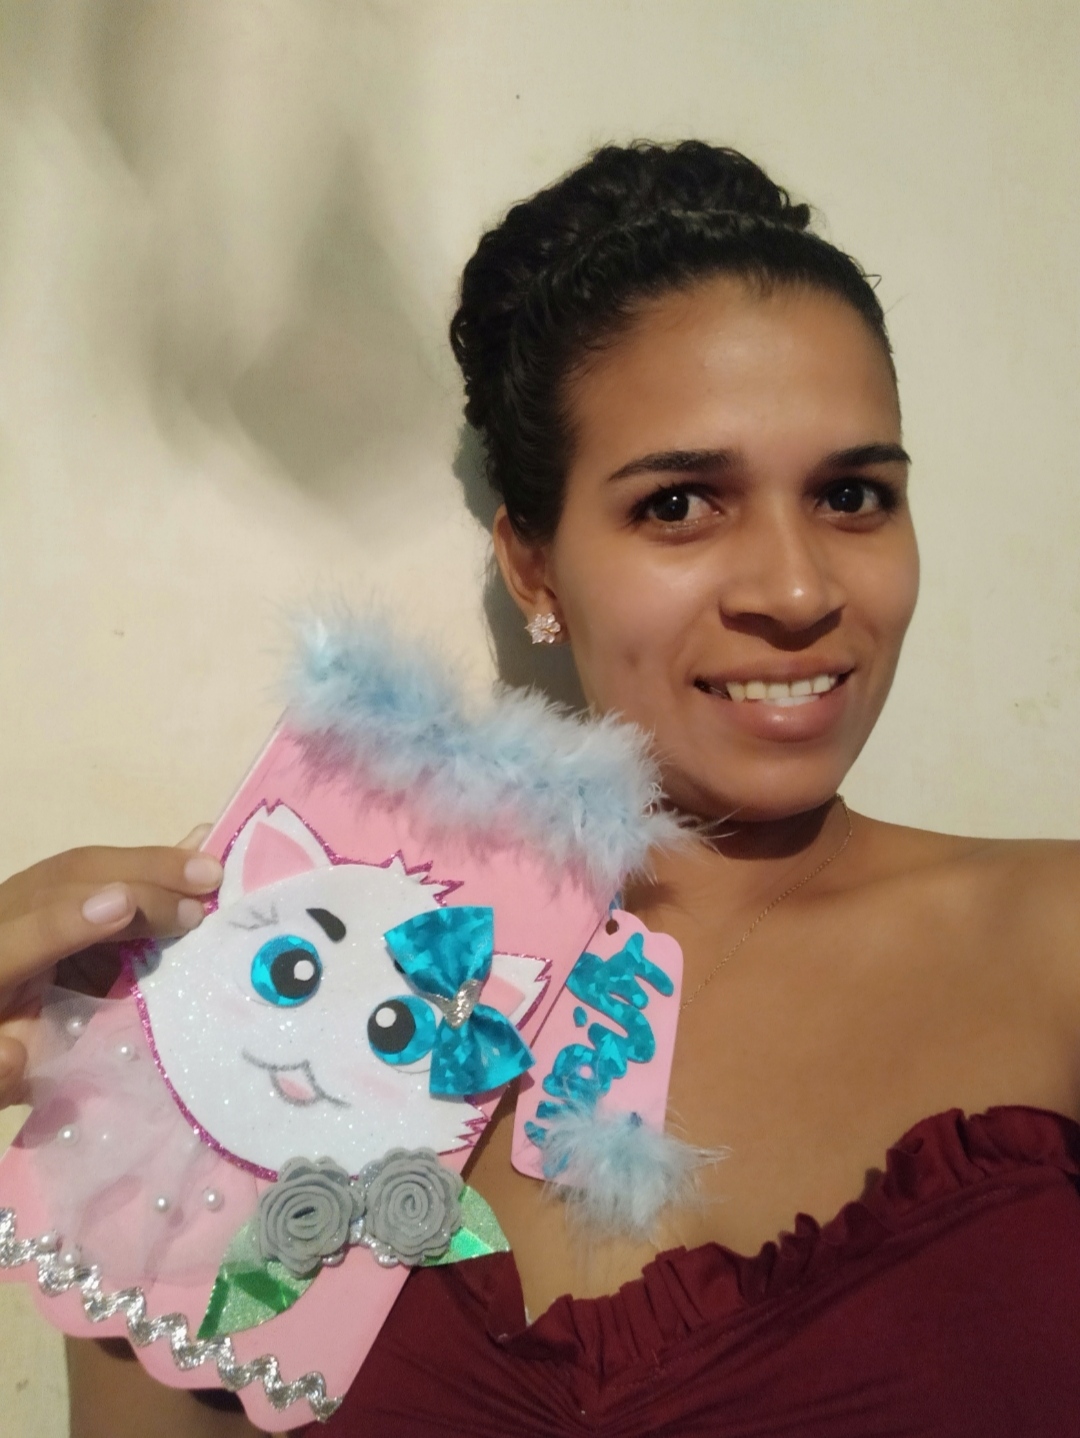
Once again with you sharing my creations and grateful for doing so... today I will show you some steps for decorating and creating a blog 🗒️ of notes that I had saved, but my princess wanted it, so she told me that if I I could decorate it for her to take to her school, so I got to work hahaha and I decorated it with the theme of a very cute white kitten and used pastel colors, I really liked the decoration and combination of colors 🌈I hope You might like it too, it's super easy to make because I had a mold saved that I had painted on some white sheets, I hope you can make it, you can make them for children and adults, it looks very nice.
Saludos a todos en esta plataforma de hive y comunidad de @Diyhud .
Nuevamente con usted compartiendo mis creaciones y agradecida de hacerlo....el día de hoy les mostrarte unos paso para la decoración y elaboración de un blog 🗒️ de notas que tenía guardado , pero mi princesa lo quería, entonces ella me dijo que si yo se lo podía decorar para ella llevarlo a su escuela , entonces me puse manos a la obra jajaja y se la decore con la temática de una gatita blanca muy tiernas y utilice colores pasteles ,me gustó mucho la decoración y combinación de los colores 🌈espero que a ustedes también les puede gustar , es súper fácil de hacer porque yo tenia un molde guardado que había pintando en unas hojas blancas , espero que lo puedan elaborar ,los pueden hacer para niños como para adultos queda muy lindo .
Materials used:
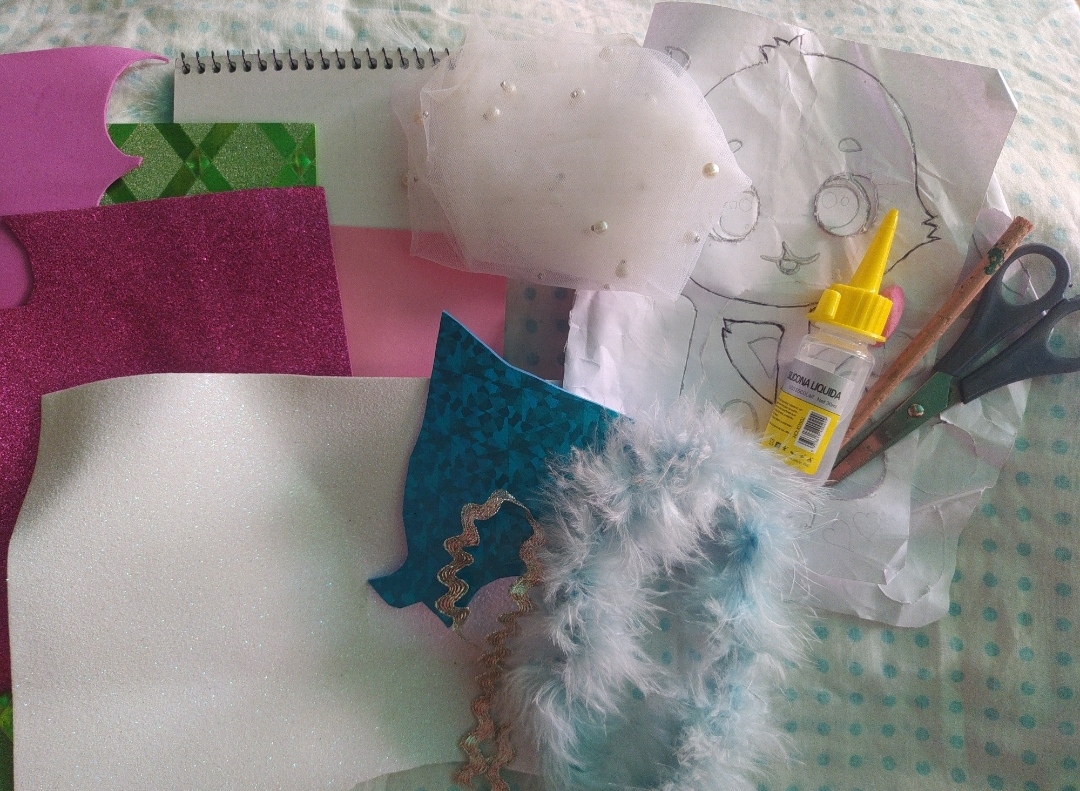
•Liquid silicone
•Scissors
•Pencil
•Blue marabu
•Tulle fabric with pearls
•Decorative silver ribbon
•Medium note blog
•Frosty white foam
•Pink Foami
•Blue printed foam
•Green printed foam
•Frosted silver foam
•Frosty fuchsia foam
•Black foam
•Pink colored chalk
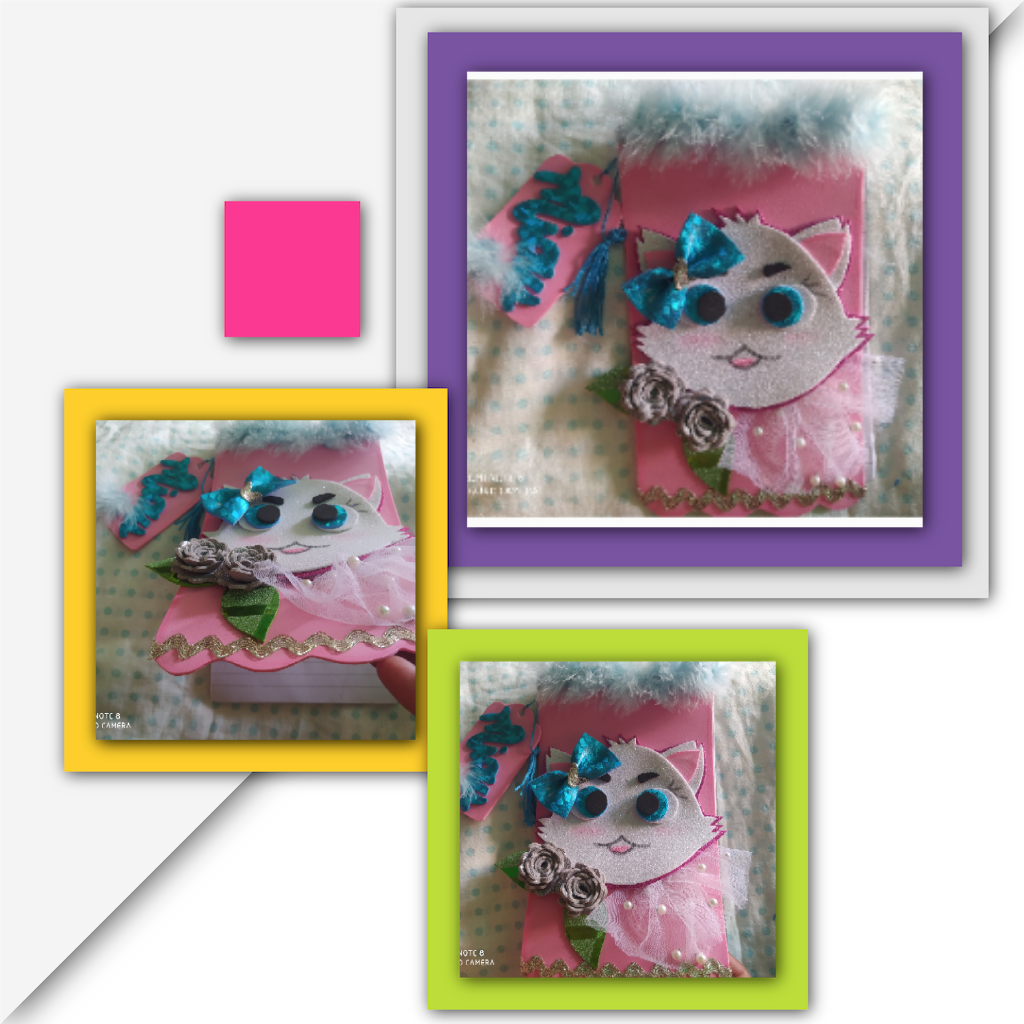
What are the steps for preparation:
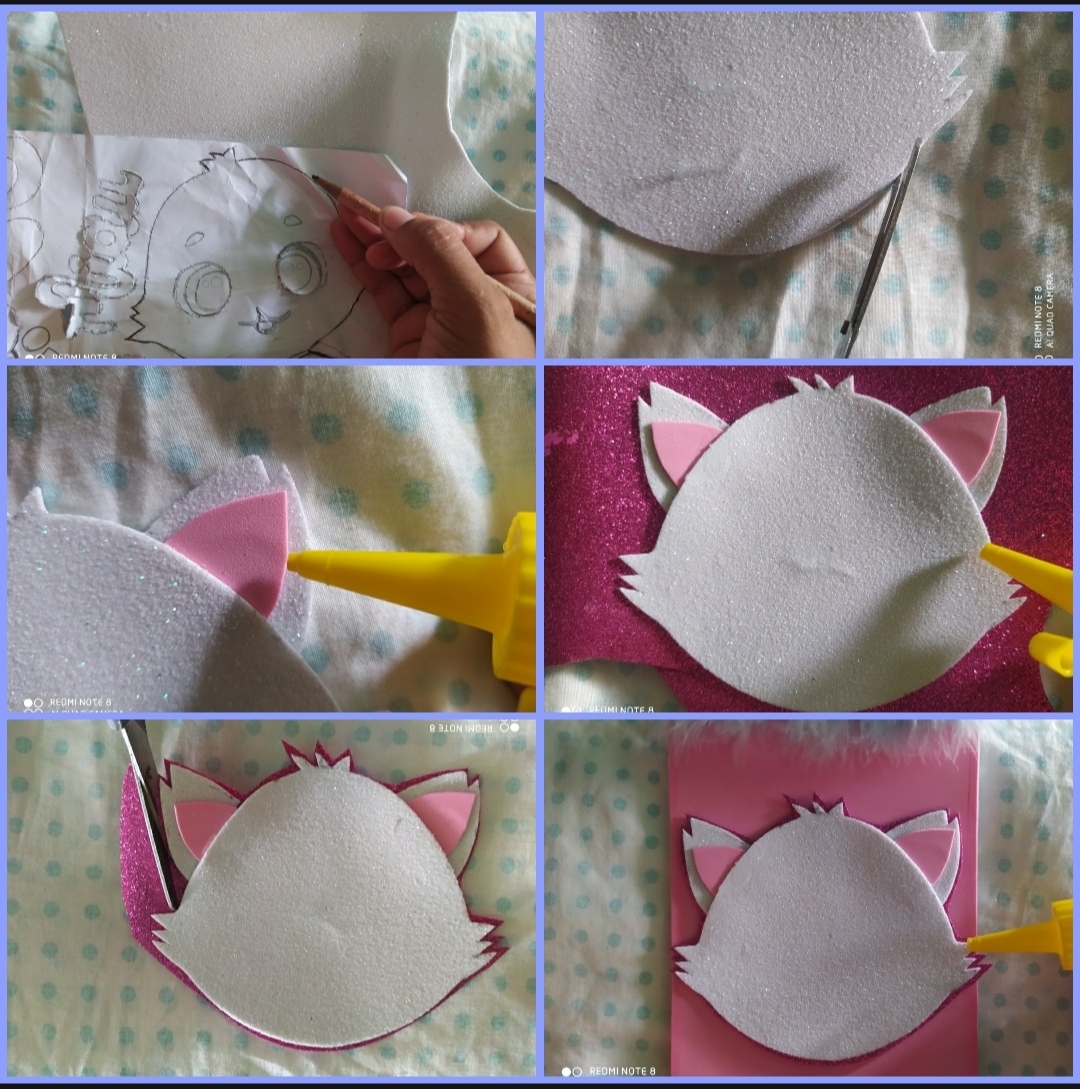
1st step:
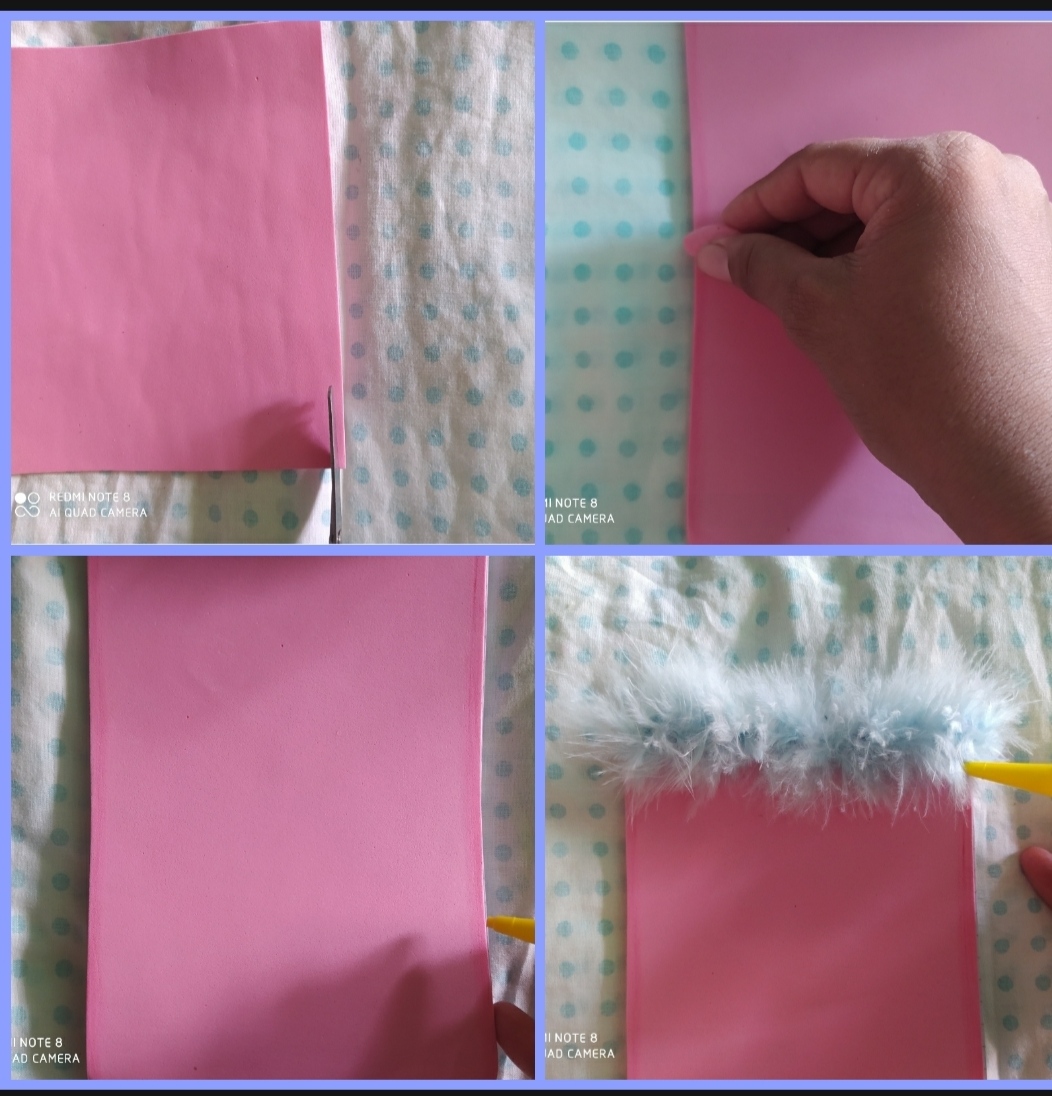
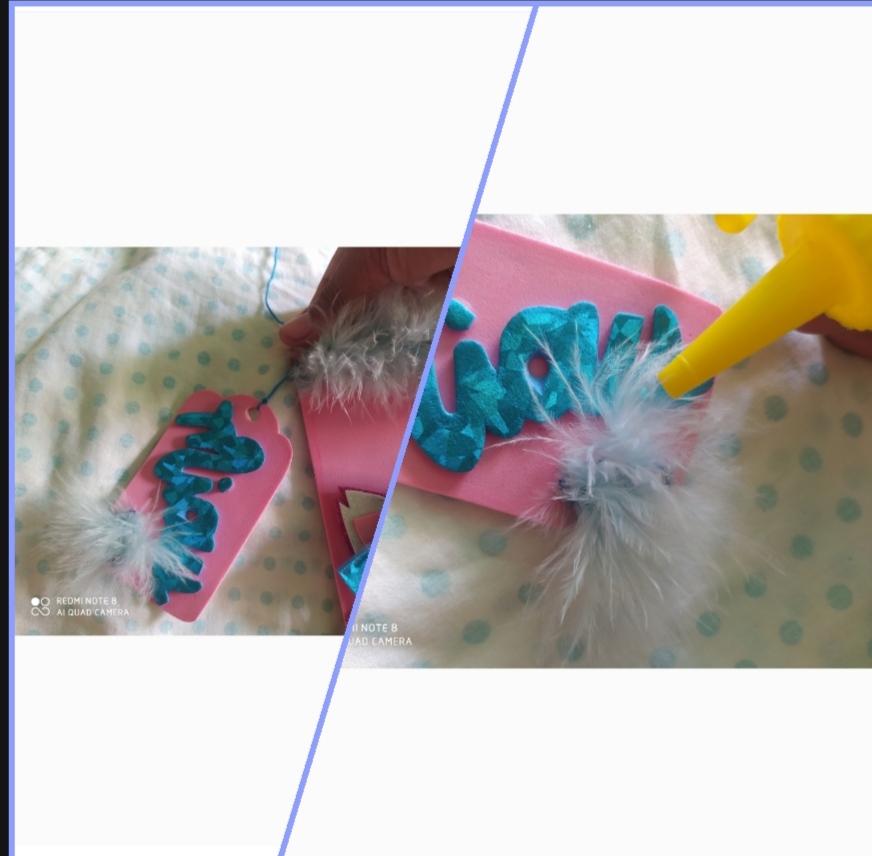
The first thing we must do is cut the pink foam to the size of the note blog to cover the parchment of the same, it is glued to the blog and with the pink chalk we blur all the edges of the foam and we cut out a strip of the blue marabu and it sticks at the top of this blog.
1° paso :
Lo primero que debemos hacer es recortar el foami rosado del tamaño de el blog de nota para cubrir el pergamino del mismo ,se le pega al blog y con la tiza rosado difulminamos todos las orillas del foami y recortamos una tira del marabu azul y se pega en la parte de arriba de este blog .
2nd Step:
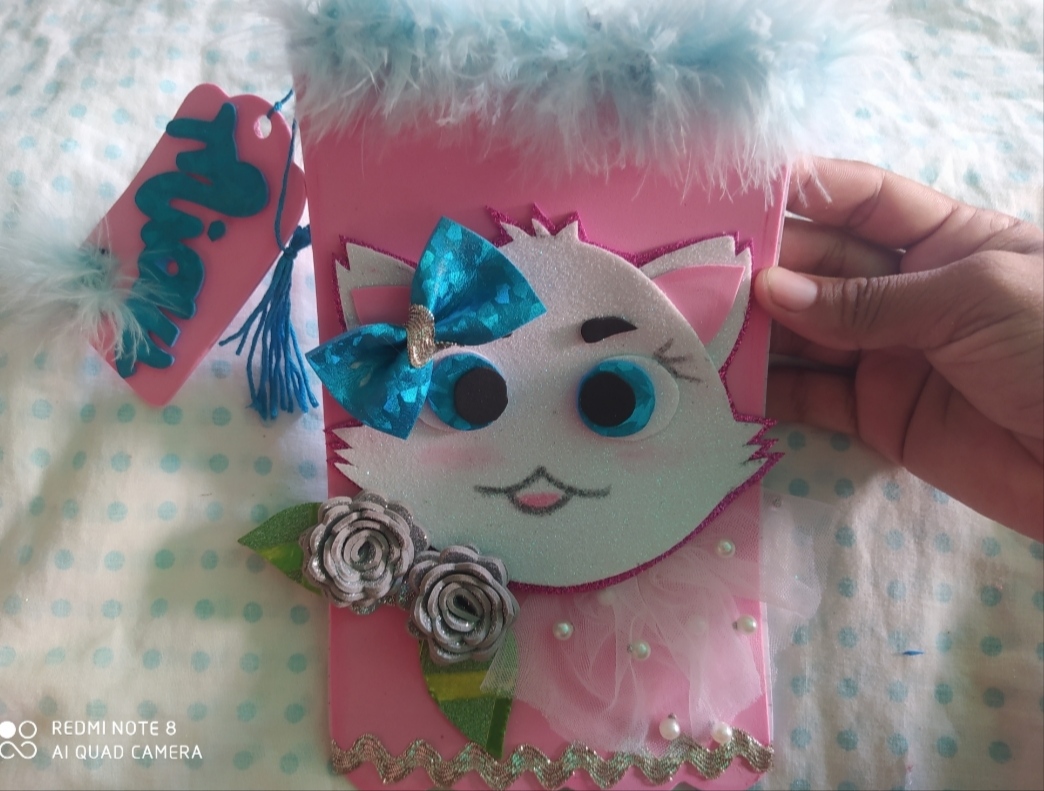
Once the blog is put together, we are going to proceed to make the figure of the east, in this case I will make the cat theme, with my mold marked on the frosty white foam the figure, it is cut out, then the ears are white and some more small pink ones are glued one on top of the other and glued to the head, when we assemble the head, it is glued to the fuchsia foam and we cut away leaving a little edge of this foam.
2°Paso:
Una vez que se armó el blog ,vamos a proceder hacer la figura de este ,en este caso yo haré la temática de gatica ,con mi molde marco en el foami blanco escarchado la figura ,se recorta ,luego las orejas unas blancas y unas más pequeñas rosadas se pegan una encima de la otra y se le pega a la cabeza ,ya cuando armamos la cabeza , está se pega del foami fucsia y vamos recortando dejando un poquito de borde de este foami .
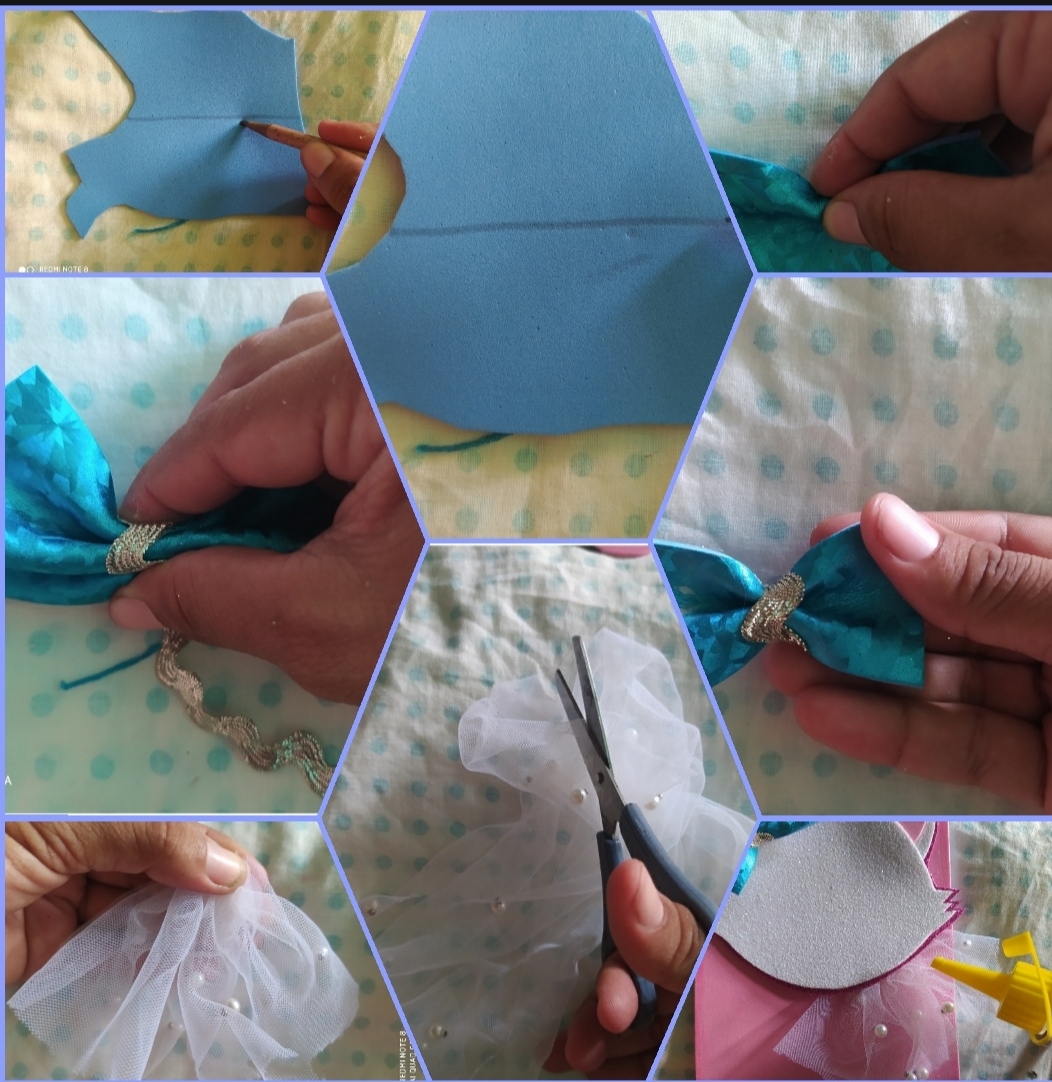
3rd Step:
On the blue printed foam, mark a small rectangle, cut it out and roll it in the center to make a bow. Use the decorative tape to stick it in the center. This bow is glued to one of the kitten's ears. , we look for the tull fabric with pearls, cut out a strip, roll it up in one part and glue it to the bottom of the cat.
3°Paso:
En el foami azul estampado ,se marca un rectángulo pequeño ,se recorta y vamos a enrollarlo en el centro para armar un lazo ,con la cinta decorativa se le pega en el centro y este lazo se le pega a una de las orejas de la gatica , buscamos la tela de tull con perlas y se recorta una franja y se enrrolla en una parte y se le pega en la parte de abajo de la gata .
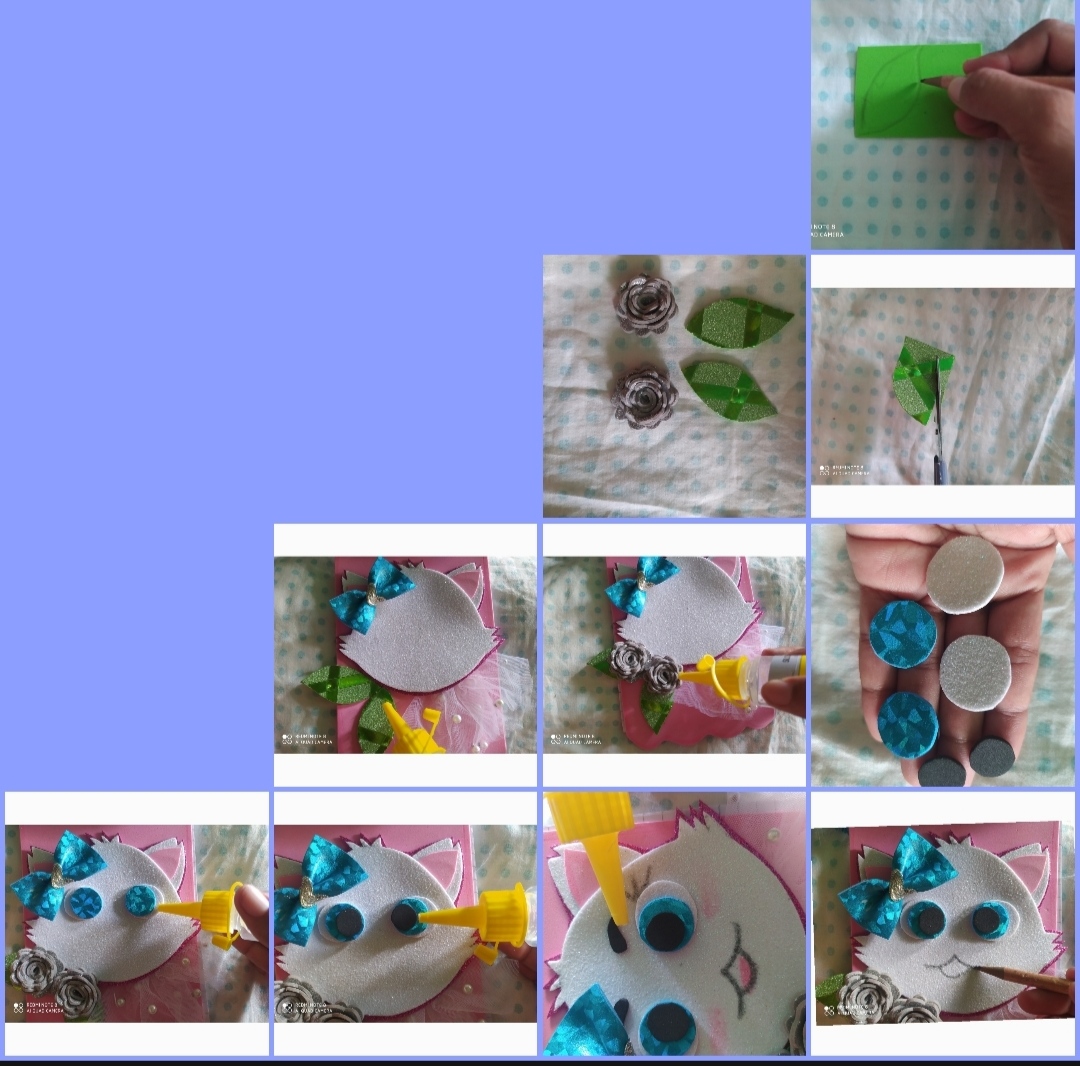
4th Step:
We will continue with the final touches of this beautiful craft, mark on the green printed foam, cut out some leaves and stick them in one corner of the kit, and mark some flowers on the frosted silver foam, cut them out and roll them up. This will be glued on top of the leaves, in the white, blue and black foam, some circles of different sizes will be cut out to make the eyes, this will be glued to the cat, with the pencil we paint the mouth, in the pink and blue foam, take them out You can do this if you wish, I really like the touches that are given to finish a craft, that's why I did it.
4°Paso:
Seguiremos con los últimos retoques de esta linda manualidad , en el foami verde estampado se marca , recorta unas hojas se le pega en una esquina de la gatica , y en el foami escarchado plateado marcamos unas flores , se recorta y se van enrrollando, estos se pegará encima de las hojas ,en el foami blanco, azul y negro se recortarán unos círculos de diferentes tamaño para armar los ojos ,esto se le pegará a la gatica ,con el lápiz pintamos la boca y en el foami rosado y azul sácalos un adorno esto lo haces si lo deseas a mí me gustan mucho los toques que se le dan para finalizar una manualidad por eso lo hice .
I hope you like it and the manual is helpful to you, stay this way.. Blessings to all of you...
Espero les guste y le sea de ayuda la manualidad ,está quedará de esta manera ..

Blessings to all of you... another time I will be in this community sharing another craft again.
Bendiciones para todos ustedes...en otra oportunidad estaré en esta comunidad compartiendo nuevamente otra manualidad.
📱The photos are my property, they were taken with my Redmi Note 8 and I used Google Translate.
📱Las fotos son de mi propiedad fueron tomadas con mi Redmi Note 8 y utilice traductor de Google.
Quedó lindo
Gracias amiga
Estimada amiga que bien que siempre nos regales grandes ideas con tus creaciones, siempre tus tutoriales son muy educativos.
Agradecida amiga de estar aquí y compartir estos tutoriales ...que bueno que te gustó ..
Q bonito me gustó
Gracias @isbelhiv02
Por nada
Me gusta mucho tu creatividad para las manualidades, @egarysv está te quedó muy linda y la modelo la muestra de una forma espectacular, muchos besos para ella 💋 💋 💋 😘
Gracias amiga @nhaydu..encantada de que te gusten mis creaciones ...hermosa mi modelo bellísima
Congratulations @egarysv! You have completed the following achievement on the Hive blockchain And have been rewarded with New badge(s)
Your next target is to reach 400 comments.
You can view your badges on your board and compare yourself to others in the Ranking
If you no longer want to receive notifications, reply to this comment with the word
STOPTo support your work, I also upvoted your post!
Check out our last posts:
El foami azul estampado es el que mas me gusta
Si amiga muy lindo ...los foamis estampados son hermosos
aha that really looks so beautiful, thanks for sharing.
This decorations use so much material, it really look colourful and the final results look cut. I love it
Thanks, a little bit of material is used but the good thing is that only a little of each one is used
Such a lovely thing you have made .
I love your blend colors and this is really breathtaking. I wish I can have a gift similar to this .
Well done dear and thanks for sharing this beauty with us.
It's a pleasure to share it, hope you like it, friend.
Ohhh que belleza, me encanto la verdad quedo precioso. Estoy segura que todo el mundo tendrá que ver con ese blog tan lindo que va a presumir tu bebe.
Saludos @egarysv ✨
!DIY
Gracias amiga de verdad espero que a todos les guste
You can query your personal balance by
!DIYSTATSQue bonito ha quedado este gatico amiga! Felicidades.
Gracias amiga ☺️
I really like the art you have, of giving life to the foami, it is wonderful, your dedication is noticeable, when making it excellent