🌺👧Tutorial :Making a Book Cover📚 [Eng/Esp]// Elaboración De Un Forro Para Libros 📚 [Eng/Esp]🌺
Good morning to everyone on this platform. May this Sunday be blessed for everyone with great enthusiasm. I hope everyone is well, I am pleased to be here again, many times I am absent for things that are not agendas for me... but the most important thing is to return from time to time, today I I would like to share with you a lining that I made in foam for a girl who wanted me to make it for her with the motif of a doll. She loved this lining because of the colors I used and the print of one of the foams. This creativity does not require a lot of time and well the same thing I say about materials with small foam cutouts that you have at home you can do it and also with a different motive or theme, I made it this way because the girl was going to capture in it an activity that she had in high school , she asked me like this, to make this beautiful craft the first thing we should look for is the materials to know if we have all the colors that we are going to use, if we don't have them we change the subject, later you will see that the steps are super easy to make and does not require much time or material, later I will show you the steps of this creativity. I hope you like them and it can be of help to you at any time.
Buenos días para todos en esta plataforma.
Que este Domingo sea bendecido para todos con mucho entusiamos.esperos todos estéan bien ,me complace nuevamente estar aquí ,muchas veces me ausento por cosas que no son agendas a mi ...pero lo más importante es volver de vez en cuando , hoy me gustaría compartir con ustedes un forro que elabore en foami para una niña que quería que yo se lo hiciera con el motivo de una muñeca , está forro le encantó por los colores que utilice y el estampado de unos de los foami , está creatividad no requiere de mucho tiempo y bueno lo mismo digo de materiales con pequeños recortes de foami que tengan en casa lo pueden hacer y también con diferente motivo o temática , yo lo elabore de esta manera porque la niña iba a plasmar en el una actividad que tenía en el liceo , ella me lo pido así , para la elaboración de esta linda manualidad lo primero que debemos buscar es los materiales para saber si tenemos todo los colores que vamos a utilizar,si no lo tenemos cambiamos de tema , más adelante verán que los pasos son súper fácil de hacer y no requiere ni de mucho tiempo ni de material, más adelante le iré mostrando los pasos de esta creatividad.Espero les gusten y les pueda ser de ayudad en cualquier momento.

The materials used in this craft are:
*Foamis:
-Brown
-Black
-skin color
-white
-Frosty pink
-Turquoise
-Purple
-Pink print
*Scissors
*Pencil
*Liquid silicone
*Light blue marabou
*Open space
*Silver decorative ribbon
*Pink balls.
Los materiales que utilice en esta manualidad son :
*Foamis
-Marron
-Negro
-Color piel
-Blanco
-Rosado escarchado
-Morado
-Turquesa
-Rosado estampado
*Tijera
*Lápiz
*Silicón líquido
*Marabú azul claro
*Abre hueco
*Cinta decorativa Plateada
*Pelotas rosada .

🌺 Step to make this craft:
🌺 Paso para la elaboración de esta manualidad.
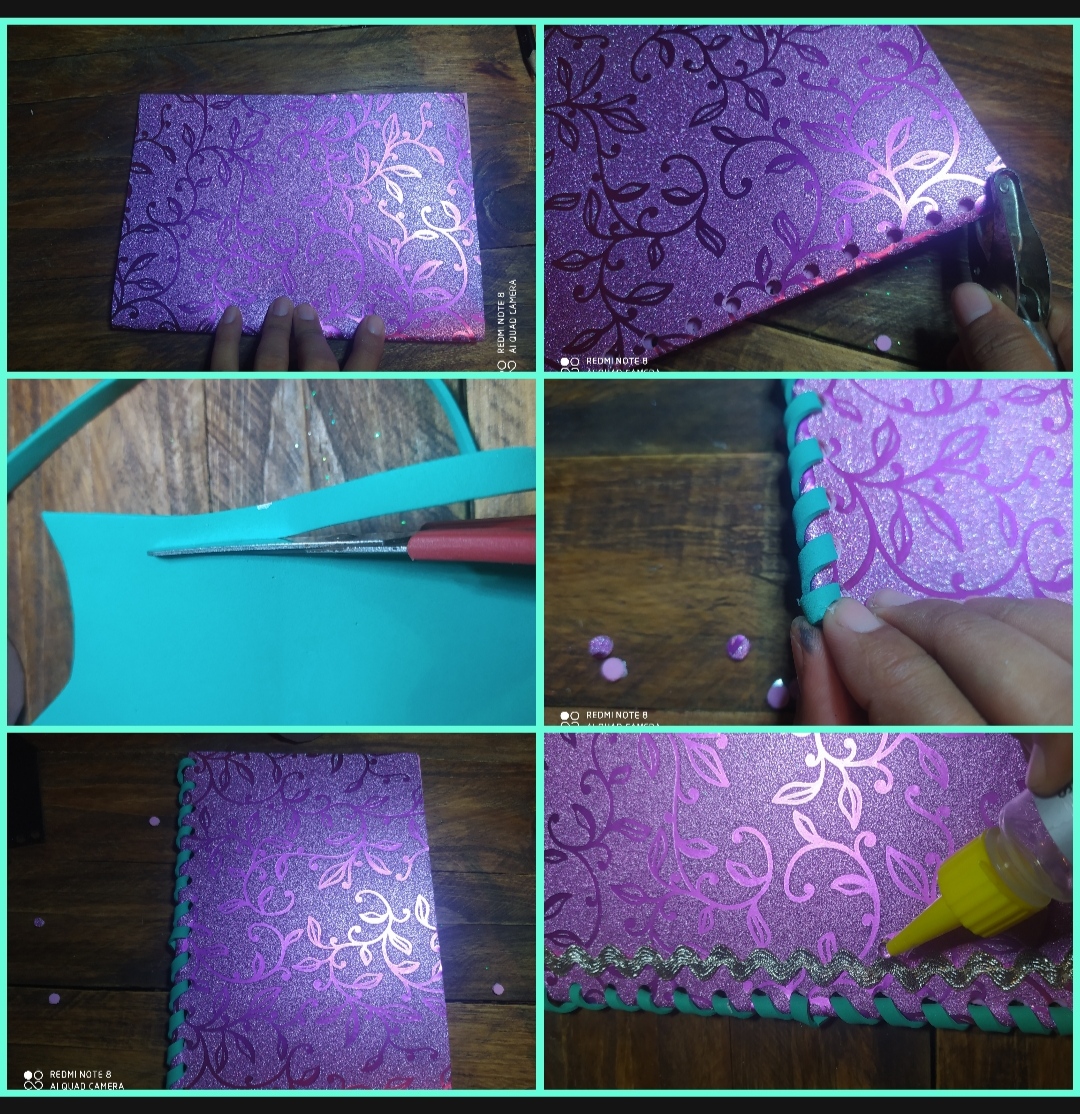
🌺 1st step is as follows:
When we get all our material that we are going to use, we fold our printed pink foam in half several times so that it stays folded, then with the hole opener, we make several holes throughout the part of the foam that is folded, in the turquoise foam, several strips are cut out so that we can trace them all over the printed foam, we pay them well so that the strip does not become clear, after this we look for our silver decorative counter and we stick it at a small distance from the lining binding.
🌺 1°paso es el siguiente:
Cuando te emos todos nuestro material que vamos a utilizar , doblamos nuestro foami rosado estampado por la mitad varias veces para que se quede doblado ,luego con el abre hueco ,se le haces varios orificios por todo la parte del foami que está doblado ,en el foami turquesa se recortan varias tiras para así con esta trazarla por todo el foami estampado ,se le paga las.ou tas bien para que no se despeje la tira , seguido de esto buscamos nuestra contá decorativa plateada y se le pega a una pequeña distancia del enlazado del forro .
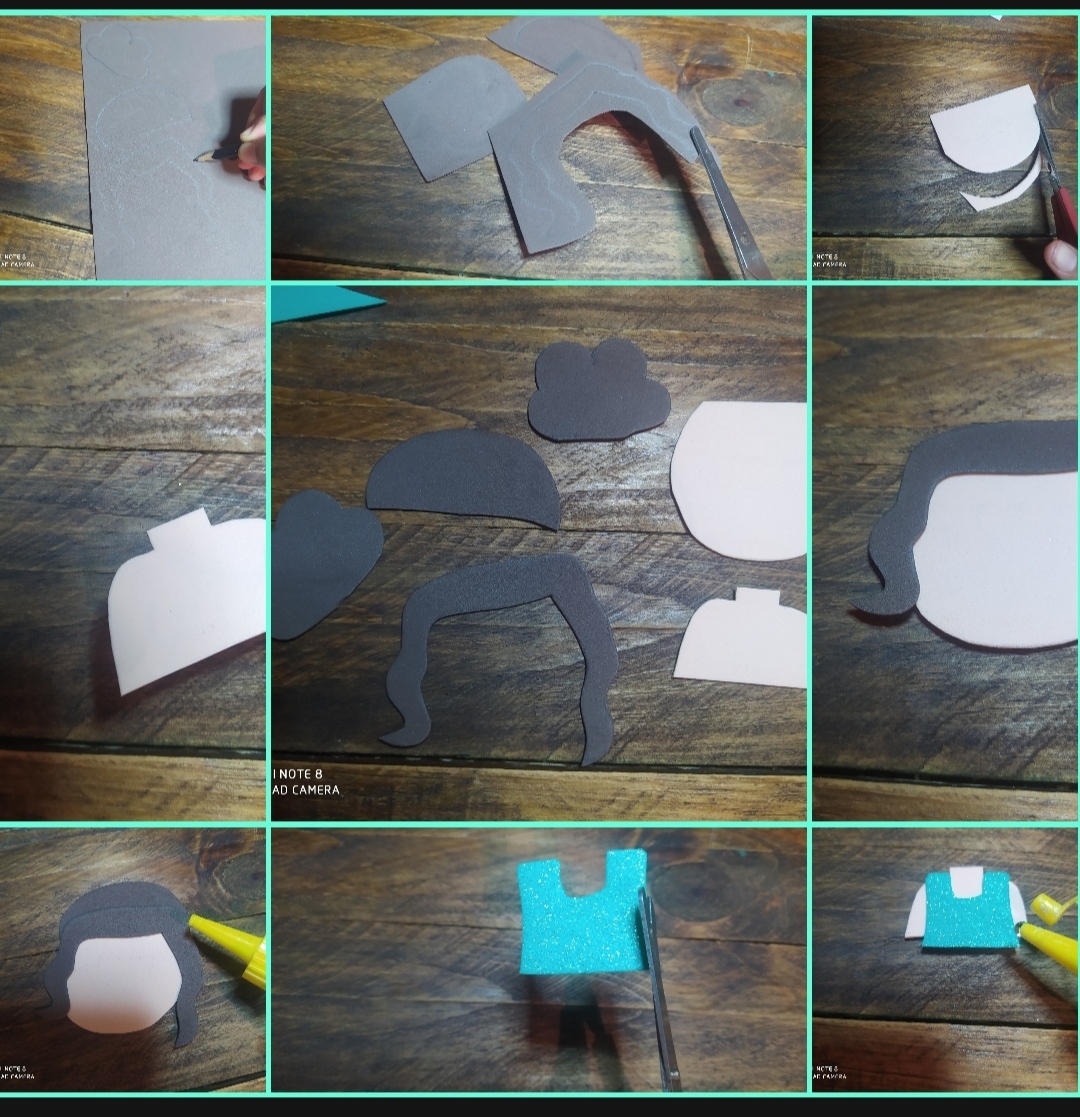
🌺 2nd step is as follows:
In the brown foam we mark the hair in several parts, in the flesh colored foam we mark the face and body in the middle, all of this is cut out, we leave it on one side so that we can now proceed to put it together, then in the turquoise foam we mark the the shirt and cut it out, then we glue the hair to the face, on the other hand the shirt to the body and finally we glue the head to the body.
🌺 2° paso es el siguiente:
En el foami marrón marcamos los cabellos en varias partes , en el foami color piel se marca la cara y el cuerpo por la mitad ,todo esto se recortan ,dejamos en un lado para ahorita proceder a armarla , luego en el foami turquesa se marca el la camisa y recorta ,después se le pega los cabellos a la cara por otra parte la camisa al cuerpo y por último pegamos la cabeza del cuerpo.
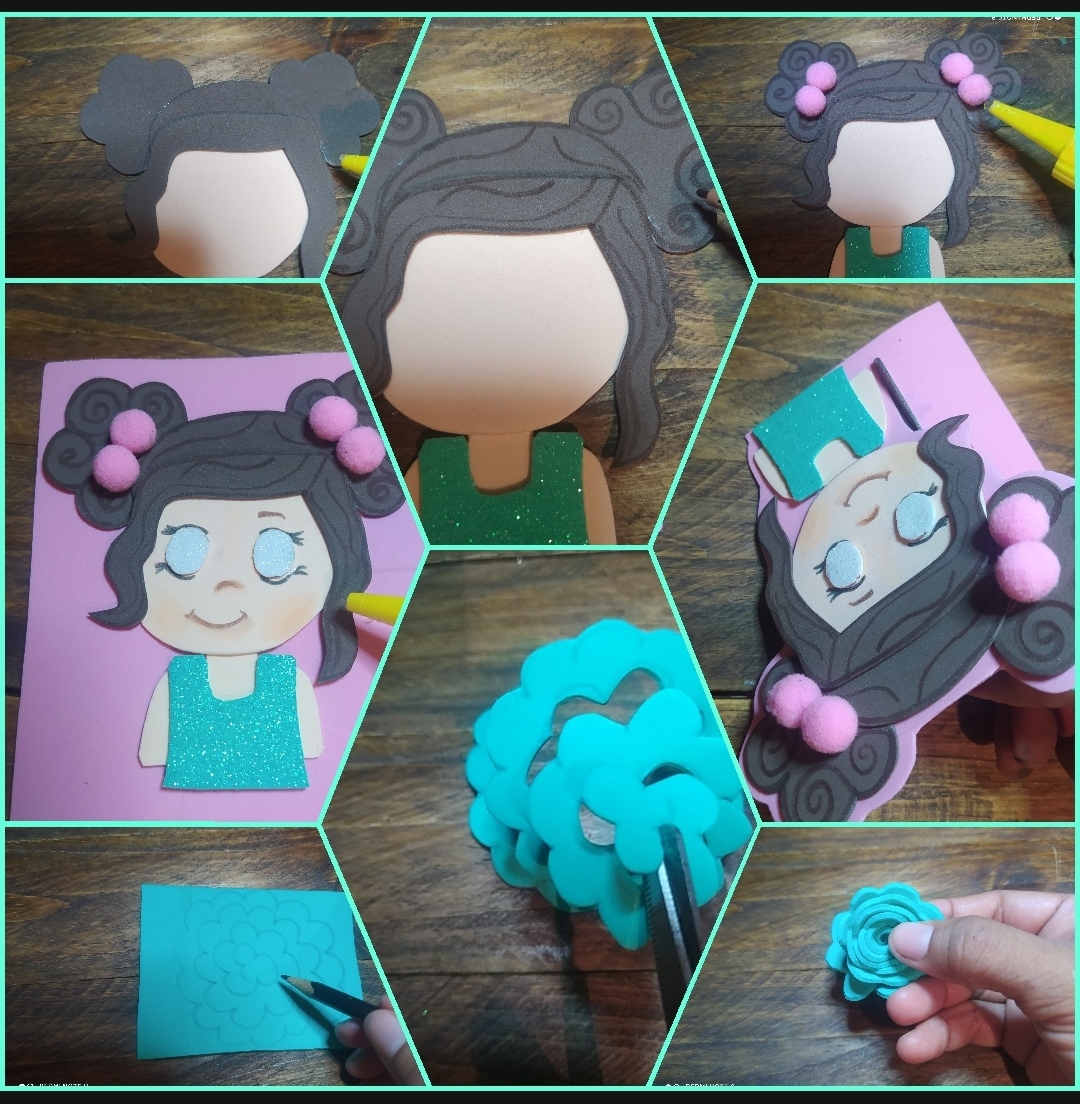
🌺 3rd Step is as follows:
In this step, with a brown marker we make the marks on the hair, we glue the pink balls, we paint the mouth, nose and eyelashes, then on the white foam we mark some circles and glue them on the eyes, Stick the doll on the pink foam, cut it out, leaving a little bit, when we make these, mark some shapes on the turquoise foam, cut it out and roll it up to assemble the flowers, do the same on the purple foam and one on the pink
🌺 3° Paso es el siguiente:
En este paso con un marcador marrón se le hacen las marcas de los cabellos , le pegamos las bolas rosadas, se le pinta la boca ,nariz y pestañas ,después en el foami blanco se marca unos círculos y se le pega en los ojos , se pega la muñeca en el foami rosado se va recortando dejando un poquito , cuando ya hacemos estos ,se marcan unas formas en el foami turquesa ,se recorta y vamos enrrollando para armar la flores ,se hace lo mismo en el foami morado y una en el rosado
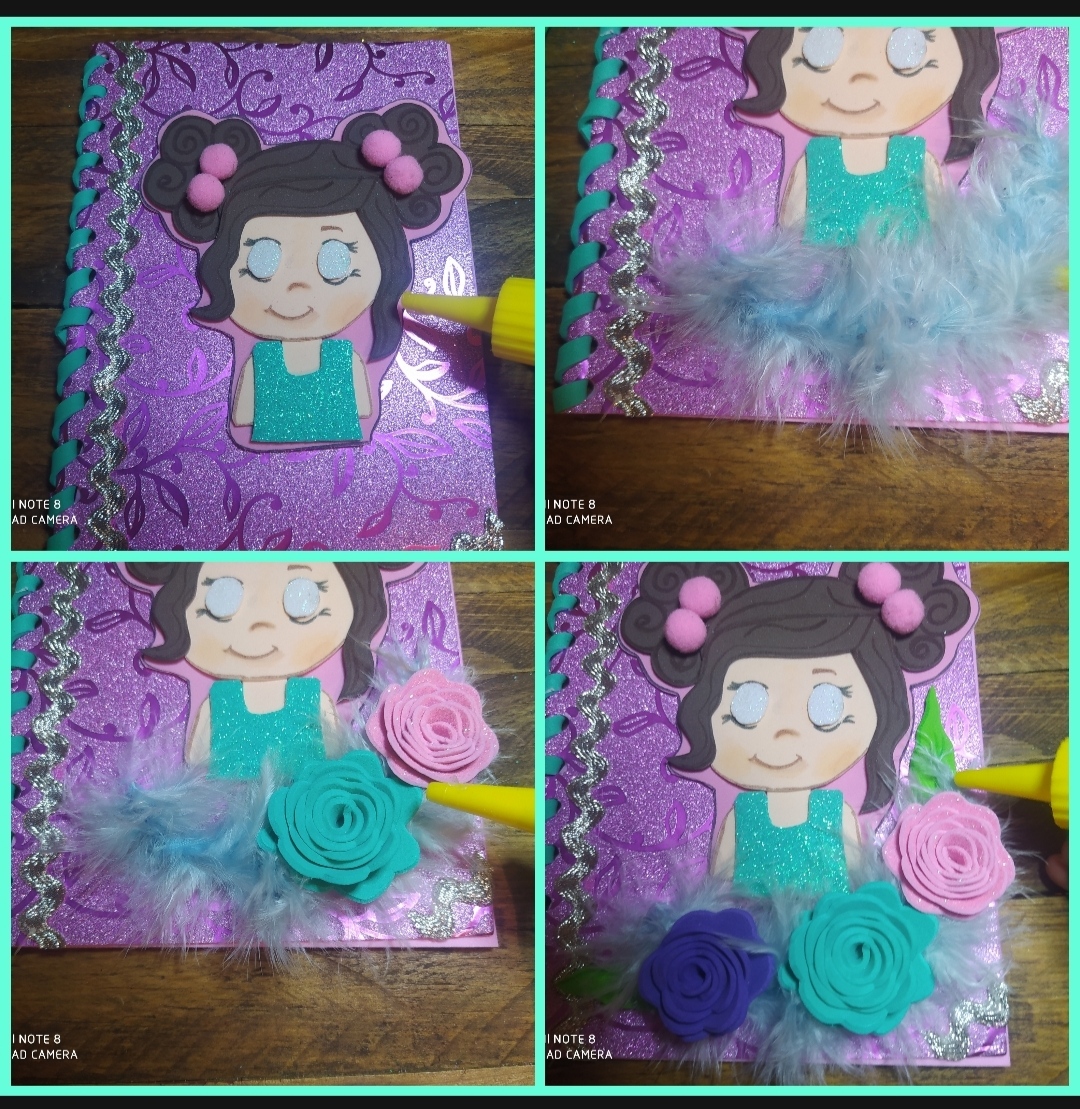
🌺 4th Step is as follows:
To complete this lining, we glue the doll to it, then we glue a piece of the marabu in a corner under the elaborate figure, and we glue the flowers on top of the marabu, cut out some leaves and glue it on top of the flowers in this way finished this creation.
4° Paso es el siguiente:
Para culminar este forro ,se pega la muñeca de este ,después pegamos un pedazo del marabu en una esquina debajo de la figura elaborada , y vamos pegando las flores encima del marabu , se recorta una hojas y se pega encima de las flores de esta manera finalizados está creación .
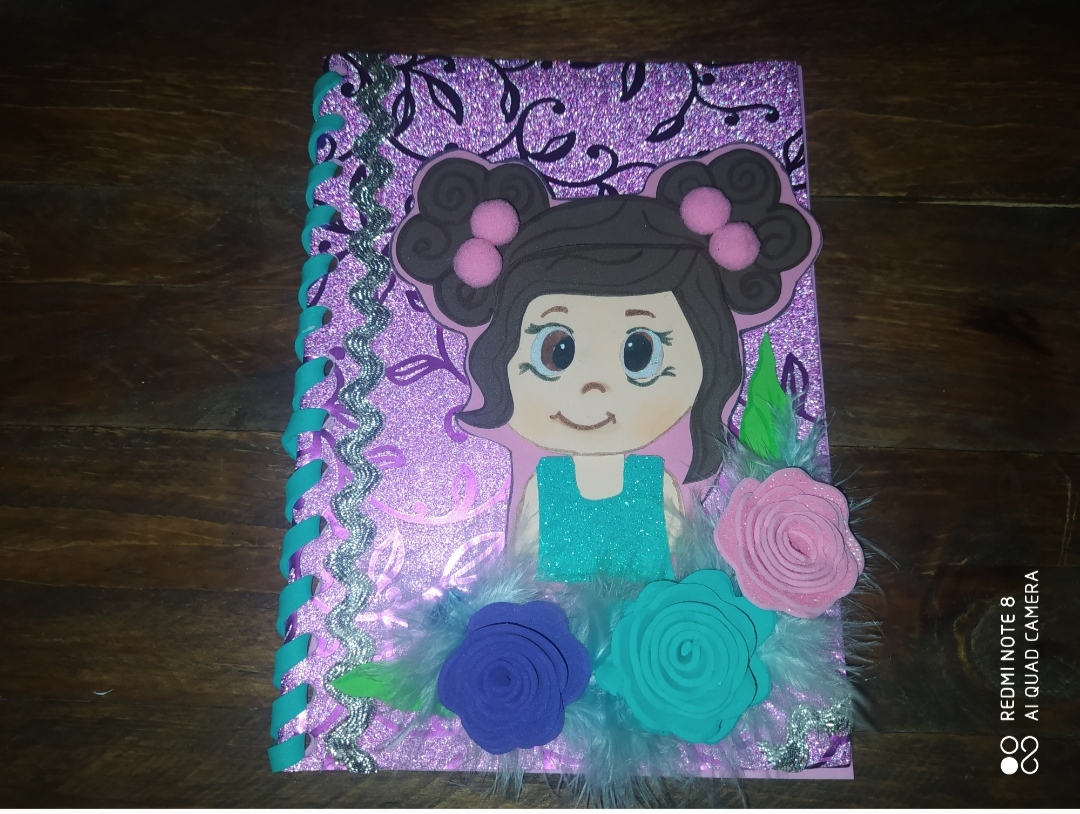
🌺🌺🌺This is how our creative lining made of foam will look.🌺🌺🌺
🌺🌺🌺Así nos quedará nuestro creativo forro elaborado en foami .🌺🌺🌺
Blessings to all, happy Sunday, I hope you enjoy it with your family...
Bendiciones para todos feliz domingo espero disfruten en familia...
📱📱The photos are my property, they were taken with my Remid note 8 and I used Google translator...📱📱
📱📱Las fotos son de mi propiedad fueron tomadas con mi Remid note 8 y utilice traductor de Google...📱📱
Bellos
That is such a beautiful book cover for the little one. Great job
Thanks for the support, I'm glad you liked it...
Estupenda idea para personalizar los cuadernos y libretas de los peques!