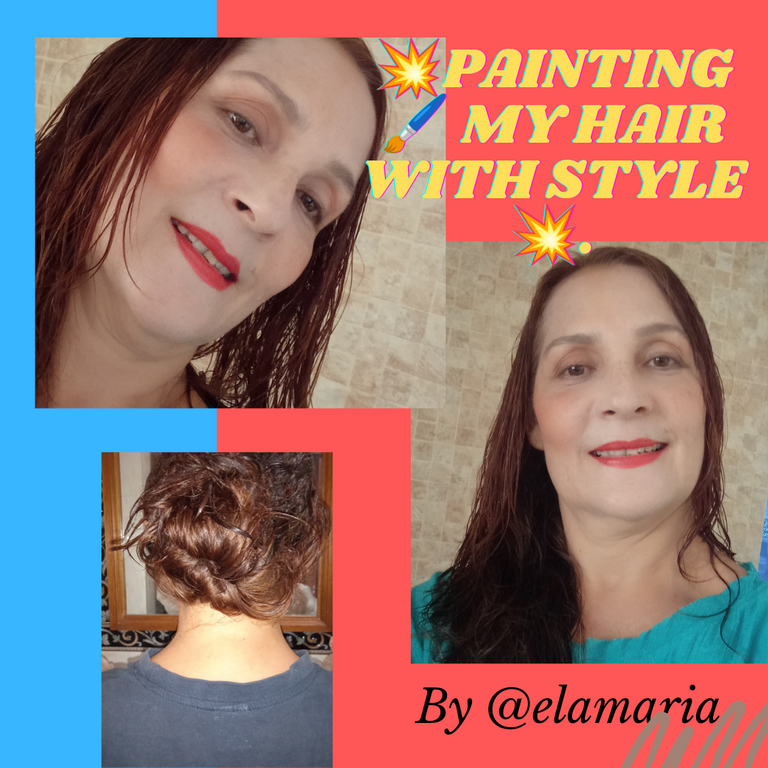
💥PAINTING 🖌️ MY HAIR 👩🦰 WITH STYLE💥. [ENG][ESP]
✨😃Hello to all my dear friends of @hairworld😃✨.
A pleasure to greet you and share with you my different styles, hairstyles, arrangements and changes in my hair. Today I share my experience painting my hair myself, which I was satisfied with despite my little or no experience doing it.
It was a little difficult for me to do the step by step and take pictures and videos. I decided to paint my hair early Saturday morning, taking advantage of the fact that my son was at home and could help me take some pictures, which I couldn't do by myself.
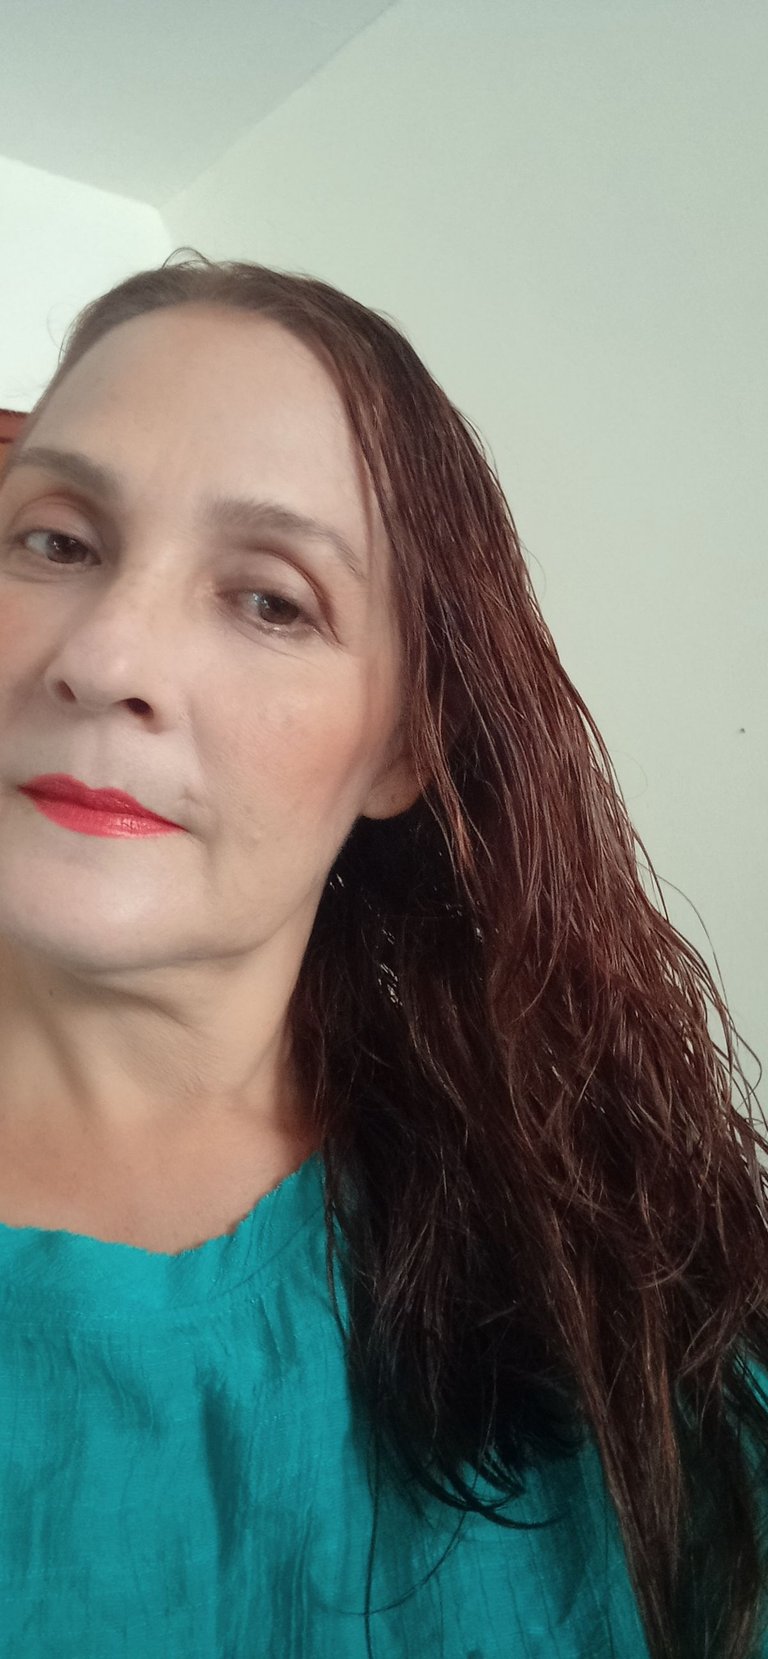
It is important to point out that I painted and retouched especially the roots, since I could see a little gray hair and I looked very disheveled. Hair is very important to keep it groomed, as it highlights our face and personal appearance. I think you have to pay a lot of attention to it and dedicate part of the day to combing and styling it. Also, if we keep it with a color that we like and looks good, it is much better.
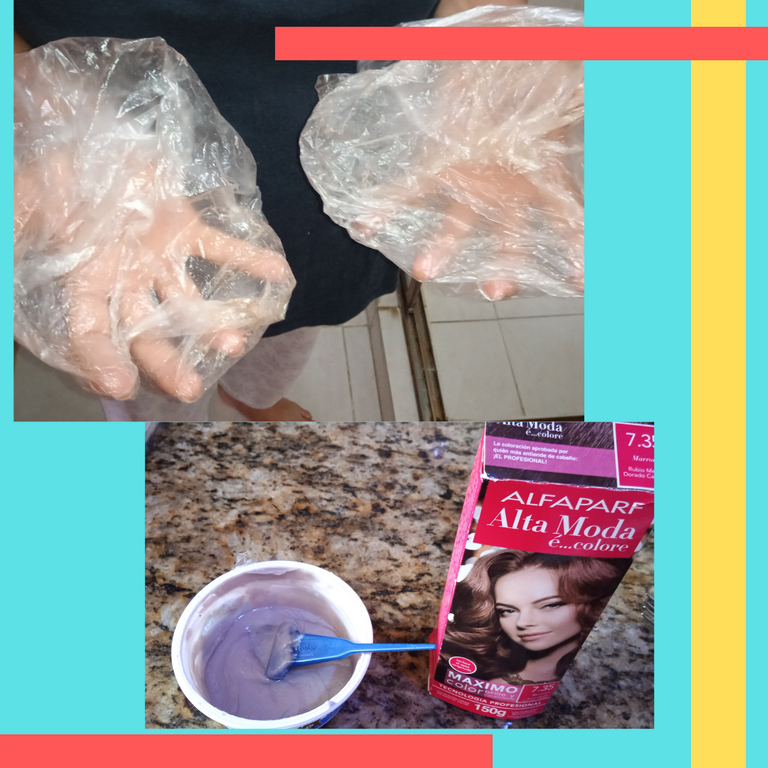
I started by preparing it in a plastic container with a brush that I had at home. The dye used is one that I buy in a recognized pharmacy in my city and I have only seen this brand there. I like good quality dyes because other brands that I have tried at some point, cause me allergies and also the color fades very quickly.

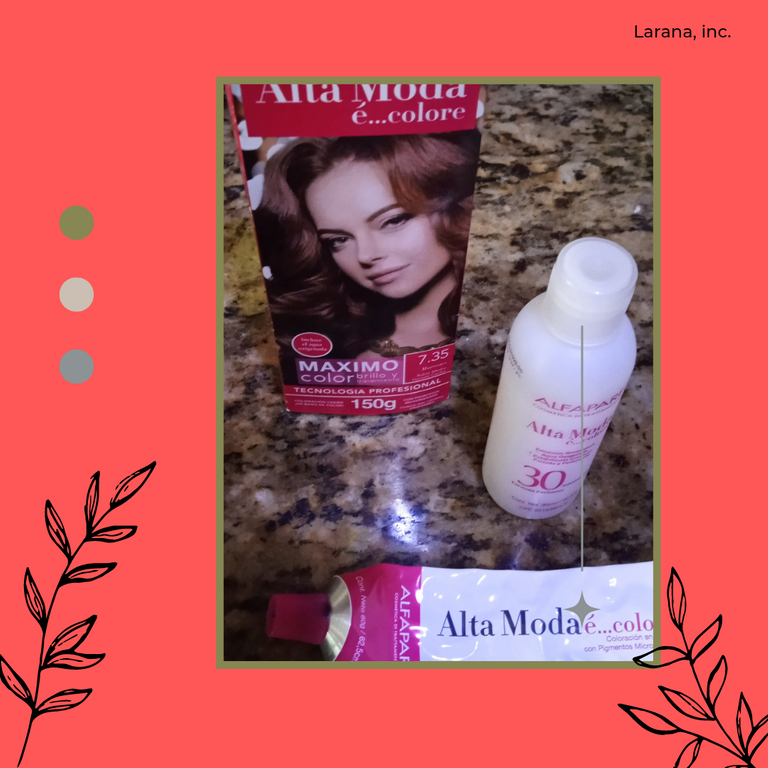
In recent times I have been painting my hair with reddish tones and the one I adopted as my favorite is a Middle Golden Golden Mahogany Blonde color. So I almost always buy this dye. You know that ultimately according to our hair color and pigmentation will be the resulting color. As we wash our hair, it gets a little lighter.
The ALFAPARF brand in my opinion is very professional and the presentation that I buy brings only the dye tube and the 30 volume bottle of hydrogen peroxide. So I improvised some gloves with two transparent plastic bags.
To touch up my ends I used approximately 40% of the dye with the same proportion of hydrogen peroxide. I mixed everything very well, stirring until I got a uniform cream without lumps. After doing this I put on and tied in each hand the plastic bags as I mentioned. I also put on a dark flannel and I was at home.

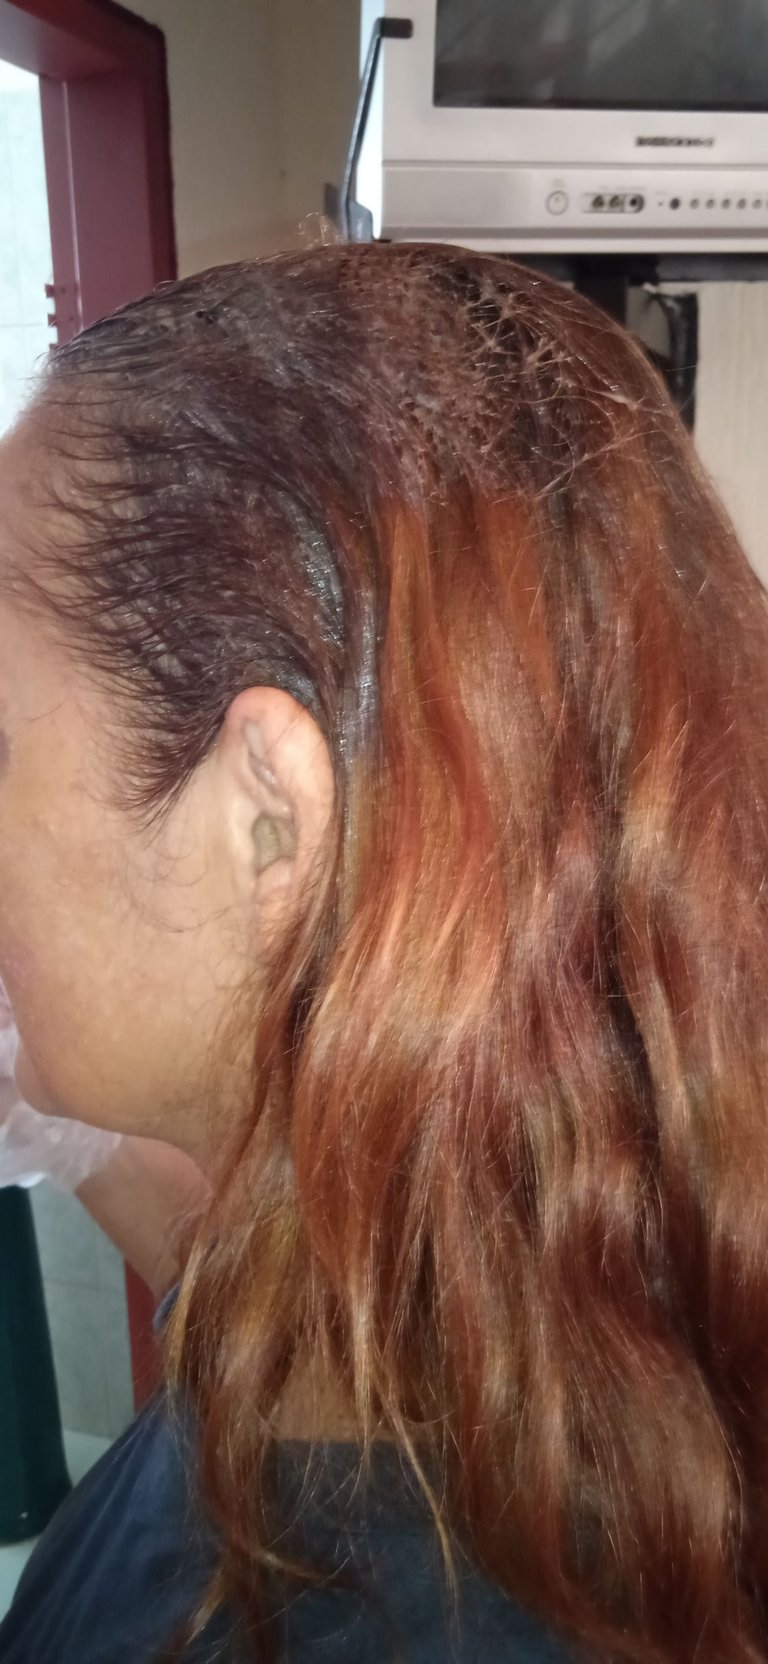
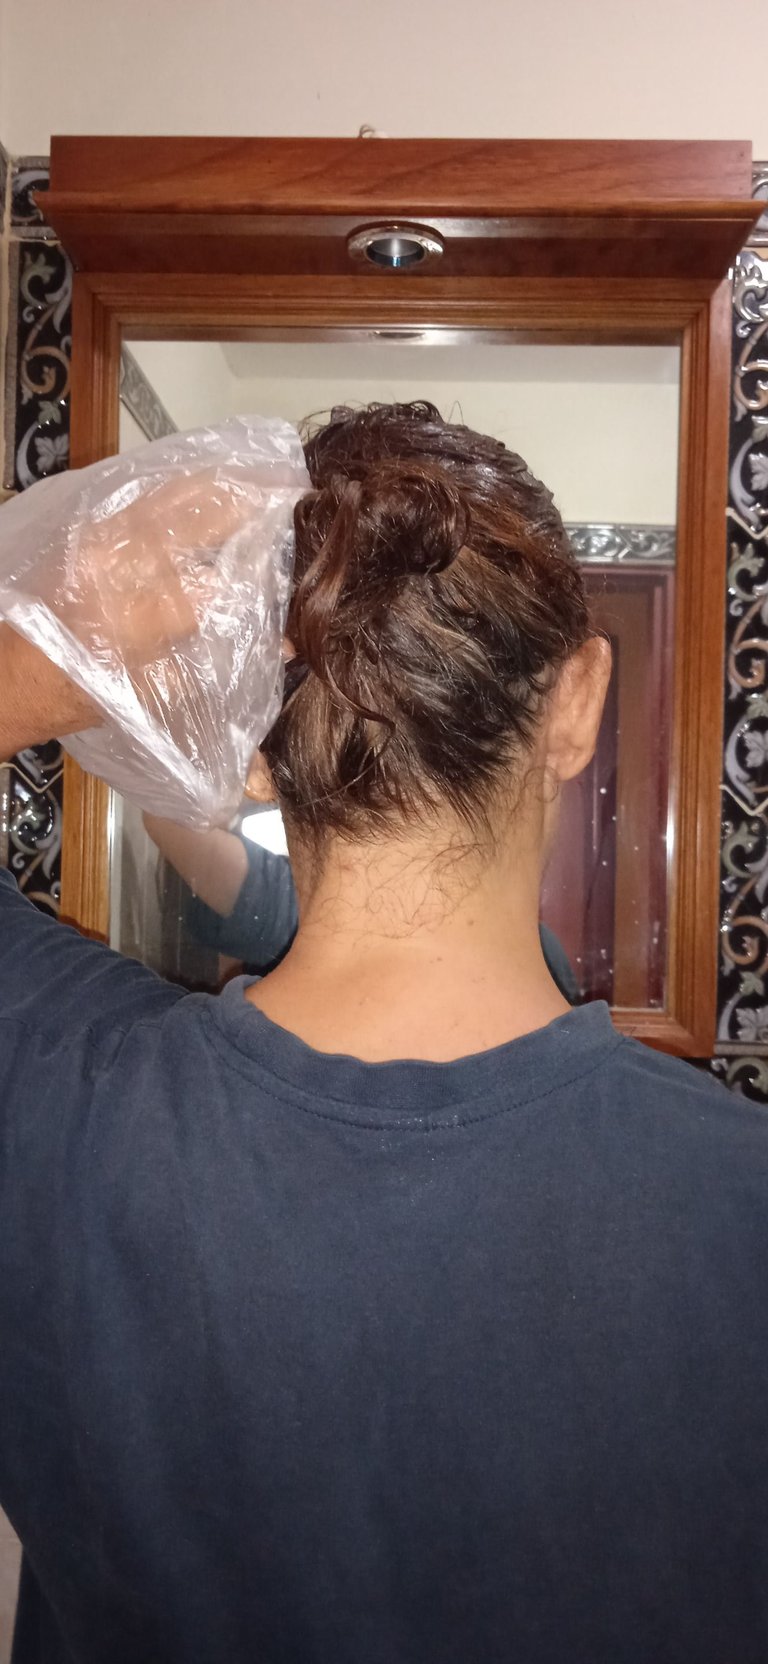
I went to the bathroom, which has a mirror and adequate light to see what I was going to do. As I have very fine hair and not so abundant it was relatively easy and quick to do. I started by applying the dye on the most visible part of the face, with the tip of the brush I moved the hair a little aside as I was placing the dye.
I did the same in the central area and finally the back of the head; especially at the roots. The remaining dye was applied to the rest of the hair. Afterwards I started to massage the dye into the hair, this step I consider important to obtain a uniform color.
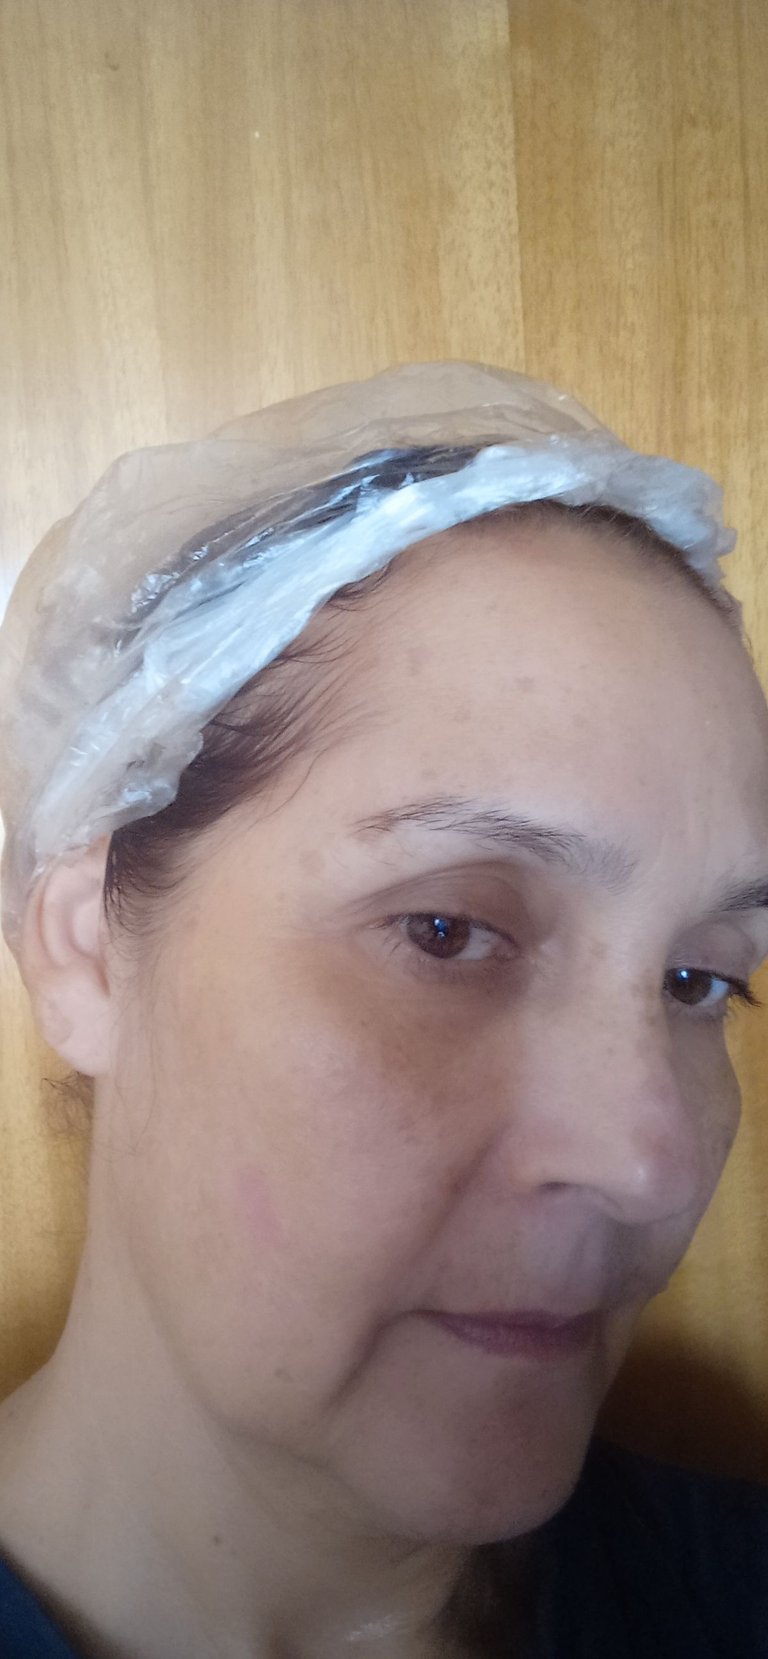
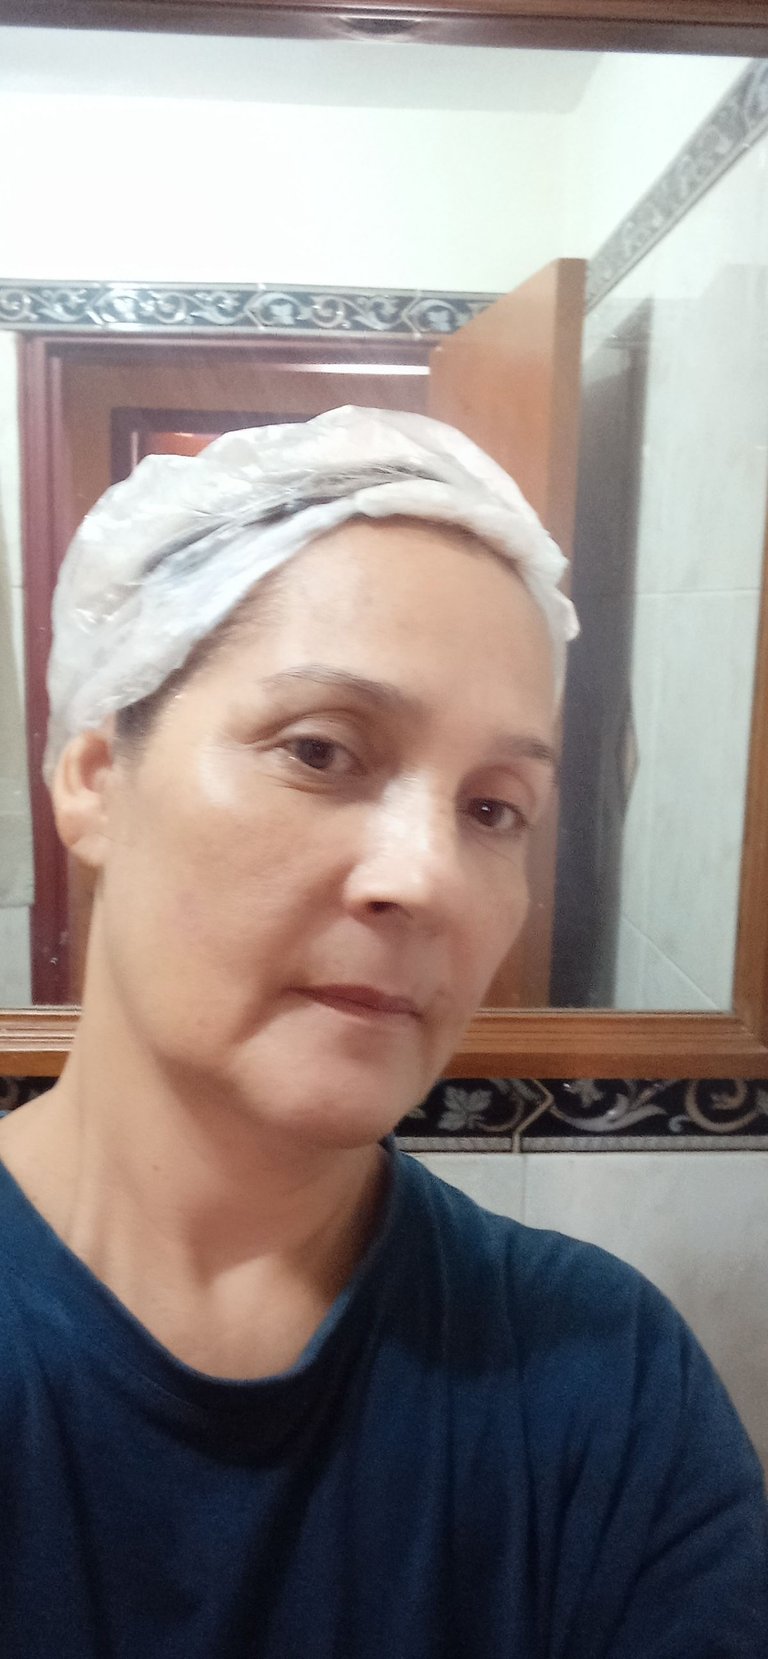
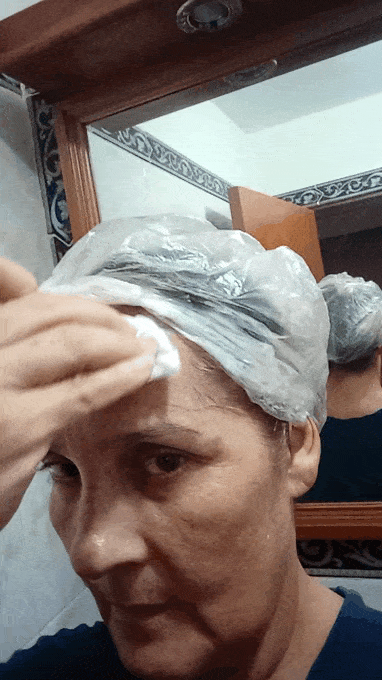
With one of the bags I carefully placed it on my head as a plastic cap. I left the dye for about 35 minutes. I took advantage of this time to wash the implements and keep the rest of the dye in an appropriate place. I also applied some cream on my face and with a napkin and circular movements I removed the dye that may have fallen on my face, in the hairdresser's they have done this step and that is why I remembered and put it into practice.
 |  |
|---|
 |  |
|---|
In many beauty salons the application of chemicals as they call it is quite expensive. It is important to learn how to do my own hair and to paint and style it myself. The satisfaction of doing it by my own hands, saving money and using it by buying good quality hair products, is now a priority for me.
Likewise, learning how to do my own hair with the things that I like and look good. I say this because I tell you that my mother-in-law used to tell us that when she went to the hairdresser or beauty salon she would come home immediately to wash her hair because she didn't like the way she was styled. She had her own tastes and hairstyle. She was one of those people who was a little embarrassed to say anything to the stylist who did her hair. She told this anecdote many times hahaha.
Nowadays with the magic of the internet many people learn everything about hairstyles, haircuts and a lot of aspects related to this topic. Everyone has their own style and personality and knows what they like. Although it is also important from time to time to go to a beauty salon, receive guidance and advice from qualified professionals for any change of look for example.
Back to the process of painting my hair. After 35 minutes I went to the shower to take a bath and first with my head backwards I rinsed well, avoiding the eye area. After the water was clear I applied shampoo twice and finally I applied a cream bath. I left it on for 5 minutes while I applied soap to my face.
At the end I wrapped it with a towel and left it for ten minutes in the open air and finally with a comb I carefully proceeded to untangle it. My scalp is a bit sensitive so I have to do this step calmly and carefully.
Results
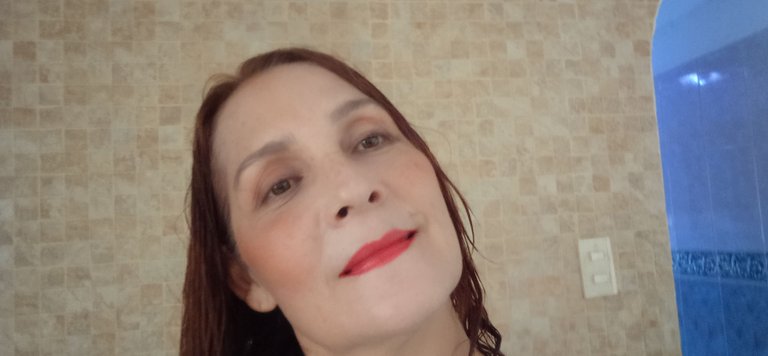
I love the way my hair looked and the color.
👩🦰What do you think 🤔 👩🦰?
 |  |
|---|
 |  |
|---|
✨Friends of #hive✨ learning how to color your hair yourself is not difficult, you might need help at first, but when you see others doing it, videos on the internet and practicing on yourself, you can become skilled. It takes motivation and willingness. So go ahead and learn how to style your hair, do your hair, blow dry and color your hair and do it the way you like it.
Thank you for sharing with me this very satisfying experience.
And let me know if you have painted your hair yourself and how the results have been.

EN ESPAÑOL
✨😃Hola a todos mis queridos amigos de @hairworld😃✨
Un gusto saludarlos y compartir con ustedes mis diferentes estilos, peinados, arreglos y cambios en mi cabello. Hoy comparto mi experiencia pintándome yo misma el cabello, el cual quedé satisfecha a pesar de mi poca o ninguna experiencia haciéndolo.
Para mí fue un poco difícil hacer el paso a paso y tomar fotos y videos. Les cuento que decidí pintármelo el sábado en la mañana muy temprano, aprovechando que mi hijo estaba en la casa y me podía ayudar a tomar algunas fotos, la cual yo misma no podía hacerlo.
Es importante señalar que me pinté y retoqué especialmente las raíces, ya que se me veían un poco las canas y me percibía muy desaliñada. El cabello es muy importante mantenerlo arreglado, ya que resalta nuestra cara y apariencia personal. Considero que hay que prestarle mucha atención y dedicarle parte del día para peinarlo y arreglarlo. Además, si lo mantenemos con un color que nos guste y quede bien, es mucho mejor.
Comencé preparando en un envase de plástico con una brocha la cual disponía en mi casa. El tinte utilizado es uno que compro en una farmacia reconocida en mi ciudad y esta marca solo la he visto allí. Me gustan los tintes de buena calidad ya que otras marcas que he probado en algún momento, me causan alergias y además el color se pierde muy rápido.
En los últimos tiempos me he pintado el cabello con tonos rojizos y el que adopté como preferido es un color Rubio Medio Dorado Caoba. Así que casi siempre compro este tinte. Ustedes saben que finalmente de acuerdo a nuestro color de cabello y pigmentación será el color resultante. A medida que vamos lavando el cabello se va aclarando un poco más.
La marca ALFAPARF a mi parecer es muy profesional y la presentación que yo compro trae solamente el tubo del tinte y el envase de agua oxigenada de 30 volúmenes. Por lo que improvisé unos guantes con dos bolsas plásticas transparentes.
Para retocarme las puntas utilicé aproximadamente el 40% del tinte con la misma proporción de agua oxigenada. Mezclé todo muy bien moviendo hasta lograr una crema uniforme sin grumos. Después de hacer esto me coloqué y amarré en cada mano las bolsas plásticas como les mencioné. Además de ponerme una franela oscura y de estar en casa.
Me fui al baño que tiene espejo y además con luz adecuada para ver bien lo que iba a hacer. Como tengo un cabello muy fino y no tan abundante me fue relativamente muy sencillo y rápido hacerlo. Comencé por aplicar el tinte por la parte de la cara o más visible, con la punta de la brocha fui apartando un poco el cabello a medida que iba colocando el tinte.
Así mismo el área central y por último la parte de atrás de la cabeza; especialmente en las raíces. El tinte restante lo coloqué en el resto del cabello. Posteriormente comencé a darme unos masajes para integrar todo el tinte, este paso considero importante para obtener un color uniforme.
Con la una de las bolsas cuidadosamente la coloqué en mi cabeza como gorro plástico. Dejé el tinte por 35 minutos aproximadamente. Aproveché en ese tiempo de lavar los implementos y guardar el resto del tinte en un lugar apropiado. Además me apliqué un poco de crema en la cara y con una servilleta y movimientos circulares retiré el tinte que pudo haber caído en el rostro.En la peluquería este paso lo han hecho y por eso recordé y lo puse en práctica.
| |
|---|
| |
|---|
En muchos centros de belleza la aplicación de químicos como así lo llaman es bastante costosa. Es importante aprender a arreglarme, pintarme y peinarme yo misma el cabello. La satisfacción de hacerlo por mi propias manos, ahorrarme el dinero y usarlo comprando productos para el cabello de buena calidad, es hoy en día una prioridad para mí.
De igual forma, aprender a arreglarse uno misma con las cosas que nos gusta y quede bien. Esto lo digo porque les cuento que mi suegra nos decía que cuando ella iba a la peluquería o Salón de Belleza llegaba a su casa inmediatamente a lavarse el cabello, ya que no le gustaba como la peinaban. Ella tenía sus propios gustos y estilo de peinado. Ella era de la personas que le daba un poco de pena decir algo al estilista que le hacía el peinado. Esta anécdota la contó muchas veces jajaja.
Hoy en día con la magia del internet muchas personas aprenden de todo acerca de peinados, cortes de cabello y una cantidad de aspectos relacionados con este tema. Cada persona tiene su estilo y personalidad, y sabe lo que le gusta. Aunque también es importante de vez en cuando acudir a un centro de belleza, recibir orientación y asesoría de profesionales calificados para cualquier cambio de look por ejemplo.
Volviendo al proceso de la pintura de mi cabello. Al cabo de los 35 minutos me fui a la ducha a bañarme y primero con la cabeza hacia atrás me enjuagué bien, evitando el área de los ojos. Después que el agua estaba clara me apliqué dos veces champo y por último me coloqué un baño de crema. Este me lo dejé por 5 minutos mientras me aplicaba jabón en mi cuerpo.
Al final lo envolví con una toalla y deje por diez minutos al aire libre y finalmente con un peine cuidadosamente procedí a desenredarlo. Tengo el cuero cabelludo un poco sensible así que este paso lo debo hacer con calma y cuidado.
Resultados
Les cuento que me encantó como me quedó mi cabello y su color.
👩🦰¿Y ustedes que piensan 🤔 como me quedó?👩🦰
| |
|---|
| |
|---|
✨Amigos de #hive✨ aprender a pintarse uno misma el cabello no es difícil, puede ser que al principio necesitemos ayuda, pero cuando vemos haciéndolo a otros, videos por internet y practicando con uno misma, podemos llegar a tener destreza. Hay que tener motivación y disposición. Anímate a aprender a arreglarte tu cabello, peinarte, secarte y pintarte y hacerlo de la forma que te gusta.
Gracias por compartir conmigo ésta muy satisfactoria experiencia.
Y cuéntame si te has pintado tu misma y cómo han sido los resultados.
Fotografías editadas en GridArt por @elamaria// Photographs edited in GridArt
Separadores de Texto hechos en Canva por @elamaria // Text Dividers made in Canva by @elamaria
Gif hechos en editor Gif por @elamaria // Gif made in Gif editor by @elamaria //
Fotografías tomadas desde mi teléfono celular Redmi 9A//Photos taken from my Redmi 9A phone.
Traductor usado es Deepl// Translator used is Deepl

Se te ve muy bien el color amiga y para ser la primera vez lo hiciste muy bien, yo lo he intentado pero en la parte de atrás no me queda bien., que bueno que a ti te quedo muy bien.
Gracias amiga @yolimarag por tu comentario. Pintarse la parte de atrás de la cabeza y especialmente la raíz es un poco difícil. Pero si tenemos suficiente tinte podemos cubrir todo el cabello. Cómo tengo poco cabello me fue fácil y aunque no quedó perfecto, se ve bien. Al menos lo intenté. A medida que siga haciéndolo lo haré mejor cada vez. Un placer amiga y muchas gracias 🤗 por compartir mi experiencia.
https://twitter.com/164005493/status/1592666876748124161
The rewards earned on this comment will go directly to the people( @yolimarag ) sharing the post on Twitter as long as they are registered with @poshtoken. Sign up at https://hiveposh.com.
Jejeje te felicito muy tu y siempre maquillada amiga regia exitos y sigue adelante. .
Amiga @yackelynher gracias por tu lindo comentario. Casi siempre que me arreglo me tomo fotos jajaja para mis post. Las tomo antes de salir a hacer mis diligencias. Que bueno que te gustó ☺️.
Hola, te quedó muy bien,para ti colore de piel, se ve genial. Saludos
Amigo @elamaria gracias por ese halago. Que lindo de tu parte haber leído mi post. Ese es mi color preferido para el cabello. Un placer compartir contigo mi experiencia pintandome el cabello 🤗.
Realmente me gusto como te quedo, me parece que ese tono es muy bonito y también pinto mi cabello en casa, es sencillo solo debes cumplir con algunos pasos esenciales, una abrazo
Amiga @yosoyronna que bueno que te gustó el color de mi cabello. Es un tono rojizo no tan rojo. A mí me gusta mucho este color y creo que es el mejor que me queda jajaja, eso creo.
A medida que me vaya familiarizando con las técnicas podré hacerlo mejor. La verdad que es un gran ahorro y además aprendemos.
Gracias por compartir tu experiencia el cabello y me alegra saber que sabes hacerlo tu misma. Un gran abrazo 😘🤗.
Has sido curado por @visualblock / You've been curated by @visualblock
Bienvenidas delegaciones / Delegations welcome
Encuentra nuestra comunidad aquí / Find our community here
Trail de Curación / Curation Trail
Wao es increible como puedes hacerlo, te quedo muy bien ese color se te mira muy bonito querida, excelente trabajo. Saludos.
Gracias amiga @carmary es un placer tenerte en mi post. Me atreví a hacerlo yo misma, ahorita es muy costoso pintarse el cabello en un Salón de Belleza y hay que intentarlo. Fue relativamente fácil ya que tengo poco cabello y fino. Como el tinte es de buena calidad me cubrió todas las canas y el resto del cabello. Gracias amiga ☺️🤗.
Debo empezar diciendo que ese color de cabello le sienta muy bien. Hace que sus ojos resalten y se ve muy bonita y además feliz con ese tinte. Me alegra que usted misma haya aprendido a hacerlo y que además le salga tan bien, mis felicitaciones para usted. Si usted está feliz con ese look, entonces valió totalmente la pena. Saluditosss.💞☁️
Amigo @artsyjose me hiciste sonreír 😃🤗☺️. Gracias por tan gentil comentario. El color rojizo me encanta y me va bien, siempre me llamó la atención ese color. Me siento muy halagada porque te haya parecido bonita. Estoy aprendiendo a arreglarme yo misma 😀. Así me ahorro el dinero de la peluquería y así lo pueda usar para comprar tratamiento para el cabello. Un gran abrazo 🤗🥰.