Bricolaje| ¿Cómo hacer ésta lámpara vintage? DIY| How to make this vintage lamp? [ Esp-Eng]
¡Hola queridos Hivers!
Hey dear Hivers!
Es un gusto estar aquí en la comunidad de artes y manualidades de Hive. Quizás muchos se identifiquen conmigo al pensar
que, dedicar tiempo al arte y a la creatividad es una de las cosas más maravillosas de la vida. Hay un ejército de artistas por todo el mundo que dejan huellas en la historia y los hivers no se están quedando atrás.
Deseo poder tener más tiempo para ser más participativo en la colmena y unirme a los muchos que día a día actualizan sus blog con contenidos súper interesantes.
Hoy tuve la oportunidad de hacer una lámpara con materiales que están al alcance de todos y me parece bien compartir el paso a paso con ustedes.
Acompáñame!
It's a pleasure to be here in the Hive arts and crafts community. Perhaps many identify with me when thinking
that dedicating time to art and creativity is one of the most wonderful things in life. There is an army of artists around the world leaving their mark on history and hivers are not far behind.
I wish I could have more time to be more participatory in the hive and join the many who update their blogs every day with super interesting content.
Today I had the opportunity to make a lamp with materials that are available to everyone and it seems good to share the step by step with you.
Accompany me!
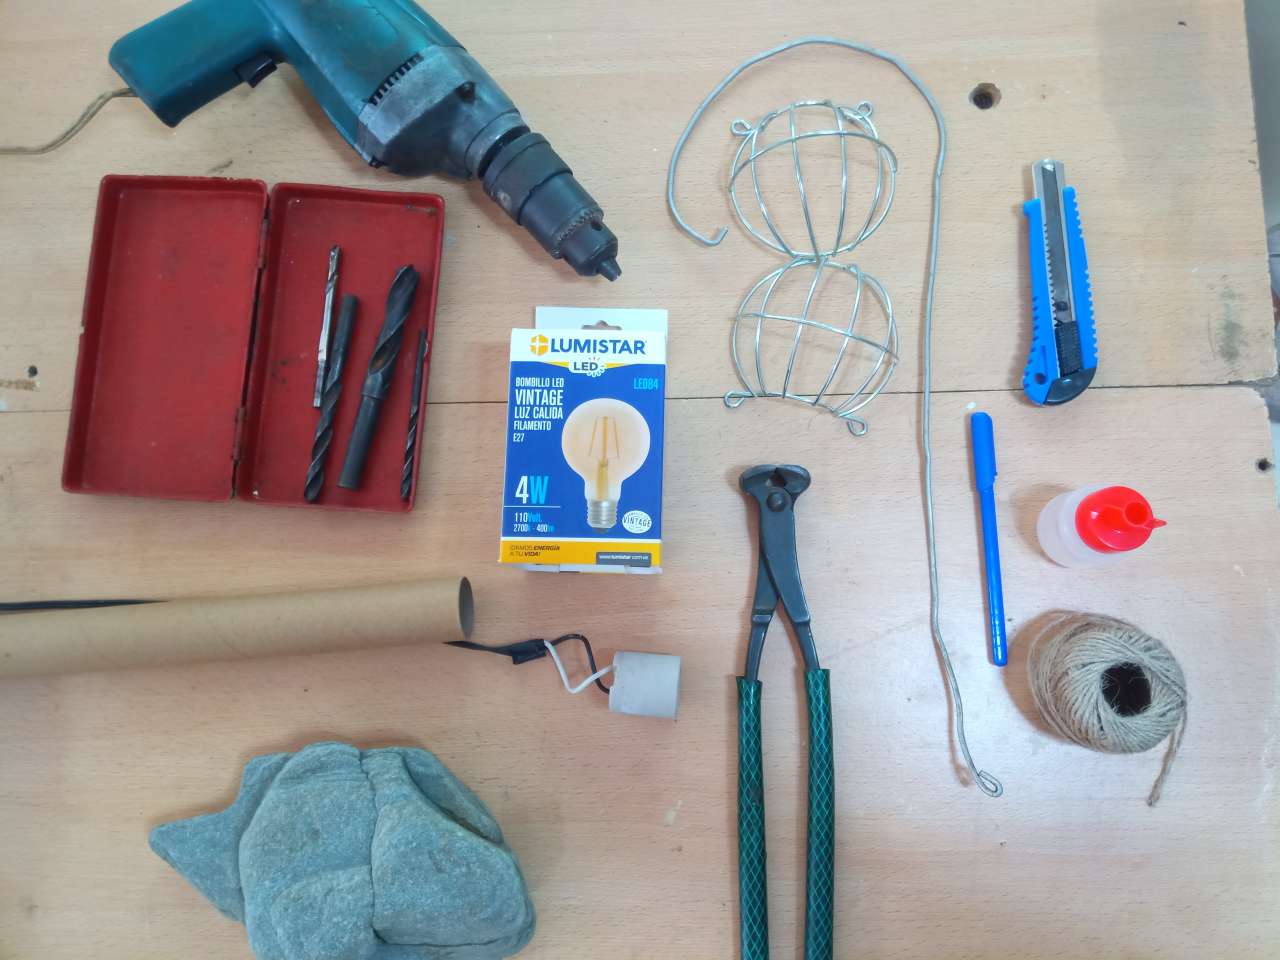
Materiales
- tubo de cartón
- alambre de aluminio (1/2 metro)
- roca
- pintura metálica
- pegamento
- bombilla
- cables
- socate/ cable y enchufe
- pincel
- cordón marrón
- cutter
- dremel
- protector de bombilla
Materials
- cardboard tube
- aluminum wire (1/2 meter)
- rock
- metallic paint
- glue
- lightbulb
- cables
- socket / cable and plug
- Brush
- brown cord
- cutter
- dremel
- bulb protector
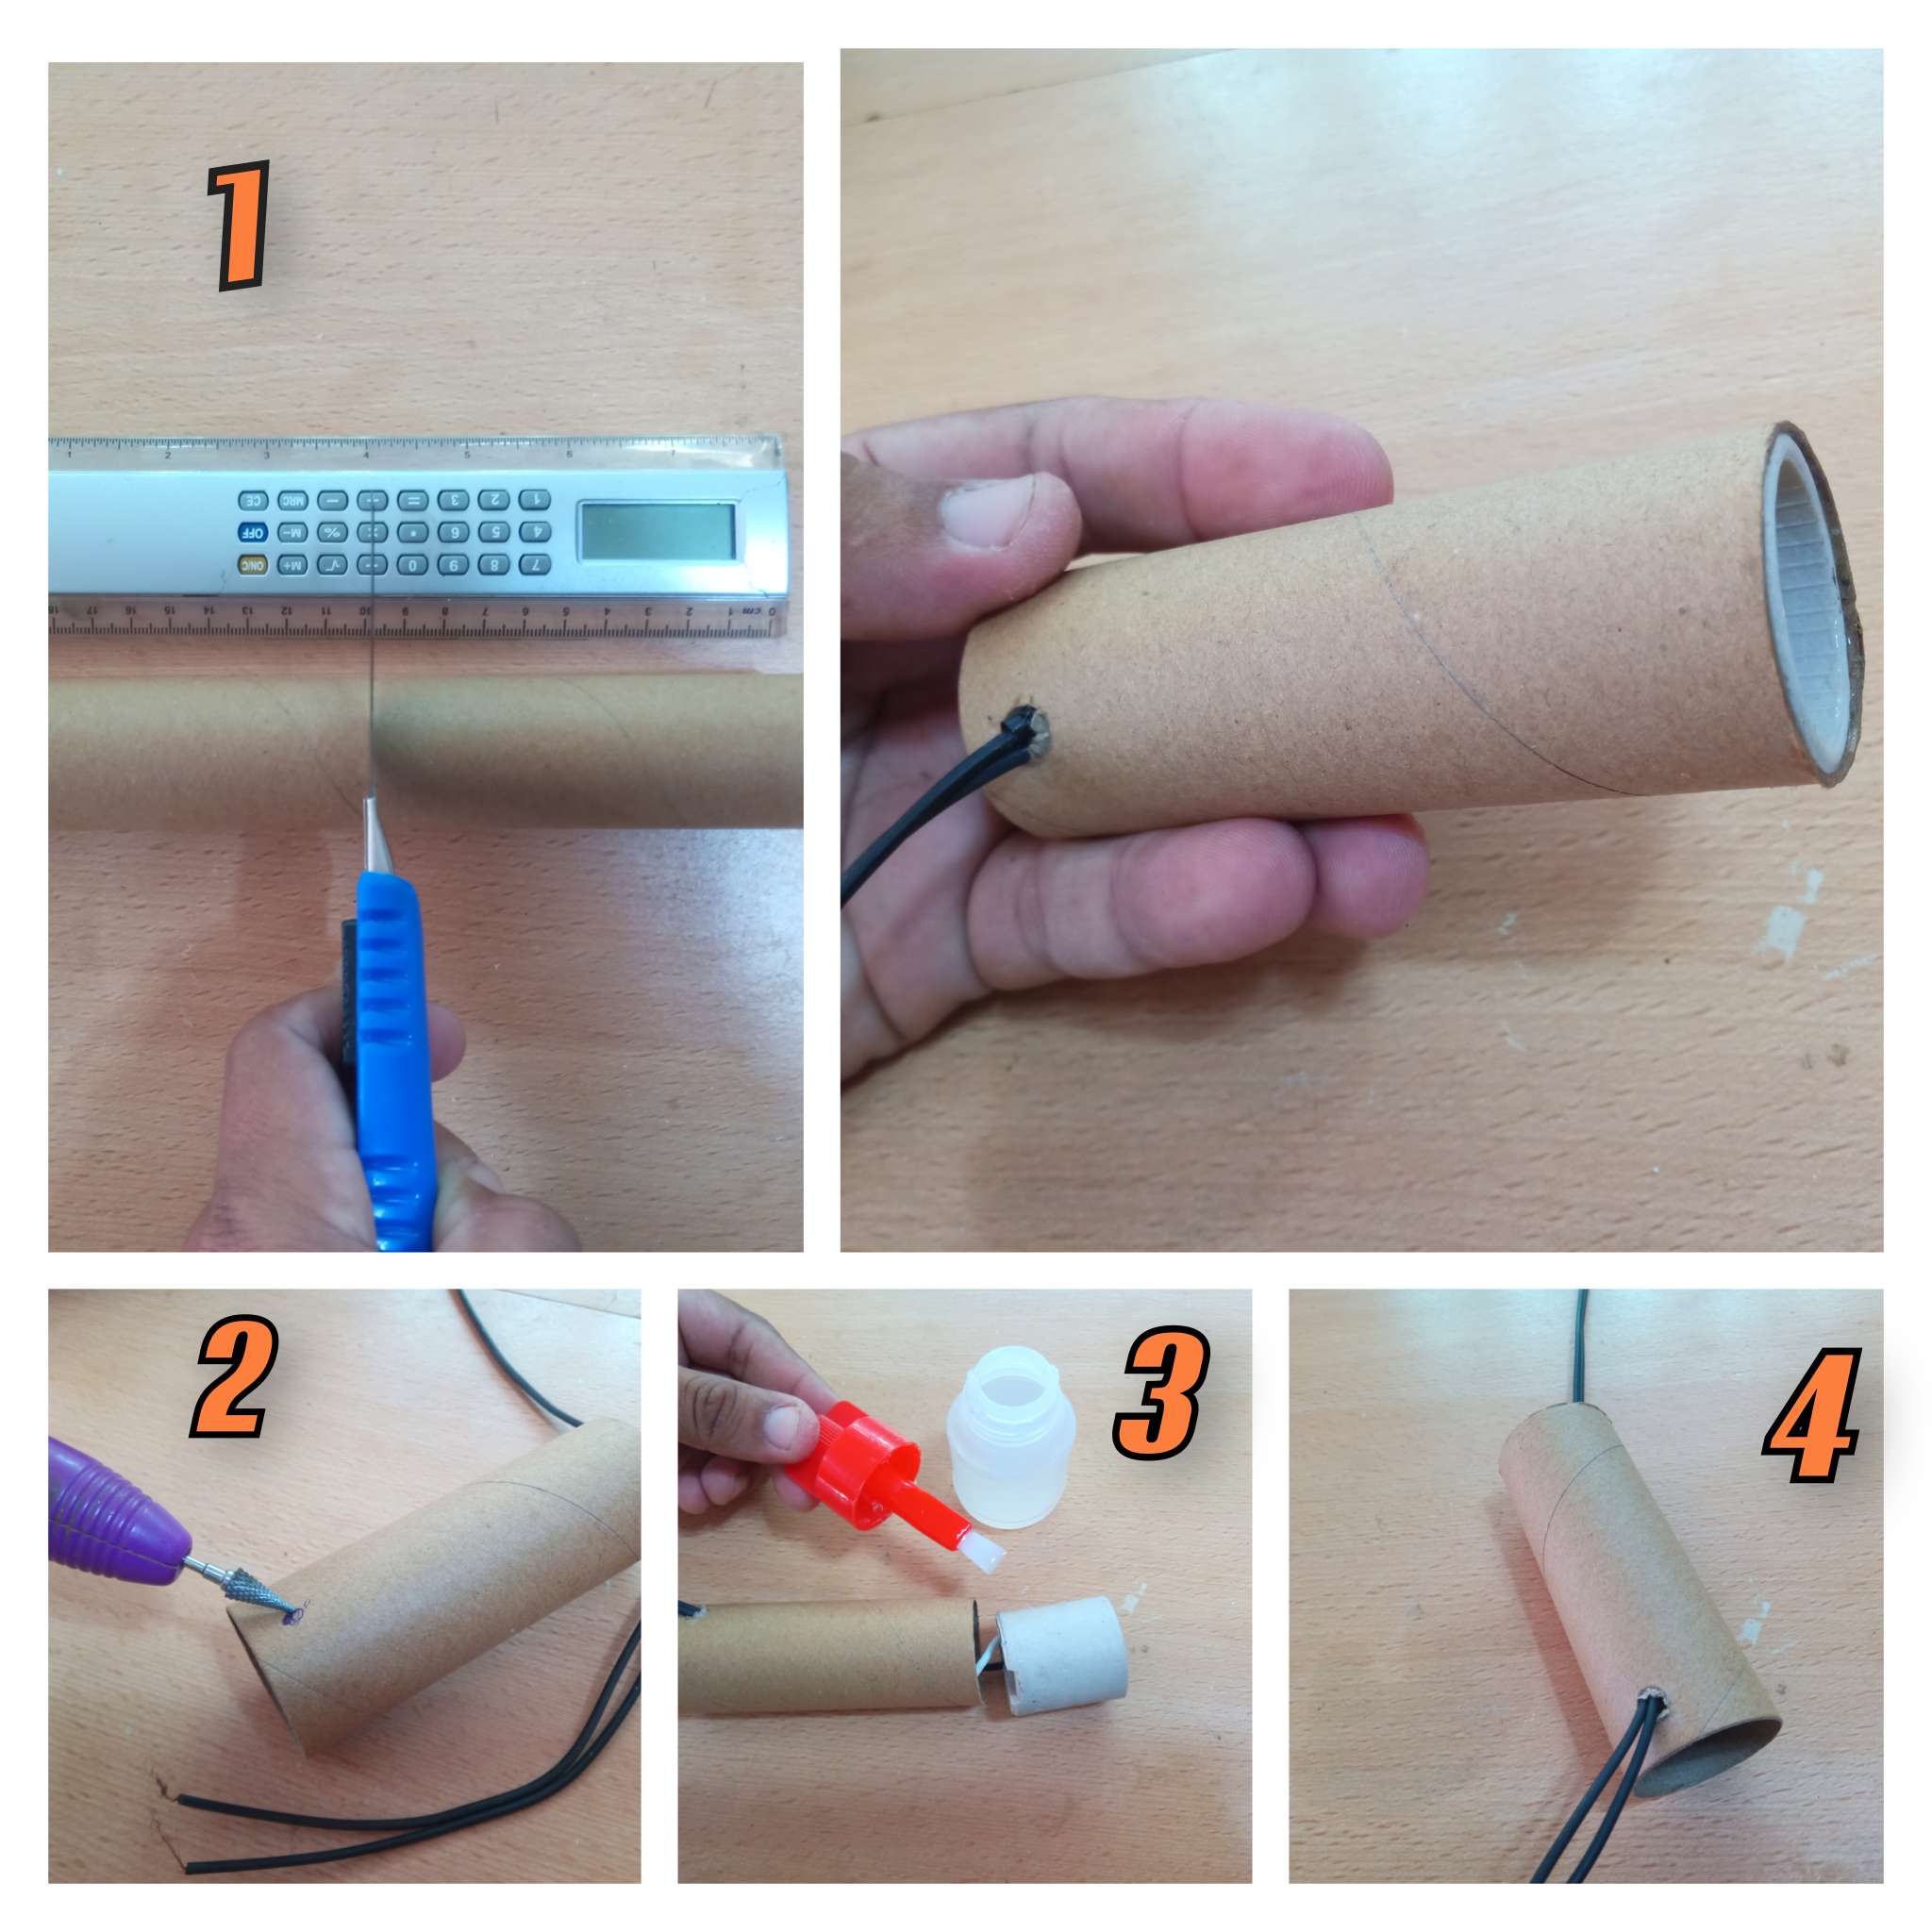
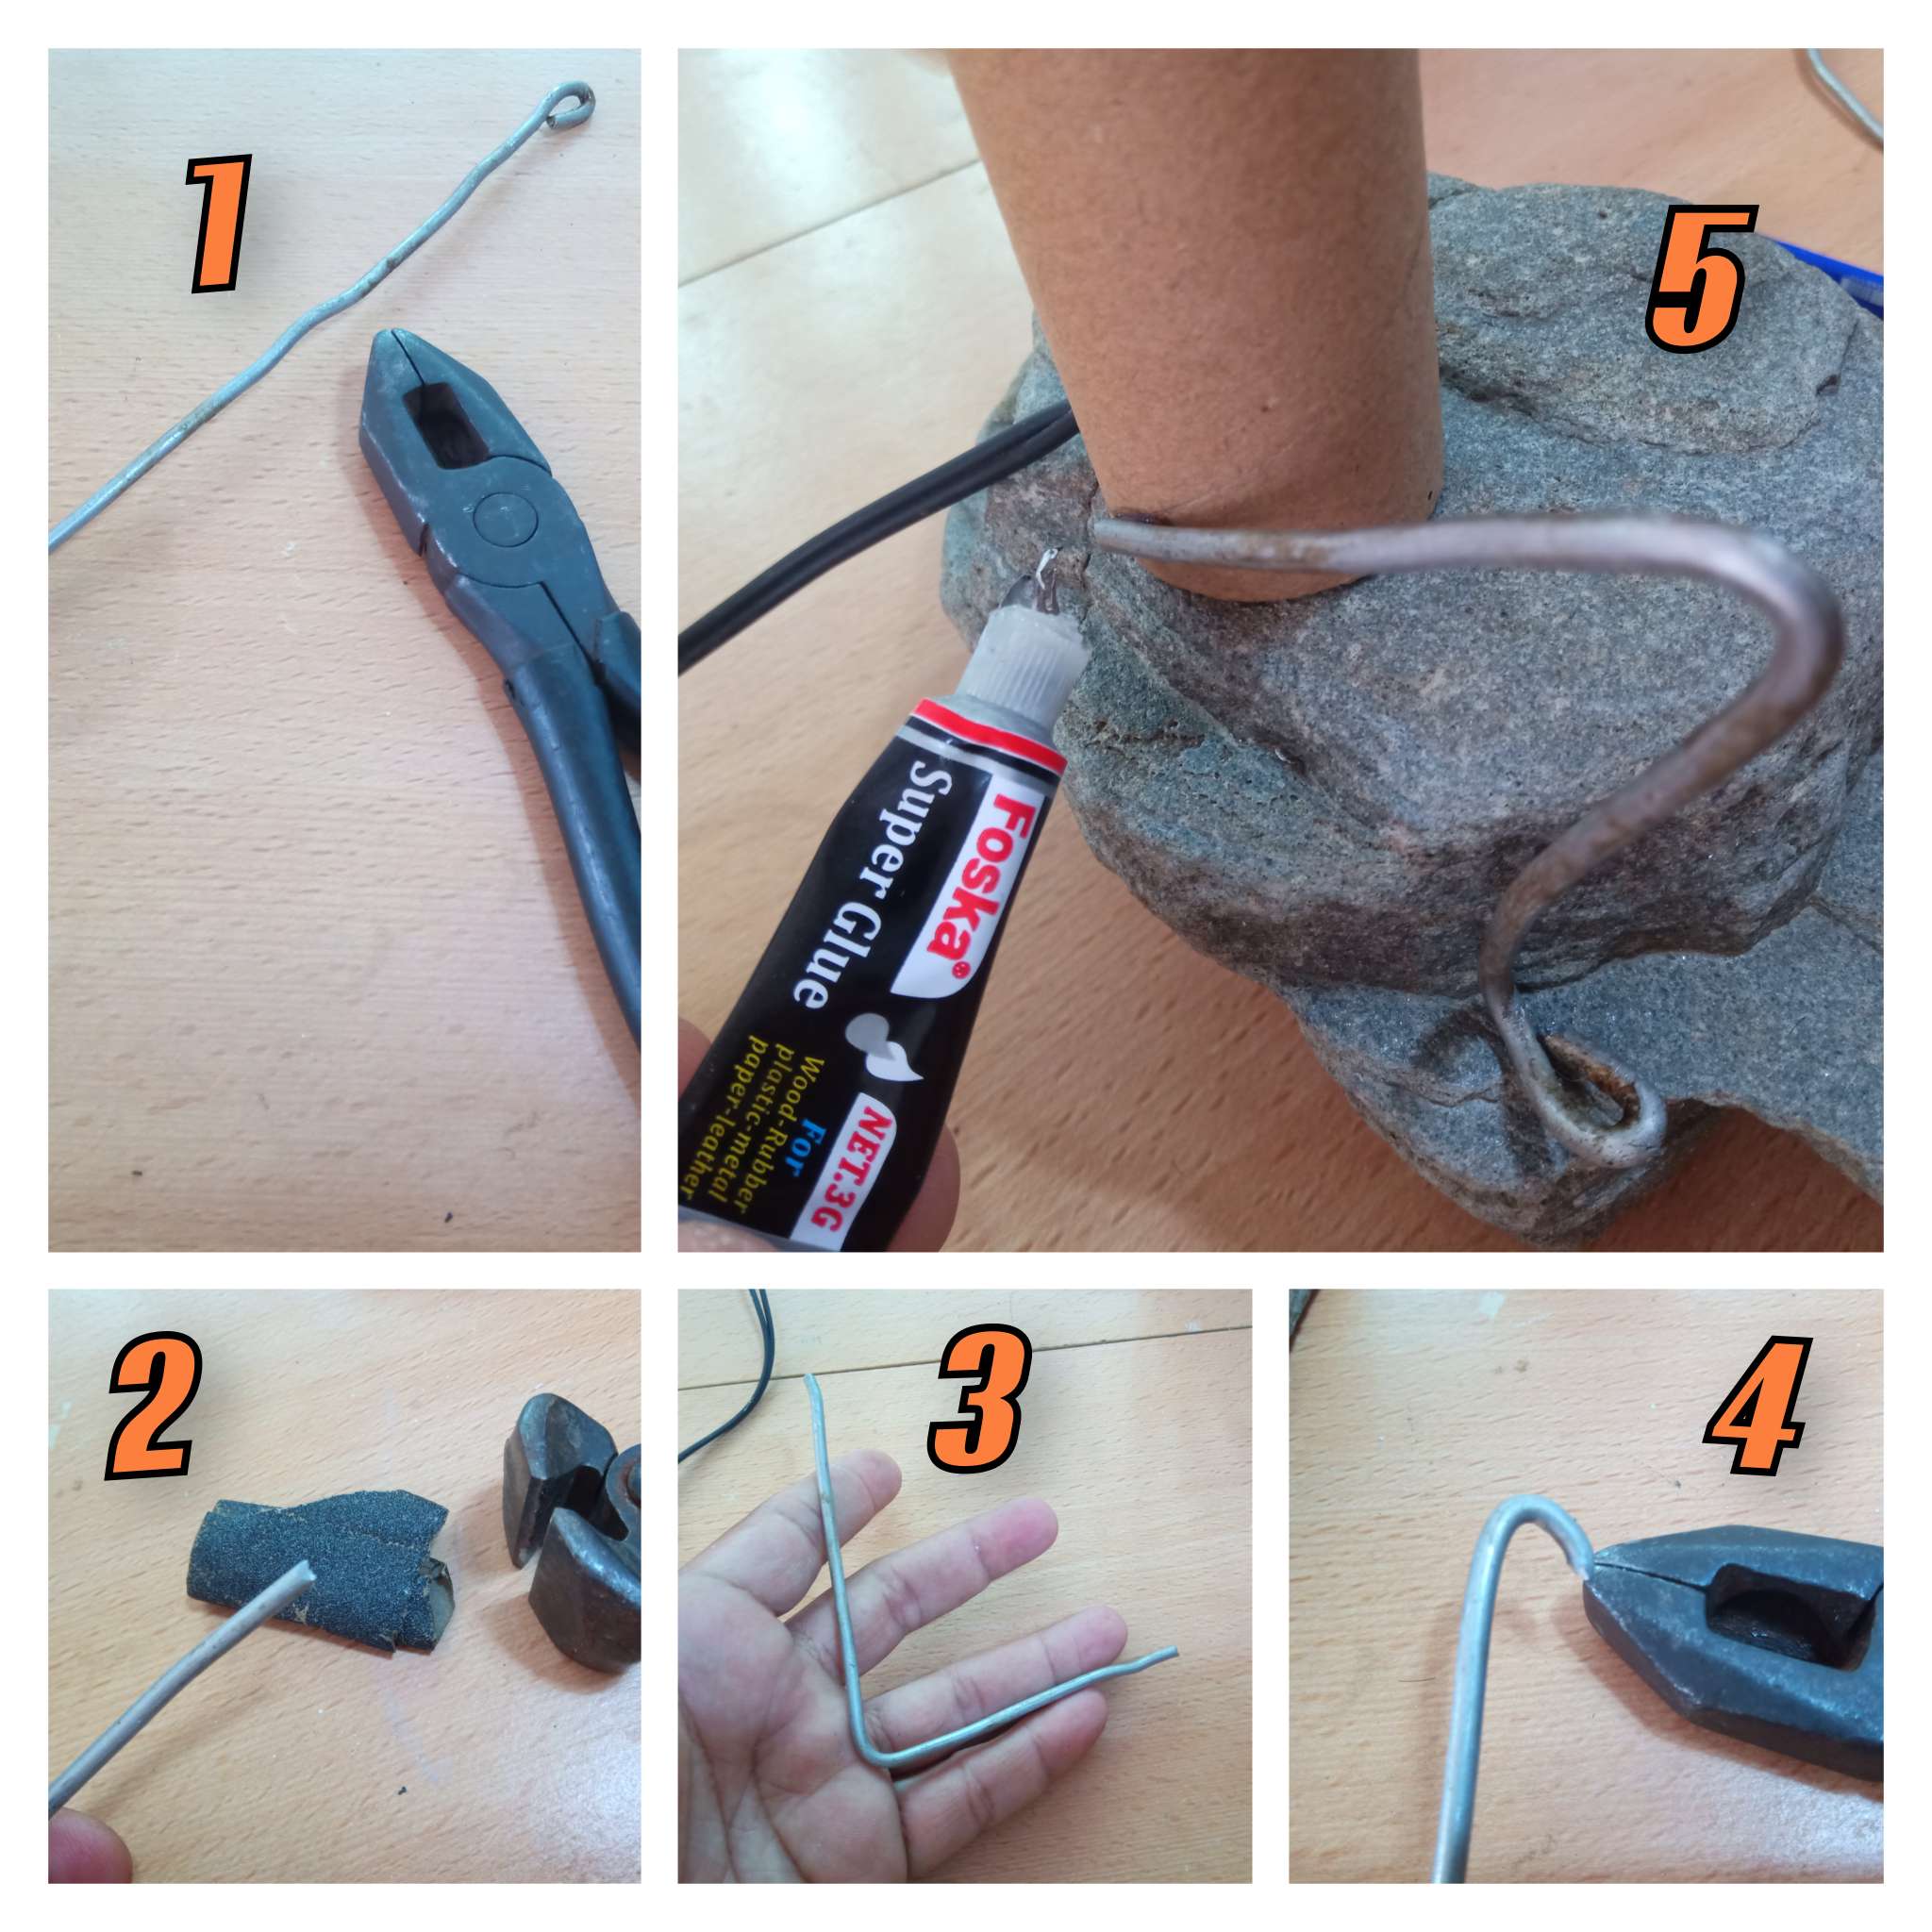
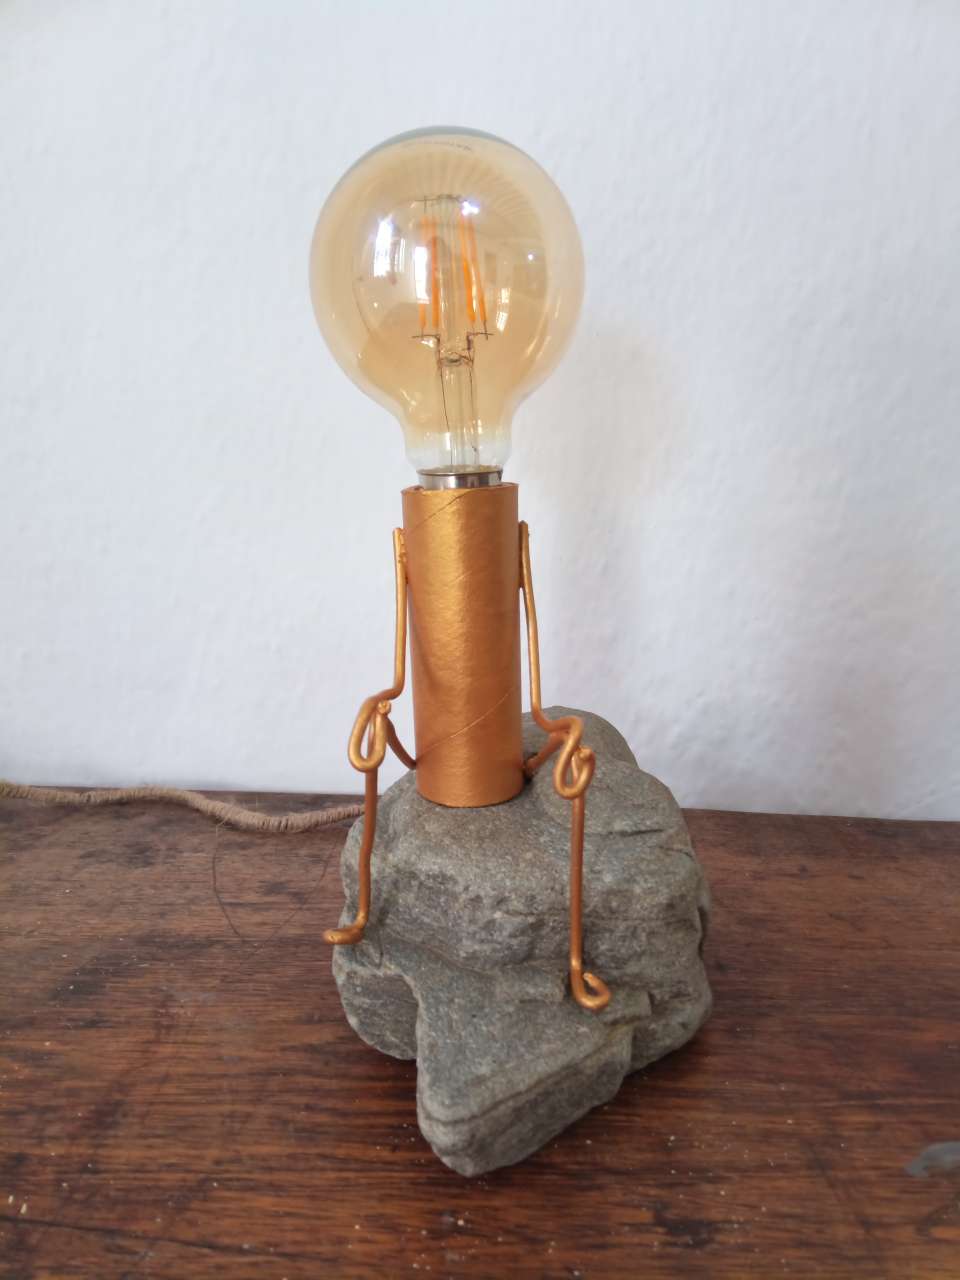
1 Paso
Cortar con el cúter 10 centímetros del tubo de cartón y hacerle un orificio en la parte inferior para sacar el cable del circuito eléctrico.
Con pegamento fijamos el socate al tubo de cartón, cuyos diámetros son casi iguales.
1 Step
Cut 10 centimeters of the cardboard tube with the cutter and make a hole in the lower part to remove the cable from the electrical circuit.
With glue we fix the socate to the cardboard tube, whose diameters are almost the same.
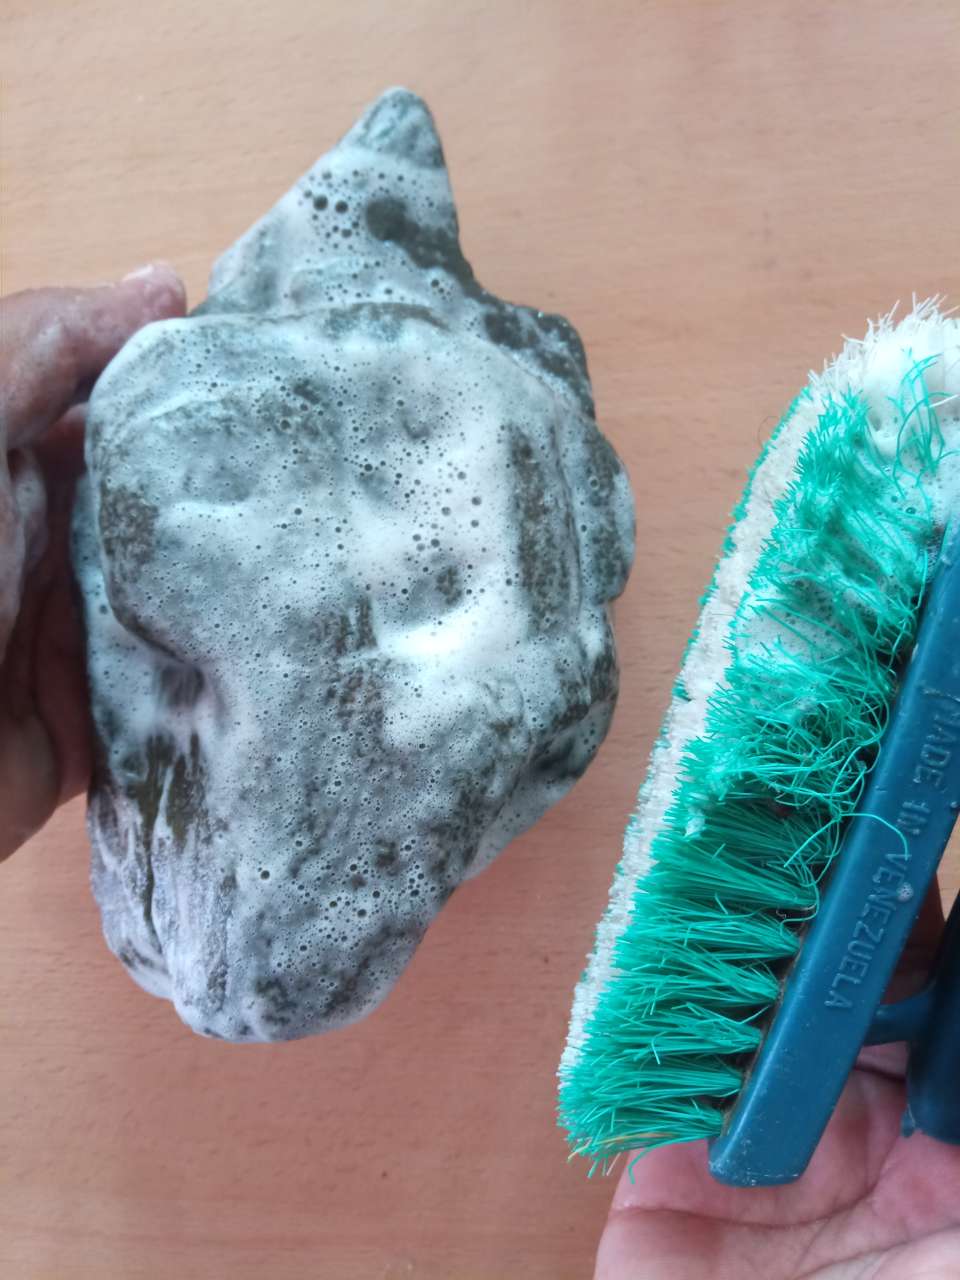
2 Paso
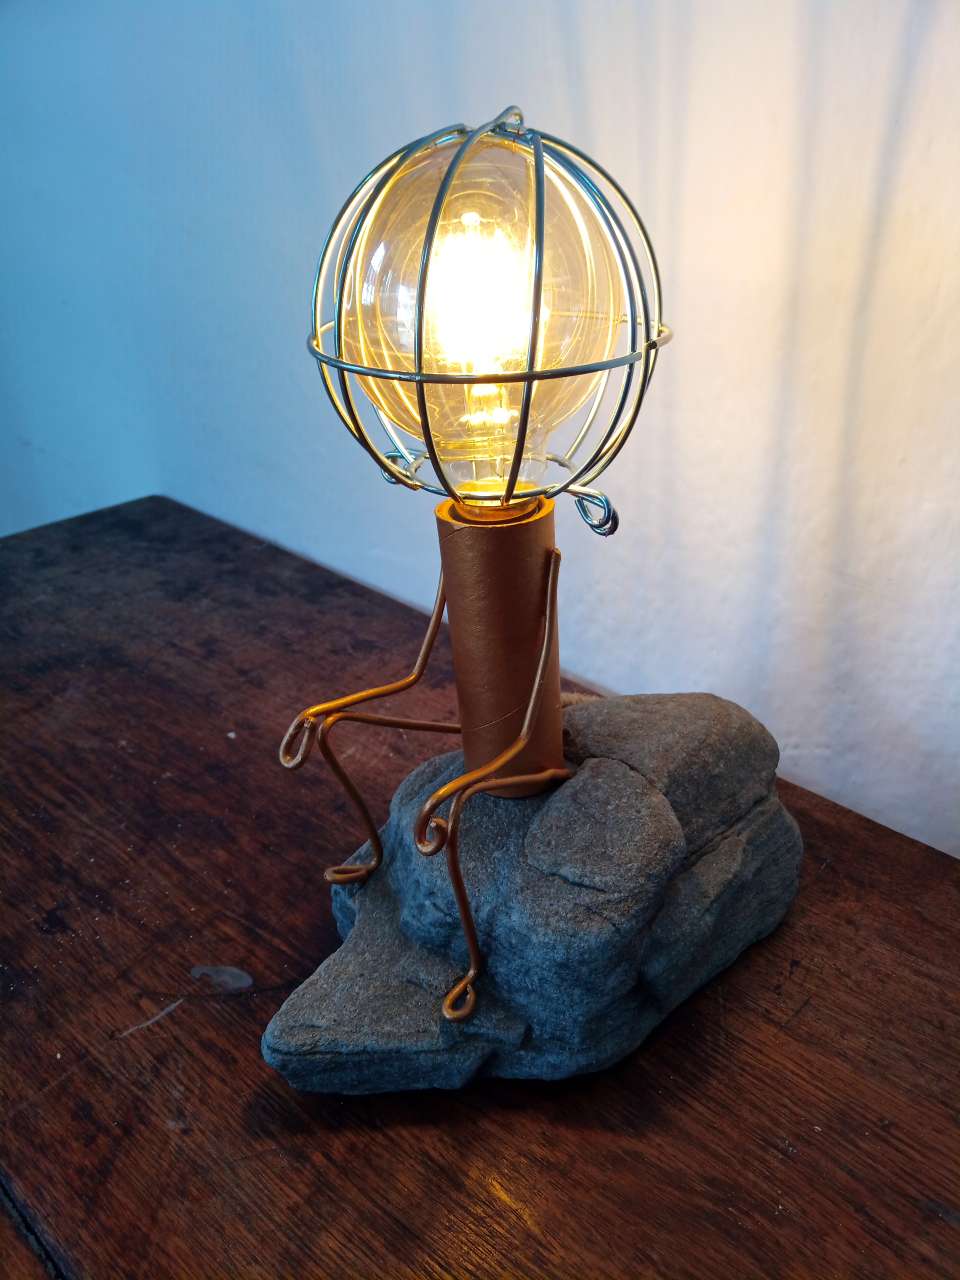
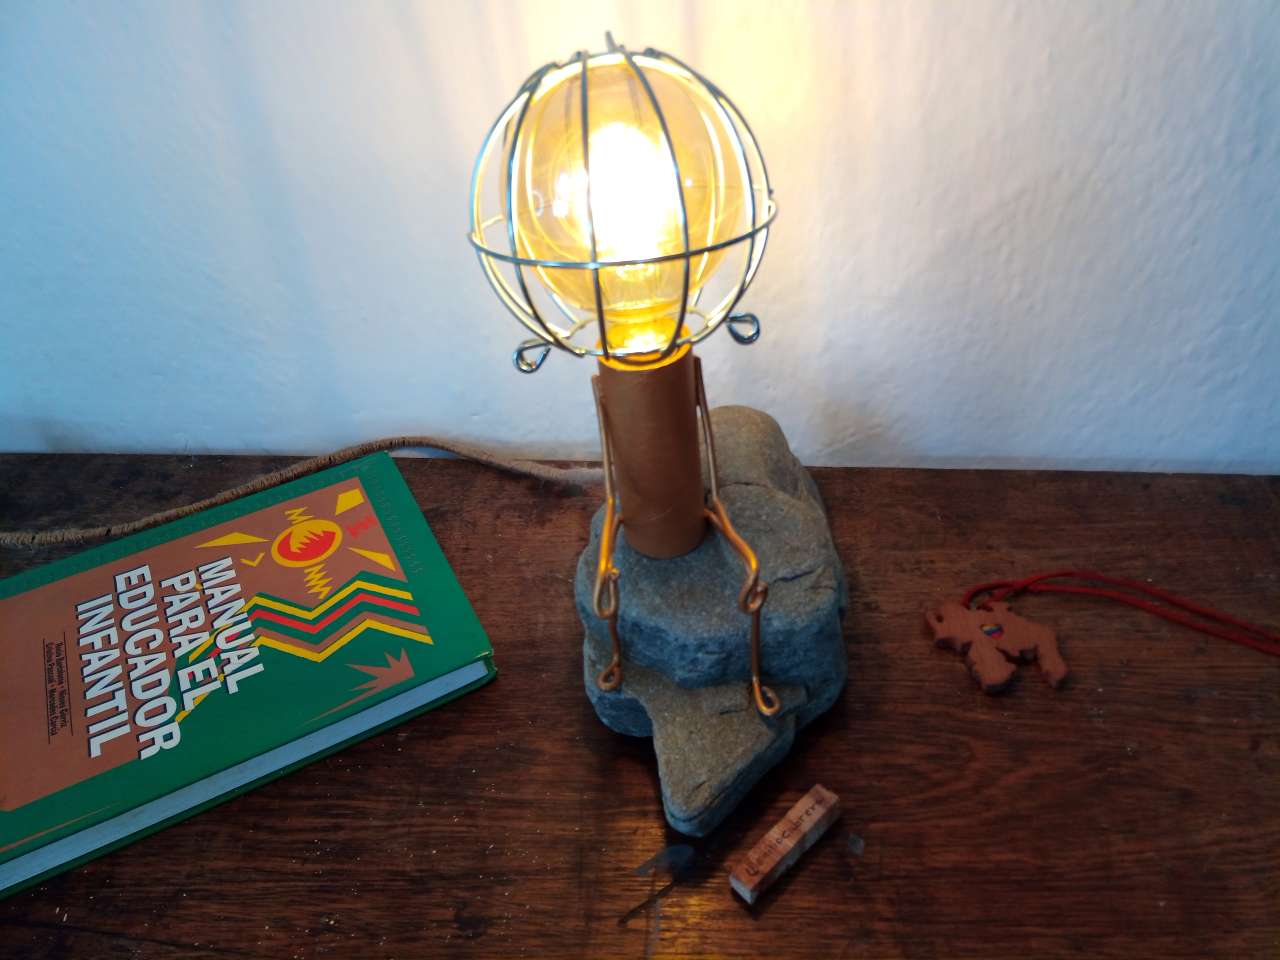
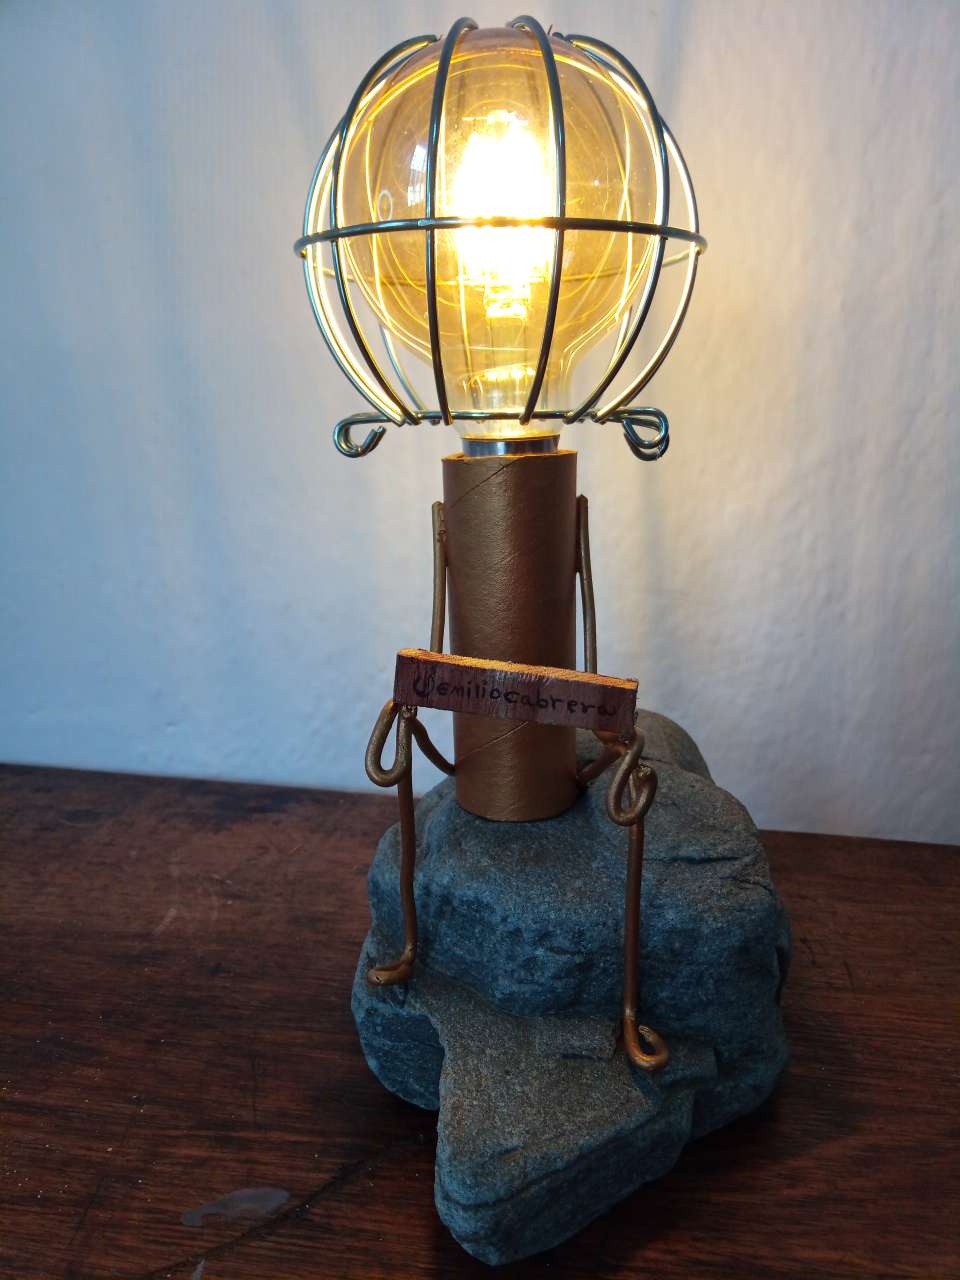
Limpiar bien la roca que servirá como base fundamental de la lámpara y a la vez el asiento cómodo del personaje iluminado. XD
2 Step
Clean the rock well that will serve as the fundamental base of the lamp and at the same time the comfortable seat of the illuminated character. XD
Pasó 3
Moldear con las manos y con la ayuda de un alicate las extremidades superiores e inferiores de la escultura.
Con la ayuda del pegamento se fija al cuerpo (tubo de cartón) y a medidas que cada pierna repose en la morfología de la roca.
Step 3
Mold with your hands and with the help of pliers the upper and lower extremities of the sculpture.
With the help of glue, it is fixed to the body (cardboard tube) and to the extent that each leg rests on the morphology of the rock.
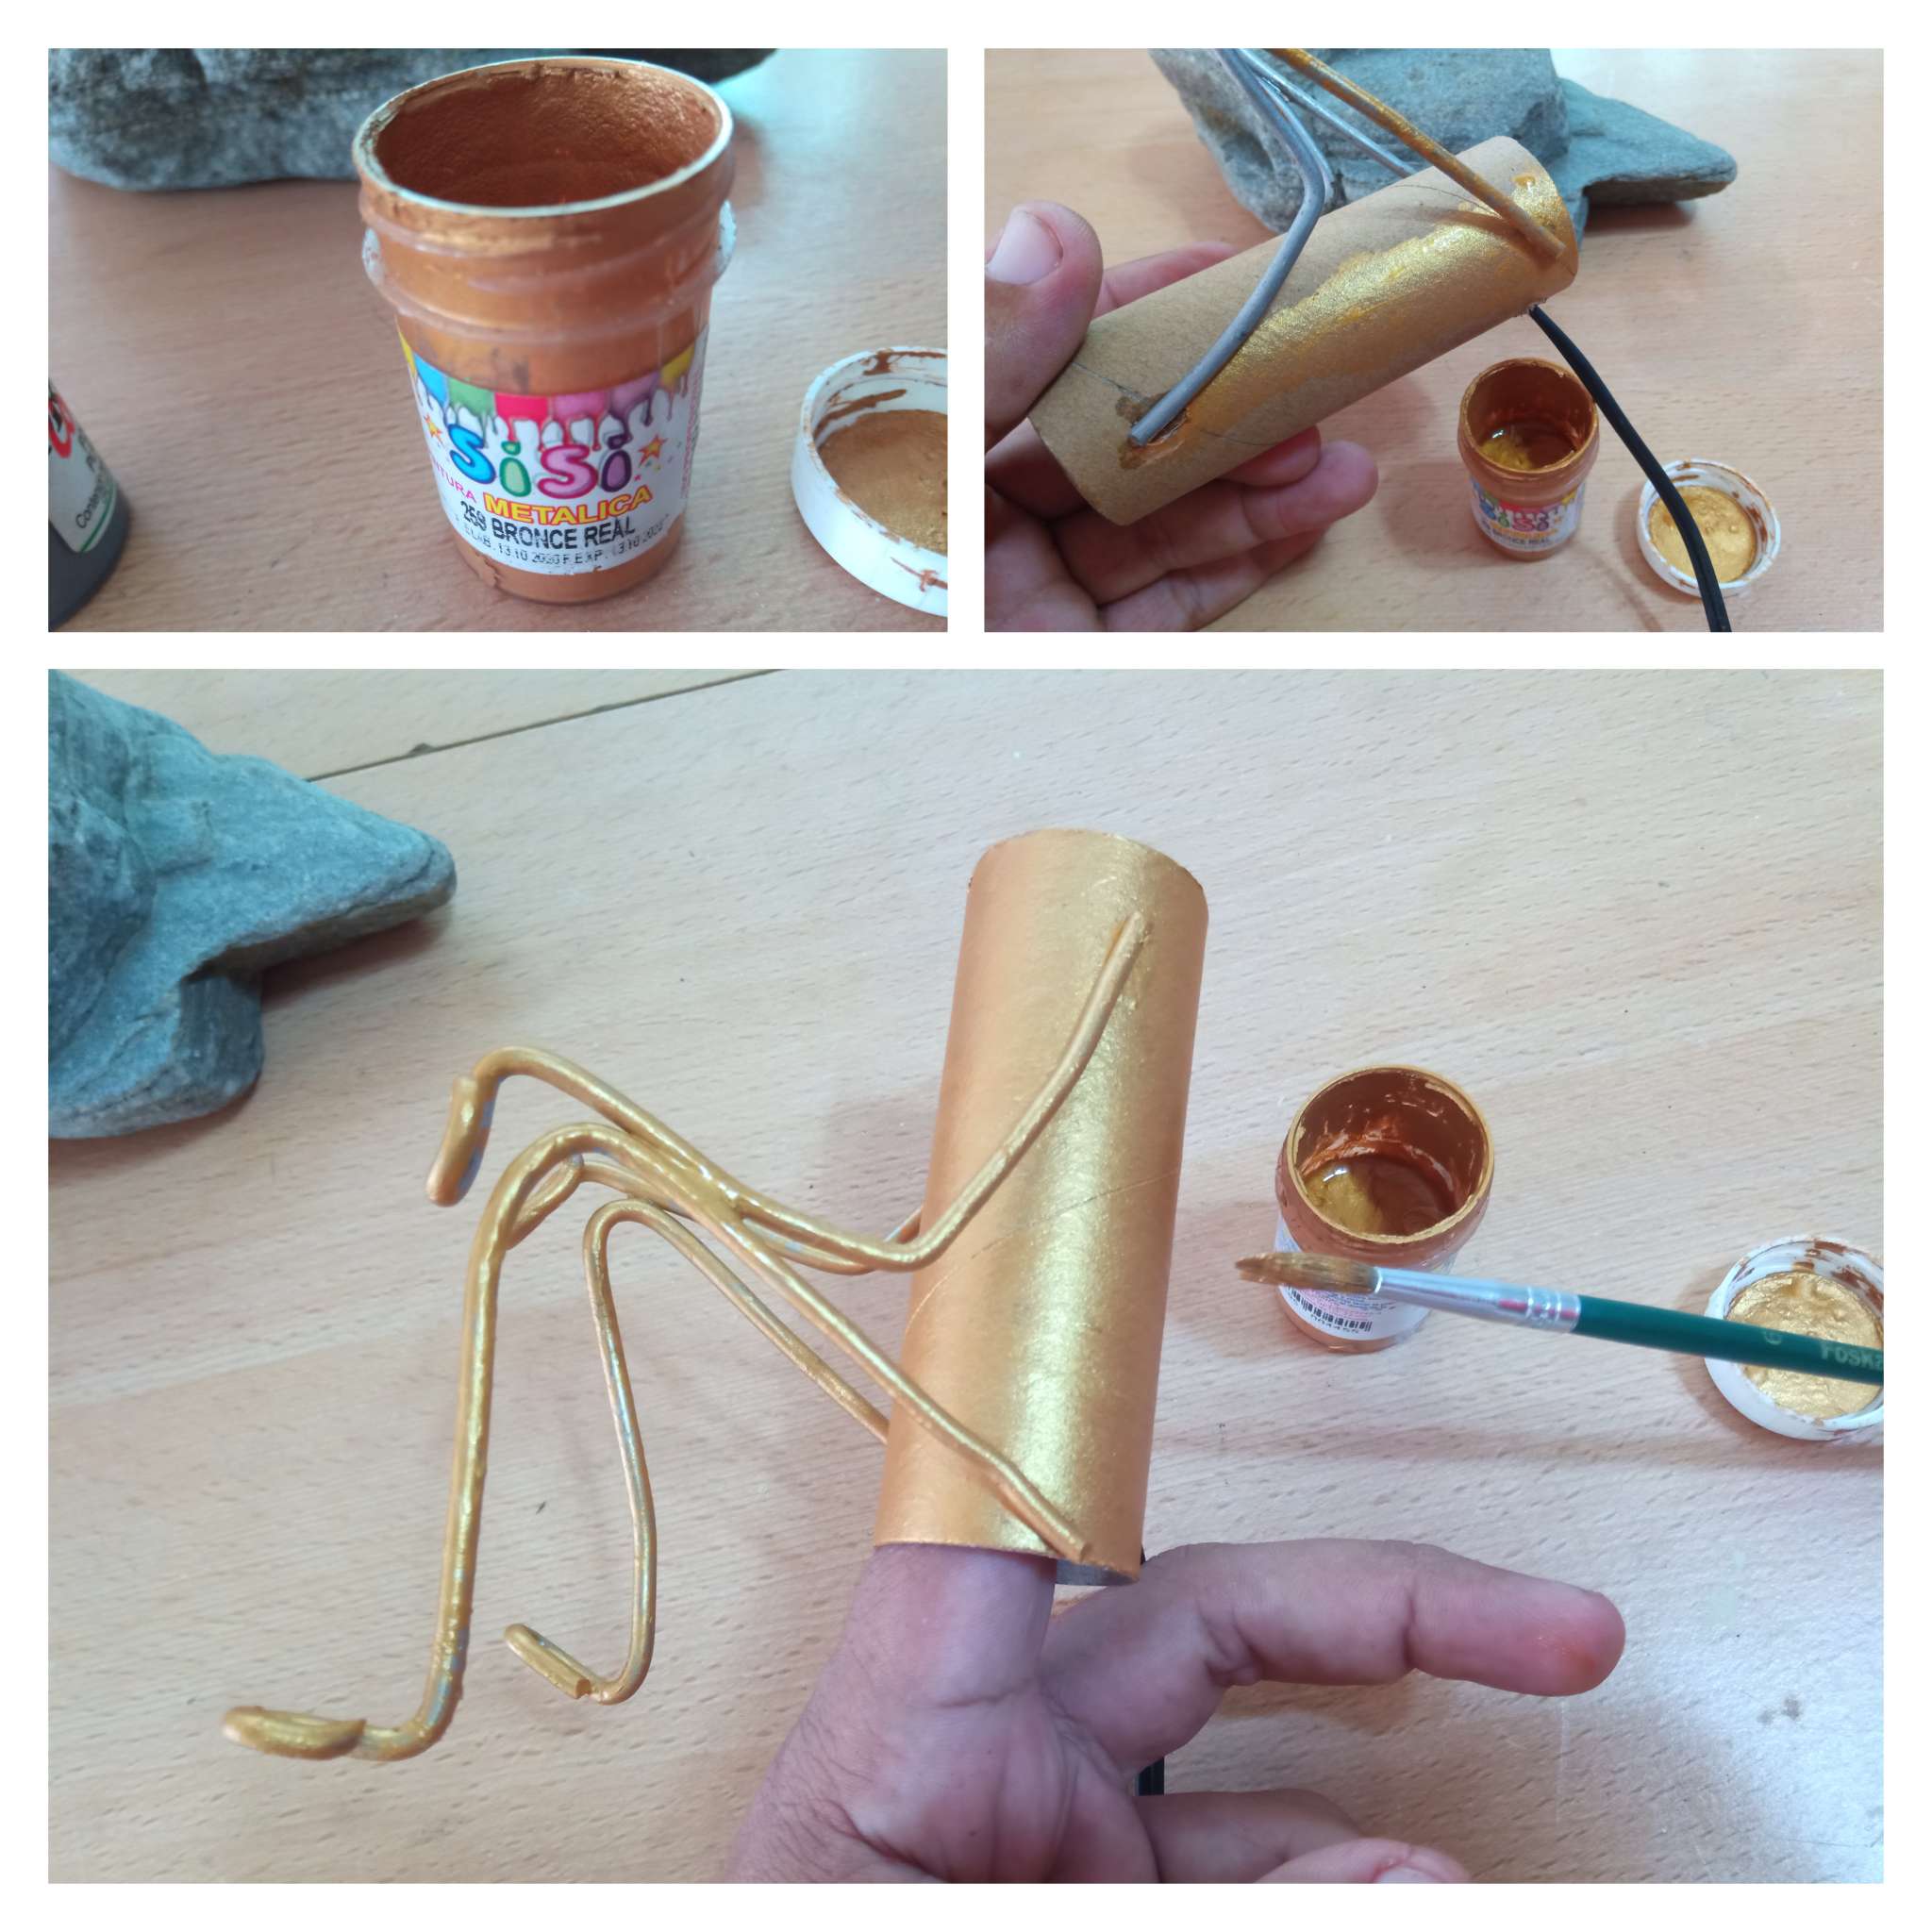
Paso 4
- Pintura
Pintar toda la escultura de la persona sentada, incluyendo cuerpo y extremidades.
Es importante resaltar que utilicé un color bronce metálico para combinarlo con el color de la bombilla.
Step 4
- Painting
Paint the entire sculpture of the seated person, including body and limbs.
It is important to note that I used a metallic bronze color to match the color of the bulb.
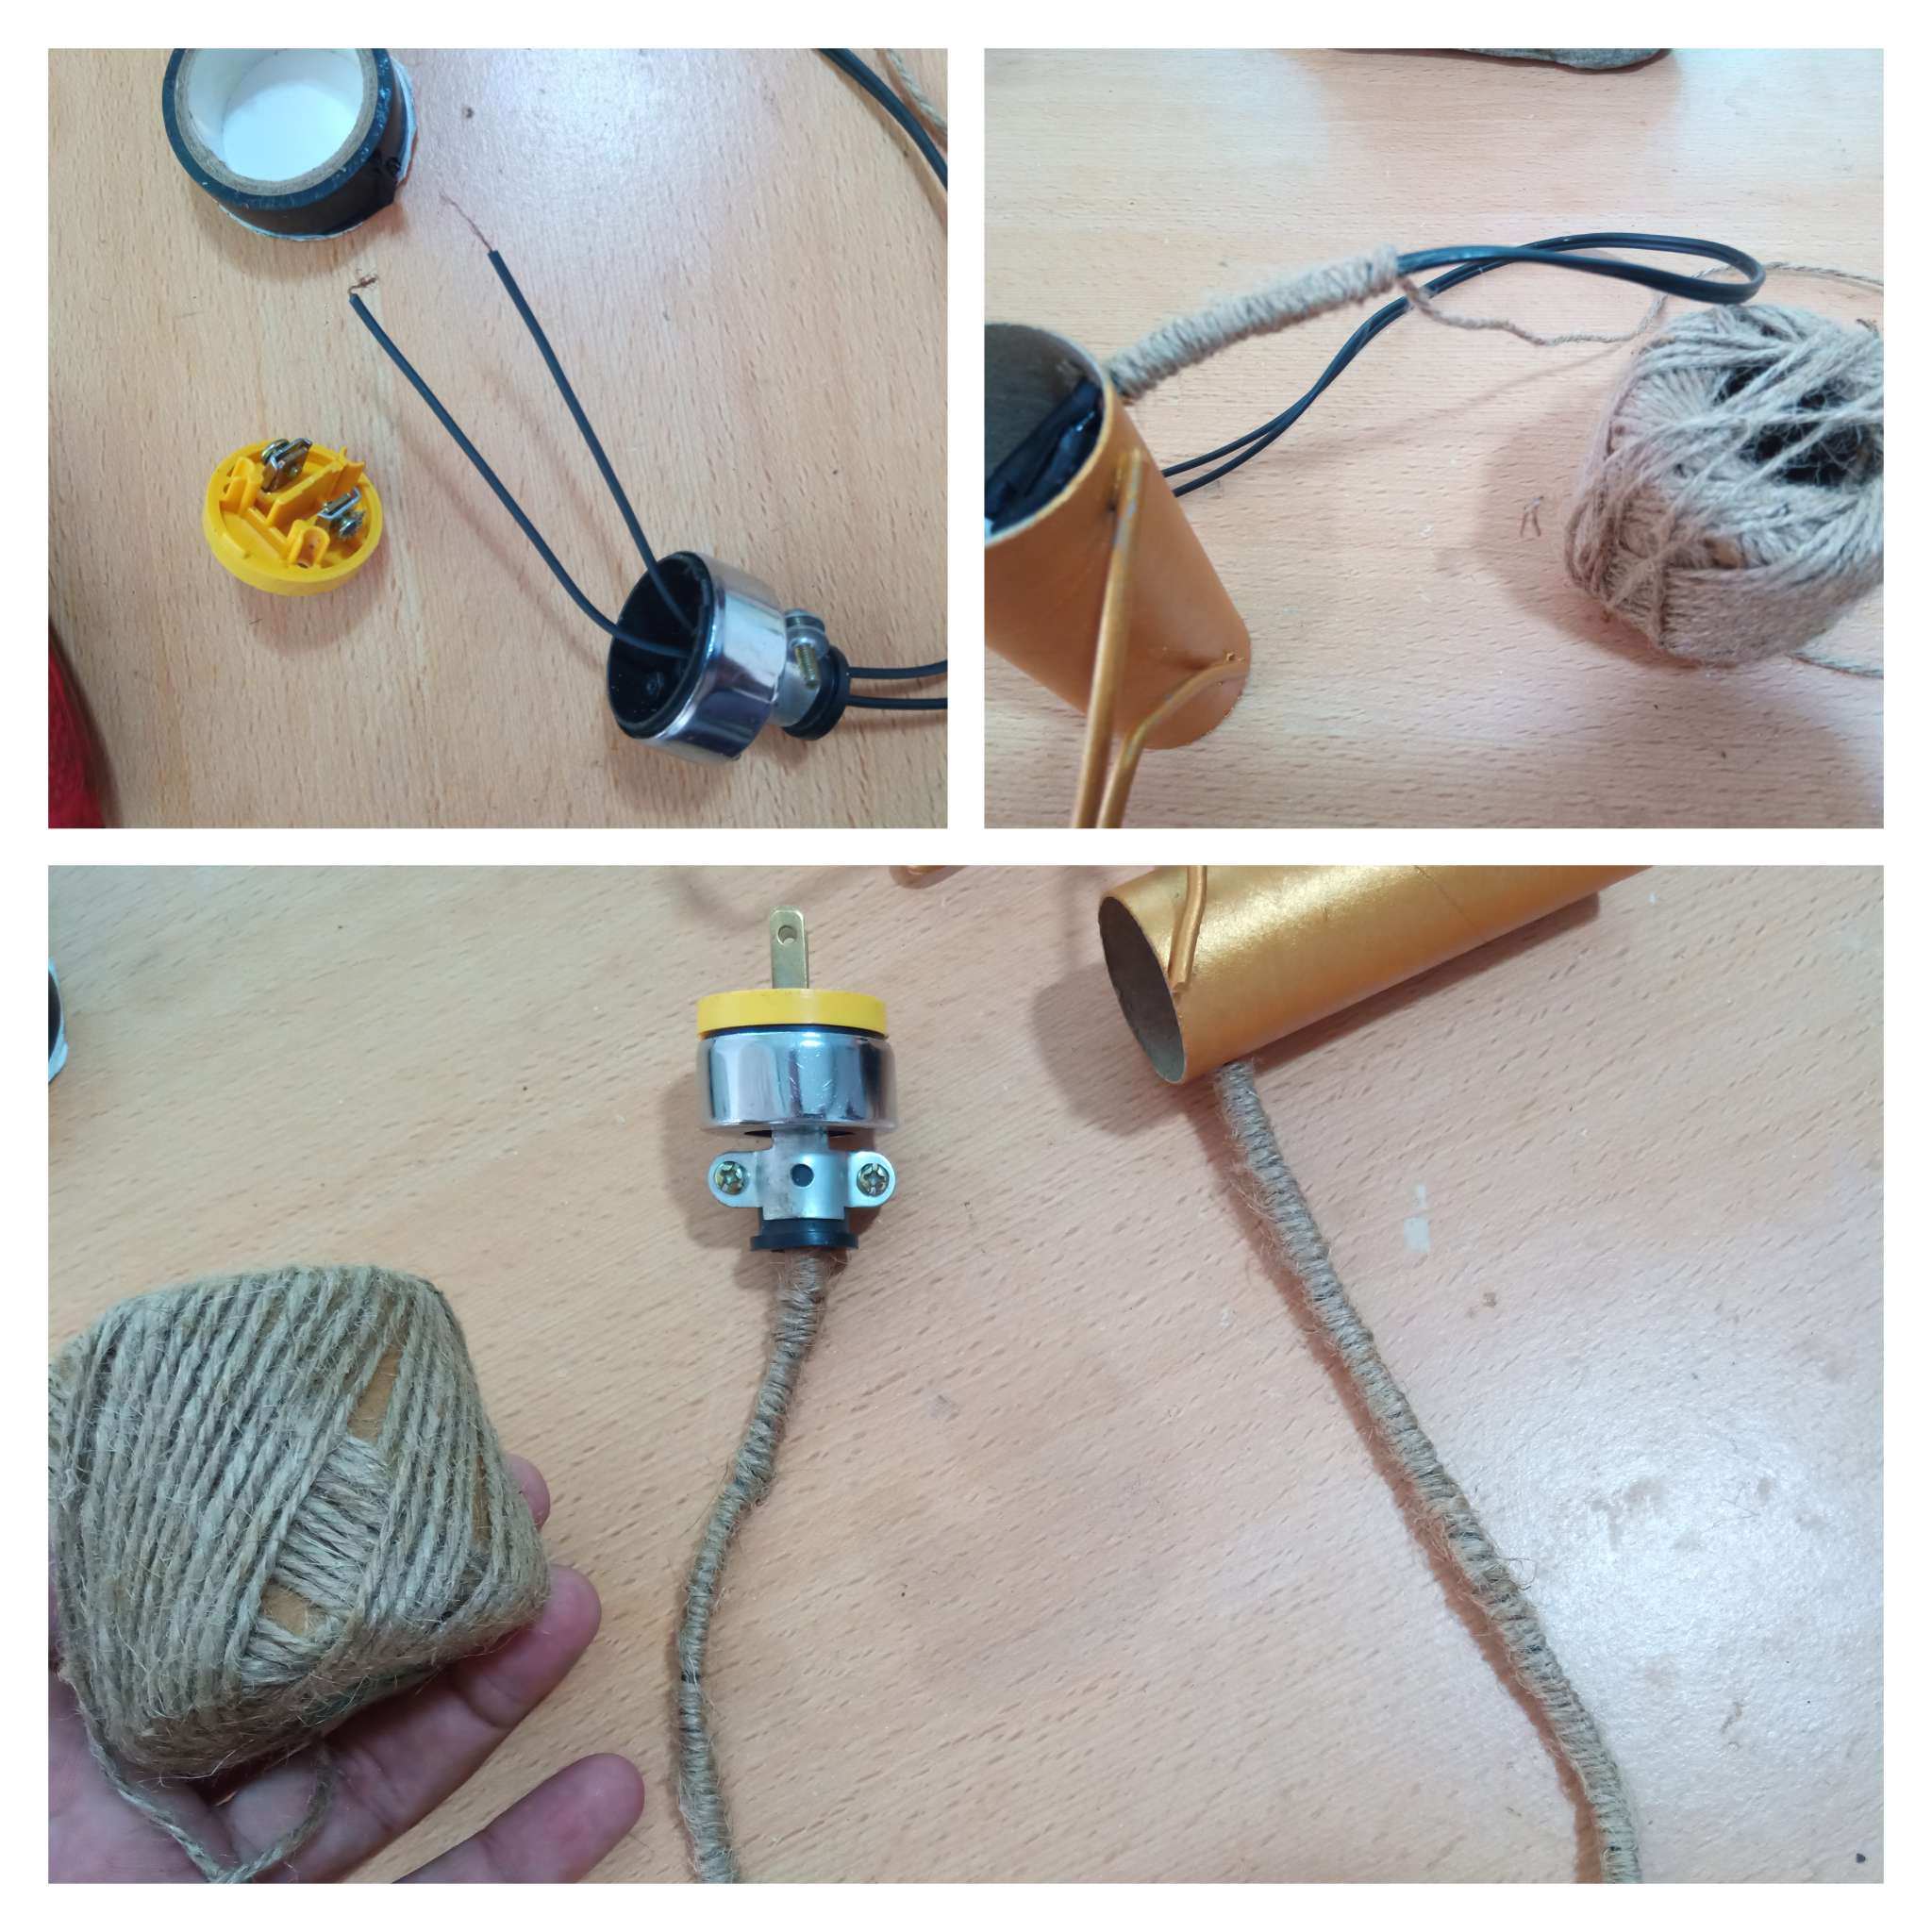
Paso 5
Envolver el cable eléctrico con cabuya marrón para que tenga una mejor estética.
El cable que utilicé es número 14 ya que la demanda de energía de la lámpara es mínima.
Step 5
Wrap the electrical cable with brown rope for better aesthetics.
The cable I used is number 14 since the power demand of the lamp is minimal.
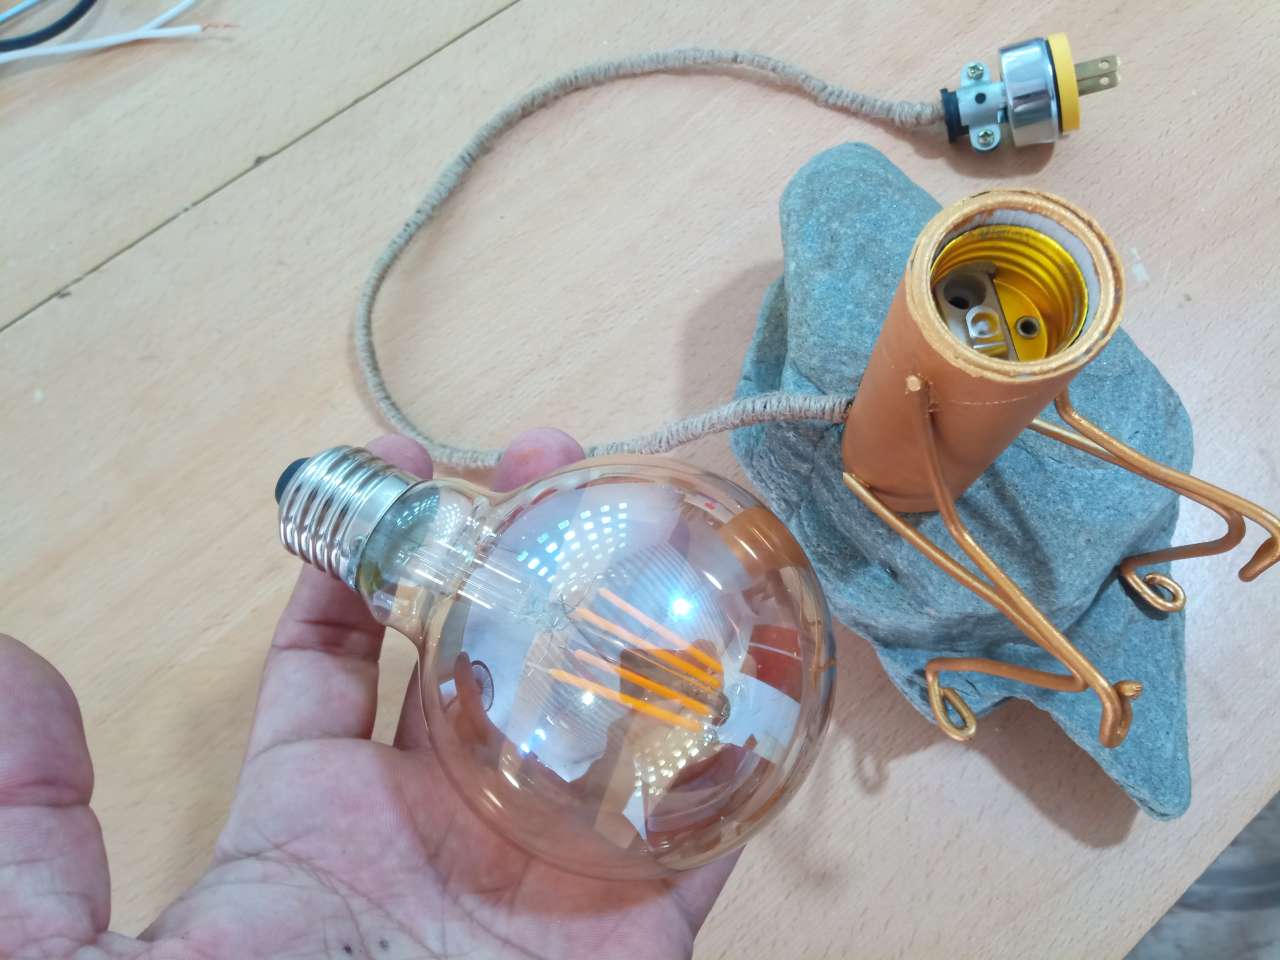
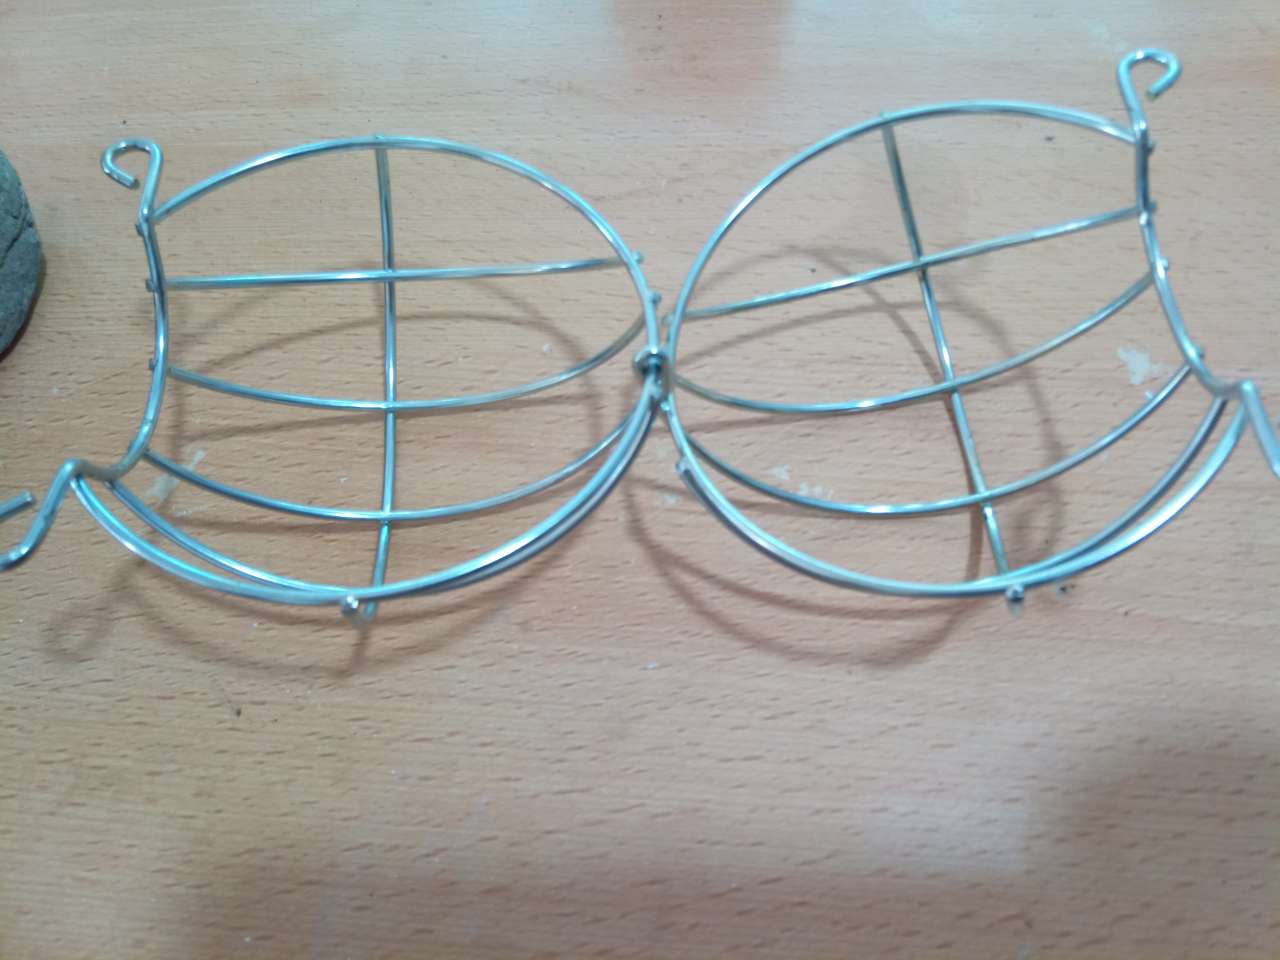
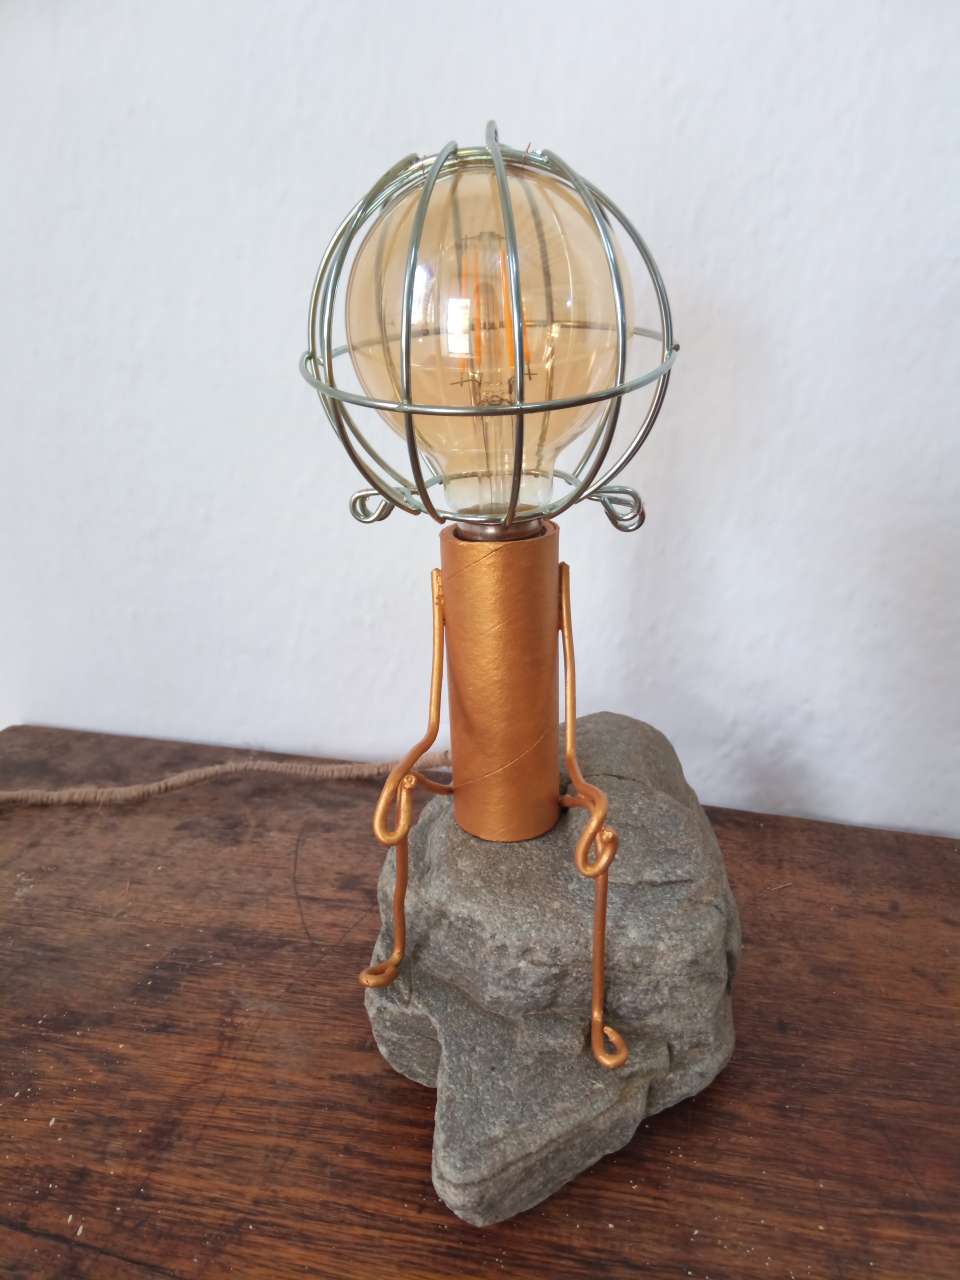
Paso 6
Colocar la bombilla y un protector.
La bombilla que utilicé es LED VINTAGE, luz cálida, 4 W 110 voltios. Apropiado para ambientes internos. Luminosidad de 300 a 350 lúmenes y la temperatura es baja 2700k, la puedes tocar con las manos una vez que se encienda y el calor es muy bajo el calor que emite.
Step 6
Place the bulb and a protector.
The bulb I used is a VINTAGE LED, warm light, 4 W 110 volts. Suitable for internal environments. Brightness from 300 to 350 lumens and the temperature is low 2700k, you can touch it with your hands once it is turned on and the heat it emits is very low.
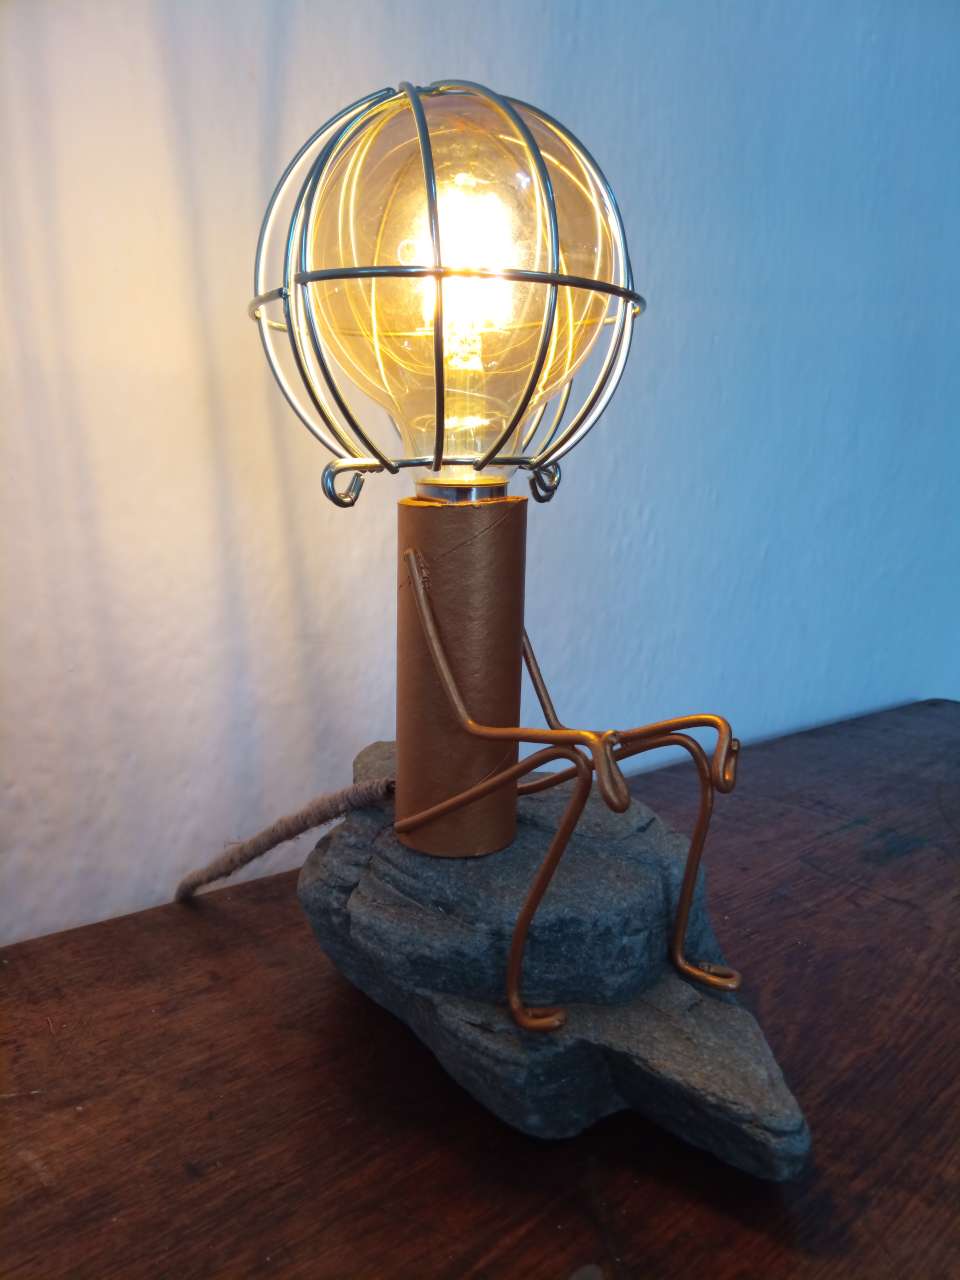
Fotografías finales/ final photographs
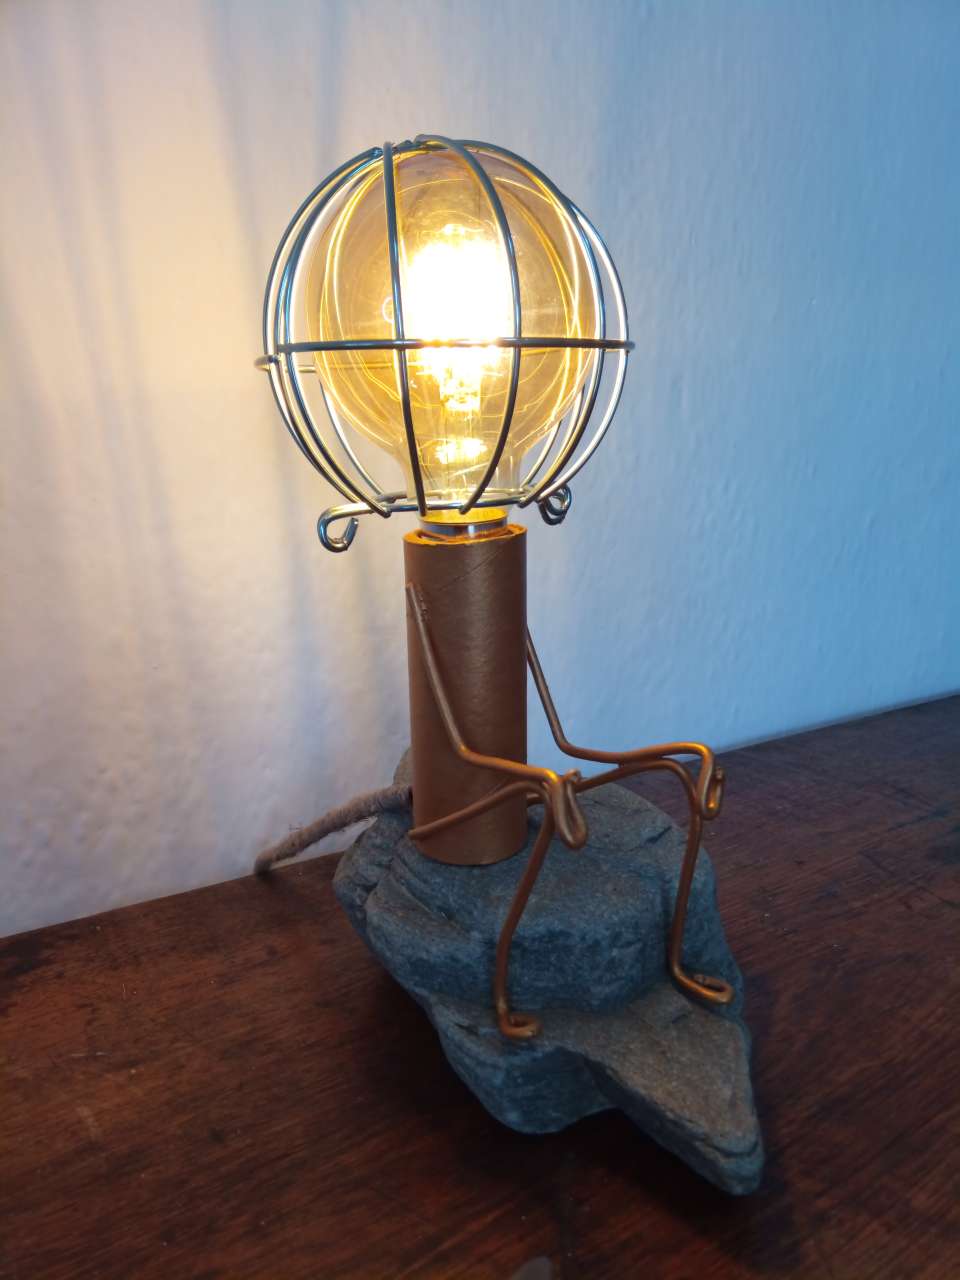
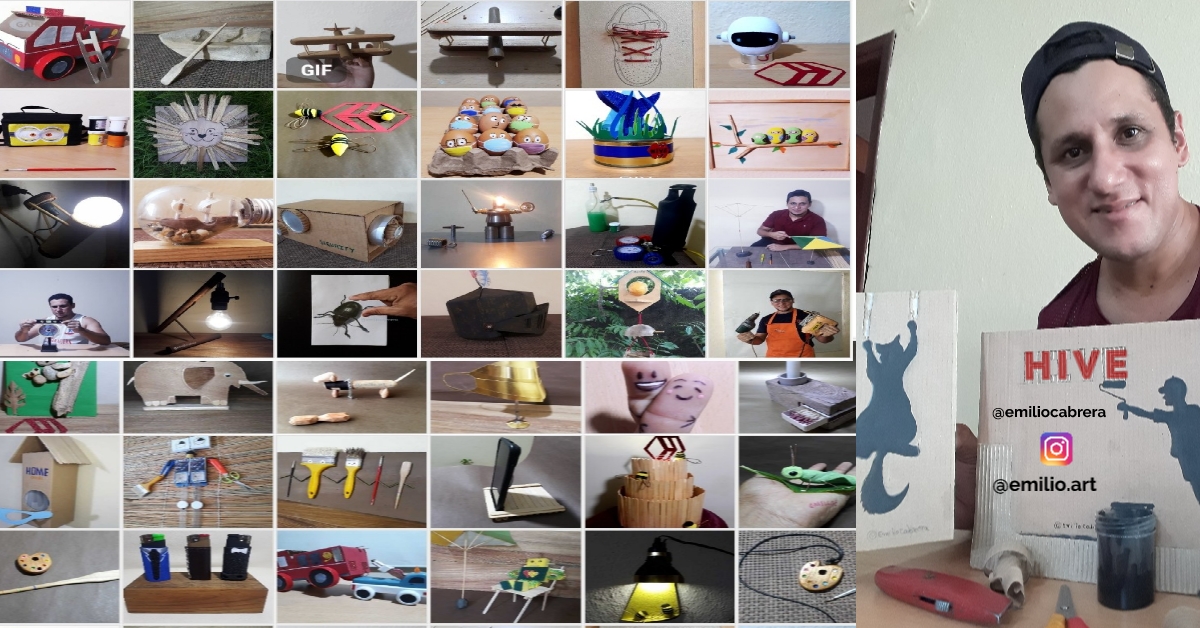
Espero te guste éste proyecto, gracias por tu atención, si desea ver más de mis publicaciones de bricolaje, siéntase libre de visitar mi blog. Saludos!
I hope you like this project, thanks for your attention, if you want to see more of my DIY posts, feel free to visit my blog. Greetings!

https://twitter.com/Emilioc84/status/1509290626063417361
The rewards earned on this comment will go directly to the person sharing the post on Twitter as long as they are registered with @poshtoken. Sign up at https://hiveposh.com.
Muy creativa tu manualidad y bien elaborada, me gustaría tener una pieza así, te felicito tus ideas son muy originales, un abrazo.
Muchas gracias por la apreciación @nhaydu, me halaga que una artista como usted le de el visto bueno. Abrazos
Saludos, le ha quedado muy bueno, ha sido un buen uso de materiales reciclados. Si usted no se molesta por la sugerencia, le diría que un sombrero que haga de pantalla le luciría genial. Bueno, mucha suerte y buen ánimo.
Muchas gracias @soltecno, en realidad sería genial, si logro hacerlo lo menciono . Qué tengas un lindo día
Una idea muy original y creativa nos compartes hoy amigo, felicidades quedó genial! 👏😊
Muchas gracias señorita @mayi04, me alegra que éste humilde bricolaje llene tus espectivas.
Qué ingenioso y artístico trabajo mi buen amigo, en el mundo existen mentes brillantes triunfadoras, y tu éstas en ese lote fácilmente. Admirar tu trabajo es un placer, porque siempre son trabajos de muy buen gusto y se nota tu pasión y esmero. Dios te bendiga mi amigo.
Un montón de gracias querida @aksurevm89, se siente bien estar aquí en nuestra casa la colmena y enseñar y aprender de gente talentosa como ustedes. Abrazos
Que gran diseño, creatividad desde la primera fotografía, gracias por compartir esta inmensa obra!
Gracias a ti por valorar éste proyecto @fixie, si duda tu también haces cosas grandiosas. Saludos
Hola mi muy estimado @emiliocabrera, ¡wow! De verdad tienes una mente muy ingeniosa y creativa, cada vez que públicas algo, sin mirarlo digo: debe ser algo fino, es decir, algo de calidad 😁. Mil bendiciones para ti y tu hermosa familia. 🤗
Jajaja qué gran motivación tu comentario mi estimada @kathelopez77. Muchas gracias por esta visita a mi post. Tu también eres super creativa. Abrazos
Jajaja, gracias @emiliocabrera 👍🏻🤗
Very creative and smart! Thanks for sharing this, we have an ongoing DIY Home Improvement contests for posts like this. We are giving away lot's of Hives, buidl and NFTs as rewards. Check out the contest HERE
Thank you very much for the appreciation, I will read the contest, it will be great to participate
Go for it!